微服务之路(一)-springbootのjdbc
主要议题
- 数据源(DataSource)
- 事务(Transaction)
- JDBC 4.0(JSR-221)
主要内容
一、数据源(DataSource)
1.基本概念
-
数据源:数据源是数据库连接的来源,通过DataSource接口获取。
-
类型
通用型数据源:javax.sql.Data.Source
分布式数据源:javax.sql.XADataSource
嵌入式数据源:org.springframework.jdbc.datasource.embedded.EmbeddedDatabase
2.SpringBoot场景演示
- 单数据源场景
- 多数据源场景
首先,可以从start.spring.io构建一个带有jdbc,mysql,reactive Web依赖的springboot项目。(在Spring Boot 2.0.0如果应用采用Spring Web MVC作为web服务,默认情况下,使用嵌入式Tomcat;如果采用Spring Web Flux,默认情况下,使用嵌入式Netty Web Server)
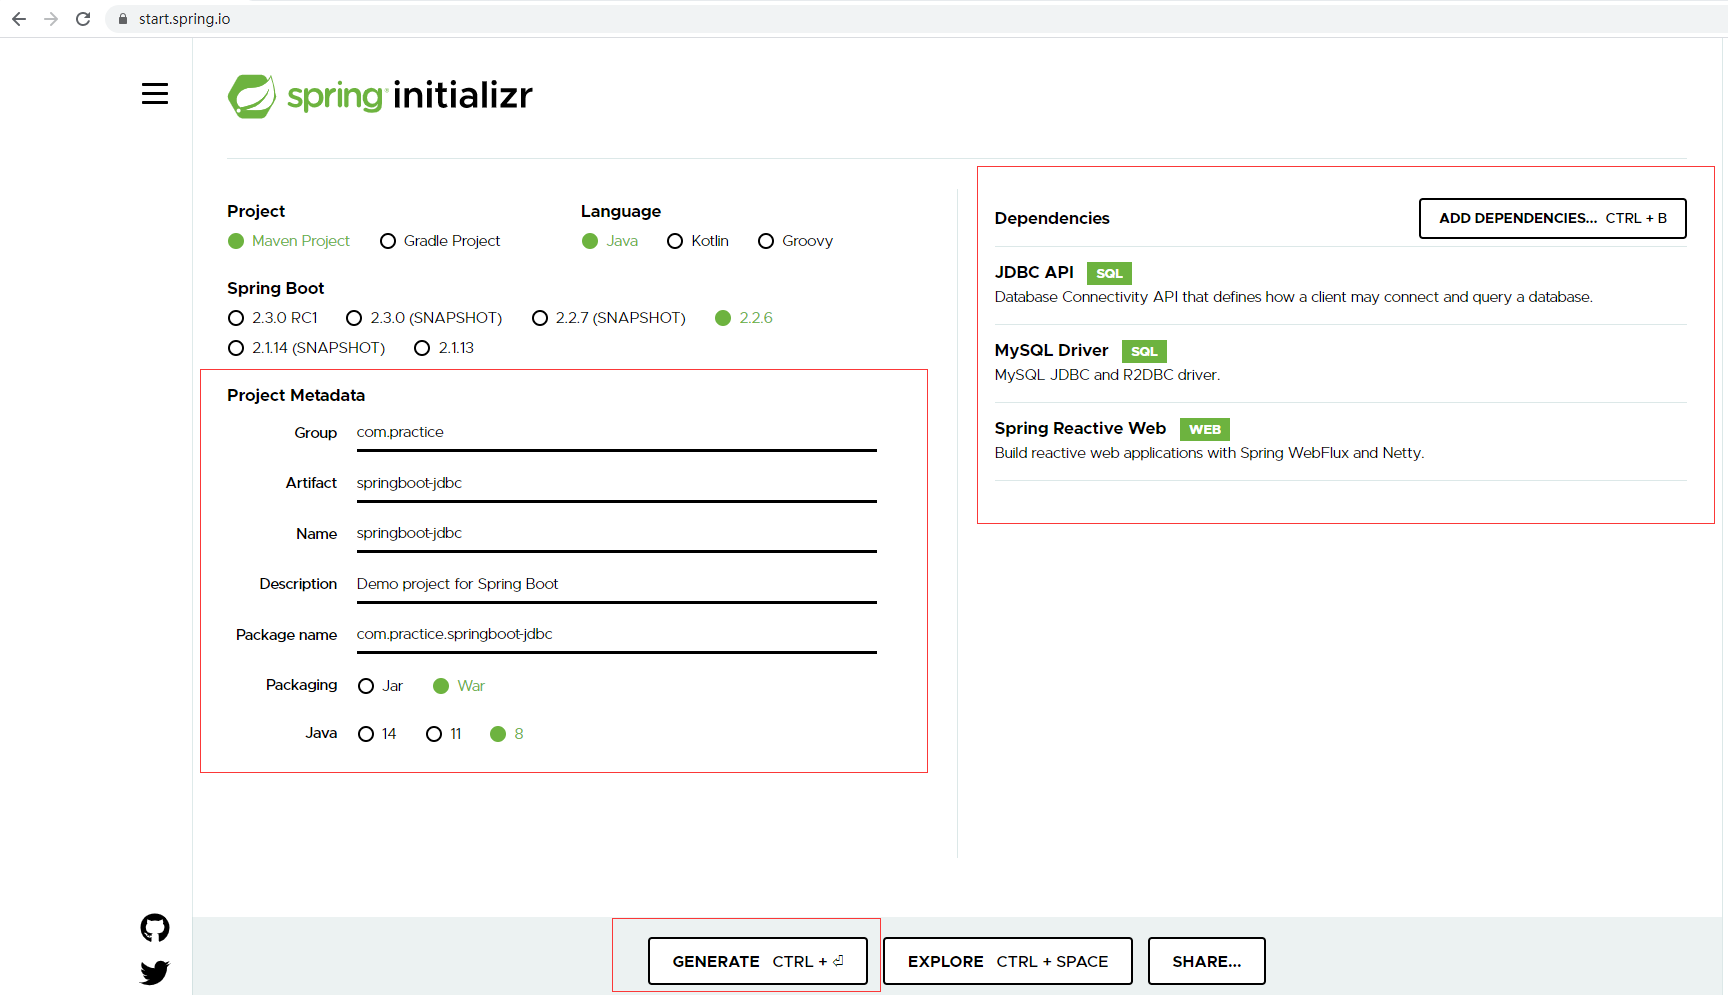
(1)单数据源的场景
a.数据库连接池技术
- commons-dbcp2:依赖commons-pool2
- commons-dbcp1:依赖commons-pool1(老版本)
b.从SpringBoot 1.4 开始支持了FailureAnalysisReporter,那么什么是FailtureAnalysisReporter?当我们把
<dependency>
			<groupId>org.springframework.boot</groupId>
			<artifactId>spring-boot-starter-jdbc</artifactId>
</dependency>
加入之后,就需要对数据库作相应的连接配置。如果没有配置的话,启动就会出现如下情况:
...
2020-05-03 13:40:11.808 ERROR 18020 --- [           main] o.s.b.d.LoggingFailureAnalysisReporter   :
***************************
APPLICATION FAILED TO START
***************************
Description:
Failed to configure a DataSource: 'url' attribute is not specified and no embedded datasource could be configured.
...
在DataSourceProperties中,有一处代码的前缀其实就是配置数据源配置的前缀,即“spring.datasource”。如下:
@ConfigurationProperties(
    prefix = "spring.datasource"
)
public class DataSourceProperties implements BeanClassLoaderAware, InitializingBean {
    private ClassLoader classLoader;
    private String name;
    private boolean generateUniqueName;
    private Class<? extends DataSource> type;
    private String driverClassName;
    private String url;
    private String username;
    private String password;
    private String jndiName;
    private DataSourceInitializationMode initializationMode;
    private String platform;
    private List<String> schema;
    private String schemaUsername;
    private String schemaPassword;
    private List<String> data;
    private String dataUsername;
    private String dataPassword;
    private boolean continueOnError;
    private String separator;
    private Charset sqlScriptEncoding;
    private EmbeddedDatabaseConnection embeddedDatabaseConnection;
    private DataSourceProperties.Xa xa;
    private String uniqueName;
    ...
这里解释一下,@ConfigurationProperties其实是保证和springboot中的application.properties文件相映射的。这里的前缀“spring.datasource”其实就是application.properties文件要配置前缀。以此可以猜想出不仅数据源如此配置,其余配置也是大致如此。
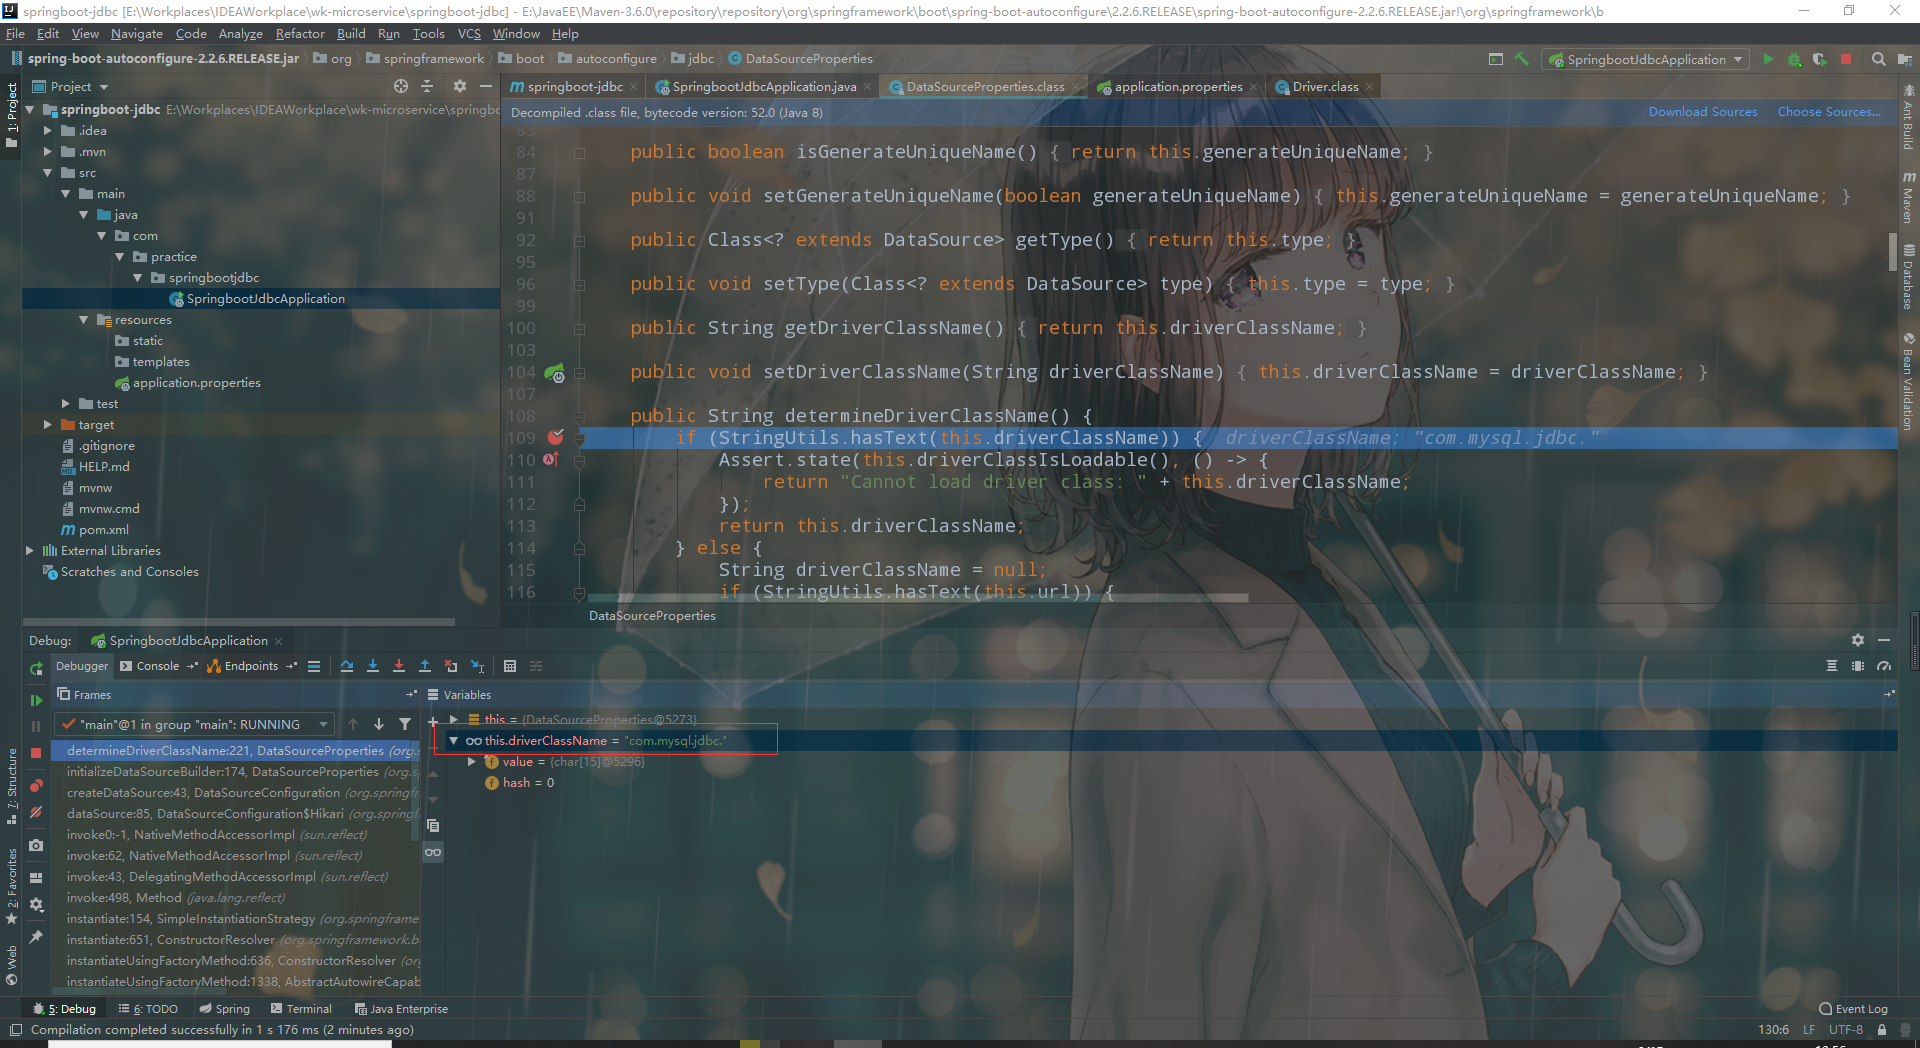
那么有上面定义的数据库连接属性,我们可以在application.properties中作出如下定义,这里的mysql驱动是什么呢?我们直接(IDEA:shift+shift)搜索一波Driver.class,然后右击Driver类名选择Copy References复制“com.mysql.jdbc.Driver”至driverClassName属性下,即:
spring.datasource.driverClassName=com.mysql.jdbc.Driver
接下来配置url,结尾test就是下面要创建的库:
spring.datasource.url=jdbc:mysql://localhost:3306/test
接下来我去mysql的图形化Navicat创建一个test库,语句如下:
CREATE DATABASE test;
然后use test这个库,即:
USE test;
再者创建User表:
CREATE TABLE user(
	id INT NOT NULL PRIMARY KEY AUTO_INCREMENT,
	name VARCHAR(32) NOT NULL
);
接着配置application.properties的数据库连接账号密码。
spring.datasource.username=root
spring.datasource.password=root123.
此刻,我在DataSourceProperties.class打下如图的断点,启动driverClassName就会有值了。
补充一点:我这里的启动控制台出现了以下提示:
Loading class `com.mysql.jdbc.Driver'. This is deprecated. The new driver class is `com.mysql.cj.jdbc.Driver'. The driver is automatically registered via the SPI and manual loading of the driver class is generally unnecessary.
说明com.mysql.jdbc.Driver已被弃用,更换成com.mysql.cj.jdbc.Driver即可。
这里有一个小知识:那就是控制台中启动springboot项目时有这么一段内容:
...
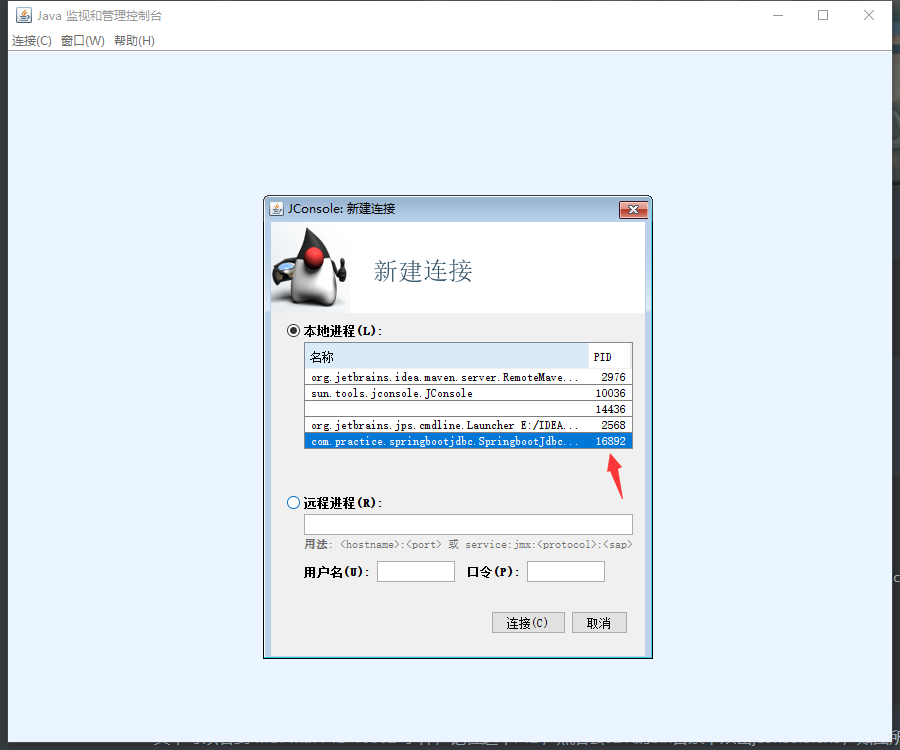
2020-05-04 14:01:03.294 INFO 16892 --- [ main] c.p.s.SpringbootJdbcApplication : Starting SpringbootJdbcApplication on MSI with PID 16892 (E:\Workplaces\IDEAWorkplace\wk-microservice\springboot-jdbc\target\classes started by 66477 in E:\Workplaces\IDEAWorkplace\wk-microservice\springboot-jdbc)
2020-05-04 14:01:03.296 INFO 16892 --- [ main] c.p.s.SpringbootJdbcApplication : No active profile set, falling back to default profiles:
...
其中可以看到“MSI with PID 16892”字样,记住这个PID,然后去JDK的bin目录下双击jconsole.exe,如图所示,选择上刚刚符合控制台PID的进程,随后点击连接,进去可以看到一些详细情况,这里作了解:
关于Reactive中的Mono和Flux介绍可以参照https://blog.csdn.net/TNTnine/article/details/83060950
传统的Servlet采用的HttpServletRequest、HttpServletResponse,而WebFlux采用的是ServerRequest、ServerResponse(这种方式不再限制于Servlet容器,可以选择自定义实现,比如Netty Web Server)
(A)两种方式的第一种:Spring Web MVC,这个比较熟悉,直接贴出代码
(1)controller包下UserController.java
import com.practice.springbootjdbc.domain.User;
import com.practice.springbootjdbc.repository.UserRepository;
import org.springframework.beans.factory.annotation.Autowired;
import org.springframework.web.bind.annotation.PostMapping;
import org.springframework.web.bind.annotation.RequestBody;
import org.springframework.web.bind.annotation.RestController;

/**
 * 用户RestController on WebMVC
 */
@RestController
public class UserController {
    @Autowired
    private UserRepository userRepository;

    @PostMapping("/web/mvc/user/saveUser")
    public boolean saveUser(@RequestBody User user){
        return userRepository.saveUser(user);
    }
}
(2)domain下的User.java模型,为了打印方便复写了下toString方法
public class User {
    private int id;
    private String name;

    public int getId() {
        return id;
    }

    public void setId(int id) {
        this.id = id;
    }

    public String getName() {
        return name;
    }

    public void setName(String name) {
        this.name = name;
    }

    @Override
    public String toString() {
        return "User{" +
                "id=" + id +
                ", name='" + name + '\'' +
                '}';
    }
}
(3)repository包下的UserRespository.java
import com.practice.springbootjdbc.domain.User;
import org.springframework.beans.factory.annotation.Autowired;
import org.springframework.stereotype.Repository;
import javax.sql.DataSource;
import java.util.Collection;
import java.util.Collections;

/**
 * 用户的仓储(Repository与dao不同的是它包括SQL或NoSQL或内存型)
 */
@Repository
public class UserRepository {

    @Autowired
    private DataSource dataSource;

    public boolean saveUser(User user){
        System.out.println("save user:"+user);
        return true;
    }

    public Collection<User> findAll(){
        return Collections.emptyList();
    }
}
(B)两种方式的第二种:Spring Web Flux,这个较为陌生,需要额外理解。
(1)webflux包下的UserHandler.java,为啥叫xxxHandler呢?原因在于第(2)中的route方法参数只接受xxHandler。
import com.practice.springbootjdbc.domain.User;
import com.practice.springbootjdbc.repository.UserRepository;
import org.springframework.stereotype.Component;
import org.springframework.web.reactive.function.server.ServerRequest;
import org.springframework.web.reactive.function.server.ServerResponse;
import reactor.core.publisher.Mono;

@Component
public class UserHandler {
    //构造器注入等同于@Autowired
    private final UserRepository userRepository;

    public UserHandler(UserRepository userRepository){
        this.userRepository=userRepository;
    }

    public Mono<ServerResponse> saveUser(ServerRequest serverRequest){
        //在Spring Web MVC中使用的是@RequestBody
        //在Spring Web Flux使用ServerRequest
        // Mono<User>类似于Optional<User>
        Mono<User> userMono = serverRequest.bodyToMono(User.class);
        //map相当于转换工作
        Mono<Boolean> booleanMono= userMono.map(userRepository::saveUser);
        return ServerResponse.ok().body(booleanMono,Boolean.class);
    }
}
(2)webFlux包下的WebFluxConfiguration.java。
import org.springframework.context.annotation.Bean;
import org.springframework.context.annotation.Configuration;
import org.springframework.web.reactive.function.server.RouterFunction;
import org.springframework.web.reactive.function.server.ServerResponse;
import static org.springframework.web.reactive.function.server.RequestPredicates.POST;
import static org.springframework.web.reactive.function.server.RouterFunctions.route;

/**
 * WebFlux配置
 */
@Configuration
public class WebFluxConfiguration {
    @Bean
    public RouterFunction<ServerResponse> saveUser(UserHandler userHandler){
        return route(POST("/web/flux/user/saveUser"),userHandler::saveUser);
    }
}
这里是route的具体方法,可见只接受HandlerFunction类型参数:
 public static <T extends ServerResponse> RouterFunction<T> route(RequestPredicate predicate, HandlerFunction<T> handlerFunction) {
        return new RouterFunctions.DefaultRouterFunction(predicate, handlerFunction);
    }
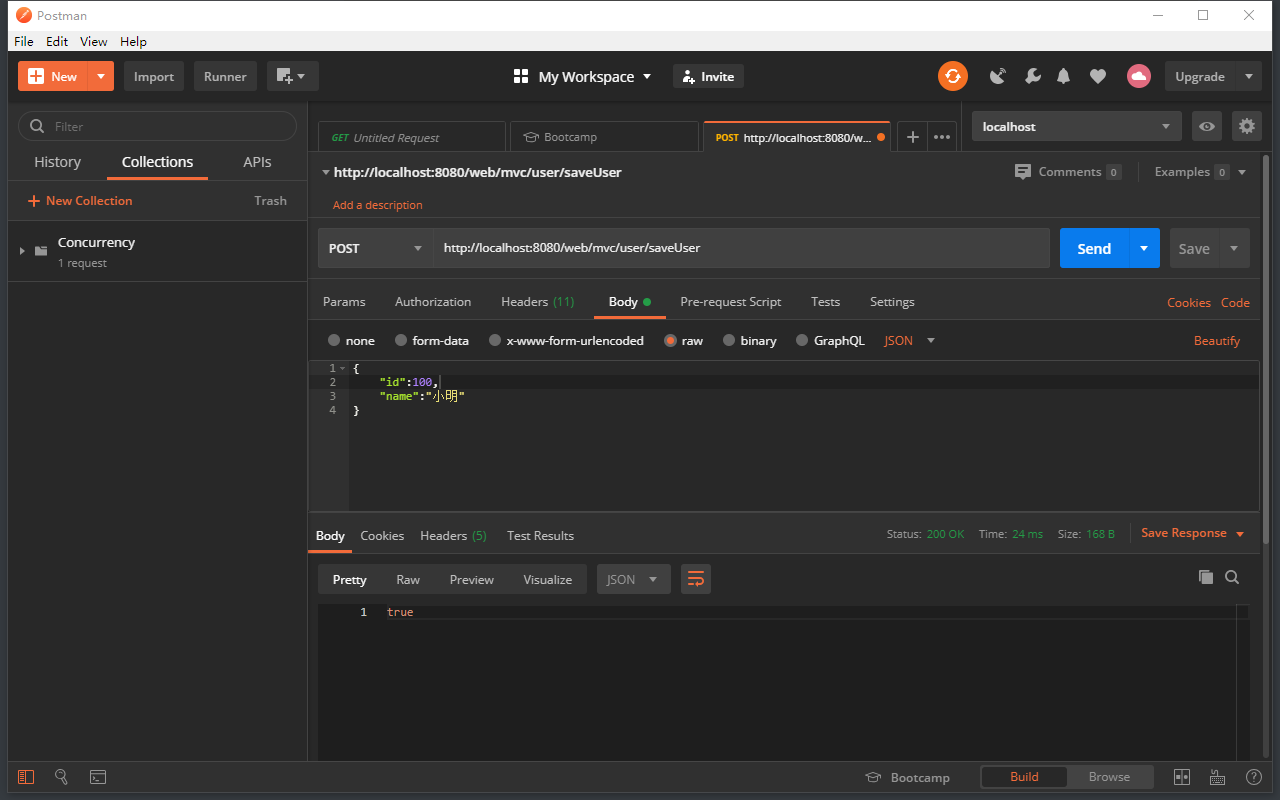
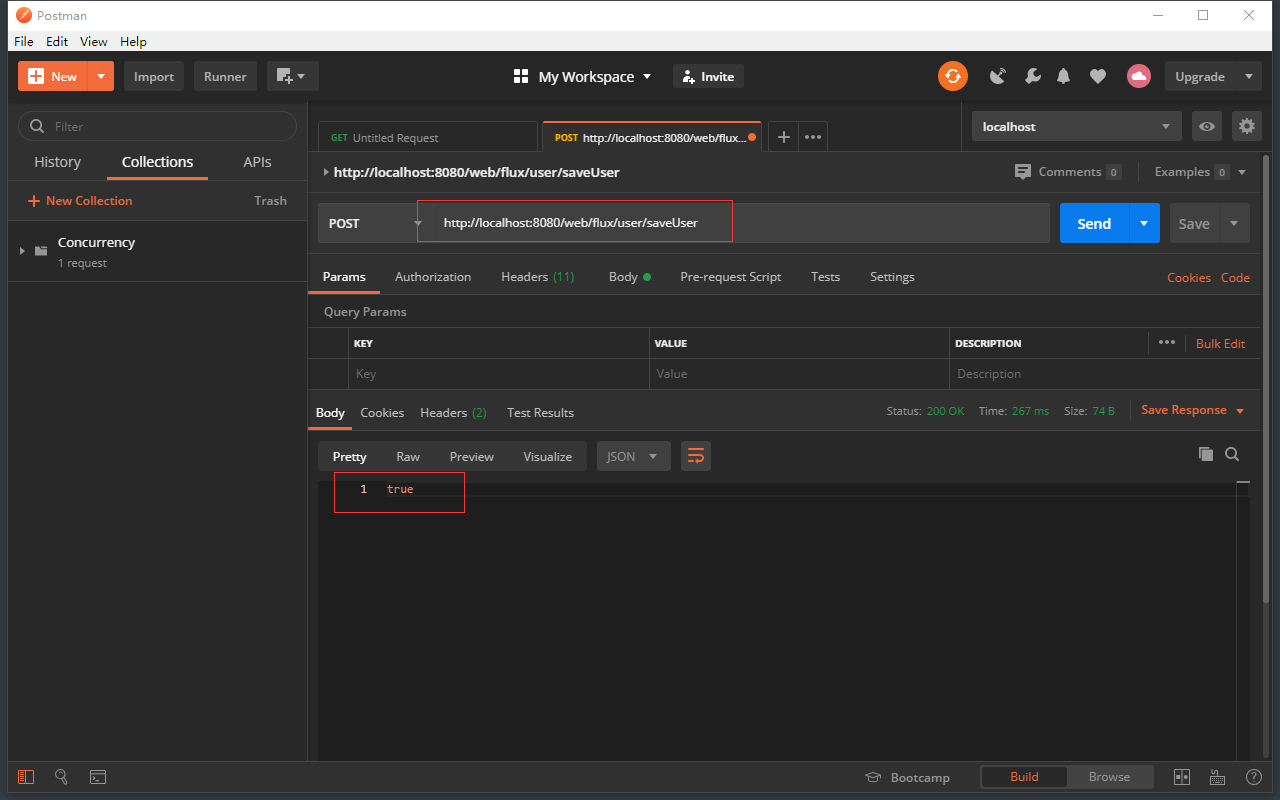
接下来,用PostMan分别测一下这两接口。
(1)首先是mvc,控制台正常打印“save user:User{id=100, name='小明'}”,postman返回值为true;
(2)然后测flux,控制台正常打印“save user:User{id=100, name='小明'}”,postman返回值也为true;
我们看到的springmvc这个controller层接口为同步调用,如果说我们想让它异步调用该怎么办呢?那就试一下,在UserController.java中创建一个线程池。改进一下同步调用为异步调用,改进后UserController.java如下(对线程池不了解的话可以参考我的一篇博客:https://www.cnblogs.com/jmy520/p/12577927.html,如果对Future线程返回值不了解的话可以参考我的另一篇博客:https://www.cnblogs.com/jmy520/p/12555343.html):
import com.practice.springbootjdbc.domain.User;
import com.practice.springbootjdbc.repository.UserRepository;
import org.springframework.beans.factory.annotation.Autowired;
import org.springframework.web.bind.annotation.PostMapping;
import org.springframework.web.bind.annotation.RequestBody;
import org.springframework.web.bind.annotation.RestController;
import java.util.concurrent.ExecutionException;
import java.util.concurrent.ExecutorService;
import java.util.concurrent.Executors;
import java.util.concurrent.Future;

/**
 * 用户RestController on WebMVC
 */
@RestController
public class UserController {
    @Autowired
    private UserRepository userRepository;

    private final ExecutorService executorService = Executors.newFixedThreadPool(5);

    @PostMapping("/web/mvc/user/saveUser")
    public boolean saveUser(@RequestBody User user) throws ExecutionException, InterruptedException {
        Future<Boolean> future= executorService.submit(()->{
             return userRepository.saveUser(user);
        });
        return future.get() ;
    }
}
以上关于WebFlux及异步执行只是一个拓展,下面言归正传,看一下多数据源的配置。
(2)多数据源的场景
那么我们可以创建一个包config,里面创建一个类MultipleDataSourceConfiguration:
import org.springframework.boot.jdbc.DataSourceBuilder;
import org.springframework.context.annotation.Bean;
import org.springframework.context.annotation.Configuration;
import org.springframework.context.annotation.Primary;
import javax.sql.DataSource;

/**
 * 多数据源配置
 */
@Configuration
public class MultipleDataSourceConfiguration {
    /**
     * 主数据源
     *
     * @return
     */
    @Bean
    @Primary//意思这个是主库
    public DataSource masterDataSource() {
        //Spring提供了一个DataSourceBuilder来创建数据源
        DataSourceBuilder dataSourceBuilder = DataSourceBuilder.create();
        //一直build,这样就创建出一个数据源
        DataSource dataSource = dataSourceBuilder.driverClassName("com.mysql.cj.jdbc.Driver")
                .url("jdbc:mysql://localhost:3306/test")
                .username("root")
                .password("root123.")
                .build();
        return dataSource;
    }

    /**
     * 从数据源
     *
     * @return
     */
    @Bean
    public DataSource slaveDataSource() {
        //同上,我重新创建一个库test_slave,创建方式参照上面即可
        DataSourceBuilder dataSourceBuilder = DataSourceBuilder.create();
        DataSource dataSource = dataSourceBuilder.driverClassName("com.mysql.cj.jdbc.Driver")
                .url("jdbc:mysql://localhost:3306/test_slave")
                .username("root")
                .password("root123.")
                .build();
        return dataSource;
    }
}
那么如何使用呢?这就需要改写一下UserRespository.java了:
import com.practice.springbootjdbc.domain.User;
import org.springframework.beans.factory.annotation.Autowired;
import org.springframework.beans.factory.annotation.Qualifier;
import org.springframework.stereotype.Repository;
import javax.sql.DataSource;
import java.util.Collection;
import java.util.Collections;

/**
 * 用户的仓储(Repository与dao不同的是它包括SQL或NoSQL或内存型)
 */
@Repository
public class UserRepository {
    //通过构造器方式注入
    private final DataSource dataSource;
    private final DataSource masterDataSource;
    private final DataSource slaveDataSource;
    //@Qualifier内容就是Bean的名称
    @Autowired
    public UserRepository(DataSource dataSource,
                          @Qualifier("masterDataSource") DataSource masterDataSource,
                          @Qualifier("slaveDataSource") DataSource slaveDataSource) {
        this.dataSource=dataSource;
        this.masterDataSource = masterDataSource;
        this.slaveDataSource = slaveDataSource;
    }
	/
    public boolean saveUser(User user){
        System.out.println("save user:"+user);
        return true;
    }

    public Collection<User> findAll(){
        return Collections.emptyList();
    }
}
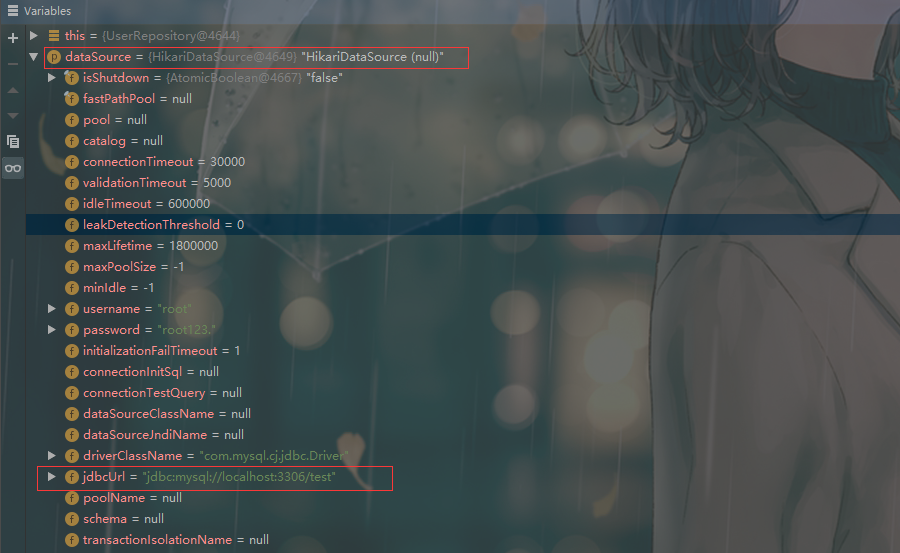
我在this.slaveDataSource=slaveDataSource;处打了个断点,启动项目,发现dataSource中的url连接的是主库。
二、事务(Transaction)
1.基本概念
事务用于提供数据完整性,并在并发访问下确保数据视图的一致性。
- 自动提交模式(Auto-commitmode)
- 事务隔离级别(Transaction isolation levels)
- 保护点(Savepoints)
2.事务场景演示
(1)自动提交模式(Auto-commitmode)
我们简单粗暴地修改一下UserRepository.java中的saveUser方法:
public boolean saveUser(User user){
        boolean success=false;
        System.out.println("save user:"+user);
        Connection connection = null;
        try {
             connection= dataSource.getConnection();
             PreparedStatement preparedStatement= connection
                     .prepareStatement("INSERT INTO user(name) VALUES(?)");
             preparedStatement.setString(1,user.getName());
             success = preparedStatement.executeUpdate()>0;
             preparedStatement.close();
        } catch (SQLException e) {
            e.printStackTrace();
        }finally {
            if(connection!=null){

            }
        }
        return success;
    }
然后启动项目,用Postman访问一下Controller层调用saveUser的接口。
如果出现乱码,url加上:
jdbc:mysql://localhost:3306/test?useUnicode=true&useJDBCCompliantTimezoneShift=true&useLegacyDatetimeCode=false&serverTimezone=UTC
断点执行如图所示:

然后去Navicat输入select * from user查询一波,发现数据已经被事务自动提交了。这就是自动提交模式(Auto-commitmode)。
那么如何不自动提交呢?通过connection.setAutoCommit(false);,然后在finally中写提交就可以了,如下:
 public boolean saveUser(User user)  {
        boolean success=false;
        System.out.println("save user:"+user);
        Connection connection = null;
        try {
             connection= dataSource.getConnection();
             connection.setAutoCommit(false);
             PreparedStatement preparedStatement= connection
                     .prepareStatement("INSERT INTO user(name) VALUES(?);");
             preparedStatement.setString(1,user.getName());
             success = preparedStatement.executeUpdate()>0;
             preparedStatement.close();
        } catch (SQLException e) {
            e.printStackTrace();
        }finally {
            if(connection!=null){
                try {
                    connection.commit();
                    connection.close();
                } catch (SQLException e) {
                    e.printStackTrace();
                }
            }
        }
        return success;
    }
(2)事务隔离级别(Transaction isolation levels)
我们可以在IDEA shift+shift看一下Connection.class,可以看到有5个隔离级别:
	//无事务
    int TRANSACTION_NONE             = 0;
	//读取未提交
    int TRANSACTION_READ_UNCOMMITTED = 1;
    //读取已提交
    int TRANSACTION_READ_COMMITTED   = 2;
	//可重复读取
    int TRANSACTION_REPEATABLE_READ  = 4;
    //串行读取
    int TRANSACTION_SERIALIZABLE     = 8;
从上至下越来越严格,速度也会越来越慢。
那么Spring中的隔离机制在哪呢?点进@Transactional注解,发现一个单词叫Isolation,隔离的意思,如下代码。
Isolation isolation() default Isolation.DEFAULT;
看到一个默认DEFAULT,那么默认是什么呢?点Isolation看看,我这里Spring2.2.6.Release是一个枚举类。
public enum Isolation {
    DEFAULT(-1),
    READ_UNCOMMITTED(1),
    READ_COMMITTED(2),
    REPEATABLE_READ(4),
    SERIALIZABLE(8);

    private final int value;

    private Isolation(int value) {
        this.value = value;
    }

    public int value() {
        return this.value;
    }
}
看到默认为-1,什么意思呢?其实这是默认值,表示使用底层数据库的默认隔离级别。对大部分数据库而言,通常这值就是:READ_COMMITTED。具体介绍详见:https://www.cnblogs.com/zhuyeshen/p/11491617.html
(3)保护点(SavePoints)
这里简要描述一下使用方法:假设SP2出现了问题,但是我只想回滚SP2,不要影响SP1的正常提交,那么可以这么操作:
save(){
    SP1
    try{
        SP2
    }catch{
        rollback(SP2)
    }
    commit();
    release(SP1);
}
其实就是还原点,看以下代码演示就会明白了,同样的,我是在UserRepository修改了下saveUser方法,而save方法上是有@Transactional修饰的:
 public boolean saveUser(User user)  {
        boolean success=false;
        System.out.println("save user:"+user);
        Connection connection = null;
        //预定义保护点
        Savepoint savepoint = null;
        try {
             connection= dataSource.getConnection();
             connection.setAutoCommit(false);
             //设置还原点
              savepoint = connection.setSavepoint("T1");
             //T2 假如我的save(user)方法出问题了,我可以还原到T1
            try {
                save(user);
            } catch (Exception e) {
               connection.rollback(savepoint);
            }
            PreparedStatement preparedStatement= connection
                     .prepareStatement("INSERT INTO user(name) VALUES(?);");
             preparedStatement.setString(1,user.getName());
             success = preparedStatement.executeUpdate()>0;

             preparedStatement.close();
        } catch (SQLException e) {
            e.printStackTrace();
        }finally {
            if(connection!=null){
                try {
                    connection.commit();
                    //记得要释放还原点
                    connection.releaseSavepoint(savepoint);
                    connection.close();
                } catch (SQLException e) {
                    e.printStackTrace();
                }
            }
        }
        return success;
    }

    @Transactional
    public boolean save(User user){
        boolean success = false;
        success=jdbcTemplate.execute("INSERT INTO user(name) VALUES(?);", new PreparedStatementCallback<Boolean>(){

            @Override
            public Boolean doInPreparedStatement(PreparedStatement preparedStatement) throws SQLException, DataAccessException {
                preparedStatement.setString(1,user.getName());
                return preparedStatement.executeUpdate()>0;
            }
        });
        return success;
    }
3.SpringBoot场景演示
- Annotation驱动
- API驱动
(1) Annotation驱动场景
预先在UserRespository.java中定义:
private final JdbcTemplate jdbcTemplate;
    //@Qualifier内容就是Bean的名称
    @Autowired
    public UserRepository(JdbcTemplate jdbcTemplate) {
        this.jdbcTemplate = jdbcTemplate;
    }
现在在UserRespository.java中继续创建一个方法,以@Transactional注解,这种写法是采用springboot的回调方式写的。
 @Transactional
    public boolean save(User user){
        boolean success = false;
        success=jdbcTemplate.execute("INSERT INTO user(name) VALUES(?);", new PreparedStatementCallback<Boolean>(){
            @Override
            public Boolean doInPreparedStatement(PreparedStatement preparedStatement) throws SQLException, DataAccessException {
                preparedStatement.setString(1,user.getName());
                return preparedStatement.executeUpdate()>0;
            }
        });
        return success;
    }
@Transactional注解最后提交的点在DataSourceTransactionalManager.class中的doCommit可以看到conn.commit语句。至于路径可以自行打断点走一遍。
采用@Transactional代理执行-TransactionInterceptor
- 可以控制rollback的异常粒度:rollBackFor()以及noRollbackFor()
- 可以指定事务管理器,@Transactional中的transactionManager()
(2) API驱动
API驱动中有一个接口叫PlatformTransactionManager,对这个类按下ALT+CTRL+B(IDEA)可以看到有很多实现类,我们先取一个叫做DataSourceTransactionManager的实现类。
我们继续在UserResipostory.java中添加构造器注入:
private final PlatformTransactionManager platformTransactionManager;

    @Autowired
    public UserRepository(PlatformTransactionManager platformTransactionManager) {
        this.platformTransactionManager = platformTransactionManager;
    }
接着创建一个apiSave方法演示一下api驱动提交事务
 public boolean apiSave(User user){
        boolean success =false;
        //它有一个默认的Transaction定义,实例用于下面的参数
        DefaultTransactionDefinition defaultTransactionDefinition = new DefaultTransactionDefinition();
        //开始事务
        TransactionStatus transactionStatus=platformTransactionManager.getTransaction(defaultTransactionDefinition);
        success=jdbcTemplate.execute("INSERT INTO user(name) VALUES(?);", new PreparedStatementCallback<Boolean>(){

            @Override
            public Boolean doInPreparedStatement(PreparedStatement preparedStatement) throws SQLException, DataAccessException {
                preparedStatement.setString(1,user.getName());
                return preparedStatement.executeUpdate()>0;
            }
        });
        //提交事务
        platformTransactionManager.commit(transactionStatus);
        return success;
    }
可以自行在commit处打断点尝试一下数据是否在此刻被提交。大多数情况下我们用@Annotation驱动方式使比较多的。
其实这两种方式是有不同的应用场景,如果涉及到事务嵌套,这就涉及到一个叫做事务传播的概念。
(3) 事务传播
@Transactional中有个叫做Propagation的类,它掌握的就是事务传播。以下就是该枚举类:
public enum Propagation {
    REQUIRED(0),
    SUPPORTS(1),
    MANDATORY(2),
    REQUIRES_NEW(3),
    NOT_SUPPORTED(4),
    NEVER(5),
    NESTED(6);

    private final int value;

    private Propagation(int value) {
        this.value = value;
    }

    public int value() {
        return this.value;
    }
简单演示一下,save1被@Transactional修饰,随着save2()在save1()中,导致没有被@Transactional修饰的save2()也有了事务提交的性质,这就是一种事务传播。
@Transactional
save1(){
	//insert into datasource1
	save2()//insert into datasource2 其中save2没有被@Transactional修饰;
}
关于事务传播相关概念可以参考:https://www.cnblogs.com/robertsun/p/7942299.html

 浙公网安备 33010602011771号