NFS服务搭建过程
NFS服务
【1】、nfs配置
作用: 解决数据一致性问题
NFS服务程序的配置文件为/etc/exports,需要严格按照共享目录的路径 允许访问的NFS客户端(共享权限参数)格式书写,定义要共享的目录与相应的权限,具体书写方式如下图所示。

# 安装服务
[root@nfs ~]# yum install -y nfs-utils

# 配置文件
[root@nfs ~]# cat /etc/exports
/data 172.16.1.0/24(rw,sync,all_squash)
[root@nfs ~]# mkdir /data/

# 启动服务
[root@nfs ~]# systemctl enable nfs --now
Created symlink /etc/systemd/system/multi-user.target.wants/nfs-server.service → /usr/lib/systemd/system/nfs-server.service.

# 我们需要看下,nfs是使用的哪个用户启动的服务,我们能看到他时使用的的uid和gid为65534的用户运行的,因此我们需要给/data 设置属主和属组
[root@nfs ~]# cat /var/lib/nfs/etab
/data   172.16.1.0/24(rw,sync,wdelay,hide,nocrossmnt,secure,root_squash,all_squash,no_subtree_check,secure_locks,acl,no_pnfs,anonuid=65534,anongid=65534,sec=sys,rw,secure,root_squash,all_squash)
[root@nfs ~]# chown nobody:nobody /data
# 客户端进行挂载
# 客户端也需要安装nfs-utils,但是不需要启动
yum install -y nfs-utlils
# showmount -e 查看有哪些共享目录
[root@web01 ~]# showmount -e 172.16.1.31
Export list for 172.16.1.31:
/data 172.16.1.0/24

# 创建本地目录,然后进行挂载
[root@web01 ~]# mount -t nfs 172.16.1.31:/data /img
[root@web01 ~]# df -Th|grep nfs
172.16.1.31:/data nfs4       48G  3.8G   45G   8% /img
[root@web01 ~]# echo hahah > /img/1.txt
# 在nfs客户端可以看到
[root@nfs ~]# cat /data/1.txt
hahah

# 在backup服务器进行挂载
[root@backup ~]# mkdir /img
[root@backup ~]# mount -t nfs 172.16.1.31:/data /img
[root@backup ~]# ll /img
total 4
-rw-r--r-- 1 nobody nobody 6 Dec  3 17:25 1.txt
[root@backup ~]# touch /img/{haha,xixi}
[root@backup ~]# ll /img
total 4
-rw-r--r-- 1 nobody nobody 6 Dec  3 17:25 1.txt
-rw-r--r-- 1 nobody nobody 0 Dec  3 17:26 haha
-rw-r--r-- 1 nobody nobody 0 Dec  3 17:26 xixi
# 在别的机器上都能看到了
[root@web01 ~]# ll /img
total 4
-rw-r--r-- 1 nobody nobody 6 Dec  3 17:25 1.txt
-rw-r--r-- 1 nobody nobody 0 Dec  3 17:26 haha
-rw-r--r-- 1 nobody nobody 0 Dec  3 17:26 xixi

# 如果在web01上删除了/img下的内容,backup上也没有了,服务端也没有了
[root@web01 ~]# rm -f /img/*
[root@web01 ~]# ll /img/
total 0
[root@backup ~]# ll /img
total 0
[root@nfs ~]# ll /data/
total 0
# 客户端实现持久化挂载
/etc/fstab
172.16.1.31:/data /img nfs defaults 0 0
【2】、nfs参数
| nfs共享参数 | 参数作用 |
|---|---|
| rw* | 读写权限 |
| ro | 只读权限 |
| root_squash | 当NFS客户端以root管理员访问时,映射为NFS服务器的匿名用户(不常用) |
| no_root_squash | 当NFS客户端以root管理员访问时,映射为NFS服务器的root管理员(不常用) |
| all_squash | 无论NFS客户端使用什么账户访问,均映射为NFS服务器的匿名用户(常用) |
| no_all_squash | 无论NFS客户端使用什么账户访问,都不进行压缩 |
| sync* | 同时将数据写入到内存与硬盘中,保证不丢失数据 |
| async | 优先将数据保存到内存,然后再写入硬盘;这样效率更高,但可能会丢失数据 |
| anonuid* | 配置all_squash使用,指定NFS的用户UID,必须存在系统 |
| anongid* | 配置all_squash使用,指定NFS的用户UID,必须存在系统 |
# ro 表示客户端只读权限
/data 172.16.1.0/24(ro,sync,all_squash)

# all_squash 表示压缩用户权限,后面不指定默认使用nobody用户

# 指定uid和gid,不再使用默认的
/data 172.16.1.0/24(rw,sync,all_squash,anonuid=666,anongid=666)

[root@nfs ~]# systemctl restart nfs
[root@nfs ~]# cat /var/lib/nfs/etab
/data   172.16.1.0/24(rw,sync,wdelay,hide,nocrossmnt,secure,root_squash,all_squash,no_subtree_check,secure_locks,acl,no_pnfs,anonuid=666,anongid=666,sec=sys,rw,secure,root_squash,all_squash)
# 客户端重新挂载,由于客户端没有uid=666的用户,因此在属主和属组的位置显示的是uid
[root@backup ~]# echo haha > /img/a.txt
[root@backup ~]# ll /img
total 4
-rw-r--r-- 1 666 666 5 Dec  3 18:59 a.txt
[root@backup ~]#
【3】、nfs原理

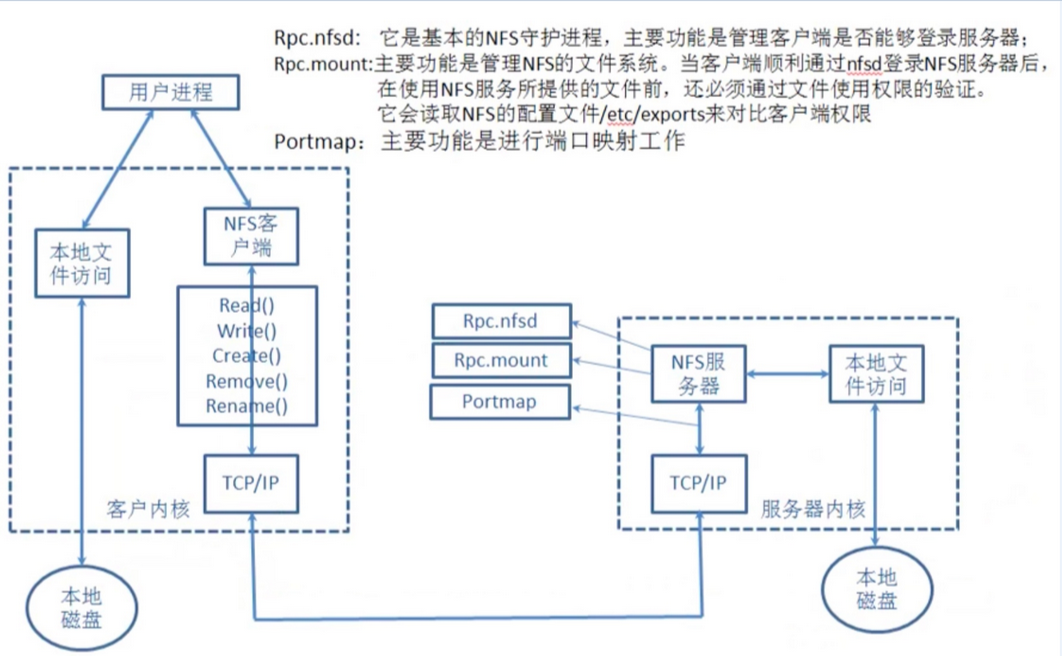
1.用户进程访问NFS客户端,使用不同的函数对数据进行处理
2.NFS客户端通过TCP/IP的方式传递给NFS服务端。
3.NFS服务端接收到请求后,会先调用portmap进程进行端口映射。
4.nfsd进程用于判断NFS客户端是否拥有权限连接NFS服务端。
5.Rpc.mount进程判断客户端是否有对应的权限进行验证。
6.idmap进程实现用户映射和压缩
7.最后NFS服务端会将对应请求的函数转换为本地能识别的命令,传递至内核,由内核驱动硬件。
注意: rpc是一个远程过程调用,那么使用nfs必须有rpc服务
【4】、解决nfs单点故障的结构

故障原因:
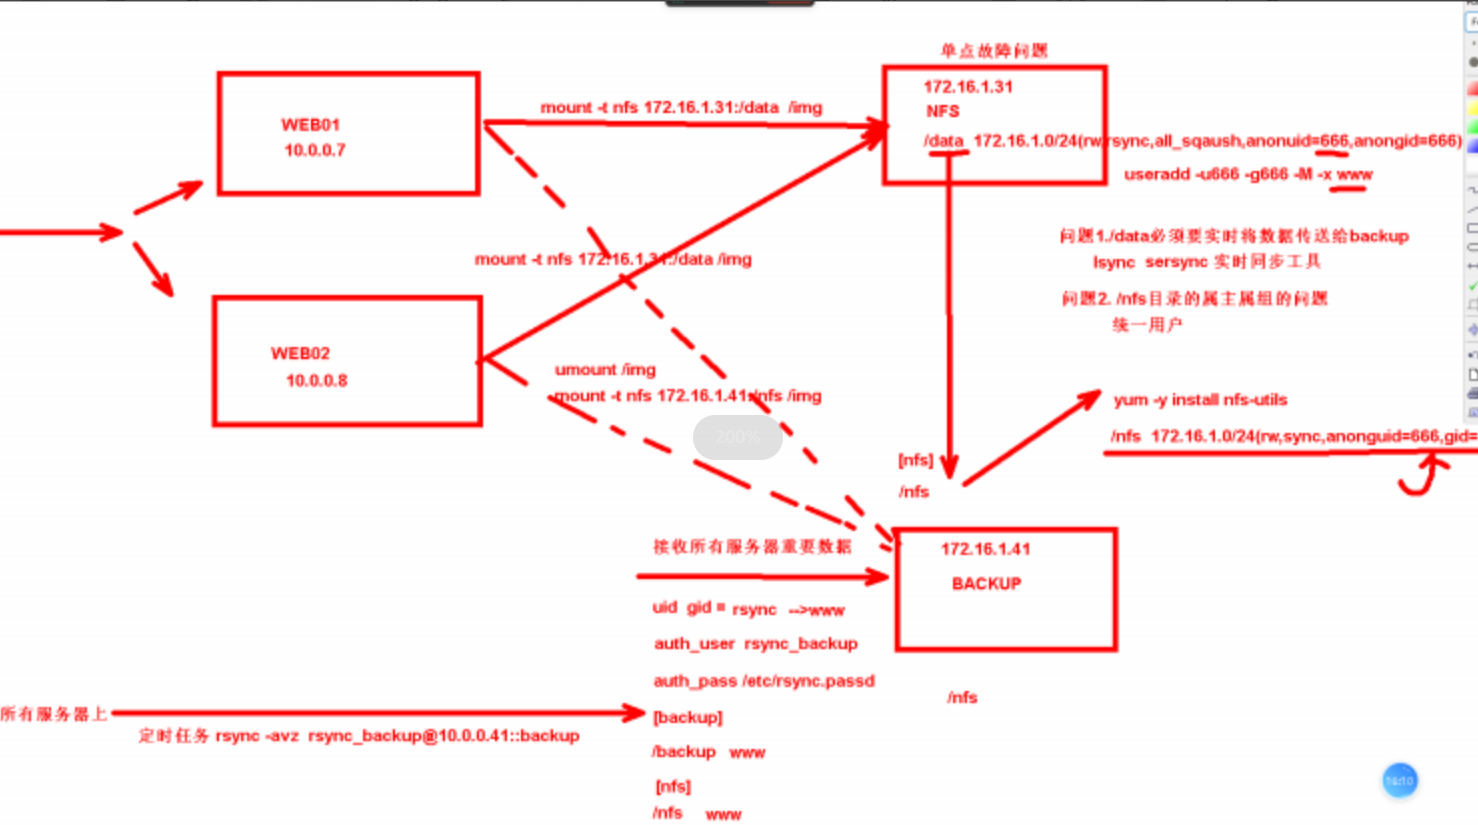
由于我们只有一台nfs服务器,假设nfs服务器挂了,那所有挂载nfs服务器上共享目录的服务器也就没有了任何的数据。
故障解决:
在我们的集群架构中存在着一台backup服务器,我们会利用backup服务器来实现一种nfs的冗余。
具体实现也就是在nfs服务器上部署lsync服务,实现将nfs上共享目录中的数据实时同步到backup服务器中,如果nfs挂了,数据不会丢失。我们还可以在backup服务器上搭建nfs服务,再让别的主机挂载到backup服务器的共享目录
在整个过程中我们需要保证用户一致
1、搭建nfs服务器的nfs服务
[root@nfs ~]# yum install -y nfs-utils
[root@nfs ~]# cat /etc/exports
/data 172.16.1.0/24(rw,all_squash,sync,anonuid=666,anongid=666)
[root@nfs ~]# groupadd -g 666 www
[root@nfs ~]# useradd -g 666 -u 666 -M -s /sbin/nologin www
[root@nfs ~]# mkdir -p /data/
[root@nfs ~]# chown www:www /data/
[root@nfs ~]# systemctl enable nfs --now
Created symlink /etc/systemd/system/multi-user.target.wants/nfs-server.service → /usr/lib/systemd/system/nfs-server.service.
[root@nfs ~]# cat /var/lib/nfs/etab
/data   172.16.1.0/24(rw,sync,wdelay,hide,nocrossmnt,secure,root_squash,all_squash,no_subtree_check,secure_locks,acl,no_pnfs,anonuid=666,anongid=666,sec=sys,rw,secure,root_squash,all_squash)

# 在web01上挂载
[root@web01 ~]# mkdir /img
[root@web01 ~]# yum install -y nfs-utils
[root@web01 ~]# showmount -e 172.16.1.31
Export list for 172.16.1.31:
/data 172.16.1.0/24
[root@web01 ~]# mount -t nfs 172.16.1.31:/data /img
[root@web01 ~]# df -Th | grep nfs
172.16.1.31:/data nfs4       48G  3.7G   45G   8% /img

# 测试
[root@web01 ~]# touch /img/aaa
[root@nfs ~]# ll /data/
total 0
-rw-r--r-- 1 www www 0 Dec  4 19:43 aaa
2、搭建rsync
[root@backup ~]# yum install -y rsync
[root@backup ~]# vim /etc/rsyncd.conf
uid = www  # 一定要和nfs用户一致
gid = www
auth users = rsync_backup
secrets file = /etc/rsync.passwd
log file = /var/log/rsync.log
fake super = yes
use chroot = no
max connections = 200
time out = 600
ignore errors
read only = false
port = 873
list = false
[backup]
path=/backup
[nfs]
path=/nfs
[root@backup ~]# groupadd -g 666 www
[root@backup ~]# useradd -g 666 -u 666 -M -s /sbin/nologin www
[root@backup ~]# echo "rsync_backup:123" > /etc/rsync.passwd
[root@backup ~]# chmod 600 /etc/rsync.passwd
[root@backup ~]# mkdir /backup /nfs
[root@backup ~]# chown www:www /backup/
[root@backup ~]# chown www:www /nfs
[root@backup ~]# systemctl enable rsyncd --now
Created symlink /etc/systemd/system/multi-user.target.wants/rsyncd.service → /usr/lib/systemd/system/rsyncd.service.

# 在web01和nfs服务器上做测试
[root@web01 ~]# rsync -avz /etc/passwd rsync_backup@192.168.121.41::backup
Password:
sending incremental file list
passwd

sent 829 bytes  received 43 bytes  158.55 bytes/sec
total size is 1,805  speedup is 2.07
-rw-r--r-- 1 www www 0 Dec  4 19:43 aaa
[root@nfs ~]# rsync -avz /etc/hosts rsync_backup@192.168.121.41::nfs
Password:
sending incremental file list
hosts

sent 140 bytes  received 43 bytes  11.09 bytes/sec
total size is 158  speedup is 0.86
3、在nfs服务器上搭建lsync
[root@nfs ~]# yum install -y lsyncd
[root@nfs ~]# cat /etc/lsyncd.conf
settings {
    logfile = "/var/log/lsyncd/lsyncd.log",
    statusFile = "/var/log/lsyncd/lsyncd.status",
    maxProcesses = 2,
    nodaemon = false,
}
sync {
    default.rsync,
    source = "/data",
    target = "rsync_backup@192.168.121.41::nfs",
    delete = true,
    delay = 1,
    rsync = {
        binary = "/usr/bin/rsync",
        password_file = "/etc/rsyncd.pwd",
        archive = true,
        compress = true,
    }
}
[root@nfs ~]# echo 123 > /etc/rsyncd.pwd
[root@nfs ~]# chmod 600 /etc/rsyncd.pwd
# 在lsync启动的时候,会自动先执行一遍里面的rsync命令
# 此时backup服务器中的nfs目录下是没有数据的
[root@backup ~]# ll /nfs
total 0
[root@nfs ~]# systemctl enable lsyncd --now
[root@nfs ~]# systemctl status lsyncd.service
● lsyncd.service - Live Syncing (Mirror) Daemon
   Loaded: loaded (/usr/lib/systemd/system/lsyncd.service; enabled; vendor preset: disabled)
   Active: active (running) since Wed 2024-12-04 20:06:19 CST; 5s
# 此时backup中的nfs共享目录就有内容了
[root@backup ~]# ll /nfs
total 0
-rw-r--r-- 1 www www 0 Dec  4 19:43 aaa
# 测试:在web01上向共享目录中写入数据,会不会自动同步到backup上
[root@web01 ~]# touch /img/{1..3}.log
[root@backup ~]# ll /nfs
total 0
-rw-r--r-- 1 www www 0 Dec  4 20:11 1.log
-rw-r--r-- 1 www www 0 Dec  4 20:11 2.log
-rw-r--r-- 1 www www 0 Dec  4 20:11 3.log
-rw-r--r-- 1 www www 0 Dec  4 19:43 aaa
# 现在我们模拟nfs挂掉,将web01的共享目录同步到backup中
[root@backup ~]# ifdown ens36
WARN      : [ifdown] You are using 'ifdown' script provided by 'network-scripts', which are now deprecated.
WARN      : [ifdown] 'network-scripts' will be removed from distribution in near future.
WARN      : [ifdown] It is advised to switch to 'NetworkManager' instead - it provides 'ifup/ifdown' scripts as well.
Device 'ens36' successfully disconnected.

# 查看挂载的共享目录是哪个
[root@web01 ~]# cat /proc/mounts
172.16.1.31:/data /img nfs4 rw,relatime,vers=4.2,rsize=131072,wsize=131072,namlen=255,hard,proto=tcp,timeo=600,retrans=2,sec=sys,clientaddr=172.16.1.7,local_lock=none,addr=172.16.1.31 0 0
[root@web01 ~]# umount -f /img

# 在backup上搭建nfs
[root@backup ~]# vim /etc/exports
/nfs 172.16.1.0/24(rw,sync,all_squash,anonuid=666,anongid=666)
[root@backup ~]# systemctl enable nfs --now
Created symlink /etc/systemd/system/multi-user.target.wants/nfs-server.service → /usr/lib/systemd/system/nfs-server.service.

# 在web01上重新挂载
[root@web01 ~]# showmount -e 172.16.1.41
Export list for 172.16.1.41:
/nfs 172.16.1.0/24
[root@web01 ~]# mount -t nfs 172.16.1.41:/nfs /img
# 数据就重新回来了
[root@web01 ~]# ll /img/
total 0
-rw-r--r-- 1 666 666 0 Dec  4 20:11 1.log
-rw-r--r-- 1 666 666 0 Dec  4 20:11 2.log
-rw-r--r-- 1 666 666 0 Dec  4 20:11 3.log
-rw-r--r-- 1 666 666 0 Dec  4 19:43 aaa
[root@web01 ~]# touch /img/4.log
[root@backup ~]# ll /nfs
total 0
-rw-r--r-- 1 www www 0 Dec  4 20:11 1.log
-rw-r--r-- 1 www www 0 Dec  4 20:11 2.log
-rw-r--r-- 1 www www 0 Dec  4 20:11 3.log
-rw-r--r-- 1 www www 0 Dec  4 20:19 4.log
-rw-r--r-- 1 www www 0 Dec  4 19:43 aaa


# 此时nfs服务器恢复运行了,我们需要将数据重新挂载回去
# 在nfs服务器挂掉的期间,web01服务器产生的数据,都在和backup的nfs共享目录进行同步,在nfs服务器恢复后,我们重新将目录挂载回去,这段时间的数据不会不会同步。由于重新挂载后我们需要重启lsync服务,我们lsync在同步时使用了 --delete 参数,因此我们为了防止数据丢失,在重新挂载之前我们要先进行一次rsync同步
[root@web01 ~]# umount /img
[root@web01 ~]# mount -t nfs 172.16.1.31:/data /img
[root@web01 ~]# ll /img/
total 0
-rw-r--r-- 1 666 666 0 Dec  4 20:11 1.log
-rw-r--r-- 1 666 666 0 Dec  4 20:11 2.log
-rw-r--r-- 1 666 666 0 Dec  4 20:11 3.log
-rw-r--r-- 1 666 666 0 Dec  4 19:43 aaa
[root@nfs ~]# systemctl restart lsyncd.service
[root@nfs ~]# ll /data
total 0
-rw-r--r-- 1 www www 0 Dec  4 20:11 1.log
-rw-r--r-- 1 www www 0 Dec  4 20:11 2.log
-rw-r--r-- 1 www www 0 Dec  4 20:11 3.log
-rw-r--r-- 1 www www 0 Dec  4 19:43 aaa
[root@backup ~]# ll /nfs
total 0
-rw-r--r-- 1 www www 0 Dec  4 20:11 1.log
-rw-r--r-- 1 www www 0 Dec  4 20:11 2.log
-rw-r--r-- 1 www www 0 Dec  4 20:11 3.log
-rw-r--r-- 1 www www 0 Dec  4 19:43 aaa
# 为了解决这一部分的数据问题,我们需要在重新挂回nfs服务器前,执行一次rsync同步数据
[root@backup ~]# rsync -avz /nfs/ 192.168.121.31:/data

Authorized users only. All activities may be monitored and reported.
root@192.168.121.31's password:
sending incremental file list
./
4.log

sent 187 bytes  received 38 bytes  64.29 bytes/sec
total size is 0  speedup is 0.00
[root@nfs ~]# ll /data
total 0
-rw-r--r-- 1 www www 0 Dec  4 20:11 1.log
-rw-r--r-- 1 www www 0 Dec  4 20:11 2.log
-rw-r--r-- 1 www www 0 Dec  4 20:11 3.log
-rw-r--r-- 1 www www 0 Dec  4 20:30 4.log
-rw-r--r-- 1 www www 0 Dec  4 19:43 aaa

[root@web01 ~]# mount -t nfs 172.16.1.31:/data /img
[root@nfs ~]# systemctl restart lsyncd.service
4、使用脚本监控nfs服务器,实现自动切换
[root@web01 ~]# cat m.sh
#!/bin/bash

ping -c1 -W1 172.16.1.31 > /dev/null 2>&1
ip=` df -Th | grep nfs | awk -F: '{print $1}'`
if [ $? -ne 0 ];then
    umount -f /img &> /dev/null &
    sleep 2
    mount -t nfs 172.16.1.41:/nfs /img
else
    if [[ $ip =~ "172.16.1.41" ]];then
         umount -f /img &> /dev/null &
         sleep 2
         mount -t nfs 172.16.1.31:/data /img
    fi
fi
# 将数据定时打包到指定目录下
#!/bin/bash

mkdir -p /backup

IP=`hostname -I | awk -F" " '{print $1}'`
path=/backup/web01_${IP}_`date +%F`
tar -zcvf  $path /etc/
rsync -avz $path rsync_backup@backup::backup
find /backup -mtime +7 -exec rm -f {} \;
本文来自博客园,作者:Linux小菜鸟,转载请注明原文链接:https://www.cnblogs.com/xuruizhao/p/18596496


【推荐】国内首个AI IDE,深度理解中文开发场景,立即下载体验Trae
【推荐】编程新体验,更懂你的AI,立即体验豆包MarsCode编程助手
【推荐】抖音旗下AI助手豆包,你的智能百科全书,全免费不限次数
【推荐】轻量又高性能的 SSH 工具 IShell:AI 加持,快人一步
· winform 绘制太阳,地球,月球 运作规律
· AI与.NET技术实操系列(五):向量存储与相似性搜索在 .NET 中的实现
· 超详细:普通电脑也行Windows部署deepseek R1训练数据并当服务器共享给他人
· 【硬核科普】Trae如何「偷看」你的代码?零基础破解AI编程运行原理
· 上周热点回顾(3.3-3.9)