高可用负载均衡集群
配置高可用负载均衡集群
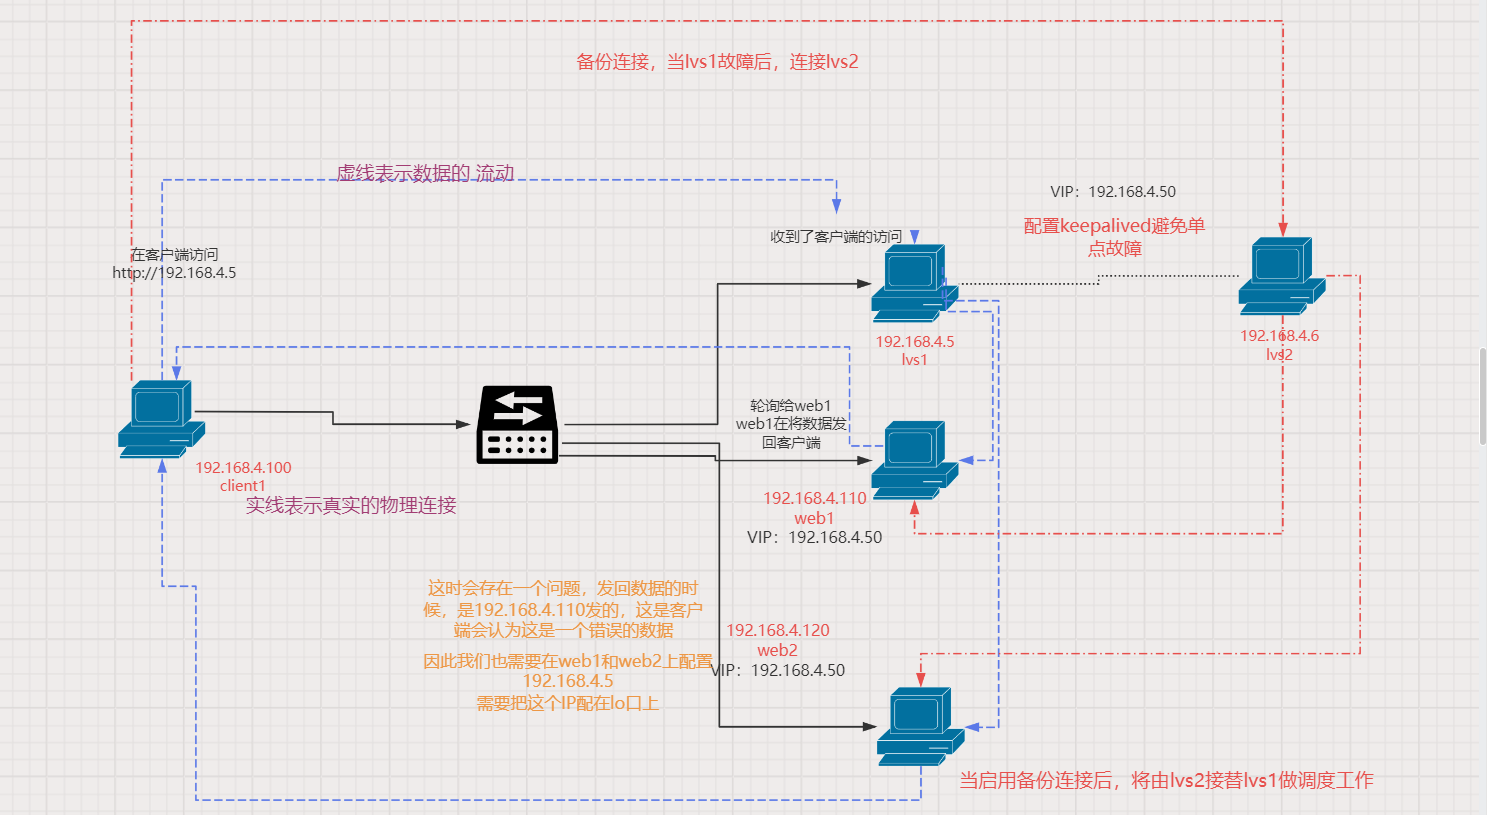
cliet1:192.168.4.100
lvs1:192.168.4.5
lvs2:192.168.4.6
web1:192.168.4.110
web2:192.168.4.120
VIP:192.168.4.50 配置在keepalived上,web1和web2的VIP
【1】、配置网络
# client1
nmcli connection modify eth0 ipv4.method manual ipv4.addresses 192.168.4.100/24
# lvs1
nmcli connection modify eth0 ipv4.method manual ipv4.addresses 192.168.4.5/24
# lvs2
nmcli connection modify eth0 ipv4.method manual ipv4.addresses 192.168.4.6/24
# web1
nmcli connection modify eth0 ipv4.method manual ipv4.addresses 192.168.4.110/24
# web2
nmcli connection modify eth0 ipv4.method manual ipv4.addresses 192.168.4.120/24
# 配置web1和web2的lo口配置IP
yum install network-scripts -y
vim /etc/sysconfig/network-scripts/ifcfg-lo:0
DEVICE=lo:0
NAME=lo:0
IPADDR=192.168.4.50
NETMASK=255.255.255.255
NETWORK=192.168.4.50
BROADCAST=192.168.4.50
ONBOOT=yes
# 启动lo口
ifup lo:0
net.ipv4.conf.all.arp_announce = 2
net.ipv4.conf.all.arp_ignore = 1
net.ipv4.conf.lo.arp_announce = 2
net.ipv4.conf.lo.arp_ignore = 1
# 将上述四条写入/etc/sysctl.conf中
sysctl -p# 关闭web1和web2相关的内核参数
【2】、安装ipvsadm和keepalived
# 在lvs1和lvs2上安装
yum install -y ipvsadm keepalived
【3】、配置keepalived
我们不需要转专门配置ipvsadm,在keepalived中提供了ipvsadm的配置
修改lvs1的keealined.conf
! Configuration File for keepalived

global_defs {
   notification_email {
     acassen@firewall.loc
     failover@firewall.loc
     sysadmin@firewall.loc
   }
   notification_email_from Alexandre.Cassen@firewall.loc
   smtp_server 192.168.200.1
   smtp_connect_timeout 30
   router_id lvs1   # 唯一id号,需要修改
   vrrp_iptables    # 添加iptables规则
   vrrp_skip_check_adv_addr
   vrrp_strict
   vrrp_garp_interval 0
   vrrp_gna_interval 0
}

vrrp_instance VI_1 {
    state MASTER    #  lvs1为主
    interface eth0
    virtual_router_id 52
    priority 100
    advert_int 1    # 心跳检测,主备之间每间隔一秒测试一次存活状态
    authentication {
        auth_type PASS
        auth_pass 1111
    }
    virtual_ipaddress {
        192.168.4.50/24  # VIP
    }
}
# 下面的配置就是keepalived中支持的ipvsadm的配置
virtual_server 192.168.4.50 80 {  # 虚拟服务器   IP   端口
    delay_loop 6
    lb_algo wrr   # 负载均衡调度算法:wrr(加权轮询)
    lb_kind DR    # LVS类型
    persistence_timeout 50
    protocol TCP  # 连接协议

    real_server 192.168.4.110 80 { # 两个真实服务器
        weight 1   # 权重
         TCP_CHECK {   # 健康检查
            connect_timeout 3  # 连接超时时间
            retry 3    # 重试次数
            delay_before_retry 3  # 重试时间间隔
        }
    }
    real_server 192.168.4.120 80 {
        weight 1
        TCP_CHECK {
            connect_timeout 3
            retry 3
            delay_before_retry 3
        }
    }
}


# 重启keepalived
[root@lvs1:192.168.4.5 /etc/keepalived]$systemctl restart keepalived.service
# 检查ipvsamd
[root@lvs1:192.168.4.5 /etc/keepalived]$ipvsadm -ln
IP Virtual Server version 1.2.1 (size=4096)
Prot LocalAddress:Port Scheduler Flags
  -> RemoteAddress:Port           Forward Weight ActiveConn InActConn
TCP  192.168.4.50:80 wrr persistent 50
  -> 192.168.4.110:80             Route   1      0          0
  -> 192.168.4.120:80             Route   1      0          0
# 检查IP
[root@lvs1:192.168.4.5 /etc/keepalived]$ip a s eth0 | grep 4
    inet 192.168.4.5/24 brd 192.168.4.255 scope global noprefixroute eth0
    inet 192.168.4.50/24 scope global secondary eth0
⚠️在keepalived配置文件中有一个
persistence_timeout 50参数。他的作用是,当一个客户连接时,lvs会分配一个web服务器负责这个客户端的业务,在50s之内,如果这个客户端又发了请求,依旧是由相同的web服务器去处理该客户的请求。
这样做的原因是:由于连接时TCP,在每一次连接时都要经历三次握手、四次挥手,如果客户发送请求比较多,来回切换服务器浪费时间。
但我们现在处于测试阶段,可以先将
persistence_timeout 50注释掉,方便我们直观的看到结果
修改lvs2的keealined.conf
! Configuration File for keepalived

global_defs {
   notification_email {
     acassen@firewall.loc
     failover@firewall.loc
     sysadmin@firewall.loc
   }
   notification_email_from Alexandre.Cassen@firewall.loc
   smtp_server 192.168.200.1
   smtp_connect_timeout 30
   router_id lvs2   # 唯一id号,需要修改
   vrrp_iptables    # 添加iptables规则
   vrrp_skip_check_adv_addr
   vrrp_strict
   vrrp_garp_interval 0
   vrrp_gna_interval 0
}

vrrp_instance VI_1 {
    state BACKUP    #  lvs1为主
    interface eth0
    virtual_router_id 52
    priority 80
    advert_int 1    # 心跳检测,主备之间每间隔一秒测试一次存活状态
    authentication {
        auth_type PASS
        auth_pass 1111
    }
    virtual_ipaddress {
        192.168.4.50/24  # VIP
    }
}
# 下面的配置就是keepalived中支持的ipvsadm的配置
virtual_server 192.168.4.50 80 {  # 虚拟服务器   IP   端口
    delay_loop 6
    lb_algo wrr   # 负载均衡调度算法:wrr(加权轮询)
    lb_kind DR    # LVS类型
    persistence_timeout 50
    protocol TCP  # 连接协议

    real_server 192.168.4.110 80 { # 两个真实服务器
        weight 1   # 权重
         TCP_CHECK {   # 健康检查
            connect_timeout 3  # 连接超时时间
            retry 3    # 重试次数
            delay_before_retry 3  # 重试时间间隔
        }
    }
    real_server 192.168.4.120 80 {
        weight 1
        TCP_CHECK {
            connect_timeout 3
            retry 3
            delay_before_retry 3
        }
    }
}


# 重启keepalived
[root@lvs1:192.168.4.5 /etc/keepalived]$systemctl restart keepalived.service
【4】、检查web1的日志
[root@web1:192.168.4.110 ~]$> /var/log/nginx/access.log
# 监控日志,同时去客户端访问
[root@web1:192.168.4.110 ~]$tail -f /var/log/nginx/access.log
192.168.4.100 - - [30/Jun/2024:16:44:52 +0800] "GET / HTTP/1.1" 200 34 "-" "curl/7.61.1" "-"
192.168.4.100 - - [30/Jun/2024:16:44:53 +0800] "GET / HTTP/1.1" 200 34 "-" "curl/7.61.1" "-"
我们可以发在LVS架构中,客户端是直接访问web的
本文来自博客园,作者:Linux小菜鸟,转载请注明原文链接:https://www.cnblogs.com/xuruizhao/p/18314211
