清清楚楚地搭建MongoDB数据库(以搭建4.0.4版本的副本集为例)
数据的目录文件层次设计

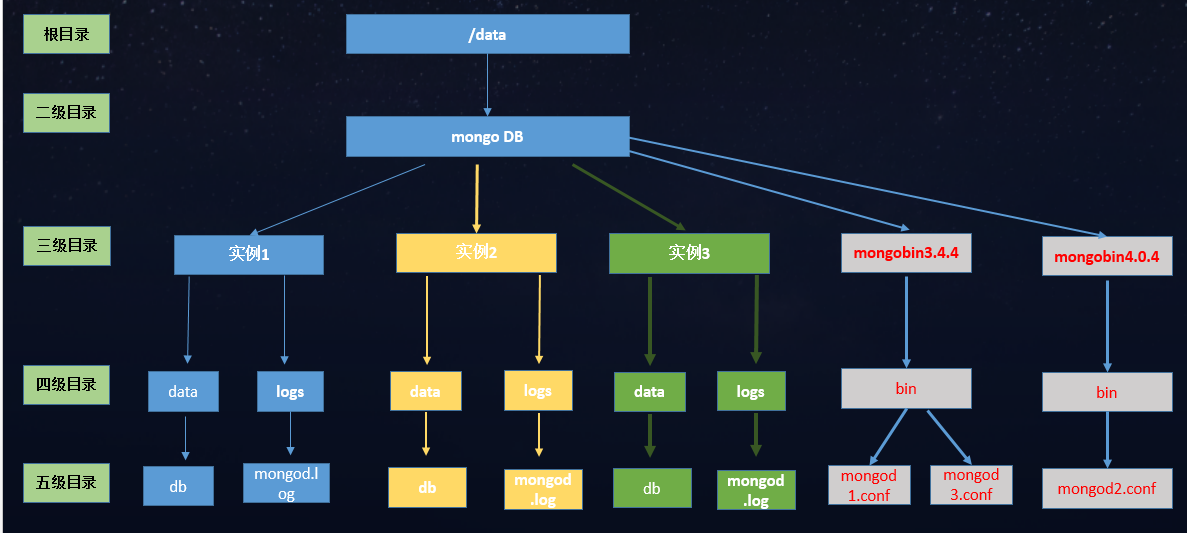
我们一般采用多实例的方式,而不是将所有的数据库尽可能地放在一个实例中。
主要基于以下考虑:
1:不同业务线对应的数据库放在不同的实例上,部分操作的运维时间容易协调等到。
2:相互独立,减少相互干扰。不会因为某个业务的激增或某个开发Team的代码问题,拖累太多的数据库。
3:实例资源容易控制,例如内存等。
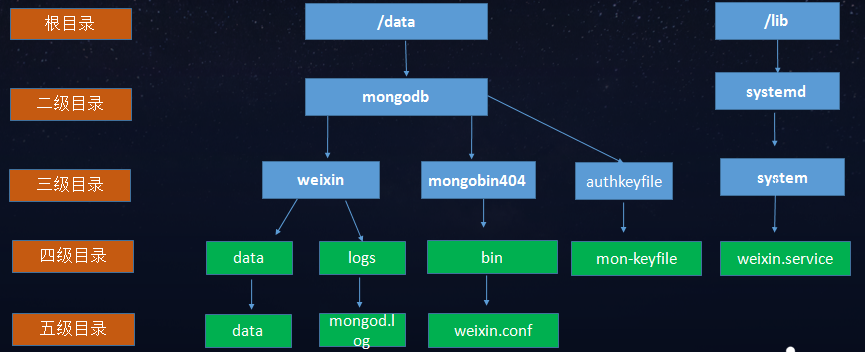
从上图可以知道,mongo二进制文件是多个实例公用的。一个版本一个目录,从图可以看出,这个服务器上支持两个版本的MongoDB,一个是版本3.4.4,一个是比较新的4.0.4。三级目录上的实例文档,我们一般是根据用途命名。比如,要安装一台存储weixin信息的MongoDB,使用的版本是4.0.4,那么它的目录层次是这样的。

安装配置步骤
下面以安装mongodbtest实例为例,逐步实现。此案例演示到创建副本集结束。
要搭建的副本集名称为 repltest,节点信息如下:
| Item | ServerIP | Port |
| Primary | 171.217.177.125 | 27288 |
| Secondary | 171.217.177.182 | 27288 |
| Arbiter | 171.217.177.134 | 27288 |
step 1 创建mongodb的配置文件,添加基本参数
创建文件:
touch mongodbtest.conf
添加启动参数:
port=27288
dbpath=/data/mongodb/mongodbtest/data/db
logpath=/data/mongodb/mongodbtest/logs/mongod.log
fork=true
bind_ip=127.0.0.1,171.217.177.125
maxConns=2500
wiredTigerCacheSizeGB=108
step 2 创建数据文件和日志文件
创建数据文件
mkdir -p /data/mongodb/mongodbtest/data/db
指定路径下创建日志文件
touch mongod.log
step 3为 Linux 系统添加mongodb专有账号(非必须,当然也可以以root账号启动;一次性,检查服务器上已添加,不需要执行了)
useradd mongouser
step 4 修改mongo数据文件的拥有者,(为mongouser增加权限)
chown -R mongodbuser:mongouser /data/mongodb/mongodbtest
chown -R mongodbuser:mongouser /data/mongodb/authkeyfile/mon-keyfile   ###(一次性)
chown -R mongodbuser:mongouser /data/mongodb/mongobin404/bin/mongodbtest.conf
step 5 添加MongoDB服务配置文件,配置service服务的文件。
service 文件放置在/lib/systemd/system文件夹中
touch mongodbtest.service
添加参数
[Unit]

Description=mongodbtest
After=network.target remote-fs.target nss-lookup.target
[Service]
User=mongouser
Group=mongouser
# (open files)
LimitNOFILE=64000
Type=forking
ExecStart=/data/mongodb/mongobin404/bin/mongod --config /data/mongodb/mongobin404/bin/mongodbtest.conf
ExecReload=/bin/kill -s HUP $MAINPID
ExecStop=/data/mongodb/mongobin404/bin/mongod --shutdown --config /data/mongodb/mongobin404/bin/mongodbtest.conf
PrivateTmp=true

[Install]
WantedBy=multi-user.target
step 6 启动服务,添加服务自启动
启动
systemctl start mongodbtest.service
查看状态
systemctl status mongodbtest.service
设置服务为开机自启动
systemctl enable mongodbtest.service
step 7 添加认证启动前,配置root权限的账号(在admin数据中执行)
db.createUser({user:"roottest", pwd:"roottestrootok",roles:[{role:"root",db:"admin"}]})
step 8 生成安全认证机制KeyFile,并将此文件传送至集群其它节点
(安全认证机制KeyFile的设置在此不做详解了,大家可以goole或百度)
生成keyfile主要命令:
openssl rand -base64 736 > /data/yanshi/mongofile/mongo-keyfile
keyfile 必须满足以下条件:
- 至少6个字符,小于1024字节,不考虑文件中的空白字符;
- 连接副本集成员的KeyFile和启动mongos进程的 KeyFile文件内容必须一致;
- 必须是base64编码,但不能有等号;
- 文件权限必须是 600(chmod 600),不能分配任何权限给group成员和其他成员。
step 9 修改启动文件mongodbtest.conf,追加登入验证参数,和副本集参数。
auth=true
replSet=repltest
oplogSize=1024
keyFile=/data/mongodb/authkeyfile/mon-keyfile
以上9步所有的操作,在副本集的所有节点上(Primary、Secondary、arbiter)都要操作一遍。
step 10 重启服务,配置副本集,请在Primary
---副本集初始化
rs.initiate( {_id : "repltest", members: [ { _id : 0, host : "171.217.177.125:27288" } ]})
----添加辅助节点
rs.add("171.217.177.182:27288")
----添加见证节点
rs.add("171.217.177.134:27288",true)
step 11 创建用户数据库及设置相关权限(要在指定的数据库test_messqq上执行)
配置读写账号
db.createUser({user:"test_messqq_dev", pwd:"test_messqq_devyaoqian",roles: [ { "role" : "readWrite", "db" : "test_messqq" }] })
配置只读账号
db.createUser({user:"test_messqq_dev_read", pwd:"test_messqq_dev_read",roles: [ { "role" : "read", "db" : "test_messqq" }] })
追述
随着版本迭代,如果升级到 Mongo 5.0.++ 版本,搭建集群,可能遇到以下问题
问题 1 【step 9 修改启动文件mongodbtest.conf,追加登入验证参数,和副本集参数。】
发现 start 启不来了,查看error log,信息如下:
{"t":{"$date":"2024-03-26T09:40:12.394+08:00"},"s":"E", "c":"CONTROL", "id":20535, "ctx":"initandlisten","msg":"Running wiredTiger without journaling in a replica set is not supported. Make sure you are not using --nojournal and that storage.journal.enabled is not set to 'false'"}
原因的话,Mongo conf 文件需要添加以下参数设置
journal = true
但是,需要说明的是:如果刚开始每天添加,已经初始化了,再添加,是会报错的,当然错误信息变量。
所以,这时候,就要删掉 db 文件,重新初始化。
【换句话说,初始化的时候,就是在 journal = true 的条件下初始化的】
问题 2 【step 10 配置副本集 ,添加见证节点】 ---总是卡住,时间过程会报错
"ok" : 0,
        "errmsg" : "Reconfig attempted to install a config that would change the implicit default write concern. Use the setDefaultRWConcern command to set a cluster-wide write concern and try the reconfig again.",
        "code" : 103,
        "codeName" : "NewReplicaSetConfigurationIncompatible"


The hang analyzer is automatically called in assert.soon functions. If you are *expecting* assert.soon to possibly fail, call assert.soon with {runHangAnalyzer: false} as the fifth argument (you can fill unused arguments with `undefined`).
解决方案
在主节点上执行
db.adminCommand({
  "setDefaultRWConcern" : 1,
  "defaultWriteConcern" : {
    "w" : "majority"
  }
})
本文版权归作者所有,未经作者同意不得转载,谢谢配合!!!


