项目总结一:注册模块
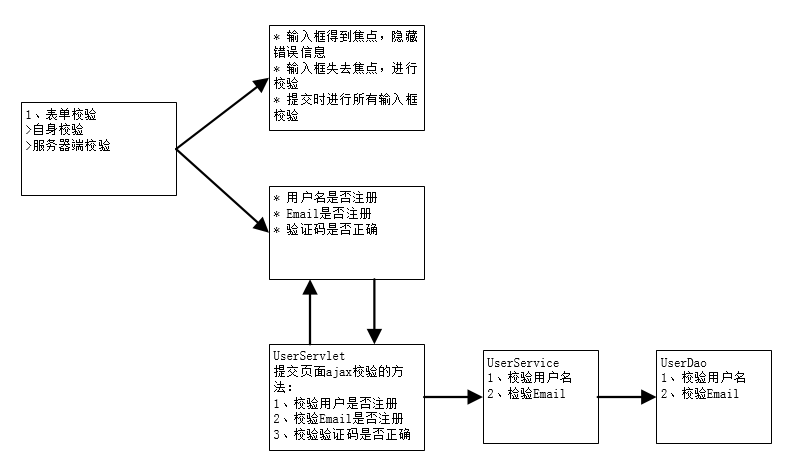
一、业务逻辑分析

二、原型图
三、实现过程
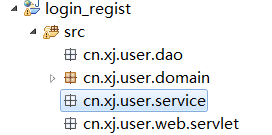
1、创建用户模块相关类

User:作为实体类与数据库表对应。
UserDao:封装了数据库的基本操作。
UserService:封装了业务功能,每个方法对应一个业务功能,例如注册方法、登录方法等。
UserServlet:用来接收客户端请求,处理与web相关的问题,例如获取客户端的请求参数,然后转发或重定向。
2、regist.jsp页面功能实现
注册从regist.jsp页面开始。我们需要在regist.jsp页面中对表单数据使用JQuery进行校验。当用户在文本框中输入数据后,光标离开文件框时对数据进行校验!如果校验未通过,会在文本框后台显示错误信息。
用户名校验:
- 用户名不能为空;
- 用户名长度必须在3 ~ 20之间;
- 用户名已被注册(需要异步访问服务器)。
登录密码校验:
- 密码不能为空;
- 密码长度必须在3 ~ 10之间;
确认密码校验:
- 确认密码不能为空;
- 两次输入不一致;
Email校验:
- Email不能为空;
- Email格式错误(/^([a-zA-Z0-9_-])+@([a-zA-Z0-9_-])+((\.[a-zA-Z0-9_-]{2,3}){1,2})$/);
- Email已被注册(需要异步访问服务器);
验证码校验:
- 验证码不能为空;
- 验证码错误(需要异步访问服务器);
当点击“立即注册”按钮时,还要对表单每项进行校验!因为一开始可能填写了正确的验证码,所以光标离开时没有错误,但用户又点击了“换一张”链接,这时填入的验证码就是错误的了,所以我们需要在提交表单时再次进行校验。
UserServlet对前端异步请求的支持
3、UserServlet#regist()
当表单校验通过后,客户端会请求UserServlet#regist() 方法。regist()方法的工作内容如下:
封装表单数据到User对象中;
对User对象数据进行服务器端校验;
- 如果校验失败,把错误信息保存到Map中;
- 把Map保存到request中;
- 把user保存到request,用来在表单中回显;
- 转发到regist.jsp页面,return;
调用UserService#regist(User)方法完成注册;
- 对user进行数据补全:uid、activationCode、status;
- 通过userDao的add(User)方法完成向数据库表插入记录;
使用TxQueryRunner的update()完成插入记录;
- 发送激活邮件。
保存成功信息,转发到msg.jsp。
/**
     * 注册功能
     * @param req
     * @param resp
     * @return
     * @throws ServletException
     * @throws IOException
     */
    public String regist(HttpServletRequest req, HttpServletResponse resp)
            throws ServletException, IOException {
        /*
         * 1. 封装表单数据到User对象
         */
        User formUser = CommonUtils.toBean(req.getParameterMap(), User.class);
        /*
         * 2. 校验之, 如果校验失败,保存错误信息,返回到regist.jsp显示
         */
        Map<String,String> errors = validateRegist(formUser, req.getSession());
        if(errors.size() > 0) {
            req.setAttribute("form", formUser);
            req.setAttribute("errors", errors);
            return "f:/jsps/user/regist.jsp";
        }
        /*
         * 3. 使用service完成业务
         */
        userService.regist(formUser);
        /*
         * 4. 保存成功信息,转发到msg.jsp显示!
         */
        req.setAttribute("code", "success");
        req.setAttribute("msg", "注册功能,请马上到邮箱激活!");
        return "f:/jsps/msg.jsp";
    }
/*
     * 注册校验
     * 对表单的字段进行逐个校验,如果有错误,使用当前字段名称为key,错误信息为value,保存到map中
     * 返回map
     */
    private Map<String,String> validateRegist(User formUser, HttpSession session) {
        Map<String,String> errors = new HashMap<String,String>();
        /*
         * 1. 校验登录名
         */
        String loginname = formUser.getLoginname();
        if(loginname == null || loginname.trim().isEmpty()) {
            errors.put("loginname", "用户名不能为空!");
        } else if(loginname.length() < 3 || loginname.length() > 20) {
            errors.put("loginname", "用户名长度必须在3~20之间!");
        } else if(!userService.ajaxValidateLoginname(loginname)) {
            errors.put("loginname", "用户名已被注册!");
        }

        /*
         * 2. 校验登录密码
         */
        String loginpass = formUser.getLoginpass();
        if(loginpass == null || loginpass.trim().isEmpty()) {
            errors.put("loginpass", "密码不能为空!");
        } else if(loginpass.length() < 3 || loginpass.length() > 20) {
            errors.put("loginpass", "密码长度必须在3~20之间!");
        }

        /*
         * 3. 确认密码校验
         */
        String reloginpass = formUser.getReloginpass();
        if(reloginpass == null || reloginpass.trim().isEmpty()) {
            errors.put("reloginpass", "确认密码不能为空!");
        } else if(!reloginpass.equals(loginpass)) {
            errors.put("reloginpass", "两次输入不一致!");
        }

        /*
         * 4. 校验email
         */
        String email = formUser.getEmail();
        if(email == null || email.trim().isEmpty()) {
            errors.put("email", "Email不能为空!");
        } else if(!email.matches("^([a-zA-Z0-9_-])+@([a-zA-Z0-9_-])+((\\.[a-zA-Z0-9_-]{2,3}){1,2})$")) {
            errors.put("email", "Email格式错误!");
        } else if(!userService.ajaxValidateEmail(email)) {
            errors.put("email", "Email已被注册!");
        }

        /*
         * 5. 验证码校验
         */
        String verifyCode = formUser.getVerifyCode();
        String vcode = (String) session.getAttribute("vCode");
        if(verifyCode == null || verifyCode.trim().isEmpty()) {
            errors.put("verifyCode", "验证码不能为空!");
        } else if(!verifyCode.equalsIgnoreCase(vcode)) {
            errors.put("verifyCode", "验证码错误!");
        }

        return errors;
    }
4、用户激活
激活页面是在用户的邮箱里,是在注册成功时发送到用户邮箱中的。

这里的超链接地址为:"http://localhost:8080/login_regist/UserServlet?method=activation&activationCode=xxx",
其中method=activation表示调用UserServlet的activation()方法;其中activationCode就是用户注册成功后生成的唯一激活码!通过唯一的activationCode可以在表中查询出User,如果没有查询到User,那么说明激活码无效;如果查询到了,把User的status修改为true,就表示激活成功。
激活功能的代码实现:
1、首先是发送邮件到注册的邮箱
      /*
         * 3. 发邮件
         */
        /*
         * 把配置文件内容加载到prop中
         */
        Properties prop = new Properties();
        try {
            prop.load(this.getClass().getClassLoader().getResourceAsStream("email_template.properties"));
        } catch (IOException e1) {
            throw new RuntimeException(e1);
        }
        /*
         * 登录邮件服务器,得到session
         */
        String host = prop.getProperty("host");//服务器主机名
        String name = prop.getProperty("username");//登录名
        String pass = prop.getProperty("password");//登录密码
        Session session = MailUtils.createSession(host, name, pass);

        /*
         * 创建Mail对象
         */
        String from = prop.getProperty("from");
        String to = user.getEmail();
        String subject = prop.getProperty("subject");
        // MessageForm.format方法会把第一个参数中的{0},使用第二个参数来替换。
        String content = MessageFormat.format(prop.getProperty("content"), user.getActivationCode());
        Mail mail = new Mail(from, to, subject, content);
        /*
         * 发送邮件
         */
        try {
            MailUtils.send(session, mail);
        } catch (MessagingException e) {
            throw new RuntimeException(e);
        } catch (IOException e) {
            throw new RuntimeException(e);
        }
    }
2、用户点击上面的超链接,会访问UserServlet#activation()方法
如下所示:
/**
     * 激活功能
     * @param req
     * @param resp
     * @return
     * @throws ServletException
     * @throws IOException
     */
    public String activation(HttpServletRequest req, HttpServletResponse resp)
            throws ServletException, IOException {
        /*
         * 1. 获取参数激活码
         * 2. 用激活码调用service方法完成激活
         *   > service方法有可能抛出异常, 把异常信息拿来,保存到request中,转发到msg.jsp显示
         * 3. 保存成功信息到request,转发到msg.jsp显示。
         */
        String code = req.getParameter("activationCode");
        try {
            userService.activatioin(code);
            req.setAttribute("code", "success");//通知msg.jsp显示对号
            req.setAttribute("msg", "恭喜,激活成功,请马上登录!");
        } catch (UserException e) {
            // 说明service抛出了异常
            req.setAttribute("msg", e.getMessage());
            req.setAttribute("code", "error");//通知msg.jsp显示X
        }
        return "f:/jsps/msg.jsp";
    }


【推荐】国内首个AI IDE,深度理解中文开发场景,立即下载体验Trae
【推荐】编程新体验,更懂你的AI,立即体验豆包MarsCode编程助手
【推荐】抖音旗下AI助手豆包,你的智能百科全书,全免费不限次数
【推荐】轻量又高性能的 SSH 工具 IShell:AI 加持,快人一步
· AI与.NET技术实操系列:基于图像分类模型对图像进行分类
· go语言实现终端里的倒计时
· 如何编写易于单元测试的代码
· 10年+ .NET Coder 心语,封装的思维:从隐藏、稳定开始理解其本质意义
· .NET Core 中如何实现缓存的预热?
· 25岁的心里话
· 闲置电脑爆改个人服务器(超详细) #公网映射 #Vmware虚拟网络编辑器
· 零经验选手,Compose 一天开发一款小游戏!
· 通过 API 将Deepseek响应流式内容输出到前端
· AI Agent开发,如何调用三方的API Function,是通过提示词来发起调用的吗