Squid代理模式、acl控制、sarg日志、反向代理
摘要
1、Squid是基于Unix的代理服务器(proxy server),它缓存比起点源点更接近请求者的互联网内容。Squid支持缓存多种不同的网络对象,包括那些通过HTTP和FTP访问的人。缓存频繁要求网页、媒体文件和其它加速回答时间并减少带宽堵塞的内容。
2、Squid代理服务器(Squid proxy server)一般和原始文件一起安装在单独服务器而不是网络服务器上。Squid通过追踪网络中的对象运用起作用。Squid最初担当中介,仅仅是把客户要求传递到服务器并存储要求对象的拷贝。如果同一个客户或同一批客户在要求还在Squid缓存(cache)时要求相同的对象,Squid就可以立刻服务,加速下载并保存带宽。
3、squid是一种用来缓存Internet数据的软件。接受来自人们需要下载的目标(object)的请求并适当的处理这些请求。也就是说,如果一个人想下载一web界面,他请求squid为他取得这个页面。squid随之连接到远程服务器并向这个页面发出请求。然后,squid显式地聚集数据到客户端机器,而且同时复制一份。当下一次有人需要同一页面时, squid可以简单的从磁盘中读到它,那样数据会立即传输到客户机子上。
一、缓存代理概述
1.1、Squid代理的工作机制
缓存网页对象,减少重复请求
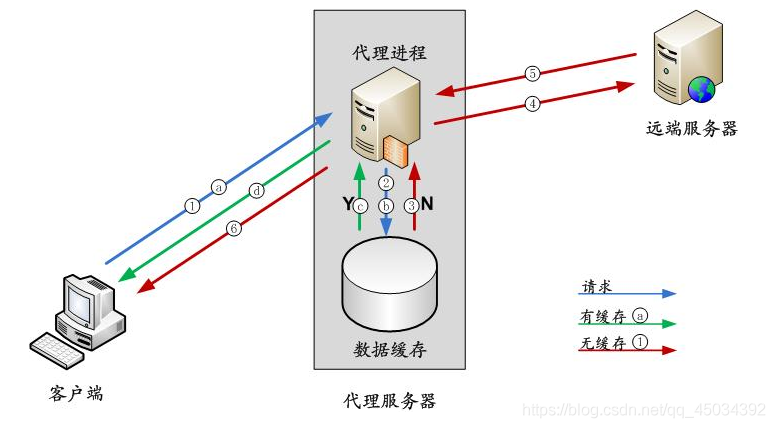
当代理服务器中有客户端需要的数据时:
a. 客户端向代理服务器发送数据请求;
b. 代理服务器检查自己的数据缓存;
c. 代理服务器在缓存中找到了用户想要的数据,取出数据;
d. 代理服务器将从缓存中取得的数据返回给客户端。
当代理服务器中没有客户端需要的数据时:
a. 客户端向代理服务器发送数据请求;
b. 代理服务器检查自己的数据缓存;
c. 代理服务器在缓存中没有找到用户想要的数据;
d. 代理服务器向Internet 上的远端服务器发送数据请求;
f. 远端服务器响应,返回相应的数据;
g. 代理服务器取得远端服务器的数据,返回给客户端,并保留一份到自己的数据缓存中。
1.2、代理的基本类型
1.2.1、传统代理:适用于Internet,需明确指定服务端
1.2.2、透明代理:客户机不需指定代理服务器的地址和端口,而是通过默认路由、防火墙策略将Web访问重定向给代理服务器处理
1.3、使用代理的好处
1.3.1、提高Web访问速度
1.3.2、隐藏客户机的真实IP地址
二、squid主要组成部分
| 服务名 | squid |
|---|---|
| 主程序 | /usr/sbin/squid |
| 配置目录 | /etc/squid |
| 主配置文件 | /etc/squid/squid.conf |
| 监听tcp端口号 | 3128 |
| 默认访问日志文件 | /var/log/squid/access.log |
三、Squid各种代理的定义
3.1、传统代理
环境
| 主机 | IP地址 |
|---|---|
| Squid代理服务器 | 20.0.0.10 |
| Web网站服务(源主机) | 20.0.0.20 |
| 客户机 | 20.0.0.30 |
3.1.1、Squid服务器配置
①安装依赖环境
1 [root@squid ~]# yum -y install gcc gcc-c++ make
②编译安装squid服务
 1 [root@squid ~]# tar zxf squid-3.5.23.tar.gz -C /opt
 2 [root@squid ~]# cd /opt/squid-3.5.23/
 3 [root@squid squid-3.5.23]# ./configure --prefix=/usr/local/squid \
 4 > --sysconfdir=/etc \ ###指定配置文件位置
 5 > --enable-arp-acl \ ###支持acl访问控制列表
 6 > --enable-linux-netfilter \ ###打开网络筛选
 7 > --enable-linux-tproxy \ ###支持透明代理
 8 > --enable-async-io=100 \ ###io优化
 9 > --enable-err-language="Simplify_Chinese" \ ###报错显示简体中文
10 > --enable-underscore \ ###支持下划线
11 > --enable-poll \ ###默认使用poll模式,开启epoll模式时提升性能
12 > --enable-gnuregex ###支持正则表达式
13 [root@squid squid-3.5.23]# make && make install
③优化路径
1 [root@squid squid-3.5.23]# ln -s /usr/local/squid/sbin/* /usr/local/sbin
2 [root@squid squid-3.5.23]# useradd -M -s /sbin/nologin squid ###创建不可登录的程序用户
3 [root@squid squid-3.5.23]# chown -R squid.squid /usr/local/squid/var
④修改配置文件,优化启动项
1 [root@squid ~]# vi /etc/squid.conf
2 cache_effective_user squid        #添加   指定程序用户
3 cache_effective_group squid       #添加   指定账号基本组
4
5 [root@squid ~]# squid -k parse ###检查配置文件语法
6 [root@squid ~]# squid -z ###初始化缓存目录
7 [root@squid ~]# squid ###启动服务
8 [root@squid ~]# netstat -anpt | grep squid
9 tcp6       0      0 :::3128                 :::*                    LISTEN      104314/(squid-1)
⑤添加服务到service管理
 1 [root@squid ~]# vi /etc/init.d/squid
 2 #!/bin/bash
 3 #chkconfig: 2345 90 25
 4 PID="/usr/local/squid/var/run/squid.pid"
 5 CONF="/etc/squid.conf"
 6 CMD="/usr/local/squid/sbin/squid"
 7
 8 case "$1" in
 9    start)
10      netstat -natp | grep squid &> /dev/null
11      if [ $? -eq 0 ]
12      then
13        echo "squid is running"
14        else
15        echo "正在启动 squid..."
16        $CMD
17      fi
18    ;;
19    stop)
20      $CMD -k kill &> /dev/null
21      rm -rf $PID &> /dev/null
22    ;;
23    status)
24      [ -f $PID ] &> /dev/null
25         if [ $? -eq 0 ]
26           then
27             netstat -natp | grep squid
28           else
29             echo "squid is not running"
30         fi
31    ;;
32    restart)
33       $0 stop &> /dev/null
34       echo "正在关闭 squid..."
35          $0 start &> /dev/null
36       echo "正在启动 squid..."
37    ;;
38    reload)
39       $CMD -k reconfigure
40    ;;
41    check)
42       $CMD -k parse
43    ;;
44    *)
45       echo "用法:$0{start|stop|status|reload|check|restart}"
46    ;;
47 esac
48
49 [root@squid ~]# chmod +x /etc/init.d/squid
50 [root@squid ~]# chkconfig --add squid
51 [root@squid ~]# chkconfig --level 35 squid on
⑥配置传统代理
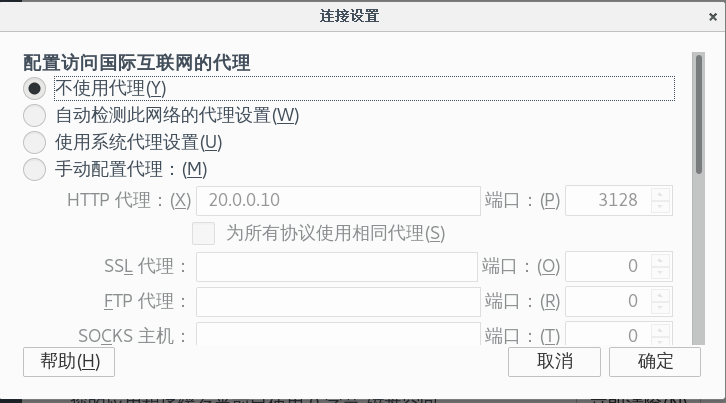
 1 [root@squid ~]# vi /etc/squid.conf
 2 # And finally deny all other access to this proxy
 3 http_access allow all              #添加
 4 http_access deny all
 5
 6 # Squid normally listens to port 3128
 7 http_port 3128
 8 cache_mem 64 MB              ###指定缓存功能所使用的内存空间大小,便于保持访问较频繁的WEB对象,容量最好为4的倍数,单位为MB,建议设为物理内存的1/4
 9 reply_body_max_size 10 MB     ###允许用户下载的最大文件大小,以字节为单位。默认设置0表示不进行限制
10 maximum_object_size 4096 KB     ###允许保存到缓存空间的最大对象大小,以KB为单位,超过大小限制的文件将不被缓存,而是直接转发给用户
11
12 [root@squid ~]# setenforce 0
13 [root@squid ~]# iptables -F
14 [root@squid ~]# iptables -I INPUT -p tcp --dport 3128 -j ACCEPT
15 [root@squid ~]# systemctl restart squid
3.1.2、Web服务器配置
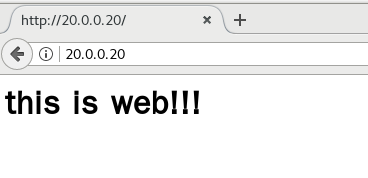
安装httpd,并设置默认网页内容
1 [root@web ~]# yum -y install httpd
2 [root@web ~]# cd /var/www/html/
3 [root@web html]# vi index.html
4 <h1>this is a web!!!</h1>
5 [root@web html]# systemctl restart httpd
6 [root@web html]# netstat -anpt | grep httpd
7 tcp6 0 0 :::80 :::* LISTEN 3432/httpd
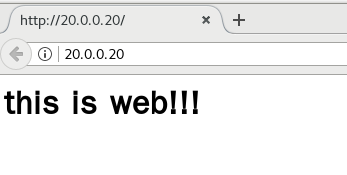
8 [root@web html]# curl http://localhost
9 <h1>this is web!!!</h1>
3.1.3、客户机测试
3.1.4、查看日志文件,看访问的IP
1 [root@web html]# cat /var/log/httpd/access_log
2 20.0.0.30 - - [09/Nov/2020:14:42:40 +0800] "GET / HTTP/1.1" 200 24 "-" "Mozilla/5.0 (X11; Linux x86_64; rv:52.0) Gecko/20100101 Firefox/52.0"
3 20.0.0.30 - - [09/Nov/2020:14:42:40 +0800] "GET /favicon.ico HTTP/1.1" 404 209 "-" "Mozilla/5.0 (X11; Linux x86_64; rv:52.0) Gecko/20100101 Firefox/52.0"
4 20.0.0.30 - - [09/Nov/2020:14:42:40 +0800] "GET /favicon.ico HTTP/1.1" 404 209 "-" "Mozilla/5.0 (X11; Linux x86_64; rv:52.0) Gecko/20100101 Firefox/52.0"
是客户机的IP
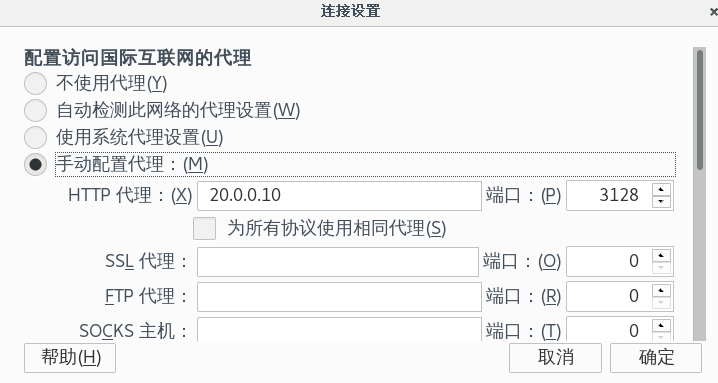
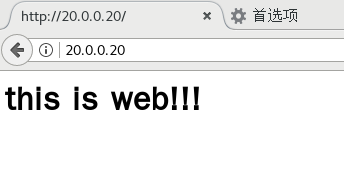
3.1.5、再网页上进行代理配置并测试
3.1.6、查看日志文件,看访问的IP
1 [root@web html]# cat /var/log/httpd/access_log
2 20.0.0.10 - - [09/Nov/2020:14:54:52 +0800] "GET / HTTP/1.1" 200 24 "-" "Mozilla/5.0 (X11; Linux x86_64; rv:52.0) Gecko/20100101 Firefox/52.0"
3 20.0.0.10 - - [09/Nov/2020:14:54:53 +0800] "GET / HTTP/1.1" 304 - "-" "Mozilla/5.0 (X11; Linux x86_64; rv:52.0) Gecko/20100101 Firefox/52.0"
成功变成Squid服务器的IP
3.2、透明代理
在搭建的传统代理基础上做如下修改:
①squid服务器添加一块网卡:192.168.100.10(仅主机模式);开启路由转发功能,开启透明代理;配置防火墙规则;
②web服务器不变;
③客户端IP地址修改为192.168.100.20,且浏览器关闭手动代理设置
| 主机 | IP地址 |
|---|---|
| Squid代理服务器 | 20.0.0.10(外网),192.168.100.10(内网) |
| Web网站服务(源主机) | 20.0.0.20(外网) |
| 客户机 | 192.168.100.20(内网) |
3.2.1、Squid服务器配置
①开启路由功能
1 [root@squid ~]# vi /etc/sysctl.conf
2 net.ipv4.ip_forward = 1           #末尾添加
3 [root@squid ~]# sysctl -p
4 net.ipv4.ip_forward = 1
②修改配置文件
1 [root@squid ~]# vi /etc/squid.conf
2 http_port 192.168.100.10:3128 transparent
3 [root@squid ~]# systemctl restart squid.service
4 [root@squid squid-3.5.23]# netstat -anpt | grep squid
5 tcp        0      0 192.168.100.10:3128     0.0.0.0:*               LISTEN      114617/(squid-1)
③设置防火墙规则
1 [root@squid ~]# iptables -F
2 [root@squid ~]# iptables -t nat -F
3 [root@squid ~]# iptables -t nat -I PREROUTING -i ens37 -s 192.168.100.0/24 -p tcp --dport 80 -j REDIRECT --to 3128
4 [root@squid ~]# iptables -t nat -I PREROUTING -i ens37 -s 192.168.100.0/24 -p tcp --dport 443 -j REDIRECT --to 3128
5 [root@squid ~]# iptables -I INPUT -p tcp --dport 3128 -j ACCEPT
3.2.2、web端设置
1 [root@web ~]# route add -net 192.168.100.0/24 gw 20.0.0.10 ###添加一条静态路由
3.2.3、客户机测试(客户机网关要设置成Squid内网网关IP)
①网页修改为不使用代理
②访问并查看日志
1 [root@web html]# cat /var/log/httpd/access_log
2 20.0.0.10 - - [09/Nov/2020:15:52:02 +0800] "GET / HTTP/1.1" 304 - "-" "Mozilla/5.0 (X11; Linux x86_64; rv:52.0) Gecko/20100101 Firefox/52.0"
3 20.0.0.10 - - [09/Nov/2020:16:06:40 +0800] "GET / HTTP/1.1" 304 - "-" "Mozilla/5.0 (X11; Linux x86_64; rv:52.0) Gecko/20100101 Firefox/52.0"
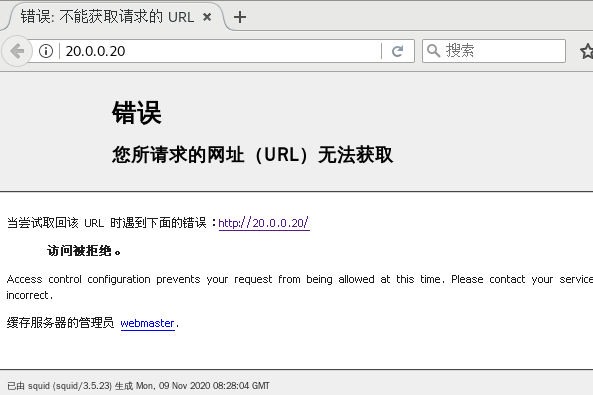
四、ACL控制
使用acl访问控制列表,禁止客户机访问web服务器
4.1、修改配置文件
 1 [root@squid squid-3.5.23]# vi /etc/squid.conf
 2 acl localnet src 10.0.0.0/8     # RFC1918 possible internal network
 3 acl localnet src 172.16.0.0/12  # RFC1918 possible internal network
 4 acl localnet src 192.168.0.0/16 # RFC1918 possible internal network
 5 acl localnet src fc00::/7       # RFC 4193 local private network range
 6 acl localnet src fe80::/10      # RFC 4291 link-local (directly plugged) machines
 7 acl host     src 192.168.100.20/32     #添加
 8
 9 # Only allow cachemgr access from localhost
10 http_access allow localhost manager
11 http_access deny host               #添加
12 http_access deny manager
13
14 [root@squid squid-3.5.23]# systemctl restart squid
15 [root@squid squid-3.5.23]# netstat -anpt | grep squid
16 tcp        0      0 192.168.100.10:3128     0.0.0.0:*               LISTEN      115270/(squid-1)
4.2、测试
五、Squid日志分析
5.1、安装依赖环境
1 [root@Squid ~]# yum -y install gd ###图像处理
5.2、编译安装日志分析软件
1 [root@squid ~]# mkdir /usr/local/sarg
2 [root@squid ~]# tar zxf sarg-2.3.7.tar.gz -C /opt
3 [root@squid ~]# cd /opt/sarg-2.3.7/
4 [root@squid sarg-2.3.7]# ./configure \
5 > --prefix=/usr/local/sarg \
6 > --sysconfdir=/etc/sarg \  ###配置文件目录,默认是/usr/local/etc
7 > --enable-extraprotection  ###添加额外的安全保护
8 [root@squid sarg-2.3.7]# make && make install
5.3、修改配置文件
 1 [root@squid ~]# vi /etc/sarg/sarg.conf
 2 7/ access_log /usr/local/squid/var/logs/access.log    //指定访问日志文件
 3
 4 25/ title "Squid User Access Reports"      //网页标题
 5
 6 120/ output_dir /var/www/html/squid-reports    //报告输出目录
 7
 8 178/ user_ip no          //使用用户名显示
 9
10 206/ exclude_hosts /usr/local/sarg/noreport   //不计入排序的站点列表文件
11
12 184/ topuser_sort_field connect reverse   //top排序中有连接次数、访问字节、降序排列 升序是normal
13
14 (注释掉)190/ #  user_sort_field reverse    //用户访问记录 连接次数、访问字节按降序排序
15
16 257/ overwrite_report no   //同名日志是否覆盖
17
18 289/ mail_utility mailq.postfix   //发送邮件报告命令
19
20 434/ charset UTF-8   //使用字符集
21
22 518/ weekdays 0-6   //top排行的星期周期
23
24 525/ hours 0-23   //top排行的时间周期
25
26 633/ www_document_root /var/www/html  //网页根目录
5.4、添加不计入站点文件,添加的域名将不被显示在排序中
1 [root@squid ~]# touch /usr/local/sarg/noreport
5.5、优化启动项并启动服务
1 [root@squid sarg-2.3.7]# ln -s /usr/local/sarg/bin/sarg /usr/local/bin
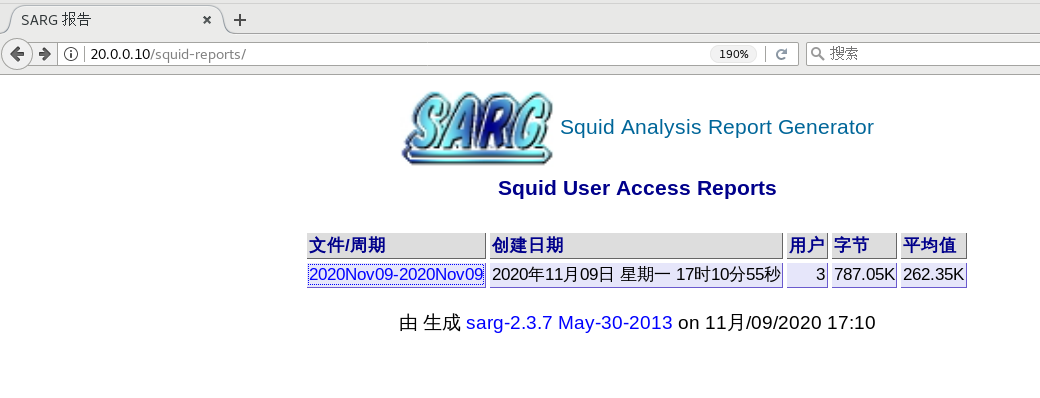
2 [root@squid sarg-2.3.7]# sarg
3 SARG: 纪录在文件: 214, reading: 100.00%
4 SARG: 成功的生成报告在 /var/www/html/squid-reports/2020Nov09-2020Nov09
5.6、安装启动httpd服务
1 [root@squid ~]# yum -y install httpd
2 [root@squid ~]# systemctl start httpd
5.7、查看报告
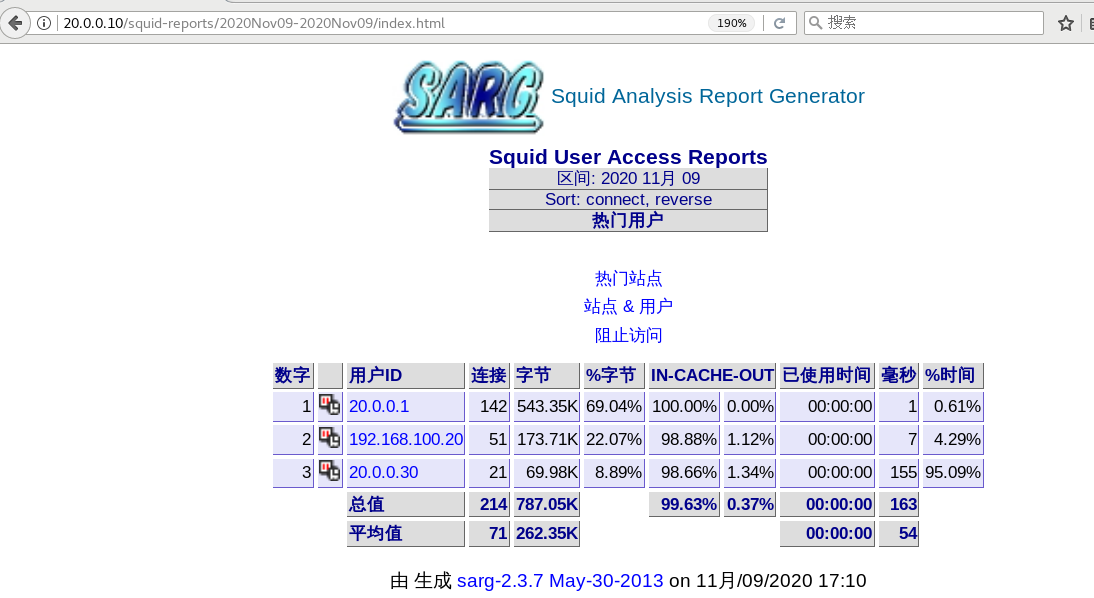
5.8、做周期性计划任务crontab使其每天生成报告
 1 [root@squid ~]# sarg -l /usr/local/squid/var/logs/access.log -o /var/www/html/squid-reports/ -z -d $(date -d "1 day ago" +%d/%m/%Y)-$(date +%d/%m/%Y)
 2 SARG: TAG: access_log /usr/local/squid/var/logs/access.log
 3 SARG: TAG: title "Squid User Access Reports"
 4 SARG: TAG: output_dir /var/www/html/squid-reports
 5 SARG: TAG: user_ip no
 6 SARG: TAG: topuser_sort_field BYTES reverse
 7 SARG: TAG: exclude_hosts /usr/local/sarg/noreport
 8 SARG: TAG: overwrite_report no
 9 SARG: TAG: mail_utility mailq.postfix
10 SARG: TAG: charset UTF-8
11 SARG: TAG: weekdays 0-6
12 SARG: TAG: hours 0-23
13 SARG: TAG: www_document_root /var/www/html
14 SARG: 纪录在文件: 127, reading: 100.00%
15 SARG: 期间被日志文件覆盖: 07/11/2020 - 08/11/2020
16 SARG: (info) date=08/11/2020
17 SARG: (info) period=2020 11月 07-2020 11月 08
18 SARG: (info) outdirname=/var/www/html/squid-reports//2020Nov07-2020Nov08
19 SARG: (info) Dansguardian report not produced because no dansguardian configuration file was provided
20 SARG: (info) No redirector logs provided to produce that kind of report
21 SARG: (info) No downloaded files to report
22 SARG: (info) Authentication failures report not produced because it is empty
23 SARG: (info) Redirector report not generated because it is empty
24 SARG: 成功的生成报告在 /var/www/html/squid-reports//2020Nov07-2020Nov08
25
26 [root@squid ~]# crontab -e
27 30 22 * * * sarg -l /usr/local/squid/var/logs/access.log -o /var/www/html/squid-reports/ -z -d $(date -d "1
28 day ago" +%d/%m/%Y)-$(date +%d/%m/%Y)
29
30 测试在浏览器输入 20.0.0.10/squid-reports/,又会出现一条新的访问记录,然后查看/var/www/html/squid-reports文件
31 [root@squid ~]# cd /var/www/html/squid-reports/
32 [root@squid squid-reports]# ll
33 drwxr-xr-x. 5 root root  213 11月  9 17:34 2020Nov08-2020Nov09
34 drwxr-xr-x. 5 root root  213 11月  9 17:10 2020Nov09-2020Nov09
35 drwxr-xr-x. 2 root root   92 11月  9 17:10 images
36 -rw-r--r--. 1 root root 4686 11月  9 17:34 index.html
六、Squid反向代理
在透明模式的基础上进行反向代理
因为httpd会占用80端口,所以必须关闭squid服务器中的httpd服务
6.1、web1配置
1 [root@web1 ~]# yum -y install httpd
2 [root@web1 ~]# echo "<h1>this is web1</h1>" > /var/www/html/index.html
3 [root@web1 ~]# systemctl start httpd
4 [root@web1 ~]# netstat -anpt | grep httpd
5 tcp6       0      0 :::80                   :::*                    LISTEN      50552/httpd
6
7 [root@web1 ~]# route add -net 192.168.100.0/24 gw 20.0.0.10 ###添加静态路由
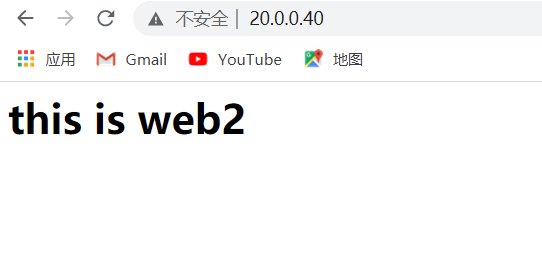
6.2、web2配置
1 [root@web2 ~]# yum -y install httpd
2 [root@web2 ~]# echo "<h1>this is web2</h1>" > /var/www/html/index.html
3 [root@web2 ~]# systemctl start httpd
4 [root@web2 ~]# netstat -anpt | grep httpd
5 tcp6       0      0 :::80                   :::*                    LISTEN      50552/httpd
6
7 [root@web2 ~]# route add -net 192.168.100.0/24 gw 20.0.0.10 ###添加静态路由
6.3、Squid配置
 1 [root@squid ~]# iptables -F
 2 [root@squid ~]# iptables -t nat -F
 3 [root@squid ~]# iptables -I INPUT -p tcp --dport 3128 -j ACCEPT
 4
 5 [root@squid ~]# vi /etc/squid.conf
 6 # Squid normally listens to port 3128
 7 http_port 20.0.0.10:80 accel vhost vport ###squid外网口IP
 8 cache_peer 20.0.0.20 parent 80 0 no-query originserver round-robin max_conn=30 weight=1 name=web1
 9 cache_peer 20.0.0.40 parent 80 0 no-query originserver round-robin max_conn=30 weight=1 name=web2
10 cache_peer_domain web1 web2 www.xuhao.com
11
12 [root@squid ~]# systemctl restart squid
6.4、测试

1 客户机需要添加hosts文件
2 20.0.0.10 www.xuhao.com
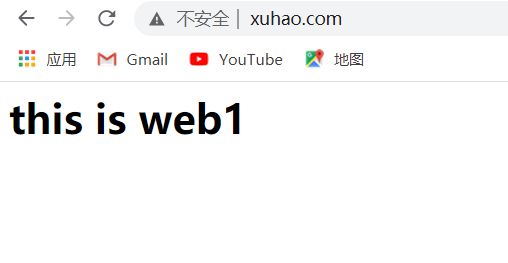

可以看出web1和web2是轮询访问的

 浙公网安备 33010602011771号