一、数据库迁移
1.常见原因
1.数据库要做升级
2.数据库服务器到期需要迁移
2.新服务器搭建数据库
[root@db02 ~]# yum install -y mariadb-server
3.启动
[root@db02 ~]# systemctl start mariadb
[root@db02 ~]# systemctl enable mariadb
4.配置数据库密码
[root@db02 ~]# mysqladmin -uroot password 'Linhd@123'
5.密码连接数据库
[root@db02 ~]# mysql -uroot -p
Enter password:
6.旧数据库导出数据
[root@db01 ~]# mysqldump -uroot -p -B wordpress zh edusoho > /tmp/full.sql
Enter password:
[root@db01 ~]# ll /tmp/full.sql
-rw-r--r-- 1 root root 1244924 Aug 28 16:46 /tmp/full.sql
7.新库授权
MariaDB [(none)]> grant all on *.* to root@'172.16.1.%' identified by '123456';
Query OK, 0 rows affected (0.01 sec)

MariaDB [(none)]> grant all on wordpress.* to wp@'172.16.1.%' identified by '123';
Query OK, 0 rows affected (0.01 sec)

MariaDB [(none)]> grant all on zh.* to zh@'172.16.1.%' identified by '234';
Query OK, 0 rows affected (0.00 sec)

MariaDB [(none)]> grant all on edusoho.* to edu@'172.16.1.%' identified by '345';
Query OK, 0 rows affected (0.00 sec)
8.将数据导入新库
[root@db01 ~]# mysql -uroot -p -h172.16.1.52 < /tmp/full.sql
Enter password: 123456
9.修改项目配置
1)wordpress代码
[root@web01 ~]# vim /code/wordpress/wp-config.php
/** WordPress数据库的名称 */
define('DB_NAME', 'wordpress');

/** MySQL数据库用户名 */
define('DB_USER', 'wp');

/** MySQL数据库密码 */
define('DB_PASSWORD', '123');

/** MySQL主机 */
define('DB_HOST', '172.16.1.52');
2)知乎代码
[root@web01 ~]# vim /code/zh/system/config/database.php
<?php

$config['charset'] = 'utf8';^M
$config['prefix'] = 'aws_';^M
$config['driver'] = 'MySQLi';^M
$config['master'] = array (
  'charset' => 'utf8',
  'host' => '172.16.1.52',
  'username' => 'zh',
  'password' => '234',
  'dbname' => 'zh',
);^M
$config['slave'] = false;^M
3)edusoho代码
[root@web01 ~]# vim /code/edusoho/app/config/parameters.yml
parameters:
    database_driver: pdo_mysql
    database_host: 172.16.1.52
    database_port: 3306
    database_name: edusoho
    database_user: edu
    database_password: '345'
10.排错
1.查看浏览器检查,找到出问题的接口或者文件页面
2.查看日志
	[root@web01 ~]# ll /var/log/nginx/access.log
	[root@web01 ~]# ll /var/log/nginx/error.log
	业务进程日志
3.把日志给开发
4.4xx自己解决
5.5xx给开发
二、拆分PHP
1.修改nginx配置
[root@web01 ~]# vim /etc/nginx/conf.d/linux.blog.com.conf
server {
    listen 80;
    server_name linux.blog.com;
    root /code/wordpress;
    location / {
        index index.php;
    }
    location ~* \.php$ {
        fastcgi_pass 172.16.1.8:9000;
        fastcgi_param SCRIPT_FILENAME $document_root$fastcgi_script_name;
        include fastcgi_params;
    }
}
2.重启访问
[root@web01 ~]# systemctl restart nginx

#访问页面http://linux.blog.com/,报错502
3.修改PHP监听端口
[root@web02 ~]# vim /etc/php-fpm.d/www.conf
#修改监听地址
listen = 172.16.1.8:9000
#修改允许连接的ip地址
listen.allowed_clients = 172.16.1.7

#重启服务
[root@web02 /code]# systemctl restart php-fpm
4.再次访问页面
#报错页面找不到或者文件找不到
5.同步nginx站点文件
[root@web01 /code]# scp -r wordpress 172.16.1.8:/code/
6.再次访问测试
#图片丢失
7.php服务器挂载
[root@web02 /code]# mount -t nfs 172.16.1.31:/data/wp /code/wordpress/wp-content/uploads
8.再次访问测试没有问题
三、数据文件实时备份
1.服务端(backup)
1)安装
[root@backup ~]# yum install -y rsync
2)配置rsync
[root@backup ~]# vim /etc/rsyncd.conf
uid = www
gid = www
port = 873
fake super = yes
use chroot = no
max connections = 200
timeout = 600
ignore errors
read only = false
list = false
auth users = rsync_backup
secrets file = /etc/rsync.passwd
log file = /var/log/rsyncd.log
#####################################
[data]
comment = welcome to oldboyedu backup!
path = /data
3)创建用户
[root@backup ~]# groupadd www -g 666
[root@backup ~]# useradd www -u 666 -g 666
4)创建密码文件
[root@backup ~]# echo "rsync_backup:123456" > /etc/rsync.passwd
[root@backup ~]# chmod 600 /etc/rsync.passwd
5)创建目录
[root@backup ~]# mkdir /data
[root@backup ~]# chown -R www.www /data/
6)启动
[root@backup ~]# systemctl start rsyncd
[root@backup ~]# ps -ef | grep rsync
2.客户端
1)安装
[root@nfs ~]# yum install -y rsync inotify-tools

#安装sersync
[root@nfs ~]# tar xf sersync2.5.4_64bit_binary_stable_final.tar.gz -C /usr/local/sersync
2)配置sersync
[root@nfs ~]# vim /usr/local/sersync/confxml.xml
3)创建密码文件
[root@nfs ~]# echo 123456 > /etc/rsync.password
[root@nfs ~]# chmod 600 /etc/rsync.password
4)启动
[root@nfs /data]# /usr/local/sersync/sersync2 -dro /usr/local/sersync/confxml.xml
3.测试
四、代理
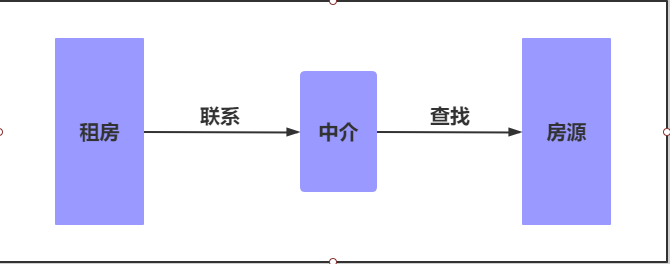
1.什么是代理
代理一词往往并不陌生, 该服务我们常常用到如(代理理财、代理租房、代理收货等等),如下图所示
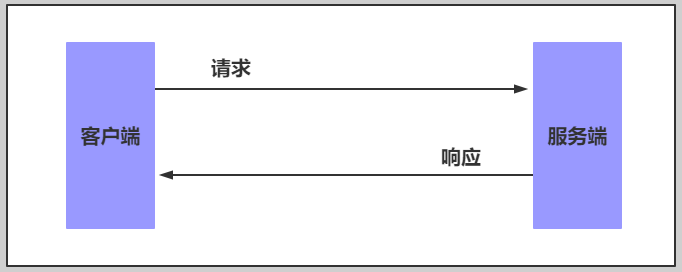
2.没有代理
在没有代理模式的情况下,客户端和Nginx服务端,都是客户端直接请求服务端,服务端直接响应客户端。
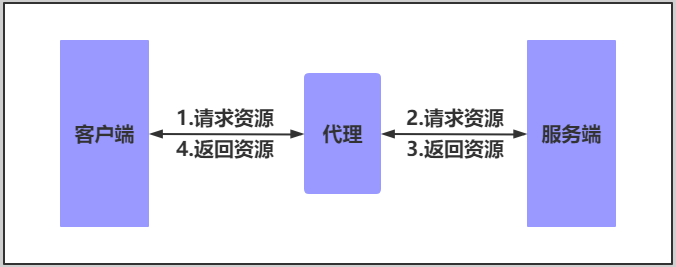
3.有代理
那么在互联网请求里面,客户端往往无法直接向服务端发起请求,那么就需要用到代理服务,来实现客户端和服务通信,如下图所示
4.代理常见模式
Nginx作为代理服务,按照应用场景模式进行总结,代理分为
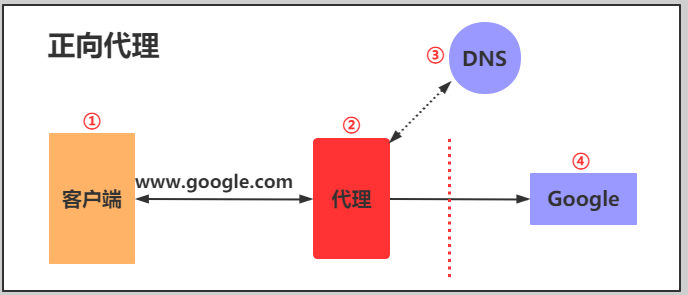
1.正向代理
2.反向代理
1)正向代理
正向代理,(内部上网)客户端<—>代理->服务端
2)反向代理
反向代理,用于公司集群架构中,客户端->代理<—>服务端
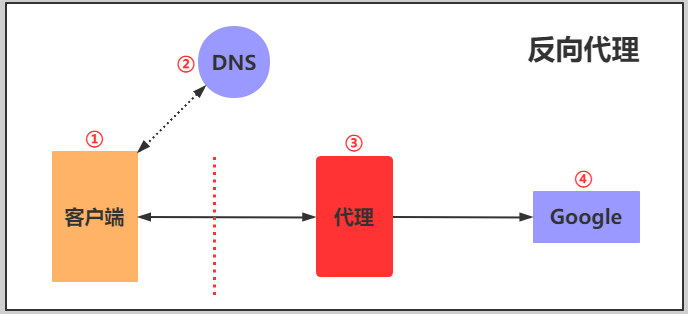
3)正向代理与反向代理区别
1.区别在于形式上服务的"对象"不一样
2.正向代理代理的对象是客户端,为客户端服务
3.反向代理代理的对象是服务端,为服务端服务
五、Nginx代理服务支持协议
1.支持的协议
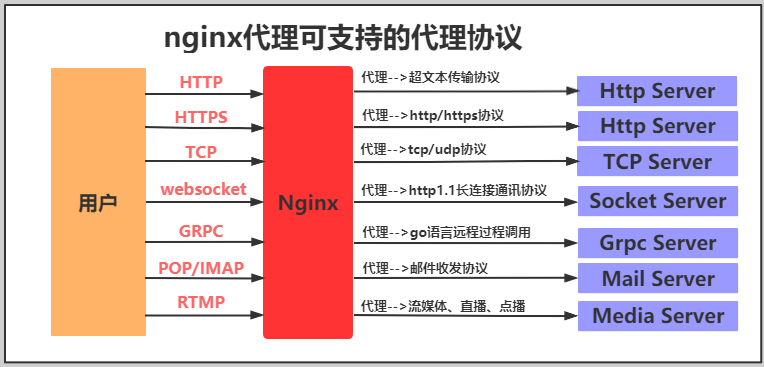
2.代理的模式
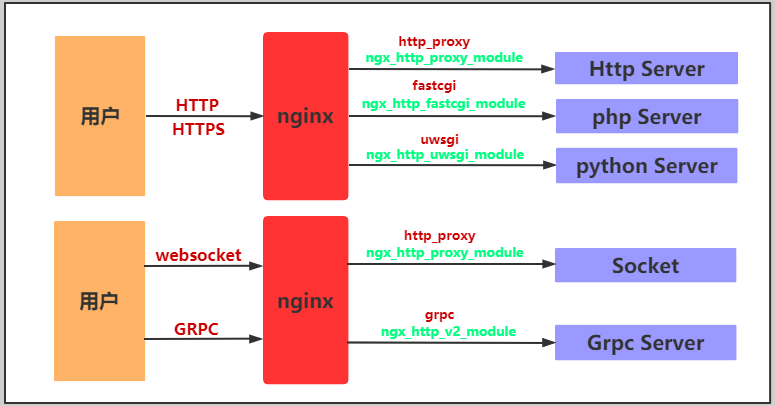
3.代理模块
反向代理模式与Nginx代理模块总结如表格所示
| 反向代理模式 |
Nginx配置模块 |
| http、websocket、https、tomcat(java程序) |
ngx_http_proxy_module |
| fastcgi(PHP程序) |
ngx_http_fastcgi_module |
| uwsgi(python程序) |
ngx_http_uwsgi_module |
| grpc(go程序)(golang) |
ngx_http_v2_module |
六、nginx代理配置
1.代理语法
Syntax:    proxy_pass URL;
Default:    —
Context:    location, if in location, limit_except
2.环境准备
| 主机 |
IP |
身份 |
| lb01 |
10.0.0.4,172.16.1.4 |
代理 |
| web01 |
172.16.1.7 |
服务端 |
3.配置web01页面
[root@web01 ~]# vim /etc/nginx/conf.d/linux.proxy.com.conf
server {
    listen 80;
    server_name linux.proxy.com;

    location / {
        root /code/proxy;
        index index.html;
    }
}

[root@web01 ~]# systemctl restart nginx
4.编写网站
[root@web01 ~]# mkdir /code/proxy
[root@web01 ~]# vim /code/proxy/index.html
web01 .............
5.访问测试
#配置本地hosts
网页访问linux.proxy.com
6.配置代理
#安装nginx
#配置nginx
#创建用户
#配置站点配置文件
[root@lb01 ~]# vim /etc/nginx/conf.d/daili.conf
server {
    listen 80;
    server_name linux.proxy.com;

    location / {
        proxy_pass http://172.16.1.7:80;
        #proxy_pass http://10.0.0.7:80;		#正常情况我们使用内网IP,抓包测试使用外网
    }
}
[root@lb01 ~]# systemctl start nginx
7.访问页面测试
#访问http://linux.proxy.com/返回结果不是我们要的内容
原因:
	代理请求后端时,没有使用域名,是使用IP访问的,匹配的配置文件是nginx中第一个配置文件
8.配置携带域名去代理
[root@lb01 ~]# vim /etc/nginx/conf.d/daili.conf
server {
    listen 80;
    server_name linux.proxy.com;

    location / {
        proxy_pass http://10.0.0.7:80;
        proxy_set_header Host $http_host;
    }
}
作业
1.恢复快照
2.搭建两台LNMP
3.数据库独立
4.文件共享
5.文件实时备份
6.代理一台机器
| 主机 |
IP |
服务 |
| web01 |
172.16.1.7 |
WordPress Nginx PHP |
| web02 |
172.16.1.8 |
WordPress Nginx PHP |
| db01 |
172.16.1.51 |
MariaDB |
| NFS |
172.16.1.31 |
NFS Rsync sersync |
| backup |
172.16.1.41 |
Rsync inotify |
| lb01 |
172.16.1.4 |
Nginx代理 |
1.搭建两台Nginx与PHP
1.Nginx

# 安装nginx
[root@web01 ~]# vim /etc/yum.repos.d/nginx.repo
[nginx-stable]
name=nginx stable repo
baseurl=http://nginx.org/packages/centos/7/$basearch/
gpgcheck=1
enabled=1
gpgkey=https://nginx.org/keys/nginx_signing.key
module_hotfixes=true

# 依赖安装
[root@web01 ~]# yum install -y gcc gcc-c++ autoconf pcre pcre-devel make automake wget httpd-tools vim tree
[root@web01 ~]# yum install -y nginx

# 配置Nginx
[root@web01 ~]# vim /etc/nginx/nginx.conf
user  www;
... ...
http {
	... ...
    client_max_body_size 200m;
    ... ...
}

# 创建用户
[root@web01 ~]# groupadd www -g 666
[root@web01 ~]# useradd www -u 666 -g 666 -s /sbin/nologin -M

# 启动Nginx
[root@web01 ~]# systemctl start nginx
[root@web01 ~]# systemctl enable nginx

# 查看是否启动
[root@web01 ~]# ps -ef | grep nginx

2.PHP

# 上传php安装包
[root@web01 ~]# mkdir /package
[root@web01 ~]# cd /package/
[root@web01 /package]# rz php.tar.gz

# 解压安装包
[root@web01 /package]# tar xf php.tar.gz

# 卸载旧版本PHP
[root@web01 /package]# yum remove -y php-mysql-5.4 php php-fpm php-common

# 安装新版本PHP
[root@web01 /package]# yum localinstall -y *.rpm

# 配置PHP
[root@web01 ~]# vim /etc/php-fpm.d/www.conf
user = www
group = www

# 修改上传文件大小
[root@web01 ~]# vim /etc/php.ini
post_max_size = 100M
upload_max_filesize = 100M

# 如果nginx和php不在一台机器,需要额外配置
[root@web01 ~]# vim /etc/php-fpm.d/www.conf
listen = 172.16.1.7:9000
listen.allowed_clients = 172.16.1.8

# 启动并加入开机自启
[root@web01 ~]# systemctl start php-fpm
[root@web01 ~]# systemctl enable php-fpm
2.数据库部署
# yum安装mariadb-server
[root@db01 ~]# yum install -y mariadb-server

# 启动并加入开机自启
[root@db01 ~]# systemctl start mariadb
[root@db01 ~]# systemctl enable mariadb

# 连接验证
[root@db01 ~]# mysql

# 设置登陆密码
[root@db01 ~]# mysqladmin -uroot password '123456'

# 使用密码登录
[root@db01 ~]# mysql -u root -p123456
MariaDB [(none)]> show databases;
MariaDB [(none)]> create database wordpress;
MariaDB [(none)]> create database zh;
MariaDB [(none)]> show databases;

# 授权
MariaDB [(none)]> grant all on *.* to root@'172.16.1.%' identified by '123456';
MariaDB [(none)]> grant all on wordpress.* to wp@'172.16.1.%' identified by '123456';
MariaDB [(none)]> grant all on zh.* to zh@'172.16.1.%' identified by '123456';

# 修改库权限
[root@web01 ~]# vim /code/wordpress/wp-config.php
/** WordPress数据库的名称 */
define( 'DB_NAME', 'wordpress' );

/** MySQL数据库用户名 */
define( 'DB_USER', 'wp' );

/** MySQL数据库密码 */
define( 'DB_PASSWORD', '123456' );

/** MySQL主机 */
define( 'DB_HOST', '172.16.1.51' );

[root@web01 ~]# vim /code/zh/system/config/database.php
  'host' => '172.16.1.51',
  'username' => 'zh',
  'password' => '123456',
  'dbname' => 'zh',

# 远程连接测试
[root@web01 ~]# mysql -uroot -p123456 -h172.16.1.51
[root@web02 ~]# mysql -uroot -p123456 -h172.16.1.51
3.搭建博客和知乎
1.安装配置WP和ZH
# 上传代码包
[root@web01 ~]# mkdir /code
[root@web01 ~]# cd /code/
[root@web01 /code]# rz
[root@web01 /code]# ll
-rw-r--r-- 1 root root 11098483 Mar 22 22:41 wordpress-5.0.3-zh_CN.tar.gz
-rw-r--r-- 1 root root  8451194 Aug 26 21:40 WeCenter_3-2-1.zip
[root@web01 /code]# tar xf wordpress-5.0.3-zh_CN.tar.gz
[root@web01 /code]# yum install -y unzip
[root@web01 /code]# unzip WeCenter_3-2-1.zip
[root@web01 /code]# mv WeCenter_3-2-1 zh

# 修改权限
[root@web01 /code]# chown -R www.www /code/

# wordpress的nginx配置
[root@web01 /code]# vim /etc/nginx/conf.d/linux.blog.com.conf
server {
    listen 80;
    server_name linux.blog.com;
    root /code/wordpress;

    location / {
        index index.php;
    }

    location ~* \.php$ {
        fastcgi_pass 127.0.0.1:9000;
        fastcgi_param SCRIPT_FILENAME $document_root$fastcgi_script_name;
        include fastcgi_params;
    }
}

# wecenter的nginx配置
[root@web01 /code]# vim /etc/nginx/conf.d/linux.zh.com.conf
server {
    listen 80;
    server_name linux.zh.com;
    root /code/zh;

    location / {
        index index.php;
    }

    location ~* \.php$ {
        fastcgi_pass 127.0.0.1:9000;
        fastcgi_param SCRIPT_FILENAME $document_root$fastcgi_script_name;
        include fastcgi_params;
    }
}

2.web02
# wordpress的nginx配置
[root@web01 /code]# vim /etc/nginx/conf.d/linux.blog.com.conf
server {
    listen 80;
    server_name xxs.blog.com;
    root /code/wordpress;

    location / {
        index index.php;
    }

    location ~* \.php$ {
        fastcgi_pass 127.0.0.1:9000;
        fastcgi_param SCRIPT_FILENAME $document_root$fastcgi_script_name;
        include fastcgi_params;
    }
}

# wecenter的nginx配置
[root@web01 /code]# vim /etc/nginx/conf.d/linux.zh.com.conf
server {
    listen 80;
    server_name xxs.zh.com;
    root /code/zh;

    location / {
        index index.php;
    }

    location ~* \.php$ {
        fastcgi_pass 127.0.0.1:9000;
        fastcgi_param SCRIPT_FILENAME $document_root$fastcgi_script_name;
        include fastcgi_params;
    }
}
# 启动服务web01
[root@web01 ~]# systemctl restart nginx
[root@web01 ~]# systemctl restart php-fpm.service

#  进行WordPress和wecenter注册

# 在web01打包传送给web02
[root@web01 /code]# tar czf ./wordpress.tar.gz ./wordpress/
[root@web01 /code]# tar czf ./zh.tar.gz ./zh/
[root@web01 /code]# scp -r /code/*   172.16.1.8:/code/
[root@web02 /code]# tar xf wordpress.tar.gz
[root@web02 /code]# tar xf zh.tar.gz

 # 启动服务web02
[root@web02 ~]# systemctl restart nginx
[root@web02 ~]# systemctl restart php-fpm.service
4.文件实现共享
# 安装NFS
[root@nfs ~]# yum install -y rpcbind nfs-utils

# 创建用户和目录并授权
[root@nfs ~]# mkdir -p /data/{wp,zh}
[root@nfs ~]# groupadd www -g 666
[root@nfs ~]# useradd www -u 666 -g 666
[root@nfs ~]# chown -R www.www /data/

# 配置NFS文件
[root@nfs ~]# vim /etc/exports
/data/wp 172.16.1.0/24(rw,sync,all_squash,anonuid=666,anongid=666)
/data/zh 172.16.1.0/24(rw,sync,all_squash,anonuid=666,anongid=666)

# 启动NFS和rpcbind
[root@nfs ~]# systemctl start rpcbind nfs
[root@nfs ~]# systemctl enable rpcbind nfs

# 检查配置是否正确
[root@nfs ~]# cat /var/lib/nfs/etab
/data/zh	172.16.1.0/24(rw,sync,wdelay,hide,nocrossmnt,secure,root_squash,all_squash,no_subtree_check,secure_locks,acl,no_pnfs,anonuid=666,anongid=666,sec=sys,rw,secure,root_squash,all_squash)
/data/wp	172.16.1.0/24(rw,sync,wdelay,hide,nocrossmnt,secure,root_squash,all_squash,no_subtree_check,secure_locks,acl,no_pnfs,anonuid=666,anongid=666,sec=sys,rw,secure,root_squash,all_squash)

# 客户端安装nfs和rpcbind
[root@web01 ~]# yum install -y rpcbind nfs-utils
[root@web02 ~]# yum install -y rpcbind nfs-utils

# 启动NFS和rpcbind
[root@web01 ~]# systemctl start rpcbind
[root@web02 ~]# systemctl start rpcbind

# 查看可挂载点
[root@web01 ~]# showmount -e 172.16.1.31
[root@web02 ~]# showmount -e 172.16.1.31
Export list for 172.16.1.31:
/data/zh  172.16.1.0/24
/data/wp  172.16.1.0/24

# 进行挂载
[root@web01 ~]# mount -t nfs 172.16.1.31:/data/wp /code/wordpress/wp-content/uploads
[root@web01 ~]# mount -t nfs 172.16.1.31:/data/zh /code/zh/uploads
[root@web02 ~]# mount -t nfs 172.16.1.31:/data/wp /code/wordpress/wp-content/uploads
[root@web02 ~]# mount -t nfs 172.16.1.31:/data/zh /code/zh/uploads
[root@web01 ~]# df -h
172.16.1.31:/data/wp   98G  1.9G   96G   2% /code/wordpress/wp-content/uploads
172.16.1.31:/data/zh   98G  1.9G   96G   2% /code/zh/uploads

# 设置上传文件大小
[root@web01 ~]# vim /etc/php.ini
post_max_size = 200M
upload_max_filesize = 200M
[root@web01 ~]# vim /etc/nginx/nginx.conf
user  www;
...
http {
	...
    client_max_body_size 200m;
    ...
}
5.文件实时备份
# 安装rsync和inotify
[root@backup ~]# yum install rsync inotify-tools -y

# 写配置文件
[root@backup ~]# vim /etc/rsyncd.conf
uid = www
gid = www
port = 873
fake super = yes
use chroot = no
max connections = 200
timeout = 600
ignore errors
read only = false
list = false
auth users = rsync_backup
secrets file = /etc/rsyncd.passwd
log file = /var/log/rsyncd.log
#################################
[data]
comment = welcome to backup!
path = /data

# 创建备份的目录和密码文件
[root@backup ~]# mkdir /data
[root@backup ~]# chown -R www.www /data/
[root@backup ~]# echo 'rsync_backup:123456' > /etc/rsyncd.passwd
[root@backup ~]# cat /etc/rsyncd.passwd
rsync_backup:123456
[root@backup ~]# chmod 600 /etc/rsyncd.passwd

# 启动rsyncd并检查
[root@backup ~]# systemctl start rsyncd
[root@backup ~]# netstat -lntup | grep rsync

# NFS 安装rsync inotify-tools sersync
# 安装rsync和inotify
[root@nfs ~]# yum install rsync inotify-tools -y

# sersync文件放入指定目录
[root@nfs ~]# wget https://raw.githubusercontent.com/wsgzao/sersync/master/sersync2.5.4_64bit_binary_stable_final.tar.gz
[root@nfs ~]# tar xf sersync2.5.4_64bit_binary_stable_final.tar.gz
[root@nfs ~]# mv GNU-Linux-x86 /usr/local/sersync

# 配置sersync配置文件
[root@nfs ~]# vim /usr/local/sersync/confxml.xml
<?xml version="1.0" encoding="ISO-8859-1"?>
<head version="2.5">
    <host hostip="localhost" port="8008"></host>
    <debug start="false"/>
    <fileSystem xfs="false"/>
    <filter start="false">
	<exclude expression="(.*)\.svn"></exclude>
	<exclude expression="(.*)\.gz"></exclude>
	<exclude expression="^info/*"></exclude>
	<exclude expression="^static/*"></exclude>
    </filter>
    <inotify>
	<delete start="true"/>
	<createFolder start="true"/>
	<createFile start="true"/>
	<closeWrite start="true"/>
	<moveFrom start="true"/>
	<moveTo start="true"/>
	<attrib start="true"/>
	<modify start="true"/>
    </inotify>

    <sersync>
	<localpath watch="/data">
	    <remote ip="172.16.1.41" name="data"/>
	    <!--<remote ip="192.168.8.39" name="tongbu"/>-->
	    <!--<remote ip="192.168.8.40" name="tongbu"/>-->
	</localpath>
	<rsync>
	    <commonParams params="-artuz"/>
	    <auth start="true" users="rsync_backup" passwordfile="/etc/rsync.password"/>
	    <userDefinedPort start="false" port="874"/><!-- port=874 -->
	    <timeout start="false" time="100"/><!-- timeout=100 -->
	    <ssh start="false"/>
	</rsync>
	<failLog path="/tmp/rsync_fail_log.sh" timeToExecute="60"/><!--default every 60mins execute once-->
	<crontab start="false" schedule="600"><!--600mins-->
	    <crontabfilter start="false">
		<exclude expression="*.php"></exclude>
		<exclude expression="info/*"></exclude>
	    </crontabfilter>
	</crontab>
	<plugin start="false" name="command"/>
    </sersync>

    <plugin name="command">
	<param prefix="/bin/sh" suffix="" ignoreError="true"/>	<!--prefix /opt/tongbu/mmm.sh suffix-->
	<filter start="false">
	    <include expression="(.*)\.php"/>
	    <include expression="(.*)\.sh"/>
	</filter>
    </plugin>

    <plugin name="socket">
	<localpath watch="/opt/tongbu">
	    <deshost ip="192.168.138.20" port="8009"/>
	</localpath>
    </plugin>
    <plugin name="refreshCDN">
	<localpath watch="/data0/htdocs/cms.xoyo.com/site/">
	    <cdninfo domainname="ccms.chinacache.com" port="80" username="xxxx" passwd="xxxx"/>
	    <sendurl base="http://pic.xoyo.com/cms"/>
	    <regexurl regex="false" match="cms.xoyo.com/site([/a-zA-Z0-9]*).xoyo.com/images"/>
	</localpath>
    </plugin>
</head>

# 创建密码文件
[root@nfs ~]# echo 123456 > /etc/rsync.password
[root@nfs ~]# chmod 600 /etc/rsync.password

# 查看启动参数
[root@nfs ~]# /usr/local/sersync/sersync2 -h
set the system param
execute:echo 50000000 > /proc/sys/fs/inotify/max_user_watches
execute:echo 327679 > /proc/sys/fs/inotify/max_queued_events
parse the command param
_______________________________________________________
参数-d:启用守护进程模式
参数-r:在监控前,将监控目录与远程主机用rsync命令推送一遍
c参数-n: 指定开启守护线程的数量,默认为10个
参数-o:指定配置文件,默认使用confxml.xml文件
参数-m:单独启用其他模块,使用 -m refreshCDN 开启刷新CDN模块
参数-m:单独启用其他模块,使用 -m socket 开启socket模块
参数-m:单独启用其他模块,使用 -m http 开启http模块
不加-m参数,则默认执行同步程序

# 指定配置文件(同步多个)
[root@nfs /web_upload]# /usr/local/sersync/sersync2 -dro /usr/local/sersync/confxml.xml
set the system param
execute:echo 50000000 > /proc/sys/fs/inotify/max_user_watches
execute:echo 327679 > /proc/sys/fs/inotify/max_queued_events
parse the command param
option: -d 	run as a daemon
option: -r 	rsync all the local files to the remote servers before the sersync work
option: -o 	config xml name:  /usr/local/sersync/confxml.xml
daemon thread num: 10
parse xml config file
host ip : localhost	host port: 8008
will ignore the inotify createFile event
daemon start,sersync run behind the console
use rsync password-file :
user is	gjs_backup
passwordfile is 	/etc/rsync.passwd
config xml parse success
please set /etc/rsyncd.conf max connections=0 Manually
sersync working thread 12  = 1(primary thread) + 1(fail retry thread) + 10(daemon sub threads)
Max threads numbers is: 22 = 12(Thread pool nums) + 10(Sub threads)
please according your cpu ,use -n param to adjust the cpu rate
------------------------------------------
rsync the directory recursivly to the remote servers once
working please wait...
execute command: cd /data && rsync -artuz -R --delete ./ rsync_backup@172.16.1.41::data --password-file=/etc/rsync.password >/dev/null 2>&1
run the sersync:
watch path is: /data

# 手动推送一遍
[root@nfs ~]# cd /data && rsync -artuz -R --delete ./ rsync_backup@172.16.1.41::data --password-file=/etc/rsync.password
6.配置代理
# 配置nginx官方源,安装nginx
# 安装nginx
[root@web01 ~]# vim /etc/yum.repos.d/nginx.repo
[nginx-stable]
name=nginx stable repo
baseurl=http://nginx.org/packages/centos/7/$basearch/
gpgcheck=1
enabled=1
gpgkey=https://nginx.org/keys/nginx_signing.key
module_hotfixes=true

# 依赖安装
[root@web01 ~]# yum install -y gcc gcc-c++ autoconf pcre pcre-devel make automake wget httpd-tools vim tree
[root@web01 ~]# yum install -y nginx

# 配置Nginx
[root@web01 ~]# vim /etc/nginx/nginx.conf
user  www;

# 创建用户
[root@web01 ~]# groupadd www -g 666
[root@web01 ~]# useradd www -u 666 -g 666 -s /sbin/nologin -M


# 配置携带域名去代理
[root@lb01 ~]# vim /etc/nginx/conf.d/daili.conf
server {
    listen 80;
    server_name xss.blog.com;

    location / {
        proxy_pass http://10.0.0.7:80;
        proxy_set_header Host $http_host;
    }
}

# 启动Nginx
[root@lb01 ~]# systemctl start nginx

# 查看是否启动
[root@web01 ~]# ps -ef | grep nginx
测试
# 本地hosts(C:\Windows\System32\drivers\etc\hosts)
10.0.0.7 linux.blog.com linux.zh.com
10.0.0.8 xxs.blog.com xxs.zh.com
10.0.0.4 xss.blog.com

# 浏览器查看
linux.blog.com
xxs.zh.com
xss.blog.com
