spring-3(静态代理和动态代理,AOP,事务)
静态代理:
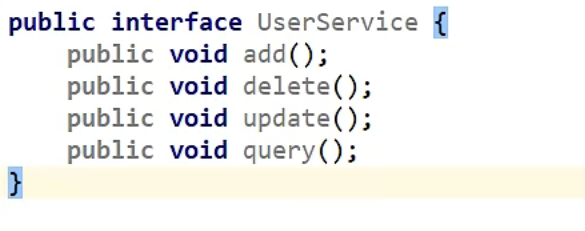
①创建接口
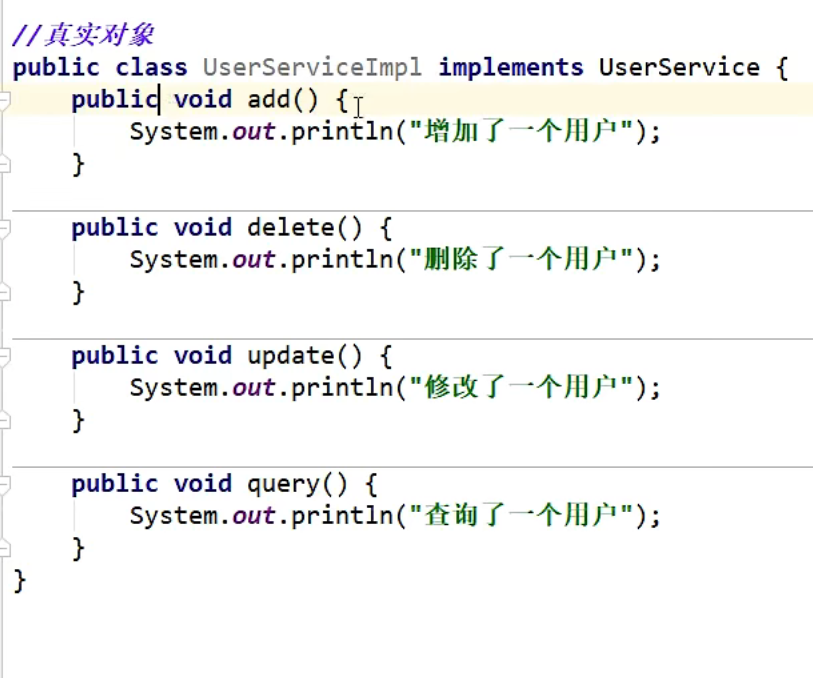
②创建真实对象
③创建代理对象

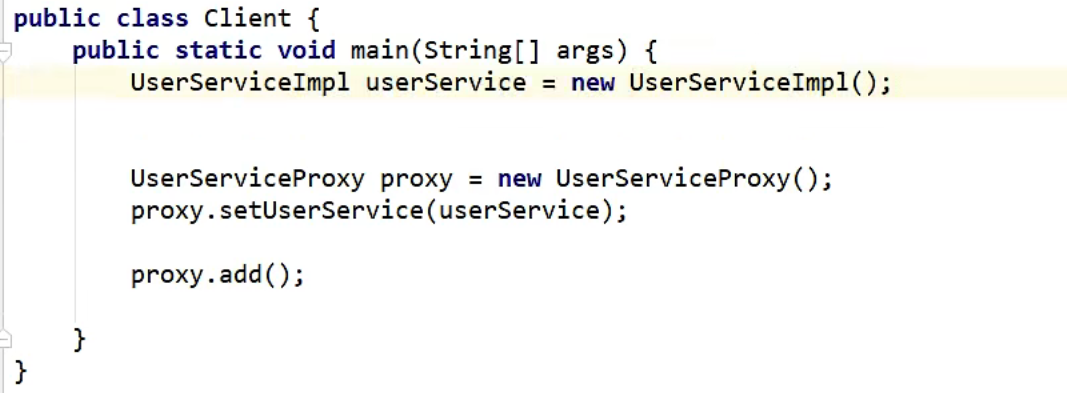
⑤测试
动态代理:
①创建接口一样
②创建真实对象一样
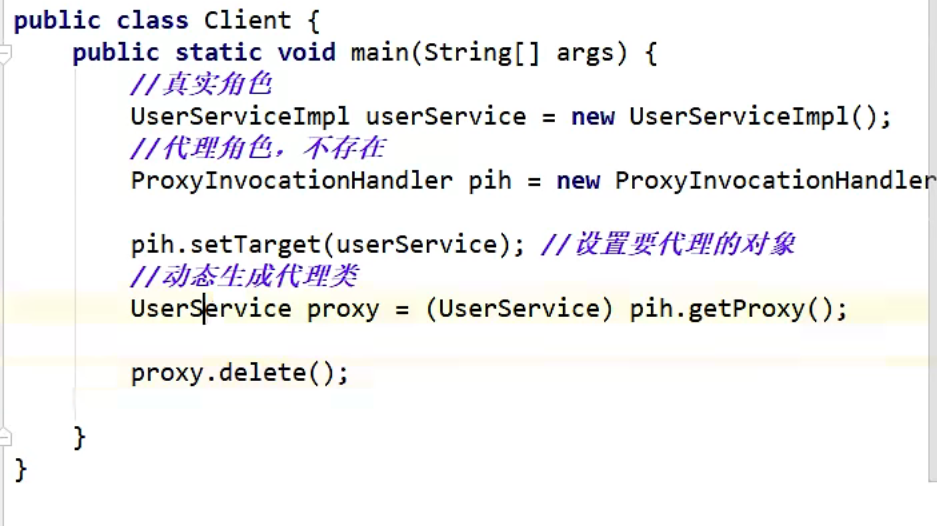
③创建代理类
package demo02;

import java.lang.reflect.InvocationHandler;
import java.lang.reflect.Method;
import java.lang.reflect.Proxy;

//用这个类自动生成代理类
public class ProxyInvocationHandler implements InvocationHandler {
    //被代理的接口
    private Object target;

    public void setRent(Rent rent) {
        this.target = rent;
    }

    //生成得到代理类
    public Object getProxy(){
        return Proxy.newProxyInstance(target.getClass().getClassLoader(),target.getClass().getInterfaces(),this);
    }
    @Override
    public Object invoke(Object proxy, Method method, Object[] args) throws Throwable {
        dobefore();
        Object result = method.invoke(target, args);
        doafter();
        return result;
    }
    public void dobefore(){
        System.out.println("前面做的内容");
    }
    public void doafter(){
        System.out.println("后面做的内容");
    }

}
④测试
测试时会发现每次执行一个方法时都会在执行前执行dobefore(),在执行后执行doafter();
动态代理的好处是:
看第三步他的属性的objcet,所以说可以代理多个类,如果是静态代理的话每次代理都需要创建一个代理类。
AOP:面向切面编程
方法一:使用原生SpringAPI接口
①导入依赖包
     <dependency>
            <groupId>org.aspectj</groupId>
            <artifactId>aspectjweaver</artifactId>
            <version>1.9.4</version>
        </dependency>
②编写接口和真实对象。
③编写相当于动态代理和静态代理执行一个方法前和执行一个方法后实现的方法。
执行前的实现MethodBeforeAdvice接口
package log;

import org.springframework.aop.MethodBeforeAdvice;

import java.lang.reflect.Method;

public class Log implements MethodBeforeAdvice {
    //method:要执行的目标对象的方法,args是参数,target目标对象
    @Override
    public void before(Method method, Object[] args, Object target) throws Throwable {
        System.out.println(target.getClass().getName()+"的"+method.getName());
    }
}
执行后的实现AfterAdvice接口,也可以实现AfterReturningAdvice用来记录返回值。
package log;

import org.springframework.aop.AfterReturningAdvice;

import java.lang.reflect.Method;

public class AfterLog implements AfterReturningAdvice  {

    @Override
    public void afterReturning(Object o, Method method, Object[] objects, Object o1) throws Throwable {
        System.out.println("执行了"+method.getName()+"返回结果为:"+o);
    }
}
④编写xml。
切入点 execution(* service.UserServiceImpl.*(..)这个的意思是
- * 返回任意类型
- service.UserServiceImpl.*包名以 service.UserServiceImpl.* 开头的类的任意方法
- (..) 参数是任意数量和类型
<?xml version="1.0" encoding="UTF-8"?>
<beans xmlns="http://www.springframework.org/schema/beans"
       xmlns:xsi="http://www.w3.org/2001/XMLSchema-instance"
       xmlns:aop="http://www.springframework.org/schema/aop"
       xsi:schemaLocation="http://www.springframework.org/schema/beans
       http://www.springframework.org/schema/beans/spring-beans.xsd
       http://www.springframework.org/schema/aop
       http://www.springframework.org/schema/aop/spring-aop.xsd">
<!--    注册Bean-->
    <bean id="userService" class="service.UserServiceImpl"/>
    <bean id="log" class="log.Log"/>
    <bean id="after" class="log.AfterLog"/>
<!--    配置AOP:导入AOP约束-->
    <aop:config>
<!--        切入点-->
        <aop:pointcut id="pointcut" expression="execution(* service.UserServiceImpl.*(..))"/>
<!--        执行环绕增加-->

        <aop:advisor advice-ref="after" pointcut-ref="pointcut"/>
        <aop:advisor advice-ref="log" pointcut-ref="pointcut"/>
    </aop:config>
</beans>
⑤测试
import org.springframework.context.ApplicationContext;
import org.springframework.context.support.ClassPathXmlApplicationContext;
import service.UserService;

public class MyTest {
    public static void main(String[] args) {
        ApplicationContext context = new ClassPathXmlApplicationContext("applicationContext.xml.");
        UserService userservice = (UserService) context.getBean("userService");
        userservice.delete();
    }
}
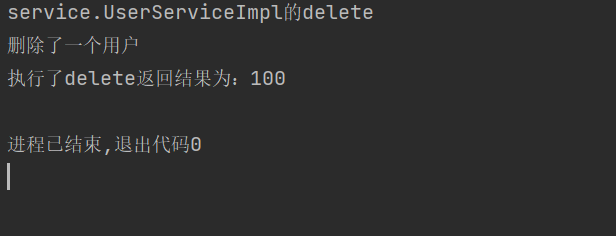
⑥结果
方法二:自定义类来实现AOP
①定义一个自定义类,定义接口和真实对象(UserService,UserServiceImpl)
package diy;

public class DiyPointCut {
    public void before(){
        System.out.println("方法执行前");
    }
    public void after(){
        System.out.println("方法执行后");
    }
}
②编写xml
<?xml version="1.0" encoding="UTF-8"?>
<beans xmlns="http://www.springframework.org/schema/beans"
       xmlns:xsi="http://www.w3.org/2001/XMLSchema-instance"
       xmlns:aop="http://www.springframework.org/schema/aop"
       xsi:schemaLocation="http://www.springframework.org/schema/beans
       http://www.springframework.org/schema/beans/spring-beans.xsd
       http://www.springframework.org/schema/aop
       http://www.springframework.org/schema/aop/spring-aop.xsd">
<!--    注册Bean-->
    <bean id="userService" class="service.UserServiceImpl"/>
<!--    自定义类-->
    <bean id="diy" class="diy.DiyPointCut"/>
    <aop:config>
<!--        自定义切面,ref要引用的类-->
        <aop:aspect ref="diy">
<!--            切入点-->
            <aop:pointcut id="point" expression="execution(* service.UserServiceImpl.*(..))"/>
            <aop:before method="before" pointcut-ref="point"/>
            <aop:after method="after" pointcut-ref="point"/>
        </aop:aspect>
    </aop:config>
</beans>
③测试,代码和上一个一样。
④测试结果

方法三:使用注解实现
①定义一个类用来写方法,定义接口类和真实对象
package diy;

import org.aspectj.lang.annotation.*;

//方式三,使用注解实现AOP

@Aspect
public class Annotation {
    @Pointcut("execution(* service.UserServiceImpl.*(..))")//指定切入点
    private void path(){}
    @Before("path()")
    public void before(){
        System.out.println("执行前");
    }
    @After("path()")
    public void after(){
        System.out.println("执行后");
    }
}
②编写xml
<?xml version="1.0" encoding="UTF-8"?>
<beans xmlns="http://www.springframework.org/schema/beans"
       xmlns:xsi="http://www.w3.org/2001/XMLSchema-instance"
       xmlns:aop="http://www.springframework.org/schema/aop"
       xsi:schemaLocation="http://www.springframework.org/schema/beans
       http://www.springframework.org/schema/beans/spring-beans.xsd
       http://www.springframework.org/schema/aop
       http://www.springframework.org/schema/aop/spring-aop.xsd">
<!--    注册Bean-->
    <bean id="userService" class="service.UserServiceImpl"/>
<!--    方式三-->
    <bean id="annotation" class="diy.Annotation"/>
<!--    开启注解支持-->
    <aop:aspectj-autoproxy/>
</beans>
③测试和之前的一样。
④结果也跟之前的一样
事务ACID原则:
①原子性。原子性是指事务是一个不可分割的工作单位,事务中的操作要么全部成功,要么全部失败
②一致性。事务必须使数据库从一个一致性状态变换到另外一个一致性状态。
③隔离性。隔离性是多个用户并发访问数据库时,数据库为每一个用户开启的事务,不能被其他事务的操作数据所干扰,多个并发事务之间要相互隔离。
④持久性。指一个事务一旦被提交,它对数据库中数据的改变就是永久性的,接下来即使数据库发生故障也不应该对其有任何影响。

 浙公网安备 33010602011771号