Spring注解
什么是注解?
注解(Annotation)提供了一种安全的类似注释的机制,为我们在代码中添加信息提供了一种形式化得方法,使我们可以在稍后某个时刻方便的使用这些数据(通过解析注解来使用这些数据),用来将任何的信息或者元数据(MetaData)与程序元素(类、方法、成员变量等)进行关联。
Annotation是一种接口(@interface),它继承了java.lang.annotition.Annotition接口
本次介绍的是以下4中注解
@Component 标识一个类是被Spring容器管理的Bean
@Value 给类的普通属性赋值
@Resource 给类的域属性赋值
@Autowired 给类的域属性赋值
@Resource和@Autowire的作用一样,不同点就是前者是JDK提供的注解,后者是Spring提供的注解,且要与@Qualifier一起使用
使用注解的案例
创建Car类和Student类
Student
package cn.happy.day04di;

import org.springframework.beans.factory.annotation.Autowired;
import org.springframework.beans.factory.annotation.Qualifier;
import org.springframework.beans.factory.annotation.Value;
import org.springframework.stereotype.Component;

import javax.annotation.Resource;

/**
 * Created by Administrator on 2018/3/6.
 */
@Component("stu")
public class Student {
    @Value("马云")
    private String name;

    /*@Resource(name="car")*/
    @Autowired
    @Qualifier(value = "car")   //这里的car要与Car类里的@Component("car")一致
    private Car car;

    public Car getCar() {
        return car;
    }

    public void setCar(Car car) {
        this.car = car;
    }

    @Override
    public String toString() {
        return "Student{" +
                "name='" + name + '\'' +
                ", car=" + car +
                '}';
    }

    public String getName() {
        return name;
    }

    public void setName(String name) {
        this.name = name;
    }
}
Car
package cn.happy.day04di;

import org.springframework.beans.factory.annotation.Value;
import org.springframework.stereotype.Component;

/**
 * Created by Administrator on 2018/3/6.
 */
@Component("car")
public class Car {
    @Value("red")
    private String color;

    public String getColor() {
        return color;
    }

    public void setColor(String color) {
        this.color = color;
    }
}
配置文件
<?xml version="1.0" encoding="UTF-8"?>
<beans xmlns="http://www.springframework.org/schema/beans"  xmlns:aop="http://www.springframework.org/schema/aop"
       xmlns:context="http://www.springframework.org/schema/context"
       xmlns:xsi="http://www.w3.org/2001/XMLSchema-instance"
       xsi:schemaLocation="http://www.springframework.org/schema/beans http://www.springframework.org/schema/beans/spring-beans.xsd
        http://www.springframework.org/schema/context http://www.springframework.org/schema/context/spring-context.xsd">

    <!--使用前需引入以上两条配置-->
    <context:component-scan base-package="cn.happy.day04di"><!--cn.happy.day04di代表扫描本身和子包,cn.happy.day04di.*只扫描子包-->
    </context:component-scan>


</beans>
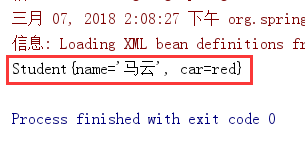
测试
 @Test
    public void Spring(){
        ApplicationContext ctx=new ClassPathXmlApplicationContext("applicationContext-day04di.xml");
        Student service=(Student)ctx.getBean("stu");
        System.out.println(service);
    }


 浙公网安备 33010602011771号