FastAdmin-T
FastAdmin
注意食用姿势,建议先通读官方文档一次,在看
根据环境及配置的不同,仅作参考
修改mysql表注释
ALTER TABLE student COMMENT '学生表';
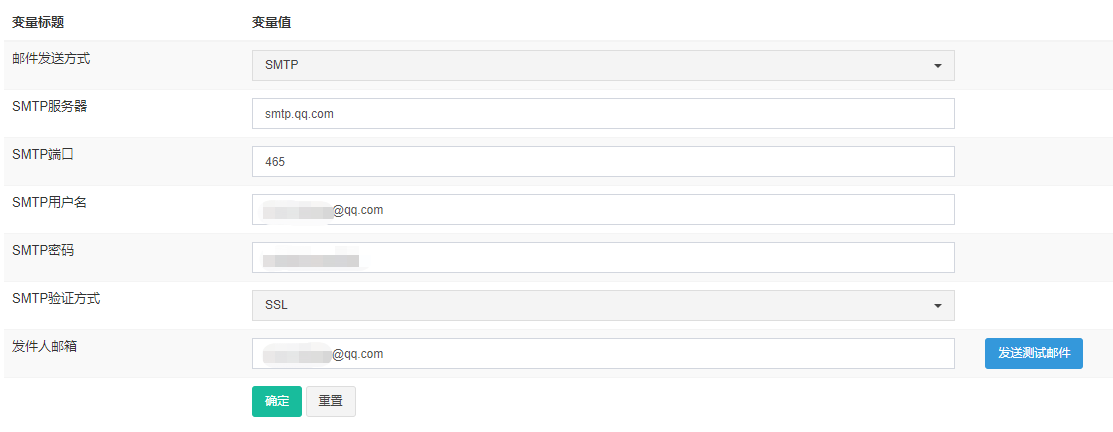
系统配置->邮件配置(测试发送成功)
注意在邮箱中开启
POP3/SMTP服务
IMAP/SMTP服务
需PHP5.6版本,7以上版本不支持
SMTP用户名 -> 邮箱地址
SMTP密码 -> 在邮箱账户设置中生成的授权码
发件人邮箱 -> 属于当前邮箱的账号都可作为发件人邮箱
fastadmin设置首页直接跳转后台登录
$this->redirect('admin/index/login');
去除首页安全提示(隐藏admin登录入口)
在application的config.php中修改 deny_module_list 添加 admin 如下:
'deny_module_list' => ['common','admin']
修改public中的admin.php文件名为 xxx.php(可以改为任意符合PHP命名规则的名称)
访问:www.yoursite.com/xxx.php 即可
如已配置前台自动跳转登录需将跳转方法改为:
$this->redirect('xxx.php/index/login');
{:xxx}
引用PHP函数
{:build_toolbar('refresh,add,delete')}
在application/common.php中,用于生成HTML页面
$this->assignconfig('demo', '传参到JS测试');
将数据透传到JS中,可直接在JS中使用
设置页面数据必填
在input标签中添加
data-rule="required"
requirejs
页面中的js统一由requorejs管理
视图、控制器、JS一一对应,
如:
application/admin/controller /user/index 控制器对应
application/admin/view /user/index 视图对应
public/assets/js/backend /user/index JS
var Orderdata = {
    column: {:json_encode(array_keys($paylist))},
    paydata: {:json_encode(array_values($paylist))},
    createdata: {:json_encode(array_values($createlist))},
};
将页面中的数据放入对象,可在JS中使用
admin/view/user/user/index.html
{:build_toolbar('refresh,edit,del')}
用于控制页面图标显示
data-operate-edit="{:$auth->check('user/user/edit')}"
控制表格操作显示
对应JS中
Table.api.init
初始化路由参数,删除后不可提交
extend-扩展类库
vendor-第三方类库
extra-扩展配置目录
框架只能加载首页时(域名后加上index.php也可以访问其他页面),在服务器添加伪静态,内容同下
去除PHP域名解析时的index.php
在文件入口处添加.htaccess文件
<IfModule mod_rewrite.c>
Options +FollowSymlinks -Multiviews
RewriteEngine On
RewriteCond %{REQUEST_FILENAME} !-d
RewriteCond %{REQUEST_FILENAME} !-f
RewriteRule ^(.*)$ index.php?/$1 [QSA,PT,L]
</IfModule>
FastAdmin
开关中提示“未更新任何行”在相应控制器中添加
protected $multiFields = 'status,switch';
或在基类中添加switch
/**
* Multi方法可批量修改的字段
*/
protected $multiFields = 'status,switch';
依然无用则在相应控制器中覆盖
/**
 * 批量操作
 * @param string $ids
 */
public function multi($ids = "")
{
    $params = $this->request->request('params');
    parse_str($params, $paramsArr);
    if (isset($paramsArr)) {
        $field = \app\admin\model\Test3::get($ids);
        $field->save($paramsArr);
        $this->success('操作成功');
    }
    return parent::multi($ids);
}
_id
两种方式,一种系统配置,一种自己添加
一、系统配置(不需要修改页面代码,只添加数据即可)
常规管理->系统配置->字典配置中添加分类类型
类型与数据库表名对应(不要前缀)(键相同会覆盖值)
在分类管理中添加分类
类型与字典配置中的值一致
此时去对应的视图中即可获取到数据
二、手动设置读取的字段
data-source="category/selectpage" 对应的控制器
data-params='{"custom[type]":"test"}' 指定需要关联的数据(如不需要去掉即可)
name="row[category_ids]" 当前表单提交的对应字段
_id使用
需确认相应input属性data-source所对应的控制器,默认获取name字段的,可用data-field设置需要读取的字段信息
data-field="id" data-source="test/index"
全句如下:
<input id="c-test_id" data-rule="required" data-source="test/index" class="form-control selectpage" name="row[test_id]" type="text" value="">
外键关联查询
->with(['cart'=>function($query){
                    $query->withField('');
                    $query->where();
                },
       ])
高级模式
public function index()
    {
        $this->relationSearch = true;
        $this->searchFields = "id";
        if ($this->request->isAjax()) {
            list($where, $sort, $order, $offset, $limit) = $this->buildparams();
            $total = $this->model
                ->with("cart")
                ->with(['cart'=>function($query){
                    $query->withField('');
                    $query->where();
                },
                ])
                ->where($where)
                ->order($sort, $order)
                ->count();
            $list = $this->model
                ->with("cart")
                ->where($where)
                ->order($sort, $order)
                ->limit($offset, $limit)
                ->select();
            $result = array("total" => $total, "rows" => $list);
            return json($result);
        }
        return $this->view->fetch();
    }
enum和set类型生成对应的字段注释
创建字段后填写相应值
在字段注释中添加相应值的选项,如下
单选下拉:1=单选1,2=单选2,3=单选3,4=单选4,5=单选5
后台/admin
前台/controller
/view
模板基类/default/common/layout
首页/default/index
右侧推荐/default/common/sidebar
表单/default/diyform
单页/default/page
专题/default/special
首页index </aside>标签之上 删除的右侧栏
{include file="common/sidebar" /}
fastadmin框架信息
{$site.name}
如果是数组类型调用如下:
<?php print_r($site); ?>
CMS配置信息
{$config.sitename}
如果是数组类型调用如下:
<?php print_r($config); ?>
页面信息控制:
public\assets\js\require-backend.min.js,后台运行时加载的JS
搜索this.options.formatExport(),可更改页面中导出的button
控制器——application\admin\controller\student\Student.php
模型层——application\admin\model\Srudent.php
视图层——application\admin\view\student\student
验证规则——application\admin\validate\Student.php
语言包——application\admin\lang\zh-cn\student\student.php
js文件——public\assets\js\backend\student\student.js
