
Docker安装Redis及Warning解决方法
虚拟机环境:VirtualBox
操作系统:CentOS 7
宿主机: Microsoft Windows 10 家庭中文版
Docker简介
Docker是一个轻量级容器技术。Docker直接运行在Linux上,而不是运行在虚拟机上,实现了虚拟机技术的资源格式,性能高于虚拟机技术。
1)工作流程:
Docker支持将软件编译成一个镜像,在这个镜像里做好软件的各种配置,然后发布这个镜像,使用者可以运行这个镜像,运行中的镜像被称为容器。
2)核心概念:
镜像(Image):Docker镜像用于创建镜像的模板,可以自己编译或者从从Docker Hub上pull拉取到机器上
容器(Container):独立运行运行的镜像,每个容器都有唯一的container-id
客户端(Client):客户端通过命令行或者其他工具使用Docker
主机(Host):执行Docker守护进程(后台一直运行)和容器的物理资源。
仓库(Registry):保存镜像的远程仓库,可以搜镜像,官方Docker Hub为https://hub.docker.com/。
配置镜像加速器
仓库可以申请阿里云Docker代理仓库加速,并且是免费的!
阿里云传送门:容器Hub服务控制台:https://cr.console.aliyun.com/
1. 安装/升级Docker客户端
推荐安装1.10.0以上版本的Docker客户端,参考文档: https://yq.aliyun.com/articles/110806

2. 配置镜像加速器
针对Docker客户端版本大于 1.10.0 的用户
您可以通过修改daemon配置文件/etc/docker/daemon.json来使用加速器
sudo mkdir -p /etc/docker
sudo tee /etc/docker/daemon.json <<-'EOF'
{
  "registry-mirrors": ["https://t5t8q6wn.mirror.aliyuncs.com"]
}
EOF
sudo systemctl daemon-reload
sudo systemctl restart docker
建议使用云服务器实验,不许要本第安装Windows和Linux双系统或使用虚拟机软件模拟,启动方便迅速,推介阿里云和腾讯云,学生有优惠。
配置网络
一般配置两个网卡:NAT,Host-Only
NAT连接到外网,Host-Only和主机通信。安装虚拟机时
管理>全局设定>网络,点击偏右上角位置的绿色十字按钮添加新NAT网络,进入端口转发,在IPv4下有和上一步一样的绿色十字按钮,点击添加新的端口转发规则主机IP本地,子系统IP看自己Linux网卡地址。
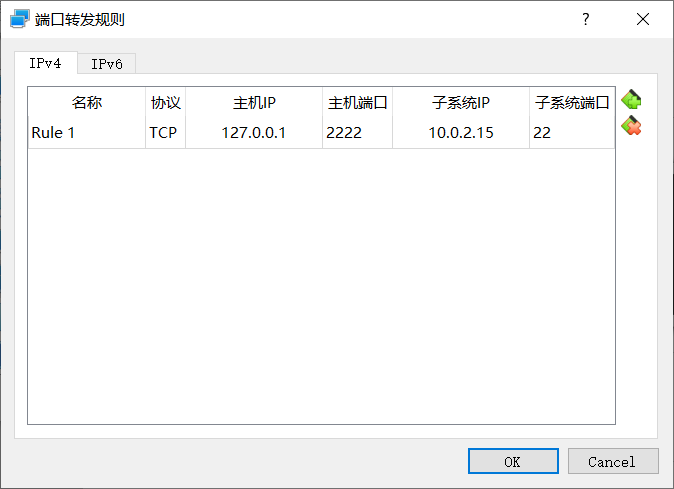
上面只是个示例。实际使用中redis一般这样定义规则。
| 名称 | 协议 | 主机IP | 主机端口 | 子系统IP | 子系统端口 |
|---|---|---|---|---|---|
| redis | TCP | 127.0.0.1 | 6979 | 10.0.2.15 | 6979 |
仅主机网卡配置静态IP。
ip addr 查看网卡配置

vim /etc/sysconfig/network-scripts/ifcfg-ensp08
TYPE=Ethernet
BOOTPROTO=static
NAME=enp0s8
DEVICE=enp0s8
ONBOOT=yes

IPADDR=192.168.56.101
NETMASK=255.255.255.0
:wq 保存退出

systemctl retart network 重启网络
也许你会看到NM_CONTROLLED这个参数,下面解释一下。
NM_CONTROLLED=yes表示NetworkManager daemon管理你的Network Interface,
NM_CONTROLLED=no表示用旧策略管理Network Interface,即用配置文件/etc/sysconfig/network-scripts/ifcfg-ethX管理。
建议yes或者不填写,不然配置不好机子的网络会出问题。
登出为什么用exit而不是logout?比如下面的情况。
[root@localhost ~]# logout
bash: logout: not login shell: use `exit'
首先要弄清楚什么是login shell和no-login shell。
login shell就是使用之前我们还需要输入帐号密码,比如我们使用tty1~tty6或使用ssh客户端远程登陆登入时。
no-login shell当然就是不用登入了,比如我们用图形化进入系统后直接点开终端程序或者在shell里直接输入bash命令。
login shell使用时要加载全局配置文件(/etc/profile等)和个人配置文件(~/.bash_profile, ~/.bashrc, ~/.bash_login等);no-longin shell只会读取~/.bashrc。
该提示就是说,你当前不是login shell,要用exit命令而不是logout来退出登录。
打包安装开发工具
yum update
yum install gcc
yum install gcc-c++
yum install make
yum install kernel-headers
yum install kernel-devel
(一定要先安装gcc和gcc-c++,再安装下面两个kernel,否则kernel无法完全编译)
或者
yum groupinstall "Development Tools"
通过yum group可安装的程序列表(包括依赖):
bison
byacc
cscope
ctags
cvs
diffstat
doxygen
flex
gcc
gcc-c++
gcc-gfortran
gettext
git
indent
intltool
libtool
patch
patchutils
rcs
redhat-rpm-config
rpm-build
subversion
swig
systemtap
安装Docker
CentOS安装命令:
[root@localhost~]yum update
[root@localhost~]yum install docker
验证安装成功,这里通过查看版本来看:
docker -v
Docker version 1.7.0 build 0baf609
Docker开机自启动
[root@localhost ~]# docker info
Cannot connect to the Docker daemon at unix:///var/run/docker.sock. Is the docker daemon running?
[root@localhost ~]# systemctl start docker
[root@localhost ~]# systemctl enable docker
Created symlink from /etc/systemd/system/multi-user.target.wants/docker.service to /usr/lib/systemd/system/docker.service.
Docker镜像本地位置
当前所有的镜像、容器默认都存储var/lib/docker,进去看一下
[root@localhost /]# cd var/lib/docker
[root@localhost docker]# ll
total 4
drwx------.  2 root root    6 May 31 16:02 containers
drwx------.  3 root root   22 May 31 14:43 image
drwxr-x---.  3 root root   19 May 31 14:43 network
drwx------. 13 root root 4096 May 31 18:35 overlay2
drwx------.  4 root root   32 May 31 14:43 plugins
drwx------.  2 root root    6 May 31 14:43 swarm
drwx------.  2 root root    6 May 31 18:35 tmp
drwx------.  2 root root    6 May 31 14:43 trust
drwx------.  3 root root   97 May 31 14:49 volumes
Docker服务
Cannot connect to the Docker daemon at unix:///var/run/docker.sock. Is the docker daemon running?
systemctl status docker - 检查docker服务状态
systemctl start docker - 启动docker服务
systemctl stop docker - 停止docker服务
启动redis出现的警告和解决方法
[root@localhost etc]# docker run -d -p 6378:6379 --name port-redis redis
25075e75cd5a387c4c807e2596a31b362efd7ee50ead5f45a18638ee96e66a66
[root@localhost etc]# docker logs port-redis
1:C 17 May 2019 06:36:35.043 # oO0OoO0OoO0Oo Redis is starting oO0OoO0OoO0Oo
1:C 17 May 2019 06:36:35.043 # Redis version=5.0.4, bits=64, commit=00000000, modified=0, pid=1, just started
1:C 17 May 2019 06:36:35.044 # Warning: no config file specified, using the default config. In order to specify a config file use redis-server /path/to/redis.conf
1:M 17 May 2019 06:36:35.046 * Running mode=standalone, port=6379.
1:M 17 May 2019 06:36:35.048 # WARNING: The TCP backlog setting of 511 cannot be enforced because /proc/sys/net/core/somaxconn is set to the lower value of 128.
1:M 17 May 2019 06:36:35.048 # Server initialized
1:M 17 May 2019 06:36:35.048 # WARNING overcommit_memory is set to 0! Background save may fail under low memory condition. To fix this issue add 'vm.overcommit_memory = 1' to /etc/sysctl.conf and then reboot or run the command 'sysctl vm.overcommit_memory=1' for this to take effect.
1:M 17 May 2019 06:36:35.048 # WARNING you have Transparent Huge Pages (THP) support enabled in your kernel. This will create latency and memory usage issues with Redis. To fix this issue run the command 'echo never > /sys/kernel/mm/transparent_hugepage/enabled' as root, and add it to your /etc/rc.local in order to retain the setting after a reboot. Redis must be restarted after THP is disabled.
1:M 17 May 2019 06:36:35.048 * Ready to accept connections
解决顺序上,建议将警告1放到最后解决。
- 警告1:
Warning: no config file specified, using the default config. In order to specify a config file use redis-server /path/to/redis.conf
意思:未指定配置文件,使用缺省配置。使用redis /path/to/redis.conf(你的配置文件路径)指定配置文件。
解决方法:
在指定目录下创建配置文件redis.conf,内容自己填,这里偷懒下载了个现成的。
redis目录下包含redis.conf,直接用这个或者将她复制到/etc/redis/下。
使用-v <你的外部配置文件路径:目标路径>挂载外部配置文件,目标路径也就是后面用到的/etc/redis/redis.conf。
具体操作:
[root@localhost ~]#mkdir -p docker/redis/conf
[root@localhost ~]#wget http://download.redis.io/redis-stable/redis.conf
[root@localhost ~]#docker run -d --privileged=true -p 6379:6379 -v /docker/redis/redis.conf:/etc/redis/redis.conf -v /docker/redis/data:/data --name testredis redis redis-server /etc/redis/redis.conf --appendonly yes
注意:
redis.conf可以自己创建或者下载对应版本。
在redis.conf内:
1)注释掉bind 127.0.0.1,行首添加#即为注释,
2)daemonize默认no,否则无法编译。
配置解释:
| 配置 | 作用 |
|---|---|
| --privileged=true | 让容器内的root有真正的root权限,否则容器内的root只有外部普通用户权限 |
| -p 6379:6379 | 把容器内的6379端口映射到宿主机6379端口 |
| -v /root/redis/redis.conf:/etc/redis/redis.conf | 把宿主机配置好的redis.conf放到容器内的这个位置中 |
| -v /root/redis/data:/data | 把redis持久化的数据在宿主机内显示,做数据备份 |
| redis-server /etc/redis/redis.conf | 让redis按redis.conf的配置启动,而不是五配置启动 |
| –appendonly yes | redis启动后开启持久化 |
- 警告2:
WARNING: The TCP backlog setting of 511 cannot be enforced because /proc/sys/net/core/somaxconn is set to the lower value of 128.
意思:TCP backlog区大不能设置为511,因为/proc/sys/net/core/somaxconn要求设为小于128的值
# echo "net.core.somaxconn=551" > /etc/sysctl.conf
# sysctl net.core.somaxconn=551
- 警告3:
WARNING overcommit_memory is set to 0! Background save may fail under low memory condition. To fix this issue add 'vm.overcommit_memory = 1' to /etc/sysctl.conf and then reboot or run the command 'sysctl vm.overcommit_memory=1' for this to take effect.
意思: overcommit_memory的值设置为0! 在低内存条件下,后台保存可能会失败。 要解决此问题,请将“vm.overcommit_memory = 1”添加到/etc/sysctl.conf,然后重新启动或运行命令“sysctl vm.overcommit_memory = 1”以使其生效。
# echo 1 > /proc/sys/vm/overcommit_memory
# echo "vm.overcommit_memory=1" >> /etc/sysctl.conf
# sysctl vm.overcommit_memory=1
- 警告4:
WARNING you have Transparent Huge Pages (THP) support enabled in your kernel. This will create latency and memory usage issues with Redis. To fix this issue run the command 'echo never > /sys/kernel/mm/transparent_hugepage/enabled' as root, and add it to your /etc/rc.local in order to retain the setting after a reboot. Redis must be restarted after THP is disabled.
意思:您在内核中启用了透明大页面(THP)支持。 这将导致Redis的延迟和内存使用问题。 要解决此问题,请以root身份运行命令'echo never > /sys/kernel/mm/transparent_hugepage/enabled',并将其添加到/etc/rc.local中,以便在重新启动后保留设置。 禁用THP后必须重新启动Redis。
[root@centos224]# echo never > /sys/kernel/mm/transparent_hugepage/enabled   [root@centos224]# vi /etc/rc.local
if test -f /sys/kernel/mm/transparent_hugepage/enabled; then
   echo never > /sys/kernel/mm/transparent_hugepage/enabled
fi
参考文章
docker后续安装(如有权限问题)
What is the function of NM_CONTROLLED
Docker下安装Redis镜像&&使用自己的redis.conf文件&&远程连接Redis
【Docker】:使用docker安装redis,挂载外部配置和数据
Linux 关于Transparent Hugepages的介绍
Installing the CentOS Development Tools (gcc, flex, etc)
https://stackoverflow.com/questions/43401645/cannot-connect-to-the-docker-daemon-at-unix-var-run-docker-sock-is-the-docke
附录
Redis(Remote Dictionary Server)各版本配置文件redis.conf文件下载
stable版本: http://download.redis.io/redis-stable/redis.conf
有4项需要注意
daemonize no # 不用守护线程的方式启动,若为yes则容器无法启动
# bind 192.168.1.1 # 注释掉这部分,这是限制redis只能本地访问
appendonly yes # 开启redis持久化
让docker非127.0.0.1的配置
requirepass yourpassword # 可选1,redis连接密码
protected-mode no # 可选2,关闭保护模式
posted on 2019-05-17 18:02 jinzhaoshi 阅读(8304) 评论(0) 编辑 收藏 举报

