
Spring注解开发01--------组件注册
注入组件的几种方式
在Spring中,有如下四种方式像容器中注入组件:
- 包扫描 + 组件标注注解(@Controller,@Service, @Repository, @Component)
- @Bean注解实现
- @Import注解实现
- 使用Spring提供的FactoryBean
下面我们来详细聊聊以上四种方式。
前期准备
1.引入Spring相关依赖
<dependencies>
    <!-- Spring5.0之后,Spring相关依赖都包含在spring-webmv这个以来之中-->
    <dependency>
        <groupId>org.springframework</groupId>
        <artifactId>spring-webmvc</artifactId>
        <version>5.3.5</version>
    </dependency>

    <!-- junit测试 -->
    <dependency>
        <groupId>junit</groupId>
        <artifactId>junit</artifactId>
        <version>4.13.2</version>
        <scope>test</scope>
    </dependency>
</dependencies>
- 我们使用的Spring版本为5.3.5,Spring5.0之后,Spring的一些核心依赖都包含在Spring-mvc当中,所以在导入依赖的时候,我们只需要导入spring-webmvc这一个即可!
- junit我们用来作为单元测试
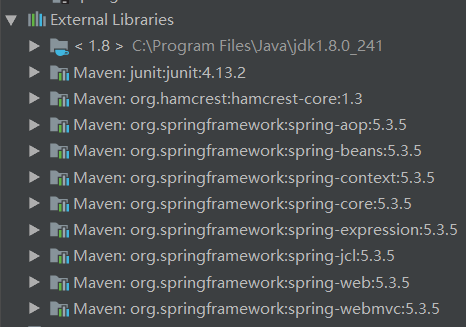
查看项目依赖,发现我们需要的jar包已经全部导入!
2.项目结构设计
3.编写Spring配置类,并使用@Configuration将配置文件注入到ioc容器中
package com.xdw.config;
import org.springframework.context.annotation.Configuration;
@Configuration
public class MainConfigOfComponent {
}
4.编写测试类,查看配置文件是否注册成功
import com.xdw.config.MainConfigOfComponent;
import org.junit.Test;
import org.springframework.context.ApplicationContext;
import org.springframework.context.annotation.AnnotationConfigApplicationContext;

public class TestBeanComponent {

    @Test
    public void test01() {
        AnnotationConfigApplicationContext applicationContext = new AnnotationConfigApplicationContext(MainConfigOfComponent.class);
        printAllBeanNames(applicationContext);
    }


    public void printAllBeanNames(ApplicationContext applicationContext) {
        String[] names = applicationContext.getBeanDefinitionNames();
        for (String name : names) {
            System.out.println(name);
        }
    }

}
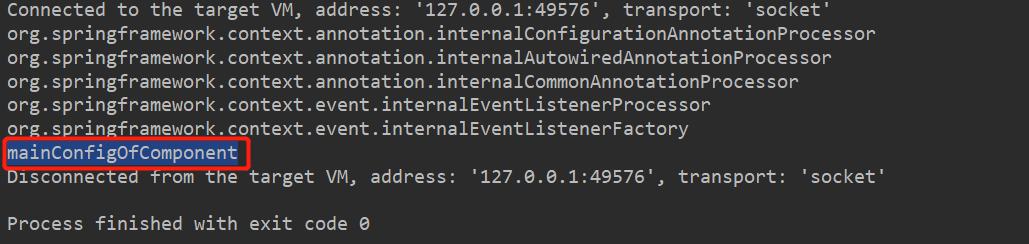
- 这里因为我们使用的是配置类的方法,所以获取ioc容器使用的是
AnnotationConfigApplicationContext,而不是之前xml文件配置时使用的ClassPathXmlApplicationContext applicationContext.getBeanDefinitionNames();方法用来获取所有在容器中的bean的id@Configuration本质也是一个@Component注解,生成的bean的id默认时类名(首字母小写)
测试,发现我们编写的配置类id已经成功注册到ioc容器中
方式一: 包扫描 + 组件标注注解
测试
1.新建测试类(Controller, Service, Dao),分别使用注解@Controller,@Service, @Repository修饰
BookController:
package com.xdw.controller;

import org.springframework.stereotype.Controller;

@Controller
public class BookController {
}
BookService:
package com.xdw.service;

import org.springframework.stereotype.Service;

@Service
public class BookService {
}
BookDao:
package com.xdw.dao;

import org.springframework.stereotype.Repository;

@Repository
public class BookDao {
}
2.在配置类上使用注解 @ComponentScan,指定需要自动扫描的包
@ComponentScan(value={"com.xdw"})
@Configuration
public class MainConfigOfComponent {

}
3.编写测试方法,运行,查看结果!
public class TestBeanComponent {

    @Test
    public void test01() {

        AnnotationConfigApplicationContext applicationContext = new AnnotationConfigApplicationContext(MainConfigOfComponent.class);
        printAllBeanNames(applicationContext);
    }

    public void printAllBeanNames(ApplicationContext applicationContext) {
        String[] names = applicationContext.getBeanDefinitionNames();
        for (String name : names) {
            System.out.println(name);
        }
    }
}
运行测试方法,结果如下:
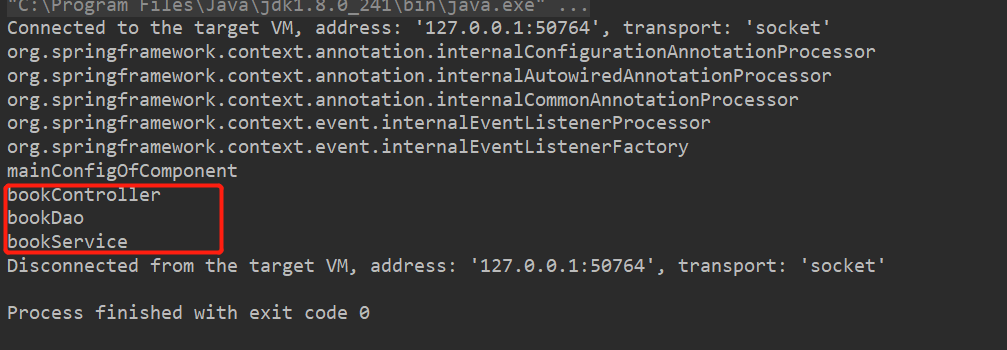
可以发现,我们刚刚新建的几个类已经成功注入到ioc容器中了!
@ComponentScan 注解属性说明
在上面的测试中,我们通过使用@ComponentScan自动包扫描注解 + 组件标注注解(@Controller,@Service, @Repository, @Component)完成了我们的组件注册!
@ComponentScan 注解提供了很多属性,供我们灵活的注册组件至容器中。
-
value属性: 用来指定要扫描的包。上面的例子中我们设置为"com.xdw",表示扫描com.xdw包下的所有类及子包下的所有类
-
excludeFilters属性:扫描的时候按照指定规则排除某些组件
-
includeFilters = Filter[]; 指定扫描的时候只需要包含哪些组件,使用的时候一定要useDefaultFilters设为false
-
我们也可以使用@ComponentScans注解来配置多个@ComponentScan
-
excludeFilters与includeFilters属性都需要配合@Filter注解使用,@Filter为我们提供了以下几种方式进行组件的过滤或者选择:
FilterType.ANNOTATION: 按照注解(常用)
FilterType.ASSIGNABLE_TYPE:表示按照指定类型(也比较常用)
FilterType.ASPECTJ: 使用ASPECTJ表达式,不常用
FilterType.REGEX: 使用正则表达式
FilterType.CUSTOM: 自定义规则
几种过率选择方式实例
因为excludeFilters与includeFilters属性使用起来基本一样,我们这里就是用excludeFilters属性进行测试。
我们选择比较常用的以下三种进行测试:
1.FilterType.ANNOTATION: 按照注解
在配置类MainConfigOfComponent添加如下注解:
@ComponentScan(value={"com.xdw"},
        includeFilters = {@Filter(type= FilterType.ANNOTATION, value= Controller.class)},
        useDefaultFilters = false)
@Configuration
public class MainConfigOfComponent {
}
注意:使用includeFilters 属性时,一定要设置useDefaultFilters = false,否则includeFilters 不会生效!
测试运行:

发现只有bookController注入容器成功!
2.FilterType.ASSIGNABLE_TYPE 按照指定类型
修改配置类如下:
@ComponentScan(value={"com.xdw"},
        includeFilters = {@Filter(type= FilterType.ASSIGNABLE_TYPE, value= BookService.class)},
        useDefaultFilters = false)
@Configuration
public class MainConfigOfComponent {

}
测试运行:

发现当前只有bookService成功注册到容器中
3.FilterType.CUSTOM自定义类型
点开FilterType枚举类,我们发现
/** Filter candidates using a given custom
* {@link org.springframework.core.type.filter.TypeFilter} implementation.
*/
CUSTOM
要使用自定义类型,我们需要编写一个类来实现TypeFilter接口。
编写MyTypeFilter类,实现TypeFilter接口:
package com.xdw.filter;

import org.springframework.core.io.Resource;
import org.springframework.core.type.AnnotationMetadata;
import org.springframework.core.type.ClassMetadata;
import org.springframework.core.type.classreading.MetadataReader;
import org.springframework.core.type.classreading.MetadataReaderFactory;
import org.springframework.core.type.filter.TypeFilter;

import java.io.IOException;

public class MyTypeFilter implements TypeFilter {

    /**
     *
     * @param metadataReader    当前扫描到的类信息
     * @param metadataReaderFactory 可以读取到其他任何类的信息
     *
     */
    @Override
    public boolean match(MetadataReader metadataReader, MetadataReaderFactory metadataReaderFactory) throws IOException {

        // 获取当前类的所有注解信息
        AnnotationMetadata annotationMetadata = metadataReader.getAnnotationMetadata();

        // 获取当前扫描类的信息
        ClassMetadata classMetadata = metadataReader.getClassMetadata();

        // 获取当前类路径信息
        Resource resource = metadataReader.getResource();

        // 这里我们使用名称,如果包含Dao就注入到ioc容器中
        if(classMetadata.getClassName().contains("Dao")) {
            return true;
        }
        return false;
    }
}
修改配置类,设置includeFilters,Filter的type设置为CUSTOM,value设置为我们刚刚编写的MyTypeFilter.class
@ComponentScan(value={"com.xdw"},
        includeFilters = {@Filter(type= FilterType.CUSTOM, value= MyTypeFilter.class)},
        useDefaultFilters = false)
@Configuration
public class MainConfigOfComponent {
}
测试:
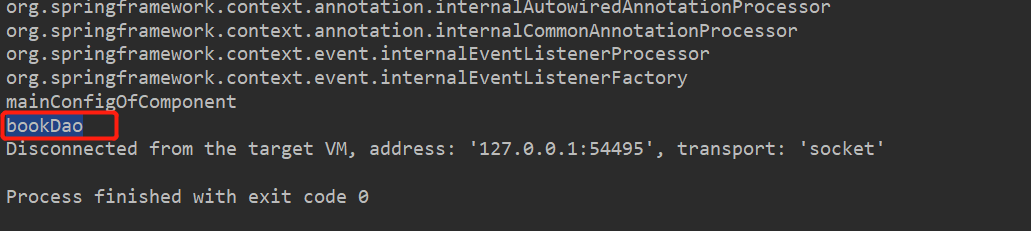
我们发现只有bookDao成功注册到容器中!
总结
1. @ComponentScan 要与 @Controller,@Service, @Repository, @Component等注解配合使用
2. @ComponentScan的includeFilters与excludeFilters属性使用时,需要结合Filter[]使用
3. 使用@ComponentScan的includeFilters属性时,一定要同时设置useDefaultFilters = false否则不会生效
方式二:@Bean注入组件
测试
1.创建Person类
package com.xdw.pojo;


public class Person {

    private Integer age;

    private String name;

    public Person() {
    }

    public Person(Integer age, String name) {
        this.age = age;
        this.name = name;
    }

    public Integer getAge() {
        return age;
    }

    public void setAge(Integer age) {
        this.age = age;
    }

    public String getName() {
        return name;
    }


    public void setName(String name) {
        this.name = name;
    }

    @Override
    public String toString() {
        return "Person{" +
                "age=" + age +
                ", name='" + name + '\'' +
                '}';
    }
}
2.编写测试类
package com.xdw.config;


import com.xdw.pojo.Person;
import org.springframework.context.annotation.Bean;
import org.springframework.context.annotation.ComponentScan;
import org.springframework.context.annotation.Configuration;


@ComponentScan(value={"com.xdw"})
@Configuration
public class MainConfigOfComponent {


    @Bean
    public Person person() {
        return new Person(10, "法外狂徒:张三");
    }

}
3.编写测试类,运行测试
import com.xdw.config.MainConfigOfComponent;
import com.xdw.pojo.Person;
import org.junit.Test;
import org.springframework.context.ApplicationContext;
import org.springframework.context.annotation.AnnotationConfigApplicationContext;

public class TestBeanComponent {

    @Test
    public void test01() {

        AnnotationConfigApplicationContext applicationContext = new AnnotationConfigApplicationContext(MainConfigOfComponent.class);
        printAllBeanNames(applicationContext);

        Person person = (Person) applicationContext.getBean("person");
        System.out.println(person);
    }


    public void printAllBeanNames(ApplicationContext applicationContext) {
        String[] names = applicationContext.getBeanDefinitionNames();
        for (String name : names) {
            System.out.println(name);
        }
    }
}
测试,结果如下:

发现我们刚创建的类已经成功注入到ioc容器中了。
@Bean注解说明
1.类型就是返回值,id默认就是方法名
2.修改id有两种方式: a.修改方法名 b.为@Bean设置name或者value属性
@Bean(value="person01")
public Person person() {
    return new Person(10, "法外狂徒:张三");
}
Bean的作用域@Scope
bean实例有如下四种作用域:
- singleton: 单实例的,ioc启动时就会创建对象放入容器中,以后每次获取就直接从容器中获取(map.get()),常用
- prototype: 多实例的,ioc容器启动时不会创建对象注入ioc容器中,以后每次获取都会调用方法创建
- request: 同一次请求创建一个实例
- session: 同一个Session创建一个实例
在不指定作用域的情况下,默认式单例模式。
单例模式测试
配置类方法:
// 不指定作用域默认是单例模式
@Bean
public Person person() {
    System.out.println("person对象开始创建");
    return new Person(10, "法外狂徒:张三");
}
编写测试方法:
@Test
public void test02() {
AnnotationConfigApplicationContext applicationContext = new AnnotationConfigApplicationContext(MainConfigOfComponent.class);
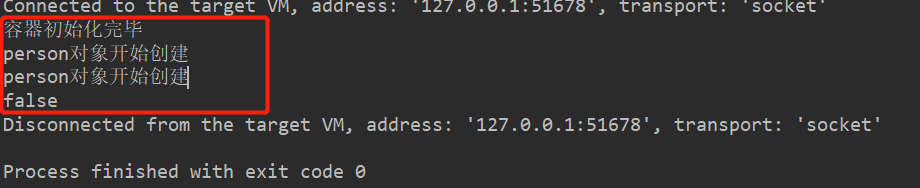
System.out.println("容器初始化完毕");
}
运行测试,结果如下:
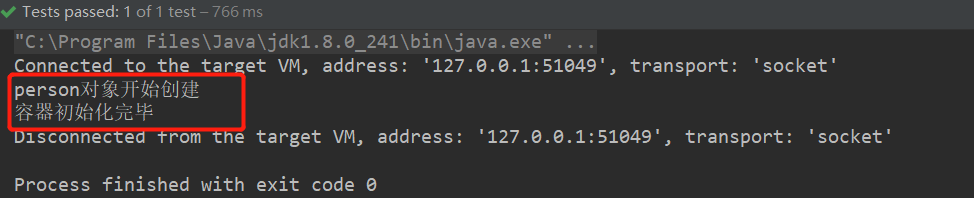
我们发现,单例模式下,默认容器初始化的时候,对象就已经被加载进ioc容器中了。
修改测试方法如下:
@Test
public void test02() {
    AnnotationConfigApplicationContext applicationContext = new AnnotationConfigApplicationContext(MainConfigOfComponent.class);
    System.out.println("容器初始化完毕");
    Person person01 = (Person)applicationContext.getBean("person");
    Person person02 = (Person) applicationContext.getBean("person");
    System.out.println(person01 == person02);
}
测试,结果如下:
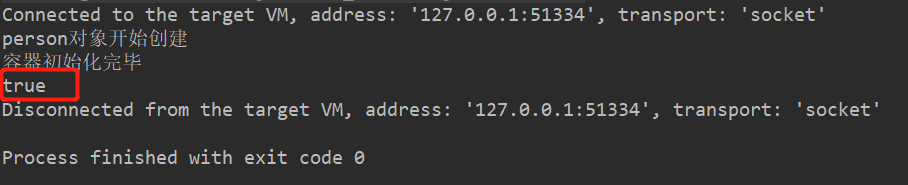
我们发现我们从容器中取了两次person取出的两个对象为同一个!
我们在创建bean的方法上添加@Lazy注解,代码如下:
@Lazy   // 表示我们在第一次获取bean时,容器才会注入bean至容器中
@Bean
public Person person() {
    System.out.println("person对象开始创建");
    return new Person(10, "法外狂徒:张三");
}
运行,测试结果如下:
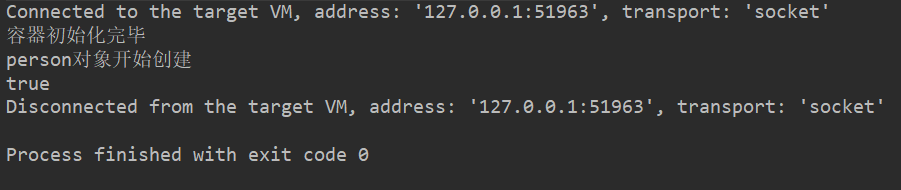
容器启动的时候,没有创建对象放入容器中,在我们第一次调用时,对象才被创建并放入容器中。
总结:
1. @Bean注入到容器中的bean,不指定作用域,默认是单例模式
2. 单例模式默认是容器启动时就创建对象放入容器中,我们可以使用@Lazy懒加载注解,让我们在第一次使用时,才创建对象并初始化。
3. 单例模式下,容器中只存在一个bean,无论取出多少次,取出的对象都为同一个。
多实例模式测试
为创建bean的方法添加如下注解:
@Scope("prototype")
@Bean
public Person person() {
    System.out.println("person对象开始创建");
    return new Person(10, "法外狂徒:张三");
}
测试代如下:
@Test
public void test02() {
    AnnotationConfigApplicationContext applicationContext = new AnnotationConfigApplicationContext(MainConfigOfComponent.class);
    System.out.println("容器初始化完毕");
    Person person01 = (Person)applicationContext.getBean("person");
    Person person02 = (Person) applicationContext.getBean("person");
    System.out.println(person01 == person02);
}
运行, 测试结果如下:
总结:
1. 多实例模式,容器在初始化的时候,不会创建实例
2. 每次去取bean的时候,容器都会新建一个bean
request与session两种模式我们基本用不上,在这里不做过多的说明。
@Conditional注解
我们可以使用 @Conditional注解,按照一定条件进行判断,满足条件给容器注入bean。
我们查看@Conditional 源码
@Target({ElementType.TYPE, ElementType.METHOD})
@Retention(RetentionPolicy.RUNTIME)
@Documented
public @interface Conditional {

	/**
	 * All {@link Condition} classes that must {@linkplain Condition#matches match}
	 * in order for the component to be registered.
	 */
	Class<? extends Condition>[] value();

}
发现该注解存在value属性,该属性值必须必须继承Condition接口。
测试
要求:我们新建一类SystemData,在配置类中编写两个创建bean的方法,id分别为windows,linux;根据系统类型,如果时windows系统,就创建id分别为windows的实例,如果是linux,就创建id为linux的实例。
1.编写两个自定义的condition类,实现condition接口:
package com.xdw.condition;

import org.springframework.beans.factory.config.ConfigurableListableBeanFactory;
import org.springframework.beans.factory.support.BeanDefinitionRegistry;
import org.springframework.context.annotation.Condition;
import org.springframework.context.annotation.ConditionContext;
import org.springframework.core.env.Environment;
import org.springframework.core.type.AnnotatedTypeMetadata;

public class WindowsCondition implements Condition {

    /**
     *
     *
     * @param context  判断条件能使用的上下文(环境)
     * @param metadata 注释
     *
     */
    @Override
    public boolean matches(ConditionContext context, AnnotatedTypeMetadata metadata) {
        // 1.获取ioc使用的beanFactory
        ConfigurableListableBeanFactory beanFactory = context.getBeanFactory();
        // 2. 获取类加载器
        ClassLoader classLoader = context.getClassLoader();
        // 3.获取当前环境信息
        Environment environment = context.getEnvironment();
        // 4.获取到bean定义的注册类,可以判断容器中bean的注册情况,也可以给容器中注册bean
        BeanDefinitionRegistry registry = context.getRegistry();

//        BeanDefinition definition = registry.getBeanDefinition("person");

        String property = environment.getProperty("os.name");
        if(property.contains("Windows")) {
            return true;
        }
        return false;
    }
}
package com.xdw.condition;

import org.springframework.beans.factory.config.ConfigurableListableBeanFactory;
import org.springframework.beans.factory.support.BeanDefinitionRegistry;
import org.springframework.context.annotation.Condition;
import org.springframework.context.annotation.ConditionContext;
import org.springframework.core.env.Environment;
import org.springframework.core.type.AnnotatedTypeMetadata;

public class LinuxCondition implements Condition {

    /**
     *
     *
     * @param context  判断条件上下文(环境)
     * @param metadata  元数据
     * @return {@code true} if the condition matches and the component can be registered,
     * or {@code false} to veto the annotated component's registration
     */
    @Override
    public boolean matches(ConditionContext context, AnnotatedTypeMetadata metadata) {

        // 1.获取ioc使用的beanFactory
        ConfigurableListableBeanFactory beanFactory = context.getBeanFactory();
        // 2. 获取类加载器
        ClassLoader classLoader = context.getClassLoader();
        // 3.获取当前环境信息
        Environment environment = context.getEnvironment();
        // 4.获取到bean定义的注册类,可以判断容器中bean的注册情况,也可以给容器中注册bean
        BeanDefinitionRegistry registry = context.getRegistry();

        String property = environment.getProperty("os.name");
        if(property.contains("Linux")) {
            return true;
        }


        return false;
    }
}
2.在配置类中新增两个注册bean的方法
@Conditional(value={WindowsCondition.class})
@Bean("windows")
public SystemData systemData01() {
    System.out.println("windows已经创建");
    return new SystemData("windows系统!");
}


@Conditional(value={LinuxCondition.class})
@Bean("linux")
public SystemData systemData02() {
    System.out.println("linux已经创建");
    return new SystemData("linux系统!");
}
运行测试, 结果如下:
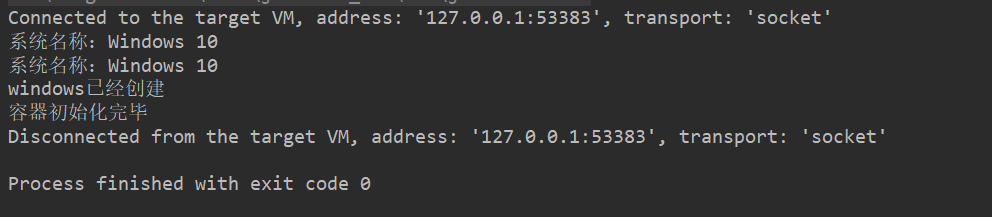
我们看出因为我们当前系统是windows,所以id为windows的bean被创建并注入到容器中了!
总结
1. @Bean注解,默认对象名称是方法名,对象类型为方法的返回类型;对象名修改可以通过@Bean注解的name属性或者直接修改方法名实现。
2. @Bean注解默认的作用域是单例模式,可以通过@Scope注解来修改
3. 单例模式默认是容器启动时创建并初始化,我们可以使用@Lazy注解实现懒加载,第一次使用时才创建并初始化bean。
4. 我们可以使用@Conditional注解,来实现满足一定条件才加载并初始化bean。这个注解既可以放在方法上,也可以放在类上.
方式三:使用@Import注解
我们可以使用@Import快速给容器中导入一个组件。
直接使用@Import
新建一个Color类:
package com.xdw.pojo;

public class Color {
}
在配置类上添加如下注解:
@Import(value={Color.class})
@Configuration
public class MainConfigOfComponent {}
编写测试方法,打印出所有注册到容器中的bean,运行测试结果如下:

我们发现刚刚创建的类已经成功注入到容器中。
总结: @Import(要导入到容器中的组件),容器中会自动注册这些组件,id默认是全类名
ImportSlector
这种方法需要实现ImportSlector接口,接口路中需要重写selectImports方法,该方法会返回一个需要实例化的数组。
新增两个类:
package com.xdw.pojo;

public class Red {
}
package com.xdw.pojo;

public class Blue {
}
编写MyImportSelector类,实现ImportSlector接口如下:
package com.xdw.selector;

import org.springframework.context.annotation.ImportSelector;
import org.springframework.core.type.AnnotationMetadata;

public class MyImportSelector implements ImportSelector {

    @Override
    public String[] selectImports(AnnotationMetadata importingClassMetadata) {
        return new String[]{"com.xdw.pojo.Red", "com.xdw.pojo.Blue"};
    }
}
这个类重写了selectImports方法,将我们刚刚新建的类的全类名返回。
修改配置类上的@Import注解,将我们创建MyImportSelector添加进@Import注解中:
@Import(value={Color.class, MyImportSelector.class})
@Configuration
public class MainConfigOfComponent {
测试,运行结果如下:

我们刚刚新建的类已经成功注入到容器中。
总结:该种方式创建的对象名默认也是全类名。
ImportBeanDefinitionRegistrar
我们还可以通过ImportBeanDefinitionRegistrar,手动注册bean至容器中。
新建一个类RainBow:
package com.xdw.pojo;

public class RainBow {
}
编写类MyImportBeanDefinitionRegistrar实现ImportBeanDefinitionRegistrar接口:
package com.xdw.selector;

import com.xdw.pojo.RainBow;
import org.springframework.beans.factory.support.BeanDefinitionRegistry;
import org.springframework.beans.factory.support.RootBeanDefinition;
import org.springframework.context.annotation.ImportBeanDefinitionRegistrar;
import org.springframework.core.type.AnnotationMetadata;

public class MyImportBeanDefinitionRegistrar implements ImportBeanDefinitionRegistrar {

    /**
     *
     * AnnotationMetadata: 当前类的注解信息
     * BeanDefinitionRegistry:BeanDefinition注册类
     *               把所有需要添加进容器中得bean: 调用
     *                   BeanDefinitionRegistry.registerBeanDefinition()方法手动注册进来
     * @param registry current bean definition registry
     */
    @Override
    public void registerBeanDefinitions(AnnotationMetadata importingClassMetadata, BeanDefinitionRegistry registry) {

        if(registry.containsBeanDefinition("com.xdw.pojo.Red") && registry.containsBeanDefinition("com.xdw.pojo.Blue")) {

            RootBeanDefinition rootBeanDefinition = new RootBeanDefinition(RainBow.class);
            registry.registerBeanDefinition("rainBow", rootBeanDefinition);
        }
    }
}
这里我们加了一个简单的判断,如果ioc容器中存在名称为"com.xdw.pojo.Red"与"com.xdw.pojo.Blue"的对象时,就加载rainBow对象。
将我们的编写的MyImportBeanDefinitionRegistrar类添加进@Import注解中:
@Import(value={Color.class, MyImportSelector.class, MyImportBeanDefinitionRegistrar.class})
@Configuration
public class MainConfigOfComponent {}
测试:

我们新建的rainBow成功载入至ioc容器中。
总结
@Import有如下三种方式到bean至容器中:
1. @Import(要导入到容器中的组件),容器中会自动注册这些组件,id默认是全类名
2. ImportSlector:返回需要导入的组件的全类名数组(这种方式在Springboot中用得比较多)
3. ImportBeanDefinitionRegistrar:手动注册bean到容器中
方式四: 使用Spring提供的FactoryBean
测试
我们还使用之前的Color类,注释掉之前的@Import。
编写ColorFactoryBean类,实现FactoryBean接口:
package com.xdw.factory;

import com.xdw.pojo.Color;
import org.springframework.beans.factory.FactoryBean;

public class ColorFactoryBean implements FactoryBean {

    /**
     * 是否是单例模式: true 单例模式   false多实例模式
     *
     * @return
     */
    @Override
    public boolean isSingleton() {
        return true;
    }


    /**
     * 相当于class
     * @return
     * @throws Exception
     */
    @Override
    public Object getObject() throws Exception {
        return new Color();
    }


    @Override
    public Class<?> getObjectType() {
        return Color.class;
    }
}
编写配置类,使用@Bean注解注册我们刚刚创建的ColorFactoryBean
@Configuration
public class MainConfigOfComponent {


    @Bean
    public ColorFactoryBean colorFactoryBean() {
        return new ColorFactoryBean();
    }
}
编写测试类:
@Test
public void test04() {

    AnnotationConfigApplicationContext applicationContext = new AnnotationConfigApplicationContext(MainConfigOfComponent.class);
    // 实际上获取到的是工厂bean调用getObject创建的对象
    Object factoryBean = applicationContext.getBean("colorFactoryBean");
    System.out.println(factoryBean.getClass());

    // 获取工厂类本身
    Object bean = applicationContext.getBean("&colorFactoryBean");
    System.out.println(bean.getClass());

}
运行结果:

总结
使用Spring提供的FactoryBean
1. 默认获取到的是工厂bean调用getObject创建的对象(使用名称获取)
2. 要获取工厂bean本身,我们需要给前面加一个&


【推荐】国内首个AI IDE,深度理解中文开发场景,立即下载体验Trae
【推荐】编程新体验,更懂你的AI,立即体验豆包MarsCode编程助手
【推荐】抖音旗下AI助手豆包,你的智能百科全书,全免费不限次数
【推荐】轻量又高性能的 SSH 工具 IShell:AI 加持,快人一步
· TypeScript + Deepseek 打造卜卦网站:技术与玄学的结合
· 阿里巴巴 QwQ-32B真的超越了 DeepSeek R-1吗?
· 【译】Visual Studio 中新的强大生产力特性
· 2025年我用 Compose 写了一个 Todo App
· 张高兴的大模型开发实战:(一)使用 Selenium 进行网页爬虫