Cxf框架中@WebService注解的使用
最近工作中总是不可避免的使用WebService来对接功能,经过自己一番摸索,总结出了一些使用方法,做一下记录:
记录了两个SpringBoot版本使用WebService的一些问题和用法,SpringBoot版本如下:
<version>1.5.6.RELEASE</version>(老版) <version>2.6.0</version>(新版)
第一步:导入依赖
<dependency>
    <groupId>org.apache.cxf</groupId>
    <artifactId>cxf-spring-boot-starter-jaxws</artifactId>
    <version>3.2.4</version>
</dependency>
第二步:定义WebService
直接在业务层的Service层进行操作就行了,自己定义或者复用都可以
接口类:
package com.xrj.webtest.service;//包名

import javax.jws.WebMethod;
import javax.jws.WebParam;
import javax.jws.WebResult;
import javax.jws.WebService;

@WebService(targetNamespace = "http://service.webtest.xrj.com/")//命名空间:包名的反转
public interface DataWebservice {
    @WebMethod//对应wsdl文件里面的operation,外部调用的方法
    @WebResult String receiveMsg(@WebParam(name = "action") String action, @WebParam(name = "message") String message);//@WebResult 接口返回值 @WebParam 外部调用需要携带的参数
}
实现类:
package com.xrj.webtest.service.impl;

import com.xrj.webtest.service.DataWebservice;
import org.springframework.stereotype.Service;

import javax.jws.WebService;

@WebService(serviceName = "DataService",//服务名,自己定义
        targetNamespace = "http://service.webservicedemo.xrj.com/",//同接口类的命名空间
        endpointInterface = "com.xrj.webtest.service.DataWebservice")//接口类相对路径
@Service
public class DataWebserviceImpl implements DataWebservice {

    //外部调用webservice接口就会进来执行这个方法了
    @Override
    public String receiveMsg(String action, String message) {
        System.out.println("webservice进来工作了");
        //todo 做你想做的事情
        return "action="+action+","+"message="+message;//返回数据,后面调用接口会返回这个
    }
}
第三步:定义CXF的配置类(新老版本有差异)
使用@Configuration来进行定义一个配置类
package com.xrj.webtest.config;

import com.xrj.webtest.service.impl.DataWebserviceImpl;
import org.apache.cxf.Bus;
import org.apache.cxf.bus.spring.SpringBus;
import org.apache.cxf.jaxws.EndpointImpl;
import org.apache.cxf.transport.servlet.CXFServlet;
import org.springframework.boot.web.servlet.ServletRegistrationBean;
import org.springframework.context.annotation.Bean;
import org.springframework.context.annotation.Configuration;

import javax.xml.ws.Endpoint;

@Configuration
public class CxfConfig {

/**
新版:这个方法直接不要,据大佬说是SpringBoot2.0.6版本之后CXF这个配置被SpringBoot整合了,在application.yml配置文件中配置cxf.path=/test即可

老版:这个方法要加上,放开注释

这个配置后可以在浏览器直接访问  http://127.0.0.1:8080/test/data?wsdl ,显示当前webservice的所有接口(见代码后面截图)

*/
//    @Bean
//    public ServletRegistrationBean dispatcherServlet() {
//        return new ServletRegistrationBean(new CXFServlet(), "/test/*");
//
//    }


    @Bean(name = Bus.DEFAULT_BUS_ID)
    public SpringBus springBus() {
        return new SpringBus();
    }

    /**
     * 站点服务,多个service在这里配置多个就行
     **/
    @Bean
    public Endpoint testData() {
        EndpointImpl endpoint = new EndpointImpl(springBus(), new DataWebserviceImpl());
        endpoint.publish("/data");
        return endpoint;
    }

}

第四步:启动服务
这个时候你可能会出现一些问题(如果你用得新版本):
第一个:
Action:

Consider defining a bean of type 'org.springframework.boot.autoconfigure.web.servlet.DispatcherServletPath' in your configuration.
这个时候看一下第三步,如果你是2.0.6版本以后得SpringBoot就把CXF配置类里的dispatcherServlet()方法删掉,对应得路径就在spring得配置文件中配置就行了
第二个:
在解决上面得问题之后,你可能还会遇到一个hibernate-validator得API不存在的问题(可能,或许和idea缓存有关),即使你没有用这个验证的包,导入依赖把
<dependency>
    <groupId>org.hibernate</groupId>
    <artifactId>hibernate-validator</artifactId>
    <version>6.0.18.Final</version>
</dependency>
直接跑起来服务,按照上面配置得路径去查看wsdl文件,将文档保存下来备用,见图:

能看到这个文档,就证明WebService服务已经发布完成了.
第五步:使用Postman测试Webservice接口
这个主要分为两步:
第一步:构造soap+xml请求体
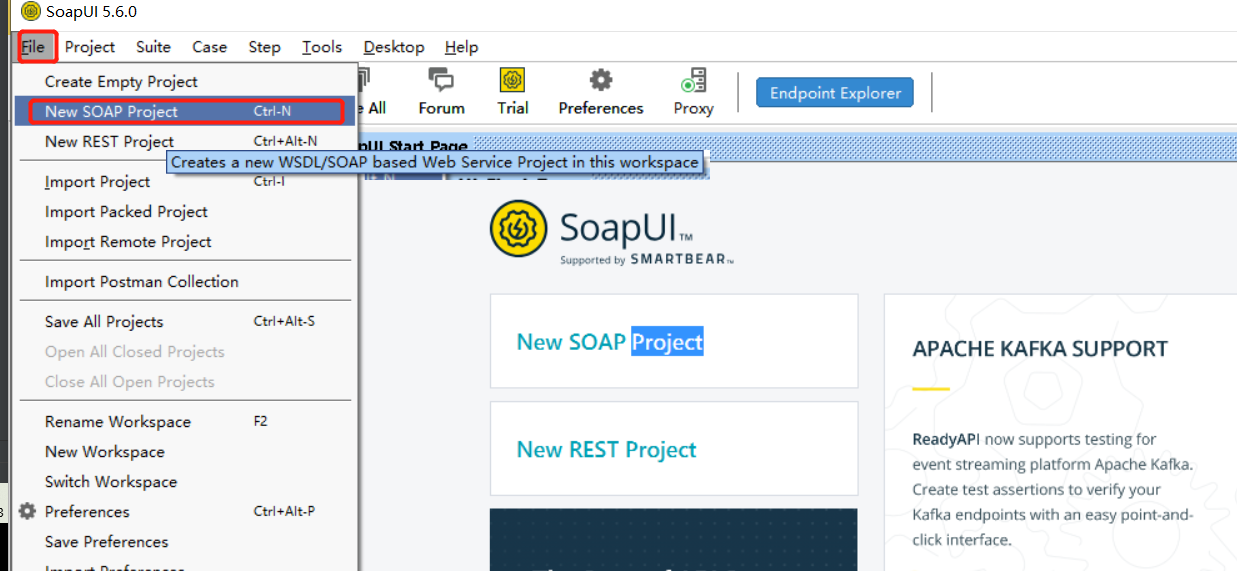
这里可以使用一款软件SoapUI来根据wsdl文件来一键生成soap_xml请求体(百度搜索下载一下)
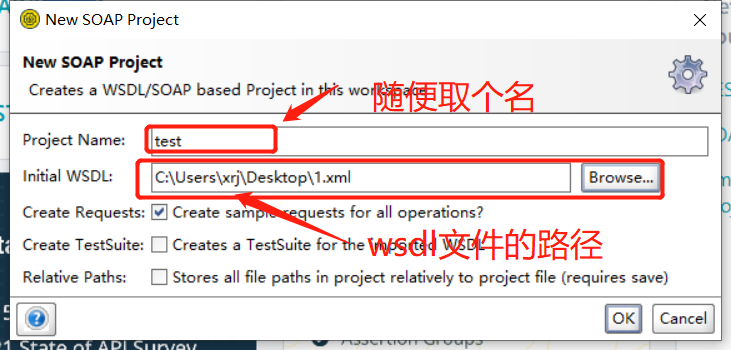
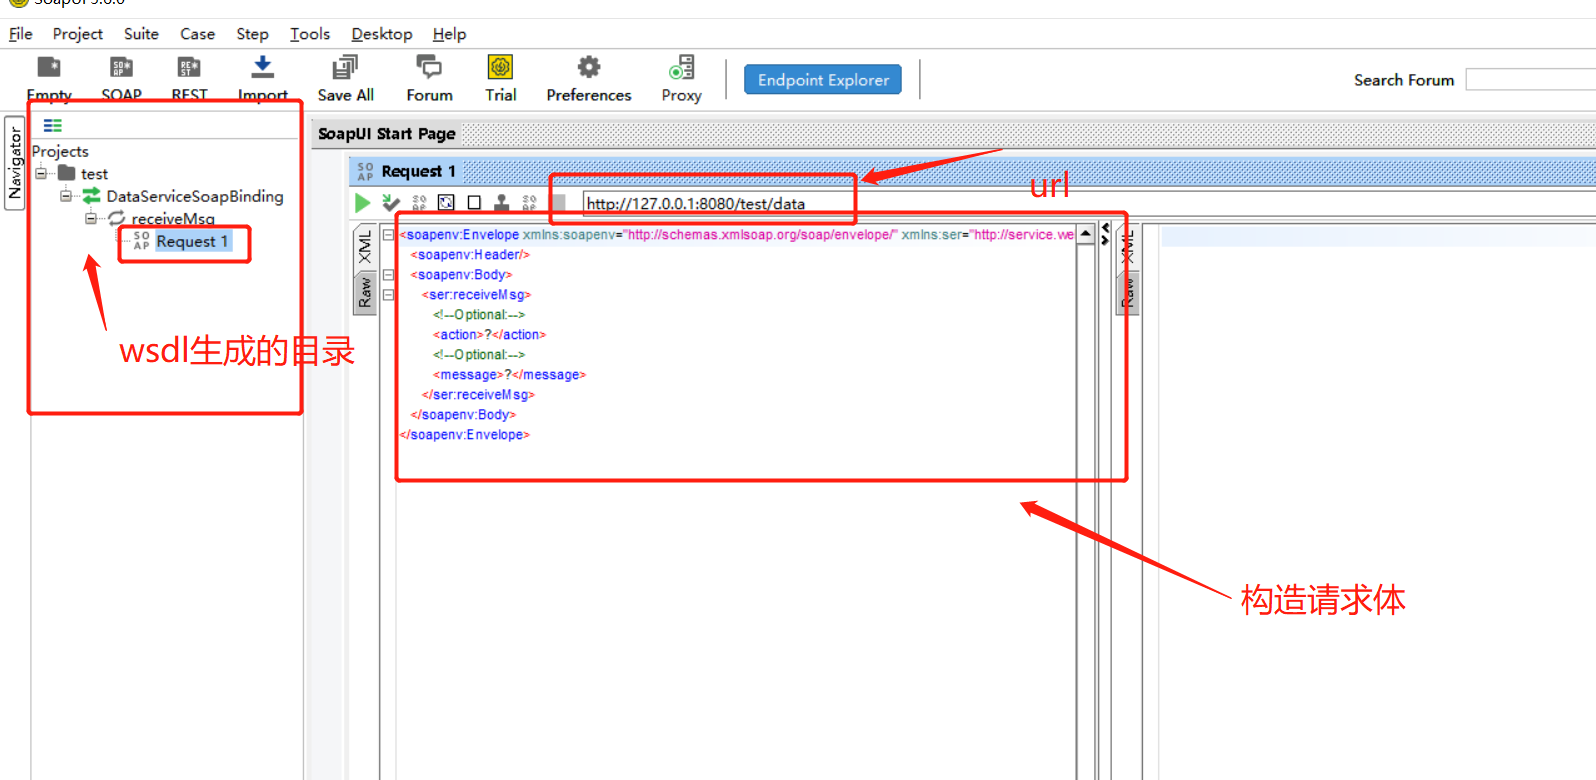
软件左上角读取你之前保存的wsdl文件,自动生成所有接口的请求体

导入wsdl文件

生成对应的接口的url和soap+xml的请求体

第二部:
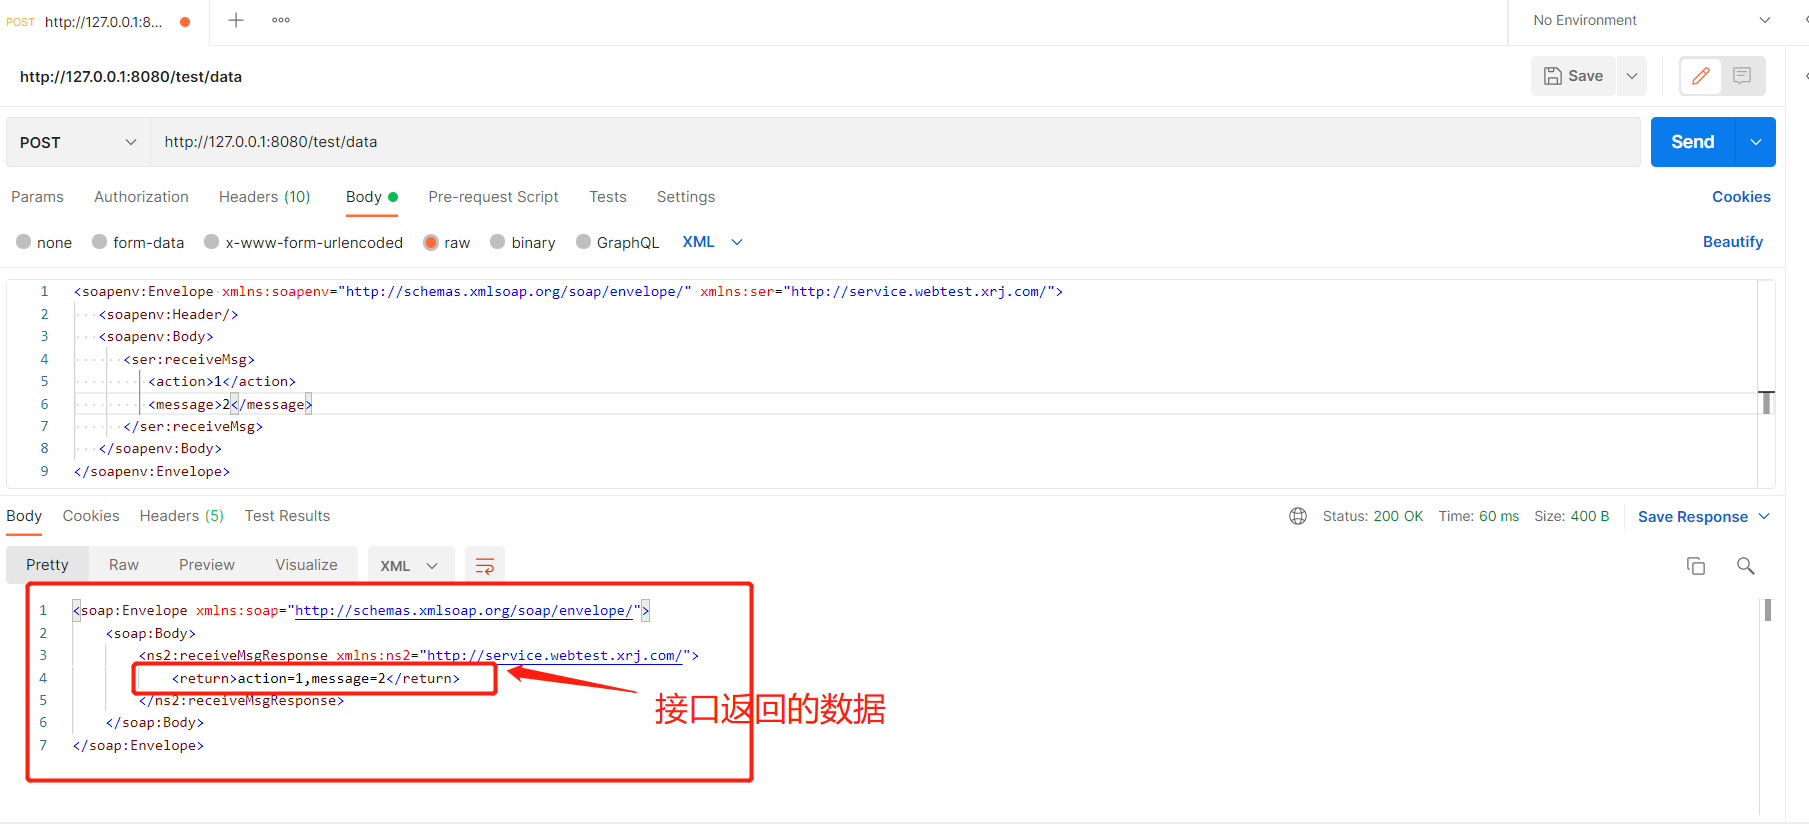
根据SoapUI生成的请求体和定义的url,用postman访问
注意的点:必须post请求,请求头Content-Type为text/xml;charset=utf-8

请求体参数:body参数配置raw,类型为xml,贴上模板补上参数

最后一键send发射,获取响应

到这里就Ojbk了,如果你看到这里,希望对你有帮助!


