
MyBatis
一. 简介
-
mybatis的HelloWorld程序
- 创建全局配置文件 mybatis-config.xml ,添加数据源相关信息
<!--将写好的sql文件注册到全局配置文件中-->
<mappers>
    <mapper resource="EmployeeMapper.xml"/>
</mappers>
+ sql的映射文件 EmployeeMapper.xml

```xml
+ 代码测试

```java
//1.根据XML配置文件(全局配置文件)创建一个SqlSessionFactory对象
//2.sql映射文件,配置了每一个 sql,以及sql的封装规则
//3.将sql映射文件注册在全局配置配置文件中
//4.编写测试代码
//     1)根据全局配置文件得到sqlSessionFactory
//     2)使用sqlSessionFactory得到SqlSession对象,来执行增删改查。一个SqlSession就代表一次会话。用完关闭
//     3)使用sql的唯一标识来告诉MyBatis执行那个sql。sql都保存在sql映射文件中。
@Test
public void test() throws Exception {
    String resource = "mybatis-config.xml";
    InputStream inputStream = Resources.getResourceAsStream(resource);
    SqlSessionFactory sqlSessionFactory =
            new SqlSessionFactoryBuilder().build(inputStream);
    SqlSession session = sqlSessionFactory.openSession();
    try{
        //@param statement Unique identifier matching the statement to use. SQL唯一标识 namespace+id
        //@param parameter A parameter object to pass to the statement. 参数
        Employee employee = session.selectOne(
                "org.mybatis.example.EmployeeMapper.selectEmployee", 1);
        System.out.println(employee);
    } finally {
        session.close();
    }
}
2. 接口式编程
    + 首先写mapper 接口

    ```java
public interface EmployeeMapper {
    public Employee getEmployeeById(Integer id);
}
+ 接口与SQL映射文件绑定(mybatis动态生成接口实现类)

```xml
> SqlSession 代表和数据库的一次会话;用完必须关闭
> SqlSession 和 connection 一样都是非线程安全的。每次使用都应该去获取新的对象。
> mapper 接口没有实现类,但是mybatis会为这个接口生成一个代理对象。(将接口和xml绑定)
> 两个重要配置文件:mybatis全局配置文件:包含数据库连接池信息,事务管理等系统环境;sql映射文件:
二. MyBatis configuration 全局配置文件
-
properties:用来引入外部的数据源配置
<properties resource="jdbc.properties"></properties>
2. settings

    ```xml
    <!--settings包含很多重要的设置-->
    <settings>
        <!--开启驼峰转下滑线-->
        <setting name="mapUnderscoreToCamelCase" value="true"/>
    </settings>
-
typeHandlers:将java类型和数据库类型进行适配。
-
plugins:插件
MyBatis allows you to intercept calls to at certain points within the execution of a mapped statement.
By default, MyBatis allows plug-ins to intercept method calls of:- Executor (update, query, flushStatements, commit, rollback, getTransaction, close, isClosed) 执行器
- ParameterHandler (getParameterObject, setParameters) 参数处理器
- ResultSetHandler (handleResultSets, handleOutputParameters) 结果集处理器
- StatementHandler (prepare, parameterize, batch, update, query) SQL语句处理器
-
environments:MyBatis can be configured with multiple environments.
environment:配置一个具体的环境信息,必须有两个标签,id代表当前环境的唯一标识。<!--通过default切换环境--> <environments default="development"> <environment id="development"> <!--配置事务管理器;type 事务管理器的类型 了解--> <transactionManager type="JDBC"/> <!--dataSource数据源;type数据源类型:UNPOOLED、POOLED、JNDI--> <dataSource type="POOLED"> <property name="driver" value="${jdbc.driver}"/> <property name="url" value="${jdbc.url}"/> <property name="username" value="${jdbc.username}"/> <property name="password" value="${jdbc.password}"/> </dataSource> </environment> </environments>
6. databaseIdProvider:MyBatis is able to execute different statements depending on your database vendor.

7. mappers:使用 class:直接注册接口,要能绑定成功,**接口和SQL映射文件同名且同一目录**

    ```xml
    <!--将写好的sql文件注册到全局配置文件中-->
    <mappers>
        <!--
        mapper:注册一个sql映射;
        resource:引入类路径下的资源
        url:网络路径,磁盘路径
        class:直接注册接口,要能绑定成功,接口和SQL映射文件同名且同一目录
        -->
        <!--<mapper resource="EmployeeMapper.xml"/>-->
        <mapper class="cn.guet.mapper.EmployeeMapper" ></mapper>
        <!--批量注册:接口与SQL映射文件同包名-->
        <!--<package name="cn.guet.mapper.EmployeeMapper"/>-->
    </mappers>
-
注:在maven项目中如果将 mapper.xml 放在 mapper 接口的包下面,需在pom文件中配置编译xml的指令
<build>
    <resources>
        <resource>
            <directory>src/main/java</directory>
            <includes>
                <include>**/*.xml</include>
            </includes>
        </resource>
    </resources>
</build>
### 三. Mapper XML Files

1. select、insert 、update 、delete

    ```xml
    <select id="getEmpById" resultType="cn.guet.bean.Employee">
		select * from tb_employee where id = #{id}
	</select>

    <!--parameterType可以省略-->
    <insert id="addEmp" parameterType="cn.guet.bean.Employee">
		insert  into tb_employee(last_name,email,gender) values(#{lastName},#{email},#{gender})
	</insert>

    <update id="updateEmp">
		update tb_employee set last_name = #{lastName},email=#{email},gender = #{gender} where id = #{id}
	</update>

    <delete id="deleteEmpById">
		delete from tb_employee where id = #{id}
	</delete>
-
单个参数处理:mybatis不会做特殊处理;#{参数名}:取出参数
-
多个参数处理
如果直接写多个形参,会报如下错误 org.apache.ibatis.binding.BindingException:

多个参数mybatis会做特殊处理,多个参数会被封装成一个map。key:param1.....paramN,或者索引;value:传入的参数值
通常使用 @Param("") 注解来指定参数名。如果多个参数是业务逻辑模型,可传入pojo,#{属性名} 直接取出。如果没有对应的pojo,不经常使用,可传入map。经常使用的话,可以编写TO数据传输对象。public Employee getEmpByIdAndLastName(@Param("id") Integer id,@Param("lastname") String lastname);
    > 注意:如果是Collection(List、Set)类型或者是数组,也会做特殊处理,也是把传入的list或者数组封装在map中。key:Collection(collection)、如果是List 还可以使用 key(list),数组(array)

4. 参数处理源码分析
    mybatis使用ParamNameResolver 解析封装参数

    ```java
//构造方法
    public ParamNameResolver(Configuration config, Method method) {
        //获取参数列表中每个参数的类型
        final Class<?>[] paramTypes = method.getParameterTypes();
        //获取参数列表上的注解
        final Annotation[][] paramAnnotations = method.getParameterAnnotations();
        //该集合用于记录参数索引与参数名称的对应关系
        final SortedMap<Integer, String> map = new TreeMap<>();
        //注解的个数
        int paramCount = paramAnnotations.length;
        // get names from @Param annotations
        for (int paramIndex = 0; paramIndex < paramCount; paramIndex++) { //遍历方法所有参数
            if (isSpecialParameter(paramTypes[paramIndex])) {
                //如果参数是RowBounds类型或ResultHandler类型,跳过对该参数的分析
                // skip special parameters
                continue;
            }
            String name = null;
            //遍历该参数对应的注解集合
            for (Annotation annotation : paramAnnotations[paramIndex]) {
                if (annotation instanceof Param) {
                    //@Param 注解出现过一次,就将hasParamAnnotation初始化为true
                    hasParamAnnotation = true;
                    //获取Param注解指定的参数名称
                    name = ((Param) annotation).value();
                    break;
                }
            }
            //这个if代码解释了上面的实例中names集合的valu为什么是0和1
            if (name == null) {
                // @Param was not specified.
                //该参数没有对应的@Param注解,则根据配置决定是否使用参数实际名作为其名称
                if (config.isUseActualParamName()) {
                    name = getActualParamName(method, paramIndex);
                }
                if (name == null) { //使用参数的索引作为名称
                    // use the parameter index as the name ("0", "1", ...)
                    // gcode issue #71
                    name = String.valueOf(map.size());
                }
            }
            map.put(paramIndex, name); //记录保存到map
        }
        names = Collections.unmodifiableSortedMap(map);
    }
```java
    //将实参与其对应名称进行关联
public Object getNamedParams(Object[] args) {
    final int paramCount = names.size();
    if (args == null || paramCount == 0) { //无参数,返回null
        return null;
    } else if (!hasParamAnnotation && paramCount == 1) { //未使用@param注解,只有一个参数
        return args[names.firstKey()];
    } else {  //处理使用了@Param注解指定了参数名称或有多个参数的情况
        //param这个map中记录了参数名称与实参之间的对应关系
        final Map<String, Object> param = new ParamMap<>();
        int i = 0;
        for (Map.Entry<Integer, String> entry : names.entrySet()) {
            //将参数名与实参对应关系记录到param中
            param.put(entry.getValue(), args[entry.getKey()]);
            // add generic param names (param1, param2, ...)
            //为参数创建“param+索引”格式默认参数名称,如:param1,param2 等,并添加到param集合中
            final String genericParamName = GENERIC_NAME_PREFIX + String.valueOf(i + 1);
            // ensure not to overwrite parameter named with @Param
            if (!names.containsValue(genericParamName)) {
                param.put(genericParamName, args[entry.getKey()]);
            }
            i++;
        }
        return param;
    }
}
5. ${ xx }  和 #{ xx  } 的区别:
    #{ xx } :是以预编译的形式,将参数设置到sql语句中。
    ${ xx } :取出的值直接拼装在sql语句中。会有安全问题,不能防止sql注入。
    大多数情况都应该使用 #{ xx } 取参数。原生JDBC不支持占位符的地方,可以使用${ xx } 取值。

    ```sql
select * from ${year }_salary where xxx;
-
Select 记录封装成 Map
//多条记录封装成map,键是这条记录的主键,值是封装后的javabean
//告诉mybatis封装map的时候,用哪个属性作为map的key
@MapKey("id")
Map<Integer, Employee> getEmpByLastNameReturnMap(String lastName);
    ```
	<select id="getEmpByLastNameReturnMap" resultType="cn.guet.bean.Employee">
		select * from tb_employee where last_name like #{lastName}
	</select>
-
resultMap:自定义结果集映射规则
<!-- resultMap:自定义结果集映射规则;
id:唯一id,方便引用
type:自定义规则的Java类型-->
<resultMap id="myEmp" type="cn.guet.bean.Employee">
    <!--主键用id定义,column:指定那一列,property指定对应的JavaBean属性-->
    <id column="id" property="id"></id>
    <result column="last_name" property="lastName"></result>
    <!--其他不指定的,自动封装。我们只要写resultMap,全部映射规则都写上-->
    <result column="email" property="email"></result>
    <result column="gender" property="gender"></result>
</resultMap>

<select id="getEmpById" resultMap="myEmp">
	select * from tb_employee  where id = #{id}
</select>
### 四. Dynamic SQL

1. if

    ```xml
    <select id="findActiveBlogLike"
            resultType="Blog">
        SELECT * FROM BLOG WHERE state = ‘ACTIVE’
        <if test="title != null">
            AND title like #{title}
        </if>
        <if test="author != null and author.name != null">
            AND author_name like #{author.name}
        </if>
    </select>
-
choose (when, otherwise)
<select id="findActiveBlogLike"
        resultType="Blog">
    SELECT * FROM BLOG WHERE state = ‘ACTIVE’
    <choose>
        <when test="title != null">
            AND title like #{title}
        </when>
        <when test="author != null and author.name != null">
            AND author_name like #{author.name}
        </when>
        <otherwise>
            AND featured = 1
        </otherwise>
    </choose>
</select>
3. trim (where, set)

    ```xml
    <select id="findActiveBlogLike"
            resultType="Blog">
        SELECT * FROM BLOG
        <where>
            <if test="state != null">
                state = #{state}
            </if>
            <if test="title != null">
                AND title like #{title}
            </if>
            <if test="author != null and author.name != null">
                AND author_name like #{author.name}
            </if>
        </where>
    </select>
-
foreach
  <!--
    SELECT * FROM POST P WHERE ID in (1,2,3)
    collection:指定要遍历的集合
    list类型的参数会封装在map中,key就是list
    item:将遍历出来的值赋给指定变量
-->
<select id="selectPostIn" resultType="domain.blog.Post">
    SELECT *
    FROM POST P
    WHERE ID in
    <foreach item="item" index="index" collection="list"
             open="(" separator="," close=")">
        #{item}
    </foreach>
</select>
### 五. 缓存机制
1. MyBatis 包含一个非常强大的查询缓存特性,它可以非常方便地配置和定制。缓存可以极大的提升查询效率。
2. MyBatis系统中默认定义了两级缓存。一级缓存和二级缓存。
+ 默认情况下,只有一级缓存( SqlSession级别的缓存,也称为本地缓存)开启。
+ 二级缓存需要手动开启和配置,他是基于namespace级别的缓存。
+ 为了提高扩展性。 MyBatis定义了缓存接口Cache。我们可以通过实现Cache接口来自定义二级缓存
3. 一级缓存
+ 一级缓存(local cache), 即本地缓存, 作用域默认为sqlSession。当 Session flush 或 close 后, 该Session 中的所有 Cache 将被清空。
+ 本地缓存不能被关闭, 但可以调用 clearCache()来清空本地缓存, 或者改变缓存的作用域.。
+ 在mybatis3.1之后, 可以配置本地缓存的作用域.,在 mybatis.xml 中配置。
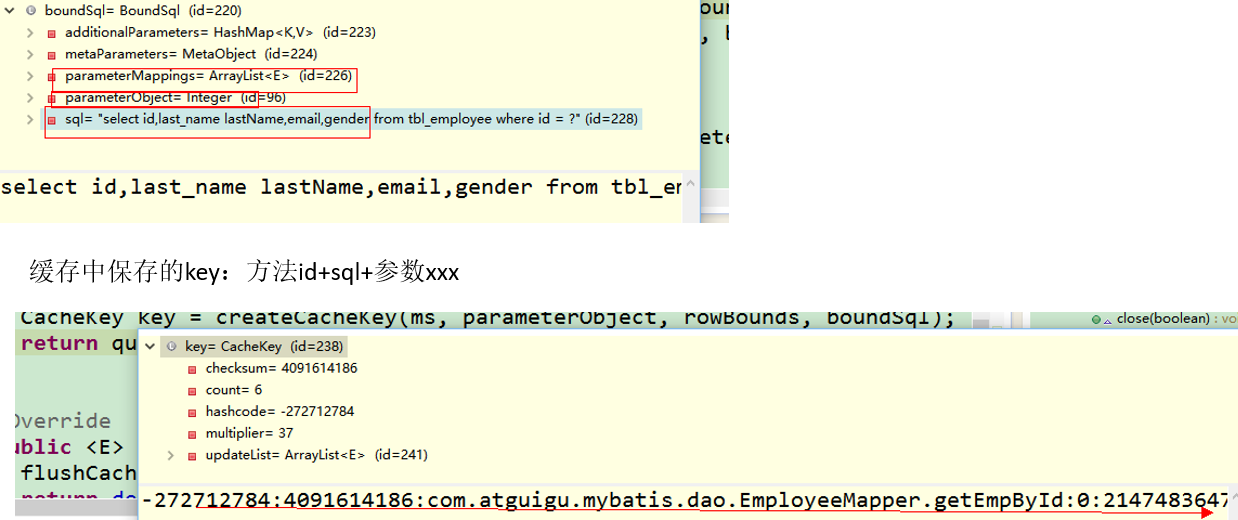
+ 同一次会话期间只要查询过的数据都会保存在当前SqlSession的一个Map中。key:hashCode+查询的SqlId+编写的sql查询语句+参数
4. 一级缓存失效的四种情况
+ 不同的SqlSession对应不同的一级缓存
+ 同一个SqlSession但是查询条件不同
+ 同一个SqlSession两次查询期间执行了任何一次增删改操作
+ 同一个SqlSession两次查询期间手动清空了缓存
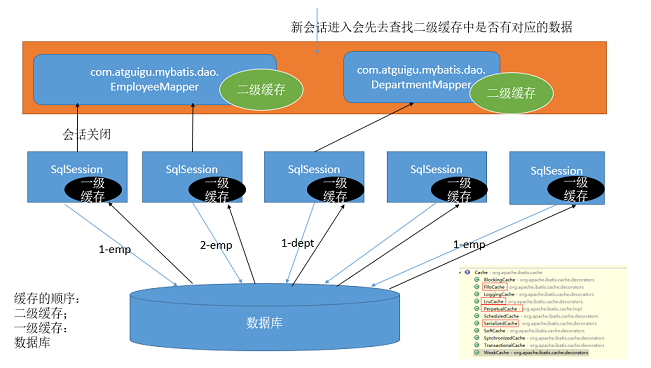
5. 二级缓存:全局缓存,基于namespace级别的缓存,一个namespace对应一个二级缓存。
6. 二级缓存 工作机制:
+ 一个会话,查询一条数据,这个数据机会被放在当前会话的一级缓存中;
+ 如果会话关闭,一级缓存中的数据会被保存到二级缓存;新的会话查询信息,就可以参照二级缓存。
+ 不同namespace查出的数据会放在自己的缓存中(map)。
7. 二级缓存
+ 二级缓存(second level cache),全局作用域缓存
+ 二级缓存默认不开启,需要手动配置
+ MyBatis提供二级缓存的接口以及实现,缓存实现要求POJO实现Serializable接口
+ 二级缓存在 SqlSession 关闭或提交之后才会生效
8. 二级缓存的使用
+ 开启全局二级缓存的配置
```xml
<settings>
<setting name="cacheEnabled" value="true"/>
</settings>
+ 去mapper.xml中配置使用二级缓存

```xml
<!--
    eviction:缓存的回收策略
    flushInterval:缓存刷新间隔,缓存多长时间清空一次,设置一个毫秒值
    readOnly:是否只读。true:只读,mybatis默认只读,不会修改。非只读:不给引用,用反序列化技术克隆给你
    size:缓存中保存多少个
    type:指定自定义缓存的全类名
-->
<cache eviction="FIFO" flushInterval="60000" readOnly="false" size="1"></cache>
+ POJO实现反序列化接口
9. 缓存原理图
### 六. mybatis-spring
略
### 七. mybatis工作原理
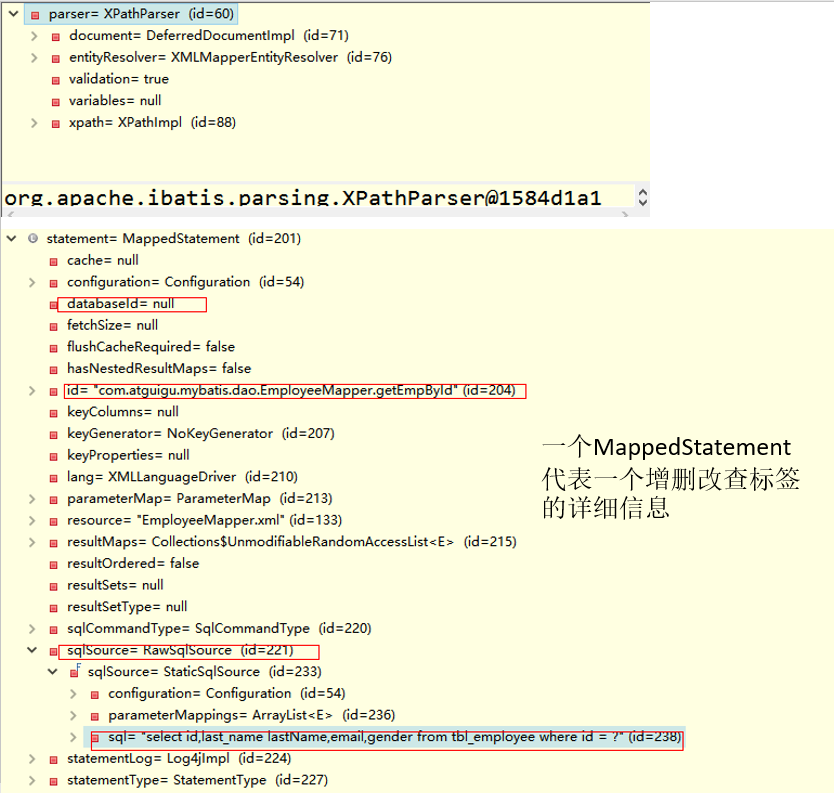
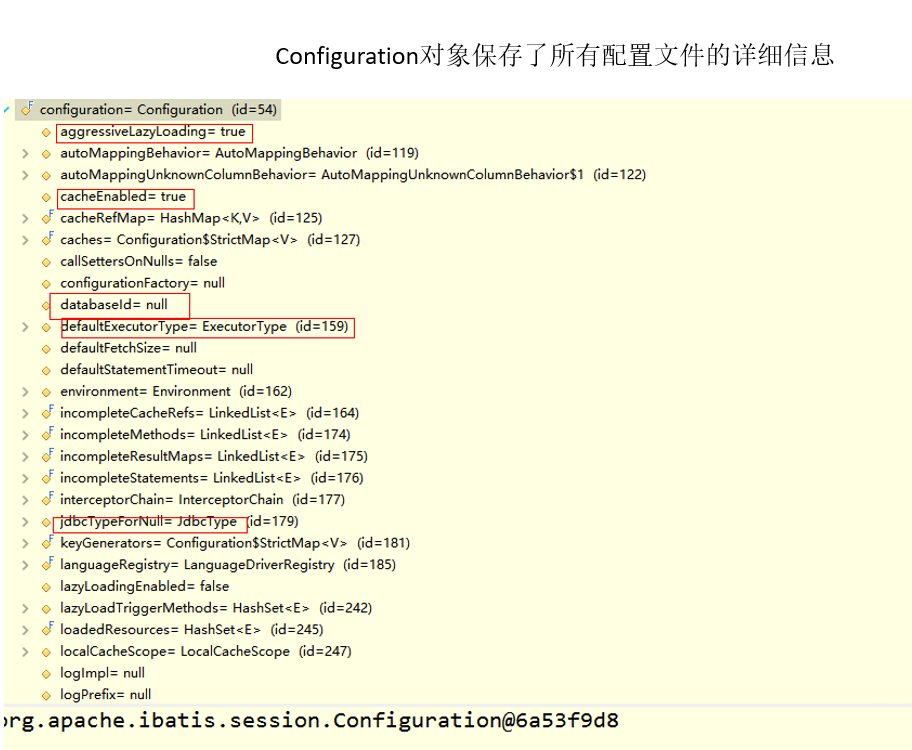
1. 获取sqlSessionFactory对象:
解析文件的每一个信息保存在Configuration中,返回包含Configuration的DefaultSqlSession;
注意:【MappedStatement】:代表一个增删改查的详细信息

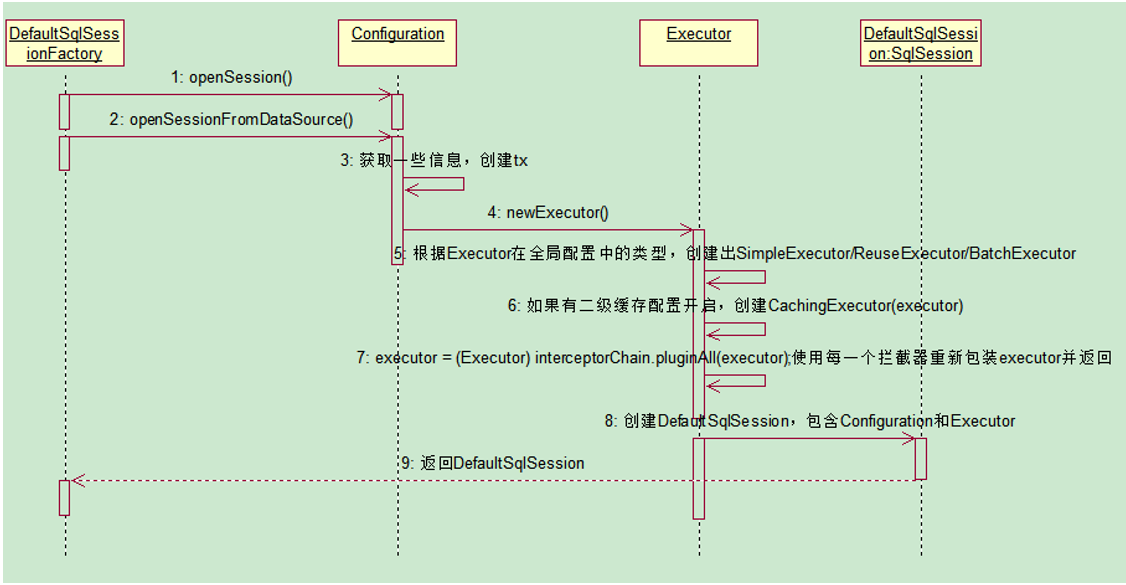
2. 获取sqlSession对象
返回一个DefaultSQlSession对象,包含Executor和Configuration;
这一步会创建Executor对象;
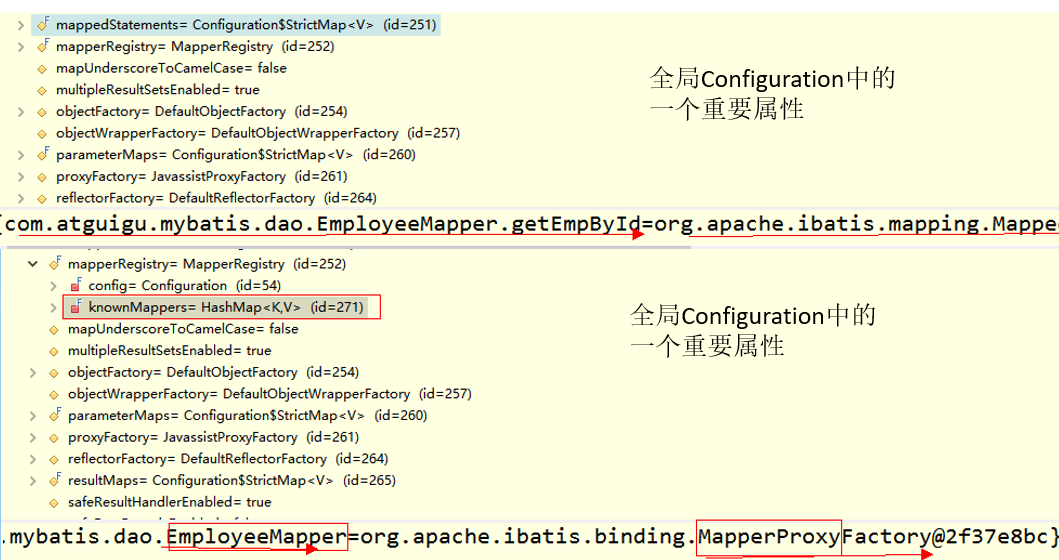
3. 获取接口的代理对象(MapperProxy)
getMapper,使用MapperProxyFactory创建一个MapperProxy的代理对象
代理对象里面包含了,DefaultSqlSession(Executor)

4. 执行增删改查方法
5. 总结:
+ 根据配置文件(全局,sql映射)初始化出Configuration对象
+ 创建一个DefaultSqlSession对象,
他里面包含Configuration以及
Executor(根据全局配置文件中的defaultExecutorType创建出对应的Executor)
+ DefaultSqlSession.getMapper():拿到Mapper接口对应的MapperProxy;
+ MapperProxy里面有(DefaultSqlSession);
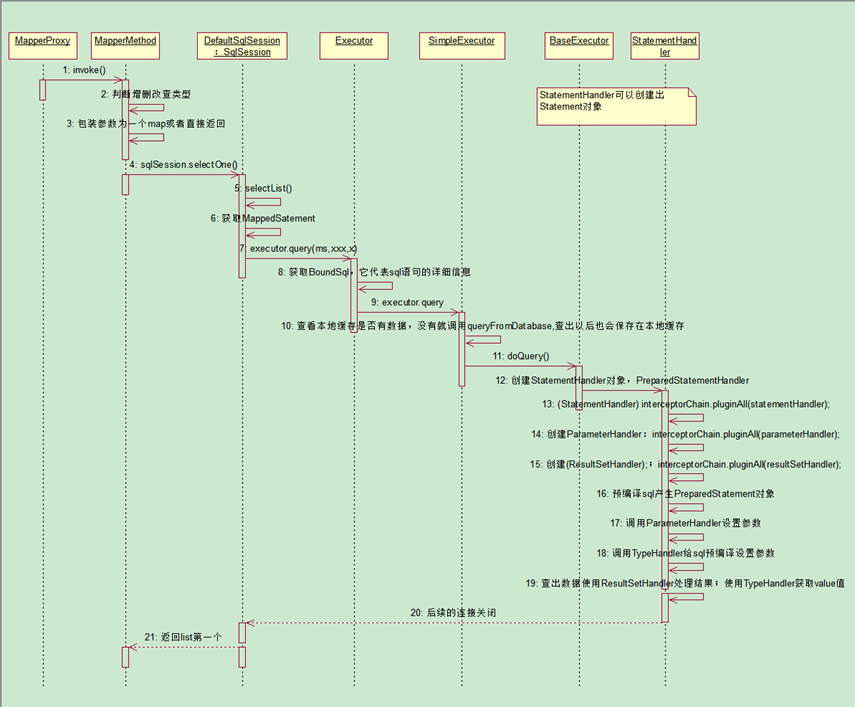
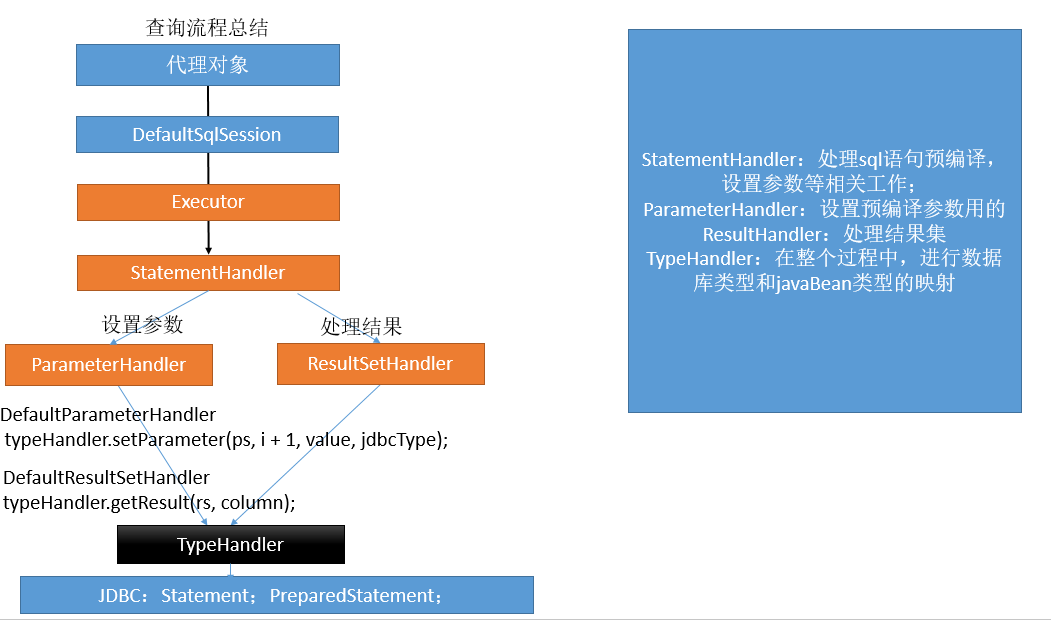
+ 执行增删改查方法:
调用DefaultSqlSession的增删改查(Executor);
会创建一个StatementHandler对象。(同时也会创建出ParameterHandler和ResultSetHandler)
调用StatementHandler预编译参数以及设置参数值;。使用ParameterHandler来给sql设置参数
调用StatementHandler的增删改查方法;
+ ResultSetHandler封装结果
> 四大对象每个创建的时候都有一个interceptorChain.pluginAll(parameterHandler);
 浙公网安备 33010602011771号