VPD更换步骤
VPD card
. Use this procedure to service the Vital Product Data (VPD) card
请使用以下步骤来对VPD卡的维护
Attention: The VPD card contains data which is vital to system operation:
(注意:VPD卡中的数据是非常重要的)
- Machine type, model, and serial number(机器型类型 型号 序列号)
- System brand (跑的什么系统)
- System unique ID (SUID)(系统唯一的ID SUID)
- Activation codes for Capacity on Demand (COD) and Virtualization Engine Technologies (VET) (if applicable)
- ( 按需扩容(COD)和虚拟化(VET)的激活代码(如适用))
Note: If you plan to replace the VPD card and have the replacement card available, you can contact the following e-mail address from 8 a.m. to 5 p.m. U.S. Central Time, Monday through Friday, to obtain replacement activation codes prior to repair. You must supply machine type and serial number, and the part number and serial number of the replacement VPD card. For System p® systems contact pcod@us.ibm.com, and for System i® systems contact icod@us.ibm.com.
(注意:如果计划更换或者需要更换VPD卡 请提供机器的型号、序列号和VPD卡的序列号于周一到周五中部时间上午8点-下午5点发邮件索取激活代码)
- Access the ASMI 进入ASMI (admin 密admin)
|
The Advanced System Management Interface (ASMI) is the interface to the service processor that is required to perform general and administrator-level service tasks, such as reading service processor error logs, reading vital product data, setting up the service processor, and controlling the system power. The ASMI may also be referred to as the service processor menus. To access the ASMI, refer to(要访问ASMI请参阅) Accessing the Advanced System Management Interface. When you have accessed the ASMI, continue with the next step.当访问ASMI时请进行下一步: |
- Save the system identifiers (保存系统标识)
|
a. On the ASM Welcome pane, specify your user ID and password, and click Log in. (输入用户名和密码 )用(celogin)密 celogin1 Note: To perform this operation, your authority level must be Administrator or Authorized service provider.(注意如要执行此项必须是管理员或者供应商提供) a. In the navigation area, expand 在导航展开 SystemConfiguration and Program Vital Product Data. b. Select (选择)System Brand. c. In the right pane, manually record the value for the System Brand. d. (在窗口的右格中手动记录系统的信息) e. Select(选择 )System Keywords unde(下面)r Program Vital Product Data. f. In the right pane, manually record the values for the machine type-model, system serial number, system unique ID, and (if applicable) activation codes for Capacity on Demand (COD) and Virtualization Engine Technologies (VET). g. (在右窗格中,手动记录值的机器型号、系统序列号、系统的唯一标识,以及(可用的)激活代码按需扩容(COD)和虚拟化引擎技术(VET)。) |
- Power off the unit关闭设备的电源
|
Power should be removed from the unit containing the VPD card. If this unit is powered on, power it off now. 关闭电源拆除VPD卡 |
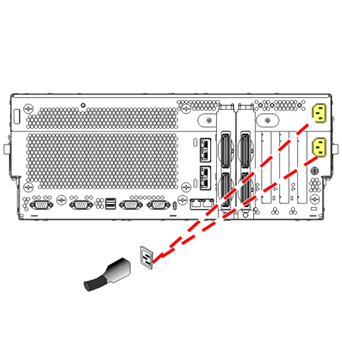
- Disconnect the power cords
|
Disconnect all power cords from the unit you are servicing. |
 |
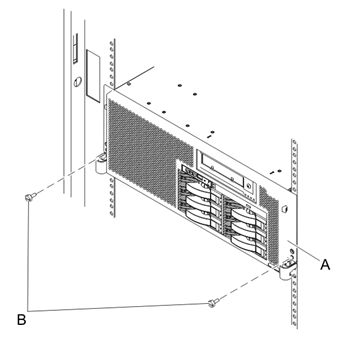
- Place into service position
|
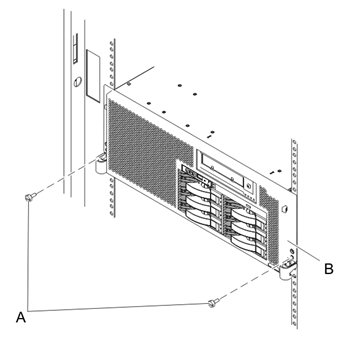
Note to expansion unit users: The instructions in this procedure are written based on the rack model. Expansion unit users can still use this procedure; however, expansion unit users should ignore specific references to rack-only features such as rack doors, rack thumbscrews, and rack-specific FRU orientation. Attention: When placing the model rack into the service position, it is essential that all stability plates are firmly in position to prevent the rack from toppling. Ensure that only one system unit is in the service position at a time. Remove two screws (A) securing the system unit (B) to the rack. |
 |
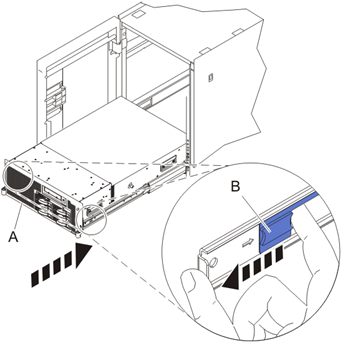
- Place into service position (continued)
|
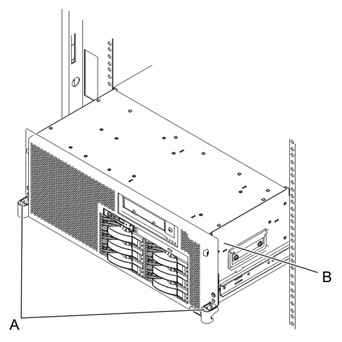
While holding the system unit release latches (A) down on both the left and right sides, pull the system unit (B) out from the rack until the rails are fully extended and locked. Notes: a. Ensure that the cables at the back of the system unit do not catch or bind as you pull the unit forward in the rack. b. When the system unit rails are fully extended, the rail safety latches lock into place. This action prevents the system from being pulled out too far. |
 |
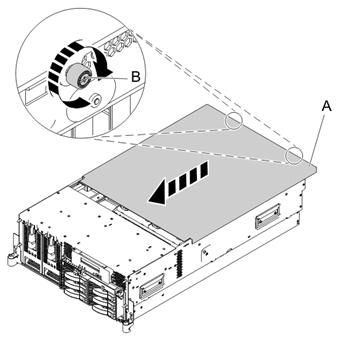
- Remove the service access cover
|
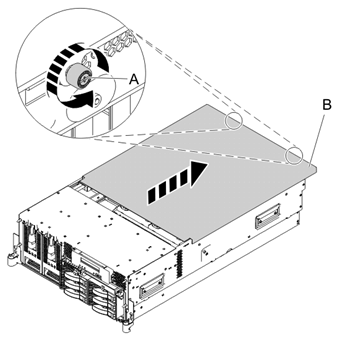
a. Loosen the two thumbscrews (A)located at the back of the cover. b. Slide the cover (B) toward the back of the system unit. When the front of the service access cover has cleared the upper frame ledge, lift the cover up and off the system unit. Attention: For proper cooling and airflow, replace the cover before turning on the system. Operating the system without the cover for more than 30 minutes could damage the system components. |
 |
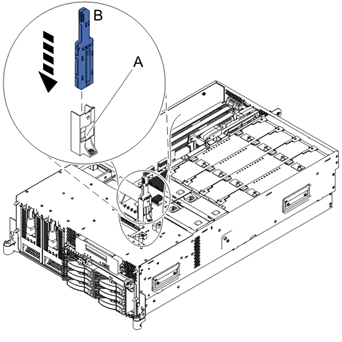
- Remove the VPD card
|
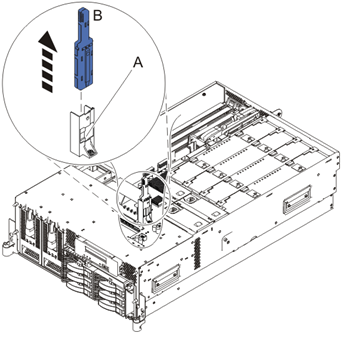
Remove the VPD card (B) from the VPD card guide (A) on the planar by pulling the blue handle. |
 |
- Install the VPD card
|
a. Insert the VPD card (B) into the VPD card guide (A). b. Push until the VPD card is fully seated. |
 |
- Install the service access cover
|
a. Place the service access cover (A) on the top of the system, about 25 mm (1 in.) from the front of the system. b. Hold the service access cover against the system unit and slide it toward the front of the system. The tabs of the service access cover slide beneath the upper chassis ledge. c. Align the two thumbscrews (B)located on the back of the service access cover with the two holes on the back of the system chassis. d. Tighten the thumbscrews to secure the service access cover. |
 |
- Place into operating position
|
a. To unlock the rail safety latches (B), slide the latches towards the front of the system. b. Push the system unit (A) back into the rack until both system-unit release latches have locked into position. Note: Ensure that the cables at the back of the system do not catch or bind as you push the system unit back into the rack. |
 |
- Place into operating position (continued)
|
Replace and tighten the two screws (B)that secure the system unit (A) to the rack. |
 |
- Connect the power cords
|
If you removed the power cords, connect all power cords to the unit you are servicing. |
 |
- Power on the system. 启动机器(打开系统电源)
|
Power on the system. |
- Access the ASMI 进入ASMI 操作界面
|
The Advanced System Management Interface (ASMI) is the interface to the service processor that is required to perform general and administrator-level service tasks, such as reading service processor error logs, reading vital product data, setting up the service processor, and controlling the system power. The ASMI may also be referred to as the service processor menus. (先进的系统管理接口 (ASMI) 是到服务处理器为执行一般和管理员级别的服务任务,例如读取服务处理器错误日志、 阅读重要产品数据、 设置服务处理器,和控制系统电源所需的接口。ASMI 可能也被称为服务处理器菜单。) To access the ASMI, refer to(要访问ASMI请参阅) Accessing the Advanced System Management Interface. When you have accessed the ASMI, continue with the next step. (当你访问ASMI,继续进行下一个步骤。) |
- Set the system identifiers 设置的系统标识符
|
a. On the ASM Welcome pane, if you have not already logged in, specify your user ID and password, and click Log In.(登陆窗口输入用户名和密码) Note: To perform this operation, your authority level must be Administrator or Authorized service provider.(注意此操作必须是管理员授权) b. In the navigation area, expand(在导航区域中,展开) System Configuration. c. Expand(展开) Program Vital Product Data. d. Select(选择) System Brand. e. If the backed up system brand is correct, click(如果系统信息显示是正确的请单击) Accept backed up setting and save. Otherwise, enter the correct system brand and click 入不正确请手动输入后单击 Continue. f. Note: If you do not know the correct system brand, contact your next level of support.(注:如果您不知道正确的系统品牌,请联系您的上一级技术支持人员。) g. Click Save setting to update the system brand to the VPD. (单击“保存设置”可更新系统品牌,VPD。) h. Select 选择 System Keywords under Program Vital Product Data. i. If the backed up system keywords is correct, click(如果备份系统关键字是否正确,请单击) Accept backed up setting and save. Otherwise, enter the values for the machine type-model, system serial number, system unique ID, and (if applicable) activation codes for Capacity on Demand (COD) and Virtualization Engine Technologies (VET). Set the Reserved field to blank spaces unless directed otherwise by Level 4 technical support. 否则,请输入值的机器型号、系统序列号、系统的唯一标识,以及(如果适用)激活代码按需扩容(COD)和虚拟化引擎技术(VET)。 设置“保留的”字段为空格,除非另有指示,4级技术支持人员。 Note: If you do not know the system unique ID, contact your next level of support. You cannot boot the system until valid values are entered for all fields. You can change these entries only once. (注: 如果您不知道系统唯一的 ID,请联系您的支持的下一级别。直到为所有字段输入有效的值,不能引导系统。您可以更改这些条目只有一次。) j. Click Save settings to update the system keywords and save them to the VPD. (单击 " 保存 " 把更新保存到 VPD 的设置。) |
|
Go to Verifying a repair . |
Parent topic: Removing and replacing FRUs
Send feedback | Rate this page
Last updated: Wed, April 18, 2012
Use this procedure to service the Vital Product Data (VPD) card
本文来自博客园,作者:xiaoming zhang,转载请注明原文链接:https://www.cnblogs.com/xmzhang

 浙公网安备 33010602011771号