7、kubernetes组件——ETCD
kubernetes组件——ETCD
简介
etcd是CoreOS团队于2013年6月发起的开源项目,它的目标是构建一个高可用的分布式键值(key-value)数据库。etcd内部采
用raft协议作为一致性算法,etcd基于Go语言实现
官方网站:https://etcd.io/
Github地址:https://github.com/etcd-io/etcd
etcd具有下面这些属性:
- 完全复制:集群中的每个节点都可以使用完整的存档
- 高可用性:Etcd可用于避免硬件的单点故障或网络问题
- 一致性:每次读取都会返回跨多主机的最新写入
- 简单:包括一个定义良好、面向用户的API(gRPC)
- 安全:实现了带有可选的客户端证书身份验证的自动化TLS
- 快速:每秒10000次写入的基准速度
- 可靠:使用Raft算法实现了存储的合理分布Etcd的工作原理
etcd配置文件
root@k8s-etcd-01:~# cat /etc/systemd/system/etcd.service
[Unit]
Description=Etcd Server
After=network.target
After=network-online.target
Wants=network-online.target
Documentation=https://github.com/coreos

[Service]
Type=notify
WorkingDirectory=/var/lib/etcd  #数据保存目录
ExecStart=/usr/local/bin/etcd \  #二进制文件路径
  --name=etcd-172.31.3.130 \    #当前node 名称
  --cert-file=/etc/kubernetes/ssl/etcd.pem \
  --key-file=/etc/kubernetes/ssl/etcd-key.pem \
  --peer-cert-file=/etc/kubernetes/ssl/etcd.pem \
  --peer-key-file=/etc/kubernetes/ssl/etcd-key.pem \
  --trusted-ca-file=/etc/kubernetes/ssl/ca.pem \
  --peer-trusted-ca-file=/etc/kubernetes/ssl/ca.pem \
  --initial-advertise-peer-urls=https://172.31.3.130:2380 \  #通告自己的集群端口
  --listen-peer-urls=https://172.31.3.130:2380 \             #集群之间通讯端口
  --listen-client-urls=https://172.31.3.130:2379,http://127.0.0.1:2379 \  #客户端访问地址
  --advertise-client-urls=https://172.31.3.130:2379 \        #通告自己的客户端端口
  --initial-cluster-token=etcd-cluster-0 \                   #创建集群使用的token,一个集群内的节点保持一致
  --initial-cluster=etcd-172.31.3.130=https://172.31.3.130:2380,etcd-172.31.3.131=https://172.31.3.131:2380,etcd-172.31.3.132=https://172.31.3.132:2380 \  #集群所有的节点信息
  --initial-cluster-state=new \                       #新建集群的时候的值为new,如果是已经存在的集群为existing。
  --data-dir=/var/lib/etcd \                          #数据目录路径
  --wal-dir= \
  --snapshot-count=50000 \
  --auto-compaction-retention=1 \
  --auto-compaction-mode=periodic \
  --max-request-bytes=10485760 \
  --quota-backend-bytes=8589934592
Restart=always
RestartSec=15
LimitNOFILE=65536
OOMScoreAdjust=-999

[Install]
WantedBy=multi-user.target
参数优化
--max-request-bytes=10485760 #request size limit(请求的最大字节数,默认一个key最大1.5Mib,官方推荐最大10Mib)
--quota-backend-bytes=8589934592 #storage size limit(磁盘存储空间大小限制,默认为2G,此值超过8G启动会有警告信息)
数据压缩
--auto-compaction-mode=periodic #周期性压缩
--auto-compaction-retention=10h #第一次压缩等待10小时,以后每次10小时*10%=1小时压缩一次。
0Hr (rev = 1)
1hr (rev = 10)
...
8hr (rev = 80)
9hr (rev = 90)
10hr (rev = 100, Compact(1))
11hr (rev = 110, Compact(10))

集群碎片整理:
root@k8s-etcd-01:~# ETCDCTL_API=3 /usr/local/bin/etcdctl defrag --cluster --endpoints=https://172.31.3.130:2379 --cacert=/etc/kubernetes/ssl/ca.pem --cert=/etc/kubernetes/ssl/etcd.pem --key=/etc/kubernetes/ssl/etcd-key.pem
Finished defragmenting etcd member[https://172.31.3.131:2379]
Finished defragmenting etcd member[https://172.31.3.130:2379]
Finished defragmenting etcd member[https://172.31.3.132:2379]
常用命令
检索节点信息
root@k8s-etcd-01:~# etcdctl  member list -w table
+------------------+---------+-------------------+---------------------------+---------------------------+------------+
|        ID        | STATUS  |       NAME        |        PEER ADDRS         |       CLIENT ADDRS        | IS LEARNER |
+------------------+---------+-------------------+---------------------------+---------------------------+------------+
|  192e98ab9fd93fa | started | etcd-172.31.3.131 | https://172.31.3.131:2380 | https://172.31.3.131:2379 |      false |
| 901fd1024507fcd5 | started | etcd-172.31.3.130 | https://172.31.3.130:2380 | https://172.31.3.130:2379 |      false |
| cf6a4cb1fc91c6af | started | etcd-172.31.3.132 | https://172.31.3.132:2380 | https://172.31.3.132:2379 |      false |
+------------------+---------+-------------------+---------------------------+---------------------------+------------+
增删改查
#添加数据
root@k8s-etcd-01:~# etcdctl put /name "tom"
OK
#查询数据
root@k8s-etcd-01:~# etcdctl get /name
/name
tom
#修改数据,直接覆盖就是更新数据
root@k8s-etcd-01:~# etcdctl put /name "xmtx"
OK
root@k8s-etcd-01:~# etcdctl get /name
/name
xmtx
#删除数据,返回的时删除了多少条数据
root@k8s-etcd-01:~# etcdctl del /name
1
etcd数据信息
#以路径的方式所有key信息
root@k8s-etcd-01:~# etcdctl get /  --prefix --keys-only
		#–prefix:默认为true可以看到所有的子目录.
		#–keys-only:默认为true,只显示key,如果设置为false,会显示key的所有值.
#pod信息
root@k8s-etcd-01:~# etcdctl get / --prefix --keys-only | grep pod
#namespace信息
root@k8s-etcd-01:~# etcdctl get / --prefix --keys-only | grep namespaces
#控制器信息
root@k8s-etcd-01:~# etcdctl get / --prefix --keys-only | grep deployment
#calico组件信息
root@k8s-etcd-01:~# etcdctl get / --prefix --keys-only | grep calico
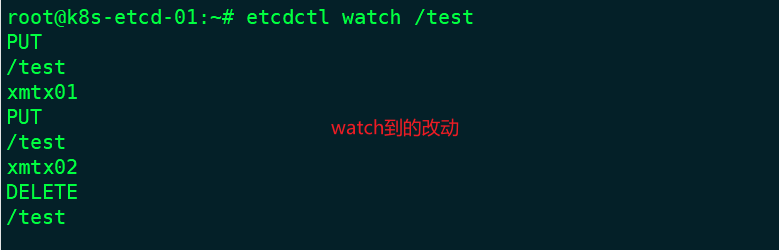
etcd数据watch机制
基于不断监看数据,发生变化就主动触发通知客户端,Etcd v3 的watch机制支持watch某个固定的key,也支持watch一个范围。
#在etcd节点1上watch一个key,没有此key也可以执行watch,后期可以再创建
root@k8s-etcd-01:~# etcdctl watch /test
#在节点2修改数据验证节点一能否检测到
root@k8s-etcd-02:~# etcdctl put /test "xmtx01"
OK
root@k8s-etcd-02:~# etcdctl put /test "xmtx02"
OK
root@k8s-etcd-02:~# etcdctl del /test
1
etcd V3 API版本数据备份与恢复
WAL是write ahead log(预写日志)的缩写,顾名思义,也就是在执行真正的写操作之前先写一个日志,预写日志。
wal: 存放预写式日志,最大的作用是记录了整个数据变化的全部历程。在etcd中,所有数据的修改在提交前,都要先写入到WAL中。
查看当前pod
root@k8s-master-01:~# kubectl get pod -n myserver
NAME        READY   STATUS    RESTARTS      AGE
net-test1   1/1     Running   0             18s
net-test2   1/1     Running   3 (74m ago)   27h
net-test3   1/1     Running   0             11s
备份数据:
#备份当前数据
root@k8s-etcd-01:/opt# etcdctl snapshot save /opt/backup/snapshot.db
{"level":"info","ts":"2022-07-28T20:32:27.925+0800","caller":"snapshot/v3_snapshot.go:65","msg":"created temporary db file","path":"/opt/backup/snapshot.db.part"}
{"level":"info","ts":"2022-07-28T20:32:27.926+0800","logger":"client","caller":"v3/maintenance.go:211","msg":"opened snapshot stream; downloading"}
{"level":"info","ts":"2022-07-28T20:32:27.927+0800","caller":"snapshot/v3_snapshot.go:73","msg":"fetching snapshot","endpoint":"127.0.0.1:2379"}
{"level":"info","ts":"2022-07-28T20:32:27.942+0800","logger":"client","caller":"v3/maintenance.go:219","msg":"completed snapshot read; closing"}
{"level":"info","ts":"2022-07-28T20:32:27.947+0800","caller":"snapshot/v3_snapshot.go:88","msg":"fetched snapshot","endpoint":"127.0.0.1:2379","size":"2.4 MB","took":"now"}
{"level":"info","ts":"2022-07-28T20:32:27.947+0800","caller":"snapshot/v3_snapshot.go:97","msg":"saved","path":"/opt/backup/snapshot.db"}
Snapshot saved at /opt/backup/snapshot.db
通过定时任务自动备份
root@k8s-etcd-01:/opt# cat script.sh
#!/bin/bash
source /etc/profile
DATE=`date +%Y-%m-%d_%H-%M-%S`
ETCDCTL_API=3 /usr/local/bin/etcdctl snapshot save /opt/backup/etcd-snapshot-${DATE}.db
恢复数据
删除pod,模拟丢失
root@k8s-master-01:~# kubectl delete pods net-test1 net-test2 -n myserver
pod "net-test1" deleted
pod "net-test2" deleted
root@k8s-master-01:~# kubectl get pod -n myserver
NAME        READY   STATUS    RESTARTS   AGE
net-test3   1/1     Running   0          12m
停止所有 Master 上 kube-apiserver 服务
root@k8s-master-01:~# systemctl stop kube-apiserver
root@k8s-master-02:~# systemctl stop kube-apiserver
root@k8s-master-03:~# systemctl stop kube-apiserver
停止集群中所有 ETCD 服务
root@k8s-etcd-01:~# systemctl stop etcd
root@k8s-etcd-02:~# systemctl stop etcd
root@k8s-etcd-03:~# systemctl stop etcd
备份现有 Etcd 数据
root@k8s-etcd-01:~# mv /var/lib/etcd/* /opt/
root@k8s-etcd-02:~# mv /var/lib/etcd/* /opt/
root@k8s-etcd-03:~# mv /var/lib/etcd/* /opt/
拷贝 ETCD 备份快照
root@k8s-etcd-01:~# scp /opt/backup/snapshot.db 172.31.3.131:/opt/backup/
root@k8s-etcd-01:~# scp /opt/backup/snapshot.db 172.31.3.132:/opt/backup/
恢复数据
#etcd-01执行
root@k8s-etcd-01:~# etcdctl snapshot restore /opt/backup/snapshot.db \
> --name etcd-172.31.3.130 \
> --initial-cluster etcd-172.31.3.130=https://172.31.3.130:2380,etcd-172.31.3.131=https://172.31.3.131:2380,etcd-172.31.3.132=https://172.31.3.132:2380 \
> --initial-cluster-token=etcd-cluster-0 \
> --initial-advertise-peer-urls=https://172.31.3.130:2380 \
> --data-dir=/var/lib/etcd
#etcd-02执行
root@k8s-etcd-02:~# etcdctl snapshot restore /opt/backup/snapshot.db \
>  --name etcd-172.31.3.131 \
>  --initial-cluster etcd-172.31.3.130=https://172.31.3.130:2380,etcd-172.31.3.131=https://172.31.3.131:2380,etcd-172.31.3.132=https://172.31.3.132:2380 \
>  --initial-cluster-token=etcd-cluster-0 \
>  --initial-advertise-peer-urls=https://172.31.3.131:2380 \
>  --data-dir=/var/lib/etcd
#etcd-03执行
root@k8s-etcd-03:~# etcdctl snapshot restore /opt/backup/snapshot.db \
>  --name etcd-172.31.3.132 \
>  --initial-cluster etcd-172.31.3.130=https://172.31.3.130:2380,etcd-172.31.3.131=https://172.31.3.131:2380,etcd-172.31.3.132=https://172.31.3.132:2380 \
>  --initial-cluster-token=etcd-cluster-0 \
>  --initial-advertise-peer-urls=https://172.31.3.132:2380 \
>  --data-dir=/var/lib/etcd
启动etcd服务
systemctl start etcd
检查节点状态
root@k8s-etcd-01:~# etcdctl  member list -w table
+------------------+---------+-------------------+---------------------------+---------------------------+------------+
|        ID        | STATUS  |       NAME        |        PEER ADDRS         |       CLIENT ADDRS        | IS LEARNER |
+------------------+---------+-------------------+---------------------------+---------------------------+------------+
|  192e98ab9fd93fa | started | etcd-172.31.3.131 | https://172.31.3.131:2380 | https://172.31.3.131:2379 |      false |
| 901fd1024507fcd5 | started | etcd-172.31.3.130 | https://172.31.3.130:2380 | https://172.31.3.130:2379 |      false |
| cf6a4cb1fc91c6af | started | etcd-172.31.3.132 | https://172.31.3.132:2380 | https://172.31.3.132:2379 |      false |
+------------------+---------+-------------------+---------------------------+---------------------------+------------+
root@k8s-etcd-01:~# export NODE_IPS="172.31.3.130 172.31.3.131 172.31.3.132"
root@k8s-etcd-01:~# for ip in ${NODE_IPS}; do ETCDCTL_API=3 /usr/local/bin/etcdctl \
>   --endpoints=https://${ip}:2379 --cacert=/etc/kubernetes/ssl/ca.pem \
>   --cert=/etc/kubernetes/ssl/etcd.pem \
>   --key=/etc/kubernetes/ssl/etcd-key.pem endpoint health; done
https://172.31.3.130:2379 is healthy: successfully committed proposal: took = 11.837476ms
https://172.31.3.131:2379 is healthy: successfully committed proposal: took = 7.595707ms
https://172.31.3.132:2379 is healthy: successfully committed proposal: took = 8.392455ms
启动 kube-apiserver并检查集群状态
root@k8s-master-01:~# systemctl start kube-apiserver
root@k8s-master-01:~# kubectl get cs
NAME                 STATUS    MESSAGE                         ERROR
controller-manager   Healthy   ok
scheduler            Healthy   ok
etcd-0               Healthy   {"health":"true","reason":""}
etcd-2               Healthy   {"health":"true","reason":""}
etcd-1               Healthy   {"health":"true","reason":""}
root@k8s-master-01:~# kubectl get pod -n myserver
NAME        READY   STATUS    RESTARTS       AGE
net-test1   1/1     Running   0              40m
net-test2   1/1     Running   3 (113m ago)   27h
net-test3   1/1     Running   0              39m
Kubernetes 集群备份主要是备份 ETCD 集群。而恢复时,主要考虑恢复整个顺序:
停止kube-apiserver --> 停止ETCD --> 恢复数据 --> 启动ETCD --> 启动kube-apiserve
注意:备份ETCD集群时,只需要备份一个ETCD就行,恢复时,拿同一份备份数据恢复。
使用kubeasz备份与恢复
root@k8s-deploy-01:/etc/kubeasz# ./ezctl --help
backup      <cluster>            to backup the cluster state (etcd snapshot)
restore     <cluster>            to restore the cluster state from backups
#备份
root@k8s-deploy-01:/etc/kubeasz/# ./ezctl backup k8s-cluster-01
root@k8s-deploy-01:/etc/kubeasz/clusters/k8s-cluster-01/backup# ll
total 7272
drwxr-xr-x 2 root root    4096 Jul 28 21:13 ./
drwxr-xr-x 5 root root    4096 Jul 27 20:39 ../
-rw------- 1 root root 3715104 Jul 28 21:13 snapshot_202207282113.db  #备份的文件
-rw------- 1 root root 3715104 Jul 28 21:13 snapshot.db
root@k8s-deploy-01:/etc/kubeasz# cat playbooks/94.backup.yml
  - name: update the latest backup
  #通过olaybook可以看到每次备份完后会将snapshot.db替换为最新的备份文件
    shell: 'cd {{ cluster_dir }}/backup/ && /bin/cp -f snapshot_{{ timestamp.stdout }}.db snapshot.db'
#恢复
root@k8s-deploy-01:/etc/kubeasz# cat roles/cluster-restore/tasks/main.yml
- name: 准备指定的备份etcd 数据
  copy:
    src: "{{ cluster_dir }}/backup/{{ db_to_restore }}"
    dest: "/etcd_backup/snapshot.db"  #这里默认使用的就是snapshot.db文件
root@k8s-deploy-01:/etc/kubeasz# ./ezctl restore k8s-cluster-01
#检查状态
root@k8s-deploy-01:/etc/kubeasz# kubectl get cs
NAME                 STATUS    MESSAGE                         ERROR
controller-manager   Healthy   ok
etcd-2               Healthy   {"health":"true","reason":""}
etcd-0               Healthy   {"health":"true","reason":""}
scheduler            Healthy   ok
etcd-1               Healthy   {"health":"true","reason":""}
root@k8s-deploy-01:/etc/kubeasz# kubectl get pod -n myserver
NAME        READY   STATUS    RESTARTS   AGE
net-test1   1/1     Running   0          56m
net-test2   1/1     Running   0          28h
net-test3   1/1     Running   0          56m
#etcd检查
root@k8s-etcd-01:~# export NODE_IPS="172.31.3.130 172.31.3.131 172.31.3.132"
root@k8s-etcd-01:~# for ip in ${NODE_IPS}; do ETCDCTL_API=3 /usr/local/bin/etcdctl   --endpoints=https://${ip}:2379 --cacert=/etc/kubernetes/ssl/ca.pem   --cert=/etc/kubernetes/ssl/etcd.pem   --key=/etc/kubernetes/ssl/etcd-key.pem endpoint health; done
https://172.31.3.130:2379 is healthy: successfully committed proposal: took = 6.251056ms
https://172.31.3.131:2379 is healthy: successfully committed proposal: took = 8.043633ms
https://172.31.3.132:2379 is healthy: successfully committed proposal: took = 8.691206ms
ETCD数据恢复流程
当etcd集群宕机数量超过集群总节点数一半以上的时候(如总数为三台宕机两台),就会导致整合集群宕机,后期需要重新恢复数据,则恢复流程如下:
1、恢复服务器系统
2、重新部署ETCD集群
3、停止kube-apiserver/controller-manager/scheduler/kubelet/kube-proxy
4、停止ETCD集群
5、各ETCD节点恢复同一份备份数据
6、启动各节点并验证ETCD集群
7、启动kube-apiserver/controller-manager/scheduler/kubelet/kube-proxy
8、验证k8s master状态及pod数据

 浙公网安备 33010602011771号