
使用自编码对文本图像进行去燥
本项目的主要内容是对下面包含文本的图像背景进行去燥处理:
主要的步骤:
- 从kaggle中获取数据
- 建立项目目录
- 准备数据——准备自定义数据集、获取可迭代的数据Loaders
- 建立自编码网络
- 训练数据
- 测试数据
一、从kaggle中获取数据
二、建立项目目录
1 ├───input
2 │   ├───test
3 │   ├───train
4 │   └───train_cleaned
5 ├───models  #包含训练好的模型;以及图片
6 │   └───Saved_Images
7 └───src   #包含所有的源代码
三、准备数据——准备自定义数据集、获取可迭代的数据Loaders
3.1 包的导入和任务概览
 1 import numpy as np
 2 import pandas as pd
 3 import matplotlib.pyplot as plt
 4 import cv2
 5 import os
 6 import torch
 7 import torchvision
 8 import glob
 9 import torch.nn as nn
10 import torch.optim as optim
11 import torch.nn.functional as F
12 from torchvision.transforms import transforms
13 from torch.utils.data import Dataset, DataLoader
14 from torchvision.utils import save_image
 1 # visualize train images
 2 def show_image(path):
 3     plt.figure(figsize=(10, 7))
 4     img = cv2.imread(path)
 5     print(img.shape)
 6     plt.imshow(img)
 7     plt.show()
 8
 9 # noisy train image and the corresponding clean train image
10 show_image('../input/train/2.png')
11 show_image('../input/train_cleaned/2.png')
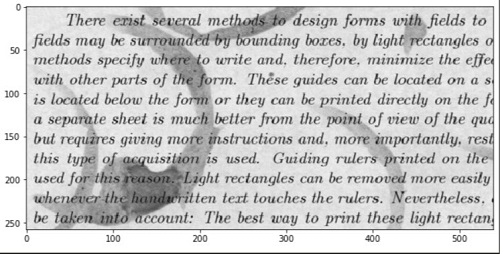
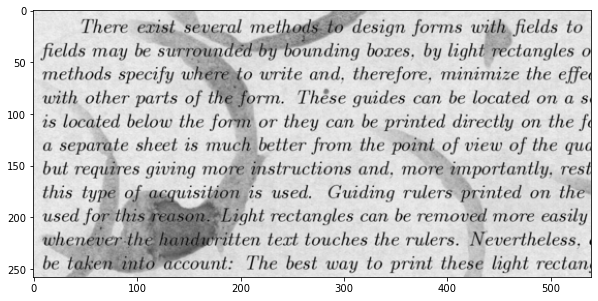
在训练的时候,我们既有训练的噪音文本图也有相对应的干净文本图;
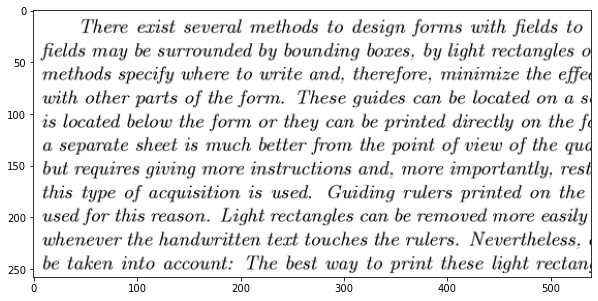
我们的任务就是训练一个深度自编码神经网络实现第二张图像
输出图片:
1)训练噪音图片
2)训练干净图
3.2 准备自定义的Dataset和DataLoaders
加载数据
1 TRAIN_IMAGES = glob.glob('../input/train/*.png')  #返回匹配文件路径名
2 TRAIN_CLEAN = glob.glob('../input/train_cleaned/*.png')
3 TEST_IMAGES = glob.glob('../input/test/*.png')
数据大小变换及存储
 1 def get_data(path):
 2     images = []
 3     for i, image in enumerate(path):
 4         image = cv2.imread(image)  #读图像
 5         image = cv2.resize(image, (256, 256))
 6         image = np.reshape(image, image.shape[0]*image.shape[1]*image.shape[2])
 7         images.append(image)  #展平的图像的数组
 8     return images #返回全部展平的图像
 9 x_train = get_data(TRAIN_IMAGES)  #调用函数对所有数据集进行处理
10 y_train = get_data(TRAIN_CLEAN)
11 x_test = get_data(TEST_IMAGES)
输出:
 1 print(len(x_train))
 2 print(len(y_train))
 3 print(len(x_test))
 4 print(x_train[1])
 5
 6 输出:
 7 144   #所有图片的数量
 8 144
 9 72
10 [231 231 231 ... 220 220 220]  #某个展平后的图像
定义超参数和图像变换
1 # constants 2 NUM_EPOCHS = 100 3 LEARNING_RATE = 1e-3 4 BATCH_SIZE = 2
数据转换
1 # define transforms
2 transform = transforms.Compose([
3      transforms.ToPILImage(),  #把Tensor of shape C x H x W or a numpy ndarray of shape H x W x C转换成PIL Image
4      transforms.ToTensor() #a PIL Image or numpy.ndarray to tensor
5 ])
格式很重要;
自定义数据类:
 1 # prepare the dataset and the dataloader
 2 class ImageData(Dataset):
 3     def __init__(self, images, labels=None, transforms=None):
 4         self.X = images  # 参数的初始化
 5         self.y = labels
 6         self.transforms = transforms
 7
 8     def __len__(self):
 9         return (len(self.X))
10
11     def __getitem__(self, i):
12         data = self.X[i][:] #存储所有的数据元素
      #把数据转换为numpy的格式
13         data = np.asarray(data).astype(np.uint8).reshape((256, 256, 3))
14
15         if self.transforms:
16             data = self.transforms(data)
17
      #在这里,我们的label也是图像像素值;所以对y进行同样的操作
18         if self.y is not None:  #test data不会进入此判断中
19             labels = self.y[i][:]
20             labels = np.asarray(labels).astype(np.uint8).reshape((256, 256, 3))
21             labels = self.transforms(labels)
22             return (data, labels)
23         else:
24             return data
25
    #创建了两个data类;
26 train_data = ImageData(x_train, y_train, transform)
27 test_data = ImageData(x_test, None, transform)
28
29 train_loader = DataLoader(train_data, batch_size=BATCH_SIZE, shuffle=True)
30 test_loader = DataLoader(test_data, batch_size=BATCH_SIZE, shuffle=True)
__getitem__(self, i) 从数据集中返回样本,当我们提供给它一个索引值;
其他辅助函数的编写:
 1 # helper functions
 2 def create_dir():
 3     image_dir = '../models/Saved_Images'
 4     if not os.path.exists(image_dir):
 5         os.makedirs(image_dir)
 6
 7 def save_decoded_image(img, name):
 8     img = img.view(img.size(0), 3, 256, 256)
 9     save_image(img, name)
10 def get_device():
11     if torch.cuda.is_available():
12         device = 'cuda:0'
13     else:
14         device = 'cpu'
15     return device
16 device = get_device()
17 print(device)
18 create_dir()
四、建立自编码网络
 1 # the autoencoder network
 2 class Autoencoder(nn.Module):
 3     def __init__(self):
 4         super(Autoencoder, self).__init__()
 5         # encoder layers
 6         self.enc1 = nn.Conv2d(3, 512, kernel_size=3, padding=1)
 7         self.enc2 = nn.Conv2d(512, 256, kernel_size=3, padding=1)
 8         self.enc3 = nn.Conv2d(256, 128, kernel_size=3, padding=1)
 9         self.enc4 = nn.Conv2d(128, 64, kernel_size=3, padding=1)
10
11         # decoder layers
12         self.dec1 = nn.ConvTranspose2d(64, 64, kernel_size=2, stride=2)
13         self.dec2 = nn.ConvTranspose2d(64, 128, kernel_size=2, stride=2)
14         self.dec3 = nn.ConvTranspose2d(128, 256, kernel_size=2, stride=2)
15         self.dec4 = nn.ConvTranspose2d(256, 512, kernel_size=2, stride=2)
16         self.out = nn.Conv2d(512, 3, kernel_size=3, padding=1)
17
18         self.bn1 = nn.BatchNorm2d(512)
19         self.bn2 = nn.BatchNorm2d(256)
20         self.bn3 = nn.BatchNorm2d(128)
21         self.bn4 = nn.BatchNorm2d(64)
22         self.pool = nn.MaxPool2d(2, 2)
23     def forward(self, x):
24         # encode
25         x = F.relu(self.enc1(x))
26         x = (self.bn1(x))
27         x = self.pool(x)
28         x = F.relu(self.enc2(x))
29         x = (self.bn2(x))
30         x = self.pool(x)
31         x = F.relu(self.enc3(x))
32         x = (self.bn3(x))
33         x = self.pool(x)
34         x = F.relu(self.enc4(x))
35         x = (self.bn4(x))
36         x = self.pool(x) # the latent space representation
37
38         # decode
39         x = F.relu(self.dec1(x))
40         x = (self.bn4(x))
41         x = F.relu(self.dec2(x))
42         x = (self.bn3(x))
43         x = F.relu(self.dec3(x))
44         x = (self.bn2(x))
45         x = F.relu(self.dec4(x))
46         x = (self.bn1(x))
47         x = torch.sigmoid(self.out(x))
48         return x
49 net = Autoencoder()
50 print(net)
51 net.to(device)
定义损失函数和优化器
1 # the loss function
2 criterion = nn.MSELoss()
3 # the optimizer
4 optimizer = optim.Adam(net.parameters(), lr=LEARNING_RATE)
五、训练函数
 1 # the training function
 2 def train(net, train_loader, NUM_EPOCHS):
 3     train_loss = []
 4     for epoch in range(NUM_EPOCHS):
 5         running_loss = 0.0  #计算每个epoch的损失
 6         for data in train_loader:
 7             img = data[0]
 8             labels = data[1]
 9             img = img.to(device)
10             labels = labels.to(device)
11             optimizer.zero_grad()
12             outputs = net(img)
13             loss = criterion(outputs, labels)  #计算损失
14             # backpropagation
15             loss.backward()                   #反向传播
16             # update the parameters
17             optimizer.step()                  #参数更新
18             running_loss += loss.item()      损失的叠加
19
20         loss = running_loss / len(train_loader)
21         train_loss.append(loss)
22         print(f'Epoch {epoch+1} of {NUM_EPOCHS}, Train Loss: {loss:.5f}')
23
24         if epoch % 10 == 0:
25             save_decoded_image(outputs.cpu().data, name='../models/denoised{epoch}.png')
26     return train_loss
测试函数
1 # the test function
2 def test(net, test_loader):
3     with torch.no_grad():
4         for i, data in enumerate(test_loader):
5             img = data
6             img = img.to(device)
7             outputs = net(img)
8             save_decoded_image(outputs.cpu().data, name='../models/test_image{i}.png')
六、训练和测试:
1 train_loss = train(net, train_loader, NUM_EPOCHS)
2 test(net, test_loader)
七、损失绘制
1 plt.plot(train_loss)
2 plt.xlabel('Epochs')
3 plt.ylabel('Loss')
4 plt.savefig('../models/loss_plot.png')
5 plt.show()

八、测试重构的图像
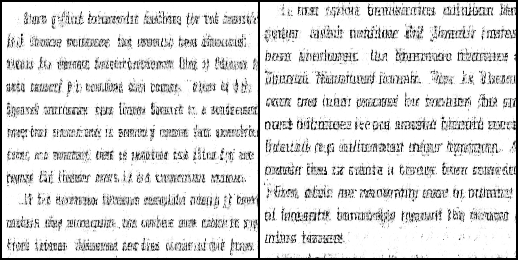
在测试数据集上,效果不是很好;
在消除背景噪音的同时,文字似乎变得也不可读;
似乎需要加一个惩罚项来进行优化;
