使用Pytorch手动训练VGG11
在前面的博客中我们提到如何用pytorch搭建一个VGG11网络框架;
在本博客中,我们将使用之前搭建的VGG11网络,同时对其进行手动训练,使我们可以更好的理解模型建立和训练的过程;
主要内容:
- 数据集和目录结构——使用数字手写辨识来训练VGG11
- 编码部分:
1)数据集准备;
2)训练和验证模型;
3)优化器
4)验证每个epoch的精度;
- 分析训练的损失和精度;
- 在图像上训练和测试数据
一、数据集和目录结构
数据集:手写体 Digit MNIST
使用torchvision.dataset模块加载;
目录结构:
├── input
│   └── test_data
│       ├── eight.jpg
│       ├── two.jpg
│       └── zero.jpg
├── outputs
│   ├── accuracy.jpg
│   └── loss.jpg
|   ...
├── src
│   ├── data
│   │   └── MNIST
│   ...
│   ├── models.py
│   ├── test.py
│   └── train.py
二、 编码部分:
1) 网络模型脚本:VGG11模型的加载,见 使用Pytorch搭建VGG网络——以VGG11为例
2)训练脚本train.py的编写:
2.1)相关包的导入:
 1 import torch
 2 import torchvision
 3 import torchvision.transforms as transforms
 4 import matplotlib.pyplot as plt
 5 import matplotlib
 6 import torch.nn as nn
 7 import torch.optim as optim
 8 from tqdm import tqdm
 9 from models import VGG11
10 matplotlib.style.use('ggplot')
2.2)定义模型的参数及设备:
1 device = torch.device('cuda' if torch.cuda.is_available() else 'cpu')
2 print(f"[INFO]: Computation device: {device}")
3 epochs = 10
4 batch_size = 32
出现了OOM(out of memory)错误的话,可以减少batch到16、8或者4,来迎合你的GPU;
2.3) 图像变换
 1 # our transforms will differ a bit from the VGG paper
 2 # as we are using the MNIST dataset, so, we will directly resize...
 3 # ... the images to 224x224 and not crop them and we will not use...
 4 # ... any random flippings also
 5 train_transform = transforms.Compose(
 6     [transforms.Resize((224, 224)),
 7      transforms.ToTensor(),
 8      transforms.Normalize(mean=(0.5), std=(0.5))])
 9 valid_transform = transforms.Compose(
10     [transforms.Resize((224, 224)),
11      transforms.ToTensor(),
12      transforms.Normalize(mean=(0.5), std=(0.5))])
注:原始论文中有图像的翻转flipping,在我们的训练中是不需要的;
Line6把图像进行resize()
line7把图像变成tensor
line7标准化处理;
————————————————————————————————
2.4)数据的加载
接下来准备训练和验证数据集以及data loaders。
 1 # training dataset and data loader
 2 train_dataset = torchvision.datasets.MNIST(root='./data', train=True,
 3                                              download=True,
 4                                              transform=train_transform)
 5 train_dataloader = torch.utils.data.DataLoader(train_dataset,
 6                                                batch_size=batch_size,
 7                                                shuffle=True)
 8 # validation dataset and dataloader
 9 valid_dataset = torchvision.datasets.MNIST(root='./data', train=False,
10                                            download=True,
11                                            transform=valid_transform)
12 valid_dataloader = torch.utils.data.DataLoader(valid_dataset,
13                                              batch_size=batch_size,
14                                              shuffle=False)
2.5)模型的初始化、损失函数以及优化器
 1 # instantiate the model
 2 model = VGG11(in_channels=1, num_classes=10).to(device)
 3 # total parameters and trainable parameters
 4 total_params = sum(p.numel() for p in model.parameters())
 5 print(f"[INFO]: {total_params:,} total parameters.")
 6 total_trainable_params = sum(
 7     p.numel() for p in model.parameters() if p.requires_grad)
 8 print(f"[INFO]: {total_trainable_params:,} trainable parameters.")
 9 # the loss function
10 criterion = nn.CrossEntropyLoss()
11 # the optimizer
12 optimizer = optim.SGD(model.parameters(), lr=0.01, momentum=0.9,
13                       weight_decay=0.0005)
- 处理的MNIS是灰度图像,所以输入通道为1;输出的类别是10;
- 使用的是交叉熵损失函数;SGD用于进行参数更新;
2.6)训练函数
 1 # training
 2 def train(model, trainloader, optimizer, criterion):
 3     model.train()
 4     print('Training')
 5     train_running_loss = 0.0
 6     train_running_correct = 0
 7     counter = 0
 8     for i, data in tqdm(enumerate(trainloader), total=len(trainloader)):
 9         counter += 1
10
11         image, labels = data
12         image = image.to(device)
13         labels = labels.to(device)
14
15         optimizer.zero_grad()
16         # forward pass
17         outputs = model(image)
18         # calculate the loss
19         loss = criterion(outputs, labels)
20         train_running_loss += loss.item()
21         # calculate the accuracy
22         _, preds = torch.max(outputs.data, 1)
23         train_running_correct += (preds == labels).sum().item()
24         loss.backward()
25         optimizer.step()
26
27     epoch_loss = train_running_loss / counter
28     epoch_acc = 100. * (train_running_correct / len(trainloader.dataset))
29     return epoch_loss, epoch_acc
- 迭代训练数据加载器,提取标签和图像;
- 加载图像和标签到计算设备上;
- 前向传播,计算损失和精度;后向传播损失;
- 返回目前epoch的损失和精度;
2.8)验证函数:
验证函数有一些不同。对每个epoch中,我们将会计算损失和精度;
我们将对每个类别计算精度,评估在每个epoch中我们的模型表现力;
 1 # validation
 2 def validate(model, testloader, criterion):
 3     model.eval()
 4
 5     # we need two lists to keep track of class-wise accuracy
 6     class_correct = list(0. for i in range(10))
 7     class_total = list(0. for i in range(10))
 8     print('Validation')
 9     valid_running_loss = 0.0
10     valid_running_correct = 0
11     counter = 0
12     with torch.no_grad():
13         for i, data in tqdm(enumerate(testloader), total=len(testloader)):
14             counter += 1
15
16             image, labels = data
17             image = image.to(device)
18             labels = labels.to(device)
19             # forward pass
20             outputs = model(image)
21             # calculate the loss
22             loss = criterion(outputs, labels)
23             valid_running_loss += loss.item()
24             # calculate the accuracy
25             _, preds = torch.max(outputs.data, 1)
26             valid_running_correct += (preds == labels).sum().item()
27             # calculate the accuracy for each class
28             correct  = (preds == labels).squeeze()
29             for i in range(len(preds)):
30                 label = labels[i]
31                 class_correct[label] += correct[i].item()
32                 class_total[label] += 1
33
34     epoch_loss = valid_running_loss / counter
35     epoch_acc = 100. * (valid_running_correct / len(testloader.dataset))
36     # print the accuracy for each class after evey epoch
37     # the values should increase as the training goes on
38     print('\n')
39     for i in range(10):
40         print(f"Accuracy of digit {i}: {100*class_correct[i]/class_total[i]}")
41     return epoch_loss, epoch_acc
2.9)训练过程:
 1 # start the training
 2 # lists to keep track of losses and accuracies
 3 train_loss, valid_loss = [], []
 4 train_acc, valid_acc = [], []
 5 for epoch in range(epochs):
 6     print(f"[INFO]: Epoch {epoch+1} of {epochs}")
 7
 8     train_epoch_loss, train_epoch_acc = train(model, train_dataloader,
 9                                               optimizer, criterion)
10     valid_epoch_loss, valid_epoch_acc = validate(model, valid_dataloader,
11                                                  criterion)
12     train_loss.append(train_epoch_loss)
13     valid_loss.append(valid_epoch_loss)
14     train_acc.append(train_epoch_acc)
15     valid_acc.append(valid_epoch_acc)
16
17     print('\n')
18     print(f"Training loss: {train_epoch_loss:.3f}, training acc: {train_epoch_acc:.3f}")
19     print(f"Validation loss: {valid_epoch_loss:.3f}, validation acc: {valid_epoch_acc:.3f}")
20
21     print('-'*50)
- 把训练和验证的损失和精度存储到train_loss、valid_loss以及train_acc和valid_acc中;
- 在每个epoch中,我们打印训练和损失的指标;
最后的步骤存储在训练的模型中,绘制出损失和精度图;
三、分析训练的损失和精度;
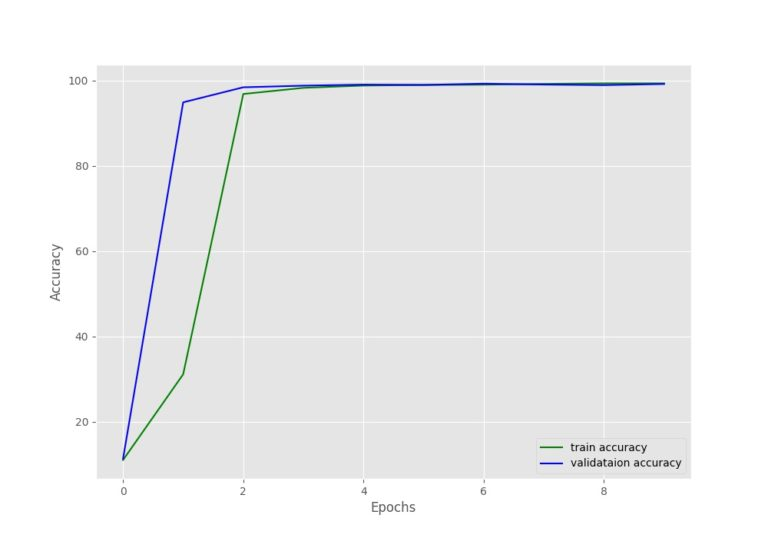
图1 精度图
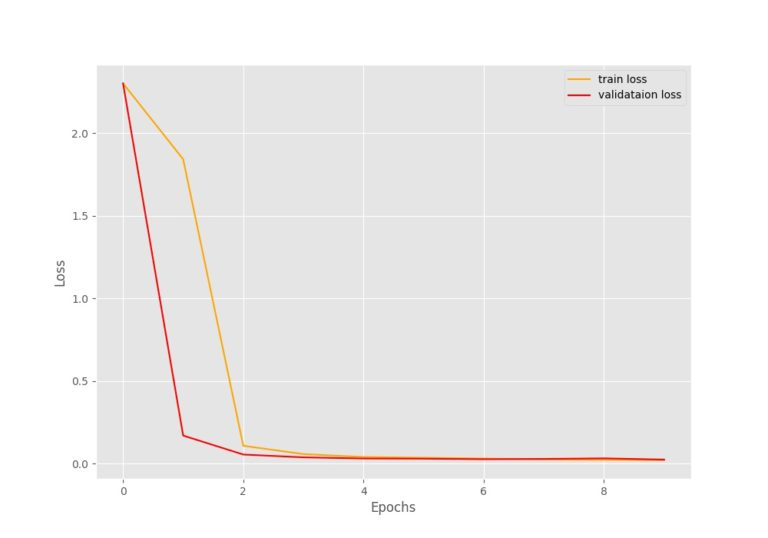
图2 损失图
四、对新的图像进行推断
1 import torch
2 import cv2
3 import glob as glob
4 import torchvision.transforms as transforms
5 import numpy as np
6 from models import VGG11
加载训练的权重,定义Transforms
 1 # inferencing on CPU
 2 device = 'cpu'
 3 # initialize the VGG11 model
 4 model = VGG11(in_channels=1, num_classes=10)
 5 # load the model checkpoint
 6 checkpoint = torch.load('../outputs/model.pth')
 7 # load the trained weights
 8 model.load_state_dict(checkpoint['model_state_dict'])
 9 model.to(device)
10 model.eval()
11 # simple image transforms
12 transform = transforms.Compose([
13     transforms.ToPILImage(),
14     transforms.Resize((224, 224)),
15     transforms.ToTensor(),
16     transforms.Normalize(mean=[0.5],
17                          std=[0.5])
18 ])
读图像并将其传入模型中
 1 # get all the test images path
 2 image_paths = glob.glob('../input/test_data/*.jpg')
 3 for i, image_path in enumerate(image_paths):
 4     orig_img = cv2.imread(image_path)
 5     # convert to grayscale to make the image single channel
 6     image = cv2.cvtColor(orig_img, cv2.COLOR_BGR2GRAY)
 7     image = transform(image)
 8     # add one extra batch dimension
 9     image = image.unsqueeze(0).to(device)
10     # forward pass the image through the model
11     outputs = model(image)
12     # get the index of the highest score
13     # the highest scoring indicates the label for the Digit MNIST dataset
14     label = np.array(outputs.detach()).argmax()
15     print(f"{image_path.split('/')[-1].split('.')[0]}: {label}")
16     # put the predicted label on the original image
17     cv2.putText(orig_img, str(label), (15, 50), cv2.FONT_HERSHEY_SIMPLEX,
18                 2, (0, 255, 0), 2)
19     # show and save the resutls
20     cv2.imshow('Result', orig_img)
21     cv2.waitKey(0)
22     cv2.imwrite(f"../outputs/result_{i}.jpg", orig_img)
总结:
本文我们主要训练了一个VGG11的神经网络从手写体MNIST数据集中;
我们以模型的初始化、训练模型和观察模型的精度即损失为主线进行了说明;
最后在新的数据集上对模型进行了验证。

 浙公网安备 33010602011771号