tls handshake
https://www.acunetix.com/blog/articles/establishing-tls-ssl-connection-part-5/
The process of establishing a secure SSL/TLS connection involves several steps. SSL/TLS security protocols use a combination of asymmetric and symmetric encryption. The client and the server must negotiate the algorithms used and exchange key information.
For the purpose of explaining this complex process, we use a TLS 1.2 connection, not the most recent TLS 1.3 protocol. The process used in TLS 1.2 was almost the same for all previous versions of SSL/TLS. However, it was greatly simplified in the latest version of Transport Layer Security.
The most important part of establishing a secure connection is called the handshake. During the TLS Handshake, the server and the client exchange important information used to determine connection properties. This example is based on a web browser handshake, but the same applies to all other SSL/TLS handshakes.
Step 1: Client Hello (Client → Server)

First, the client sends a Client Hello to the server. The Client Hello includes the following information.
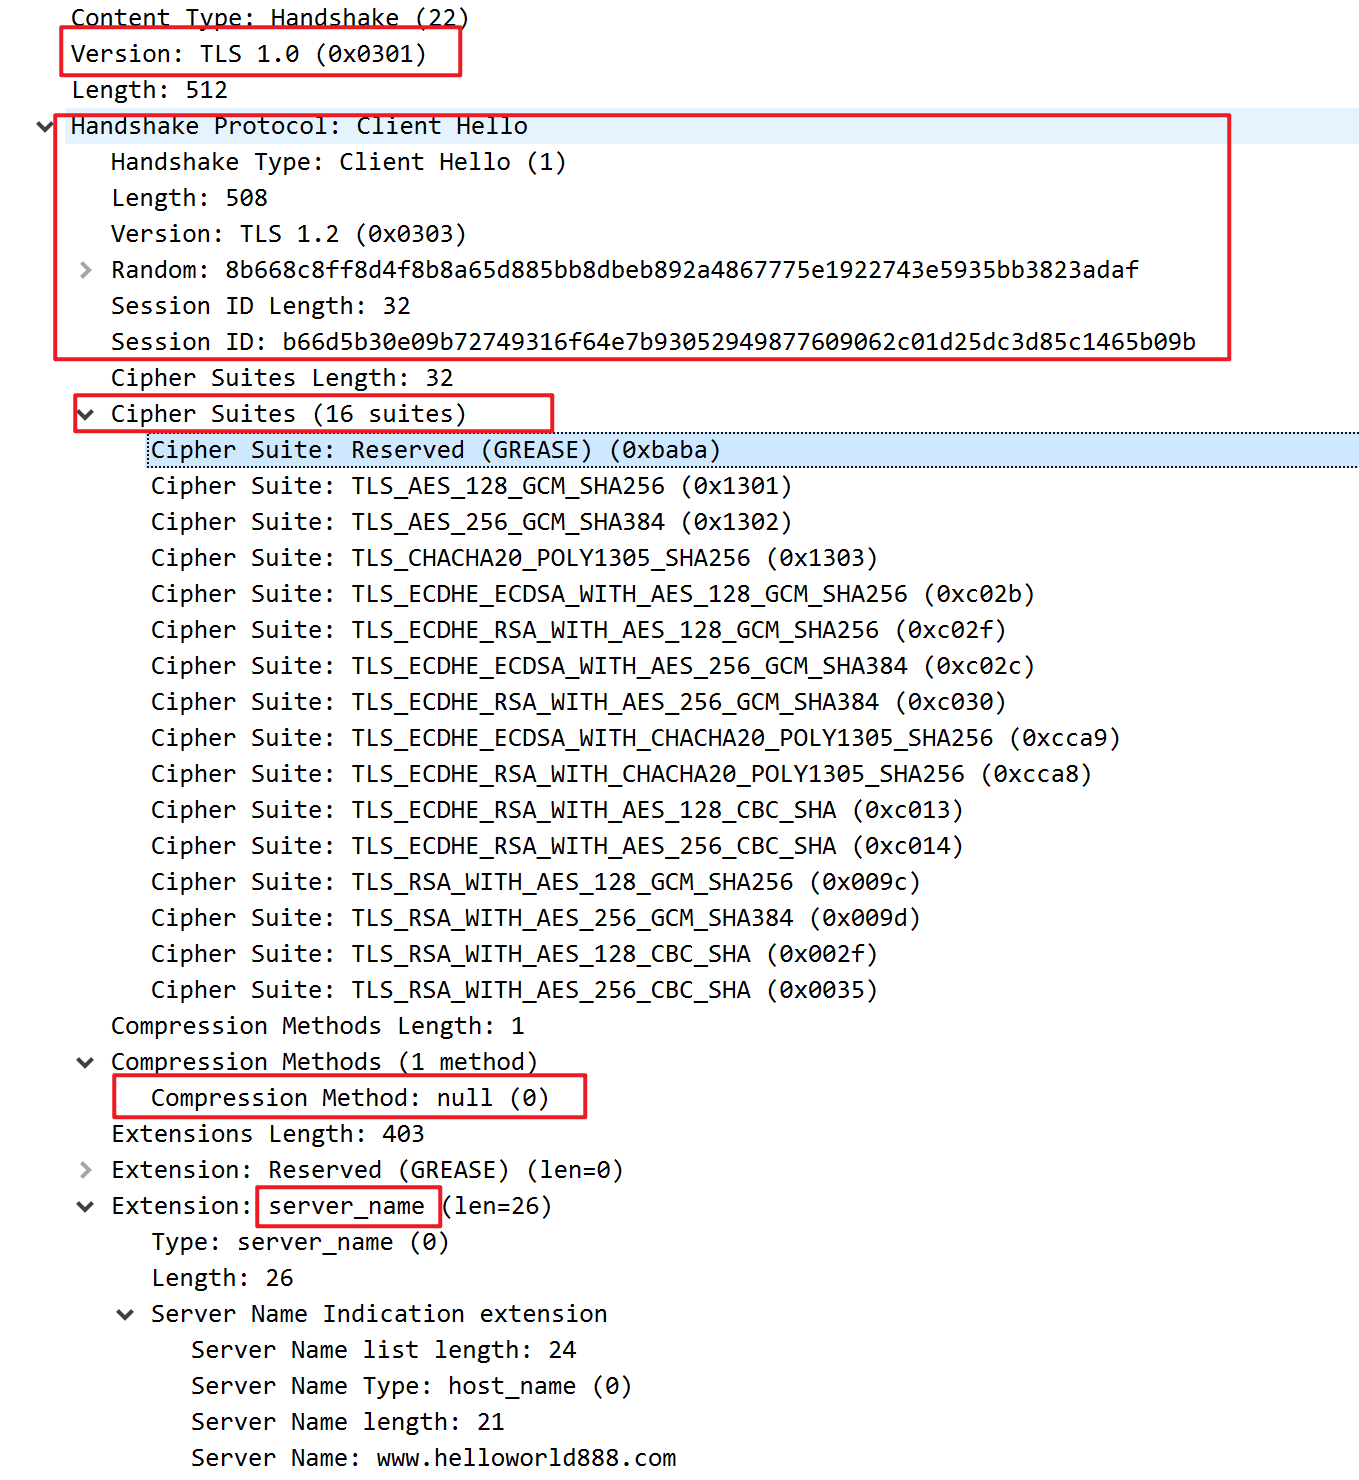
Client Version
The client sends a list of all the TLS/SSL protocol versions that it supports with the preferred one being first on the list. The preferred one is usually the latest available version. For example, TLS 1.2 has a client_version 3,3. This is because TLS 1.0 is treated as a minor revision of Secure Sockets Layer (SSL 3.0), so TLS 1.0 is 3,1, TLS 1.1 is 3,2, and so on.
Client Random
This is a 32-byte random number. The client random and the server random are later used to generate the key for encryption.
In the original TLS 1.2 specification, the first 4 bytes were supposed to represent the current date and time of the client (in epoch format) and the remaining 28 bytes was supposed to be a randomly generated number. However, IETF later recommended against it.
Session ID
This is the session id to be used for the connection. If the session_id is not empty, the server searches for previously cached sessions and resumes that session if a match is found.
compression_methods
This is the method that is going to be used for compressing the SSL packets. By using compression, we can achieve lower bandwidth usage and therefore, faster transfer speeds. Later on this article we will see why using compression is risky.
Cipher Suites
Cipher suites are combinations of cryptographic algorithms. Typically, each cipher suite contains one cryptographic algorithm for each of the following tasks: key exchange, authentication, bulk (data) encryption, and message authentication. The client sends a list of all the cipher suites that it supports in order of preference. This means that the client would ideally prefer the connection to be established using the first cipher suite sent.
Cipher suites are identified by strings. A sample cipher suite string is: TLS_ECDHE_ECDSA_WITH_AES_128_GCM_SHA256. This string contains the following information:
TLSis the protocol being usedECDHEis the key exchange algorithm (Elliptic curve Diffie–Hellman)ECDSAis the authentication algorithm (Elliptic Curve Digital Signature Algorithm)AES_128_GCMis the data encryption algorithm (Advanced Encryption Standard 128 bit Galois/Counter Mode)SHA256is the Message Authentication Code (MAC) algorithm (Secure Hash Algorithm 256 bit)
Compression Methods
This is a list of method that is going to be used for compressing data (before encrypting it). If you use compression, you can lower bandwidth usage and speed up transfers. However, compression is risky and recommended against: see information on CRIME and BREACH attacks.
Extensions
The client can request additional functionality for the connection. This can be done via extensions such as supported groups for elliptic curve cryptography, point formats for elliptic curve cryptography, signature algorithms, and more. If the server cannot provide the additional functionality, the client may abort the handshake if needed.
Here’s what an actual Client Hello looks like in a Wireshark capture.


Step 2: Server Hello (Server → Client)

After the server receives the Client Hello, it replies with a Server Hello. A Server Hello may either contain selected options (from among those proposed during Client Hello) or it may be a handshake failure message.
Server Version
The server selects the preferred version of the SSL/TLS protocol from among those presented by the client.
Server Random
This is a 32-byte random number. The server random and the client random are later used to generate the encryption key.
In the original TLS 1.2 specification, the first 4 bytes were supposed to represent the current date and time of the client (in epoch format) and the remaining 28 bytes was supposed to be a randomly generated number (just like in the case of Client Random). However, IETF later recommended against it.
Session ID
If the client Session ID was not empty, the server searches for previously cached sessions and if a match is found, that session ID is used to resume the session. If the client Session ID was empty, a new session may be created by the server and sent in the server Session ID.
Cipher Suites
The server selects the cipher suite from among Cipher Suites sent in the Client Hello.
Compression Methods
The server selects the compression method from among Compression Methods sent in the Client Hello.

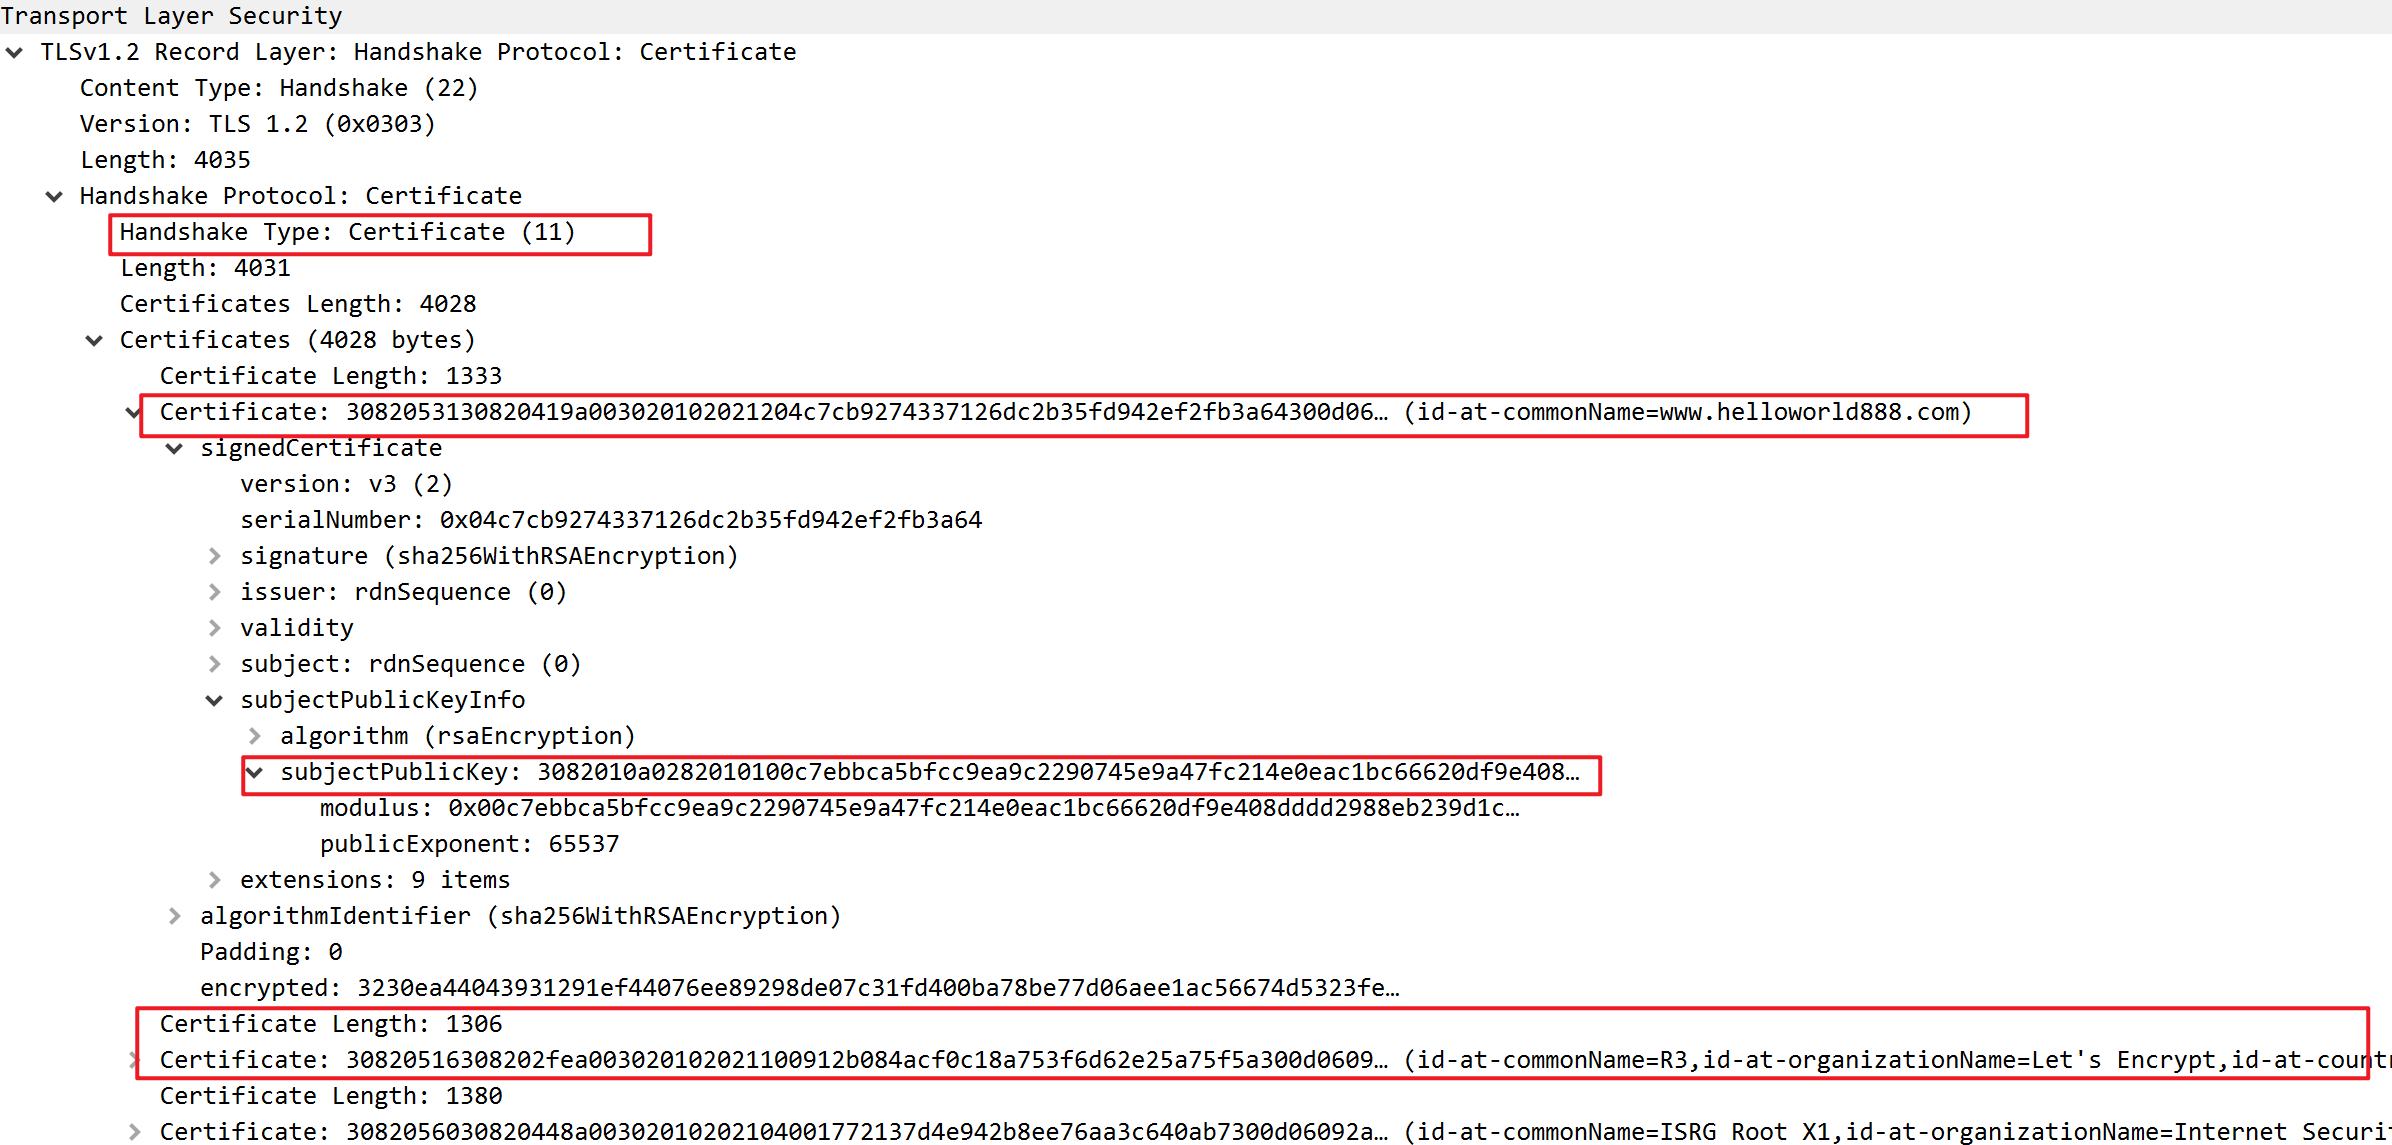
Step 3: Server Certificate (Server → Client)
The server now sends a signed TLS/SSL certificate that proves its identity to the client. It also contains the public key of the server.

Step 4: Client Certificate (Client → Server, Optional)
In rare cases, the server may require the client to be authenticated with a client certificate. If so, the client provides its signed certificate to the server.
Step 5: Server Key Exchange (Server → Client)
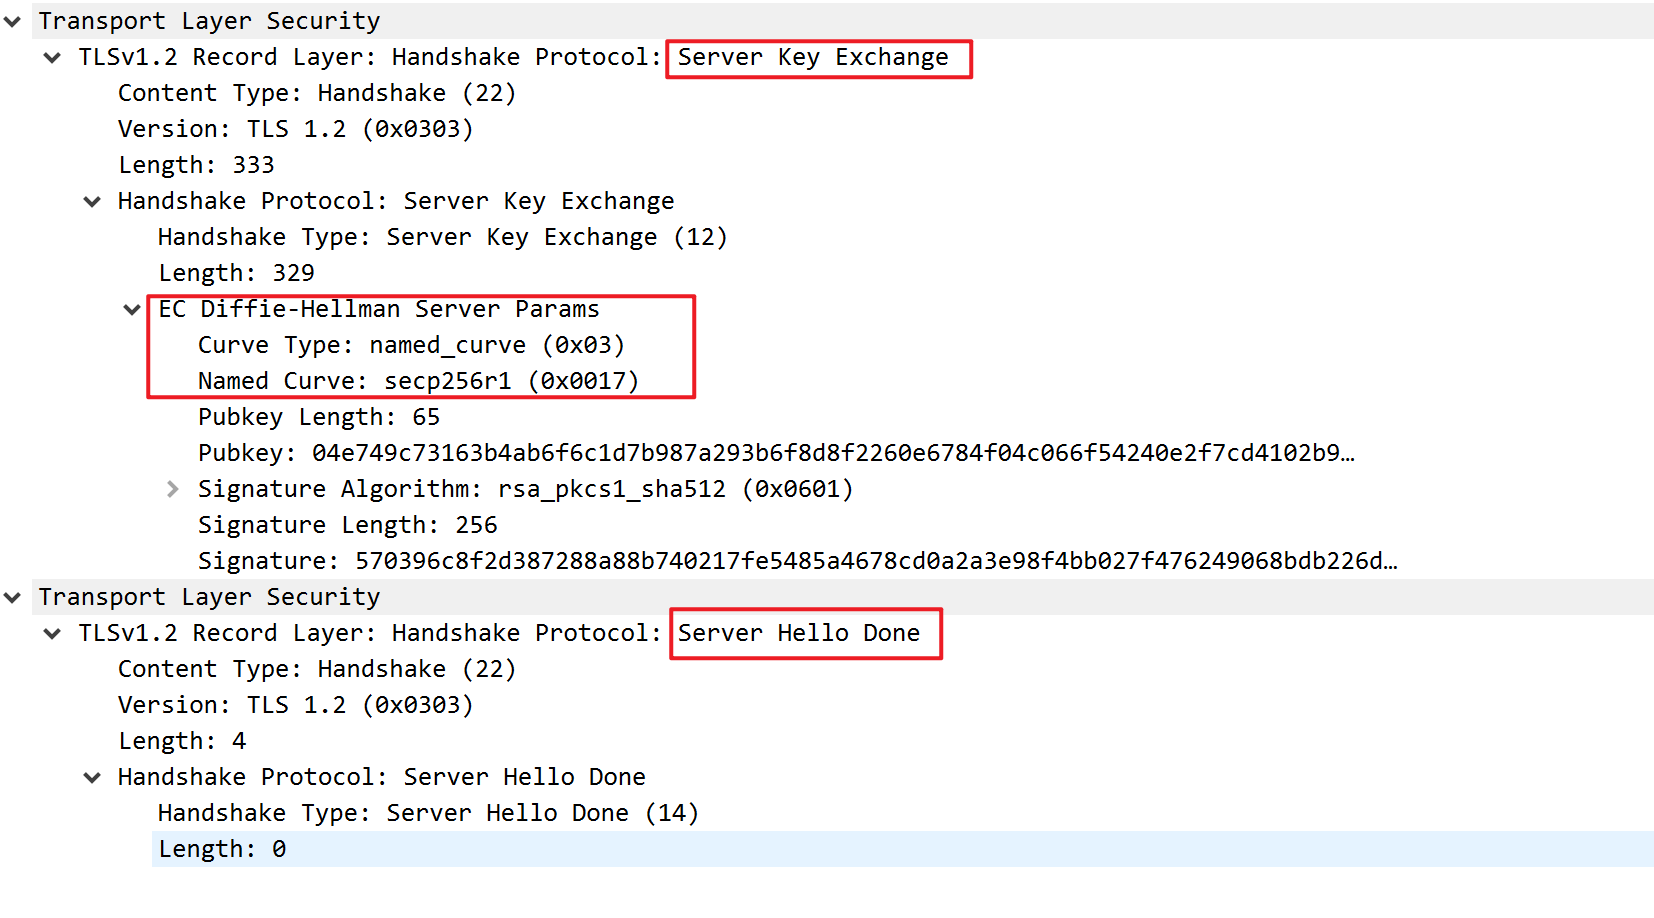
The server key exchange message is sent only if the certificate provided by the server is not sufficient for the client to exchange a pre-master secret. (This is true for DHE_DSS, DHE_RSA, and DH_anon).
Step 6: Server Hello Done (Server → Client)
The server sends this to the client to confirm that the Server Hello message is finished.
This is what a Server Hello looks like in a Wireshark capture.


Step 7: Client Key Exchange (Server → Client)

The Client Key Exchange message is sent right after the Server Hello Done is received from the server. If the server requests a Client Certificate, the Client Key Exchange is sent after that. During this stage, the client creates a pre-master key.
Pre-Master Secret
The pre-master secret is created by the client (the method of creation depends on the cipher suite) and then shared with the server.
Before sending the pre-master secret to the server, the client encrypts it using the server public key extracted from the certificate provided by the server. This means that only the server can decrypt the message since asymmetric encryption (key pair) is used for the pre-master secret exchange.
This is what the key exchange looks like in a Wireshark capture (using Diffie–Hellman).

Master Secret
After the server receives the pre-master secret key, it uses its private key to decrypt it. Now, the client and the server compute the master secret key based on random values exchanged earlier (Client Random and Server Random) using a pseudorandom function (PRF). A PRF is a function used to generate arbitrary amounts of pseudorandom data.
master_secret = PRF(pre_master_secret, "master secret", ClientHello.random + ServerHello.random) [0..47];The master secret key, which is 48 bytes in length, will then be used by both client and server to symmetrically encrypt the data for the rest of the communication.
The client and the server create a set of 3 keys:
- client_write_MAC_key: Authentication and Integrity check
- server_write_MAC_key: Authentication and Integrity check
- client_write_key: Message encryption using symmetric key
- server_write_key: Message encryption using symmetric key
- client_write_IV: Initialization Vector used by some AHEAD ciphers
- server_write_IV: Initialization Vector used by some AHEAD ciphers
Both Client and Server will use the master secret to generate the sessions keys which will be to encrypt/decrypt data.
Step 8: Client Change Cipher Spec (Client → Server)
At this point, the client is ready to switch to a secure, encrypted environment. The Change Cipher Spec protocol is used to change the encryption. Any data sent by the client from now on will be encrypted using the symmetric shared key.
This is what Change Cipher Spec looks like in a Wireshark capture.

Step 9: Client Handshake Finished (Client → Server)
The last message of the handshake process from the client signifies that the handshake is finished. This is also the first encrypted message of the secure connection.

Step 10: Server Change Cipher Spec (Server → Client)
The server is also ready to switch to an encrypted environment. Any data sent by the server from now on will be encrypted using the symmetric shared key.
Step 11: Server Handshake Finished (Server → Client)
The last message of the handshake process from the server (sent encrypted) signifies that the handshake is finished.

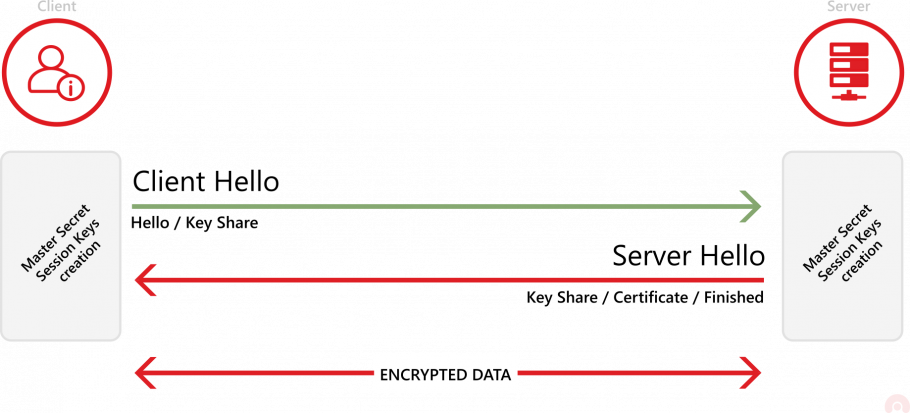
To recap, the following illustrates a typical handshake.

The TLS Handshake in TLS 1.3
In TLS 1.2 and earlier, the TLS handshake needed two round trips to be completed. The first round trip was the exchange of hellos and the second one was the key exchange and changing the cipher spec. In TLS 1.3, this process is streamlined and only one round trip is needed. TLS 1.3 also no longer supports TLS compression.

In TLS 1.3, when the client sends its hello, it immediately guesses the key agreement protocol that the server will most likely select. At the same time, it shares its key using the guessed protocol. The server’s hello message also contains the shared key, the certificate, and the server finished message. There is no need for cipher change because after the exchange of hellos both parties already have all that they need to encrypt communication.


