SpringBoot自动配置原理
什么是SpringBoot自动配置?
我认为体现在两个方面,一是会自动从META-INF/spring.factories 中筛选并配置 Bean,并由 spring 容器帮我们管理,二是会自动读取配置类完成配置。举个例,使用 ssm 开发的时候启动程序前我们要配置 tomcat,设置端口号打 war 包,而使用 springboot 的时候直接点 run 就行,这是因为我们使用 springboot 的时候引入了一个 web-starter 的依赖,它内嵌了 tomcat,并帮我们完成了配置。自动配置就是在程序点击 run 之后的启动过程中完成的,接下来我讲一下其原理。
自动配置会去这里面找到要加载的配置类的全限定名
不是在这个包:META-INF/spring.factories
就是在这个包:META-INF/spring/org.springframework.boot.autoconfigure.AutoConfiguration.imports.
自SpringBoot3.0 之后是在下面这个包
自动配置原理
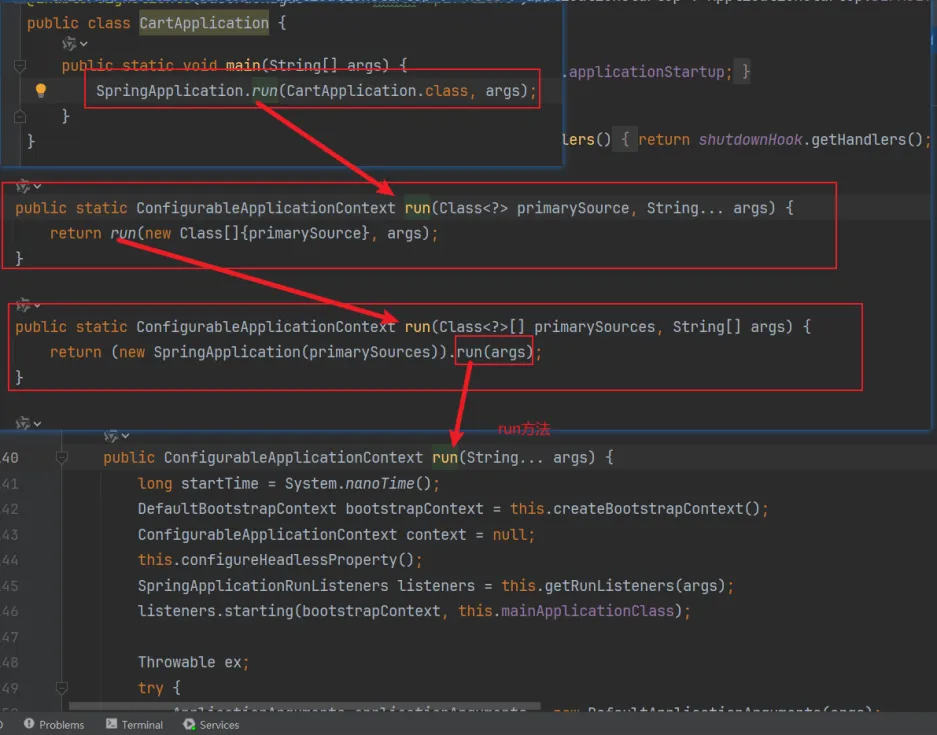
先从启动类说起,简单说一下SpringBoot启动流程。启动类中的这个 run 方法做了 2 件事情,一是 new 了一个 SpringApplication,二是传入了启动参数执行了 run 方法。
初始化SpringApplication
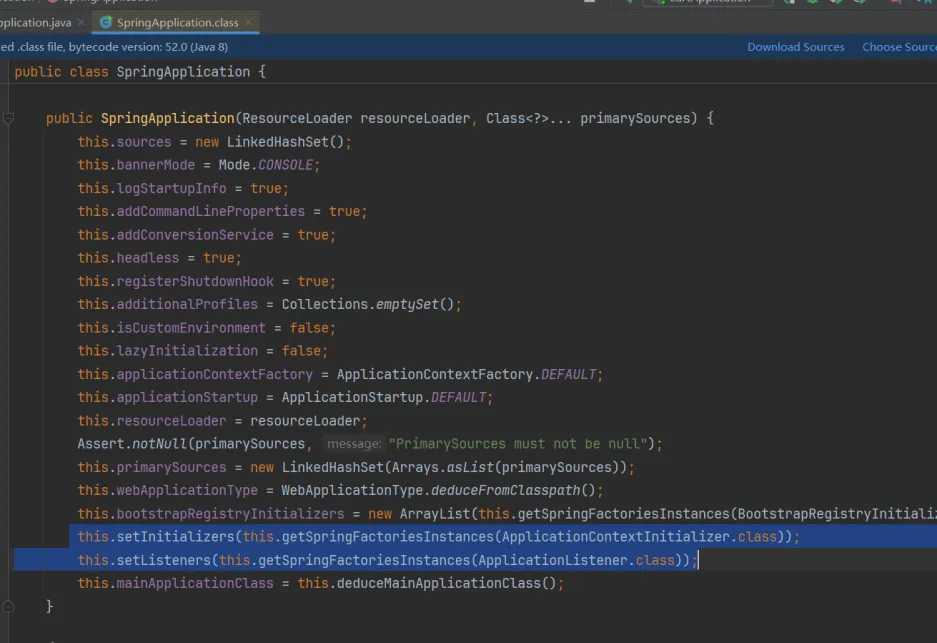
初始化 SpringApplication 的过程就是执行了 SpringApplication 类中的构造方法完成了一些初始化参数的设置

其中有 2 个步骤和 run 方法的执行以及自动配置有关,一个是 setInitializers,还一个是setListeners。可以看到这两个set操作都和getSpringFactoriesInstances有关,只是传入的参数不同。
以setInitializers为例,查看源码可以看到这个方法调用了loadFactoryNames,

跟着源码一步步查看,可知最终执行到了这里,这里读取了配置文件并且将数据放进了缓存,之后在运行 run 方法的时候是直接从缓存中获取 META-INF/spring.factories 中的值的。
点击查看代码
private static Map<String, List<String>> loadSpringFactories(ClassLoader classLoader) {
        Map<String, List<String>> result = (Map)cache.get(classLoader);
        if (result != null) {
            return result;
        } else {
            Map<String, List<String>> result = new HashMap();

            try {
		//从配置文件中读取自动配置类
               ** Enumeration<URL> urls = classLoader.getResources("META-INF/spring.factories");**
                ......
		//放到缓存中去
                **cache.put(classLoader, result);**
                return result;
            } catch (IOException var14) {
                IOException ex = var14;
                throw new IllegalArgumentException("Unable to load factories from location [META-INF/spring.factories]", ex);
            }
        }
    }
执行run方法
new 了一个 SpringApplication 后就会执行.run 方法(SpringApplication 这个类中)

点击查看代码
public ConfigurableApplicationContext run(String... args) {
    //1.计时,低一些的版本是用的StopWatch
    long startTime = System.nanoTime();
    //2.创建引导上下文
    DefaultBootstrapContext bootstrapContext = this.createBootstrapContext();
    /**createBootstrapContext源码
private DefaultBootstrapContext createBootstrapContext() {
    DefaultBootstrapContext bootstrapContext = new DefaultBootstrapContext();
    this.bootstrappers.forEach((initializer) -> initializer.initialize(bootstrapContext));
    return bootstrapContext;
}**/
    //3.创建IOC容器
    ConfigurableApplicationContext context = null;
    /**
        DefaultBootstrapContext和ConfigurableApplicationContext的区别:
            DefaultBootstrapContext:主要用于存储启动过程中的基础信息和配置。
            ConfigurableApplicationContext:作为 Spring 容器的一部分,
                        用于管理 Bean 的生命周期、事件发布、资源访问等。
    **/


    //4.给属性赋值,不必深究
    this.configureHeadlessProperty();

    //5.获取运行时监听器,开始监听,这些监听器就是初始化SpringApplication产生的
    //监听器用观察者模式比较多,有点像发布订阅模式
    SpringApplicationRunListeners listeners = this.getRunListeners(args);
    listeners.starting(bootstrapContext, this.mainApplicationClass);

    Throwable ex;
    try {
        //6.准备环境: 把启动参数 args 包装成了 ApplicationArguments 类型的对象。
        ApplicationArguments applicationArguments = new DefaultApplicationArguments(args);
        //7.进行准备 Spring 环境,我们点进去看下具体实现(这个挺重要的,以后详看):
        //例如系统环境计算机名字、文件编码格式、jdk格式等等
        ConfigurableEnvironment environment = this.prepareEnvironment(listeners, bootstrapContext, applicationArguments);

/**
private ConfigurableEnvironment prepareEnvironment(SpringApplicationRunListeners listeners, DefaultBootstrapContext bootstrapContext, ApplicationArguments applicationArguments) {
    //1.创建一个环境对象,是创建web环境对象?还是标准非web环境对象?再决定调用哪个方法
    ConfigurableEnvironment environment = this.getOrCreateEnvironment();
    //2.进行了系统环境变量的初始化
    this.configureEnvironment(environment, applicationArguments.getSourceArgs());
    //3.加载配置源参数和命令行属性
    ConfigurationPropertySources.attach(environment);
    //4.进到里面有一个重要的监听器,这个监听器就是帮我们加载配置文件的,
    //并将其加入上下文的environment变量中
    listeners.environmentPrepared(bootstrapContext, environment);
    DefaultPropertiesPropertySource.moveToEnd(environment);
    Assert.state(!environment.containsProperty("spring.main.environment-prefix"), "Environment prefix cannot be set via properties.");
    this.bindToSpringApplication(environment);
    if (!this.isCustomEnvironment) {
        EnvironmentConverter environmentConverter = new EnvironmentConverter(this.getClassLoader());
        environment = environmentConverter.convertEnvironmentIfNecessary(environment, this.deduceEnvironmentClass());
    }
    ConfigurationPropertySources.attach(environment);
    return environment;
}
**/
        //配置环境
        this.configureIgnoreBeanInfo(environment);
        //输出banner
        Banner printedBanner = this.printBanner(environment);

        /**8.创建上下文**/
        context = this.createApplicationContext();
        context.setApplicationStartup(this.applicationStartup);

        //重要!!!!准备上下文
        //
        this.prepareContext(bootstrapContext, context, environment, listeners, applicationArguments, printedBanner);

        //刷新上下文
        this.refreshContext(context);
        this.afterRefresh(context, applicationArguments);
        Duration timeTakenToStartup = Duration.ofNanos(System.nanoTime() - startTime);
        if (this.logStartupInfo) {
            (new StartupInfoLogger(this.mainApplicationClass)).logStarted(this.getApplicationLog(), timeTakenToStartup);
        }

        listeners.started(context, timeTakenToStartup);
        this.callRunners(context, applicationArguments);
    } catch (Throwable var12) {
        ex = var12;
        this.handleRunFailure(context, ex, listeners);
        throw new IllegalStateException(ex);
    }

    try {
        Duration timeTakenToReady = Duration.ofNanos(System.nanoTime() - startTime);
        listeners.ready(context, timeTakenToReady);
        return context;
    } catch (Throwable var11) {
        ex = var11;
        this.handleRunFailure(context, ex, (SpringApplicationRunListeners)null);
        throw new IllegalStateException(ex);
    }
}
run方法里头有2个方法与自动配置相关,prepareContext和refreshContext。
prepareContext这个方法把上面设置的一些个像环境参数、上下文、监听器这些东西作为参数传进去了,设置了环境参数也就是把我们配置文件里面的参数进行了设置像端口号这些;主要还做了一个事就是找到启动类然后调用了 load 方法通过 isEligible 方法是否符合条件从而被注册为 Bean,这个方法在低版本的boot中是isComponent(source),即这个bean必须要被@Component标记才能被注册
准备工作完成之后接下来进入到我们非常重要的一个方法refreshContext(context)方法,即刷新上下文,这个方法最终是走到了 refresh方法里头,即 spring 的一个底层源码,refresh方法中一共调用了 13 个方法,讲其中和自动配置有关的几个方法
invokeBeanFactoryPostProcessors(beanFactory)Bean 工厂后置处理器
这个方法开启了自动配置的逻辑,他会调用执行processConfigBeanDefinitions()方法找到并调用 parse 方法解析我们的启动类。

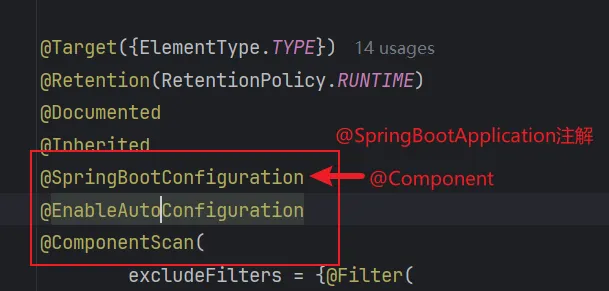
执行doProcessConfigurationClass首先会判断启动类上有没有@Component注解,有,然后解析了启动类上的@PropertySource、@ComponentScan、@Import注解。
解析@Import注解的时候会调用 getImports.process() 方法,就会找到启动类上@EnableAutoConfiguration这个注解里头的 Import 注解,执行这些注解的时候也是完成自动配置的关键。
@Import({AutoConfigurationImportSelector.class}) 注解负责选择并返回一组配置类,这个注解对应执行的类叫做AutoConfigurationImportSelector.class,这个类实现了DeferredImportSelector接口,保证我们的配置类是后于@Component、@Bean 标记的类执行的,有什么作用?因为这个类会调用了一个getAutoConfigurationEntry() 方法取 spring.factories中存放的配置类的全限定名,然后会解析 Bean ,通过@ConditationOnClass等一些条件判断哪些 Bean 是我要加载的,拿到这些符合条件的 bean 之后呢会返回具体的自动配置对象到 process 方法,自动配置也就完成了。
然后回到 run 方法,继续一些其他的设置比如计算 IOC 容器,也就是上下文的创建时间、开启监听 IOC 容器之类的其他一些方法,那么我们的程序就启动了


