SpringCloudStream消息驱动
1. 基本介绍
官方文档: https://spring.io/projects/spring-cloud-stream#learn
背景:
在一般的大型项目中,或者分布式微服务结构的系统里,一般都会使用到消息中间件,例如 RabbitMq 或者 ActiveMq 等等来实现系统间的异步消费, 对系统进行削峰填谷,提高系统的并发性能和扩展性
但是市面的 消息中间件种类繁多, 使用的方式也不相同, 但是达成的目的有时确实一致的, 此时若系统中使用了多个中间件,或者对消息中间件进行修改,那么对程序员的要求也将提高, 同时也对系统的扩展有了限制,
而SpringCloud Stream 就是解决这个问题的, 它屏蔽了底层具体中间件的工作流程(目前仅支持 RibbitMq和Kafka), 对外暴露一个"Binder" 实现与外部用户的交互, 并通过Spring Cloud Stream插入的input(相当于消费者consumer,它是从队列中接收消息的)和output(相当于生产者producer,它是从队列中发送消息的。)通道与外界交流
示意图:
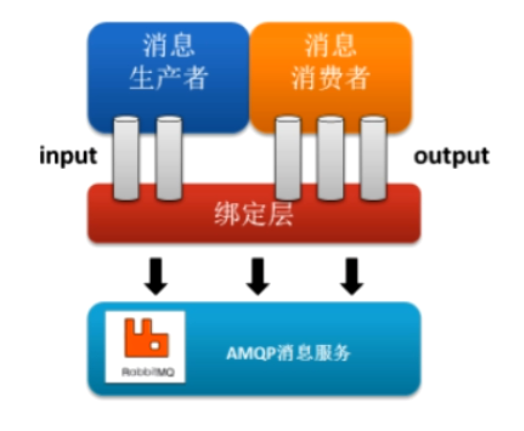
上面图片中的各个角色:
- RabbitMq的底层支持, 被上层Binder 屏蔽
- Binder ,应用和消息中间件的封装,通过Binder可以很方便的连接中间件, 可以动态改变消息类型(对应Kafka的topic RabbitMq的exchange) ,这些都可以通过配置文件来实现
- Input, 通过该输入通道接受到的消息进入应用程序
- Output , 发布的消息将通过该通道离开应用程序
2. 基本使用
2.1 消息发送方搭建
pom依赖
    <dependencies>
        <dependency>
            <groupId>org.springframework.boot</groupId>
            <artifactId>spring-boot-starter-web</artifactId>
        </dependency>

        <!-- rabbit作为实现的依赖 -->
        <dependency>
            <groupId>org.springframework.cloud</groupId>
            <artifactId>spring-cloud-starter-stream-rabbit</artifactId>
        </dependency>

        <dependency>
            <groupId>org.springframework.boot</groupId>
            <artifactId>spring-boot-starter-actuator</artifactId>
        </dependency>
        <dependency>
            <groupId>org.springframework.boot</groupId>
            <artifactId>spring-boot-devtools</artifactId>
            <scope>runtime</scope>
            <optional>true</optional>
        </dependency>
        <dependency>
            <groupId>org.springframework.boot</groupId>
            <artifactId>spring-boot-starter-test</artifactId>
            <scope>test</scope>
        </dependency>
    </dependencies>
yaml配置文件
server:
  port: 8801
spring:
  application:
    name: cloud-stream-provider
  cloud:
    stream:
      binders:  #下面定义一个binders对象,连接用户和消息中间件
        testRabbit: # 定义的名称,用于binding整合,在本例Rabbitmq中就是一个交换机名
            type: rabbit #消息组件类型
            environment: #环境配置
              spring:
                rabbitmq:
                  virtual-host: /test
                  host: 192.168.100.222
                  port: 5672
                  username: username
                  password: password

      bindings: # 下面定义一个bindings 通道,供用户使用
        output: # 名字是通道的名称,代码中需要指定这个名字,用于构建通道,并且此时并不确定是input还是output
          destination: testExchange # 表示要使用的Exchange名称定义
          content-type: application/json # 设置消息类型,本次为json
          binder: testRabbit #将本通道和定义的一个Binder对象绑定
测试发送消息代码
//发送信息业务接口
public interface IMessageProvider {
    String send();
}
//实现类
@Service
public class MessageProviderImpl implements IMessageProvider {

    @Resource
    private MessageChannel output; //消息发送的管道

    @Override
    public void send() {
        String serial = UUID.randomUUID().toString();
        output.send(MessageBuilder.withPayload(serial).build());
        System.out.println("*****serial: " +serial);
    }
}

//controller调用
@RestController
public class SendMessageController {

    @Resource
    private IMessageProvider messageProvider;

    @GetMapping("/sendMessage")
    public String sendMessage(){
        return messageProvider.send();
    }

}
启动类:
@SpringBootApplication
@EnableBinding(Source.class)  //构建消息通道,并注入到容器中
public class StreamMQMain8801 {
    public static void main(String[] args) {
        SpringApplication.run(StreamMQMain8801.class, args);
    }
}
对上述代码的说明:
-
在配置文件中,分别定义了一个 Binder 对象,和一个Binding 通道, 并指定中间件类型和交换机名称,并将两者绑定
-
本例使用了简单的,框架自带的接口来构建初始化通道,
public interface Source {
    String OUTPUT = "output";

    @Output("output")
    MessageChannel output();
}
这个接口是框架为我们提供的简单的发送消息的使用方式, 使用注解
@Output指定使用此方法构建一个通道对象, 并且指定使用的配置就是配置文件中配置的Binding,名字为"output"的信息,此方法返回一个MessageChannel对象,并注册到容器中,可以使用此对象发送信息,bean的id也为"output" -
启动类上
@EnableBinding(Source.class)的定义,意味在启动时就将加载初始化此通道
当我们启动项目成功后,查看RabbitMq 管理后台,看见已经自动为我们创建一个名为"testRabbit"的exchange

2.2 消息接收方搭建
pom依赖和发送方一致
yaml:
server:
  port: 8802
spring:
  application:
    name: cloud-stream-consumer
  cloud:
    stream:
      binders:  #需要绑定的rabbitmq的服务信息
        testRabbit: #定义的名称,用于binding整合
            type: rabbit #消息组件类型
            environment: #环境配置
                spring:
                    rabbitmq:
                        virtual-host: /test
                        host: 192.168.100.222
                        port: 5672
                        username: username
                        password: password
      bindings: # 服务的整合处理
        input: # 名字是一个通道的名称
          destination: testExchange # 表示要使用的Exchange名称定义,和消息发送方一致
          content-type: application/json # 设置消息类型,本次为json
          binder: testRabbit #设置要绑定的消息服务的具体设置
接收业务类:
@Component
public class ReceiveMessageListenerController {

    @Value("${server.port}")
    private String serverPort;

    @StreamListener(Sink.INPUT)
    public void input(Message<String> message) {
        System.out.println("消费者1号,------>接收到的消息:"+message.getPayload()+"\t port" +serverPort);
    }

}
启动类:
@SpringBootApplication
@EnableBinding(Sink.class)
public class StreamMQMain8802 {
    public static void main(String[] args) {
        SpringApplication.run(StreamMQMain8802.class, args);
    }
}
对上述代码的说明:
-
和发送方一样,配置文件中,需要指明整合的消息服务类型和配置,
-
启动类上使用注解
@EnableBinding,来初始化通道,使用的是自带的简单的接口Sinkpublic interface Sink { String INPUT = "input"; @Input("input") //指明名称,返回的对象则为客户端接收对象使用到的对象 SubscribableChannel input(); } -
在接收消息的处理业务类中, 使用注解
@StreamListener,来指明接收的方法, 并标注和哪个通道相连,本例为Sink.INPUT
测试:
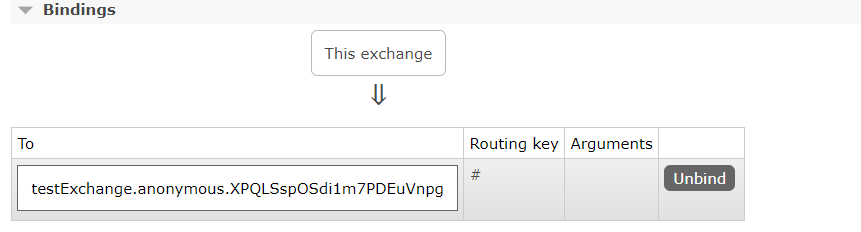
启动两个服务, 可以通过rabbitmq的后台管理页面看到, 有两个连接,并且创建了一个队列与exchange绑定
图一:

图二:
调用发送方接口http://127.0.0.1:8801/sendMessage,接收方成功打印信息:消费者1号,------>接收到的消息:aa86f3fb-a479-4eb0-92f2-03ab578b50f0 port8802
3. 自定义通道连接
上面的Demo中 ,我们使用了框架自带的 Source 和 Sink 接口,来实现简单的通信,但是在实际使用中, 我们还需要自定义连接规则,来实现复杂的功能,下面通过对上面的Demo 进行改造,来实现
3.1 消息发送方修改:
yaml添加新的通道:
server:
  port: 8801
spring:
  application:
    name: cloud-stream-provider
  cloud:
    stream:
      binders:  #下面定义一个binders对象,连接用户和消息中间件
        testRabbit: # 定义的名称,用于binding整合,在本例Rabbitmq中就是一个交换机名
            type: rabbit #消息组件类型
            environment: #环境配置
              spring:
                rabbitmq:
                  virtual-host: /test
                  host: 192.168.100.222
                  port: 5672
                  username: username
                  password: password

      bindings: # 下面定义一个bindings 通道,供用户使用
        output: # 名字是通道的名称,代码中需要指定这个名字,用于构建通道,并且此时并不确定是input还是output
          destination: testExchange # 表示要使用的Exchange名称定义
          content-type: application/json # 设置消息类型,本次为json
          binder: testRabbit #将本通道和定义的一个Binder对象绑定
        myOutput: #新的名称
          destination: myExchange # 新的exchange
          content-type: application/json # 设置消息类型,本次为json
          binder: testRabbit #使用的消息服务还是同一个
自定义接口,初始化通道:
public interface MySource {
    String OUTPUT = "myOutput"; // 绑定通道的配置,并且这也是MessageChannel 对象注册到容器中的id

    @Output(OUTPUT)
    MessageChannel output();
}
添加新的业务方法:
@Service
public class MessageProviderImpl implements IMessageProvider {

    @Resource
    private MessageChannel output; //消息发送管道

    @Resource
    private MessageChannel myOutput; //字段名字必须为myOutput 才能接受到

    @Override
    public String send() {
        String serial = UUID.randomUUID().toString();
        output.send(MessageBuilder.withPayload(serial).build());
        System.out.println("*****serial: " +serial);
        return null;
    }

    @Override
    public String mySend() {
        String serial = UUID.randomUUID().toString();
        myOutput.send(MessageBuilder.withPayload(serial).build());
        System.out.println("*****serial: " +serial);
        return null;
    }
}
主启动类添加通道的绑定声明:
@SpringBootApplication
@EnableBinding({Source.class, MySource.class})  //定义消息的推送广播
public class StreamMQMain8801 {
    public static void main(String[] args) {
        SpringApplication.run(StreamMQMain8801.class, args);
    }
}
3.2 消息接收方修改:
yaml添加配置:
server:
  port: 8802
spring:
  application:
    name: cloud-stream-consumer
  cloud:
    stream:
      binders:  #需要绑定的rabbitmq的服务信息
        testRabbit: #定义的名称,用于binding整合
            type: rabbit #消息组件类型
            environment: #环境配置
                spring:
                    rabbitmq:
                        virtual-host: /test
                        host: 192.168.100.222
                        port: 5672
                        username: username
                        password: password
      bindings: # 服务的整合处理
        input: # 名字是一个通道的名称
          destination: testExchange # 表示要使用的Exchange名称定义,和消息发送方一致
          content-type: application/json # 设置消息类型,本次为json
          binder: testRabbit #设置要绑定的消息服务的具体设置
        myInput:
           destination: myExchange # 和发送方一致
           content-type: application/json
           binder: testRabbit
同样需要自定义接口:
public interface MySink {
    String INPUT = "myInput";

    @Input(INPUT)
    SubscribableChannel input();
}
添加接收方法:
@Component
public class ReceiveMessageListenerController {

    @Value("${server.port}")
    private String serverPort;

    @StreamListener(Sink.INPUT)
    public void input(Message<String> message) {
        System.out.println("消费者1号,------>接收到的消息:"+message.getPayload()+"\t port" +serverPort);
    }

    @StreamListener(MySink.INPUT)
    public void myInput(Message<String> message) {
        System.out.println("自定义通道-->接收到的消息:"+message.getPayload()+"\t port" +serverPort);
    }

}
主启动类添加声明:
@SpringBootApplication
@EnableBinding({Sink.class, MySink.class}) //添加声明
public class StreamMQMain8802 {
    public static void main(String[] args) {
        SpringApplication.run(StreamMQMain8802.class, args);
    }
}
测试:
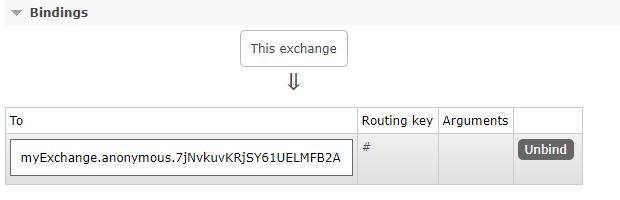
通过后台查看,同样创建了一个名为myexchange的交换机,并且接收方创建了一个队列与之绑定
4. 消息分组
对上述Demo 的消息接收方进行拷贝,修改端口号为8803, 模拟消息接收方有两个时的情况,并启动三个服务
查看rabbitmq后台:
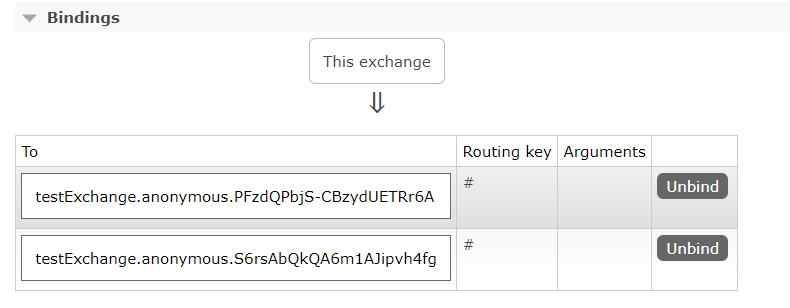
可以看到, testExchange 交换机下已经创建了两个队列,分别对应了两个接收方服务,并且队列名是随机分配的.
这时我们通过消息发送方服务向该交换机发送消息:
发现两个接收方,都进行了消费:说明在发送消息时,并没有指定对应的队列名为RoutingKey.所以默认为对应的队列名,即每个队列都发,这样每个队列的监听客户端都可以监听到,
消费者1号,------>接收到的消息:fe392be0-c779-4e99-9c8c-ab85a9144399	 port8802
消费者2号,------>接收到的消息:fe392be0-c779-4e99-9c8c-ab85a9144399	 port8803
那如果需要指定某个队列如何解决: SpringCloud Stream ,提供了分组的概念解决这个问题
只需在不想要重复消费的binding 上指定其分组即可:
      bindings: # 服务的整合处理
        input: # 名字是一个通道的名称
          destination: testExchange # 表示要使用的Exchange名称定义
          content-type: application/json # 设置消息类型,本次为json
          binder: testRabbit #设置要绑定的消息服务的具体设置
          group: groupA

        myInput:
           destination: myExchange # 表示要使用的Exchange名称定义
           content-type: application/json # 设置消息类型,本次为json
           binder: testRabbit #设置要绑定的消息服务的具体设置
本例中,将两个客户端input通道的分组都设置为groupA ,代表其为同一个分组下的客户端,一次只能有一个消费即可,对应Rabbitmq,也是创建了groupA为名字的队列,并且两个客户端共同监听:

所以,每次生产方发送的信息,只由一个客户端消费,并且默认为轮询的方式
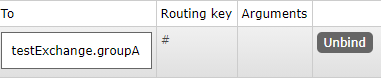
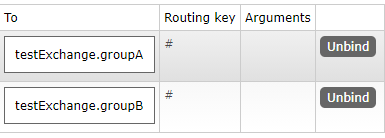
如果指定不同的分组,即创建不同的队列,如下所示,此时也将重复消费
消息持久化:
在没有指定分组队列名前,使用默认生成的队列名,并且创建的队列随着其监听客户端的销毁而销毁, 没有保持持久化,后续当服务重新启动后,就再创建一个新的,
如果使用group 指定队列名,则队列持久化,此时在客户端宕机过程中,如果有消息则持久化在 Rabbitmq的队列中,当再次连接时,继续消费
