CentOS报错:Could not retrieve mirrorlist http://mirrorlist.centos.org/?release=7&arch=x86_64&repo=os&infra=stock32 error was 14: curl#6 - "Could not resolve host: mirrorlist.centos.org; Unknown error"
今天安装完带图形界面的CentOS 7后,在Terminal中运行yum安装命令时报了以下错误:
Could not retrieve mirrorlist http://mirrorlist.centos.org/?release=7&arch=x86_64&repo=os&infra=stock32 error was
14: curl#6 - "Could not resolve host: mirrorlist.centos.org; Unknown error"

One of the configured repositories failed (Unknown),
and yum doesn't have enough cached data to continue. At this point the only
safe thing yum can do is fail. There are a few ways to work "fix" this:

 1. Contact the upstream for the repository and get them to fix the problem.

 2. Reconfigure the baseurl/etc. for the repository, to point to a working
    upstream. This is most often useful if you are using a newer
    distribution release than is supported by the repository (and the
    packages for the previous distribution release still work).

 3. Disable the repository, so yum won't use it by default. Yum will then
    just ignore the repository until you permanently enable it again or use
    --enablerepo for temporary usage:

        yum-config-manager --disable <repoid>

 4. Configure the failing repository to be skipped, if it is unavailable.
    Note that yum will try to contact the repo. when it runs most commands,
    so will have to try and fail each time (and thus. yum will be be much
    slower). If it is a very temporary problem though, this is often a nice
    compromise:

        yum-config-manager --save --setopt=<repoid>.skip_if_unavailable=true
googel了一下这个错误,发现报错原因是“本机无法连接网络的网络设置”的原因。
于是参照“How to Setup network on centos 7”这篇博文,配置了下DHPC,最终解决了这个error。
配置CentOS 7的网络,步骤如下:
1.在终端中输入以下命令,查看安装在本机的网卡:

[xi@localhost ~]$ nmcli d
//以下显示是已经配置到网络后的本机网络状况。
DEVICE       TYPE      STATE         CONNECTION
virbr0       bridge    connected     virbr0
eno16777736  ethernet  connected     eno16777736
virbr0-nic   ethernet  disconnected  --
lo           loopback  unmanaged     --
2.GUI 或 命令模式的网络配置:
GUI模式:
Step #1 » 在终端中输入以下命令,打开网络管理员。接着选择“Edit a connection”后按回车键(使用TAB键进行选择的选项)。
[xi@localhost ~]$ nmtui

Step #2 » 现在你可以看到所有的网络接口,选择一个(我选择了“eno16777736”),然后点击“ Edit “。

Step 3 » 动态配置 或 静态配置
» 动态配置
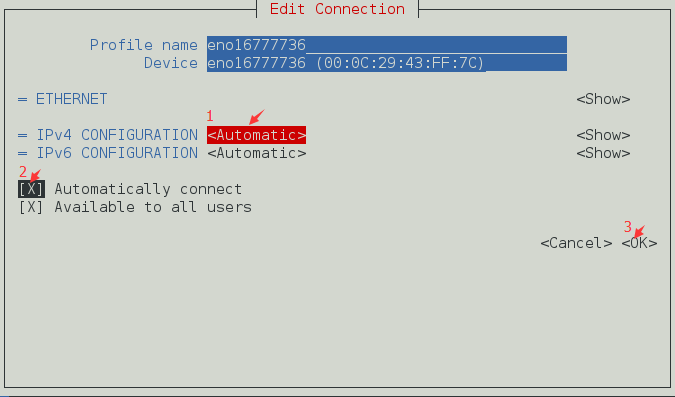
1.在“IPv4 CONFIGURATION”配置选择“<Automatic>”;
2.选择“Automatically connect”复选框;
3.点击OK键,退出网络管理器。最后,通过键入以下命令重新启动网络服务。
[xi@localhost ~]$ systemctl restart network
现在你的服务器将从DHCP获得IP地址。

» 动态配置
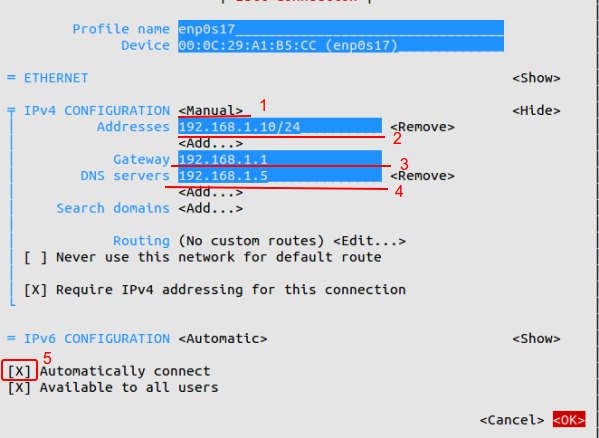
1.在“IPv4 CONFIGURATION”配置选择”Manual”;
2.添加与子网掩码,网关和DNS服务器(参见下图)的IP地址;
3.选择“Automatically connect”复选框;
4.点击OK键,退出网络管理器。现在,通过键入以下命令重新启动网络服务。
[xi@localhost ~]$ systemctl restart network

现在你的服务器具有静态IP。
命令模式:
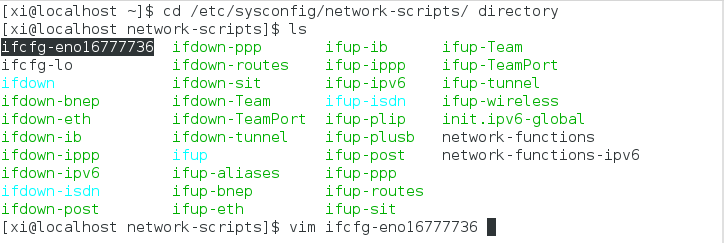
Step #1 » 切换到/etc/sysconfig/network-scripts/目录下,打开“ifcfg-eno16777736”文件:
xi@localhost network-scripts]$ cd /etc/sysconfig/network-scripts/

[xi@localhost network-scripts]$ vim ifcfg-eno16777736
打开ifcfg-eno16777736文件,展开如下:
1  TYPE=Ethernet
2  BOOTPROTO=none
3  DEFROUTE=yes
4  IPV4_FAILURE_FATAL=no
5  IPV6INIT=yes
6  IPV6_AUTOCONF=yes
7  IPV6_DEFROUTE=yes
8  IPV6_FAILURE_FATAL=no
9  NAME=enp0s17
10 UUID=7f1aff2d-b154-4436-9497-e3a4dedddcef
11 ONBOOT=no
12 HWADDR=00:0C:29:A1:B5:D6
13 PEERDNS=yes
14 PEERROUTES=yes
15 IPV6_PEERDNS=yes
16 IPV6_PEERROUTES=yes
Step #3 » 动态配置 或 静态配置
» 动态配置
依次将第2行和第11行替换为:
BOOTPROTO=dhcp
ONBOOT=yes
然后,通过键入以下命令重新启动网络服务:
[xi@localhost ~]$ systemctl restart network
连接外网,测试网络是否成功:
xi@localhost ~]$ ping www.baidu.com
» 静态配置
依次将第2行和第11行替换为:
BOOTPROTO=static
ONBOOT=yes
然后,在文件末尾添加以下4行:
IPADDR=172.27.0.32
NETMASK=255.255.255.0
GATEWAY=172.27.0.1
DNS1=172.27.0.5
最后,通过键入以下命令重新启动网络服务:
[xi@localhost ~]$ systemctl restart network
现在你的服务器具有静态IP。
此外,你可以通过打开文件/ etc / sysconfig / network来修改主机名和DNS。
centos查询本机的外网输入 curl ifconfig.me 命令即可查看:

centos查询上网网关IP,tracepath www.baidu.com

HOSTNAME = server.krizna.com
DNS1 = 192.168.1.5
DNS2 = 8.8. 8.8
SEARCH = krizna.com


 浙公网安备 33010602011771号