
文章点赞功能(Ajax)
一、文章点赞样式构建
1、将base.html的css样式改为外部引入
将base.html的内嵌样式删除,改为使用 HTML 头部的 <head> 标签对中使用<link>标签来引入外部的 CSS 文件。
base.html内容如下所示:
<!DOCTYPE html>
<html lang="en">
<head>
    <meta charset="UTF-8">
    <title>Title</title>
    <!-- 引入 Bootstrap 核心 CSS 文件 -->
    <link rel="stylesheet" href="/static/blog/bootstrap-3.3.7/css/bootstrap.css">
    <!-- jQuery (Bootstrap 的所有 JavaScript 插件都依赖 jQuery,所以必须放在前边) -->
    <script src="/static/js/jquery-3.3.1.js"></script>
    <!-- 引入 Bootstrap 核心 JavaScript 文件 -->
    <script src="/static/blog/bootstrap-3.3.7/js/bootstrap.js"></script> <!--依赖jquery-->
    <link rel="stylesheet" href="/static/blog/css/home_site.css">
    <link rel="stylesheet" href="/static/blog/css/article_detail.css">
</head>
<body>

<div class="header">
    <div class="content">
        <!--站点标题-->
        <p class="title">
            <span>{{ blog.title }}</span>
            <a href="" class="backend">管理</a>
        </p>
    </div>
</div>

<div class="container">
    <div class="row">
        <div class="col-md-3">
            <!--添加bootstrap面板-->
            {% load my_tags %}
            {% get_classification_style username %}
        </div>
        <div class="col-md-9">
            {% block content %}

            {% endblock %}
        </div>
    </div>
</div>

</body>
</html>
个人站点的样式——home_site.css:
* {
    margin: 0;
    padding: 0;
}
.header {
    width: 100%;
    height: 60px;
    background-color: #369;
}
.header .title {
    font-size: 18px; /* 字体大小 */
    font-weight: 100; /* 字体粗细 */
    line-height: 60px; /* 行高与页头一致,完成居中 */
    color: white;
    margin-left: 15px;
    margin-top: -10px;
}
.backend {
    float: right; /* 浮动到右边 */
    color: white;
    text-decoration: none; /* 去除下划线 */
    font-size: 16px;
    margin-right: 12px;
    margin-top: 10px;
}
.pub_info {
    margin-top: 10px;
    color: darkgray;
}
.menu {
    margin-top: 20px;
}
文章详情页的样式——article_detail.css:
.article_info .title {
    margin-bottom: 20px;
}
上述css代码是将标题部分和文字主体部分错开20像素。
2、构建点赞样式
根据博客园代码,在article_detail.html引入文章推荐踩灭:
{% extends "base.html" %}

{% block content %}
    <h3 class="text-center">{{ article_obj.title }}</h3>
    <div class="cont">
        {{ article_obj.content|safe }}
    </div>

    {# 文章点赞 #}
    <div id="div_digg">
        <div class="diggit">
            <span class="diggnum" id="digg_count">1</span>
        </div>
        <div class="buryit">
            <span class="diggnum" id="bury_count">0</span>
        </div>
        <div class="clear"></div>
        <div class="diggword" id="digg_tips" style="color: red;"></div>
    </div>
{% endblock %}
将点赞的css样式写入article_detail.css中:
.article_info .title {
    margin-bottom: 20px;
}

#div_digg {
    float: right;
    margin-bottom: 10px;
    margin-right: 30px;
    font-size: 12px;
    width: 125px;
    text-align: center;
    margin-top: 10px;
}

/* 推荐 */
.diggit {
    float: left;
    width: 46px;
    height: 52px;
    background: url('/static/font/upup.gif') no-repeat;
    text-align: center;
    cursor: pointer;
    margin-top: 2px;
    padding-top: 5px;
}

/* 反对 */
.buryit {
    float: right;
    margin-left: 20px;
    width: 46px;
    height: 52px;
    background: url('/static/font/downdown.gif') no-repeat;
    text-align: center;
    cursor: pointer;
    margin-top: 2px;
    padding-top: 5px;
}

.clear {
    clear: both;  /* 清除浮动,解决塌陷问题 */
}
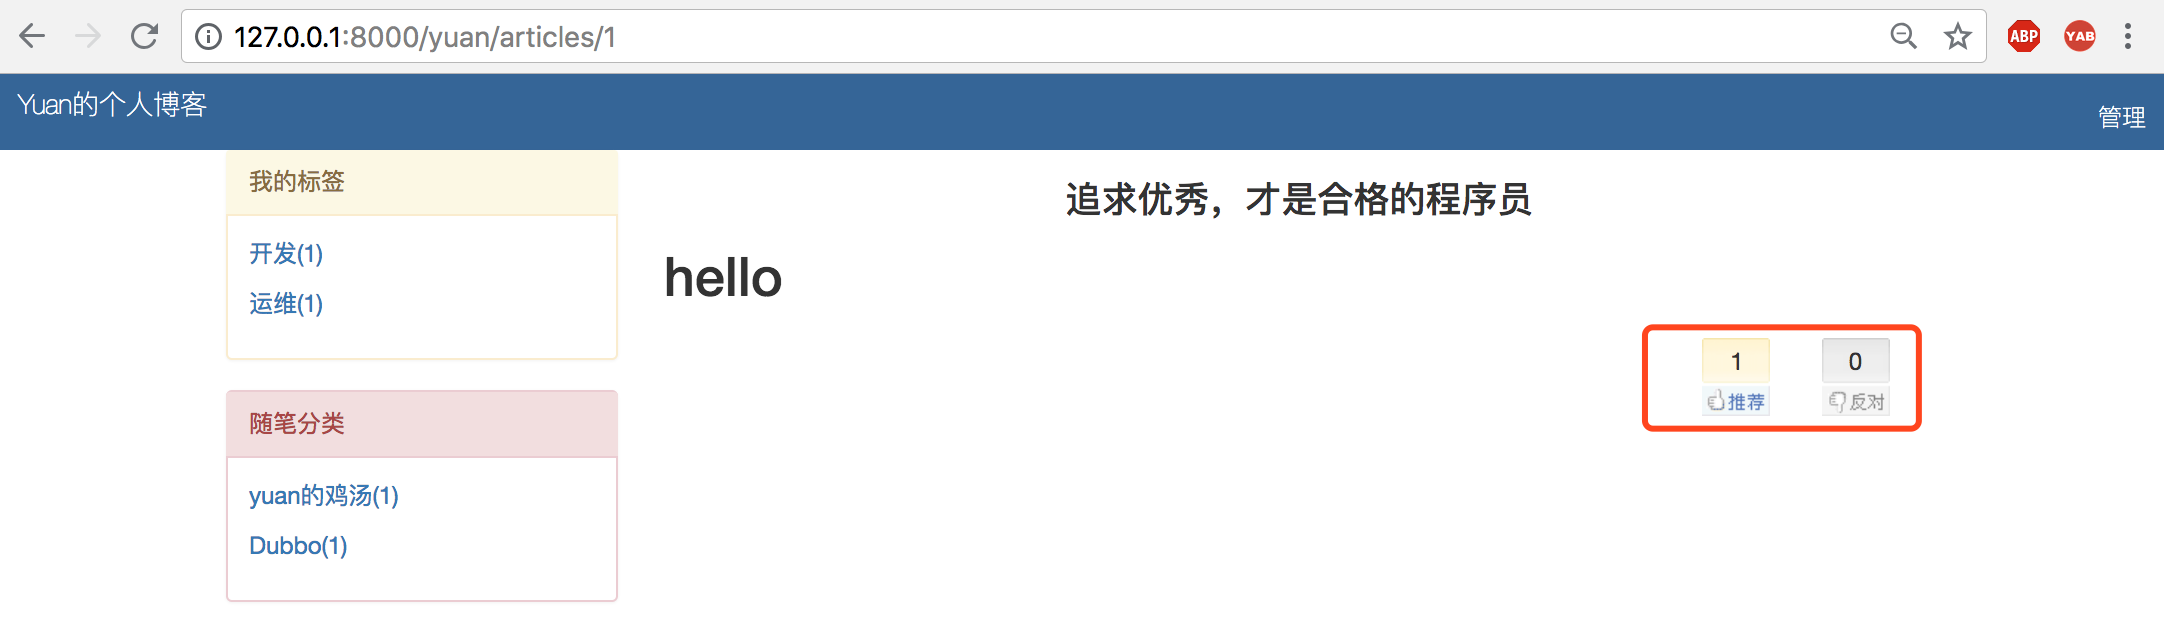
显示效果:

二、文章点赞事件绑定 (Ajax)
给推荐和反对的这两个标签绑定事件,一点击就发送ajax请求。
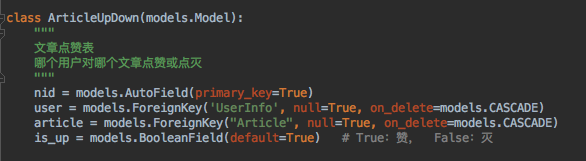
另外查看blog_articleupdown表:

其中is_up字段是存的是一个布尔值。点击推荐则为True,点击反对则为False.在这里将两个标签合在一个事件中,仅仅是做判断点击的是哪个标签。注意文章点赞的script代码应写在article_detail.html模板中。
由于这两个标签有不同的类,一个包含diggit,一个包含buryit。因此只需要判断点击的标签class名就可以,article_detail.html:
 {% extends "base.html" %}

{% block content %}
    <h3 class="text-center">{{ article_obj.title }}</h3>
    <div class="cont">
        {{ article_obj.content|safe }}
    </div>

    {# 文章点赞 #}
    <div id="div_digg">
        {# 推荐 #}
        <div class="diggit action">
            <span class="diggnum" id="digg_count">1</span>
        </div>
        {# 点灭 #}
        <div class="buryit action">
            <span class="diggnum" id="bury_count">0</span>
        </div>
        <div class="clear"></div>
        <div class="diggword" id="digg_tips" style="color: red;"></div>
    </div>

    <script>
        $('#div_digg .action').click(function () {
            var is_up = $(this).hasClass("diggit");
            alert(is_up);
        })
    </script>
{% endblock %}
三、文章点赞保存
1、在article_detail.html模板初步构建ajax请求
<script>
    $('#div_digg .action').click(function () {
        var is_up = $(this).hasClass("diggit");
        $.ajax({
            url: "/digg/",
            type: "post",
            data: {
                'csrfmiddlewaretoken': $("[name= 'csrfmiddlewaretoken']").val(),
                "is_up": is_up,
                "article_id": "{{ article_obj.pk }}",
            },
            success: function (data) {
                console.log(data);
            }
        })
    })
</script>
需要注意:文章点赞人、评论人都应是当前登录人。因此这里不需要传入user_id到ajax中。
由于这里是post请求,因此需要添加csrf_token避免forbidden错误,因此需要构建一条新路由:
urlpatterns = [
    path('admin/', admin.site.urls),
    ...
    path('digg/', views.digg),  # 点赞
  ...
]
创建点赞视图函数:
def digg(request):
    """
    点赞视图函数
    :param request:
    :return:
    """
    print(request.POST)

    return HttpResponse("OK")
访问页面,点击推荐,视图函数request.POST输出:
<QueryDict: {'csrfmiddlewaretoken': ['hBlBWfxGFhDXaqDCfkSMFhKd6ZhZsbuqM8TEj3upzwe2NynenybodHgQyFHQAvZ0'], 'is_up': ['true'], 'article_id': ['1']}>
同时页面控制台输出:OK。
2、生成赞记录
import json

def digg(request):
    """
    点赞视图函数
    :param request:
    :return:
    """
    print(request.POST)
    # <QueryDict: {'csrfmiddlewaretoken': ['hBlBWfxGFhDXaqDCfkSMFhKd6ZhZsbuqM8TEj3upzwe2NynenybodHgQyFHQAvZ0'],
    #               'is_up': ['true'], 'article_id': ['1']}>

    article_id = request.POST.get("article_id")
    # is_up = request.POST.get("is_up")    # 拿到的是一个字符串 "true"
    is_up = json.loads(request.POST.get("is_up"))   # 反序列化,拿到一个bool值

    # 点赞人即当前登录人
    user_id = request.user.pk

    # 创建一条新记录
    ard = models.ArticleUpDown.objects.create(user_id=user_id, article_id=article_id, is_up=is_up)

    return HttpResponse("OK")
在这里需要注意:
(1)生成一条赞记录根据models中的类:
因此拿到article_id、user_id、is_up这三条就可以生成一个新记录。
(2)request.POST.get("is_up") 拿到的结果是一个字符串。因为它在js中虽然也是bool值,但是在传递时,没有设置ContentType,默认使用urlencoded编码,在组装键值的时候,is_up = True就按照字符串发送出去了。因此需要json来进行反序列化。
(3)点击赞后,查看blog_articleupdwon表记录,确认新记录是否生成:

四、文章点赞数的数据同步
生成一条赞记录,就应该把赞记录对应的文章up_count+1,如果是踩灭,则将down_count+1;保持这种同步。
涉及到up_count自加一,需要用到Django的F函数。
import json

from django.db.models import F   # F函数

def digg(request):
    """
    点赞视图函数
    :param request:
    :return:
    """
    print(request.POST)
    # <QueryDict: {'csrfmiddlewaretoken': ['hBlBWfxGFhDXaqDCfkSMFhKd6ZhZsbuqM8TEj3upzwe2NynenybodHgQyFHQAvZ0'],
    #               'is_up': ['true'], 'article_id': ['1']}>

    article_id = request.POST.get("article_id")
    # is_up = request.POST.get("is_up")    # 拿到的是一个字符串 "true"
    is_up = json.loads(request.POST.get("is_up"))   # 反序列化,拿到一个bool值

    # 点赞人即当前登录人
    user_id = request.user.pk

    # 创建一条新记录
    ard = models.ArticleUpDown.objects.create(user_id=user_id, article_id=article_id, is_up=is_up)

    queryset = models.Article.objects.filter(pk=article_id)
    if is_up:
        queryset.update(up_count=F("up_count")+1)
    else:
        queryset.update(up_count=F("down_count")+1)

    return HttpResponse("OK")
工作原理是,直接在数据库中查出数据,计数后更改数据库。点赞后刷新页面,点赞次数已经更新:
五、点赞提示重复操作
博客园文章点赞规则:用户对一篇文章点赞后,不允许再对文章进行点赞或踩灭操作。
1、根据用户在点赞是否有记录进行判断
import json
from django.http import JsonResponse

from django.db.models import F   # F函数

def digg(request):
    """
    点赞视图函数
    :param request:
    :return:
    """
    print(request.POST)
    # <QueryDict: {'csrfmiddlewaretoken': ['hBlBWfxGFhDXaqDCfkSMFhKd6ZhZsbuqM8TEj3upzwe2NynenybodHgQyFHQAvZ0'],
    #               'is_up': ['true'], 'article_id': ['1']}>

    article_id = request.POST.get("article_id")
    # is_up = request.POST.get("is_up")    # 拿到的是一个字符串 "true"
    is_up = json.loads(request.POST.get("is_up"))   # 反序列化,拿到一个bool值

    # 点赞人即当前登录人
    user_id = request.user.pk

    # 用户只要在点赞表存有记录就不能再存了
    obj = models.ArticleUpDown.objects.filter(user_id=user_id, article_id=article_id).first()

    response = {"state": True}
    if not obj:
        # 创建一条新记录
        ard = models.ArticleUpDown.objects.create(user_id=user_id, article_id=article_id, is_up=is_up)

        queryset = models.Article.objects.filter(pk=article_id)
        if is_up:
            queryset.update(up_count=F("up_count")+1)
        else:
            queryset.update(down_count=F("down_count")+1)
    else:
        # 重复点赞提示,告诉ajax已经推荐过了
        response["state"] = False
        response["handled"] = obj.is_up   # True:推荐过了, Flase: 踩过了

    return JsonResponse(response)   # 返回response字典
注意:
(1)通过models.ArticleUpDown.objects.filter(user_id=user_id, article_id=article_id).first(),拿到当前用户在点赞表中针对该文章的点赞记录。if not obj则可以判定没有点赞过,可以正常操作。
(2)提前创建response字典,将需要传递给ajax的信息放入其中。然后引入JsonResponse传递字典。
2、在ajax中处理重复错误信息
<script>
    $('#div_digg .action').click(function () {
        var is_up = $(this).hasClass("diggit");
        $.ajax({
            url: "/digg/",
            type: "post",
            data: {
                'csrfmiddlewaretoken': $("[name= 'csrfmiddlewaretoken']").val(),
                "is_up": is_up,
                "article_id": "{{ article_obj.pk }}"
            },
            success: function (data) {
                console.log(data);
                if (data.state) {

                } else {
                    if (data.handled) {
                        $("#digg_tips").html("您已经推荐过!")
                    } else {
                        $("#digg_tips").html("您已经反对过!")
                    }
                    setTimeout(function () {
                        $("#digg_tips").html("")
                    }, 1000)
                }
            },
        })
    })
</script>
注意:
(1)在data.state为false时,判断data.handled字典是True/False,在id="digg_tips"标签添加对应的内容。
(2)运用setTimeout函数,在提示消息显示1秒后,自动隐藏。
(3)显示效果如下:

六、点赞数ajax更新
修改article_detail.html内script代码:
<script>
    $('#div_digg .action').click(function () {
        var is_up = $(this).hasClass("diggit");
        $.ajax({
            url: "/digg/",
            type: "post",
            data: {
                'csrfmiddlewaretoken': $("[name= 'csrfmiddlewaretoken']").val(),
                "is_up": is_up,
                "article_id": "{{ article_obj.pk }}"
            },
            success: function (data) {
                console.log(data);
                if (data.state) {
                    if (is_up){
                        var val = parseInt($("#digg_count").text());  // parseInt() 函数可解析一个字符串,并返回一个整数。
                        $("#digg_count").text(val+1);
                    } else {
                        var val = parseInt($("#bury_count").text());
                        $("#bury_count").text(val+1);
                    }

                } else {
                    if (data.handled) {
                        $("#digg_tips").html("您已经推荐过!")
                    } else {
                        $("#digg_tips").html("您已经反对过!")
                    }
                    setTimeout(function () {
                        $("#digg_tips").html("")
                    }, 1000)
                }
            },
        })
    })
</script>
这样在点击推荐或踩灭后,不用刷新页面,第一时间就显示了数字加1。
七、代码优化
主要针对article_detail.html中js的重复代码。
{% extends "base.html" %}

{% block content %}
    {%  csrf_token %}
    <h3 class="text-center">{{ article_obj.title }}</h3>
    <div class="cont">
        {{ article_obj.content|safe }}
    </div>

    {# 文章点赞 #}
    <div id="div_digg">
        {# 推荐 #}
        <div class="diggit action">
            <span class="diggnum" id="digg_count">{{ article_obj.up_count }}</span>
        </div>
        {# 点灭 #}
        <div class="buryit action">
            <span class="diggnum" id="bury_count">{{ article_obj.down_count }}</span>
        </div>
        <div class="clear"></div>
        <div class="diggword" id="digg_tips" style="color: red;"></div>
    </div>

<script>
    $('#div_digg .action').click(function () {
        var is_up = $(this).hasClass("diggit");

        $obj = $(this).children("span");

        $.ajax({
            url: "/digg/",
            type: "post",
            data: {
                'csrfmiddlewaretoken': $("[name= 'csrfmiddlewaretoken']").val(),
                "is_up": is_up,
                "article_id": "{{ article_obj.pk }}"
            },
            success: function (data) {
                console.log(data);
                if (data.state) {
                    var val = parseInt($obj.text());  // parseInt() 函数可解析一个字符串,并返回一个整数。
                    $obj.text(val+1);
                } else {
                    // 三元表达式
                    var val = data.handled?"您已经推荐过!":"您已经反对过!";
                    $("#digg_tips").html(val);

                    setTimeout(function () {
                        $("#digg_tips").html("")
                    }, 1000)
                }
            },
        })
    })
</script>
{% endblock %}
注意:
(1)$obj = $(this).children("span"); 变量定义,取消了is_up的判断。
(2)应用三元表达式true对应已经推荐过,false对应已经反对过
// 三元表达式
var val = data.handled?"您已经推荐过!":"您已经反对过!";

 浙公网安备 33010602011771号