
设计个人站点页面(跨表查询、分组查询)
一、个人站点页面的文章查询
1、路由配置个人站点url
urls.py:
urlpatterns = [
    ...
    # 个人站点url
    # 正则规则:\w:匹配数字、字母、下划线   \W:匹配除数字、字母、下划线以外的任意字符
    # '(?P<name>...)' 分组匹配  {"username": alex}
    re_path('^(?P<username>\w+)$', views.home_site),
]
2、构建home_site视图函数及文章查询
def home_site(request, username):
    """
    个人站点视图函数
    :param request:
    :param username:  yuan / alex
    :return:
    """
    print("username", username)
    # 去数据库查找该用户是否存在
    # ret = UserInfo.objects.filter(username= username).exists()

    # 拿到当前用户对象
    user = UserInfo.objects.filter(username= username).first()

    # 判断用户是否存在
    if not user:
        # 用户不存在返回404页面
        return render(request, "not_found.html")

    # 查询当前站点对象
    blog = user.blog

    # 查看当前用户或当前站点所对应的所有文章
    # 方法1:基于对象查询
    # article_list = user.article_set.all()
    # 方法2:基于双下划线查询
    article_list = models.Article.objects.filter(user=user)

    return render(request, "home_site.html")
注意:
(1)访问个人网站需要去数据库查看该用户是否存在,如果用户不存在返回404页面。
# 去数据库查找该用户是否存在
ret = UserInfo.objects.filter(username= username).exists()

# 判断用户是否存在
if not ret:
    # 用户不存在返回404页面
    return render(request, "not_found.html")
(2)查看当前站点对象
(3)查看当前用户或当前站点所对应的所有文章
# 查看当前用户或当前站点所对应的所有文章
# 方法1:基于对象查询
# article_list = user.article_set.all()
# 方法2:基于双下划线查询
article_list = models.Article.objects.filter(user=user)
二、个人站点页面标签和分类查询
# 每一个后的表模型.objects.values("pk").annotate(聚合函数(关联表__统计字段)).values()
# 查询每一个分类名称及对应的文章数(最简单的分组查询)
ret = models.Category.objects.values("pk").annotate(c=Count("article__title")).values("title", "c")
print(ret)   # <QuerySet [{'title': 'yuan的鸡汤', 'c': 1}, {'title': 'Dubbo', 'c': 1}, {'title': '前端', 'c': 1}]>

# 查询当前站点的每一个分类名称以及对应的文章数
cate_list = models.Category.objects.filter(blog=blog).values("pk").annotate(c=Count("article__title")).values_list("title", "c")
print(cate_list)  # <QuerySet [{'title': 'yuan的鸡汤', 'c': 1}, {'title': 'Dubbo', 'c': 1}]>

# 查询当前站点的每一个标签名称及对应的文章数
tag_list = models.Tag.objects.filter(blog=blog).values("pk").annotate(c=Count("article")).values_list("title", "c")
print(tag_list)
三、日期归档查询方式一
这是一个单表分组查询。按照日期进行分组。但是create_time字段是包含时分秒的,因此不能使用它分组。
# 查询当前站点每一个年月的名称及对应的文章数
date_list = models.Article.objects.filter(user=user).extra(select={"y_m_date": "date_format(create_time, '%%Y-%%m')"}).values("y_m_date").annotate(c=Count("nid")).values("y_m_date", "c")
print(date_list)   # <QuerySet [{'y_m_date': '2018-08', 'c': 2}]>
1、date_format函数
注意date\time\datetime三种事件类型的区别
创建表并插入当前时间:
create table t_mul_new(d date,t time,dt datetime);

insert into t_mul_new values(now(),now(),now());
利用date_form函数用于以不同的格式显示日期/时间数据
mysql> select * from t_mul_new;
+------------+----------+---------------------+
| d          | t        | dt                  |
+------------+----------+---------------------+
| 2018-08-02 | 14:58:57 | 2018-08-02 14:58:57 |
+------------+----------+---------------------+
1 row in set (0.00 sec)

mysql> select date_format(dt,"%Y/%m/%d") from t_mul_new;
+----------------------------+
| date_format(dt,"%Y/%m/%d") |
+----------------------------+
| 2018/08/02                 |
+----------------------------+
1 row in set (0.00 sec)
语法和参数如下所示:
语法:
DATE_FORMAT(date,format)
    date 参数是合法的日期。format 规定日期/时间的输出格式。

常用格式:
%a	缩写星期名
%b	缩写月名
%c	月,数值
%D	带有英文前缀的月中的天
%d	月的天,数值(00-31)
%e	月的天,数值(0-31)
%H	小时 (00-23)
%h	小时 (01-12)
%I	小时 (01-12)
%i	分钟,数值(00-59)
%j	年的天 (001-366)
%M	月名
%m	月,数值(00-12)
%p	AM 或 PM
%r	时间,12-小时(hh:mm:ss AM 或 PM)
%S	秒(00-59)
%s	秒(00-59)
%T	时间, 24-小时 (hh:mm:ss)
2、extra函数
语法:
extra(select=None, where=None, params=None, tables=None, order_by=None, select_params=None)
有些情况下,Django的查询语法难以简单的表达复杂的 WHERE 子句,对于这种情况, Django 提供了 extra() QuerySet修改机制 — 它能在 QuerySet生成的SQL从句中注入新子句。
extra可以指定一个或多个参数,例如 select, where or tables. 这些参数都不是必须的,但是你至少要使用一个!要注意这些额外的方式对不同的数据库引擎可能存在移植性问题.(因为你在显式的书写SQL语句),除非万不得已,尽量避免这样做。
select参数:
The select 参数可以让你在 SELECT从句中添加其他字段信息,它应该是一个字典,存放着属性名到 SQL 从句的映射。
queryResult=models.Article.objects.extra(select={'is_recent': "create_time > '2017-09-05'"})
结果集中每个 Entry 对象都有一个额外的属性is_recent, 它是一个布尔值,表示 Article对象的create_time 是否晚于2017-09-05.
如果要进一步过滤结果,拿到匹配元素的名称和是否最近的结果:
ret = models.Article.objects.extra(select={"is_recent": "create_time > '2017-09-05'"}).values("title", "is_recent")
print(ret) # <QuerySet [{'is_recent': 1, 'title': '追求优秀,才是合格的程序员'}, {'is_recent': 1, 'title': 'Dubbo负载均衡与集群容错机制'}, {'is_recent': 1, 'title': 'vue相关'}]>
利用extra查看对应所有文章,并得到年-月-日形式发布时间:
ret = models.Article.objects.extra(select={"y_m_d_date": "date_format(create_time, '%%Y-%%m-%%d')"}).values("title", "y_m_d_date")
print(ret)  # <QuerySet [{'y_m_d_date': '2018-08-01', 'title': '追求优秀,才是合格的程序员'}, {'y_m_d_date': '2018-08-01', 'title': 'Dubbo负载均衡与集群容错机制'}, {'y_m_d_date': '2018-08-01', 'title': 'vue相关'}]>
3、再加入filter(user=user)过滤出当前站点用户,并使用.annotate(c=Count("nid"))分组
date_list = models.Article.objects.filter(user= user).extra(select={"y_m_date": "date_format(create_time, '%%Y-%%m')"}).values("y_m_date").annotate(c=Count("nid")).values("y_m_date", "c")
print(date_list)   # <QuerySet [{'y_m_date': '2018-08', 'c': 2}]>
如此就得到了当前站点每一个年月的文章数。但是这个数据传入模板中,调用不了,因为它并不是字典。
# 改用values_list,得到字典
date_list = models.Article.objects.filter(user=user).extra(
    select={"y_m_date": "date_format(create_time, '%%Y-%%m')"}).values("y_m_date").annotate(c=Count("nid")).values_list(
    "y_m_date", "c")
print(date_list)  # <QuerySet [('2018-08', 2)]>
四、日期归档查询方式二
应用django提供的接口来快速处理日期归档查询,这里引入的是TruncMonth,比较常用的还有TruncDay等。
from django.db.models.functions import TruncMonth
ret = models.Article.objects.filter(user=user).annotate(month=TruncMonth("create_time")).values("month").annotate(c=Count("nid")).values_list("month", "c")
print("ret---->", ret)   # ret----> <QuerySet [(datetime.datetime(2018, 8, 1, 0, 0), 2)]>
1、TruncMonth模块及使用方式
from django.db.models.functions import TruncMonth

Sales.objects
	.annotate(month=TruncMonth('timestamp'))  # Truncate to month and add to select list
	.values('month')                          # Group By month
	.annotate(c=Count('id'))                  # Select the count of the grouping
	.values('month', 'c')                     # (might be redundant, haven't tested) select month and count
注意:
(1).annotate(month=TruncMonth('timestamp'))并没有做分组,是把日期截断到年月为止,并赋值给month的字段;
(2).values('month') 是利用刚刚截断出来的month字段来进行分组;
(3).annotate(c=Count('id')) 统计id的数量;
(4).values('month', 'c') 显示month和统计出来的c值。
2、django中的时区设置TIME_ZONE,USE_TZ
运行代码发现报错:Database returned an invalid datetime value. Are time zone definitions for your database installed?
检查发现是settings.py中改写过TIME_ZONE = "Asia/Shanghai"后,需要将USE_TZ=True改为USE_TZ=False。
Django如果开启了Time Zone功能,则所有的存储和内部处理,甚至包括直接print显示全都是UTC的。只有通过模板进行表单输入/渲染输出的时候,才会执行UTC本地时间的转换。建议后台处理时间的时候,最好完全使用UTC,不要考虑本地时间的存在。而显示时间的时候,也避免手动转换,尽量使用Django模板系统代劳。
启用 USE_TZ = True 后,处理时间方面,有两条 “黄金法则”:
1、保证存储到数据库中的是 UTC 时间;
2、在函数之间传递时间参数时,确保时间已经转换成 UTC 时间;

# 通常获取当前时间用的是:
import datetime
now = datetime.datetime.now()

# 启用 USE_TZ = True 后,需要写成:
import datetime
from django.utils.timezone import utc
utcnow = datetime.datetime.utcnow().replace(tzinfo=utc)
除非应用支持用户设置自己所在的时区,通常我们不需要关心模板的时区问题。模板在展示时间的时候,会使用 settings.TIME_ZONE 中的设置自动把 UTC 时间转成 settings.TIME_ZONE 所在时区的时间渲染。
TIME_ZONE = 'Asia/Shanghai'
五、个人站点页面渲染布局
1、将数据传入模板home_site.html中:
def home_site(request, username):
    ...
    return render(request, "home_site.html", {"blog": blog, "article_list": article_list, "cate_list": cate_list, "date_list": date_list})
2、home_site.html页面布局及数据获取代码如下:
<!DOCTYPE html>
<html lang="en">
<head>
    <meta charset="UTF-8">
    <title>Title</title>
    <!-- 引入 Bootstrap 核心 CSS 文件 -->
    <link rel="stylesheet" href="/static/blog/bootstrap-3.3.7/css/bootstrap.css">
    <!-- jQuery (Bootstrap 的所有 JavaScript 插件都依赖 jQuery,所以必须放在前边) -->
    <script src="/static/js/jquery-3.3.1.js"></script>
    <!-- 引入 Bootstrap 核心 JavaScript 文件 -->
    <script src="/static/blog/bootstrap-3.3.7/js/bootstrap.js"></script> <!--依赖jquery-->
    <style>
        * {
            margin: 0;
            padding: 0;
        }

        .header {
            width: 100%;
            height: 60px;
            background-color: #369;
        }

        .header .title {
            font-size: 18px; /* 字体大小 */
            font-weight: 100; /* 字体粗细 */
            line-height: 60px; /* 行高与页头一致,完成居中 */
            color: white;
            margin-left: 15px;
            margin-top: -10px;
        }

        .backend {
            float: right; /* 浮动到右边 */
            color: white;
            text-decoration: none; /* 去除下划线 */
            font-size: 16px;
            margin-right: 12px;
            margin-top: 10px;
        }
        .pub_info {
            margin-top: 10px;
            color: darkgray;
        }
    </style>
</head>
<body>

<div class="header">
    <div class="content">
        <!--站点标题-->
        <p class="title">
            <span>{{ blog.title }}</span>
            <a href="" class="backend">管理</a>
        </p>
    </div>
</div>

<div class="container">
    <div class="row">
        <div class="col-md-3">
            <!--添加bootstrap面板-->
            <div class="panel panel-warning">
                <div class="panel-heading">我的标签</div>
                <div class="panel-body">
                    {% for tag in tag_list %}
                        <p>{{ tag.0 }}({{ tag.1 }})</p>
                    {% endfor %}
                </div>
            </div>
            <div class="panel panel-danger">
                <div class="panel-heading">随笔分类</div>
                <div class="panel-body">
                    {% for cate in cate_list %}
                        <p>{{ cate.0 }}({{ cate.1 }})</p>
                    {% endfor %}
                </div>
            </div>
            <div class="panel panel-success">
                <div class="panel-heading">随笔归档</div>
                <div class="panel-body">
                    {% for date in date_list %}
                        <p>{{ date.0 }}({{ date.1 }})</p>
                    {% endfor %}
                </div>
            </div>
        </div>
        <div class="col-md-9">
            <div class="article_list">
                <div class="article_list">
                    {% for article in article_list %}
                        <div class="article-item clearfix">
                            <h5><a href="">{{ article.title }}</a></h5>
                            <div class="article-desc">
                                {# 文章摘要 #}
                                {{ article.desc }}
                            </div>
                            <!--文章下方详细信息-->
                            <div class="small pub_info pull-right">
                                {# 文章发布时间 #}
                                <span>发布于  {{ article.create_time|date:"Y-m-d H:i" }}</span>
                                {# 评论数 #}
                                <span class="glyphicon glyphicon-comment"></span> 评论({{ article.comment_count }})
                                {# 点赞数 #}
                                <span class="glyphicon glyphicon-thumbs-up"></span> 点赞({{ article.up_count }})
                            </div>
                        </div>
                        <hr>
                    {% endfor %}
                </div>
            </div>
        </div>
    </div>
</div>

</body>
</html>
注意:
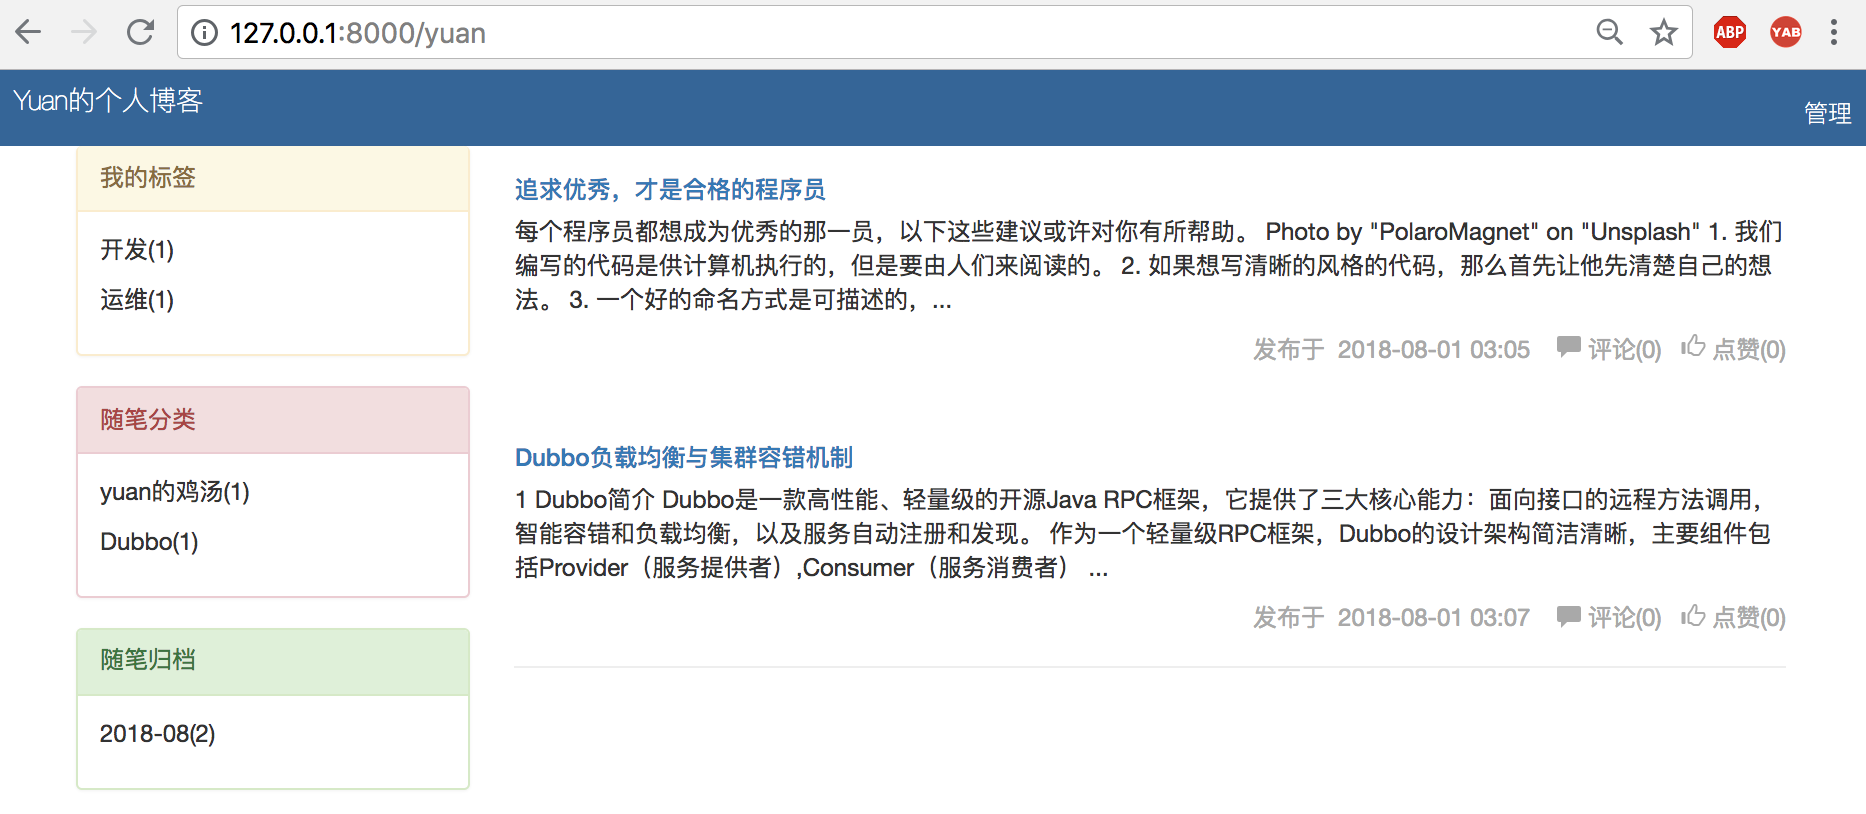
(1)这里文章列表可以复用首页的文章列表代码来显示,做去除头像等微调即可。
(2)div标签添加class="clearfix",解决标签浮动问题。
通过为父元素添加 .clearfix 类可以很容易地清除浮动(float)。这里所使用的是 Nicolas Gallagher 创造的 micro clearfix 方式。此类还可以作为 mixin 使用。
<div class="article-item clearfix">
    <h5><a href="">{{ article.title }}</a></h5>
    <div class="article-desc">
        {# 文章摘要 #}
        {{ article.desc }}
    </div>
    <!--文章下方详细信息-->
    <div class="small pub_info pull-right">
        {# 文章发布时间 #}
        <span>发布于  {{ article.create_time|date:"Y-m-d H:i" }}</span>
        {# 评论数 #}
        <span class="glyphicon glyphicon-comment"></span> 评论({{ article.comment_count }})
        {# 点赞数 #}
        <span class="glyphicon glyphicon-thumbs-up"></span> 点赞({{ article.up_count }})
    </div>
</div>
3、显示效果:
六、个人站点页面跳转过滤功能
1、页面跳转路由设计
在点击标签、随笔分类、随笔日期归档的时候,显示对应的过滤信息。需要利用到路由跳转。
仿照博客园页面地址:https://www.cnblogs.com/xiugeng/category/1156842.html
urlpatterns = [
    ...
    # 个人站点url
    re_path('^(?P<username>\w+)$', views.home_site),

    # 个人站点跳转   有名分组
    re_path('^(?P<username>\w+)/(?P<condition>tag|category|archive)/(?P<param>.*)/$', views.home_site),
]
当用户访问个人站点时,传给视图函数home_site两个实参:homesite(request, username='yuan');
当用户访问个人站点跳转时,传递四个参数:homesite(request, username='yuan', condition='tag', param='运维');
2、home_site视图函数改写
def home_site(request, username, **kwargs):
    """
    个人站点视图函数
    :param request:
    :param username:  yuan / alex
    :return:
    """
    # 拿到当前用户对象
    user = UserInfo.objects.filter(username=username).first()

    # 判断用户是否存在
    if not user:
        # 用户不存在返回404页面
        return render(request, "not_found.html")

    # 查询当前站点对象
    blog = user.blog

    if kwargs:
        condition = kwargs.get("condition")
        param = kwargs.get("param")  # 2012-12

        if condition=="category":
            article_list = models.Article.objects.filter(user=user).filter(category__title=param)
        elif condition=="tag":
            article_list = models.Article.objects.filter(user=user).filter(tags__title=param)
        else:
            year, month = param.split("-")
            article_list = models.Article.objects.filter(user=user).filter(create_time__year=year, create_time__month=month)
    else:
        article_list = models.Article.objects.filter(user=user)

    # 查询每一个分类名称及对应的文章数(最简单的分组查询)
    ret = models.Category.objects.values("pk").annotate(c=Count("article__title")).values("title", "c")
    print(ret)  # <QuerySet [{'title': 'yuan的鸡汤', 'c': 1}, {'title': 'Dubbo', 'c': 1}, {'title': '前端', 'c': 1}]>

    # 查询当前站点的每一个分类名称以及对应的文章数
    cate_list = models.Category.objects.filter(blog=blog).values("pk").annotate(c=Count("article__title")).values_list(
        "title", "c")
    print(cate_list)  # <QuerySet [{'title': 'yuan的鸡汤', 'c': 1}, {'title': 'Dubbo', 'c': 1}]>

    # 查询当前站点的每一个标签名称及对应的文章数
    tag_list = models.Tag.objects.filter(blog=blog).values("pk").annotate(c=Count("article")).values_list("title", "c")
    print(tag_list)

    # 改用values_list,得到字典
    date_list = models.Article.objects.filter(user=user).extra(
        select={"y_m_date": "date_format(create_time, '%%Y-%%m')"}).values("y_m_date").annotate(
        c=Count("nid")).values_list(
        "y_m_date", "c")
    print(date_list)  # <QuerySet [('2018-08', 2)]>

    return render(request, "home_site.html",
                  {"blog": blog, "article_list": article_list, "cate_list": cate_list, "tag_list": tag_list,
                   "date_list": date_list})
注意要点:
(1)给home_site()函数添加**kwargs参数。在访问个人站点跳转时,可以接收到其他参数。
(2)基于kwargs是否存在,判断是否是个人站点跳转,如果是的,拿到condition和param的值:
if kwargs:
    condition = kwargs.get("condition")
    param = kwargs.get("param")  # 2012-12
(3)由于condition的值只可能是tag\category\archive这三种,根据这三种情况拿到对应的文章列表
if kwargs:
    condition = kwargs.get("condition")
    param = kwargs.get("param")  # 2012-12

    if condition=="category":
        article_list = models.Article.objects.filter(user=user).filter(category__title=param)
    elif condition=="tag":
        article_list = models.Article.objects.filter(user=user).filter(tags__title=param)
    else:
        year, month = param.split("-")
        article_list = models.Article.objects.filter(user=user).filter(create_time__year=year, create_time__month=month)
else:
    article_list = models.Article.objects.filter(user=user)
由于models.Article.objects.filter(user=user)出现了多次重复,代码优化如下:
article_list = models.Article.objects.filter(user=user)
if kwargs:
    condition = kwargs.get("condition")
    param = kwargs.get("param")  # 2012-12

    if condition=="category":
        article_list = article_list.filter(category__title=param)
    elif condition=="tag":
        article_list = article_list.filter(tags__title=param)
    else:
        year, month = param.split("-")
        article_list = article_list.filter(create_time__year=year, create_time__month=month)
(4)日期归档时,当condition="archive"时,param的值是类似2012-12这样的格式,需要进行切割处理
year, month = param.split("-")
访问验证


3、home_site.html模板修改
需要在views.py的return render中再给模板传递一个"username":
def home_site(request, username, **kwargs):
  ...
  return render(request, "home_site.html",
                  {"username": username, "blog": blog, "article_list": article_list, "cate_list": cate_list, "tag_list": tag_list,
                   "date_list": date_list})
(1)我的标签 添加<a>并填写访问路径
<div class="panel panel-warning">
    <div class="panel-heading">我的标签</div>
    <div class="panel-body">
        {% for tag in tag_list %}
            <p><a href="/{{ username }}/tag/{{ tag.0 }}">{{ tag.0 }}({{ tag.1 }})</a></p>
        {% endfor %}
    </div>
</div>
注意{{tag.0}}是标签名称。点击验证如下:

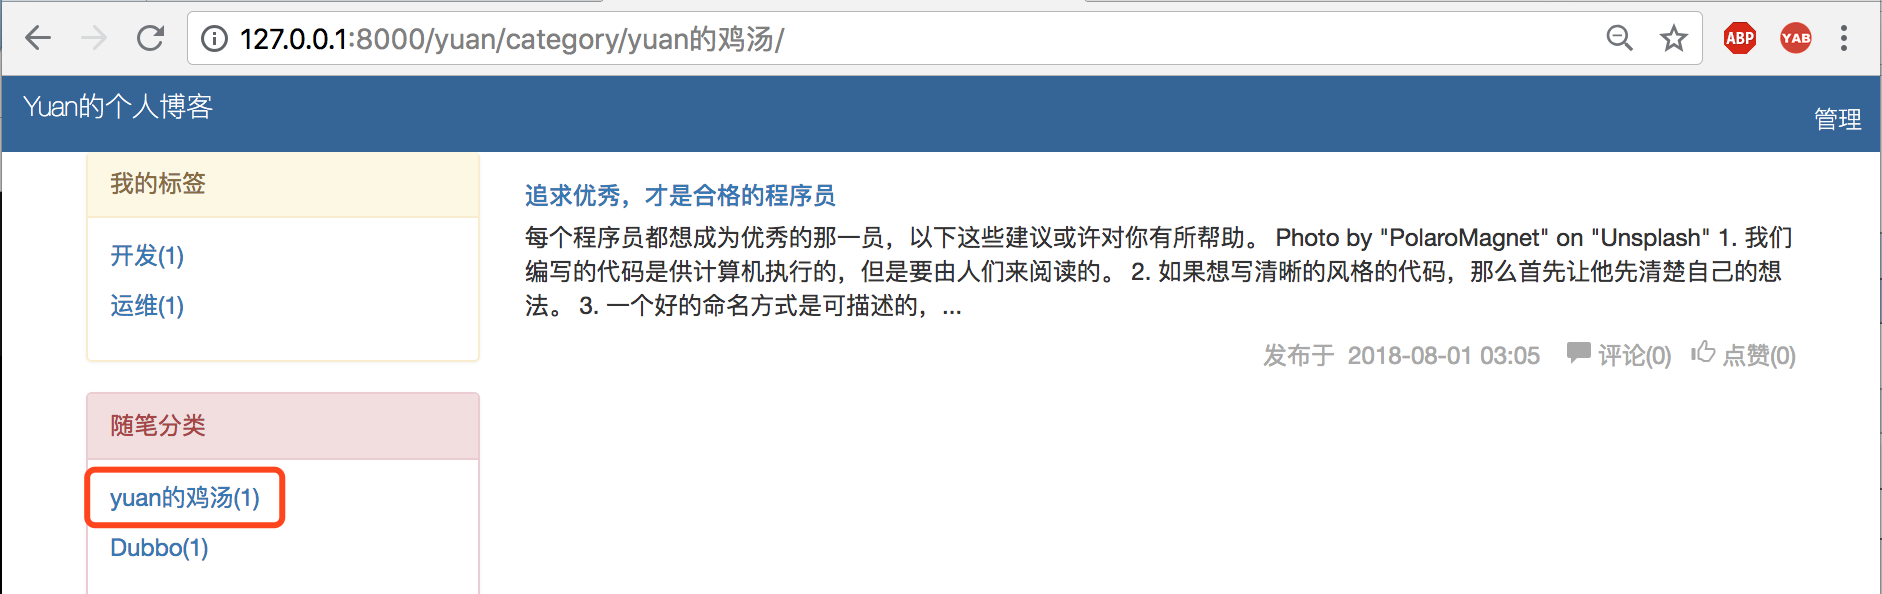
(2)随笔分类 处理方式和tag类似
<div class="panel panel-danger">
    <div class="panel-heading">随笔分类</div>
    <div class="panel-body">
        {% for cate in cate_list %}
            <p><a href="/{{ username }}/category/{{ cate.0 }}">{{ cate.0 }}({{ cate.1 }})</a></p>
        {% endfor %}
    </div>
</div>
显示效果:
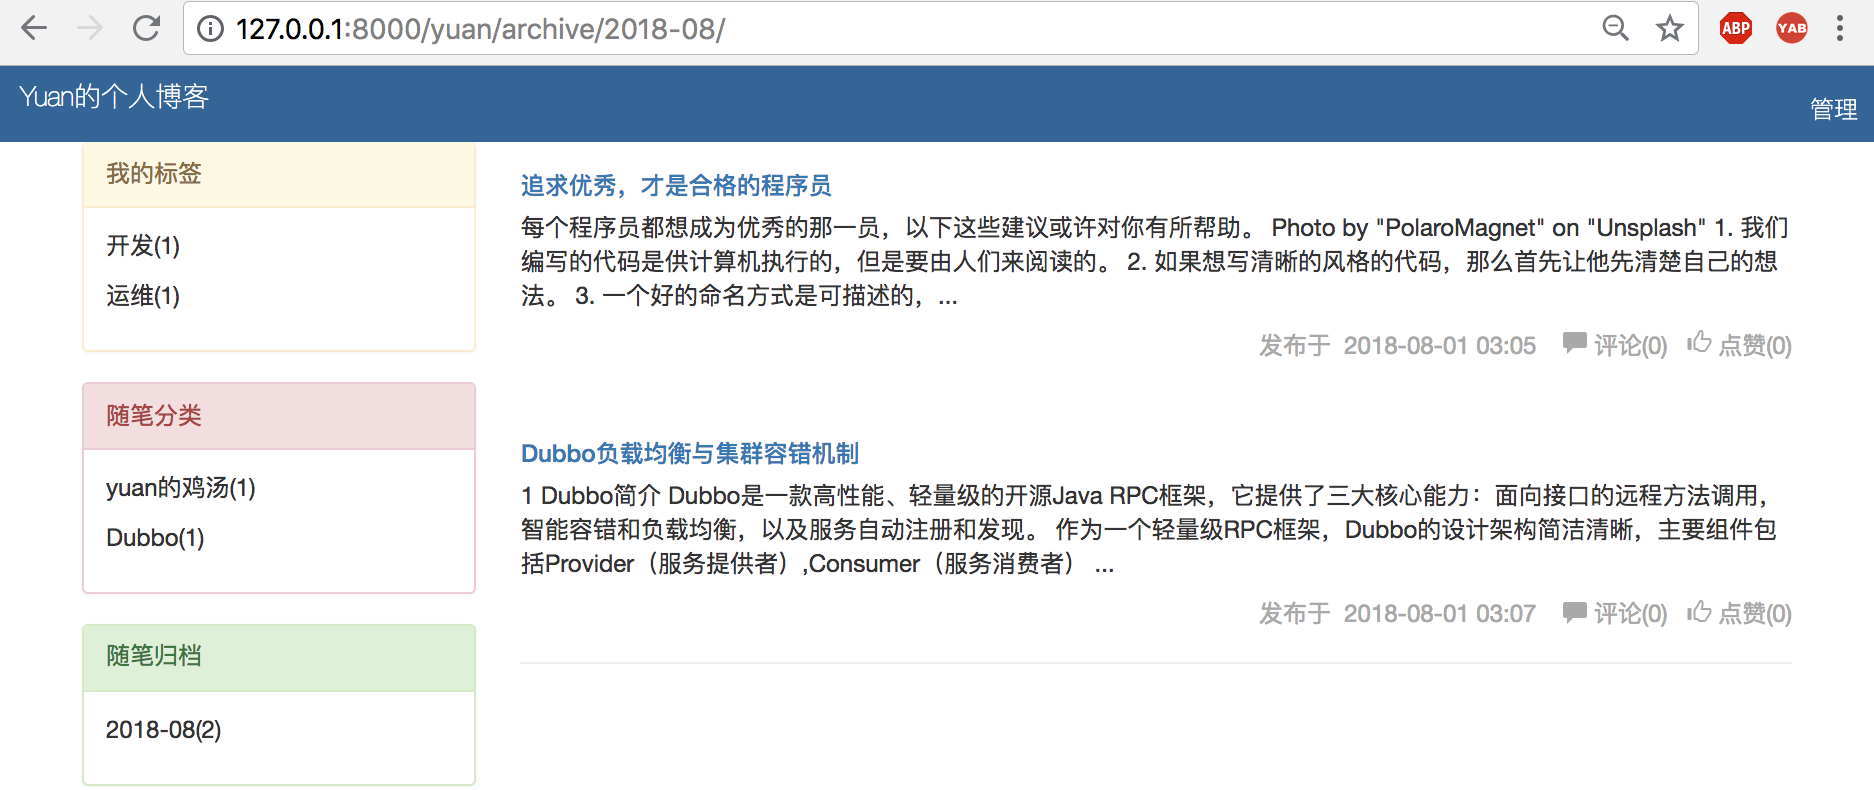
(3)随笔归档处理如下:
<div class="panel panel-success">
    <div class="panel-heading">随笔归档</div>
    <div class="panel-body">
        {% for date in date_list %}
            <p><a href="/{{ username }}/archive/{{ date.0 }}">{{ date.0 }}({{ date.1 }})</a></p>
        {% endfor %}
    </div>
</div>
显示效果如下:


 浙公网安备 33010602011771号