【西天取经】(骚操作)net core WebAPI生成ReDoc文档后支持多语言样例(x-code-samples)
【西天取经】(骚操作)net core WebAPI生成ReDoc文档后支持多语言样例(x-code-samples)
现在做的项目多是以WebAPI的方式对外提供功能的,配合像Vue这样的前端技术展示出页面、或者自己写的程序调用、或者外部第三方公司写的程序调用。
程序员不仅需要写完接口的功能,还需要把这些接口功能对应的文档写出来,多数情况下程序员会直接通过工具来生成接口的文档,普遍使用的是:Swagger。
.net core使用Swagger功能需要引用Swashbuckle.AspNetCore这个包以及它的子包。(也有用别的包来实现的)。我只介绍我的项目里面用到哪些包:
  <PackageReference Include="Swashbuckle.AspNetCore" Version="5.6.3" />
  <PackageReference Include="Swashbuckle.AspNetCore.Annotations" Version="5.6.3" />
  <PackageReference Include="Swashbuckle.AspNetCore.Newtonsoft" Version="5.6.3" />
  <PackageReference Include="Swashbuckle.AspNetCore.ReDoc" Version="5.6.3" />
其中Swashbuckle.AspNetCore.ReDoc这个包就是我这篇文章要介绍的内容。ReDoc是一个既美观又大方的展示页面(它使用React+TypeScript语言开发出来的,最终编译后会生成一个js文件和一个html文件),Swashbuckle.AspNetCore.ReDoc包里面已经包含编译之后的js和html文件,如图所示:

没用过ReDoc界面的人可能还是不清楚它到底长什么样子。
首先,看一下Swagger-UI的界面样子:(基本上都见过了)
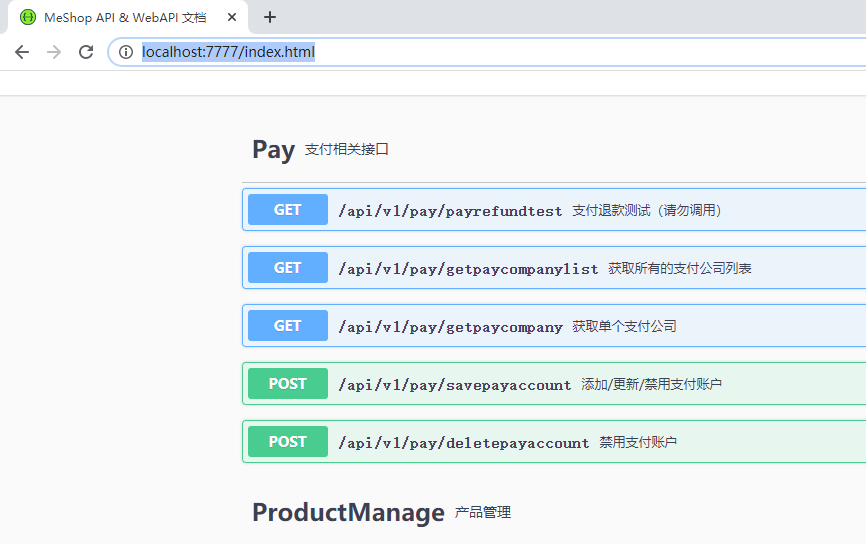
然后,ReDoc的界面样子:(我要介绍的就是这个界面)

通常情况下,程序员会把Swagger-UI的界面留给自己或者内部使用,因为Swagger-UI可以发送请求测试接口的功能,也是入门必备的技能包;但是ReDoc更侧重于给外部第三方的客户使用,这两种展示方式我个人认为只是有用途上的区分而已。而 Knife4j 和 Swagger-UI 用途上我认为更接近。下图是Knife4j的界面(本文不介绍),我们给前端组的小伙伴提供接口文档用这个界面。
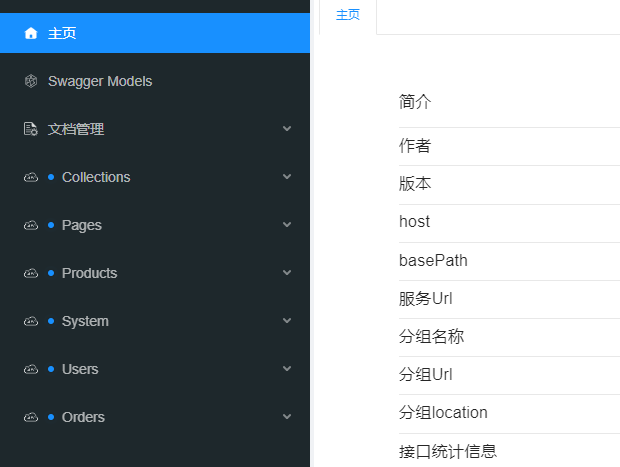
如果想把ReDoc文档变得更漂亮或者想加上公司的logo等等有定制需求时,就需要下载ReDoc源码自己改吧改吧了。我们目前就是自己稍微改了一下然后放到官网上去的。
ReDoc如果只是把上面这些接口的信息显示出来肯定是缺了点什么,到底缺什么呢?答案是:缺例子。第三方客户看到这些文档,又没有例子100%会关闭你的网页,因为没有人会花时间学习你的接口文档,除非你做的项目足够强大或者你所在的公司高大尚。但是往往像这样牛逼的公司提供出来的接口文档都会很全的,相反自己做的接口文档少这少那,又怎么会有人用你做的东西呢?
下面就来做一个带有多语言的sample的Redoc文档,如图所示:
- C#:
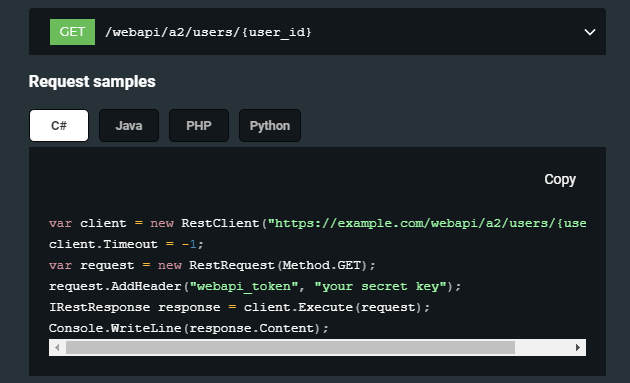
- Java:

- PHP:

- Python:
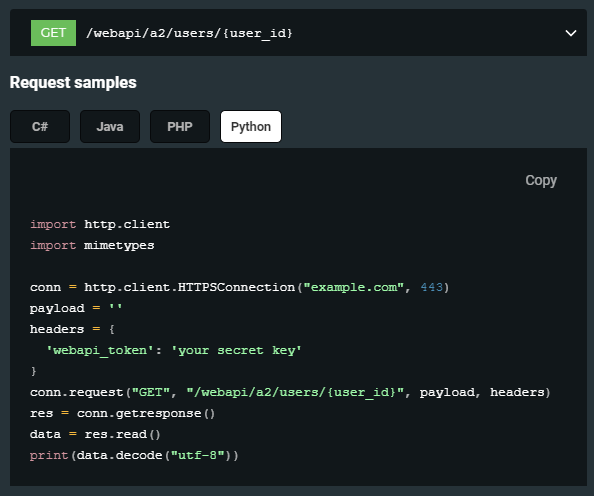
代码奉上:(前提是你的会Swagger,我这里只介绍ReDoc添加多语言sample代码)
1、.net core项目使用ReDoc:
/// <summary>
/// 加入ReDoc中间件
/// </summary>
/// <param name="app"></param>
/// <param name="environment"></param>
private void UseReDoc(IApplicationBuilder app, IWebHostEnvironment environment)
{
    app.UseSwagger(options => { options.RouteTemplate = "webapi/swagger/{documentName}/swagger.yaml"; options.SerializeAsV2 = true; });

    app.UseReDoc(option =>
    {
        option.RoutePrefix = "webapi";
        option.SpecUrl = $"/webapi/swagger/v1/swagger.yaml";
        option.DocumentTitle = "ReDoc多语言sample代码示例";
        option.ConfigObject = new Swashbuckle.AspNetCore.ReDoc.ConfigObject
        {
            NoAutoAuth = true,
            HideDownloadButton = true,
            HideLoading = false,
            HideHostname = true,
            RequiredPropsFirst = true,
            DisableSearch = true,
            NativeScrollbars = true,
        };
    });
}
2、设置ReDoc增加多语言的samples代码,ReDoc就是从x-code-samples里面拿各种语言的sample代码:
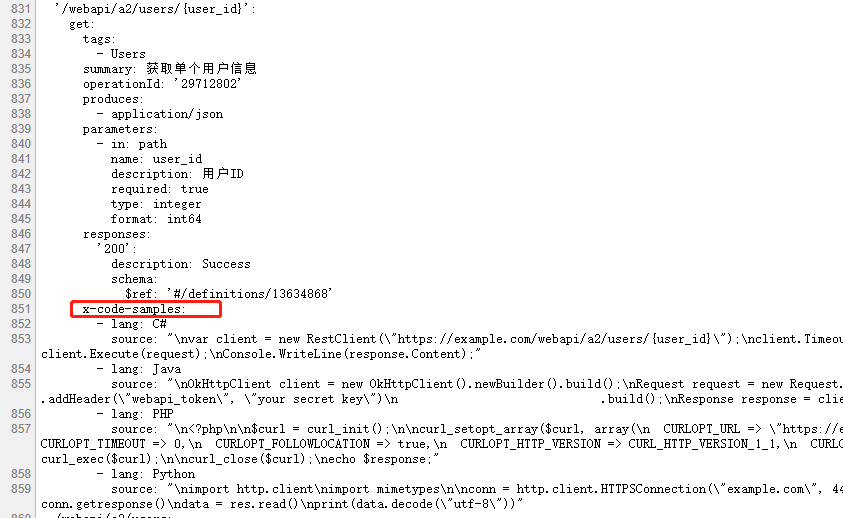
/// <summary>
/// 用来生成Swagger里面ReDoc多语言Sample例子。即:"x-code-samples"里面的内容
/// </summary>
public class XCodeSamplesOperationFilter : IOperationFilter
{
    public void Apply(OpenApiOperation operation, OperationFilterContext context)
    {
        const string KEY = "x-code-samples";
        if (!operation.Extensions.ContainsKey(KEY))
        {
            var xCodeSamplesAttributes = context.MethodInfo
                                                .GetCustomAttributes(true)
                                                .OfType<XCodeSamplesAttribute>()  //自定义的Attribute
                                                ;
            if (xCodeSamplesAttributes == null || !xCodeSamplesAttributes.Any())
            {
                return;
            }

            OpenApiArray openApiArray = new OpenApiArray();
            foreach(var xCodeSamples in xCodeSamplesAttributes)
            {
                openApiArray.Add(new OpenApiObject
                   {
                       {"lang", new OpenApiString(xCodeSamples.Lang)},
                       {"source", new OpenApiString(xCodeSamples.Source, true)}
                   });
            }
            operation.Extensions.Add(KEY, openApiArray);
        }
    }
}
3、自定义XCodeSamplesAttribute,用来添加每种语言的sample代码:
/// <summary>
/// 用来生成Swagger里面ReDoc多语言Sample例子。即:"x-code-samples"里面的内容
/// </summary>
[System.AttributeUsage(System.AttributeTargets.Method, AllowMultiple = true)]
public class XCodeSamplesAttribute : Attribute
{
    /// <summary>
    /// 语言
    /// </summary>
    public string Lang { get; set; }
    /// <summary>
    /// 代码
    /// </summary>
    public string Source { get; set; }

    public XCodeSamplesAttribute(string lang, string source)
    {
        this.Lang = lang;
        this.Source = source;
    }
}
4、设置Swagger的IOperationFilter和ReDoc进行关联,关于Swagger里面的设置还有很多其他知识,我这里就不啰嗦了,百度、谷歌都能找得到。这里只介绍和多语言sample相关的代码部分:
/// <summary>
/// 注入Swagger服务
/// </summary>
/// <param name="services"></param>
private void AddSwagger(IServiceCollection services)
{
    //注册Swagger生成器
    services.AddSwaggerGen(option =>
    {
    ...
       option.OperationFilter<XCodeSamplesOperationFilter>();
    ...
    }
}
5、给Controller里面的某一个Action上添加多语言的sample代码,使用自定义的XCodeSamplesAttribute(下面的代码看着有点丑)。
/// <summary>
/// 获取单个用户信息
/// </summary>
/// <param name="userId">用户ID</param>
/// <returns></returns>
[HttpGet("{user_id}")]
[XCodeSamples(lang: "C#", source: @"
var client = new RestClient(""https://example.com/webapi/a2/users/{user_id}"");
client.Timeout = -1;
var request = new RestRequest(Method.GET);
request.AddHeader(""webapi_token"", ""your secret key"");
IRestResponse response = client.Execute(request);
Console.WriteLine(response.Content);")

 , XCodeSamples(lang: "Java", source: @"
OkHttpClient client = new OkHttpClient().newBuilder().build();
Request request = new Request.Builder()
                     .url(""https://example.com/webapi/a2/users/{user_id}"")
                     .method(""GET"", null)
                     .addHeader(""webapi_token"", ""your secret key"")
                     .build();
Response response = client.newCall(request).execute();")

 , XCodeSamples(lang: "PHP", source: @"
<?php

$curl = curl_init();

curl_setopt_array($curl, array(
CURLOPT_URL => ""https://example.com/webapi/a2/users/%7Buser_id%7D"",
CURLOPT_RETURNTRANSFER => true,
CURLOPT_ENCODING => """",
CURLOPT_MAXREDIRS => 10,
CURLOPT_TIMEOUT => 0,
CURLOPT_FOLLOWLOCATION => true,
CURLOPT_HTTP_VERSION => CURL_HTTP_VERSION_1_1,
CURLOPT_CUSTOMREQUEST => ""GET"",
CURLOPT_HTTPHEADER => array(
""webapi_token: your secret key""
),
));

$response = curl_exec($curl);

curl_close($curl);
echo $response;")

 , XCodeSamples(lang: "Python", source: @"
import http.client
import mimetypes

conn = http.client.HTTPSConnection(""example.com"", 443)
payload = ''
headers = {
'webapi_token': 'your secret key'
}
conn.request(""GET"", ""/webapi/a2/users/{user_id}"", payload, headers)
res = conn.getresponse()
data = res.read()
print(data.decode(""utf-8""))")
]
public JsonModel<ApiUserInfoModelOpenAPI> GetUser([FromRoute(Name = "user_id")] long userId)
{
    ...
}
好了,终于完工了,这回你的ReDoc文档看起来就很全面了。
如果你不知道其他语言的代码怎么写出来的,我这里介绍一个简单的方法,使用Postman可以帮你轻松完成,我拿一个URL举例来介绍,如图:
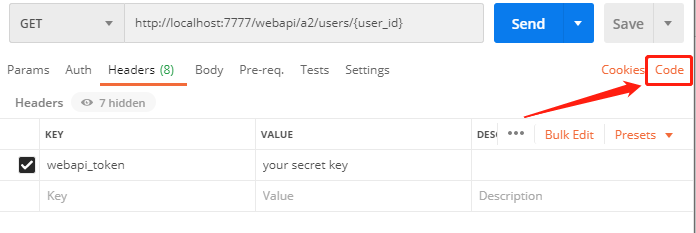
从下图里找到你需要添加的语言,然后直接复制右面的代码就可以了。注意:往C#里面粘贴下面的代码时,因为字符串里面会有双引号,和C#里面的@符号有冲突,用两个双引号就可以解决了。

希望每一个对外提供接口的项目,都能给你的客户提供更全更好的接口文档。


