


自动Emergency Responder
在接下来的例子中,你将为上一个例子中的“Set up Auto Responder”按钮添加后台代码,来自动回复那些关心你状态的请求。
1. 首先,创建一个新的autoresponder.xml layout资源文件用于布局自动回复设定的窗口。包含一个EditText来输入要发送的状态消息,一个Spinner用于选择自动回复的终止时间,一个CheckBox用于让用户选择是否在自动回复消息中包含它们的位置。
<?xml version=”1.0” encoding=”utf-8”?>
<LinearLayout
xmlns:android=”http://schemas.android.com/apk/res/android”
android:orientation=”vertical”
android:layout_width=”fill_parent”
android:layout_height=”fill_parent”>
<TextView
android:layout_width=”fill_parent”
android:layout_height=”wrap_content”
android:text=”Respond With”/>
<EditText
android:id=”@+id/responseText”
android:layout_width=”fill_parent”
android:layout_height=”wrap_content”/>
<CheckBox
android:id=”@+id/checkboxLocation”
android:layout_width=”fill_parent”
android:layout_height=”wrap_content”
android:text=”Transmit Location”/>
<TextView
android:layout_width=”fill_parent”
android:layout_height=”wrap_content”
android:text=”Auto Respond For”/>
<Spinner
android:id=”@+id/spinnerRespondFor”
android:layout_width=”fill_parent”
android:layout_height=”wrap_content”
android:drawSelectorOnTop=”true”/>
<LinearLayout
xmlns:android=”http://schemas.android.com/apk/res/android”
android:orientation=”horizontal”
android:layout_width=”fill_parent”
android:layout_height=”wrap_content”>
<Button
android:id=”@+id/okButton”
android:layout_width=”wrap_content”
android:layout_height=”wrap_content”
android:text=”Enable”/>
<Button
android:id=”@+id/cancelButton”
android:layout_width=”wrap_content”
android:layout_height=”wrap_content”
android:text=”Disable”/>
</LinearLayout>
</LinearLayout>
2. 更新程序的string.xml资源文件,来定义程序的SharedPreference和每个Key的名字。
<?xml version=”1.0” encoding=”utf-8”?>
<resources>
<string name=”app_name”>Emergency Responder</string>
<string name=”respondAllClearButtonText”>I am Safe and Well</string>
<string name=”respondMaydayButtonText”>MAYDAY! MAYDAY! MAYDAY!</string>
<string name=”respondAllClearText”>I am safe and well. Worry not!</string>
<string name=”respondMaydayText”>Tell my mother I love her.</string>
<string name=”querystring”>”are you ok?”</string>
<string name=”user_preferences”>com.paad.emergencyresponder.preferences</string>
<string name=”includeLocationPref”>PREF_INCLUDE_LOC</string>
<string name=”responseTextPref”>PREF_RESPONSE_TEXT</string>
<string name=”autoRespondPref”>PREF_AUTO_RESPOND</string>
<string name=”respondForPref”>PREF_RESPOND_FOR</string>
</resources>
你还可以在这里定义layout中标签的字符串。
3. 然后,创建一个新的arrays.xml资源,并创建用于填充Spinner的数组。
<resources>
<string-array name=”respondForDisplayItems”>
<item>- Disabled -</item>
<item>Next 5 minutes</item>
<item>Next 15 minutes</item>
<item>Next 30 minutes</item>
<item>Next hour</item>
<item>Next 2 hours</item>
<item>Next 8 hours</item>
</string-array>
<array name=”respondForValues”>
<item>0</item>
<item>5</item>
<item>15</item>
<item>30</item>
<item>60</item>
<item>120</item>
<item>480</item>
</array>
</resources>
4. 现在,创建一个新的AutoResponder Activity,显示第1步中创建的layout。
package com.paad.emergencyresponder;
import android.app.Activity;
import android.app.AlarmManager;
import android.app.PendingIntent;
import android.content.res.Resources;
import android.content.Context;
import android.content.Intent;
import android.content.IntentFilter;
import android.content.BroadcastReceiver;
import android.content.SharedPreferences;
import android.content.SharedPreferences.Editor;
import android.os.Bundle;
import android.view.View;
import android.widget.ArrayAdapter;
import android.widget.Button;
import android.widget.CheckBox;
import android.widget.EditText;
import android.widget.Spinner;
public class AutoResponder extends Activity {
@Override
public void onCreate(Bundle icicle) {
super.onCreate(icicle);
setContentView(R.layout.autoresponder);
}
}
5. 更新onCreate方法,获取layout中每个控件的引用,并用底3步中定义的数组来绑定Spinner。创建两个新的桩函数,savePreferences和updateUIFromPreferences,它们分别用来保存自动回复设定到命名的SharedPreference中和应用保存的SharedPreference到当前UI。
Spinner respondForSpinner;
CheckBox locationCheckbox;
EditText responseTextBox;
@Override
public void onCreate(Bundle icicle) {
super.onCreate(icicle);
setContentView(R.layout.autoresponder);
5.1. 获取每个View的引用。
respondForSpinner = (Spinner)findViewById(R.id.spinnerRespondFor);
locationCheckbox = (CheckBox)findViewById(R.id.checkboxLocation);
responseTextBox = (EditText)findViewById(R.id.responseText);
5.2. 填充Spinner,允许用户选择自动回复的终止时刻。
ArrayAdapter<CharSequence> adapter = ArrayAdapter.createFromResource(
this,R.array.respondForDisplayItems,android.R.layout.simple_spinner_item);
adapter.setDropDownViewResource(android.R.layout.simple_spinner_dropdown_item);
respondForSpinner.setAdapter(adapter);
5.3. 现在,为OK和Cancel按钮添加处理函数,来允许用户保存或取消设定。
Button okButton = (Button) findViewById(R.id.okButton);
okButton.setOnClickListener(new View.OnClickListener() {
public void onClick(View view) {
savePreferences();
setResult(RESULT_OK, null);
finish();
}
});
Button cancelButton = (Button) findViewById(R.id.cancelButton);
cancelButton.setOnClickListener(new View.OnClickListener() {
public void onClick(View view) {
respondForSpinner.setSelection(-1);
savePreferences();
setResult(RESULT_CANCELED, null);
finish();
}
});
5.4. 最后,确保Activity启动时,它能更新GUI来显示最近的设定。
// Load the saved preferences and update the UI
updateUIFromPreferences();
5.5. 关闭onCreate方法,添加updateUIFromPreferences和savePreferences桩函数。
}
private void updateUIFromPreferences() {}
private void savePreferences() {}
6. 接下来,完成第5步中创建的桩函数。首先是updateUIFromPreferences,它需要读取当前保存的自动回复preferences并将它们应用到UI上。
private void updateUIFromPreferences() {
// Get the saves settings
String preferenceName = getString(R.string.user_preferences);
SharedPreferences sp = getSharedPreferences(preferenceName, 0);
boolean autoRespond = sp.getBoolean(getString(R.string.autoRespondPref), false);
String respondText = sp.getString(getString(R.string.responseTextPref), “”);
boolean includeLoc = sp.getBoolean(getString(R.string.includeLocationPref), false);
int respondForIndex = sp.getInt(getString(R.string.respondForPref), 0);
// Apply the saved settings to the UI
if (autoRespond)
respondForSpinner.setSelection(respondForIndex);
else
respondForSpinner.setSelection(0);
locationCheckbox.setChecked(includeLoc);
responseTextBox.setText(respondText);
}
7. 完成savePreferences桩函数,来保存当前UI设定到SharedPreferences中。
private void savePreferences() {
// Get the current settings from the UI
boolean autoRespond = respondForSpinner.getSelectedItemPosition() > 0;
int respondForIndex = respondForSpinner.getSelectedItemPosition();
boolean includeLoc = locationCheckbox.isChecked();
String respondText = responseTextBox.getText().toString();
// Save them to the Shared Preference file
String preferenceName = getString(R.string.user_preferences);
SharedPreferences sp = getSharedPreferences(preferenceName, 0);
Editor editor = sp.edit();
editor.putBoolean(getString(R.string.autoRespondPref), autoRespond);
editor.putString(getString(R.string.responseTextPref), respondText);
editor.putBoolean(getString(R.string.includeLocationPref), includeLoc );
editor.putInt(getString(R.string.respondForPref), respondForIndex );
editor.commit();
// Set the alarm to turn off the autoresponder
setAlarm(respondForIndex);
}
private void setAlarm(int respondForIndex) {}
8. 第8步中的setAlarm用于创建一个新的Alarm,它将触发一个Intent并disable自动回复。
你需要创建一个Alarm对象和一个BroadcastReceiver,用于在disable之前监听Alarm。
8.1. 首先,创建一个表示Alarm Intent动作的字符串。
public static final String alarmAction =
“com.paad.emergencyresponder.AUTO_RESPONSE_EXPIRED”;
8.2. 然后,创建一个BroadcastReceiver对象,来监听上一步中定义的动作Intent。当Intent接收到后,应该修改自动回复的设定,来disable自动回复。
private BroadcastReceiver stopAutoResponderReceiver = new BroadcastReceiver() {
@Override
public void onReceive(Context context, Intent intent) {
if (intent.getAction().equals(alarmAction)) {
String preferenceName = getString(R.string.user_preferences);
SharedPreferences sp = getSharedPreferences(preferenceName, 0);
Editor editor = sp.edit();
editor.putBoolean(getString(R.string.autoRespondPref), false);
editor.commit();
}
}
};
8.3. 最后,完成setAlarm方法。如果自动回复关闭了,它应该取消已经存在的Alarm;否则,它需要用最新的终止时间进行更新。
PendingIntent intentToFire;
private void setAlarm(int respondForIndex) {
// Create the alarm and register the alarm intent receiver.
AlarmManager alarms = (AlarmManager)getSystemService(ALARM_SERVICE);
if (intentToFire == null) {
Intent intent = new Intent(alarmAction);
intentToFire = PendingIntent.getBroadcast(getApplicationContext(),0,intent,0);
IntentFilter filter = new IntentFilter(alarmAction);
registerReceiver(stopAutoResponderReceiver, filter);
}
if (respondForIndex < 1)
// If “disabled” is selected, cancel the alarm.
alarms.cancel(intentToFire);
else {
// Otherwise find the length of time represented by the selection and
// and set the alarm to trigger after that time has passed.
Resources r = getResources();
int[] respondForValues = r.getIntArray(R.array.respondForValues);
int respondFor = respondForValues [respondForIndex];
long t = System.currentTimeMillis();
t = t + respondFor*1000*60;
// Set the alarm.
alarms.set(AlarmManager.RTC_WAKEUP, t, intentToFire);
}
}
9. 以上就完成了AutoResponder,但在你用之前,你需要把它添加到AndroidManifest中。
<?xml version=”1.0” encoding=”utf-8”?>
<manifest
xmlns:android=”http://schemas.android.com/apk/res/android”
package=”com.paad.emergencyresponder”>
<application
android:icon=”@drawable/icon”
android:label=”@string/app_name”>
<activity
android:name=”.EmergencyResponder”
android:label=”@string/app_name”>
<intent-filter>
<action android:name=”android.intent.action.MAIN” />
<category android:name=”android.intent.category.LAUNCHER” />
</intent-filter>
</activity>
<activity
android:name=”.AutoResponder”
android:label=”Auto Responder Setup”/>
</application>
<uses-permission android:name=”android.permission.ACCESS_GPS”/>
<uses-permission android:name=”android.permission.ACCESS_LOCATION”/>
<uses-permission android:name=”android.permission.RECEIVE_SMS”/>
<uses-permission android:name=”android.permission.SEND_SMS”/>
</manifest>
10. 为了enable自动回复,返回到EmergencyResponder Activity并更新startAutoResponder方法。它用于启动刚创建的AutoResponder Activity。
private void startAutoResponder() {
startActivityForResult(new Intent(EmergencyResponder.this, AutoResponder.class), 0);
}
11. 如果启动工程,你现在就能进入自动回复设定窗口,进行自动回复设定。它看起来如图9-5所示。
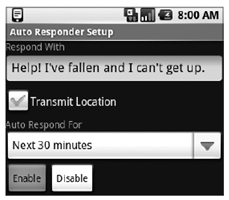
图9-5
12. 最后一步,更新EmergencyResponder Activity中的requestReceived方法,来检查自动设定是否激活。如果它激活了,requestReceived 方法需要自动执行respond方法。使用程序的SharedPreferences中定义的消息和位置设定。
public void requestReceived(String _from) {
if (!requesters.contains(_from)) {
lock.lock();
requesters.add(_from);
aa.notifyDataSetChanged();
lock.unlock();
// Check for auto-responder
String preferenceName = getString(R.string.user_preferences);
SharedPreferences prefs = getSharedPreferences(preferenceName, 0);
String autoRespondPref = getString(R.string.autoRespondPref)
boolean autoRespond = prefs.getBoolean(autoRespondPref, false);
if (autoRespond) {
String responseTextPref = getString(R.string.responseTextPref);
String includeLocationPref = getString(R.string.includeLocationPref);
String respondText = prefs.getString(responseTextPref, “”);
boolean includeLoc = prefs.getBoolean(includeLocationPref, false);
respond(_from, respondText, includeLoc);
}
}
}
现在,你拥有了一个功能完整的、自动的emergency responder。
你可以使用前一个例子中描述的方法来进行测试,使用第二个模拟器实例来接收回复消息,模拟器控制面板来发送状态请求。

