Understanding User Interface in Android - Part 3: More Views(译)
无意中看到的几篇文章,想翻译出来分享给大家。不过声明,翻译后的意思不一定能完全表达作者的意图,如果想看原文,请参考:
http://mobiforge.com/developing/story/understanding-user-interface-android-part-3-more-views
在前一篇文章中,你已经看到一些基本的View,例如TextView,EditText,Button,此外,你还学习了如何在应用程序中使用它们。在这篇文章里,我们将继续探讨其它三个种类的View — Picker View,List View和Display View。讨论的View包括:
- TimePicker
- DatePicker
- ListView
- Spinner
- Gallery
- ImageView
- ImageSwitcher
- GridView
注意:这篇文章中的所有例子,必须使用前篇文章中创建的工程。
Picker Views
在移动程序中,选择日期和时间是一项非常常见的活动。Android提供TimePicker和DatePicker来支持这项功能。
TimePicker View
TimePicker允许用户选择一天中的一个时间,不管是24小时模式还是AM/PM模式。
在res/layout文件夹下添加一个新的文件,命名为datetimepicker.xml,并以下面的元素填充:
<?xml version="1.0" encoding="utf-8"?>
<LinearLayout xmlns:android="http://schemas.android.com/apk/res/android"
android:orientation="vertical"
android:layout_width="fill_parent"
android:layout_height="fill_parent"
>
<TimePicker
android:layout_width="wrap_content"
android:layout_height="wrap_content" />
</LinearLayout>
在src/net.learn2develop.AndroidViews文件夹下添加一个新类,命名为DateTimePickerExample.java,填充如下:
package net.learn2develop.AndroidViews;
import android.app.Activity;
import android.os.Bundle;
public class DateTimePickerExample extends Activity
{
@Override
protected void onCreate(Bundle savedInstanceState)
{
super.onCreate(savedInstanceState);
setContentView(R.layout.datetimepicker);
}
}
修改AndroidManifest.xml文件来注册新的Activity:
<?xml version="1.0" encoding="utf-8"?>
<manifest xmlns:android="http://schemas.android.com/apk/res/android"
package="net.learn2develop.AndroidViews"
android:versionCode="1"
android:versionName="1.0.0">
<application android:icon="@drawable/icon" android:label="@string/app_name">
<activity android:name=".ViewsActivity"
android:label="@string/app_name">
<intent-filter>
<action android:name="android.intent.action.MAIN" />
<category android:name="android.intent.category.LAUNCHER" />
</intent-filter>
</activity>
<activity android:name=".DateTimePickerExample"
android:label="@string/app_name" />
</application>
</manifest>
修改ViewsActivity.java文件来启动DateTimePickerExample Activity:
package net.learn2develop.AndroidViews;
import android.app.Activity;
import android.content.Intent;
import android.os.Bundle;
public class ViewsActivity extends Activity
{
/** Called when the activity is first created. */
@Override
public void onCreate(Bundle savedInstanceState)
{
super.onCreate(savedInstanceState);
setContentView(R.layout.main);
startActivity(new Intent(this, DateTimePickerExample.class));
}
}
按下F11,在Android模拟器中调试应用程序。图1显示了动作中的TimePicker。你可以使用设备上的数字键盘来修改小时和分钟,点击AM按钮来切换AM和PM。
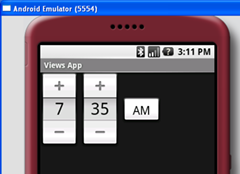
图 1 动作中的TimePicker
在对话框窗口中显示TimePicker
你还可以在对话框中显示TimePicker。修改DateTimePickerExample.java文件如下:
package net.learn2develop.AndroidViews;
import android.app.Activity;
import android.app.Dialog;
import android.app.TimePickerDialog;
import android.os.Bundle;
import android.widget.TimePicker;
import android.widget.Toast;
public class DateTimePickerExample extends Activity
{
int hour, minute;
static final int TIME_DIALOG_ID = 0;
@Override
protected void onCreate(Bundle savedInstanceState)
{
super.onCreate(savedInstanceState);
setContentView(R.layout.datetimepicker);
showDialog(TIME_DIALOG_ID);
}
@Override
protected Dialog onCreateDialog(int id)
{
switch (id) {
case TIME_DIALOG_ID:
return new TimePickerDialog(
this, mTimeSetListener, hour, minute, false);
}
return null;
}
private TimePickerDialog.OnTimeSetListener mTimeSetListener =
new TimePickerDialog.OnTimeSetListener()
{
public void onTimeSet(TimePicker view, int hourOfDay, int minuteOfHour)
{
hour = hourOfDay;
minute = minuteOfHour;
Toast.makeText(getBaseContext(),
"You have selected : " + hour + ":" + minute,
Toast.LENGTH_SHORT).show();
}
};
}
上面的代码在Activity创建的时候显示一个TimePickerDialog。当时间设定后,使用Toast类显示选择的时间。图2显示了动作中的TimePickerDialog。
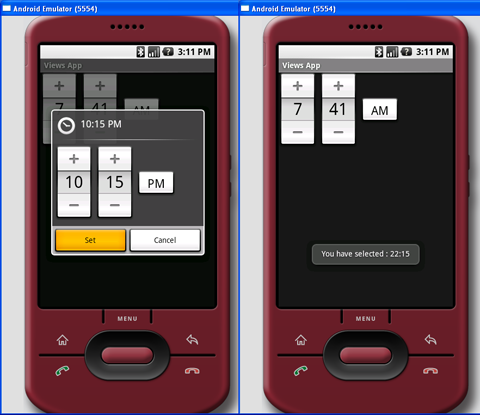
图 2 动作中的TimePickerDialog
DatePicker View
和TimePicker一样,DatePicker允许用户选择一个日期。修改datetimepicker.xml文件如下:
<?xml version="1.0" encoding="utf-8"?>
<LinearLayout xmlns:android="http://schemas.android.com/apk/res/android"
android:orientation="vertical"
android:layout_width="fill_parent"
android:layout_height="fill_parent"
>
<DatePicker
android:layout_width="wrap_content"
android:layout_height="wrap_content" />
</LinearLayout>
移除上一章节中添加的语句:
@Override
protected void onCreate(Bundle savedInstanceState)
{
super.onCreate(savedInstanceState);
setContentView(R.layout.datetimepicker);
//---remove this line---
//showDialog(TIME_DIALOG_ID);
}
按下F11,在Android模拟器中调试应用程序。图3显示了动作中的DatePicker。除了触摸“+”和“-”按钮外,你还可以使用设备上的数字键盘来修改月日年。
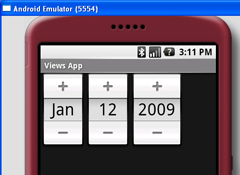
图 3 动作中的DatePicker
在对话框窗口中显示DatePicker
你还可以在对话框中显示一个DatePicker。修改DateTimePickerExample.java文件如下:
package net.learn2develop.AndroidViews;
import android.app.Activity;
import android.app.DatePickerDialog;
import android.app.Dialog;
import android.app.TimePickerDialog;
import android.os.Bundle;
import android.widget.DatePicker;
import android.widget.TimePicker;
import android.widget.Toast;
public class DateTimePickerExample extends Activity
{
int hour, minute;
int Year, month, day;
static final int TIME_DIALOG_ID = 0;
static final int DATE_DIALOG_ID = 1;
@Override
protected void onCreate(Bundle savedInstanceState)
{
super.onCreate(savedInstanceState);
setContentView(R.layout.datetimepicker);
showDialog(DATE_DIALOG_ID);
}
@Override
protected Dialog onCreateDialog(int id)
{
switch (id) {
case TIME_DIALOG_ID:
return new TimePickerDialog(
this, mTimeSetListener, hour, minute, false);
case DATE_DIALOG_ID:
return new DatePickerDialog(
this, mDateSetListener, Year, month, day);
}
return null;
}
private TimePickerDialog.OnTimeSetListener mTimeSetListener =
new TimePickerDialog.OnTimeSetListener()
{
//...
};
private DatePickerDialog.OnDateSetListener mDateSetListener =
new DatePickerDialog.OnDateSetListener()
{
public void onDateSet(DatePicker view, int year, int monthOfYear,
int dayOfMonth)
{
Year = year;
month = monthOfYear;
day = dayOfMonth;
Toast.makeText(getBaseContext(),
"You have selected : " + (month + 1) +
"/" + day + "/" + Year,
Toast.LENGTH_SHORT).show();
}
};
}
上面的代码在Activity创建时显示了一个DatePickerDialog。当日期设定后,使用Toast类来显示设定的日期。图4显示了动作中的DatePickerDialog。
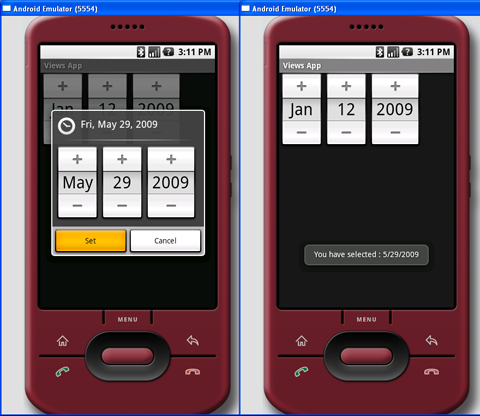
图 4 动作中的DatePickerDialog
List Views
ListView和Spinner对于显示长列表项目非常有用。
ListView View
ListView以垂直可滚动列表方式显示项目。想看ListView如何工作的,在res/layout文件夹下添加一个新的文件,命名listview.xml,并以以下的内容进行填充:
<?xml version="1.0" encoding="utf-8"?>
<LinearLayout xmlns:android="http://schemas.android.com/apk/res/android"
android:orientation="vertical"
android:layout_width="fill_parent"
android:layout_height="fill_parent"
>
<ListView android:id="@+id/android:list"
android:layout_width="fill_parent"
android:layout_height="fill_parent" />
</LinearLayout>
在src/net.learn2develop.AndroidViews文件夹下添加一个新类,命名ListViewExample.java。填充以下内容:
package net.learn2develop.AndroidViews;
import android.os.Bundle;
import android.view.View;
import android.widget.ArrayAdapter;
import android.widget.ListView;
import android.widget.Toast;
import android.app.ListActivity;
public class ListViewExample extends ListActivity
{
String[] presidents = {
"Dwight D. Eisenhower",
"John F. Kennedy",
"Lyndon B. Johnson",
"Richard Nixon",
"Gerald Ford",
"Jimmy Carter",
"Ronald Reagan",
"George H. W. Bush",
"Bill Clinton",
"George W. Bush",
"Barack Obama"
};
@Override
public void onCreate(Bundle savedInstanceState)
{
super.onCreate(savedInstanceState);
setContentView(R.layout.listview);
setListAdapter(new ArrayAdapter<String>(this,
android.R.layout.simple_list_item_1, presidents));
}
public void onListItemClick(
ListView parent, View v,
int position, long id)
{
Toast.makeText(this,
"You have selected " + presidents[position],
Toast.LENGTH_SHORT).show();
}
}
注意ListViewExample类继承自ListActivity类。
修改AndroidManifest.xml文件来注册新的Activity:
<?xml version="1.0" encoding="utf-8"?>
<manifest xmlns:android="http://schemas.android.com/apk/res/android"
package="net.learn2develop.AndroidViews"
android:versionCode="1"
android:versionName="1.0.0">
<application android:icon="@drawable/icon" android:label="@string/app_name">
<activity android:name=".ViewsActivity"
android:label="@string/app_name">
<intent-filter>
<action android:name="android.intent.action.MAIN" />
<category android:name="android.intent.category.LAUNCHER" />
</intent-filter>
</activity>
<activity android:name=".ListViewExample"
android:label="@string/app_name" />
</application>
</manifest>
修改ViewsActivity.java文件如下,启动ListViewExample Activity:
package net.learn2develop.AndroidViews;
import android.app.Activity;
import android.content.Intent;
import android.os.Bundle;
public class ViewsActivity extends Activity
{
/** Called when the activity is first created. */
@Override
public void onCreate(Bundle savedInstanceState) {
super.onCreate(savedInstanceState);
setContentView(R.layout.main);
startActivity(new Intent( this, ListViewExample.class));
}
}
按下F11,在Android模拟器中调试应用程序。图5显示了动作中的ListView。当选择某一个项目时,会显示一个消息。
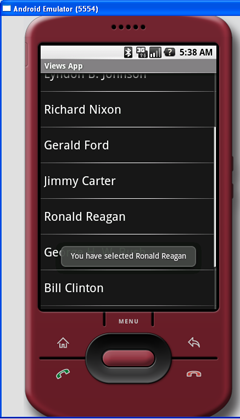
图 5 动作中的ListView
Spinner View
Spinner在某一时刻只显示列表中的一个项目,并允许用户从中选择。在res/layout文件夹下添加一个新的文件,命名spinner.xml,并以以下元素填充:
<?xml version="1.0" encoding="utf-8"?>
<LinearLayout xmlns:android="http://schemas.android.com/apk/res/android"
android:orientation="vertical"
android:layout_width="fill_parent"
android:layout_height="fill_parent"
>
<Spinner
android:id="@+id/spinner1"
android:layout_width="wrap_content"
android:layout_height="wrap_content"
android:drawSelectorOnTop="true" />
</LinearLayout>
在src/net.learn2develop.AndroidViews文件夹下添加一个新类,命名SpinnerExample.java。如下填充:
package net.learn2develop.AndroidViews;
import android.app.Activity;
import android.os.Bundle;
import android.view.View;
import android.widget.AdapterView;
import android.widget.ArrayAdapter;
import android.widget.Spinner;
import android.widget.Toast;
import android.widget.AdapterView.OnItemSelectedListener;
public class SpinnerExample extends Activity
{
String[] presidents = {
"Dwight D. Eisenhower",
"John F. Kennedy",
"Lyndon B. Johnson",
"Richard Nixon",
"Gerald Ford",
"Jimmy Carter",
"Ronald Reagan",
"George H. W. Bush",
"Bill Clinton",
"George W. Bush",
"Barack Obama"
};
Spinner s1;
@Override
public void onCreate(Bundle savedInstanceState)
{
super.onCreate(savedInstanceState);
setContentView(R.layout.spinner);
s1 = (Spinner) findViewById(R.id.spinner1);
ArrayAdapter<String> adapter = new ArrayAdapter<String>(this,
android.R.layout.simple_spinner_item, presidents);
s1.setAdapter(adapter);
s1.setOnItemSelectedListener(new OnItemSelectedListener()
{
public void onItemSelected(AdapterView<?> arg0,
View arg1, int arg2, long arg3)
{
int index = s1.getSelectedItemPosition();
Toast.makeText(getBaseContext(),
"You have selected item : " + presidents[index],
Toast.LENGTH_SHORT).show();
}
public void onNothingSelected(AdapterView<?> arg0) {}
});
}
}
上面的代码创建了一个ArrayAdapter对象,将其与Spinner进行关联。当Spinner中的一个项目被选择时,使用Toast显示出选择的项目。
修改AndroidManifest.xml文件来注册新的Activity:
<?xml version="1.0" encoding="utf-8"?>
<manifest xmlns:android="http://schemas.android.com/apk/res/android"
package="net.learn2develop.AndroidViews"
android:versionCode="1"
android:versionName="1.0.0">
<application android:icon="@drawable/icon" android:label="@string/app_name">
<activity android:name=".ViewsActivity"
android:label="@string/app_name">
<intent-filter>
<action android:name="android.intent.action.MAIN" />
<category android:name="android.intent.category.LAUNCHER" />
</intent-filter>
</activity>
<activity android:name=".SpinnerExample"
android:label="@string/app_name" />
</application>
</manifest>
修改ViewsActivity.java文件来启动SpinnerExample Activity:
package net.learn2develop.AndroidViews;
import android.app.Activity;
import android.content.Intent;
import android.os.Bundle;
public class ViewsActivity extends Activity
{
/** Called when the activity is first created. */
@Override
public void onCreate(Bundle savedInstanceState) {
super.onCreate(savedInstanceState);
startActivity(new Intent(this, SpinnerExample.class));
}
}
按下F11,在Android模拟器中调试应用程序。图6显示了动作中的Spinner。
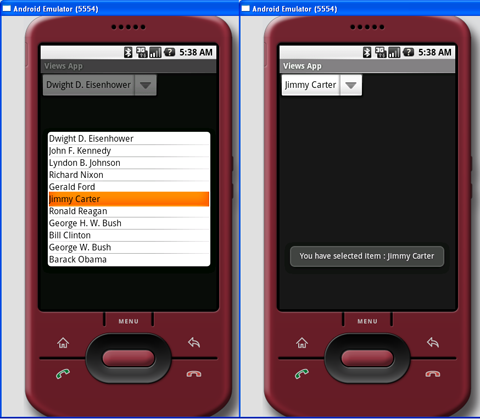
图 6 动作中的Spinner
如果不想以简单list形式显示ArrayAdapter中的项目的话,你还可以使用RadioButton来显示它们。想达到这样的效果,修改ArrayAdapter构造函数中的第二个参数:
ArrayAdapter<String> adapter = new ArrayAdapter<String>(
this,
android.R.layout.simple_spinner_dropdown_item,
presidents);
图7显示了Spinner的新外观。
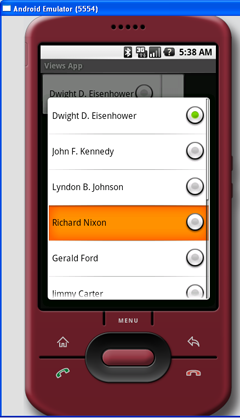
图 7 Spinner 外观
Display Views
到目前为止,你所使用的View都是用于显示文本信息。为了显示图片,你可以使用ImageView,Gallery和ImageSwitcher。
Gallery和ImageView
Gallery以居中、水平滚动列表方式显示项目(例如许多图片)。图8显示了Android Market中使用的Gallery。
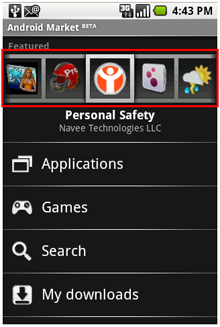
图 8 Android Market中使用的Gallery
想看Gallery如何工作,在res/layout文件夹下添加一个新的文件,命名displayview.xml,并以以下元素填充:
<?xml version="1.0" encoding="utf-8"?>
<LinearLayout xmlns:android="http://schemas.android.com/apk/res/android"
android:orientation="vertical"
android:layout_width="fill_parent"
android:layout_height="fill_parent"
>
<TextView
android:layout_width="fill_parent"
android:layout_height="wrap_content"
android:text="Images of San Francisco" />
<Gallery
android:id="@+id/gallery1"
android:layout_width="fill_parent"
android:layout_height="wrap_content" />
<ImageView
android:id="@+id/image1"
android:layout_width="320px"
android:layout_height="250px"
android:scaleType="fitXY" />
</LinearLayout>
在res/values文件夹下添加一个新的文件,命名attrs.xml。如下填充:
<?xml version="1.0" encoding="utf-8"?>
<resources>
<declare-styleable name="Gallery1">
<attr name="android:galleryItemBackground" />
</declare-styleable>
</resources>
Gallery1 style将应用在Gallery中显示的图片上,效果是每个图片周围有一个边缘(见图9)。
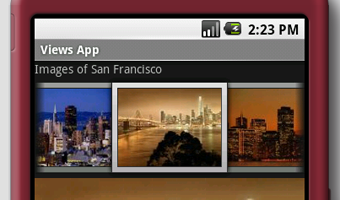
图 9 Gallery,图片周围有边缘
添加一些图片到res/drawable文件夹下(见图10)。
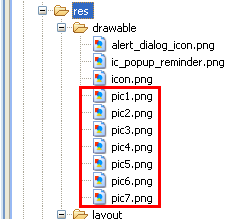
图 10 添加图片
在src/net.learn2develop.AndroidViews文件夹下添加新的类,命名DisplayViewsExample.java。如下填充:
package net.learn2develop.AndroidViews;
import android.app.Activity;
import android.content.Context;
import android.content.res.TypedArray;
import android.os.Bundle;
import android.view.View;
import android.view.ViewGroup;
import android.widget.AdapterView;
import android.widget.BaseAdapter;
import android.widget.Gallery;
import android.widget.ImageView;
import android.widget.Toast;
import android.widget.AdapterView.OnItemClickListener;
public class DisplayViewsExample extends Activity
{
//---the images to display---
Integer[] imageIDs = {
R.drawable.pic1,
R.drawable.pic2,
R.drawable.pic3,
R.drawable.pic4,
R.drawable.pic5,
R.drawable.pic6,
R.drawable.pic7
};
@Override
public void onCreate(Bundle savedInstanceState)
{
super.onCreate(savedInstanceState);
setContentView(R.layout.displayview);
Gallery gallery = (Gallery) findViewById(R.id.gallery1);
gallery.setAdapter(new ImageAdapter(this));
gallery.setOnItemClickListener(new OnItemClickListener()
{
public void onItemClick(AdapterView parent,
View v, int position, long id)
{
Toast.makeText(getBaseContext(),
"pic" + (position + 1) + " selected",
Toast.LENGTH_SHORT).show();
}
});
}
public class ImageAdapter extends BaseAdapter
{
private Context context;
private int itemBackground;
public ImageAdapter(Context c)
{
context = c;
//---setting the style---
TypedArray a = obtainStyledAttributes(R.styleable.Gallery1);
itemBackground = a.getResourceId(
R.styleable.Gallery1_android_galleryItemBackground, 0);
a.recycle();
}
//---returns the number of images---
public int getCount() {
return imageIDs.length;
}
//---returns the ID of an item---
public Object getItem(int position) {
return position;
}
public long getItemId(int position) {
return position;
}
//---returns an ImageView view---
public View getView(int position, View convertView, ViewGroup parent) {
ImageView imageView = new ImageView(context);
imageView.setImageResource(imageIDs[position]);
imageView.setScaleType(ImageView.ScaleType.FIT_XY);
imageView.setLayoutParams(new Gallery.LayoutParams(150, 120));
imageView.setBackgroundResource(itemBackground);
return imageView;
}
}
}
创建ImageAdapter类(继承自BaseAdapter类)是为了能让Gallery与一系列的ImageView绑定。而ImageView用于显示图片。
当Gallery中图片被选择时(或者被点击),选择的图片编号将显示出来。
修改AndroidManifest.xml文件来注册新的Activity:
<?xml version="1.0" encoding="utf-8"?>
<manifest xmlns:android="http://schemas.android.com/apk/res/android"
package="net.learn2develop.AndroidViews"
android:versionCode="1"
android:versionName="1.0.0">
<application android:icon="@drawable/icon" android:label="@string/app_name">
<activity android:name=".ViewsActivity"
android:label="@string/app_name">
<intent-filter>
<action android:name="android.intent.action.MAIN" />
<category android:name="android.intent.category.LAUNCHER" />
</intent-filter>
</activity>
<activity android:name=".DisplayViewsExample"
android:label="@string/app_name" />
</application>
</manifest>
修改ViewsActivity.java文件如下,启动DisplayViewsExample Activity:
public class ViewsActivity extends Activity
{
/** Called when the activity is first created. */
@Override
public void onCreate(Bundle savedInstanceState) {
super.onCreate(savedInstanceState);
setContentView(R.layout.main);
startActivity(new Intent(this, DisplayViewsExample.class));
}
}
按下F11,在Android模拟器中调试应用程序。图11显示了动作中的Gallery。你可以通过挥动它来滚动图片的缩略图。当某一个图片被选择时,选择的图片的名字将由Toast类显示出来。
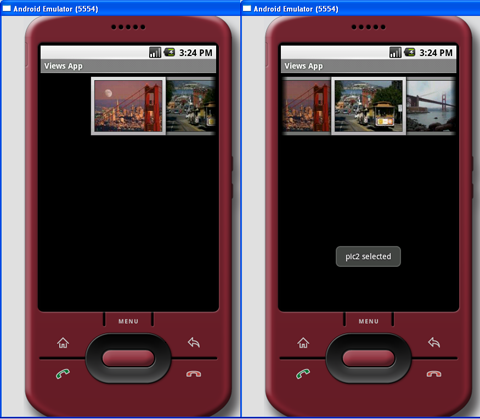
图 11 动作中的Gallery
如果你想在ImageView中显示选择的图片,修改onItemClick()方法来在ImageView(image1)中显示选择的图片:
public void onItemClick(AdapterView parent,
View v, int position, long id)
{
//---display the images selected---
ImageView imageView = (ImageView) findViewById(R.id.image1);
imageView.setImageResource(imageIDs[position]);
}
当一个图片选择时,它将显示在下方的ImageView中(见图12)。
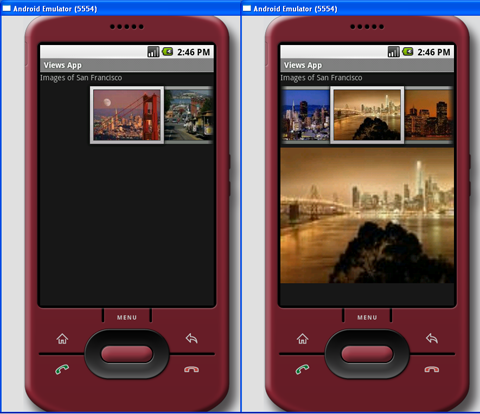
图 12 选择的图片显示在ImageView中
ImageSwitcher View
在上一个章节中,你已经看到了如何将Gallery和ImageView结合起来显示一系列图片的缩略图以及当其中一个图片被选中时,选中的图片会显示在ImageView中。由于这是如此常用的UI操作,Android提供了ImageSwitcher,它拥有上一章节中我们实现的相似功能。
修改displayview.xml文件如下,添加ImageSwitcher元素:
<?xml version="1.0" encoding="utf-8"?>
<RelativeLayout xmlns:android="http://schemas.android.com/apk/res/android"
android:orientation="vertical"
android:layout_width="fill_parent"
android:layout_height="fill_parent"
android:background="#ff000000"
>
<ImageSwitcher
android:id="@+id/switcher1"
android:layout_width="fill_parent"
android:layout_height="fill_parent"
android:layout_alignParentLeft="true"
android:layout_alignParentRight="true"
android:layout_alignParentBottom="true"
/>
<Gallery
android:id="@+id/gallery1"
android:layout_width="fill_parent"
android:layout_height="wrap_content"
/>
</RelativeLayout>
修改DisplayViewsExample.java文件如下:
package net.learn2develop.AndroidViews;
import android.app.Activity;
import android.content.Context;
import android.content.res.TypedArray;
import android.os.Bundle;
import android.view.View;
import android.view.ViewGroup;
import android.view.animation.AnimationUtils;
import android.widget.AdapterView;
import android.widget.BaseAdapter;
import android.widget.Gallery;
import android.widget.Gallery.LayoutParams;
import android.widget.ViewSwitcher.ViewFactory;
import android.widget.ImageSwitcher;
import android.widget.ImageView;
import android.widget.AdapterView.OnItemClickListener;
public class DisplayViewsExample extends Activity
implements ViewFactory
{
//---the images to display---
Integer[] imageIDs = {
R.drawable.pic1,
R.drawable.pic2,
R.drawable.pic3,
R.drawable.pic4,
R.drawable.pic5,
R.drawable.pic6,
R.drawable.pic7
};
private ImageSwitcher imageSwitcher;
@Override
public void onCreate(Bundle savedInstanceState)
{
super.onCreate(savedInstanceState);
setContentView(R.layout.displayview);
imageSwitcher = (ImageSwitcher) findViewById(R.id.switcher1);
imageSwitcher.setFactory(this);
imageSwitcher.setInAnimation(AnimationUtils.loadAnimation(this,
android.R.anim.fade_in));
imageSwitcher.setOutAnimation(AnimationUtils.loadAnimation(this,
android.R.anim.fade_out));
Gallery gallery = (Gallery) findViewById(R.id.gallery1);
gallery.setAdapter(new ImageAdapter(this));
gallery.setOnItemClickListener(new OnItemClickListener()
{
public void onItemClick(AdapterView parent,
View v, int position, long id)
{
imageSwitcher.setImageResource(imageIDs[position]);
}
});
}
public View makeView()
{
ImageView imageView = new ImageView(this);
imageView.setBackgroundColor(0xFF000000);
imageView.setScaleType(ImageView.ScaleType.FIT_CENTER);
imageView.setLayoutParams(new
ImageSwitcher.LayoutParams(
LayoutParams.FILL_PARENT,
LayoutParams.FILL_PARENT));
return imageView;
}
public class ImageAdapter extends BaseAdapter
{
private Context context;
private int itemBackground;
public ImageAdapter(Context c)
{
context = c;
//---setting the style---
TypedArray a = obtainStyledAttributes(R.styleable.Gallery1);
itemBackground = a.getResourceId(
R.styleable.Gallery1_android_galleryItemBackground, 0);
a.recycle();
}
//---returns the number of images---
public int getCount()
{
return imageIDs.length;
}
//---returns the ID of an item---
public Object getItem(int position)
{
return position;
}
public long getItemId(int position)
{
return position;
}
//---returns an ImageView view---
public View getView(int position, View convertView, ViewGroup parent)
{
ImageView imageView = new ImageView(context);
imageView.setImageResource(imageIDs[position]);
imageView.setScaleType(ImageView.ScaleType.FIT_XY);
imageView.setLayoutParams(new Gallery.LayoutParams(150, 120));
imageView.setBackgroundResource(itemBackground);
return imageView;
}
}
}
观察DisplayViewsExample类,现在它实现了ViewFactory类。ViewFactory类在ViewSwitcher中创建一个View。当你的类实现了ViewFactory类,你需要覆写makeView()方法,在其中创建一个新的View来添加到ViewSwitcher中。
按下F11,观察ImageSwitcher的动作,如图13所示:
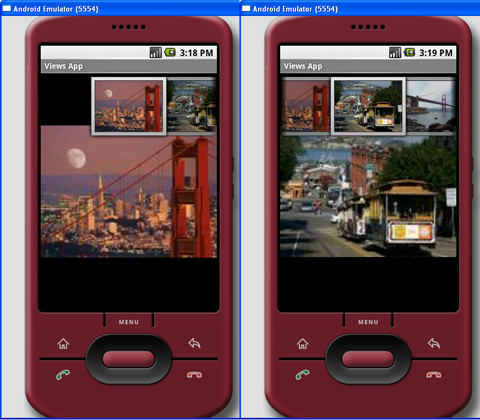
图 13 动作中的ImageSwitcher
GridView View
GridView在二维滚动网格中显示项目。你可以将GridView和ImageView结合起来显示一系列图片。
修改displayview.xml文件如下:
<?xml version="1.0" encoding="utf-8"?>
<GridView xmlns:android="http://schemas.android.com/apk/res/android"
android:id="@+id/gridview"
android:layout_width="fill_parent"
android:layout_height="fill_parent"
android:numColumns="auto_fit"
android:verticalSpacing="10dp"
android:horizontalSpacing="10dp"
android:columnWidth="90dp"
android:stretchMode="columnWidth"
android:gravity="center"
/>
在DisplayViewsExample.java文件中,编写以下代码:
package net.learn2develop.AndroidViews;
import android.app.Activity;
import android.content.Context;
import android.os.Bundle;
import android.view.View;
import android.view.ViewGroup;
import android.widget.AdapterView;
import android.widget.BaseAdapter;
import android.widget.GridView;
import android.widget.ImageView;
import android.widget.Toast;
import android.widget.AdapterView.OnItemClickListener;
public class DisplayViewsExample extends Activity
{
//---the images to display---
Integer[] imageIDs = {
R.drawable.pic1,
R.drawable.pic2,
R.drawable.pic3,
R.drawable.pic4,
R.drawable.pic5,
R.drawable.pic6,
R.drawable.pic7
};
@Override
public void onCreate(Bundle savedInstanceState)
{
super.onCreate(savedInstanceState);
setContentView(R.layout.displayview);
GridView gridView = (GridView) findViewById(R.id.gridview);
gridView.setAdapter(new ImageAdapter(this));
gridView.setOnItemClickListener(new OnItemClickListener()
{
public void onItemClick(AdapterView parent,
View v, int position, long id)
{
Toast.makeText(getBaseContext(),
"pic" + (position + 1) + " selected",
Toast.LENGTH_SHORT).show();
}
});
}
public class ImageAdapter extends BaseAdapter
{
private Context context;
public ImageAdapter(Context c)
{
context = c;
}
//---returns the number of images---
public int getCount() {
return imageIDs.length;
}
//---returns the ID of an item---
public Object getItem(int position) {
return position;
}
public long getItemId(int position) {
return position;
}
//---returns an ImageView view---
public View getView(int position, View convertView, ViewGroup parent)
{
ImageView imageView;
if (convertView == null) {
imageView = new ImageView(context);
imageView.setLayoutParams(new GridView.LayoutParams(85, 85));
imageView.setScaleType(ImageView.ScaleType.CENTER_CROP);
imageView.setPadding(5, 5, 5, 5);
} else {
imageView = (ImageView) convertView;
}
imageView.setImageResource(imageIDs[position]);
return imageView;
}
}
}
代码和Gallery的例子很相似——创建了ImageAdapter类(继承自BaseAdapter类)来将GridView和一系列ImageView进行绑定。ImageView用于显示图片。当某一图片被选中时,使用Toast类来显示图片的编号。
按下F11,调试应用程序。图14显示了动作中的GridView。
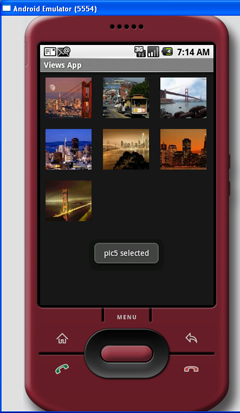
图 14 动作中的GridView
小结
在这篇文章中,你已经看到了Picker,List和Display View种类中的众多View。希望你对它们有了更好的理解并能在应用程序中很好的使用它们。留意下一篇文章,我将向你展示菜单和一些超酷的View。


