

Understanding User Interface in Android - Part 2: Views(译)
无意中看到的几篇文章,想翻译出来分享给大家。不过声明,翻译后的意思不一定能完全表达作者的意图,如果想看原文,请参考:
http://mobiforge.com/designing/story/understanding-user-interface-android-part-2-views
前一篇关于Android UI的文章中,你已经看到了组成Android应用程序UI的组件。Android UI最基本的单元是View。一个View代表一个构件(Widget),它在屏幕上拥有外观。在这篇文章(以及接下来的两篇)里,你将学习到你在Android开发旅程中可能用到的一些常用的View。特别的,我将View进行了分类,如下面的组所示:
- Basic Views - 常用的View,例如TextView, EditText, 和Button
- Picker Views - 允许用户进行选择的View,例如TimePicker和DatePicker
- List Views - 显示大量项目的View,例如ListView和Spinner
- Display Views - 显示图片的View,例如Gallery和ImageSwitcher
- Menus - 显示额外的和上下文菜单项目的View
- Additional Views - 感兴趣的View,例如AnalogClock和DigitalClock
在这篇文章里,我将囊括第一组 - Basic Views。接下来的文章将囊括Picker Views和List Views。最后,第三篇文章将囊括Menus和Additional Views。
这篇文章中的所有例子,你需要使用Eclipse创建一个新的工程。命名工程如图1所示。
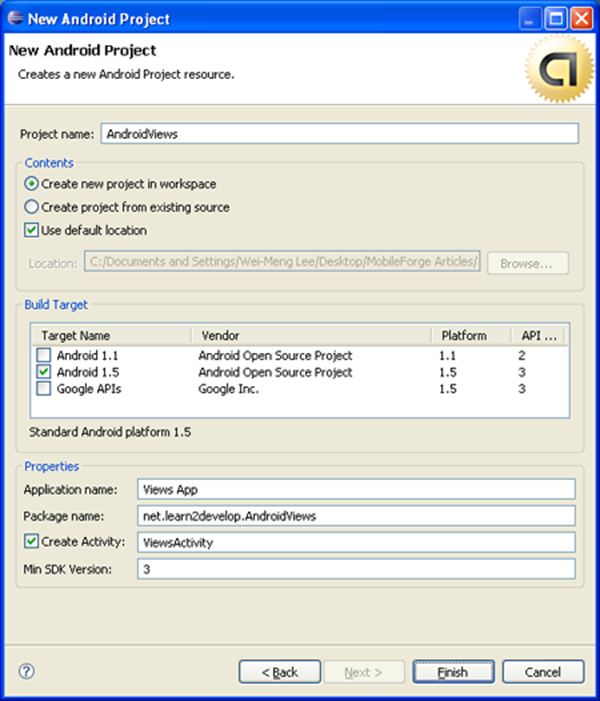
图 1 命名工程
Basic Views
在这一章节,你将学习Android中最基本的View,允许你显示文本信息,也能执行一些基本的选择。特别的,你将学习以下Views:
- TextView
- EditText
- Button
- ImageButton
- CheckBox
- ToggleButton
- RadioButton
- RadioGroup
TextView View
当你创建一个新的Android工程时,Eclipse总是创建main.xml文件(位于res/layout文件夹下),其中就包含了一个<TextView>元素:
<?xml version="1.0" encoding="utf-8"?>
<LinearLayout xmlns:android="http://schemas.android.com/apk/res/android"
android:orientation="vertical"
android:layout_width="fill_parent"
android:layout_height="fill_parent"
>
<TextView
android:layout_width="fill_parent"
android:layout_height="wrap_content"
android:text="@string/hello"
/>
</LinearLayout>
TextView用于向用户显示文本。这是最基本的View,当你开发Android应用程序时你一定遇到过。如果你需要允许用户来编辑显示的文本,你需要使用TextView的子类 - EditText,它将在下一个章节中讨论。
Button,ImageButton,EditText,CheckBox,ToggleButton,RadioButton和RadioGroup,包括TextView,这些都是你经常遇到的。还有一些其它的控件,在以后的使用过程中你会发现的。
一开始,在res/layout文件夹下添加一个新的文件,取名basicviews.xml。将下面的元素填入其中:
<?xml version="1.0" encoding="utf-8"?>
<LinearLayout xmlns:android="http://schemas.android.com/apk/res/android"
android:orientation="vertical"
android:layout_width="fill_parent"
android:layout_height="fill_parent"
>
<Button android:id="@+id/btnSave"
android:layout_width="fill_parent"
android:layout_height="wrap_content"
android:text="Save"
/>
<Button android:id="@+id/btnOpen"
android:layout_width="wrap_content"
android:layout_height="wrap_content"
android:text="Open"
/>
<ImageButton android:id="@+id/btnImg1"
android:layout_width="fill_parent"
android:layout_height="wrap_content"
android:src="@drawable/icon"
/>
<EditText android:id="@+id/txtName"
android:layout_width="fill_parent"
android:layout_height="wrap_content"
/>
<CheckBox android:id="@+id/chkAutosave"
android:layout_width="fill_parent"
android:layout_height="wrap_content"
android:text="Autosave"
/>
<CheckBox android:id="@+id/star"
style="?android:attr/starStyle"
android:layout_width="wrap_content"
android:layout_height="wrap_content"
/>
<RadioGroup android:id="@+id/rdbGp1"
android:layout_width="fill_parent"
android:layout_height="wrap_content"
android:orientation="vertical"
>
<RadioButton android:id="@+id/rdb1"
android:layout_width="fill_parent"
android:layout_height="wrap_content"
android:text="Option 1"
/>
<RadioButton android:id="@+id/rdb2"
android:layout_width="fill_parent"
android:layout_height="wrap_content"
android:text="Option 2"
/>
</RadioGroup>
<ToggleButton android:id="@+id/toggle1"
android:layout_width="wrap_content"
android:layout_height="wrap_content"
/>
</LinearLayout>
注意,使用id特性来标识每个View元素。每个View的id必须以“@+id/”标示符开始,后面紧接View的名字。
上面的XML文件包含以下View:
- Button - 表示一个可按的按钮构件
- ImageButton - 与Button相似,但它可以显示一个图片
- EditText - TextView的子类,它允许用户编辑文本内容
- CheckBox - 特殊类型的Button,它拥有两个状态——checked或unchecked
- RadioGroup和RadioButton - RadioButton有两个状态——checked或unchecked。一旦RadioButton是checked,它就不能是unchecked。RadioGroup用于组合一个或多个RadioButton,因此,允许RadioGroup中仅含一个RadioButton来选择。
- ToggleButton - 使用亮条来显示checked/unchecked状态
图2显示了不同状态下的View。特别的,右侧的图片显示了CheckBox,RadioButton和ToggleButton处于checked状态。
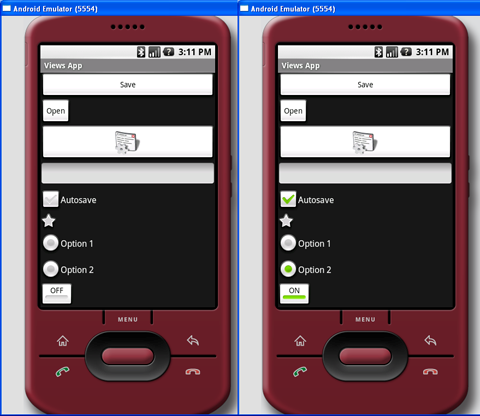
图 2 View的几种状态
为了处理View的通用事件,在src/net.learn2develop.AndroidViews文件夹下添加一个新的类,取名BasicViewsExample.java。在文件中添加以下代码:
package net.learn2develop.AndroidViews;
import android.app.Activity;
import android.os.Bundle;
import android.view.View;
import android.widget.Button;
import android.widget.CheckBox;
import android.widget.RadioGroup;
import android.widget.Toast;
import android.widget.ToggleButton;
import android.widget.RadioGroup.OnCheckedChangeListener;
public class BasicViewsExample extends Activity
{
@Override
public void onCreate(Bundle savedInstanceState) {
super.onCreate(savedInstanceState);
setContentView(R.layout.basicviews);
//---Button view---
Button btnOpen = (Button) findViewById(R.id.btnOpen);
btnOpen.setOnClickListener(new View.OnClickListener() {
public void onClick(View v) {
Toast.makeText(getBaseContext(),
"You have clicked the Open button",
Toast.LENGTH_SHORT).show();
}
});
Button btnSave = (Button) findViewById(R.id.btnSave);
btnSave.setOnClickListener(new View.OnClickListener()
{
public void onClick(View v) {
DisplayToast("You have clicked the Save button");
}
});
//---CheckBox---
CheckBox checkBox = (CheckBox) findViewById(R.id.chkAutosave);
checkBox.setOnClickListener(new View.OnClickListener()
{
public void onClick(View v) {
if (((CheckBox)v).isChecked())
DisplayToast("CheckBox is checked");
else
DisplayToast("CheckBox is unchecked");
}
});
//---RadioButton---
RadioGroup radioGroup = (RadioGroup) findViewById(R.id.rdbGp1);
radioGroup.setOnCheckedChangeListener(new OnCheckedChangeListener()
{
public void onCheckedChanged(RadioGroup group, int checkedId) {
//---displays the ID of the RadioButton that is checked---
DisplayToast(Integer.toString(checkedId));
}
});
//---ToggleButton---
ToggleButton toggleButton = (ToggleButton) findViewById(R.id.toggle1);
toggleButton.setOnClickListener(new View.OnClickListener()
{
public void onClick(View v) {
if (((ToggleButton)v).isChecked())
DisplayToast("Toggle button is On");
else
DisplayToast("Toggle button is Off");
}
});
}
private void DisplayToast(String msg)
{
Toast.makeText(getBaseContext(), msg,
Toast.LENGTH_SHORT).show();
}
}
上面的代码在控件点击的时候作了特殊的处理,显示了一个消息(使用Toast类)。
在AndroidManifest.xml文件中添加下面粗体的几行来注册新的BasicViewsExample Activity:
<?xml version="1.0" encoding="utf-8"?>
<manifest xmlns:android="http://schemas.android.com/apk/res/android"
package="net.learn2develop.AndroidViews"
android:versionCode="1"
android:versionName="1.0.0">
<application android:icon="@drawable/icon" android:label="@string/app_name">
<activity android:name=".ViewsActivity"
android:label="@string/app_name">
<intent-filter>
<action android:name="android.intent.action.MAIN" />
<category android:name="android.intent.category.LAUNCHER" />
</intent-filter>
</activity>
<activity android:name=".BasicViewsExample"
android:label="@string/app_name" />
</application>
</manifest>
为了显示BasicViewsExample Activity,在ViewsActivity.java文件中添加以下粗体的语句:
package net.learn2develop.AndroidViews;
import android.app.Activity;
import android.content.Intent;
import android.os.Bundle;
public class ViewsActivity extends Activity
{
/** Called when the activity is first created. */
@Override
public void onCreate(Bundle savedInstanceState) {
super.onCreate(savedInstanceState);
setContentView(R.layout.main);
//---load the BasicViewsExample activity---
startActivity(new Intent(this, BasicViewsExample.class));
}
}
为了测试应用程序,按下F11,在Android模拟器中调试应用程序。图3显示了当ToggleButton点击时显示的消息。

图 3 当ToggleButton点击时显示消息
对于EditText View,你还可以设置它来接受密码,以“.”来替代每个字符。这是通过password特性来完成的:
<EditText android:id="@+id/txtName"
android:layout_width="fill_parent"
android:layout_height="wrap_content"
android:password = "true"
/>
图4显示了当你在View中输入字符串时,你输入的字符一开始总是显示,当你输入下一个字符(或者你什么也不做,一秒后)时前一个才会变成“.”。
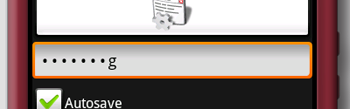
图 4 将password特性设置为true
ProgressBar View
ProgressBar提供了后台工作的视觉反馈。举个例子,你可能从网页上下载一些数据,需要向用户更新下载的状态。在这种情况下,ProgressBar是这项工作最好的选择。
使用上一章节中创建的Activity,在basicviews.xml文件中插入下面的元素:
<?xml version="1.0" encoding="utf-8"?>
<LinearLayout xmlns:android="http://schemas.android.com/apk/res/android"
android:orientation="vertical"
android:layout_width="fill_parent"
android:layout_height="fill_parent"
>
<ProgressBar android:id="@+id/progressbar"
android:layout_width="wrap_content"
android:layout_height="wrap_content"
/>
<Button android:id="@+id/btnSave"
android:layout_width="fill_parent"
android:layout_height="wrap_content"
android:text="Save"
/>
<!-
Other views omitted
-->
</LinearLayout>
ProgressBar的默认模式是不确定的——也就是说,它显示成一个循环的动画。这个模式对于那些不清楚何时完成的任务来说非常有用。举个例子,你正在向一个网页服务器发送一些数据,等待服务器的响应。
下面的代码演示了如何用一个线程来模拟一个耗时的任务。当任务完成时,通过设定ProgressBar的Visibility属性为GONE(值为8)来隐藏它。
import android.widget.ProgressBar;
import android.os.Handler;
public class BasicViewsExample extends Activity
{
private static int progress = 0;
private ProgressBar progressBar;
private int progressStatus = 0;
private Handler handler = new Handler();
@Override
public void onCreate(Bundle savedInstanceState)
{
super.onCreate(savedInstanceState);
setContentView(R.layout.basicviews);
progressBar = (ProgressBar) findViewById(R.id.progressbar);
//---do some work in background thread---
new Thread(new Runnable()
{
public void run()
{
//---do some work here---
while (progressStatus < 10)
{
progressStatus = doSomeWork();
}
//---hides the progress bar---
handler.post(new Runnable()
{
public void run()
{
//---0 - VISIBLE; 4 - INVISIBLE; 8 - GONE---
progressBar.setVisibility(8);
}
});
}
//---do some long lasting work here---
private int doSomeWork()
{
try {
//---simulate doing some work---
Thread.sleep(500);
} catch (InterruptedException e)
{
e.printStackTrace();
}
return ++progress;
}
}).start();
//...
//...
}
//...
}
INVISIBLE和GONE常量的区别是,INVISIBLE常量只是简单的隐藏ProgressBar。而GONE常量表示从Activity中移除ProgressBar,并且不再占据Activity的任何空间。
图5的左边显示了动作中的ProgressBar。后台任务完成后,当你设定Visibility属性为GONE时,ProgressBar会放弃它占据的空间。
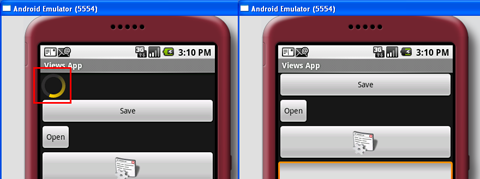
图 5 动作中的ProgressBar(左),当后台任务完成时消失(右)
如果你不想ProgressBar以不确定的模式显示,那么,你可以修改它显示成一个水平条。下面的style特性指定了ProgressBar显示成一个水平条:
<ProgressBar android:id="@+id/progressbar"
android:layout_width="wrap_content"
android:layout_height="wrap_content"
style="?android:attr/progressBarStyleHorizontal"
/>
下面的代码使得ProgressBar从1增加到100,然后从屏幕消失(见图6):
public class BasicViewsExample extends Activity
{
private static int progress = 0;
private ProgressBar progressBar;
private int progressStatus = 0;
private Handler handler = new Handler();
@Override
public void onCreate(Bundle savedInstanceState) {
super.onCreate(savedInstanceState);
setContentView(R.layout.basicviews);
progressBar = (ProgressBar) findViewById(R.id.progressbar);
//---do some work in background thread---
new Thread(new Runnable()
{
public void run()
{
while (progressStatus < 100)
{
progressStatus = doSomeWork();
//---Update the progress bar---
handler.post(new Runnable()
{
public void run() {
progressBar.setProgress(progressStatus);
}
});
}
//---hides the progress bar---
handler.post(new Runnable()
{
public void run() {
//---0 - VISIBLE; 4 - INVISIBLE; 8 - GONE---
progressBar.setVisibility(8);
}
});
}
private int doSomeWork()
{
try
{
//---simulate doing some work---
Thread.sleep(500);
} catch (InterruptedException e)
{
e.printStackTrace();
}
return ++progress;
}
}).start();
//...
//...
}
}
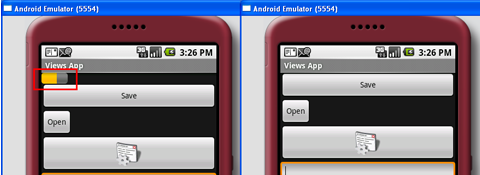
图 6 动作中的水平ProgressBar(左),后台任务完成时消失(右)
AutoCompleteTextView View
AutoCompleteTextView是一个类似于EditText的View(实际上它是EditText的子类),不同的是当用户输入字符时,会自动显示出字符补全建议的列表。
在res/layout文件夹下添加一个新的文件,取名autocomplete.xml并且填入以下元素:
<?xml version="1.0" encoding="utf-8"?>
<LinearLayout xmlns:android="http://schemas.android.com/apk/res/android"
android:orientation="vertical"
android:layout_width="fill_parent"
android:layout_height="fill_parent"
>
<AutoCompleteTextView android:id="@+id/txtCountries"
android:layout_width="fill_parent"
android:layout_height="wrap_content"
/>
</LinearLayout>
在src/net.learn2develop.AndroidViews文件夹下添加新的文件,取名AutoCompleteExample.java。填入以下内容:
package net.learn2develop.AndroidViews;
import android.app.Activity;
import android.os.Bundle;
import android.widget.ArrayAdapter;
import android.widget.AutoCompleteTextView;
public class AutoCompleteExample extends Activity
{
String[] presidents =
{
"Dwight D. Eisenhower",
"John F. Kennedy",
"Lyndon B. Johnson",
"Richard Nixon",
"Gerald Ford",
"Jimmy Carter",
"Ronald Reagan",
"George H. W. Bush",
"Bill Clinton",
"George W. Bush",
"Barack Obama"
};
@Override
public void onCreate(Bundle savedInstanceState)
{
super.onCreate(savedInstanceState);
setContentView(R.layout.autocomplete);
ArrayAdapter<String> adapter = new ArrayAdapter<String>(this,
android.R.layout.simple_dropdown_item_1line, presidents);
AutoCompleteTextView textView = (AutoCompleteTextView)
findViewById(R.id.txtCountries);
textView.setThreshold(3);
textView.setAdapter(adapter);
}
}
注意,建议的列表从ArrayAdapter对象中获取。setThreshold方法设定了在建议列表显示成下拉菜单之前用户必须输入的最少字符数。
在AndroidManifest.xml文件中添加以下粗体行来注册新的AutoCompleteExample Activity:
<?xml version="1.0" encoding="utf-8"?>
<manifest xmlns:android="http://schemas.android.com/apk/res/android"
package="net.learn2develop.AndroidViews"
android:versionCode="1"
android:versionName="1.0.0">
<application android:icon="@drawable/icon" android:label="@string/app_name">
<activity android:name=".ViewsActivity"
android:label="@string/app_name">
<intent-filter>
<action android:name="android.intent.action.MAIN" />
<category android:name="android.intent.category.LAUNCHER" />
</intent-filter>
</activity>
<activity android:name=".AutoCompleteExample"
android:label="@string/app_name" />
</application>
</manifest>
修改ViewsActivity.java文件来启动AutoCompleteExample Activity:
package net.learn2develop.AndroidViews;
import android.app.Activity;
import android.content.Intent;
import android.os.Bundle;
public class ViewsActivity extends Activity
{
/** Called when the activity is first created. */
@Override
public void onCreate(Bundle savedInstanceState)
{
super.onCreate(savedInstanceState);
setContentView(R.layout.main);
startActivity(new Intent(this, AutoCompleteExample.class));
}
}
图7显示了输入一些文本时动作中的AutoCompleteTextView。
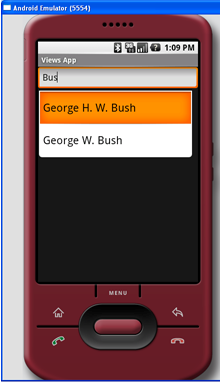
图 7 动作中的AutoCompleteTextView
小结
在这篇文章里,你已经看到一些在Android中很常用的View。在接下来的两篇文章里,我将深入讲解更多的View来帮助你构建杀手级的Android应用程序。请继续关注下一篇文章,在那里,我将讨论你可能使用到的Picker和List Views。
