


Understanding User Interface in Android - Part 1: Layouts(译)
- LinearLayout
- AbsoluteLayout
- TableLayout
- RelativeLayout
- FrameLayout
- ScrollView
- layout_alignParentTop
- layout_alignParentLeft
- layout_alignLeft
- layout_alignRight
- layout_below
- layout_centerHorizontal
无意中看到的几篇文章,想翻译出来分享给大家。不过声明,翻译后的意思不一定能完全表达作者的意图,如果想看原文,请参考:
http://mobiforge.com/designing/story/understanding-user-interface-android-part-1-layouts
到目前为止,我之前的几篇关于Android的文章都集中于向你展示如何解决Android中的问题,而没有花太多的时间来讨论Android应用程序开发的视觉元素——UI设计。在这篇和接下来的文章,我将带你穿越构建Android应用程序的UI元素。文章的开始部分,我将讨论Android中的一些布局(Layouts)和一些在屏幕上摆放的构件(Widget)。
Android屏幕UI组件
到这个时点,你已经看到Android应用程序最基本的单元式Activity。Activity用于显示应用程序的UI,它可能包含许多构件,如buttons, labels, text boxes等。一般,你会使用一个XML文件(例如,位于res/layout文件夹下的main.xml文件)来定义你的UI,它看起来像这样:
<?xml version="1.0" encoding="utf-8"?>
<LinearLayout xmlns:android="http://schemas.android.com/apk/res/android"
android:orientation="vertical"
android:layout_width="fill_parent"
android:layout_height="fill_parent"
>
<TextView
android:layout_width="fill_parent"
android:layout_height="wrap_content"
android:text="@string/hello"
/>
</LinearLayout>
在运行时,你在Activity的onCreate事件处理函数里加载XML UI,使用Activity类的setContentView方法:
@Override
public void onCreate(Bundle savedInstanceState) {
super.onCreate(savedInstanceState);
setContentView(R.layout.main);
}
在编译期间,XML文件中的元素会编译成相应地Android GUI类,并设定了指定的特性。当加载时,Android系统会创建Activity的UI。
使用XML文件来构建UI往往是比较容易的,然后,也存在一些时候需要你在运行时动态地构建UI(例如,当编写游戏)。因此,也有可能完全通过代码来创建的你的UI。
Views和ViewGroups
一个Activity包含View和ViewGroup。一个View是一个构件,它在屏幕上有一个外观。构件包括buttons, labels, text boxes等。一个View继承自android.view.View基类。
一个或多个View可以组合起来放入一个ViewGroup。一个ViewGroup(它是特殊类型的View)提供一个布局,在其上你可以安排View的显示和次序。ViewGroup包括LinearLayout, FrameLayout等。一个ViewGroup继承自android.view.ViewGroup基类。
Android支持以下的ViewGroup:
接下来的章节将讨论每个ViewGroup的细节。注意,在练习中,通常会嵌套不同类型的布局来创建想要的UI。
创建一个简单工程
创建一个新的Android工程,如图1所示命名它。
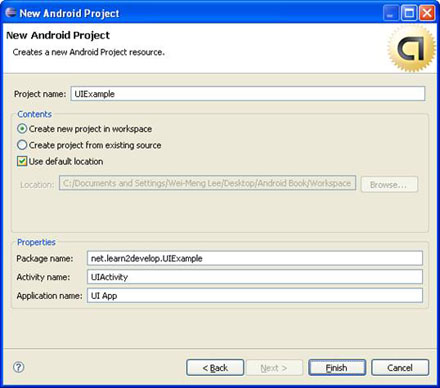
图 1 使用Eclipse来创建一个新的Android工程
Eclipse支持很少的Android UI设计,因此,你不能在设计面板上进行构件的拖拽。作为替代的,你可以使用免费的DroidDraw工具(从 http://www.droiddraw.org/ 获取)。图2显示了动作中的DroidDraw。你可以在不同的布局上拖拽构件,然后使用它来生成等价的XML代码。然后DroidDraw不是很完美,对于你刚开始Android的UI设计来说还是非常有用的,并且它是学习Android中众多的View和ViewGroup的得力工具。
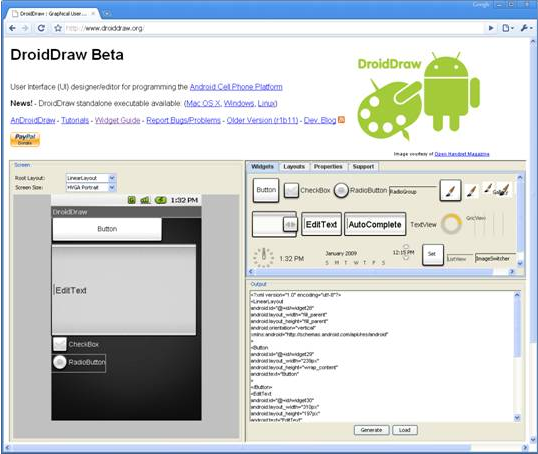
图 2 DroidDraw网页应用程序来设计你的AndroidUI
你还可以下载独立的DroidDraw版本(Windows, Mac OS X, Linux)。
LinearLayout
LinearLayout以单一的行或列来布局View。子View既可以垂直摆放也可以水平摆放。查看LinearLayout如何工作,让我们修改一下工程的main.xml文件:
<?xml version="1.0" encoding="utf-8"?>
<LinearLayout xmlns:android="http://schemas.android.com/apk/res/android"
android:orientation="vertical"
android:layout_width="fill_parent"
android:layout_height="fill_parent"
>
<TextView
android:layout_width="fill_parent"
android:layout_height="wrap_content"
android:text="@string/hello"
/>
</LinearLayout>
在main.xml文件中,可以看到根元素是<LinearLayout>,并且它包含一个<TextView>元素。<LinearLayout>元素控制着其内元素的顺序和显示。
每个View和ViewGroup都有一堆通用的特性,其中一部分显示在表1中。
| 特性 | 描述 |
| layout_width | 指定View或ViewGroup的宽度 |
| layout_height | 指定View或ViewGroup的高度 |
| layout_marginTop | 指定View或ViewGroup上方的空间 |
| layout_marginBottom | 指定View或ViewGroup下方的空间 |
| layout_marginLeft | 指定View或ViewGroup左边的空间 |
| layout_marginRight | 指定View或ViewGroup右边的空间 |
| layout_gravity | 指定子View 如何摆放 |
| layout_weight | 指定Layout的剩余空间的多少分配给View |
| layout_x | 指定View或ViewGroup的x坐标 |
| layout_y | 指定View或ViewGroup的y坐标 |
表 1 View和ViewGroup的通用特性
注意,这些特性中的部分只在当一个View位于某个特定的ViewGroup里才能应用。例如,layout_weight和layout_gravity特性只能当View位于LinearLayout或者TableLayout里才能应用。
举个例子,上面的<TextView>元素使用fill_parent常量填充了父元素的全部宽度(在这里是屏幕)。它的高度使用wrap_content常量,表示它的高度依据内容的高度(在这里,是其内的文本)。如果确实不想让<TextView>View占据整个行,那么,你也可以设定layout_width特性为wrap_content,像这样:
<TextView
android:layout_width="wrap_content"
android:layout_height="wrap_content"
android:text="@string/hello"
/>
这样设置意味著View的宽度与其内包含的文本的宽度一样,你还可以设置宽度为一个绝对的值,像这样:
<TextView
android:layout_width="105px"
android:layout_height="wrap_content"
android:text="@string/hello"
/>
在这里,宽度设置为105像素宽。让我们修改main.xml文件,添加一个<Button>View吧,如下所示:
<?xml version="1.0" encoding="utf-8"?>
<LinearLayout
android:layout_width="fill_parent"
android:layout_height="fill_parent"
xmlns:android="http://schemas.android.com/apk/res/android"
>
<TextView
android:layout_width="105px"
android:layout_height="wrap_content"
android:text="@string/hello"
/>
<Button
android:layout_width="100px"
android:layout_height="wrap_content"
android:text="Button"
/>
</LinearLayout>
图3显示了View从左往右摆放。
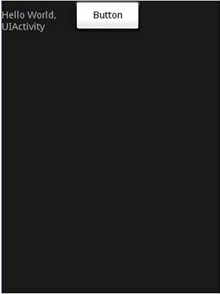
图 3 LinearLayout中View的摆放
LinearLayout默认的方向为水平的。如果你想修改它的方向为垂直的,设置orientation特性为vertical,像这样:
<LinearLayout
android:layout_width="fill_parent"
android:layout_height="fill_parent"
android:orientation="vertical"
xmlns:android="http://schemas.android.com/apk/res/android"
>
图4显示了修改方向为垂直方向的效果。

图 4 修改方向为垂直方向
在LinearLayout中,你可以应用其内View的layout_weight和layout_gravity特性,如下面对main.xml的修改所示:
<?xml version="1.0" encoding="utf-8"?>
<LinearLayout
android:layout_width="fill_parent"
android:layout_height="fill_parent"
xmlns:android="http://schemas.android.com/apk/res/android"
android:orientation="vertical"
>
<TextView
android:layout_width="105px"
android:layout_height="wrap_content"
android:text="@string/hello"
/>
<Button
android:layout_width="100px"
android:layout_height="wrap_content"
android:text="Button"
android:layout_gravity="right"
android:layout_weight="0.2"
/>
<EditText
android:layout_width="fill_parent"
android:layout_height="wrap_content"
android:textSize="18sp"
android:layout_weight="0.8"
/>
</LinearLayout>
图5显示了Button通过使用layout_gravity特性将其摆放在父元素(LinearLayout)的右侧。如此同时,使用layout_weight特性,Button和EditText以一定的比率占据屏幕剩余的空间。layout_weight特性值的总和必须等于1。
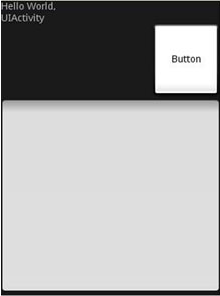
图 5 应用layout_weight和layout_gravity特性
AbsoluteLayout
AbsoluteLayout允许你指定孩子的精确位置。假设main.xml中定义了下面的UI:
<?xml version="1.0" encoding="utf-8"?>
<AbsoluteLayout
android:layout_width="fill_parent"
android:layout_height="fill_parent"
xmlns:android="http://schemas.android.com/apk/res/android"
>
<Button
android:layout_width="188px"
android:layout_height="wrap_content"
android:text="Button"
android:layout_x="126px"
android:layout_y="361px"
/>
<Button
android:layout_width="113px"
android:layout_height="wrap_content"
android:text="Button"
android:layout_x="12px"
android:layout_y="361px"
/>
</AbsoluteLayout>
图6显示了两个Button,使用android:layout_x和android:layout_y特性来定位它们指定的位置。
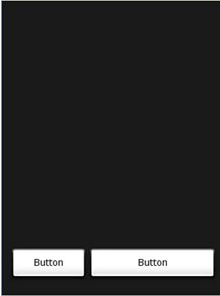
图 6 在AbsoluteLayout中摆放View
作者的提醒:当屏幕的旋转发生改变,你需要重新摆放你的View时,你最好使用AbsoluteLayout。
TableLayout
TableLayout以行列的方式来组合View。你可以使用<TableRow>元素来在表中生成一行。每一行可以包含一个或多个View。你在行中放置的每个View会形成一个单元。每列的宽度由这一列中单元的最大宽度来决定。
以下面的元素来填充mail.xml,观察UI如图7所示:
<?xml version="1.0" encoding="utf-8"?>
<TableLayout
xmlns:android="http://schemas.android.com/apk/res/android"
android:layout_height="fill_parent"
android:layout_width="fill_parent"
android:background="#000044">
<TableRow>
<TextView
android:text="User Name:"
android:width ="120px"
/>
<EditText
android:id="@+id/txtUserName"
android:width="200px" />
</TableRow>
<TableRow>
<TextView
android:text="Password:"
/>
<EditText
android:id="@+id/txtPassword"
android:password="true"
/>
</TableRow>
<TableRow>
<TextView />
<CheckBox android:id="@+id/chkRememberPassword"
android:layout_width="fill_parent"
android:layout_height="wrap_content"
android:text="Remember Password"
/>
</TableRow>
<TableRow>
<Button
android:id="@+id/buttonSignIn"
android:text="Log In" />
</TableRow>
</TableLayout>
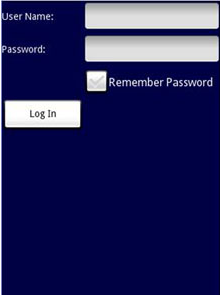
图 7 使用TableLayout
注意,在上面的例子中,TableLayout中有两列四行。Password正下方的TextView填入了一个空的元素。如果你不这么做,记住密码的Checkbox将会出现在Password TextView的下方,如图8所示。

图 8 注意记住密码Checbox位置的改变
RelativeLayout
RelativeLayout允许你指定子View的位置相对于其它的View。假设main.xml文件如下面所示:
<?xml version="1.0" encoding="utf-8"?>
<RelativeLayout
android:id="@+id/RLayout"
android:layout_width="fill_parent"
android:layout_height="fill_parent"
xmlns:android="http://schemas.android.com/apk/res/android"
>
<TextView
android:id="@+id/lblComments"
android:layout_width="wrap_content"
android:layout_height="wrap_content"
android:text="Comments"
android:layout_alignParentTop="true"
android:layout_alignParentLeft="true"
/>
<EditText
android:id="@+id/txtComments"
android:layout_width="fill_parent"
android:layout_height="170px"
android:textSize="18sp"
android:layout_alignLeft="@+id/lblComments"
android:layout_below="@+id/lblComments"
android:layout_centerHorizontal="true"
/>
<Button
android:id="@+id/btnSave"
android:layout_width="125px"
android:layout_height="wrap_content"
android:text="Save"
android:layout_below="@+id/txtComments"
android:layout_alignRight="@+id/txtComments"
/>
<Button
android:id="@+id/btnCancel"
android:layout_width="124px"
android:layout_height="wrap_content"
android:text="Cancel"
android:layout_below="@+id/txtComments"
android:layout_alignLeft="@+id/txtComments"
/>
</RelativeLayout>
注意,放入RelativeLayout中的View都有特性来设置它们与其它View对齐。这些特性是:
这些特性的值是你已经为View定义的ID。上面的XML UI创建的屏幕如图9所示。
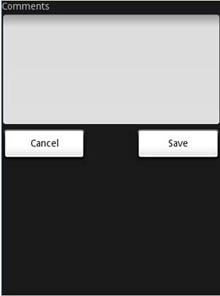
图 9 使用AbsoluteLayout来摆放View
FrameLayout
FrameLayout是屏幕上的一个占位符,你可以用它来显示单个View。添加到FrameLayout上的View总是位于布局的左上角。假设main.xml中有以下内容:
<?xml version="1.0" encoding="utf-8"?>
<AbsoluteLayout
android:id="@+id/widget68"
android:layout_width="fill_parent"
android:layout_height="fill_parent"
xmlns:android="http://schemas.android.com/apk/res/android"
>
<FrameLayout
android:layout_width="wrap_content"
android:layout_height="wrap_content"
android:layout_x="40px"
android:layout_y="35px"
>
<ImageView
android:src = "@drawable/androidlogo"
android:layout_width="wrap_content"
android:layout_height="wrap_content"
/>
</FrameLayout>
</AbsoluteLayout>
</p>
<p>Here, you have a <code>FrameLayout
在AbsoluteLayout中,放置了一个FrameLayout,其中嵌入了一个ImageView。UI如图10所示。
注意:这个例子假设res/drawable文件夹下有一个名叫androidlogo.png图片。
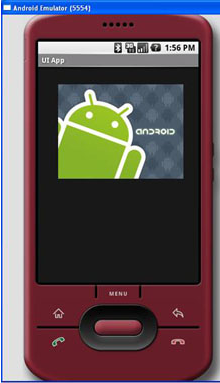
图 10 使用FrameLayout
如果你添加另一个View(例如一个Button)到FrameLayout上,新的View将遮盖前一个View(如图11所示):
<?xml version="1.0" encoding="utf-8"?>
<AbsoluteLayout
android:id="@+id/widget68"
android:layout_width="fill_parent"
android:layout_height="fill_parent"
xmlns:android="http://schemas.android.com/apk/res/android"
>
<FrameLayout
android:layout_width="wrap_content"
android:layout_height="wrap_content"
android:layout_x="40px"
android:layout_y="35px"
>
<ImageView
android:src = "@drawable/androidlogo"
android:layout_width="wrap_content"
android:layout_height="wrap_content"
/>
<Button
android:layout_width="124px"
android:layout_height="wrap_content"
android:text="Print Picture"
/>
</FrameLayout>
</AbsoluteLayout>
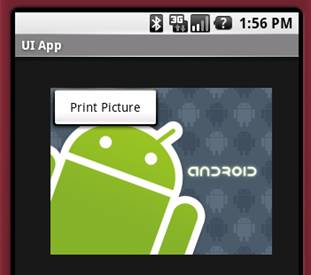
图 11 重叠View
你可以添加多个View到一个FrameLayout上,但每一个都将停靠在前一个的上方。
ScrollView
ScrollView是一种特殊类型的FrameLayout,它允许用户滚动查看View列表,而这些View将占据比实际显示更多的空间。ScrollView仅能容纳一个子View或ViewGroup,一般都是LinearLayout。
注意:不要将ListView和ScrollView一起使用。ListView设计用来显示有联系的信息列表,并且为大列表的处理作了优化。
接下来的main.xml的内容包含一个ScrollView,其中包含一个LinearLayout,LinearLayout中依次包含一些Button和EditText:
<?xml version="1.0" encoding="utf-8"?>
<ScrollView
android:id="@+id/widget54"
android:layout_width="fill_parent"
android:layout_height="fill_parent"
xmlns:android="http://schemas.android.com/apk/res/android"
>
<LinearLayout
android:layout_width="310px"
android:layout_height="wrap_content"
android:orientation="vertical"
>
<Button
android:id="@+id/button1"
android:layout_width="fill_parent"
android:layout_height="wrap_content"
android:text="Button 1"
/>
<Button
android:id="@+id/button2"
android:layout_width="fill_parent"
android:layout_height="wrap_content"
android:text="Button 2"
/>
<Button
android:id="@+id/button3"
android:layout_width="fill_parent"
android:layout_height="wrap_content"
android:text="Button 3"
/>
<EditText
android:id="@+id/txt"
android:layout_width="fill_parent"
android:layout_height="300px"
/>
<Button
android:id="@+id/button4"
android:layout_width="fill_parent"
android:layout_height="wrap_content"
android:text="Button 4"
/>
<Button
android:id="@+id/button5"
android:layout_width="fill_parent"
android:layout_height="wrap_content"
android:text="Button 5"
/>
</LinearLayout>
</ScrollView>
图12中ScrollView在屏幕的右侧显示了一个滚动条。用户可以往上拖拽屏幕来显示位于屏幕下方的View。
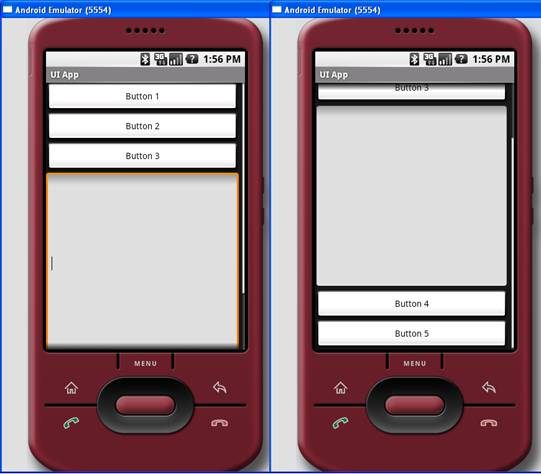
图 12 使用ScrollView
小结
在这一篇文章里,你已经看到了Android中用于创建UI的一些布局。下一篇文章中,我将向你展示一些View(Widget),你可以使用它来创建杀手级的应用程序。至此,祝愉快!

