
路由
主要是5大类
| 名称 | 说明 |
|
Routes |
路由配置,保存哪个URL对应展示哪个组件,以及在哪个RouuterOutlet中展示组件 |
|
RouterOutlet |
在html中标记路由内容呈现位置的占位符指令 |
|
Router |
负责在运行时执行路由的对象,可以通过调用器navigate()和navigateByUrl()方法来导航到一个指定的路由 |
|
RouterLink |
在html中声明路由导航用的指令 |
|
ActivatedRoute |
当前激活的路由对象,保存着当前路由的信息,如路由地址,路由参数等 |
一、Routes
const routes: Routes = [
{ path: '', redirectTo: '/home', pathMatch: 'full' }, //重定向,将空的路径重定向到home组件
{ path: 'home', component: HomeComponent },
{ path: 'product-detail/:id', component: ProductDetailComponent },
{ path: '**', component: NotFoundComponent}//通用路由,放在最后面,因为ng是先匹配优先策越
];
注意:path中不能配置 / 线 如 path:'/' 不允许
二、Router 、ActivatedRoute
通过构造函数的依赖注入来获取这个Router、ActivatedRoute
constractor(private router:Router, private activatedRoute:ActivatedRoute){}
Router使用:
this._router.navigate(['/home']);
//或传参数
this._router.navigate(['/product-detail', 2]);
三、路由传递数据
主要有3种:
1.在查询参数中传递数据
product?id=1&name=2
获取:
//通过参数快照
this._activeRoute.snapshot.queryParams['id'];
//或是参数订阅
this._activeRoute.queryParams.subscribe((params:Params)=>this.id = params['id'])
2.在路由路径中
product/:id
获取:
//通过参数快照
this._activeRoute.snapshot.params['id'];
//或是参数订阅
this._activeRoute.params.subscribe((params:Params)=>this.id = params['id'])
3.在路由配置中
{path:'', component:HomeCompoent, data:[{isHome:true}]}
获取:
this._activeRoute.snapshot.data[0]['id']
//或是参数订阅
this._activeRoute.data.subscribe((data: Data) => { this._productId = data[0]['id']; });
参数快照和参数订阅,当自身路由到自身的时候,如果路由数据有变化使用参数订阅
四、子路由
在路由配置中使用children属性,在父组件中添加路由输出outlet,如下,在HomeComponent的模板中添加<router-outlet>用来表示子路由及DetailComponent显示的位置
const routes: Routes = [
{ path: 'home', component: HomeComponent,children:[
    { path: 'detail/:id', component: DetailComponent}
] },

];
//home.component.html

<p>
  这是home组件
</p>
<!--使用相对路径来跳转子路由-->
<a [routerLink]="['./detail', 2]"></a>
<router-outlet></router-outlet>
注意:使用相对路径来跳转子路由,相对于当前html
五、辅助路由
一个组件只能有一个主路由输出,但是可以有多个辅助路由输出,添加name属性的为辅助路由输出
<router-outlet></router-outlet>
<router-outlet name='aux'></router-outlet>
配置:
1 const routes: Routes = [
2 { path: '', redirectTo: '/home', pathMatch: 'full' },
3 { path: 'home', component: HomeComponent},
4 //使用outlet属性指明该组件由哪个路由输出
5 { path: 'product-detail/:id', component: ProductDetailComponent,outlet:'aux' },
6 { path: '**', component: NotFoundComponent}
7 ];
使用:
//primary是指定主路由显示哪个组件,可选。意思是辅助路由在显示商品详情的时候,主路由显示主页
<a [routerLink]="[{outlets: {primary:'home', aux: 'product-detail/2'}}']"></a>
//辅助路由不显示
<a [routerLink]="[{outlets: {primary:'home', aux: null]"></a>
六、路由守卫
路由守卫分为3种
| 名称 | 说明 |
| canActivate | 路由进入某组件时的判断,如点击进入某路由时,如发现不满足某些条件,则不允许进入该路由 |
| canDeactivate | 离开路由时,如不满足某条件不允许离开。如提示用户没有保存信息,不允许离开的提示 |
| resolve | 进入某路由前,将一些数据提前加载,如http请求数据,可放在这里面,数据请求到了再跳转 |
1、canActivate
新建login.activate.ts文件
import { CanActivate } from '@angular/router';

export class LoginActivate implements CanActivate {
  canActivate() {
    const loggedIn = Math.random() < 0.5;
    return loggedIn;
  }
}
配置路由
const routes: Routes = [
  { path: '', component: HomeComponent, pathMatch: 'full' },
//配置守卫
  { path: 'home', component: HomeComponent, canActivate: [LoginActivate] },
  { path: 'product-detail/:id', component: ProductDetailComponent }
];

@NgModule({
  imports: [
    RouterModule.forRoot(routes, { enableTracing: false })
  ],
    //将守卫注册
  providers: [LoginActivate],
  exports: [RouterModule]
})
2、canDeactivate
新建leave.deactivate.ts文件
import { CanDeactivate } from '@angular/router';

export class LeaveDeactivate implements CanDeactivate<ProductDetailComponent> {
  canDeactivate(product: ProductDetailComponent) {
    const loggedIn = Math.random() < 0.5;
    return window.confirm('您还有信息未保存,请保存再离开?');
  }
}
路由配置
const routes: Routes = [
  { path: '', component: HomeComponent, pathMatch: 'full' },
  { path: 'home', component: HomeComponent, canDeactivate: [LeaveDeactivate] },
  { path: 'product-detail/:id', component: ProductDetailComponent }
];

@NgModule({
  imports: [
    RouterModule.forRoot(routes, { enableTracing: false })
  ],
  providers: [LeaveDeactivate],
  exports: [RouterModule]
})
3、resolve
新建product.resolve.ts文件
import { Resolve } from '@angular/router';
import { Product } from './product.interface';
export class ProductResolve implements Resolve<Product> {
  resolve() {
    const _porduct: Product = {
      id: 1,
      name: '',
      image: '',
      bigImage: '',
      description: '这个是第一个商品',
      price: '9.99',
      score: 5
    };
    return _porduct;
  }
}
配置:
const routes: Routes = [
  { path: '', component: HomeComponent, pathMatch: 'full' },
  { path: 'home', component: HomeComponent, resolve: { product: ProductResolve } },
  { path: 'product-detail/:id', component: ProductDetailComponent }
];

@NgModule({
  imports: [
    RouterModule.forRoot(routes, { enableTracing: false })
  ],
  providers: [ProductResolve],
  exports: [RouterModule]
})
使用:
constructor(private _activeRoute: ActivatedRoute) {
  }

  ngOnInit() {
    this._activeRoute.data.subscribe((data: Data) => { this.currProduct = data['product']; });
  }
七、路由懒加载
如果在app.module.ts里面注册的模块都会被打包成一个js文件,在html打开时该文件就会被加载,一个大文件浏览器加载可能很慢,所以有了延迟加载,在使用该模块的时候才会加载这个js文件(会生成单独的文件)
使用loadChildern来延迟加载模块,值为字符串,包括该模块的位置+文件名+模块名,默认路径在src,因此需要添加app路径
const routes: Routes = [
{ path: '', redirectTo: '/home', pathMatch: 'full' },
{ path: 'home', component: HomeComponent },
{ path: 'product-detail/:id', component: ProductDetailComponent },
//延迟加载about模块
{ path: 'about', loadChildren: 'app/about/about.module#AboutModule' },
{ path: '**', component: NotFoundComponent}
使用build之后会多生成一个js文件,如下
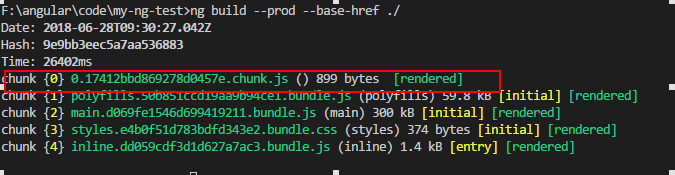
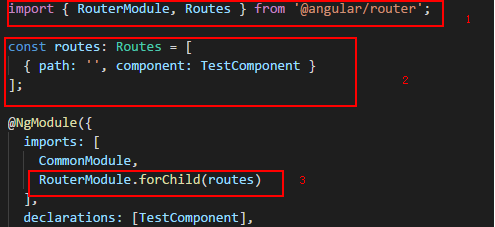
在延迟加载模块中,需要新建一个路由模块,或是添加进aboutModule中也可以,用来导航到延迟加载模块的组件中

 浙公网安备 33010602011771号