niagara Workbench module import IntelliJ
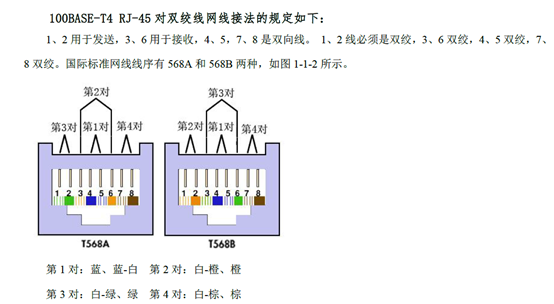
1、 在整个网络布线中使用一种布线方式,但是两端都有RJ-45 plug 的网络连线,无论是采用方式A还是方式B 端接的方式都是试用的。网络都是通用的,双绞线的顺序与RJ-45偶的引脚序号一一对应,10M 以太网的网线接法使用 1,2,3,6编号的芯线传递数据,100M以太网的网线使用4,5,7,8 编号的芯线传递数据,
2、使用IntelliJ 开发Niagara4的模块
首先 下载安装 Niagara 4 和 IntelliJ IDEA(使用 Community edition 即可) 下载N4 Grade tool在 N4的额控制台输入 gradlew 命令,第一次使用gradlew 会相应的下载grade lib 响应的版本会下载到用户账户文件下(userhome /.gradle)同时从Maven库上下载所有依赖的lib ,如果么有网络的时候可以直接从其他电脑上复制响应的版本的库文件。下图是办公室今天么网, 所以没有成功的下载到本地。下载成功如右面的图示。


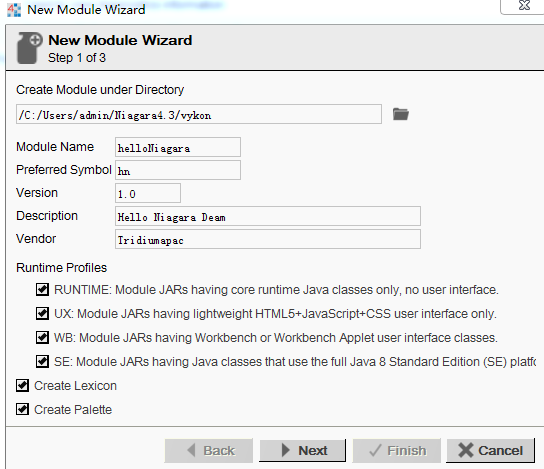
其次 ,打开Workbench创建一个新的 New Module,会出现 New Module Wizard
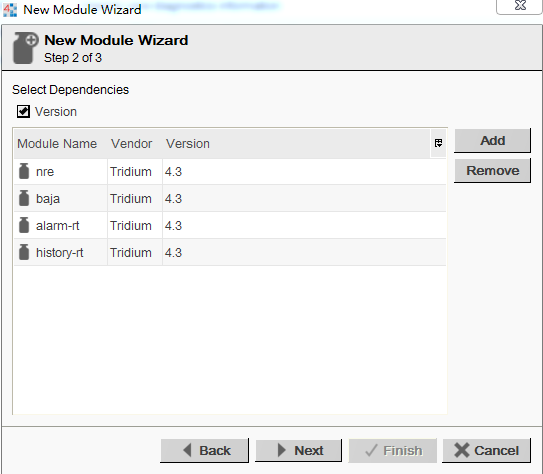
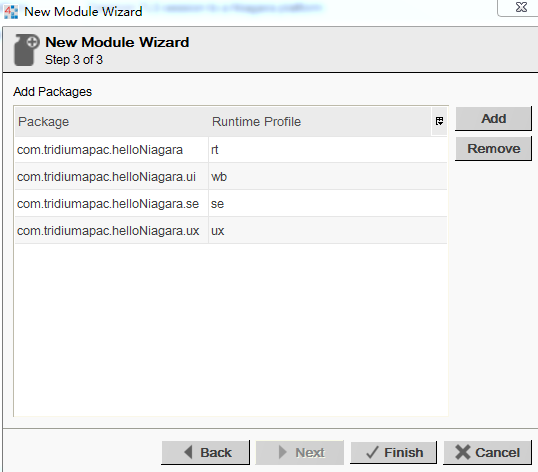
,添加上必要的描述信息之后,点击下一步,依次添加下面的模块,或者根据自己项目的需要添加模块 Alarm-rt \ bql-rt \ control-rt 等。一旦完成Module 之后,N4 Workbench 中显如图所示。
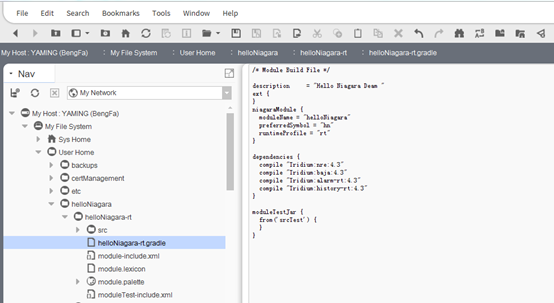
在使用控制台定位文件的时候,如果没有成功安装gradlew 会解释出错 ,可用这种方法创建一个新的 new N4 module ,除此之外还可以使用 IntelliJ IDE 来创建Module ,在N4 Workbench中可以使用CTL+L命令打开帮助系统 志气啊ORD中输入: local:|module://docDevelop/doc/build.thml .或者可以在控制台 中输入命令 gradlew task-all
帮助显示项目所有可以使用的命令。
:NiagaraIntelliJ-rt:tasks
------------------------------------------------------------
All tasks runnable from project :NiagaraIntelliJ-rt - Niagara IntelliJ module
------------------------------------------------------------
Build tasks
-----------
assemble - Assembles the outputs of this project.
build - Assembles and tests this project.
buildDependents - Assembles and tests this project and all projects that depend on it.
buildNeeded - Assembles and tests this project and all projects it depends on.
classes - Assembles main classes.
clean - Deletes the build directory.
combineJs - Combine many JavaScript files into one
gzipJs - GZip a given JavaScript file
jar - Assembles a jar archive containing the main classes.
minifyJs - Minify JavaScript using Closure Compiler
niagaraModuleTestClasses - Assembles niagara module test classes.
props2js - Convert Java properties files for use with JavaScript
requireJs - Run the r.js Optimizer to produce Require.js output
testClasses - Assembles test classes.
Documentation tasks
-------------------
javadoc - Generates Javadoc API documentation for the main source code.
jsdoc - Produce HTML documentation with JSDoc 3
Help tasks
----------
buildEnvironment - Displays all buildscript dependencies declared in project ':NiagaraIntelliJ-rt'.
components - Displays the components produced by project ':NiagaraIntelliJ-rt'. [incubating]
dependencies - Displays all dependencies declared in project ':NiagaraIntelliJ-rt'.
dependencyInsight - Displays the insight into a specific dependency in project ':NiagaraIntelliJ-rt'.
help - Displays a help message.
model - Displays the configuration model of project ':NiagaraIntelliJ-rt'. [incubating]
projects - Displays the sub-projects of project ':NiagaraIntelliJ-rt'.
properties - Displays the properties of project ':NiagaraIntelliJ-rt'.
tasks - Displays the tasks runnable from project ':NiagaraIntelliJ-rt'.
IDE tasks
---------
cleanEclipse - Cleans all Eclipse files.
cleanIdea - Cleans IDEA project files (IML, IPR)
eclipse - Generates all Eclipse files.
idea - Generates IDEA project files (IML, IPR, IWS)
Niagara tasks
-------------
compactProfileOption - Set the compact3 profile option on JavaCompile tasks if needed.
generateModuleTestModuleXml - Generate module.xml for a module test jar
generateModuleXml - Generate module.xml for a module
migrateSlotomatic - Migrate all old slot code in a module to new slot code
moduleTestJar - Build the Niagara test module
slotomatic - Run slotomatic on a module
Publishing tasks
----------------
publish - Publishes all publications produced by this project.
publishToMavenLocal - Publishes all Maven publications produced by this project to the local Maven cache.
Verification tasks
------------------
check - Runs all checks.
jshint - Analyze JavaScript sources with JSHint
test - Runs the unit tests.
Other tasks
-----------
generateBajadoc
javadocJar - Assemble javadoc jar for Niagara module
Rules
-----
Pattern: clean<TaskName>: Cleans the output files of a task.
Pattern: build<ConfigurationName>: Assembles the artifacts of a configuration.
Pattern: upload<ConfigurationName>: Assembles and uploads the artifacts belonging to a configuration.
To see all tasks and more detail, run gradlew tasks --all
To see more detail about a task, run gradlew help --task <task>
BUILD SUCCESSFUL
Total time: 6.078 secs
现在将Workbench中的模块导入到IntelliJ IDE 中进行开发。

首先设置系统变量 —— Niagara_Home 对于导入IntelliJ 很重要。

在 IntelliJ IDE 中直接打开 .gradle文件 ,这回自动创建一个新的项目,包含符合.gradle 文件依赖。 同时使用gradle 的File菜单打开项目 new –[Module from Existing …..]
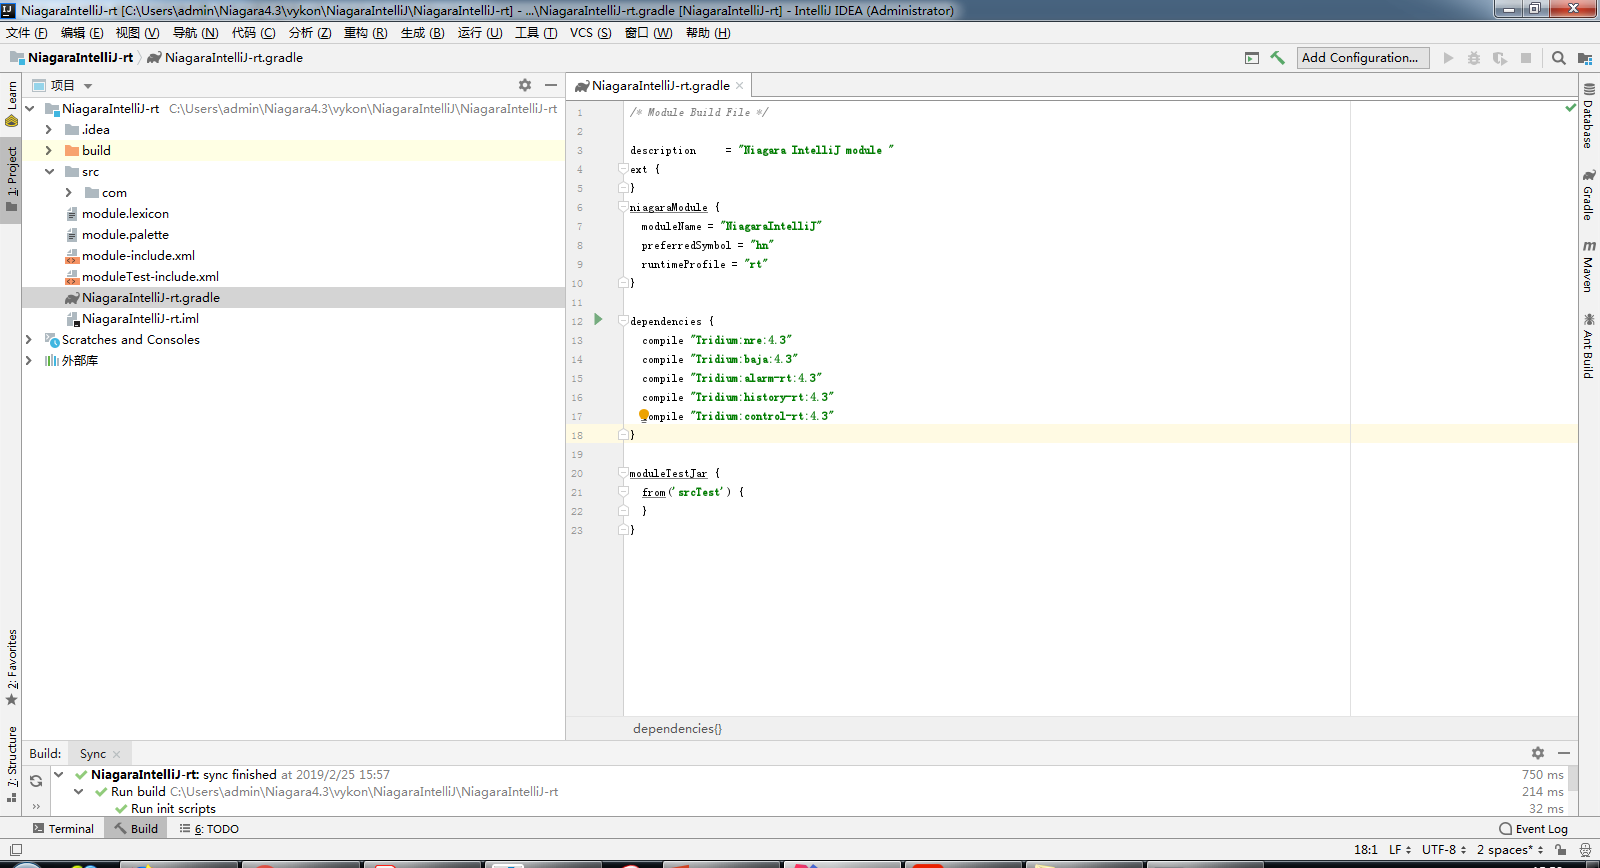
之后进行模块的开发
编译module的另一种方法是,在IDE中使用 gradlew plug-in 或者是哦用控制台命令
View—Gradle 然后在 gradle侧边栏运行biuld命令: gradlew build (同样 下面显示错误的信息 ,因为没有安装上gradle)

3、在 IntelliJ 开发Niagara4中导入的模块和组件
4、一个Niagara系统中存在四中典型的Programs 这些程序之间的关系及其网络通讯关系可以通过下面的图来说明
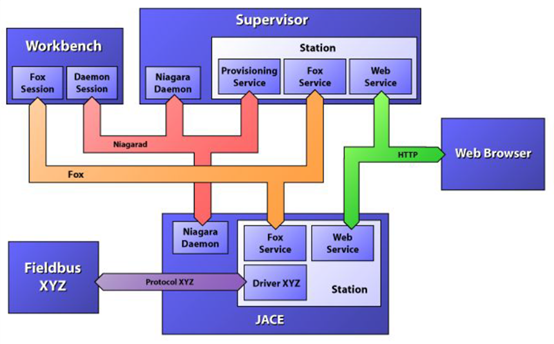
对上面出现的一些关键术语解释如下:
Jace (jace Application Control engine “java 程序控制引擎)他用来描述 一种无显示器的嵌入式平台,通常一个jace 都运行在一个Flash文件系统上并提供后背电池组。Jace通常承载一个Daemon和一个Station ,Jace 不承载Workbench,Jace通常运行QNX(一种商用的实时操作系统)或者WindowsXP嵌入版作为他的操作系统 。
Supervisor 使用与运行一个Station的工作站或者服务器,Supervisor特指为其他无历史或者警报集合的Station提供Station机器,Superisor必须行一个Station,但是可能同时运行Workbench或Daemon
Station Niagara 系统的架构是围绕着“以组件(Component)为向导的编程,为核心的设计的,组件的Component是使用Java编写,打包,和部署为模块(modules)的自包含单位,多个组件通过连线构成一个应用(application)并运行与Station上。

一个Niagara 的Station应用,会被存储在名为config.bog 的XML文件中,这个Config.cog文件包含了一个组件以及其属性的树状结构中,并且记录了他们之间如何使用连接(link)来彼此连接,Station的数据库可以使用下面机制中的一种创建。
第一 使用 Workbench的图形编程工具在Station在线是即时编辑,
第二 使用Workbench的图形编程工具离线编辑
第三 预定义变在站点创建的时候安装,
第四 本地程序自动生成, 也就是使用外部编辑器编译程序的模块
Daemon 的守护进程使用本地代码写成没有使用 java , 在操作系统上由守护进程引导并管理的Niagara平台,具体有一下功能: 安装并备份站点的数据。启动和监视数据,配置TCP/IP 。安装并升级操作系统(只针对QNX)安装并升级JavaVM ,安装并升级Niagara 软件。安装本地字典管理并授权码(license),在workbench中访问Daemon,必须使用 Open platform 命令来启动一个平台会话连接远程的客户端的Daemon,或者在workbench的控制台上使用命令 plat.exe 来运行,可以获取更多的命令。
Fox 通讯协议是Niagara自己的协议,
FOX 是一种基于TCP协议的多通道复用点对点的通讯协议,FOX通讯协议的默认端口号是1911 ,他的特性包括:
基于 TCP的Socket 通讯,摘要是验证方式 、请求应答方式通讯, 支持异步时间,基于流(streamin)模式,通过频道切换多路复用技术可以实现多应用的同时运行。使用字符码发送帧信息,方便调试。 统一的信息语法格式。高性能,使用java实现协议栈。
在niagara 中有很多已经被挤在的API可以使用,编写一个API理解关键你、概念: 一是 稳定性,二是 Baja 和Tridium 公开的API会放在java.baja ,执行特殊的代码会放在com.tridium 中


