
java从入门到精通
1. 进制转换
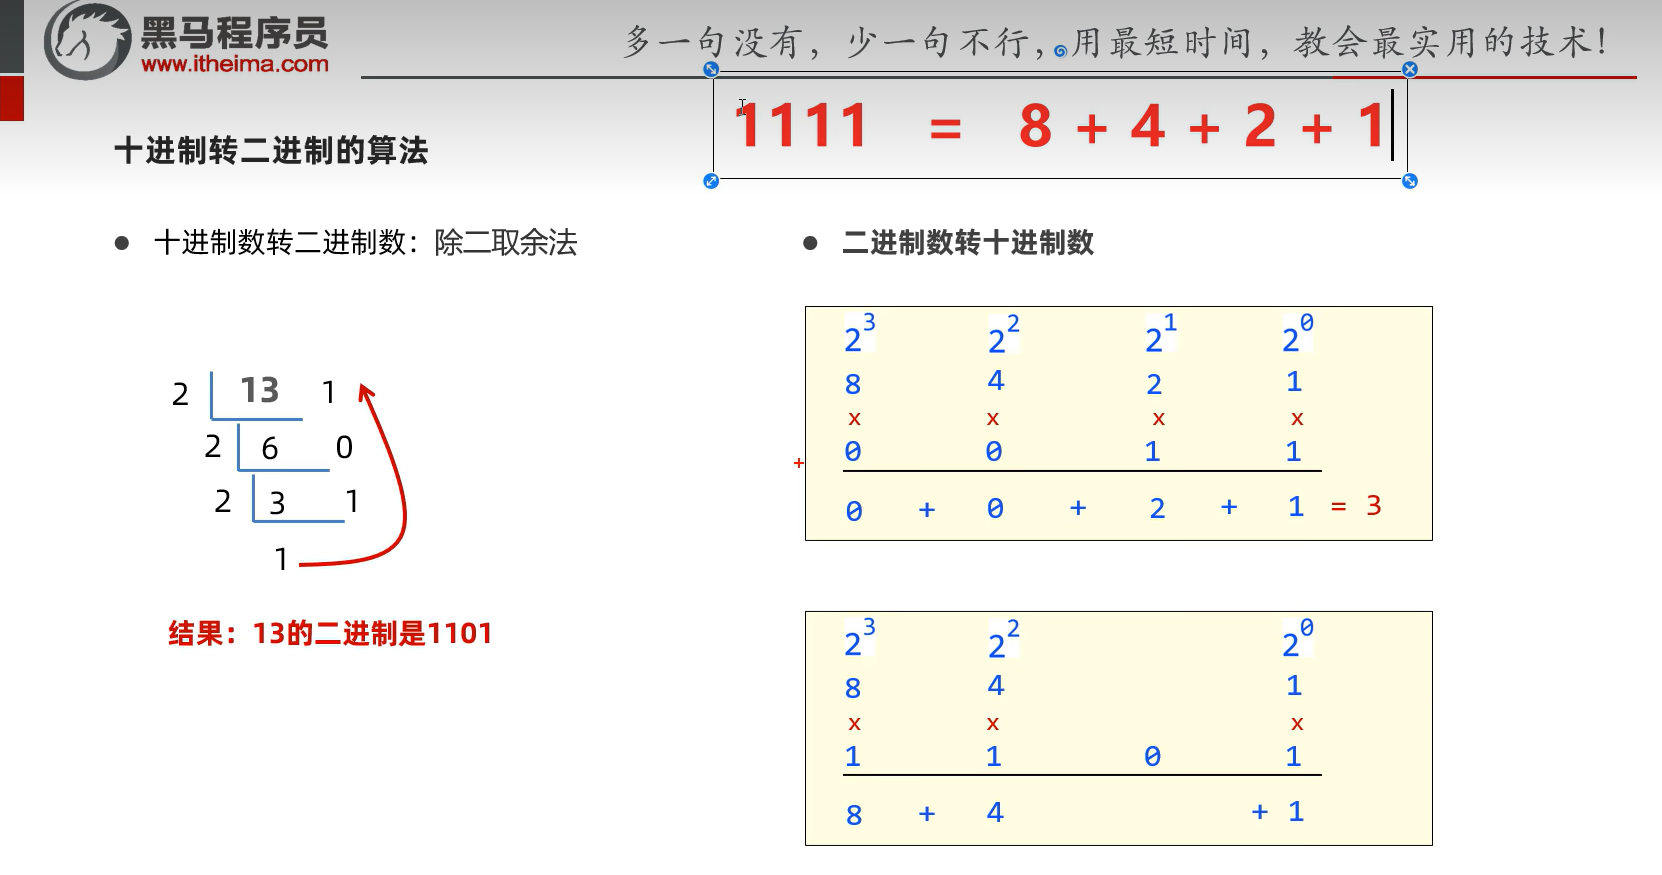
1.1 二进制和十进制
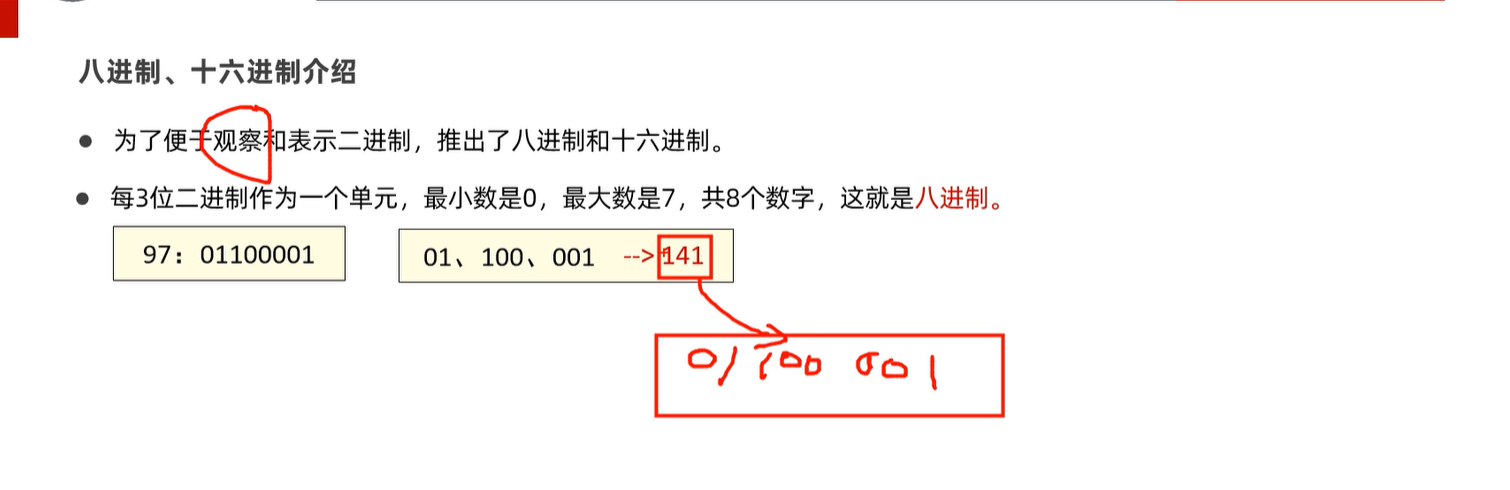
1.2 八进制
package com.itheima.variable;

public class ASCIIDemo1 {
    public static void main(String[] args) {
        // 目标:掌握ASCII编码表的编码特点。
        System.out.println('a' + 10); // 97 + 10 = 107
        System.out.println('A' + 10); // 65 + 10 = 75
        System.out.println('0' + 10); // 48 + 10 = 58

        // 二进制 八进制 十六进制在程序中的写法。
        int a1 = 0B01100001;
        System.out.println(a1); //97

        int a2 = 0141;  // 0开头的数据当成八进制看待!
        System.out.println(a2); //97

        int a3 = 0XFA;  // 0X开头的数据是十六进制
        System.out.println(a3);
    }
}
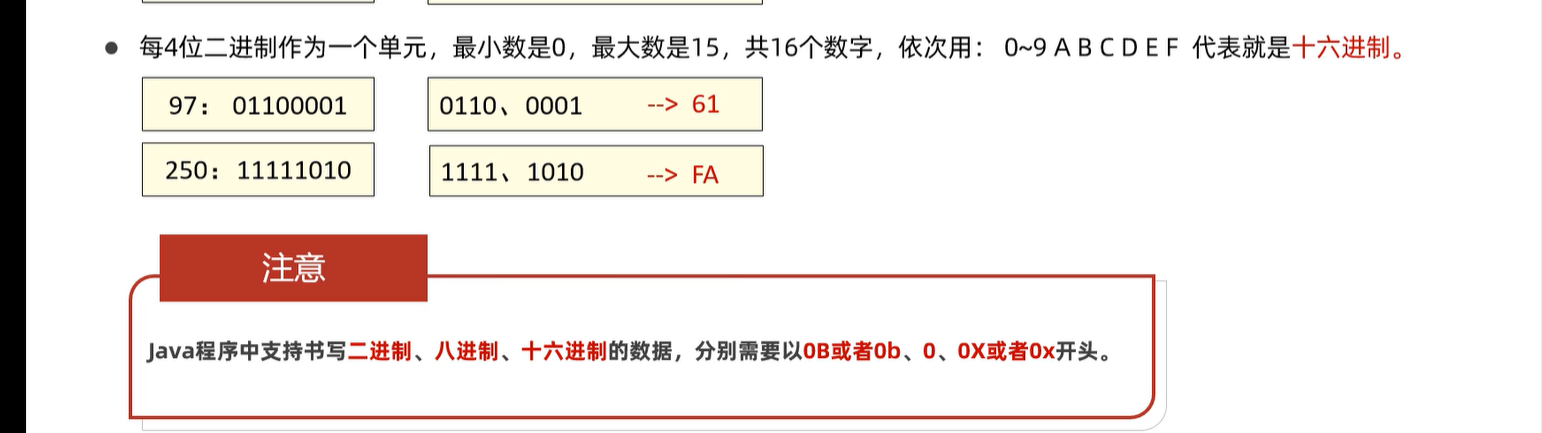
1.3 十六进制
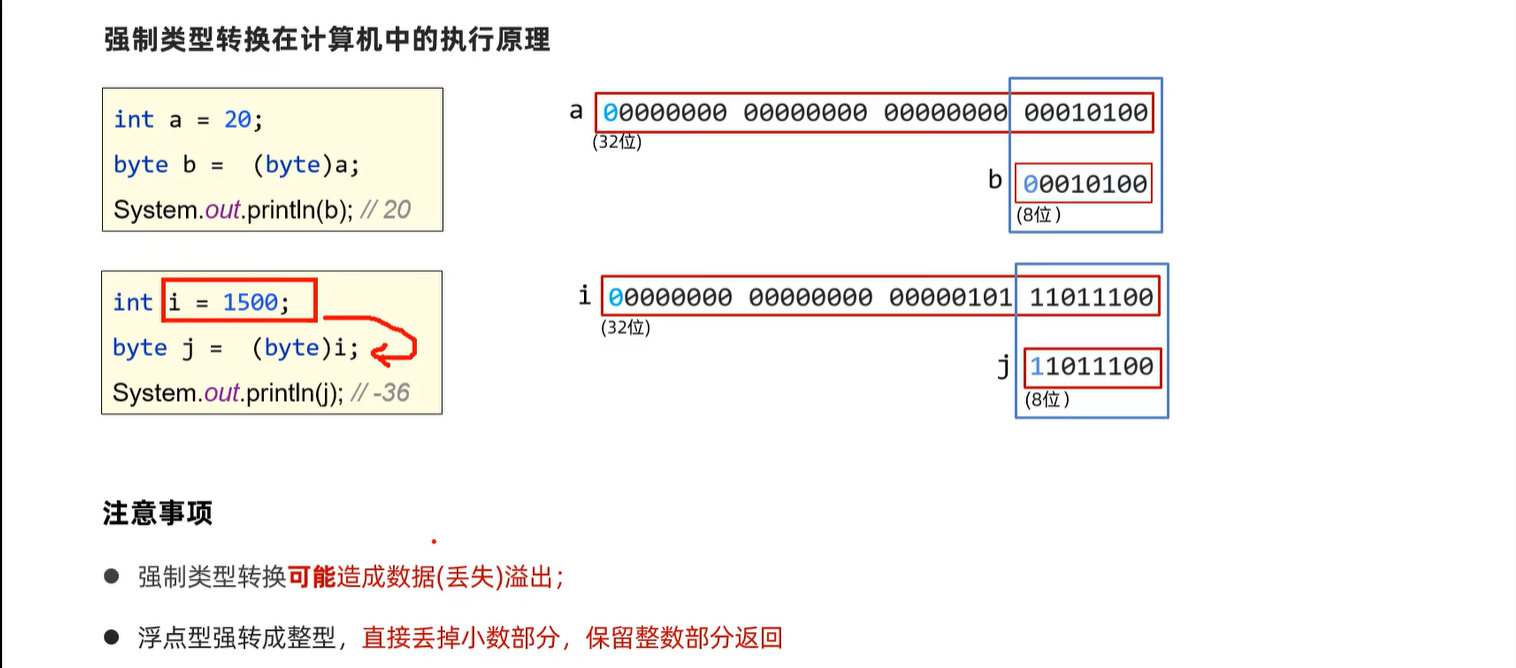
2. 类型及转换
2.1 基本数据类型
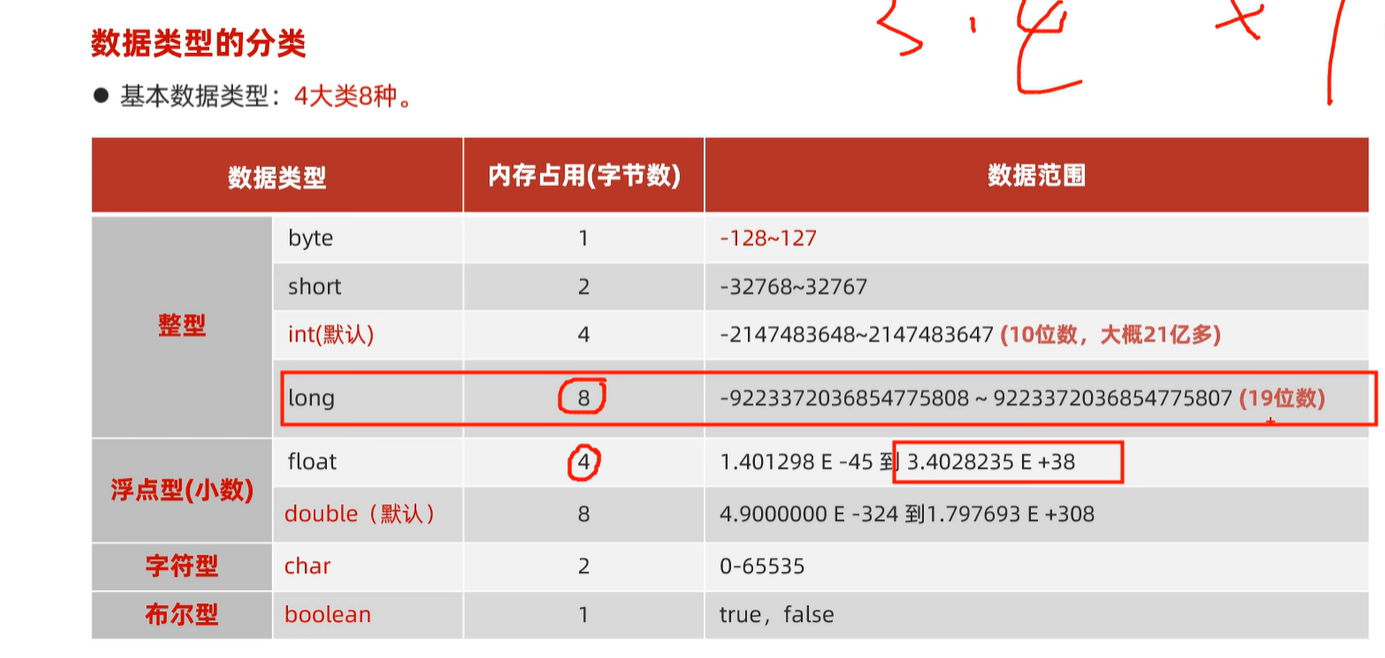
1字节等于8位(2进制)
2.2 自动类型转换

package com.itheima.type;

public class TypeConversionDemo1 {
    public static void main(String[] args) {
        // 目标:理解自动类型转换机制。
        byte a = 12;
        int b = a; // 发生了自动类型转换了
        System.out.println(a);
        System.out.println(b);

        int c = 100; // 4
        double d = c;// 8 发生了自动类型转换了
        System.out.println(d);

        char ch = 'a'; // 'a' 97 => 00000000 01100001
        int i = ch; // 发生了自动类型转换了 =>  00000000 00000000  00000000 01100001
        System.out.println(i); //97
    }
}
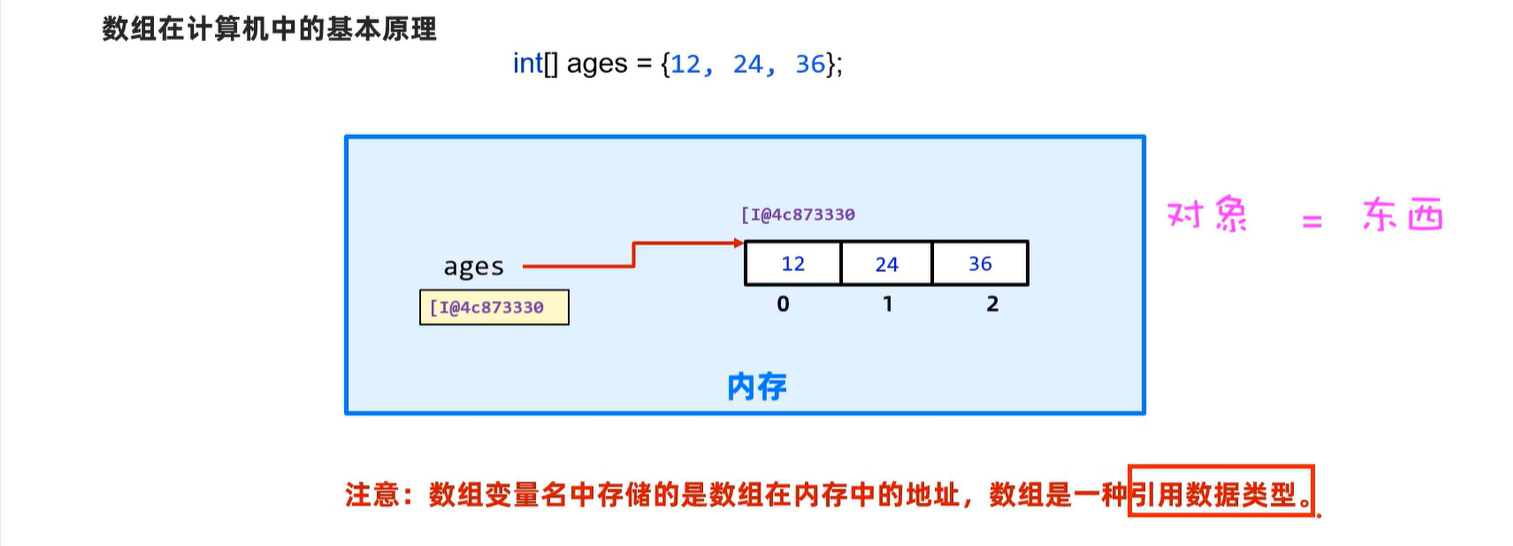
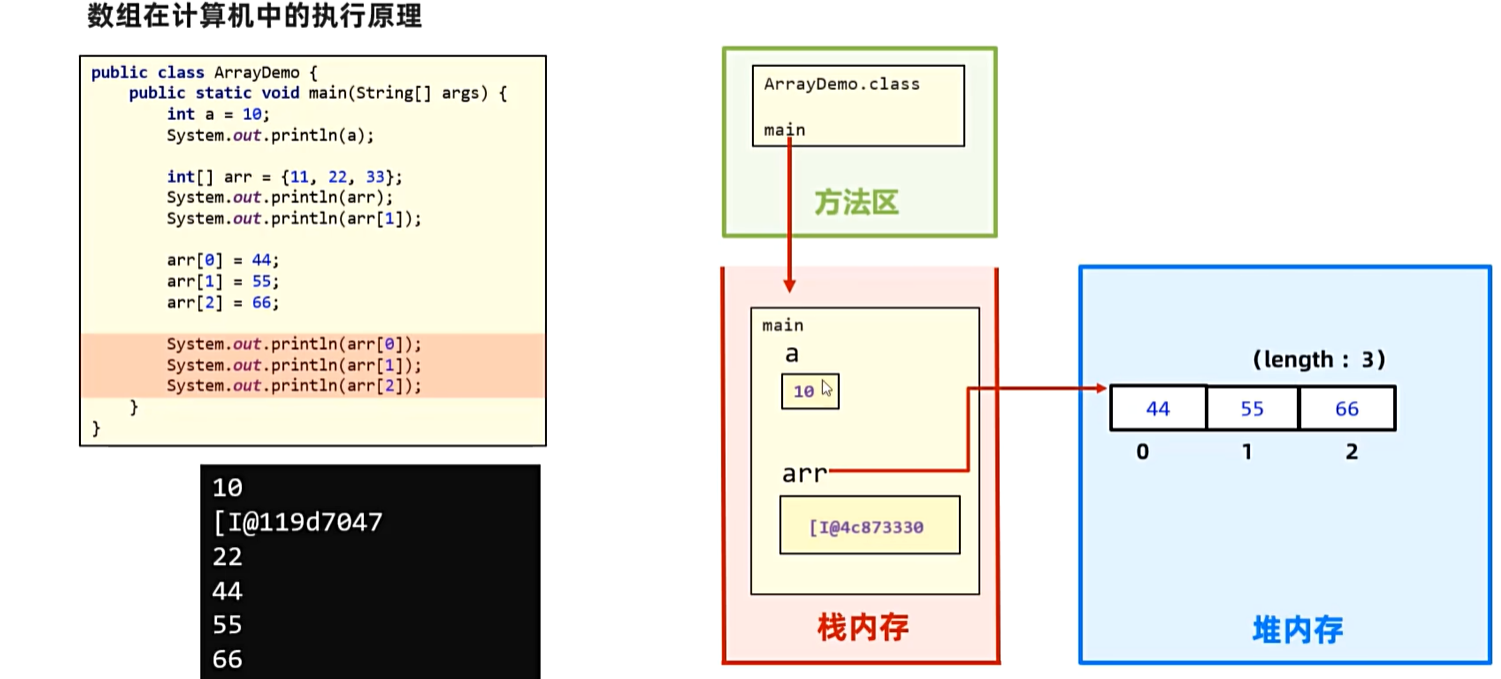
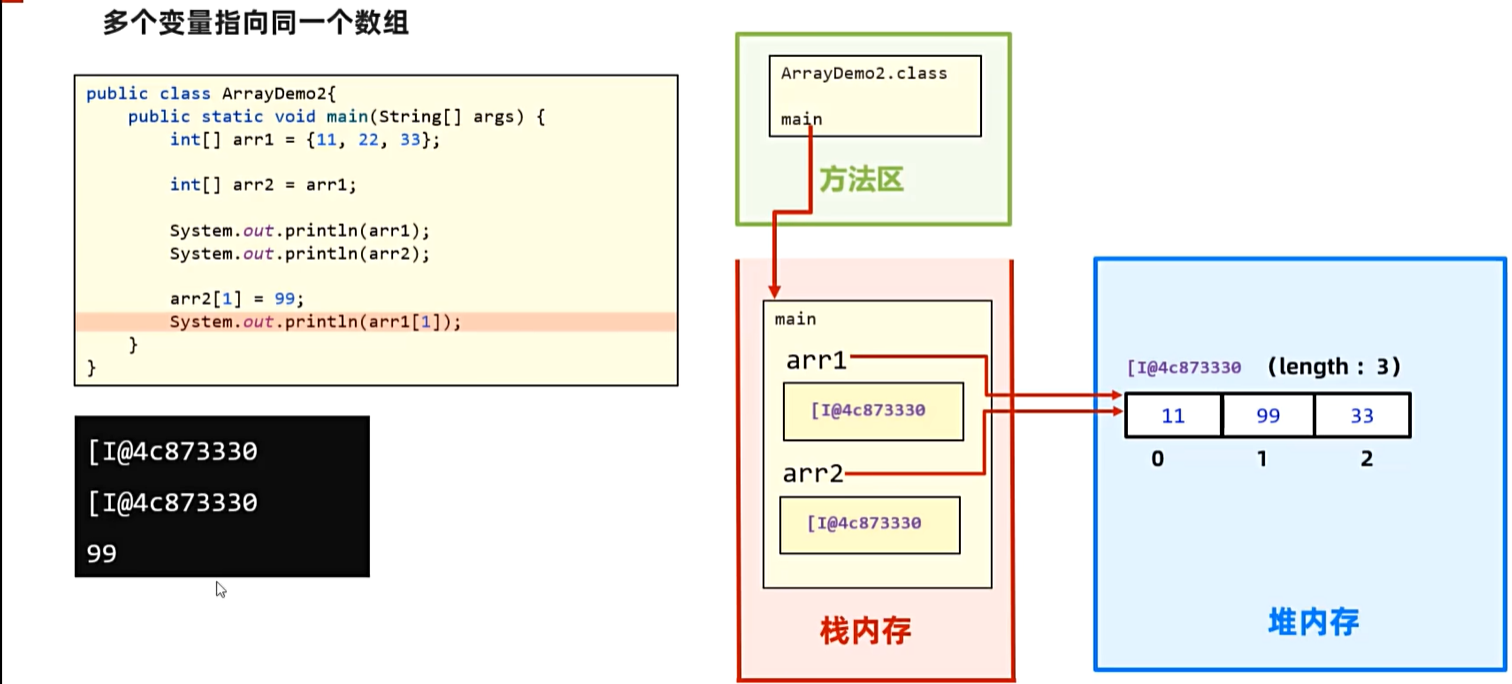
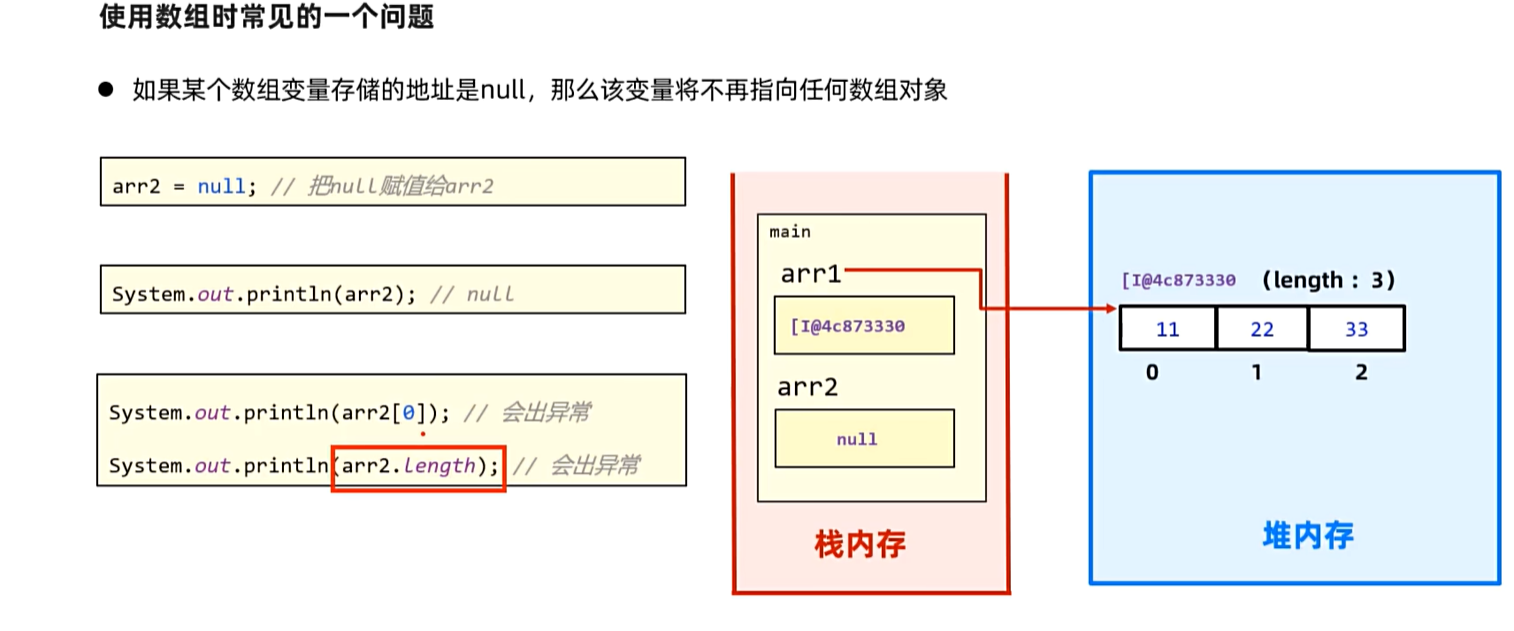
3. 数组
3.1数组在内存中的执行原理
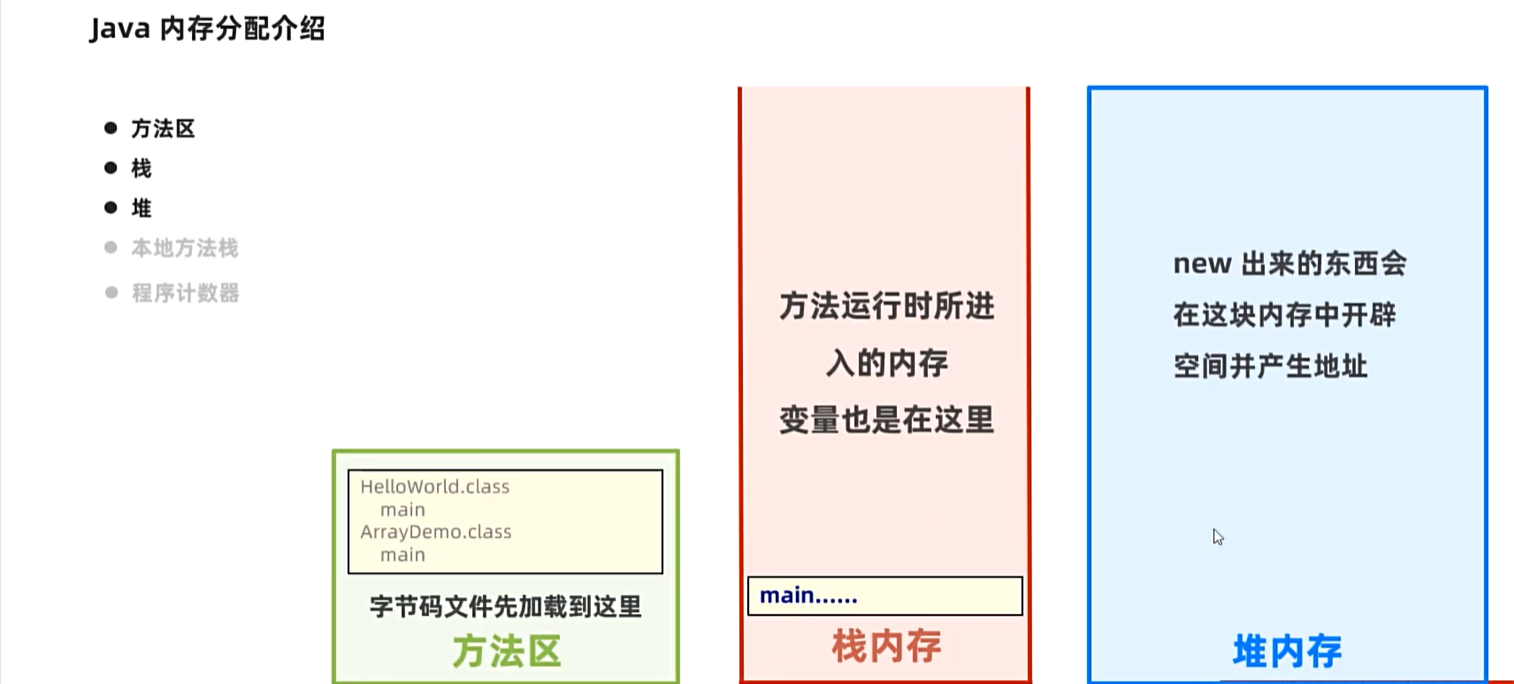
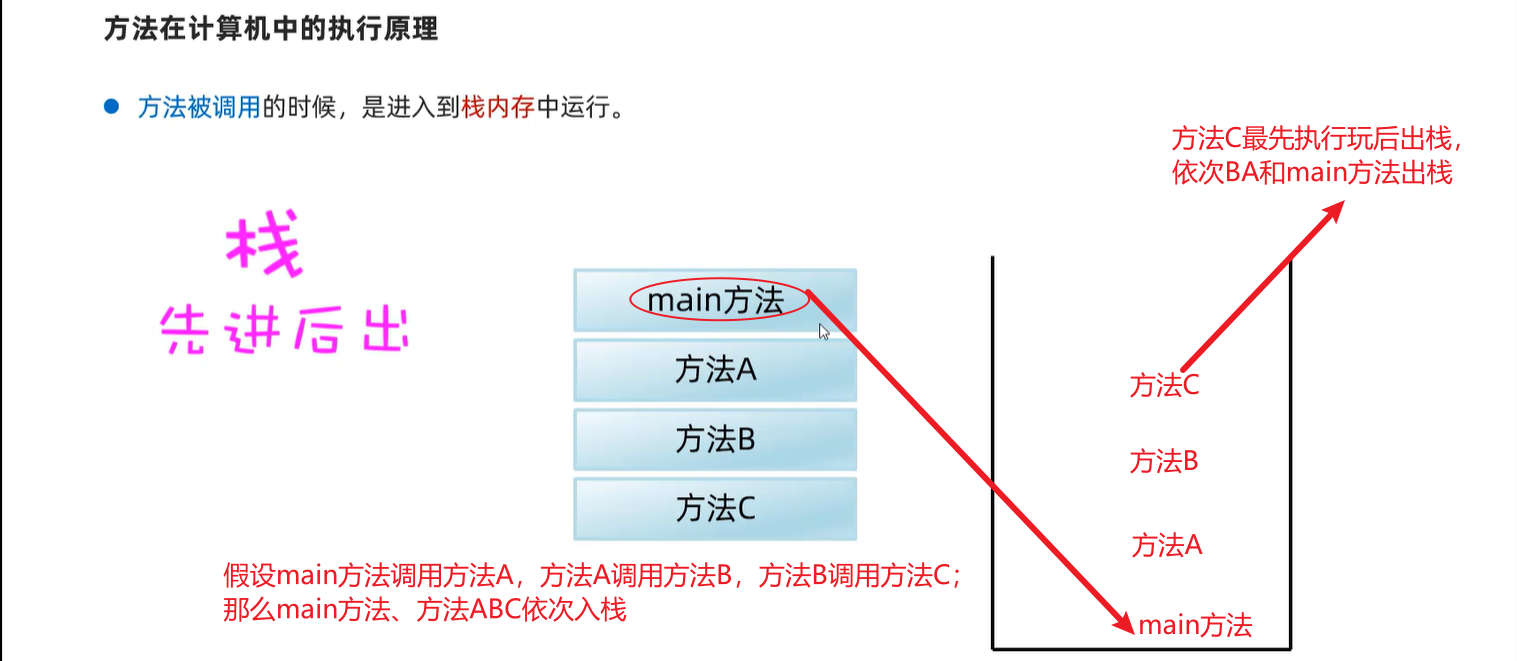
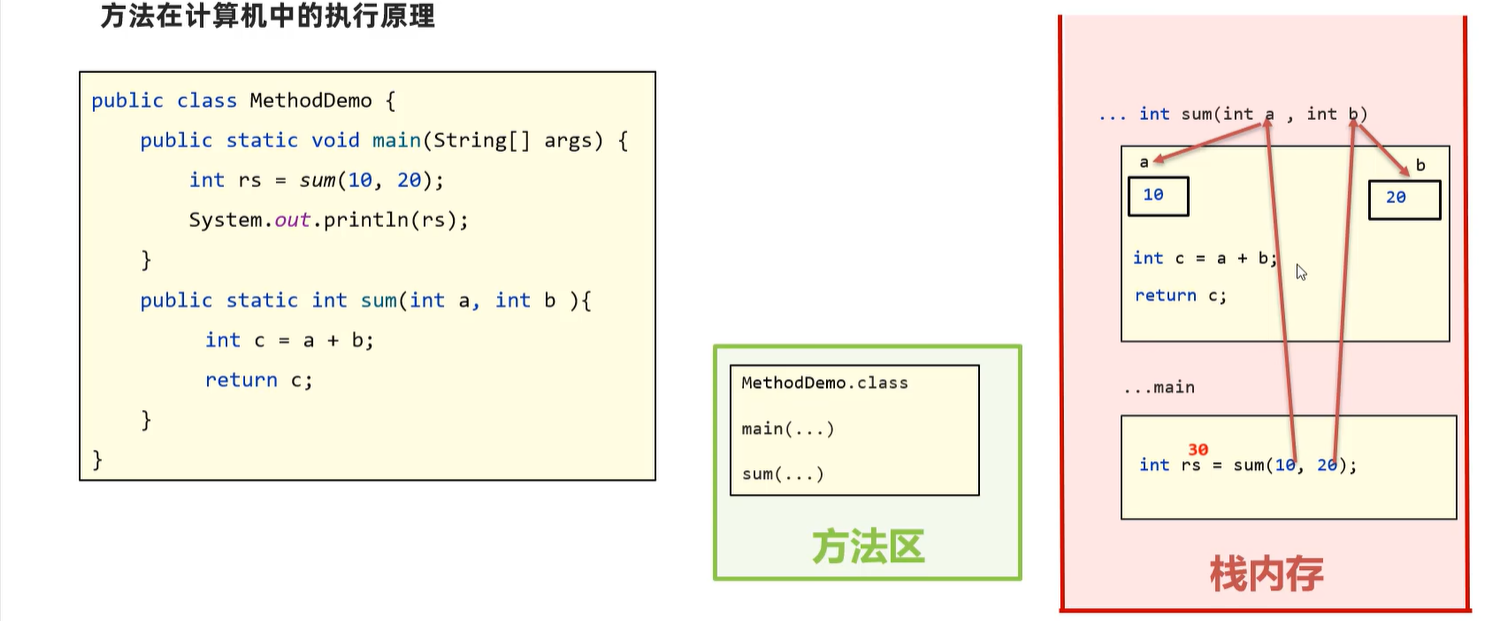
4. 方法
4.1在内存中的执行原理
4.2 java中的方法传递
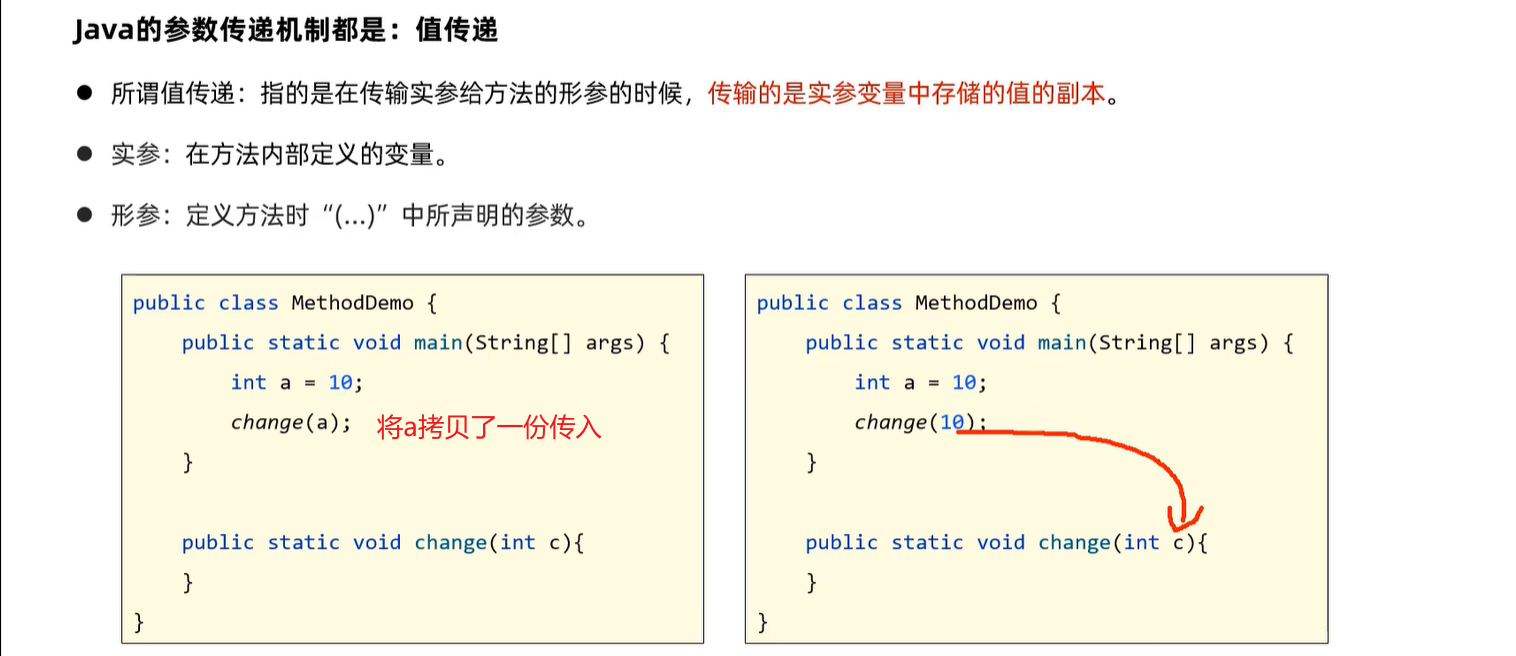
4.2.1 基本数据类型传递
package com.itheima.parameter;

public class MethodDemo1 {
    public static void main(String[] args) {
        // 目标:理解方法的参数传递机制:值传递。
        int a = 10;
        change(a); // change(10);
        System.out.println("main:" + a); // 10
    }

    public static void change(int a){
        System.out.println("change1:" + a); // 10
        a = 20;
        System.out.println("change2:" + a); // 20
    }
}
4.2.2 引用数据类型传递
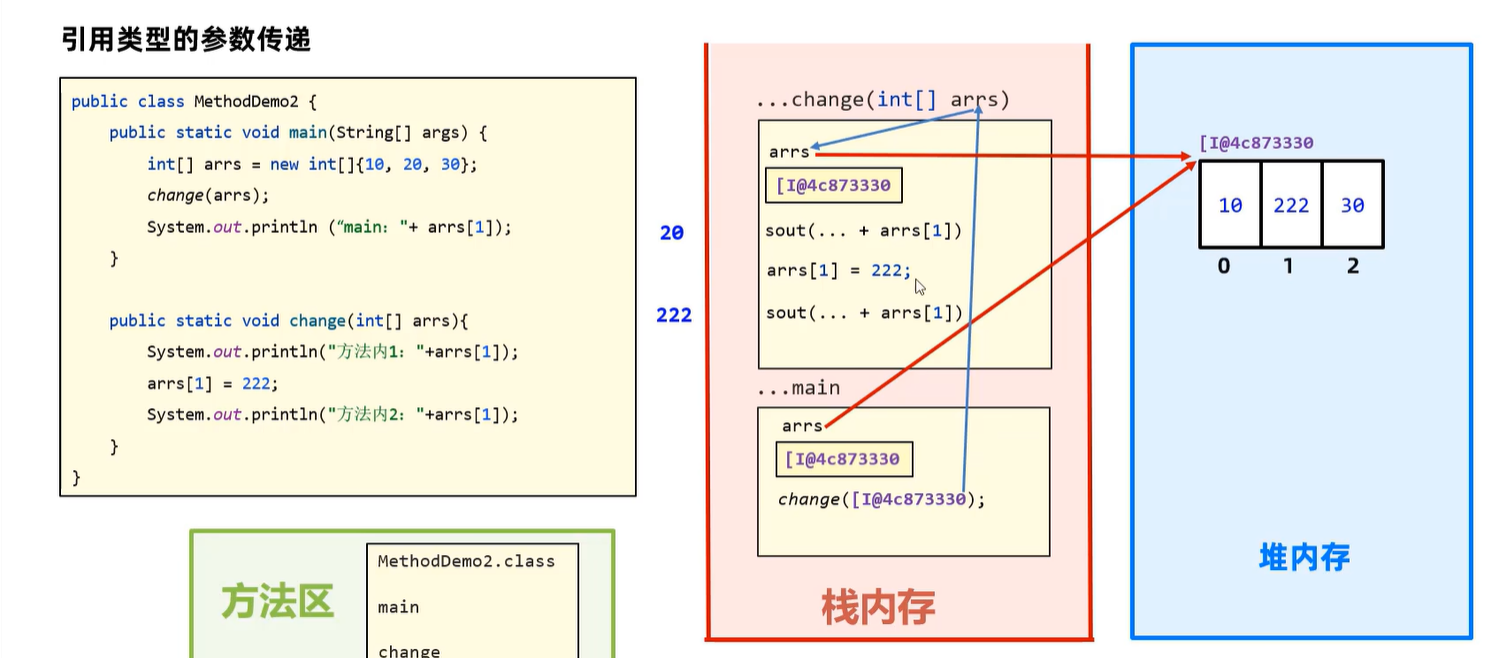
package com.itheima.parameter;

public class MethodDemo2 {
    public static void main(String[] args) {
        // 目标:理解引用类型的参数传递机制:值传递的。
        int[] arrs = new int[]{10, 20, 30};
        change(arrs);
        System.out.println("main:" + arrs[1]); //222
    }

    public static void change(int[] arrs){
        System.out.println("方法内1:" + arrs[1]); //20
        arrs[1] = 222;
        System.out.println("方法内2:" + arrs[1]); //222
    }
}
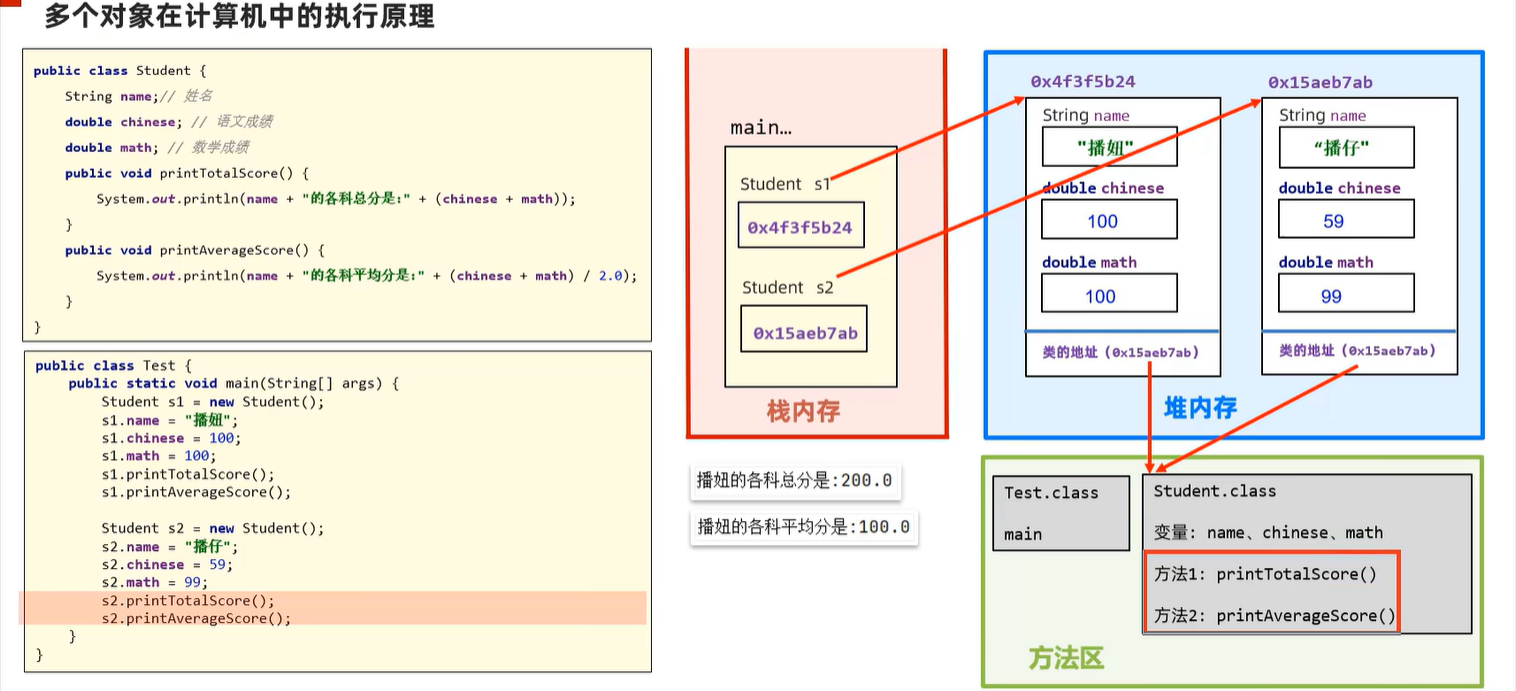
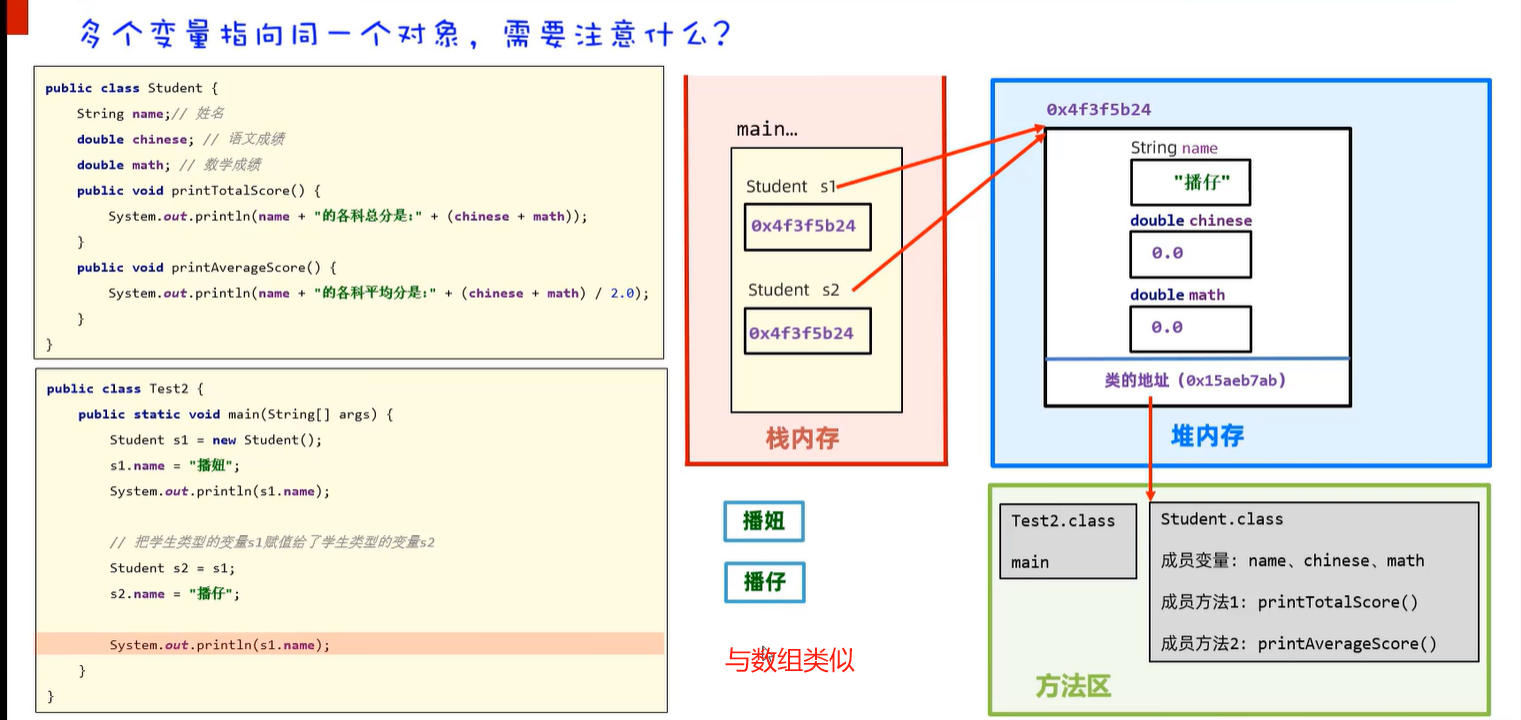
5. 对象
5.1 对象在内存中的执行原理
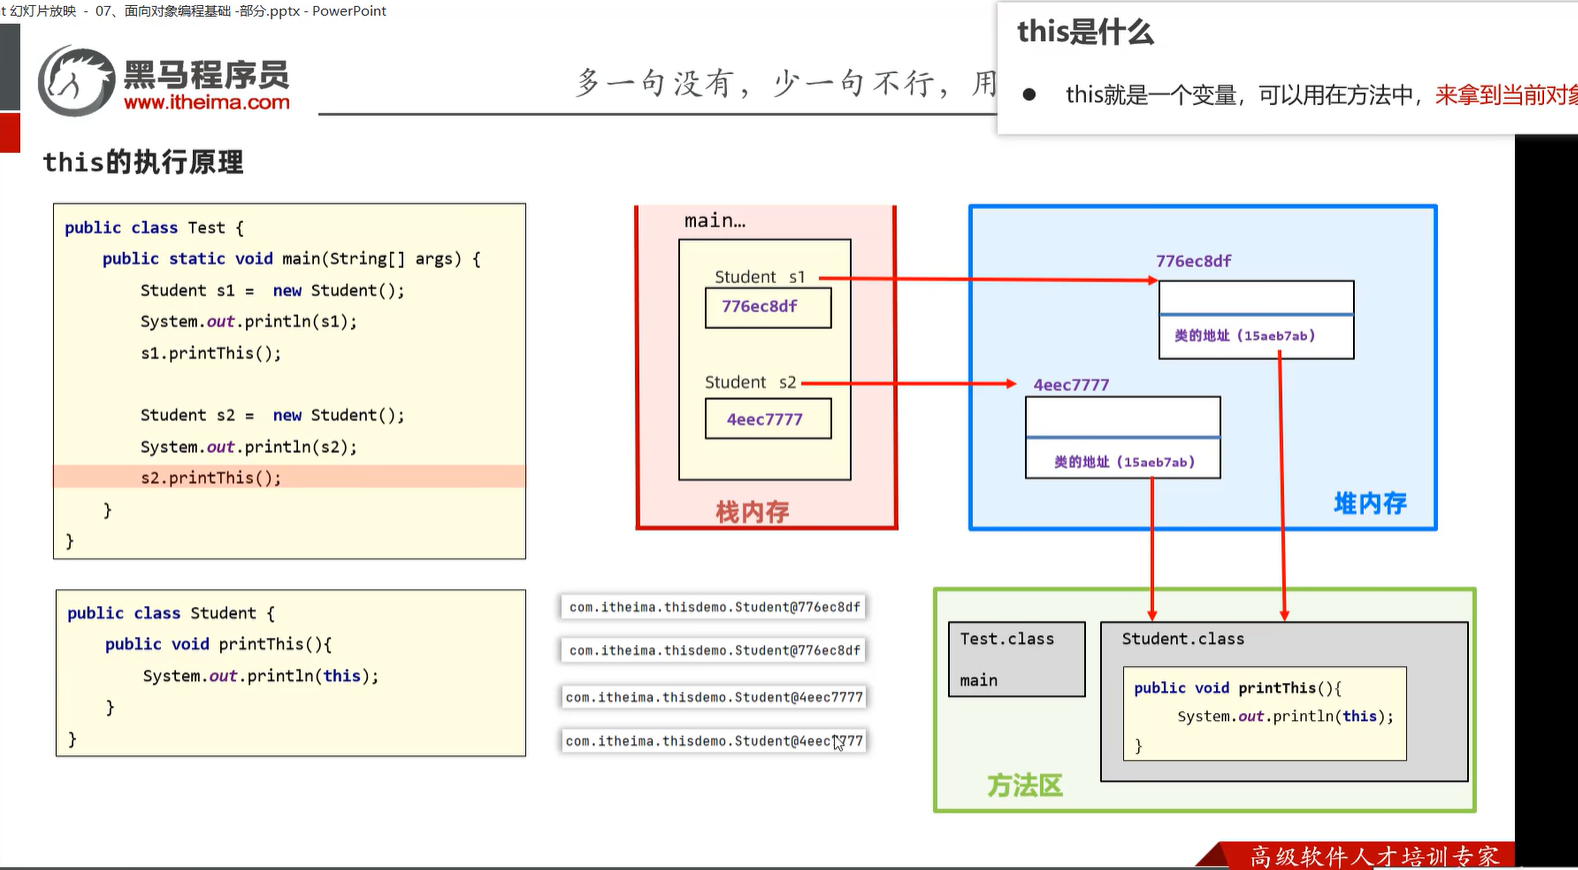
5.2 this的执行原理
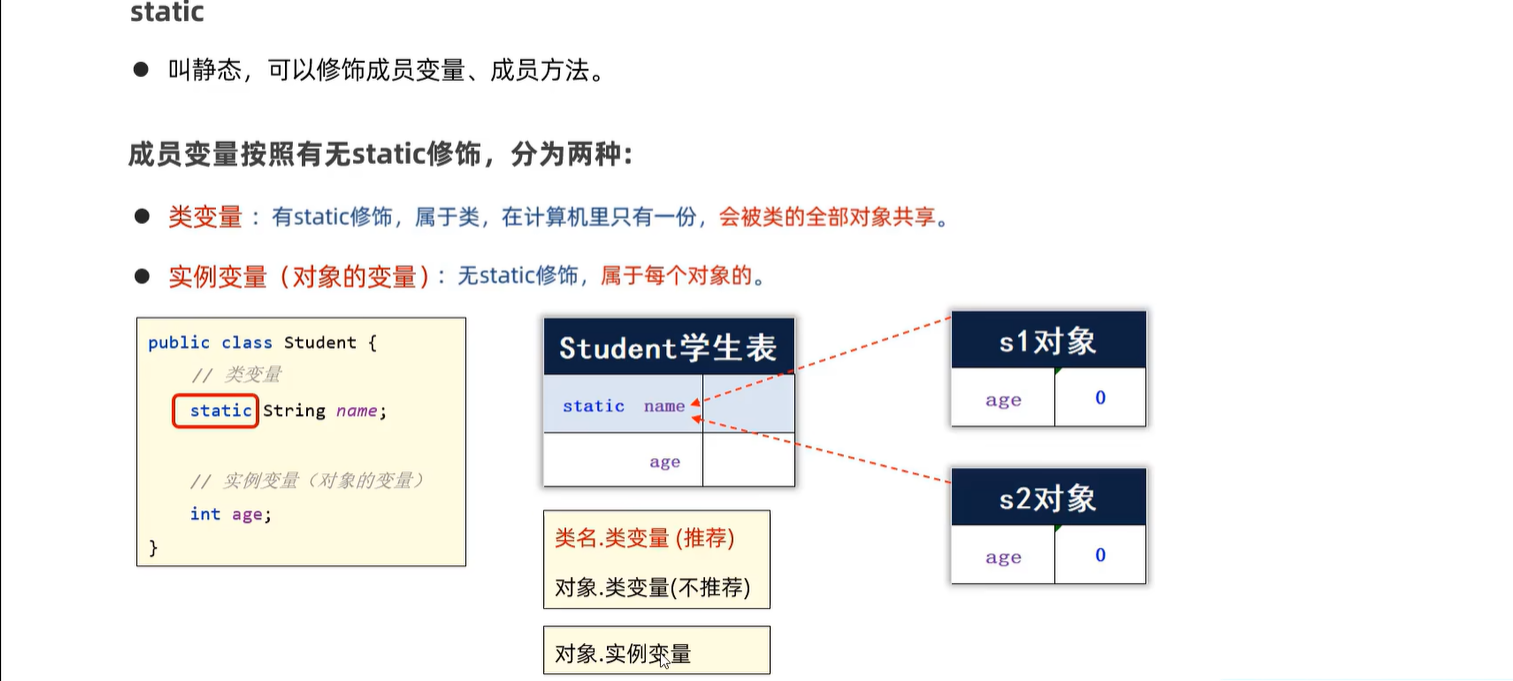
5.3 static的用法
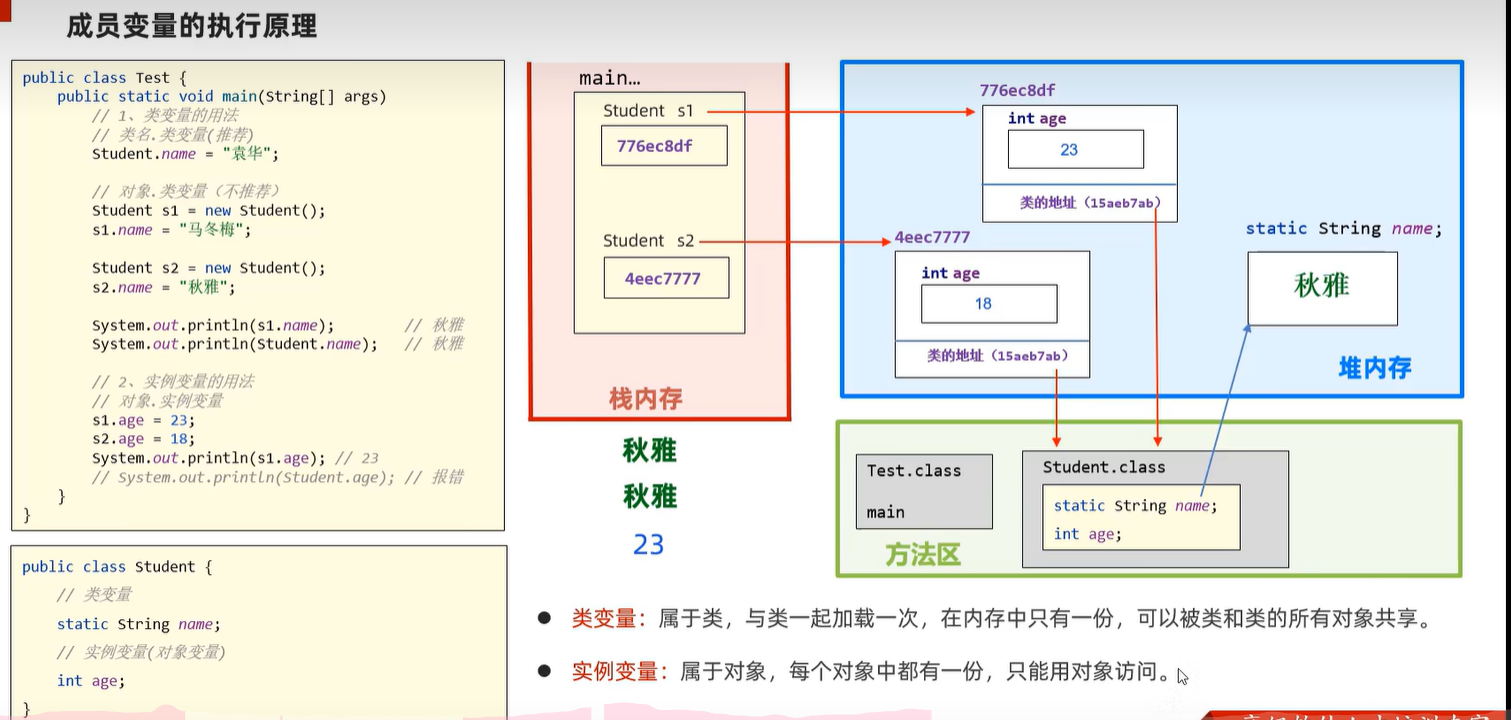
5.4 成员变量的执行原理
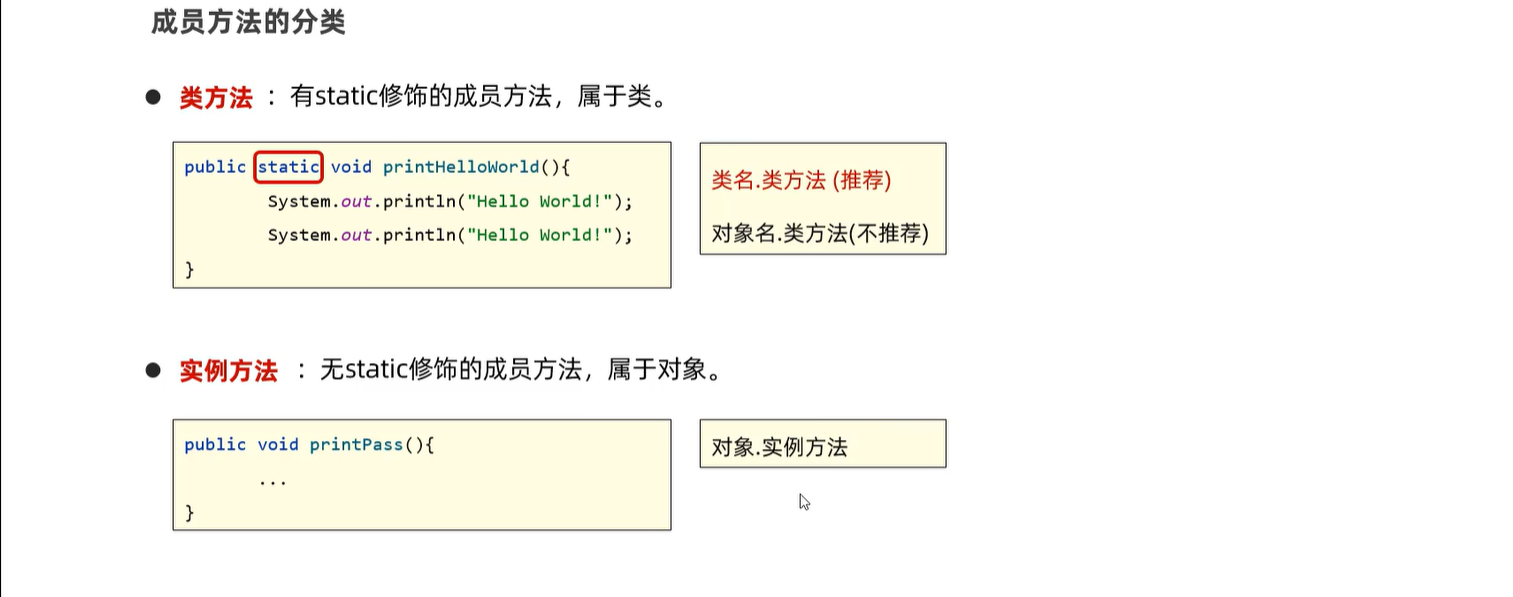
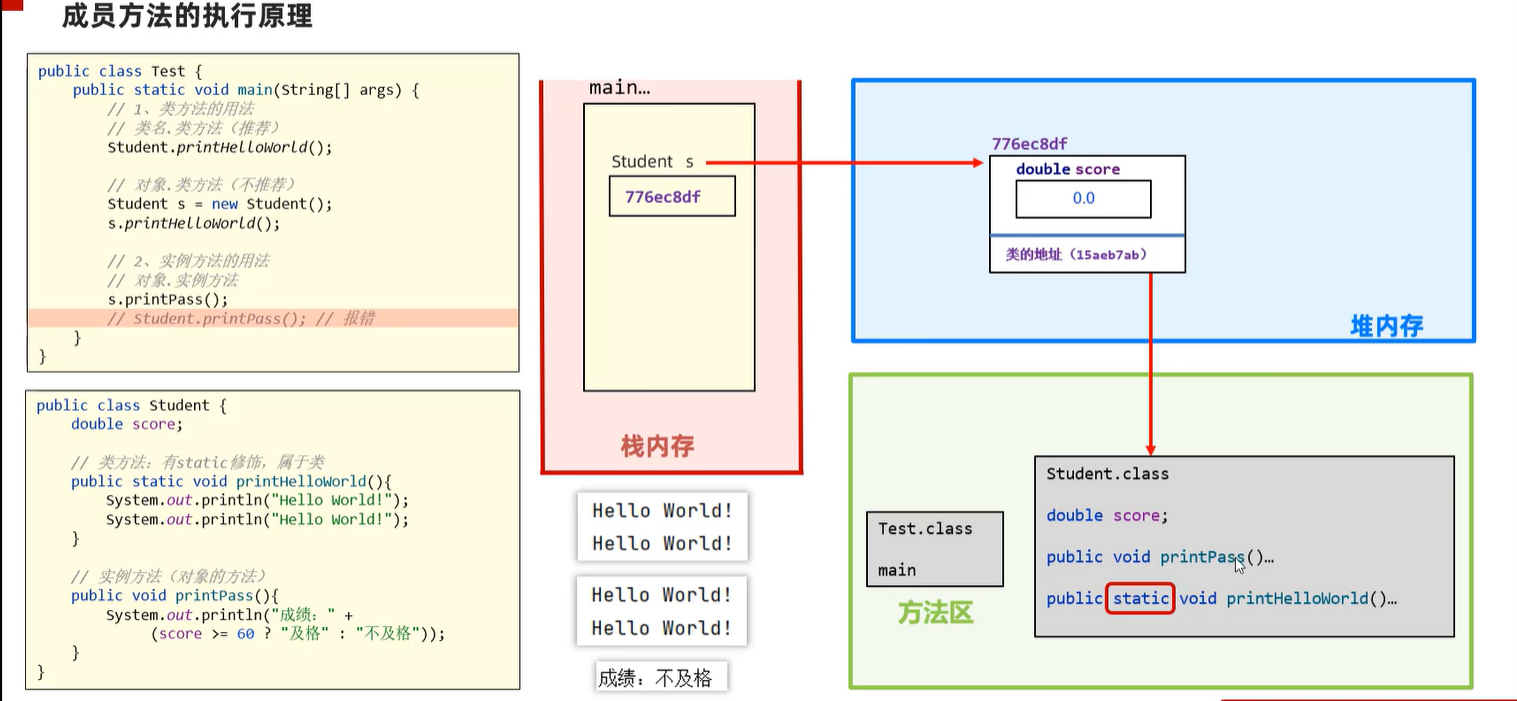
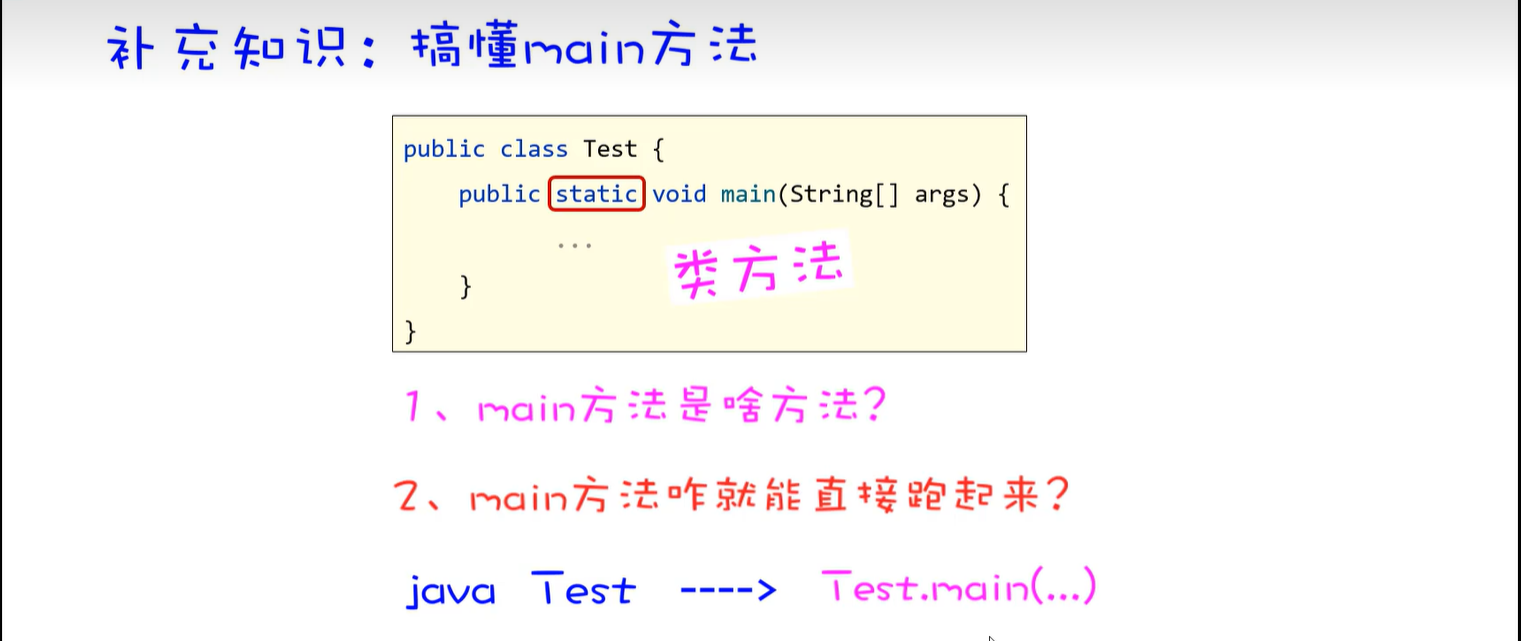
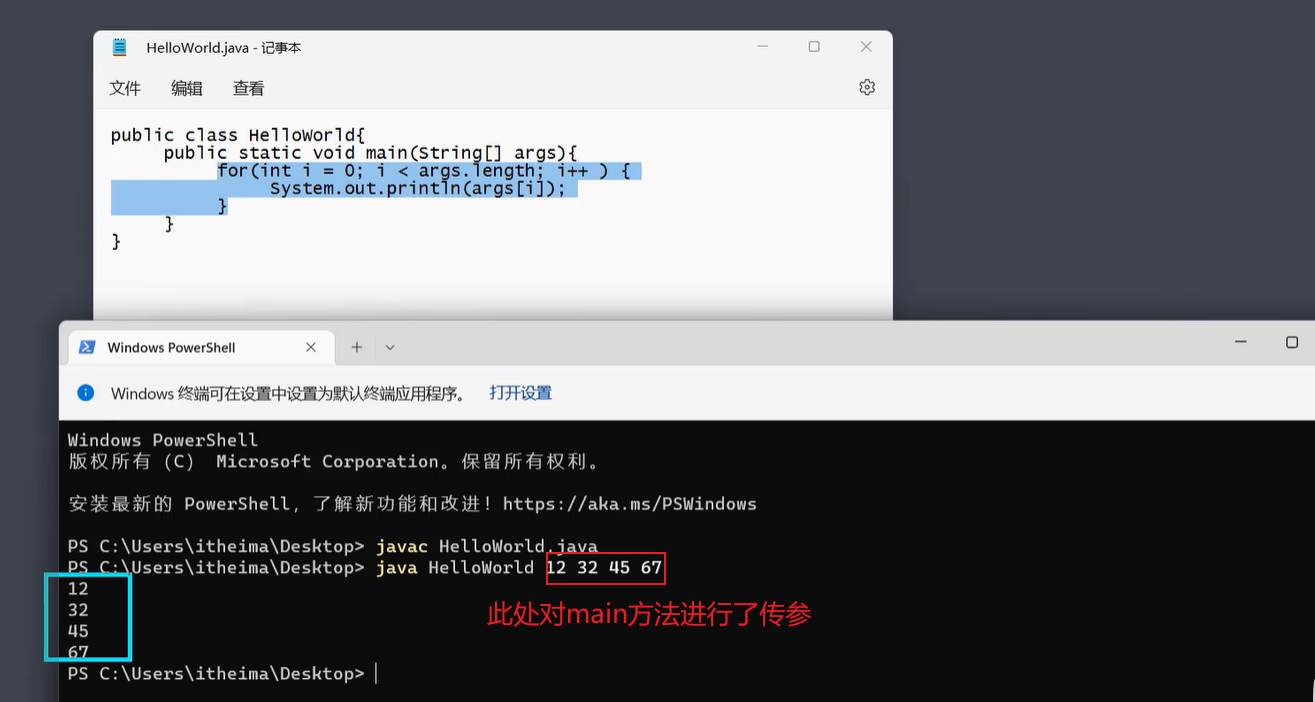
5.5 成员方法
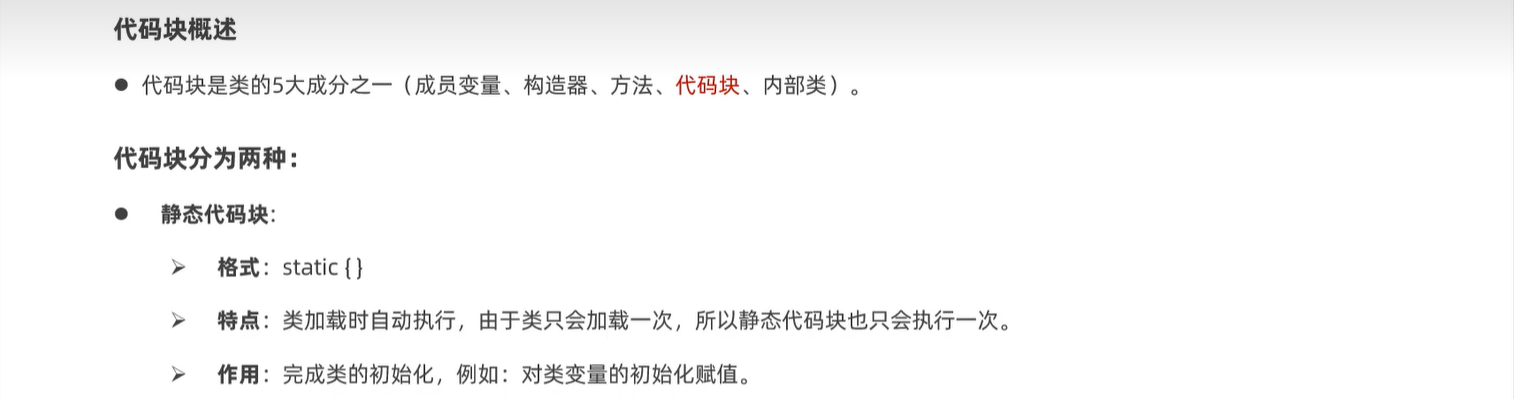
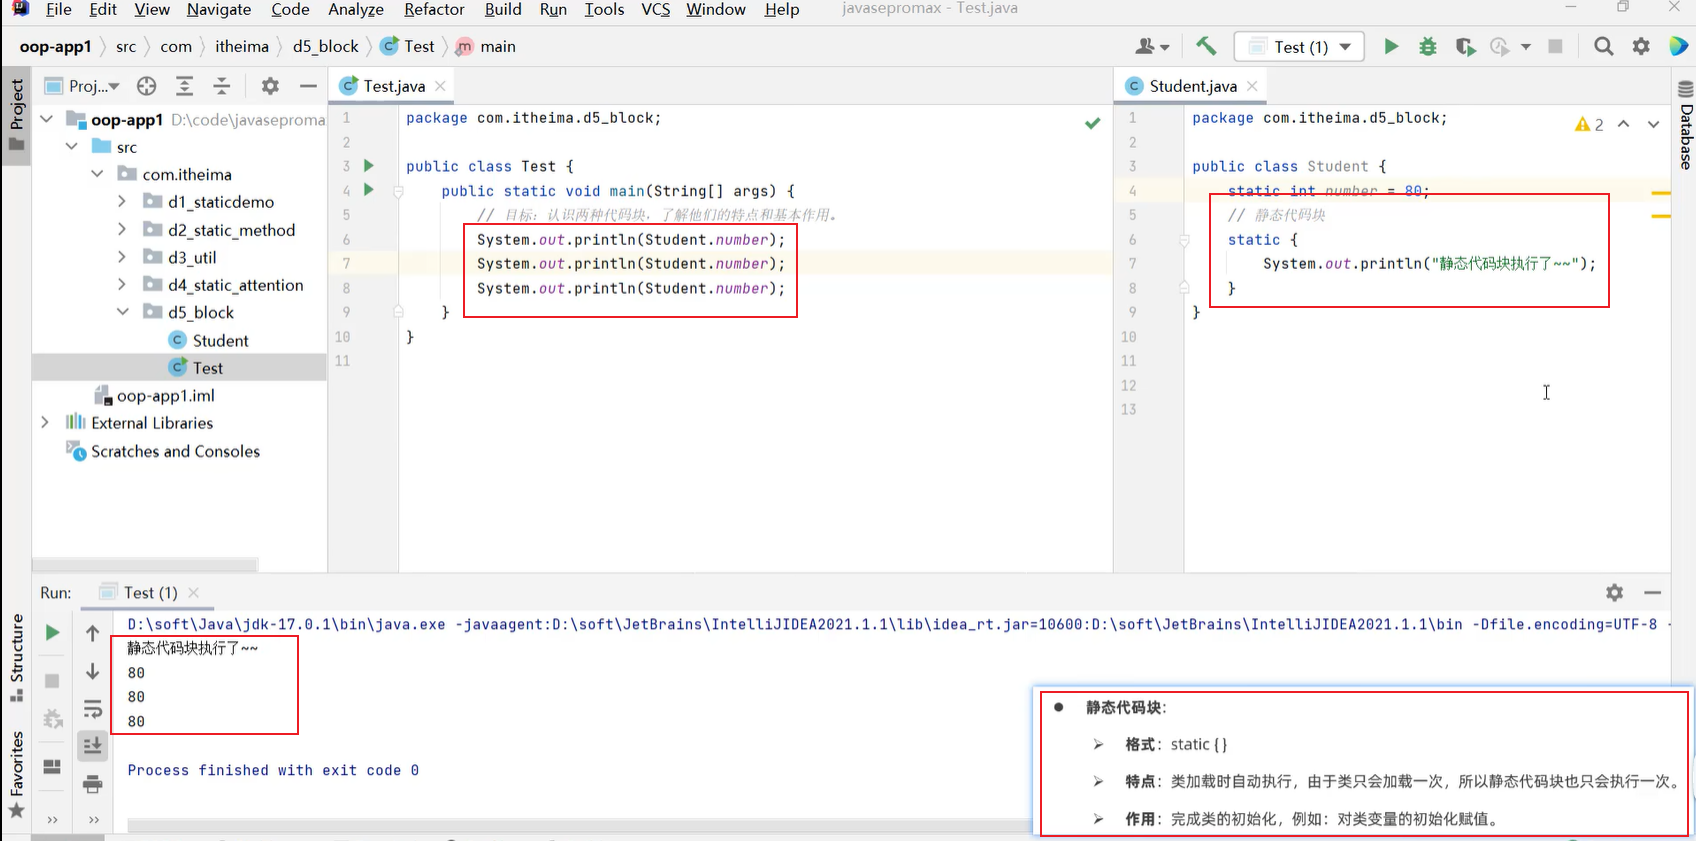
5.6 静态代码块
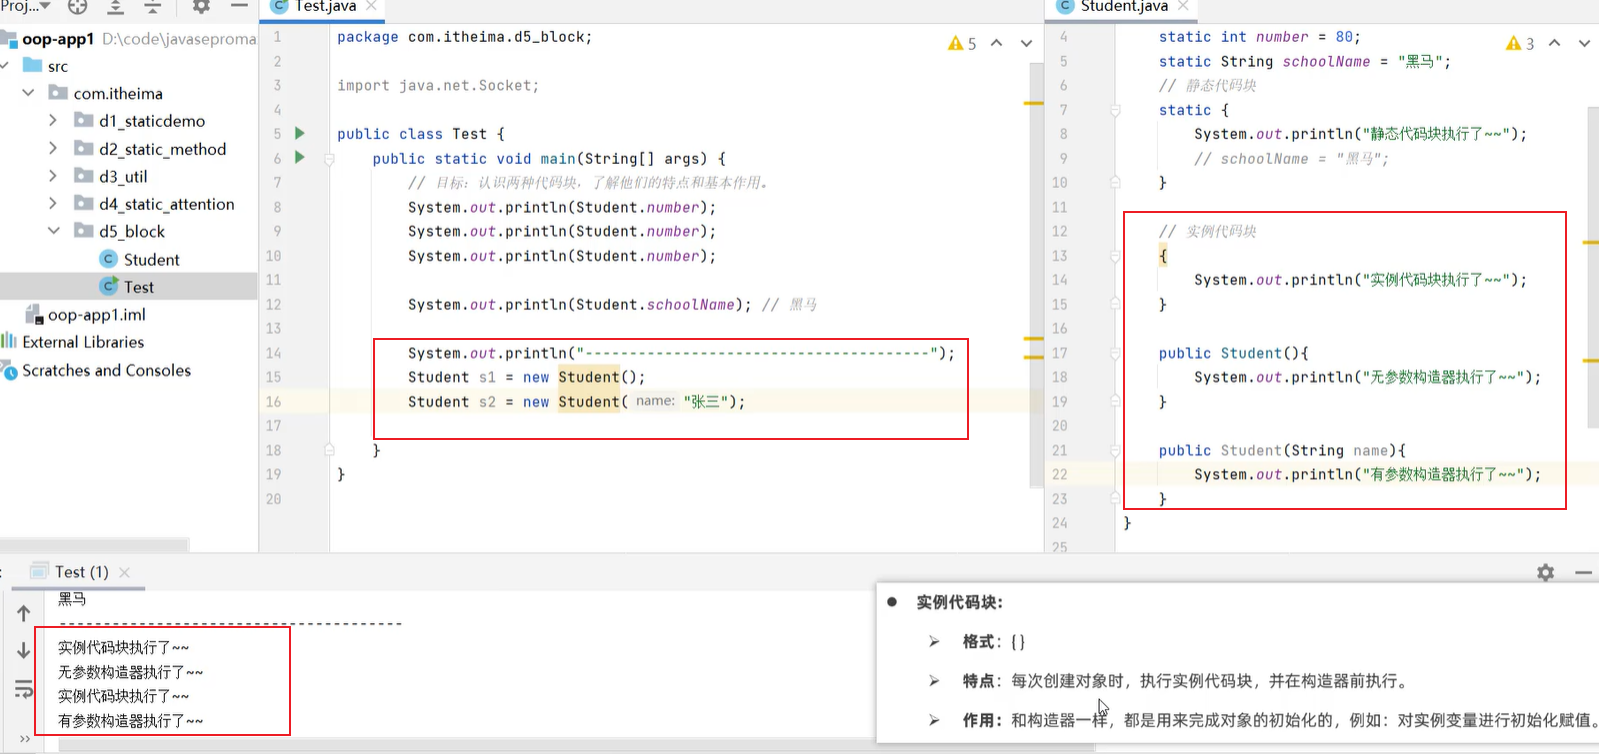
5.7 实例代码块

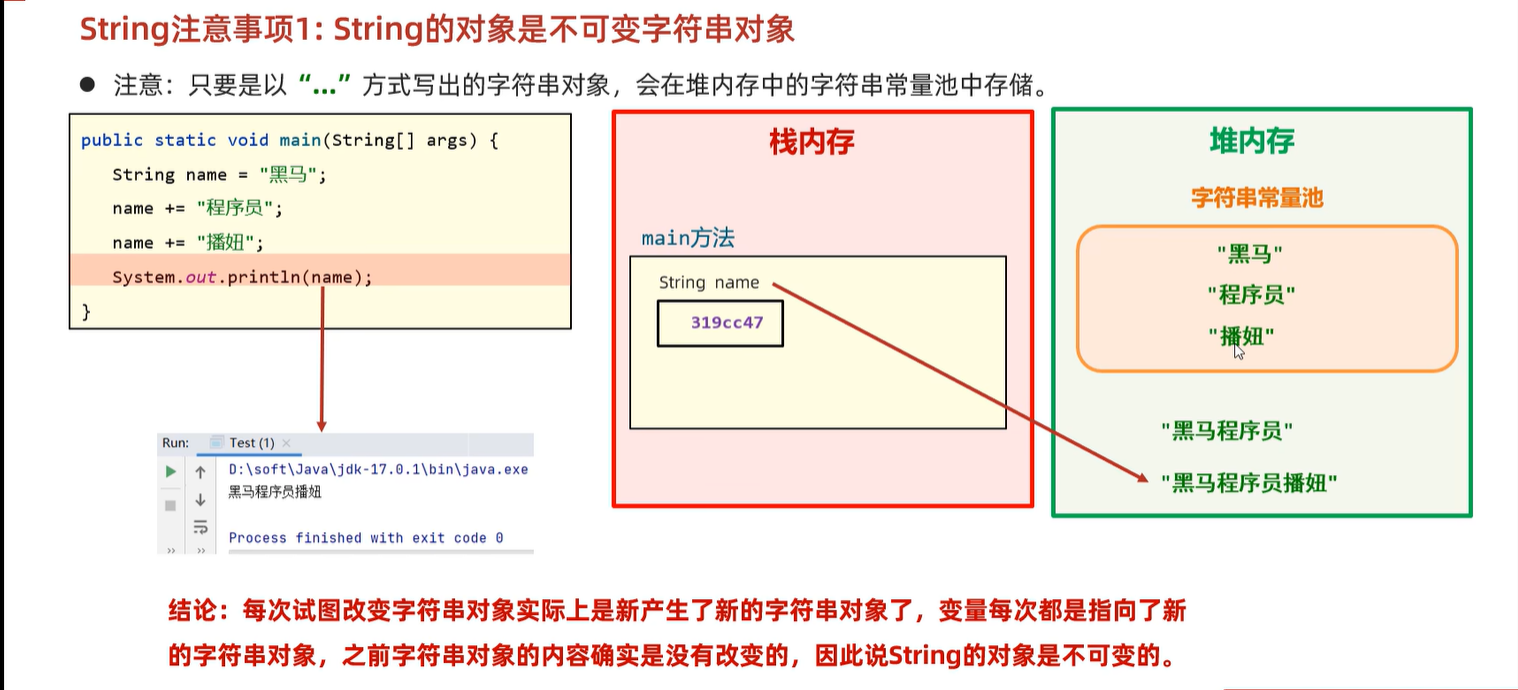
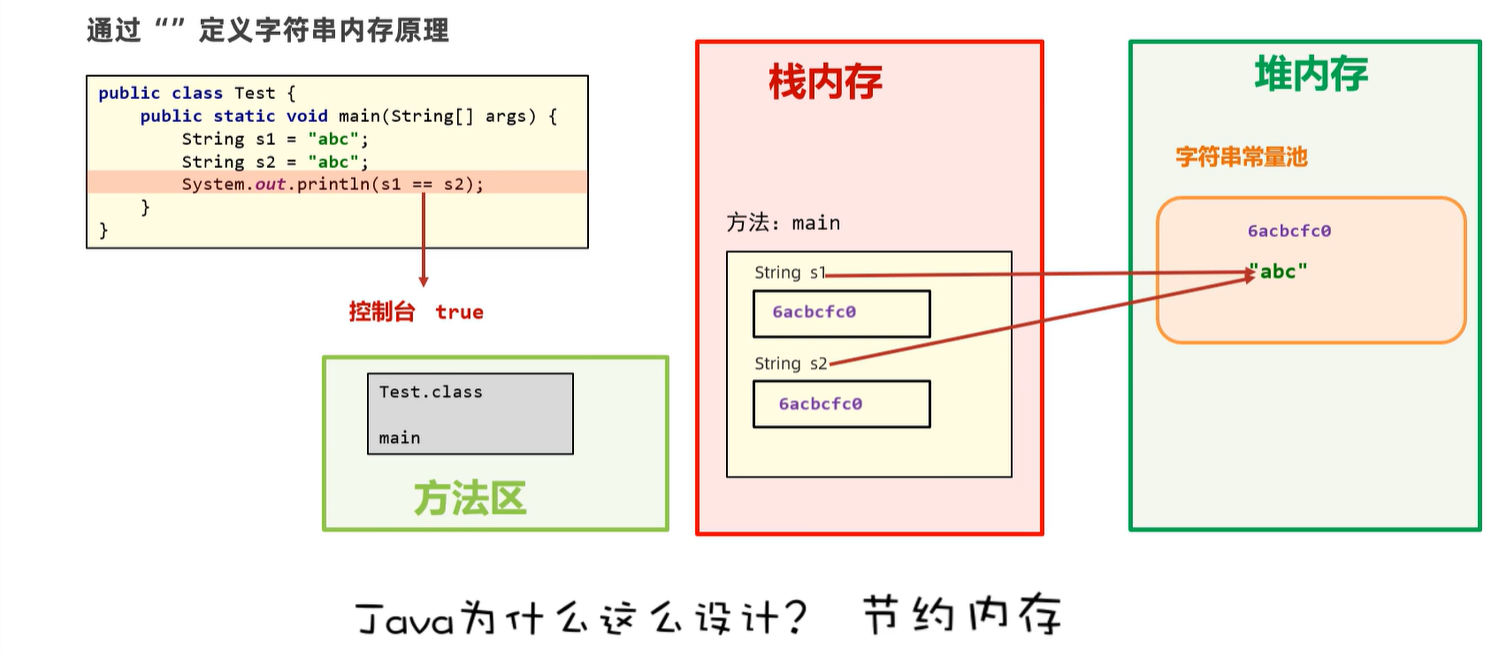
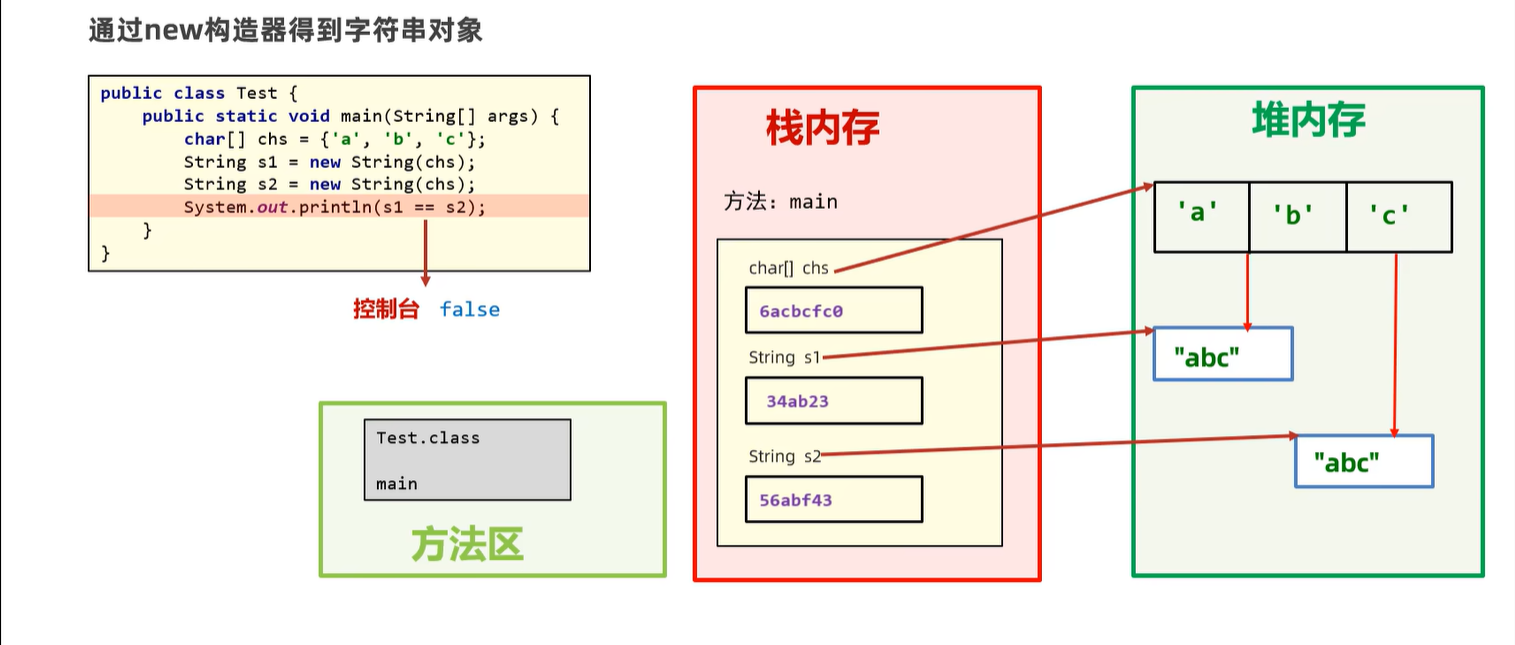
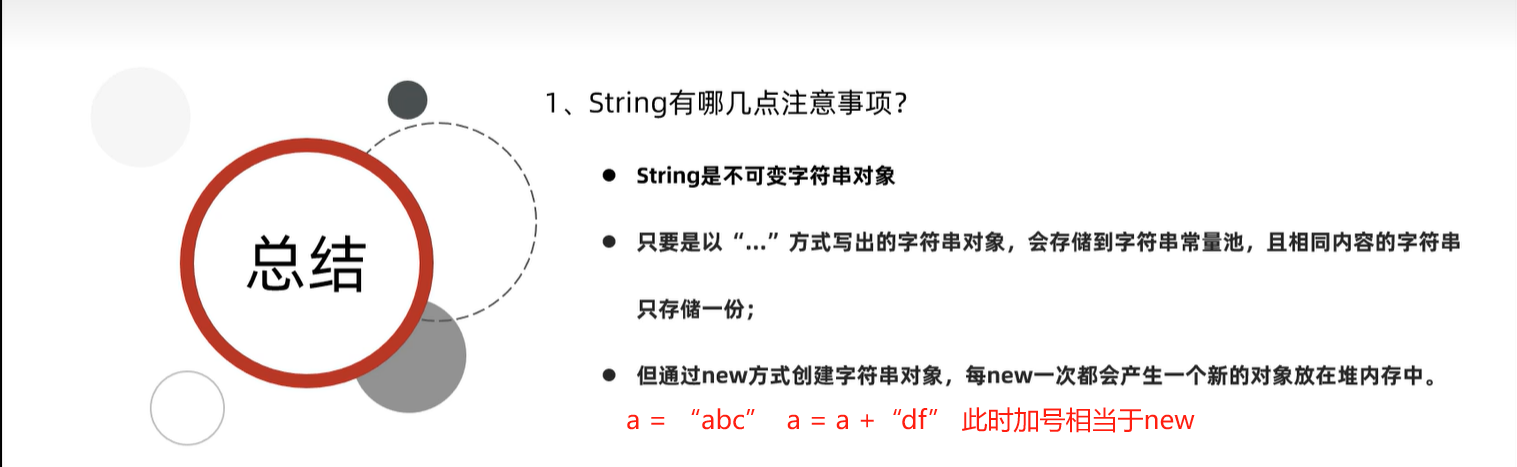
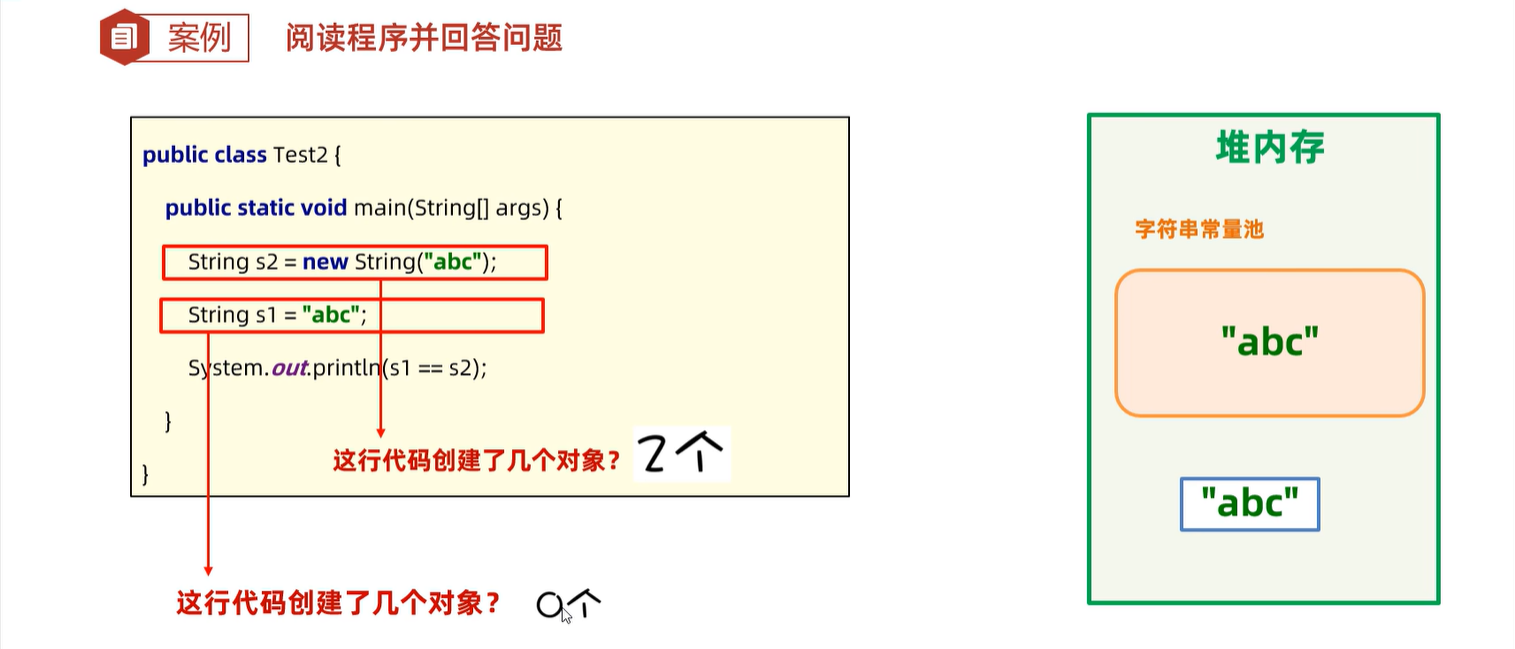
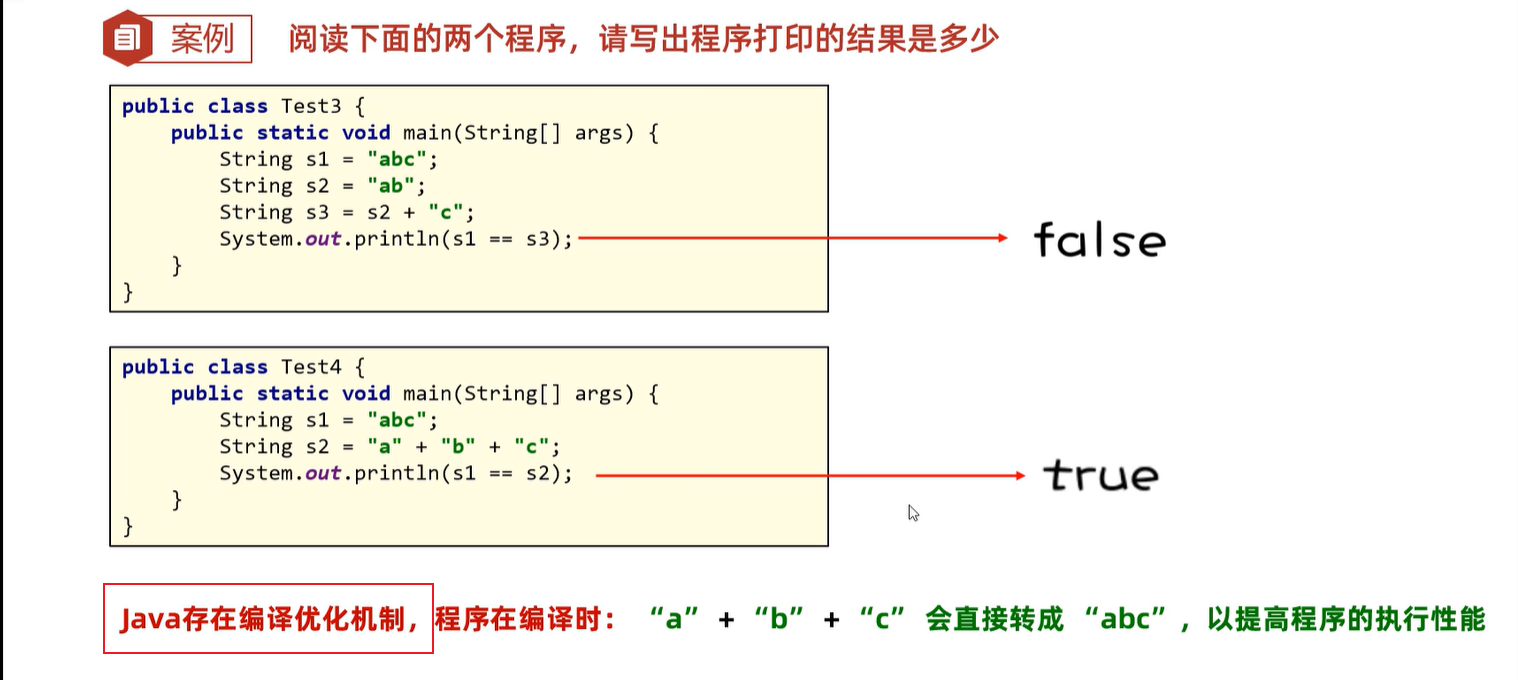
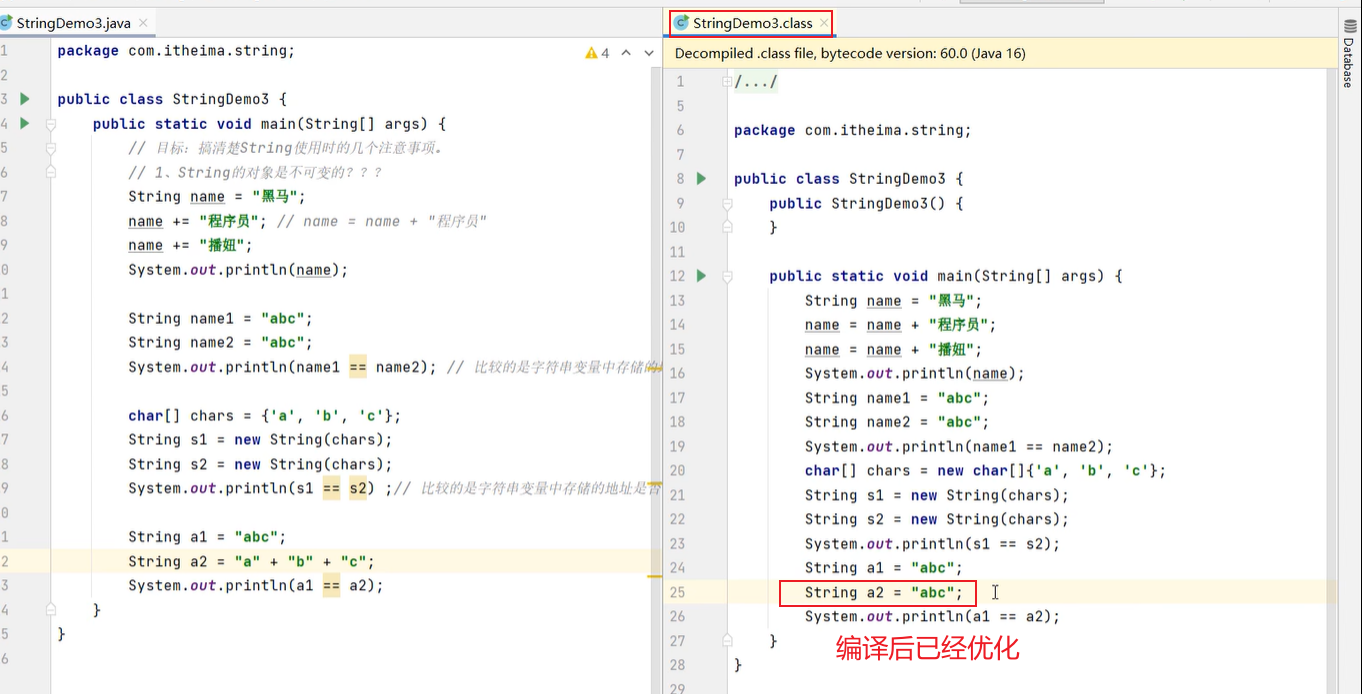
6. string
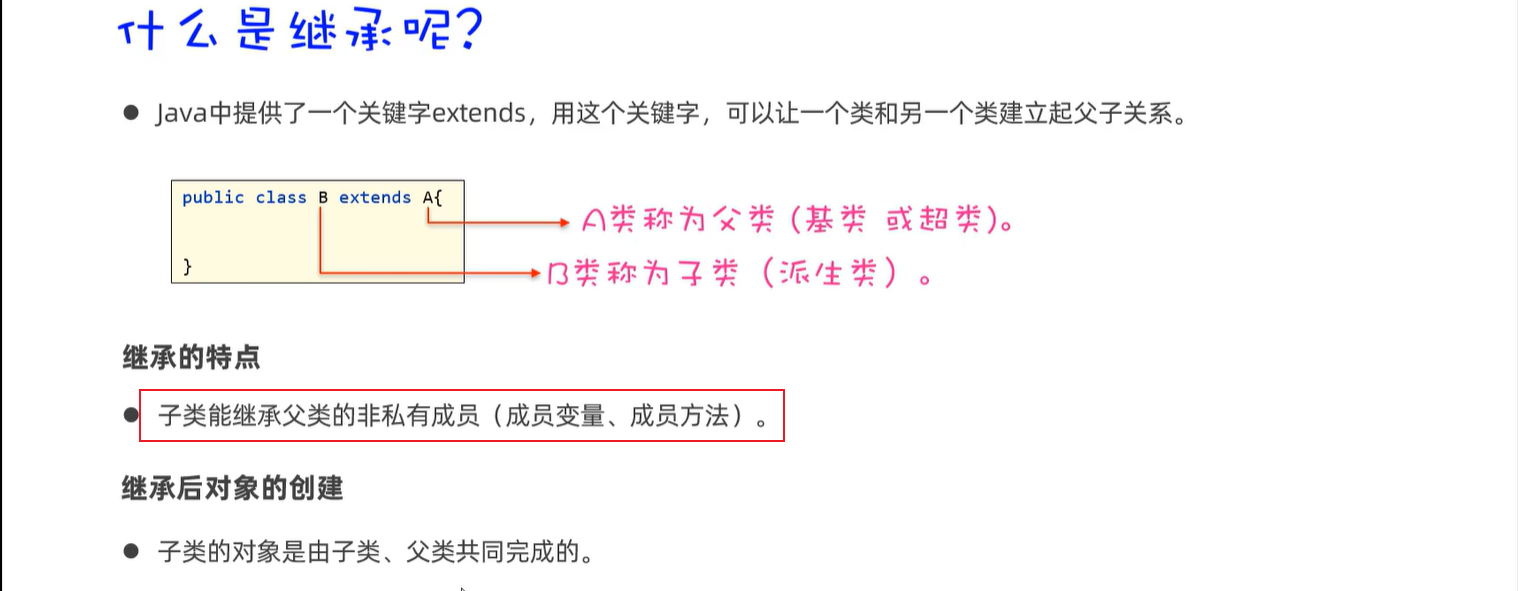
7. 继承
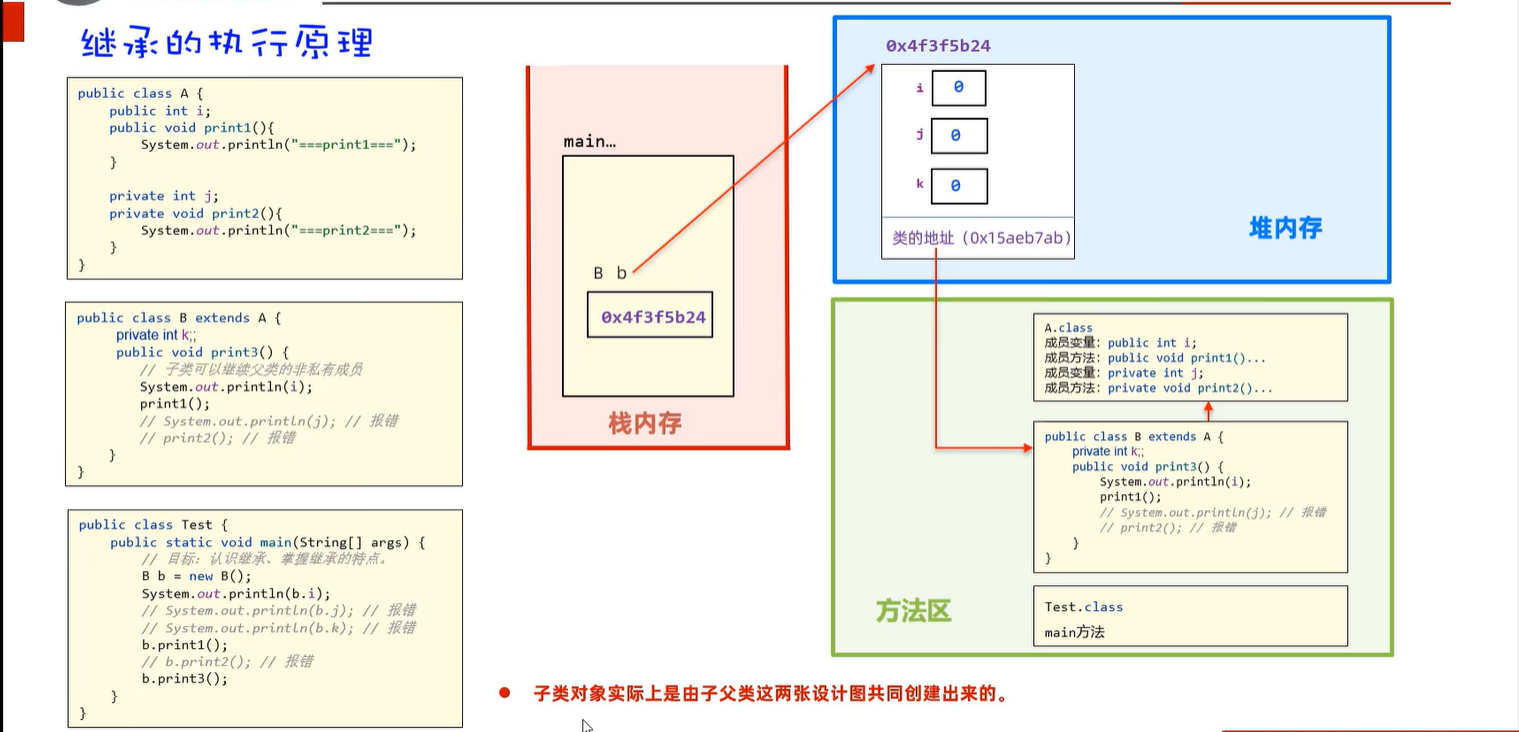
7.1 继承的执行原理
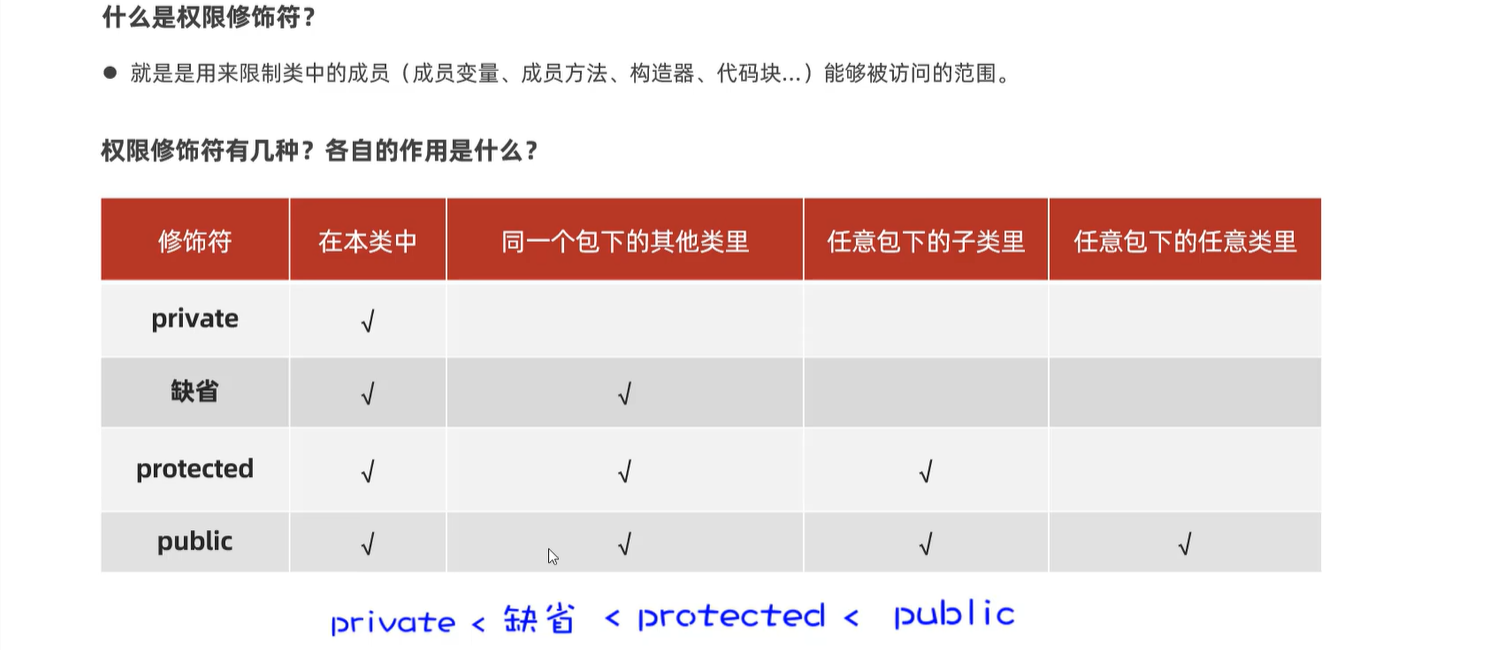
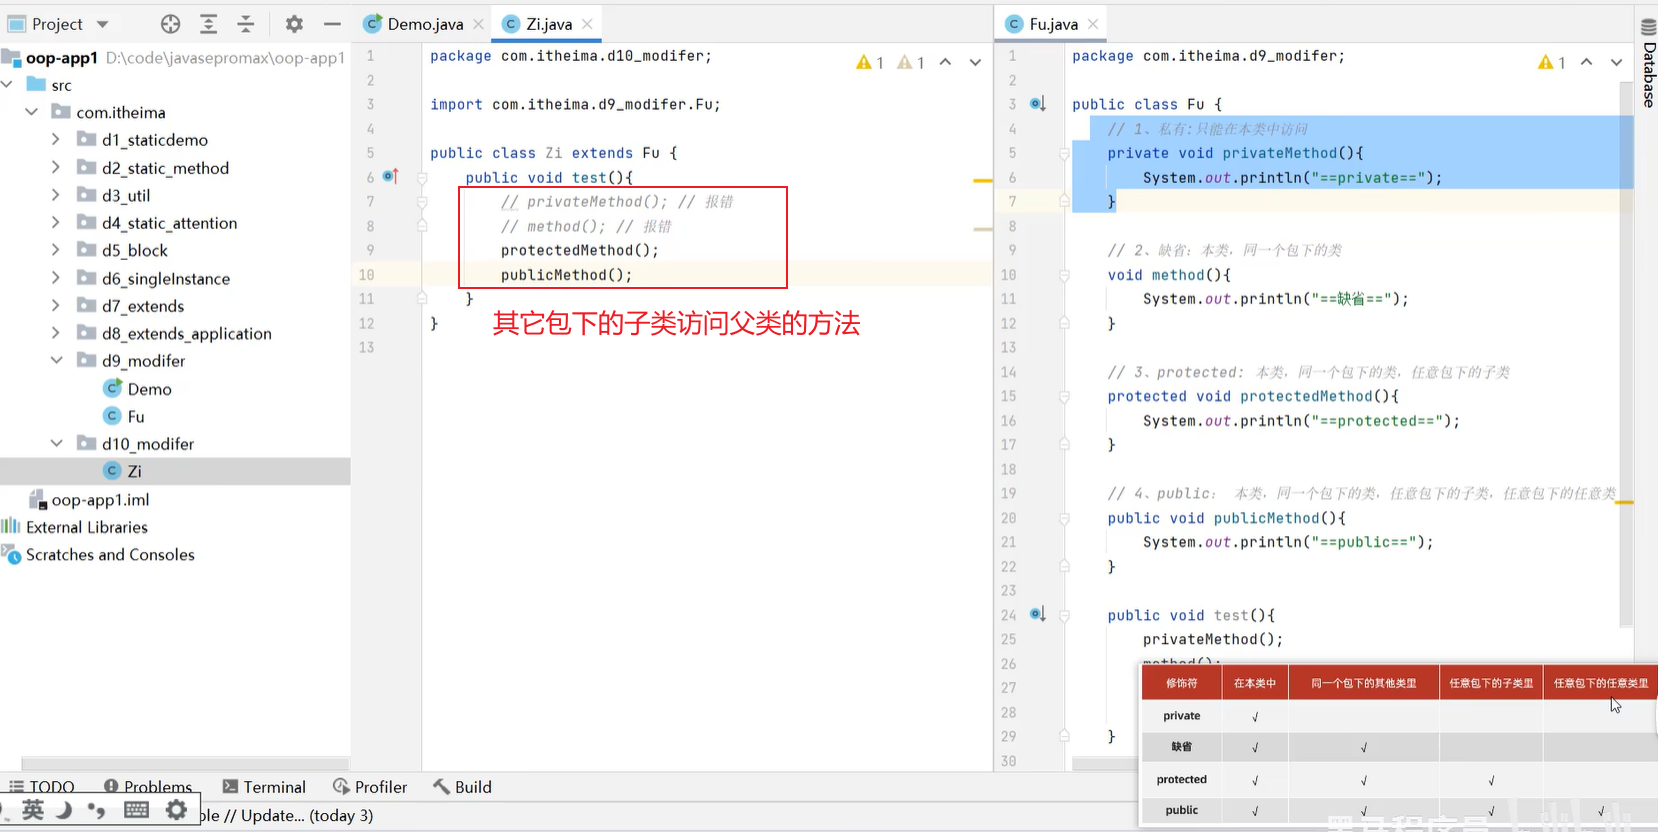
7.2 权限修饰符

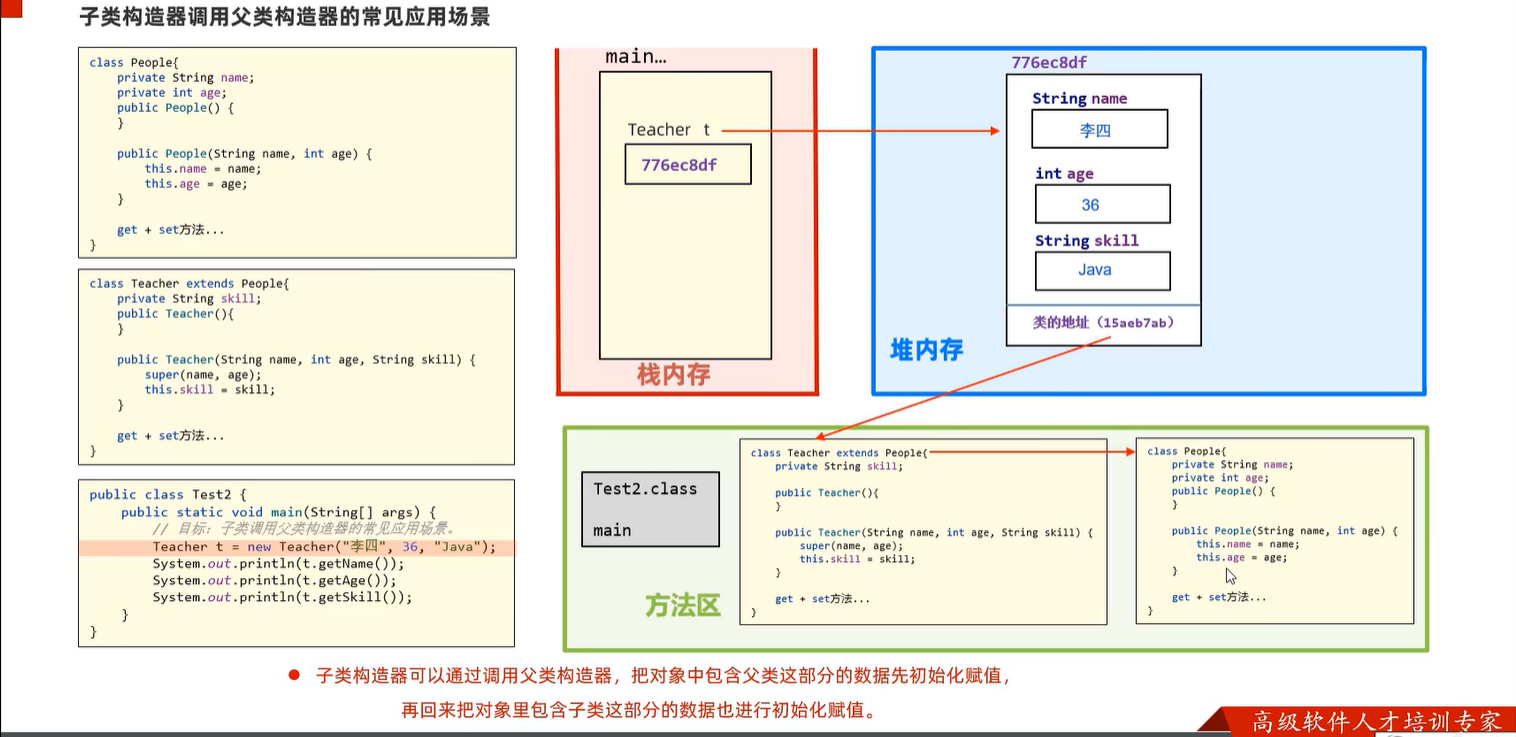
7.3 子类构造器

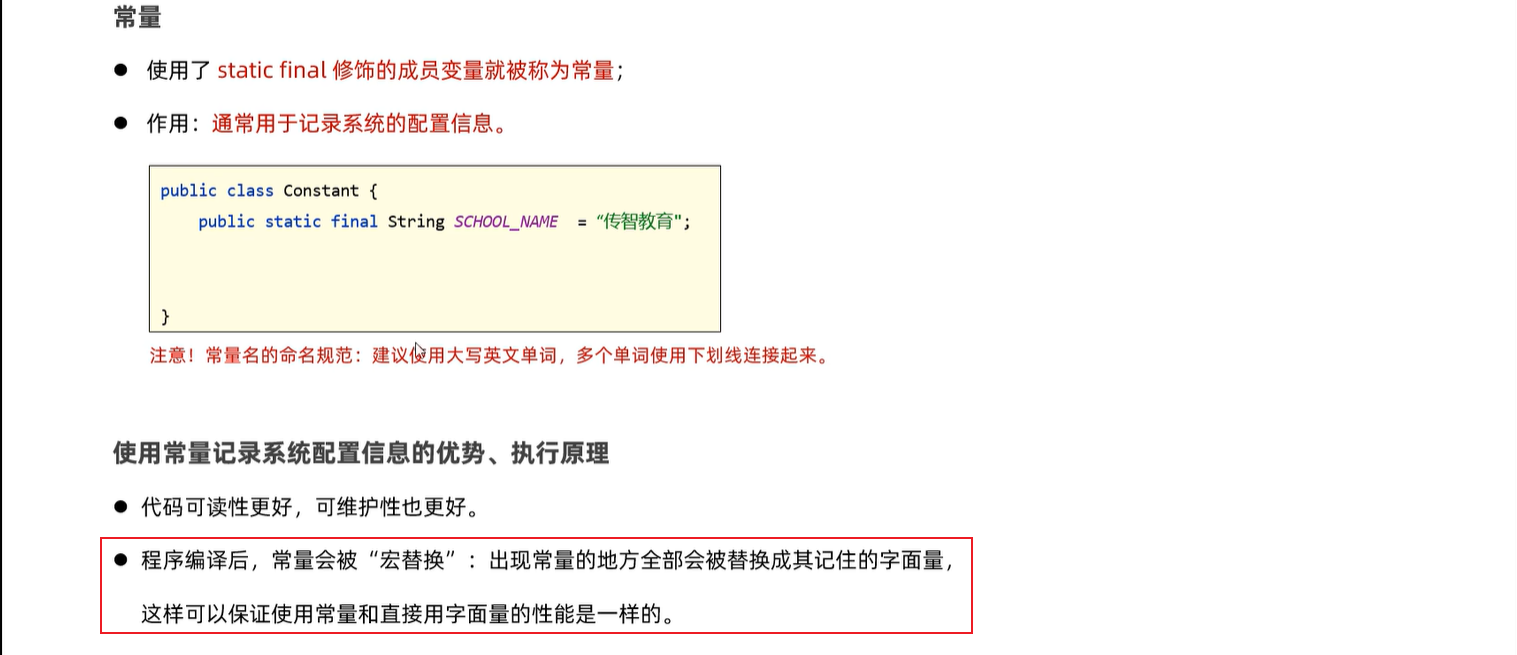
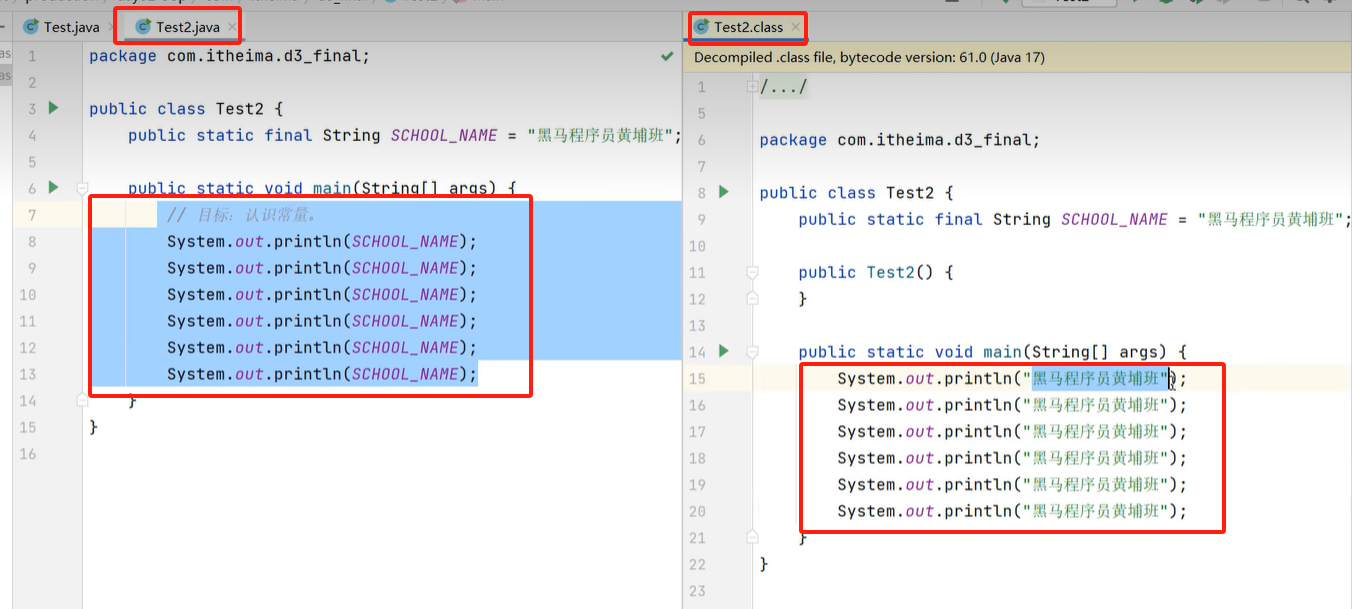
7.4 final

package com.itheima.d3_final;

public class Test {
    /**
     * 常量: public static final修饰的成员变量,建议名称全部大写,多个单词下划线连接
     */
    public static final String SCHOOL_NAME = "黑马";
    private final String name = "猪八戒"; // 这种用法没有意义,知道就行

    public static void main(String[] args) {
        // 目标:认识final的作用。
        // 3、final可以修饰变量总规则:有且仅能赋值一次
        /* 变量:
            一,局部变量
            二,成员变量
                1、静态成员变量
                2、实例成员变量
        */
        final int a;
        a = 12;
        // a = 13; // 第二次赋值,出错了

        final double r = 3.14;
        // r = 0.1; // 第二次赋值,出错了

        final int[] arr = {11, 22, 33};
        // arr = null; // 第二次赋值,出错了
        arr[1] = 222;

        // schoolName = "白马"; // 第二次赋值,出错了
        Test t = new Test();
        // t.name = "孙悟空";// 第二次赋值,出错了
    }

    public static void buy(final double z){
        // z = 0.1;// 第二次赋值,出错了
    }
}

// 1、final修饰类,类不能被继承了
final class A{}
//class B extends A{}

// 2、final修饰方法,方法不能被重写了
class C{
    public final void test(){
    }
}
class D extends C{
//    @Override
//    public void test() {
//
//    }
}

final int[] arr = {11, 22, 33};
// arr = null; // 第二次赋值,出错了,final修饰地址不能改变
arr[1] = 222; //值是可以改变的
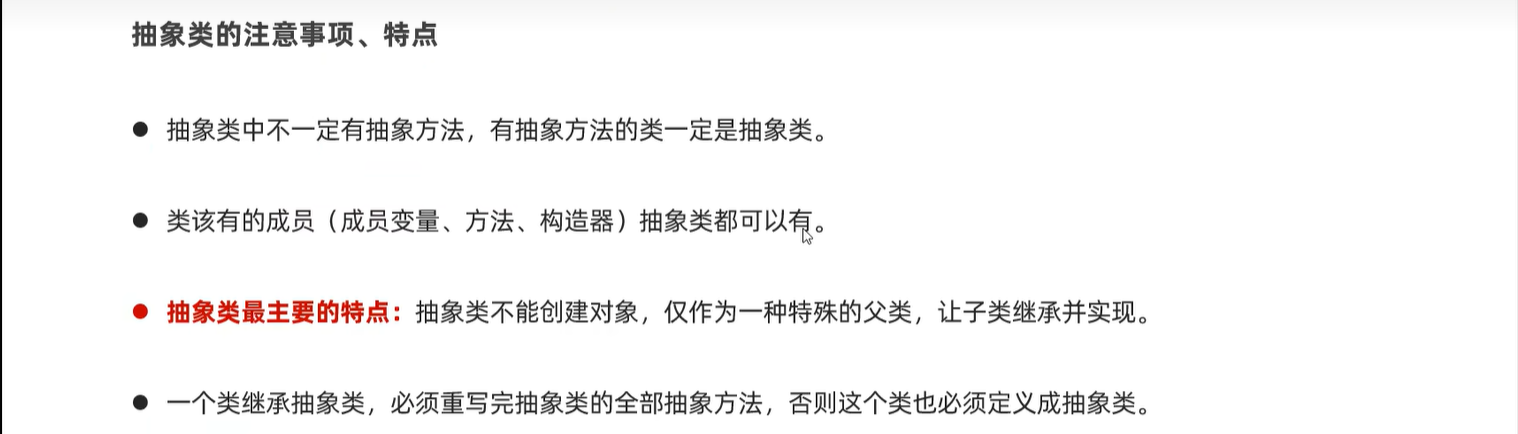
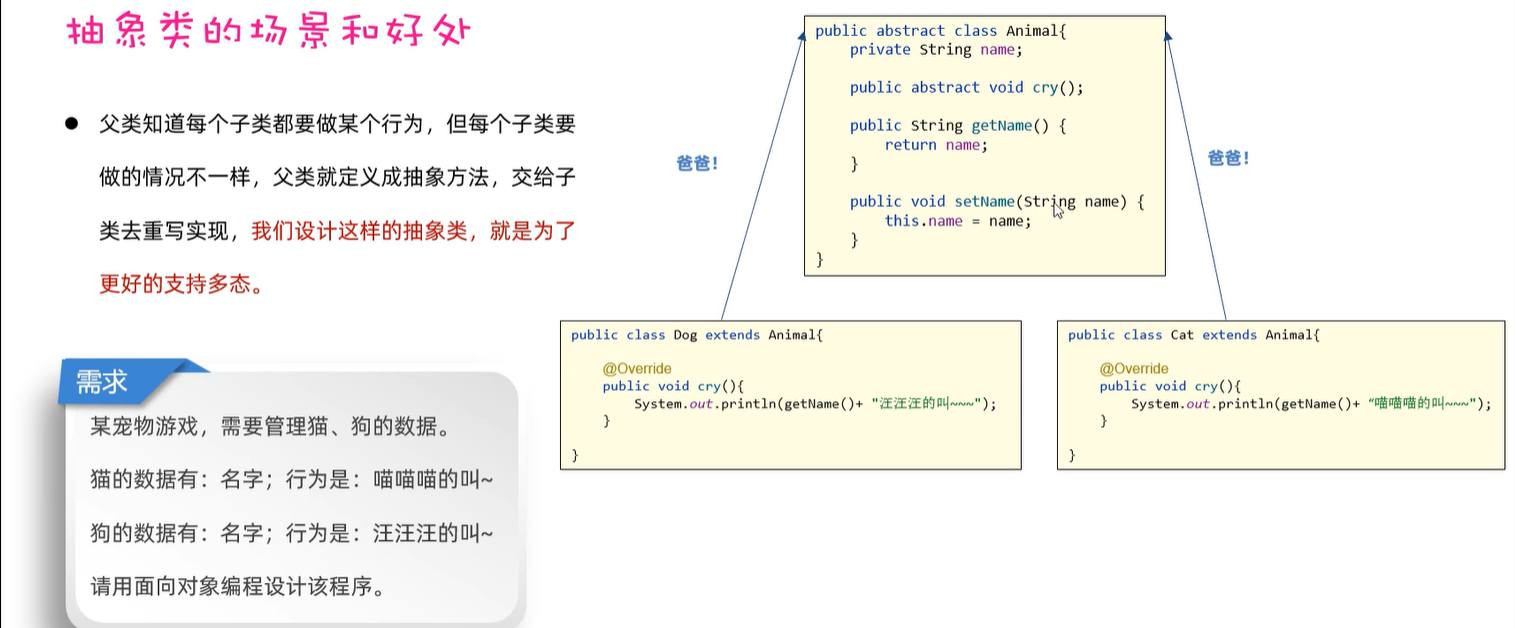
8. 抽象类
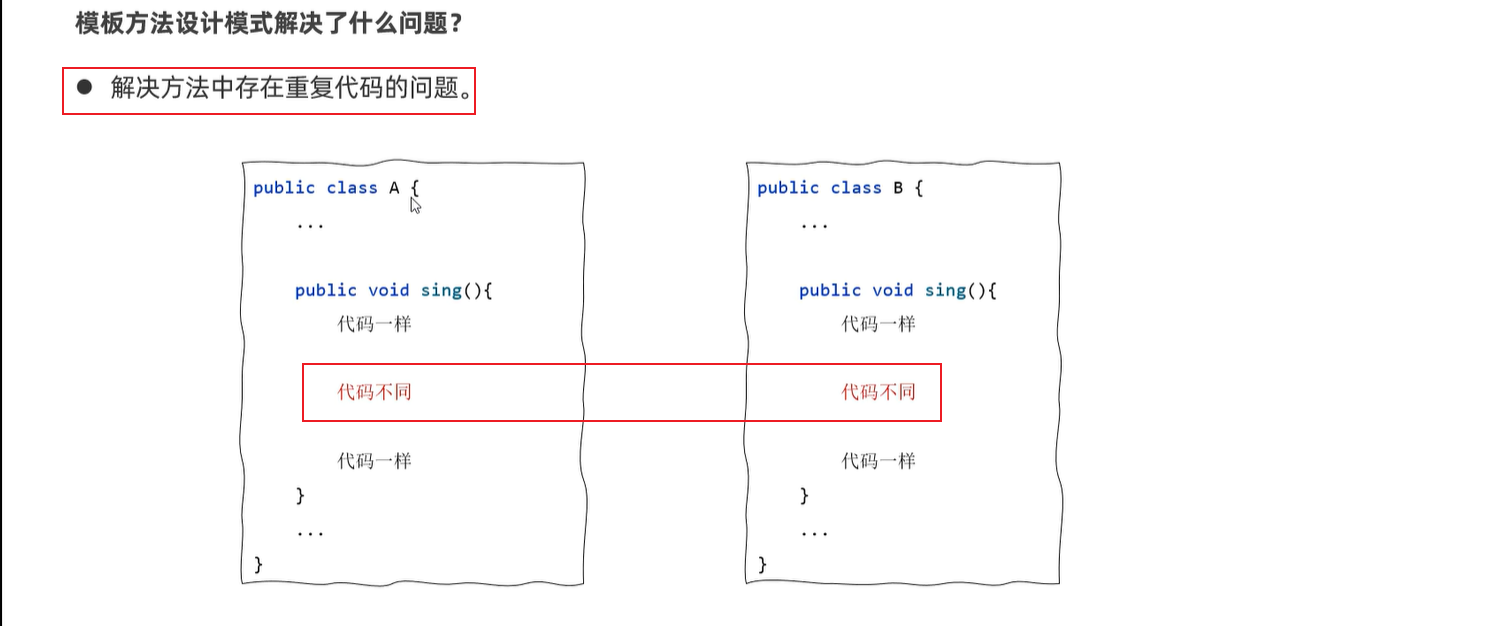
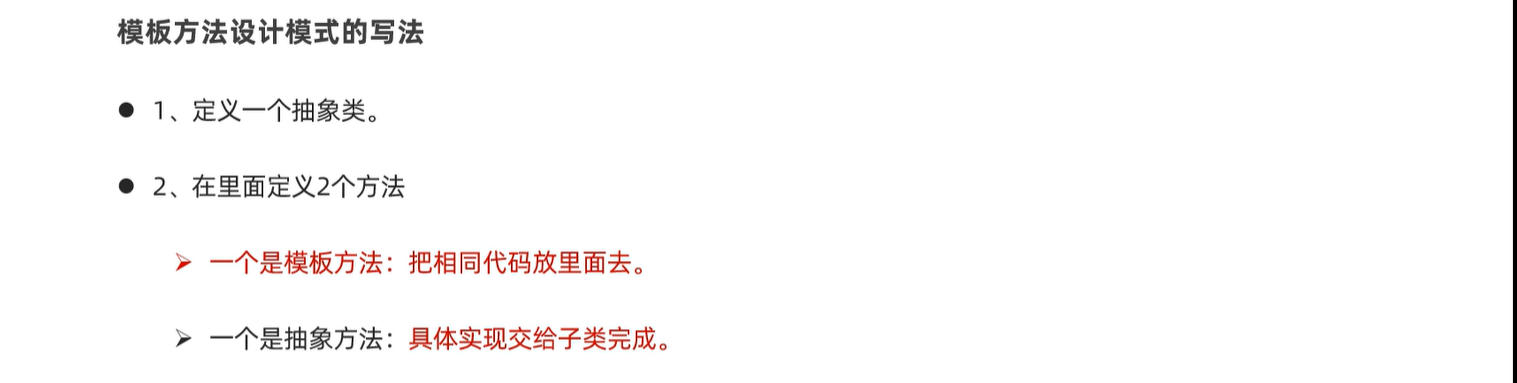
8.1 模板方法设计模式

9. 接口
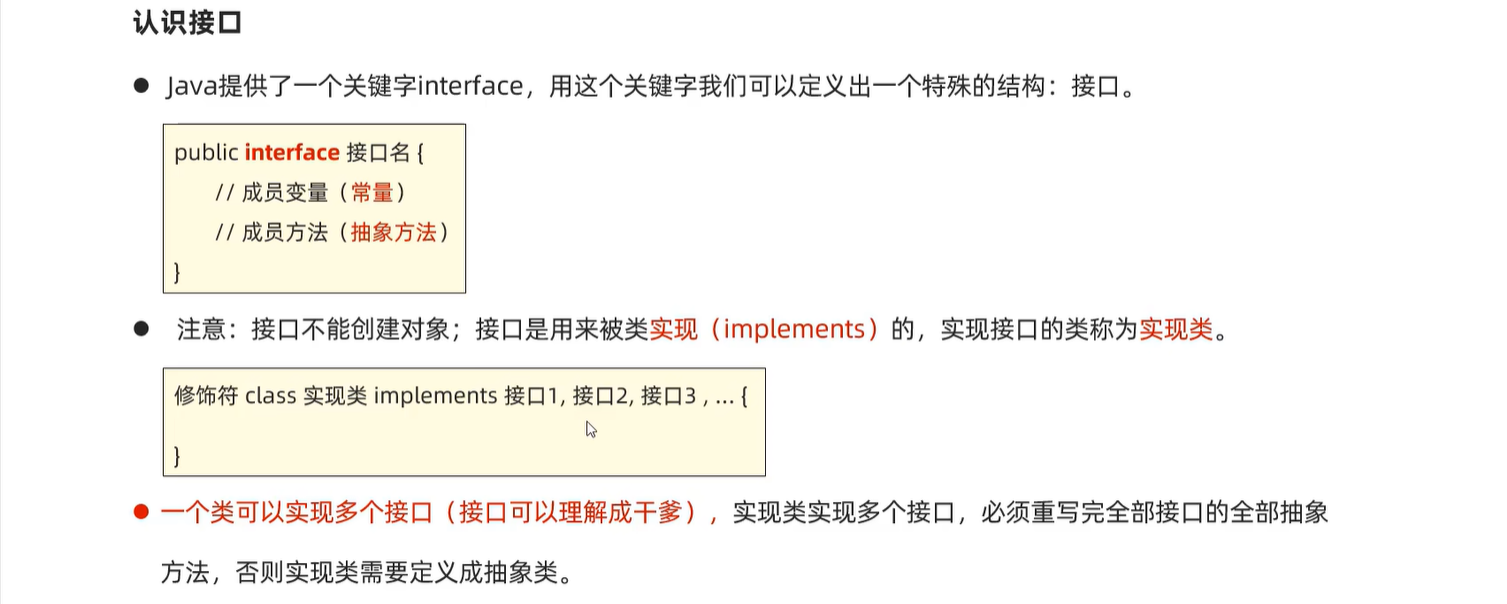
jdk 8 之后接口新增了三种方法
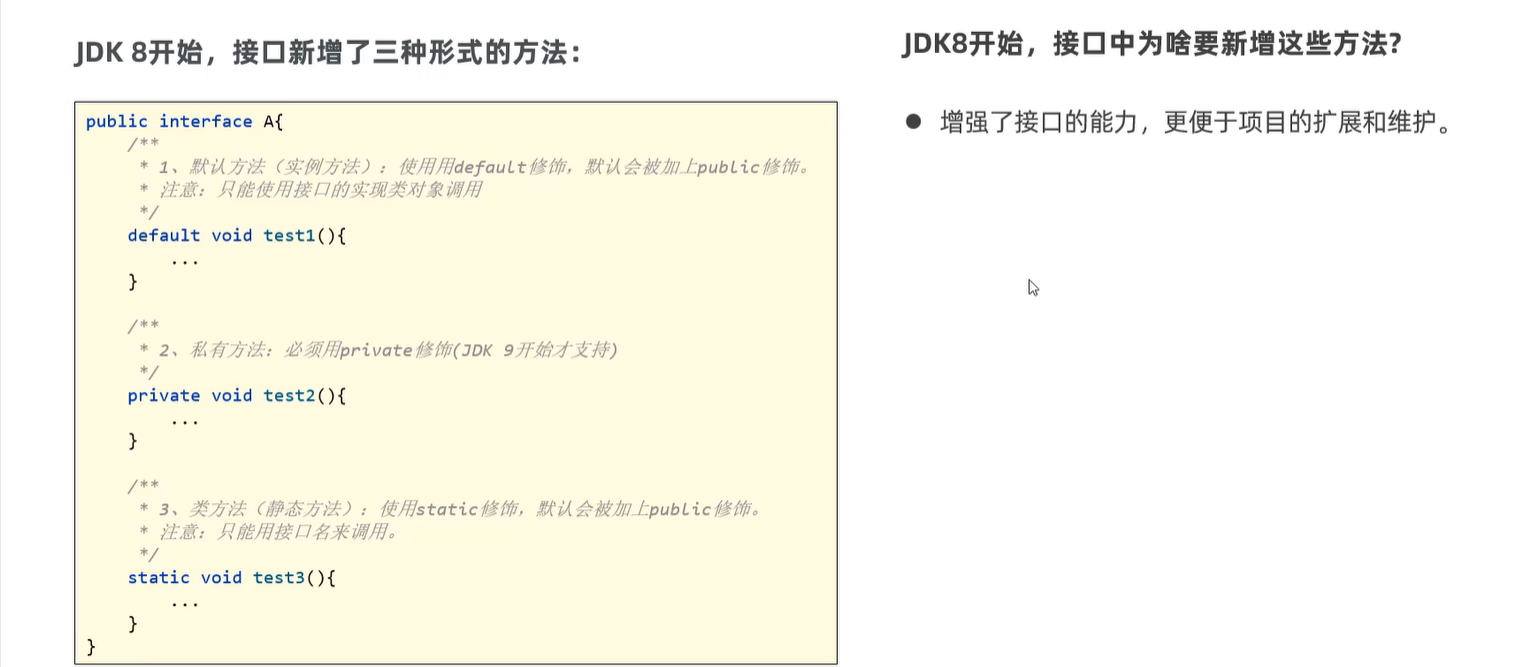
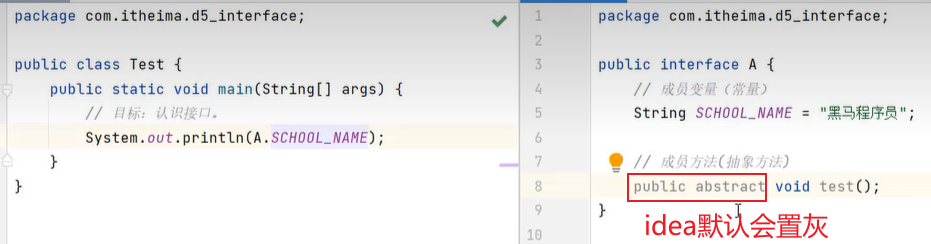
package com.itheima.d10_interface_jdk8;

public interface A {
    /**
     * 1、默认方法:必须使用default修饰,默认会被public修饰
     * 实例方法:对象的方法,必须使用实现类的对象来访问。
     */
    default void test1(){
        System.out.println("===默认方法==");
        test2();
    }

    /**
     * 2、私有方法:必须使用private修饰。(JDK 9开始才支持的)
     *   实例方法:对象的方法。
     */
    private void test2(){
        System.out.println("===私有方法==");
    }

    /**
     * 3、静态方法:必须使用static修饰,默认会被public修饰
     */
     static void test3(){
        System.out.println("==静态方法==");
     }

     void test4();
     void test5();
     default void test6(){

     }
}
10. 内部类
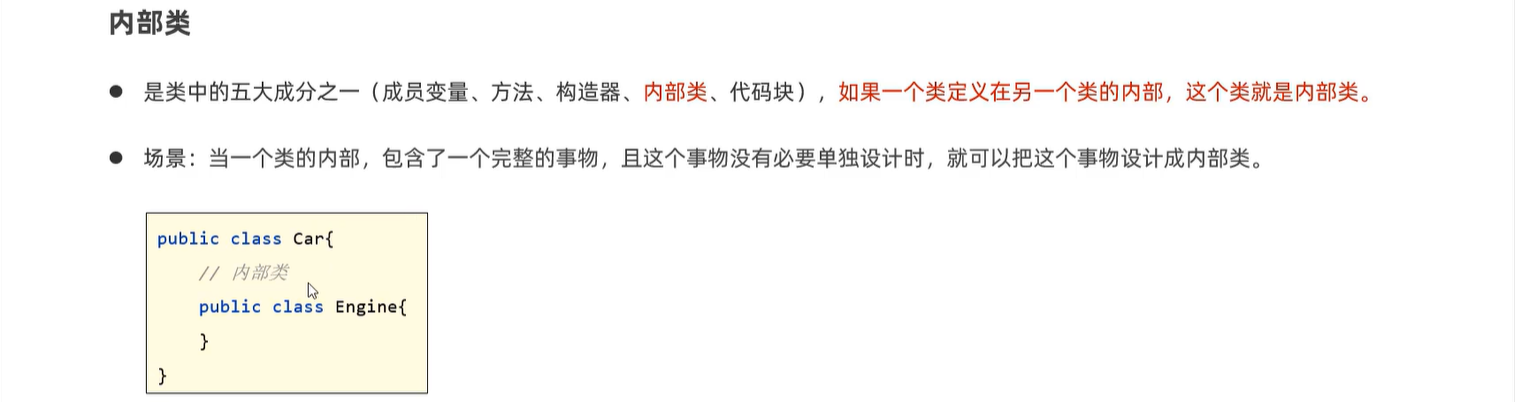
10.1 成员内部类
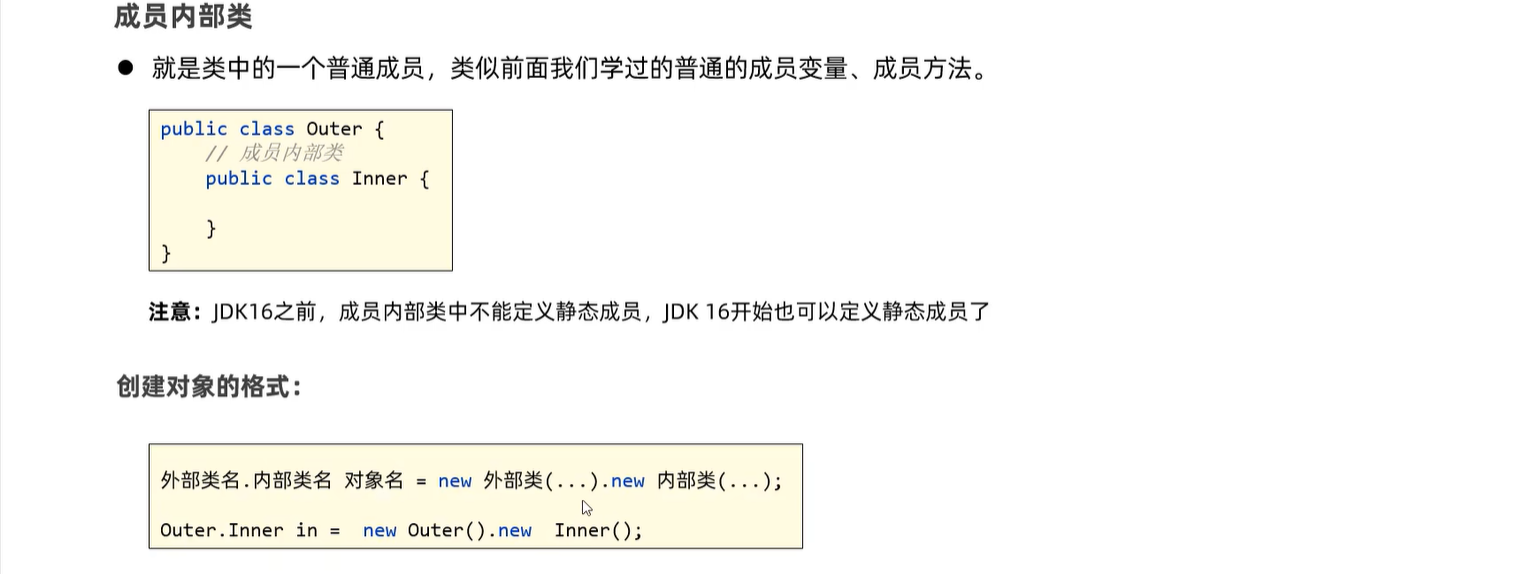

package com.itheima.d1_inner_class1;

public class Outer {
    private int age = 99;
    public static String a;
    // 成员内部类
    public class Inner{
        private String name;
        public static String schoolName; // JDK 16开始才支持定义静态成员的
        private int age = 88;

        public void test(){
            System.out.println(age); //内部类可以访问外部类的成员变量
            System.out.println(a);

            int age = 66;  //内部类、外部类变量名相同,如何访问
            System.out.println(age);// 66
            System.out.println(this.age);// 88
            System.out.println(Outer.this.age);// 99
        }

        public String getName() {
            return name;
        }

        public void setName(String name) {
            this.name = name;
        }
    }

    public void test2(){
        System.out.println(age);
        System.out.println(a);
    }
}
package com.itheima.d1_inner_class1;

public class Test {
    public static void main(String[] args) {
        // 目标:了解成员内部类和其特点。
        Outer.Inner in = new Outer().new Inner();
        in.test();
    }
}
10.2 静态内部类
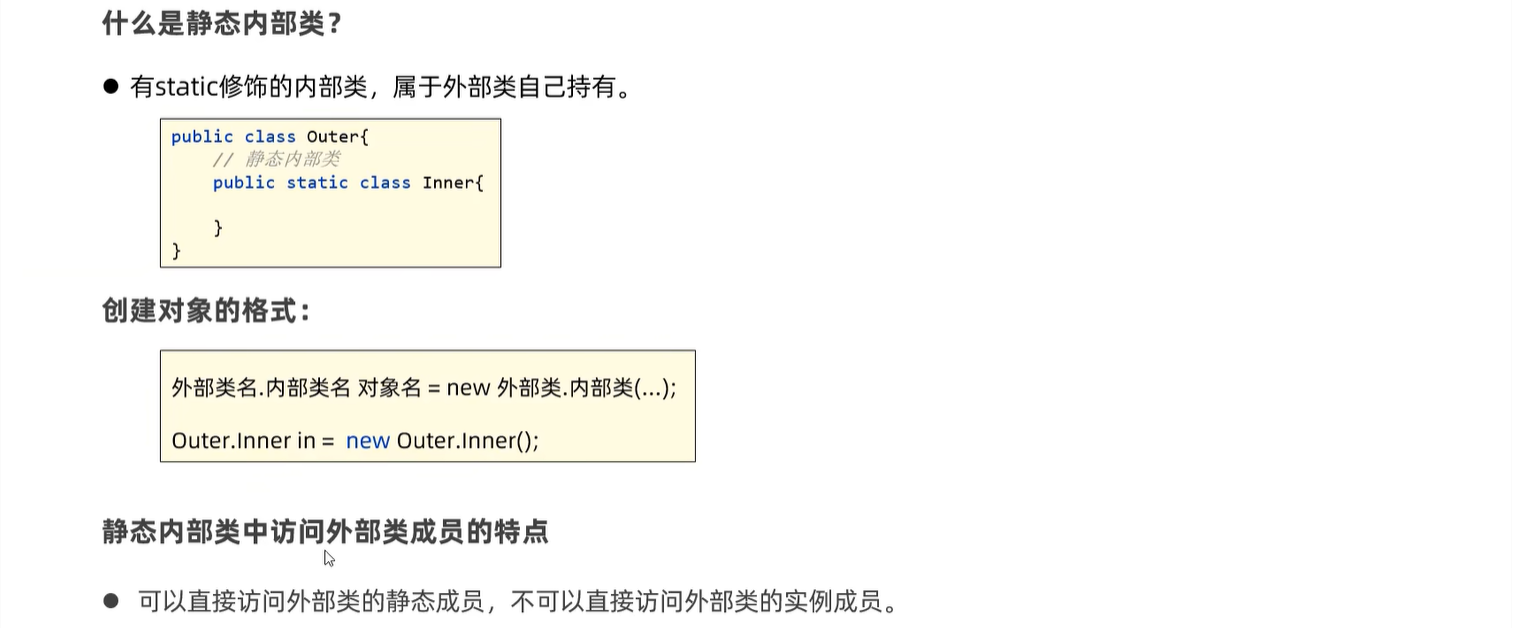
package com.itheima.d2_inner_class2;

public class Outer {
    private int age = 99;
    public static String schoolName;
    // 静态内部类
    public static class Inner{
        private String name;
        public static int a;
        private int age = 88;

        public void test(){
            System.out.println(schoolName);
            // System.out.println(age); //静态内部类与静态方法类似,只能访问外部类的静态成员变量,										  //不能访问实例变量
        }

        public String getName() {
            return name;
        }

        public void setName(String name) {
            this.name = name;
        }
    }

    public static void test2(){
        System.out.println(schoolName); //静态方法只能访问静态成员变量
        // System.out.println(age); //静态方法不能访问实例变量
    }
}
package com.itheima.d2_inner_class2;

public class Test {
    public static void main(String[] args) {
        // 目标:了解静态内部类。
        Outer.Inner in = new Outer.Inner();
        in.test();
    }
}
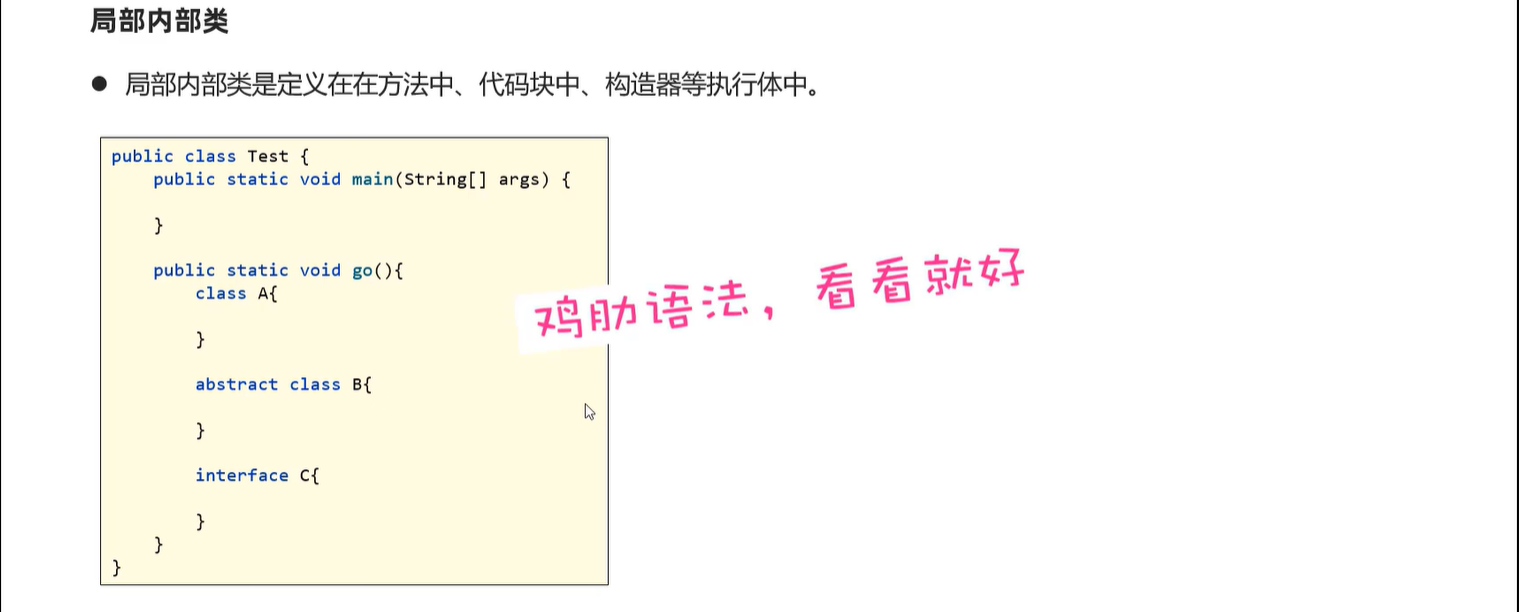
10.3 局部内部类
10.4 匿名内部类
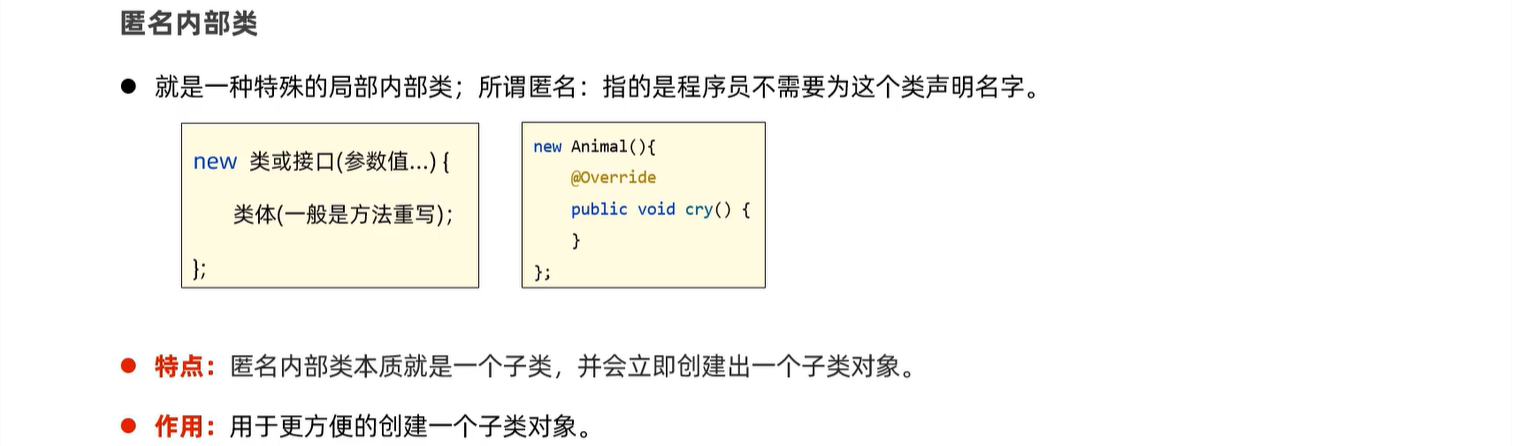
利用之前的子类去实现功能
package com.itheima.d3_inner_class3;

public class Test {
    public static void main(String[] args) {
        // 目标:认识匿名内部类,并掌握其作用。
        Animal a = new Cat();
        a.cry();
    }
}

class Cat extends Animal{
    @Override
    public void cry() {
        System.out.println("猫喵喵喵的叫~~~");
    }
}

abstract class Animal{
    public abstract void cry();
}
利用匿名内部类实现该功能
package com.itheima.d3_inner_class3;

public class Test {
    public static void main(String[] args) {
        // 目标:认识匿名内部类,并掌握其作用。
        // 1、把这个匿名内部类编译成一个子类,然后会立即创建一个子类对象出来。
        Animal a = new Animal(){
            @Override
            public void cry() {
                System.out.println("猫喵喵喵的叫~~~");
            }
        };
        a.cry();
    }
}


abstract class Animal{
    public abstract void cry();
}
10.5 匿名内部类的使用场景
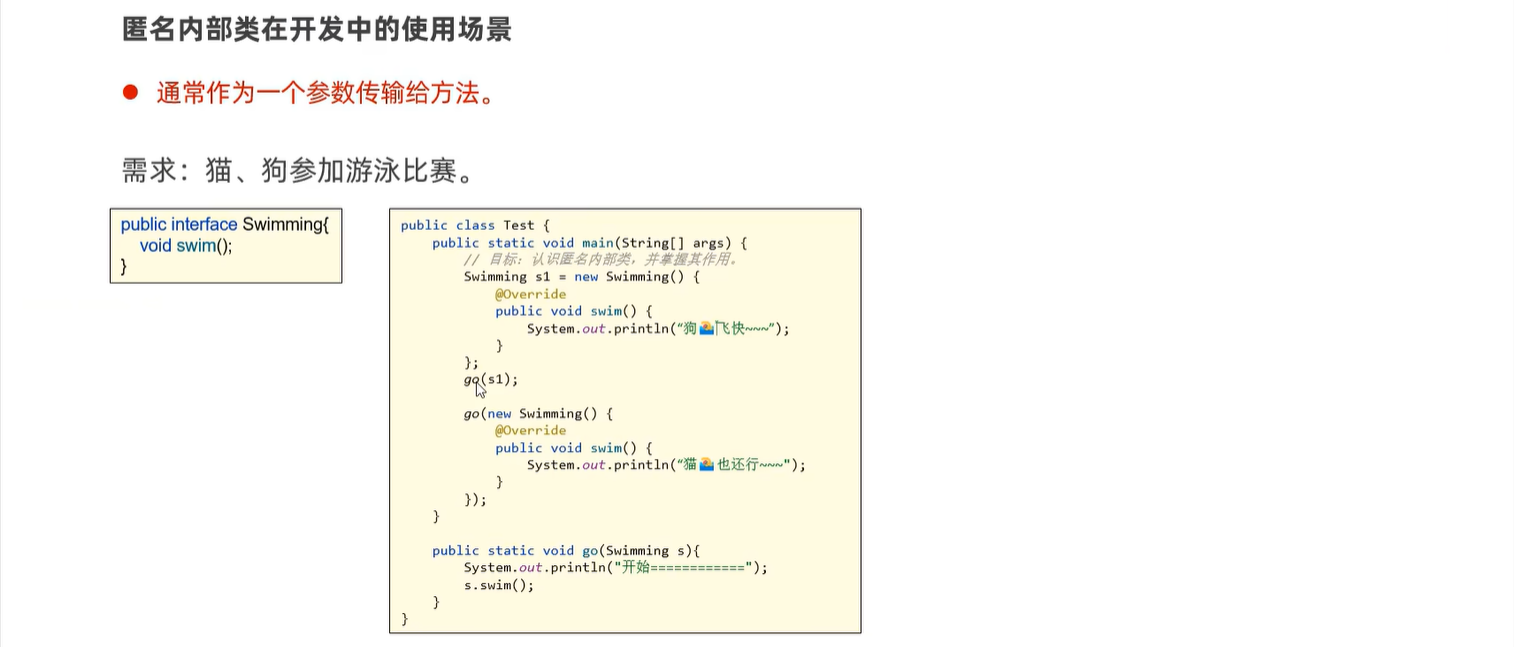
package com.itheima.d3_inner_class3;
public class Test2 {
public static void main(String[] args) {
// 目标:掌握匿名的常见使用场景。
// Swimming s1 = new Swimming(){
// @Override
// public void swim() {
// System.out.println("狗🏊飞快~~~~");
// }
// };
// go(s1);
go(new Swimming(){
@Override
public void swim() {
System.out.println("狗🏊飞快~~~~");
}
});
}
// 设计一个方法,可以接收swimming接口的一切实现类对象进来参加游泳比赛。
public static void go(Swimming s){
System.out.println("开始-----------------------");
s.swim();
}
}
// 猫和狗都要参加游泳比赛
interface Swimming{
void swim();
}
11. 枚举类
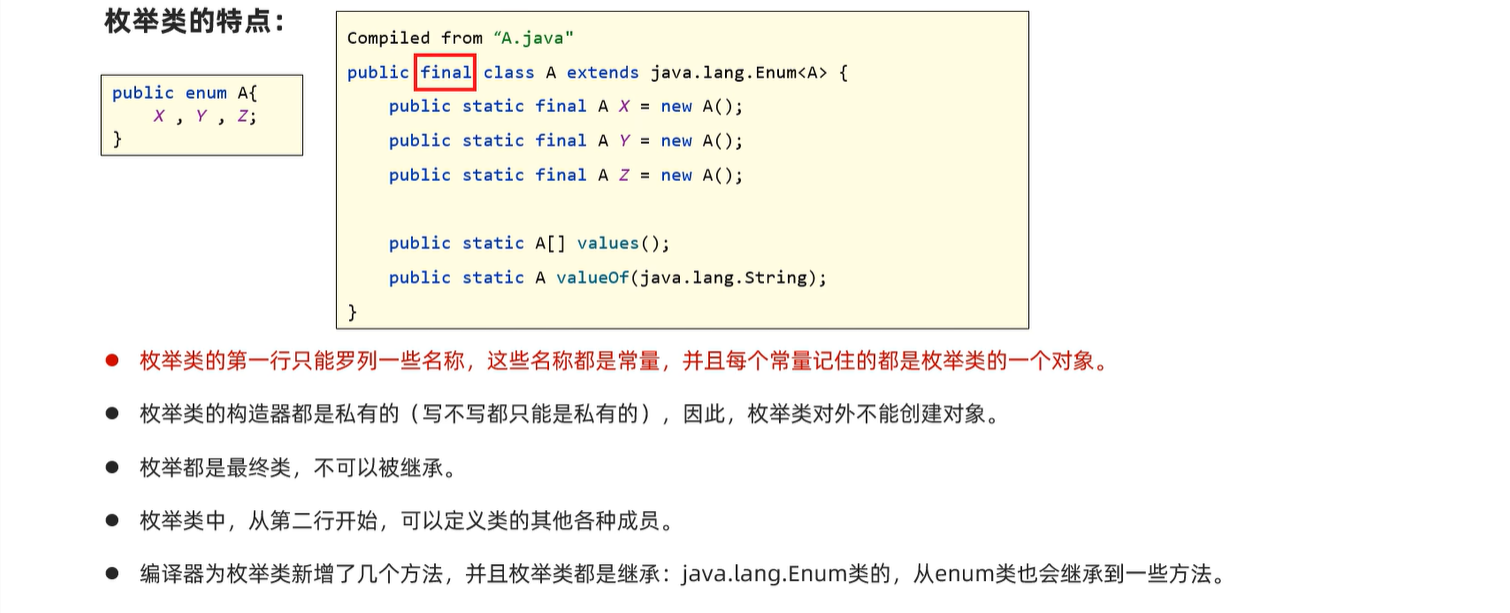
package com.itheima.d4_enum;
// 枚举类
public enum A {
    // 常量,每个常量都是记住枚举类的一个对象的。
    X, Y, Z;

    A(){
    }

    A(String name){ //枚举类中的默认有参和无参构造方法都是私有的
    }
    private String name;

    public String getName() {
        return name;
    }

    public void setName(String name) {
        this.name = name;
    }
}
package com.itheima.d4_enum;

public class Test {
    public static void main(String[] args) {
        // 目标:认识枚举类。
        // A.X = null;
        A a1 = A.X;
        A a2 = A.Y;
        A a3 = A.Z;

        System.out.println(a2.ordinal());
    }
}
应用
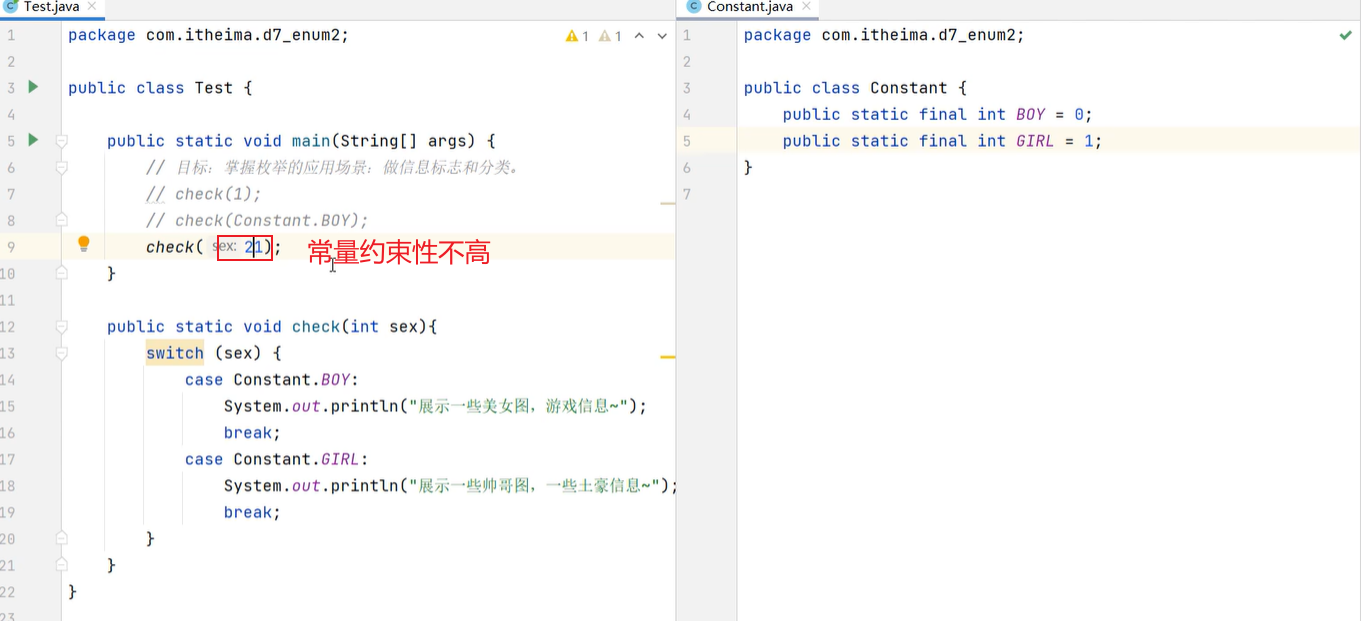
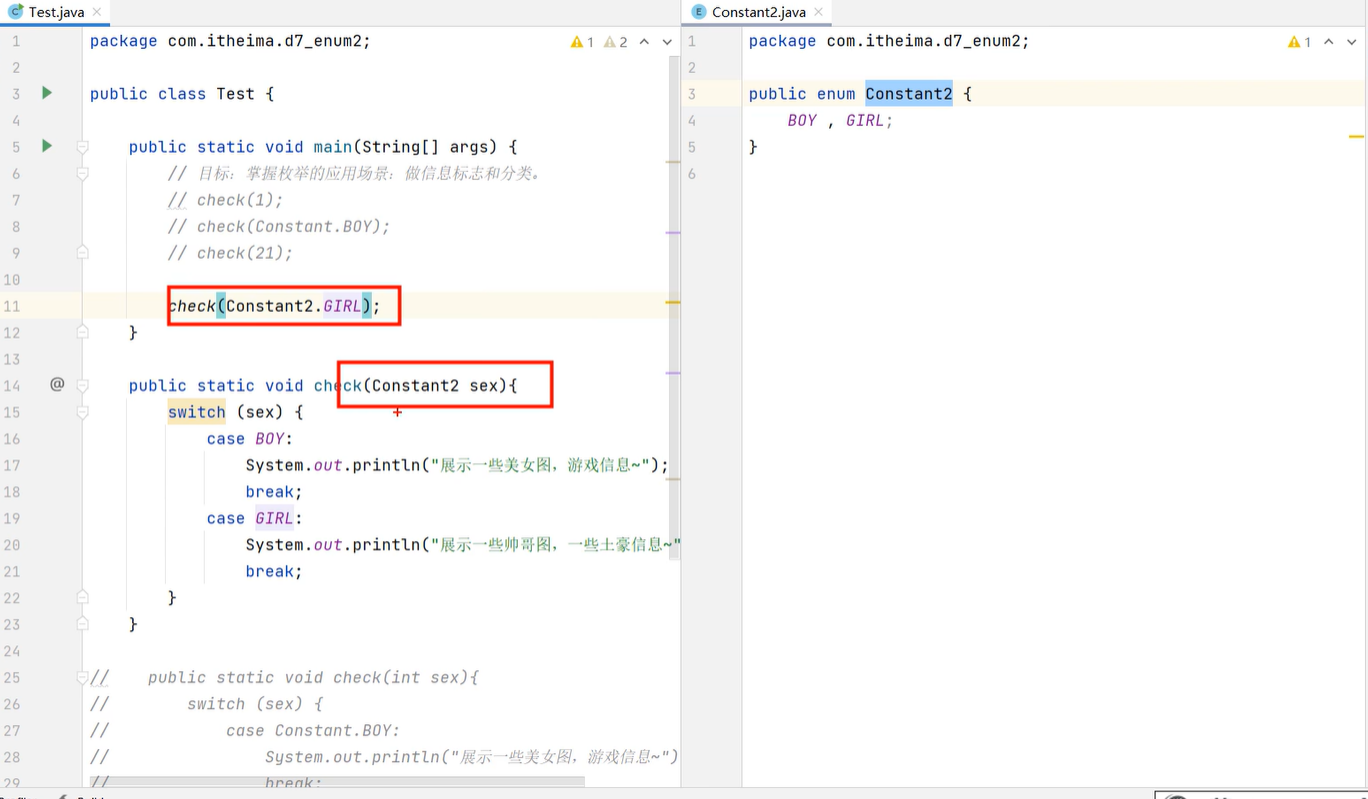
使用了枚举之后比较严谨,且代码可读性更高
12. 泛型
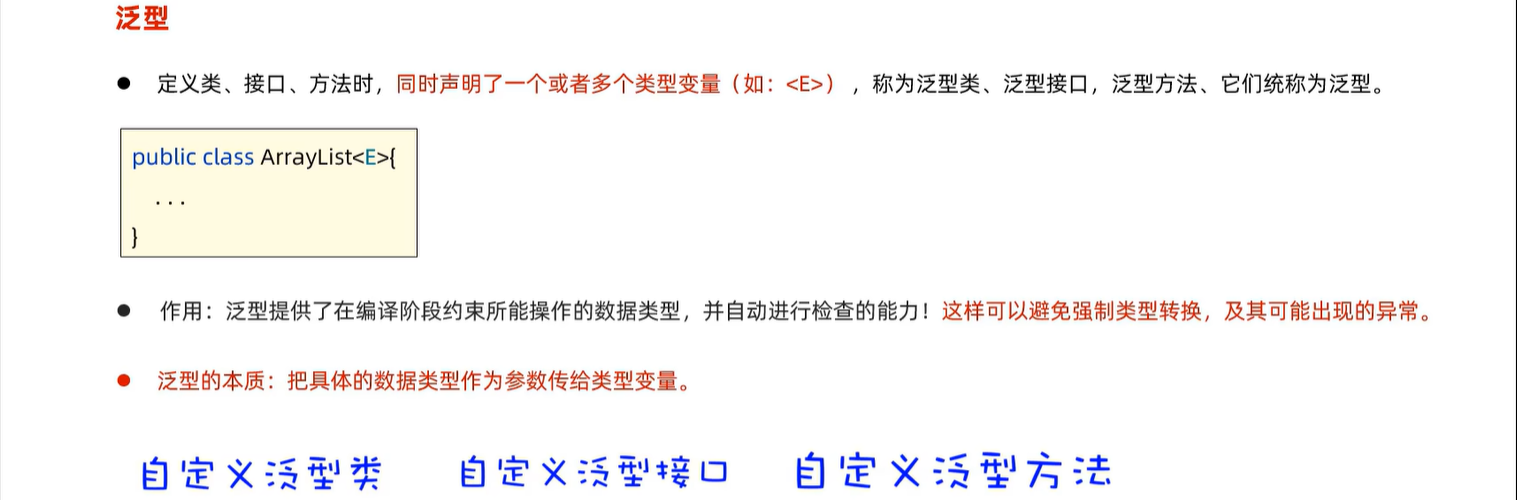
12.1 泛型类
package com.itheima.d6_generics_class;
// 泛型类
public class MyArrayList<E> { //此处的E也可以是其它字母,只是习惯于用E来表示泛型
    private Object[] arr = new Object[10];
    private int size; // 记录当前位置的

    public boolean add(E e){
        arr[size++] = e;
        return true;
    }

    public E get(int index){
        return (E) arr[index];
    }
}
package com.itheima.d6_generics_class;

public class Test {
    public static void main(String[] args) {
        // 目标:掌握泛型类的定义和使用。
        MyArrayList<String> list = new MyArrayList<>();
        list.add("java1");
        list.add("java2");
        String ele = list.get(1);
        System.out.println(ele);
    }
}
声明多个类型变量
package com.itheima.d6_generics_class;

public class MyClass2<E, T> {
    public void put(E e, T t){

    }
}
package com.itheima.d6_generics_class;

public class Test {
    public static void main(String[] args) {
        MyClass2<Cat, String> c2 = new MyClass2<>();
    }
}
限定类型变量
package com.itheima.d6_generics_class;

public class MyClass3<E extends Animal> { // 该泛型变量约束为Animal或者Animal的子类

}
package com.itheima.d6_generics_class;

public class Test {
    public static void main(String[] args) {
        // MyClass3<String> c3 = new MyClass3<>(); // 报错
        MyClass3<Animal> c4 = new MyClass3<>();
        MyClass3<Dog> c5 = new MyClass3<>();
    }
}
12.2 泛型接口

package com.itheima.d7_generics_interface;

import java.util.ArrayList;

// 泛型接口
public interface Data<T> {
    void add(T t);
    ArrayList<T> getByName(String name);
}
package com.itheima.d7_generics_interface;

import java.util.ArrayList;

public class StudentData implements Data<Student>{
    @Override
    public void add(Student student) {

    }

    @Override
    public ArrayList<Student> getByName(String name) {
        return null;
    }
}
package com.itheima.d7_generics_interface;

import java.util.ArrayList;

public class TeacherData implements Data<Teacher>{
    @Override
    public void add(Teacher teacher) {

    }

    @Override
    public ArrayList<Teacher> getByName(String name) {
        return null;
    }
}
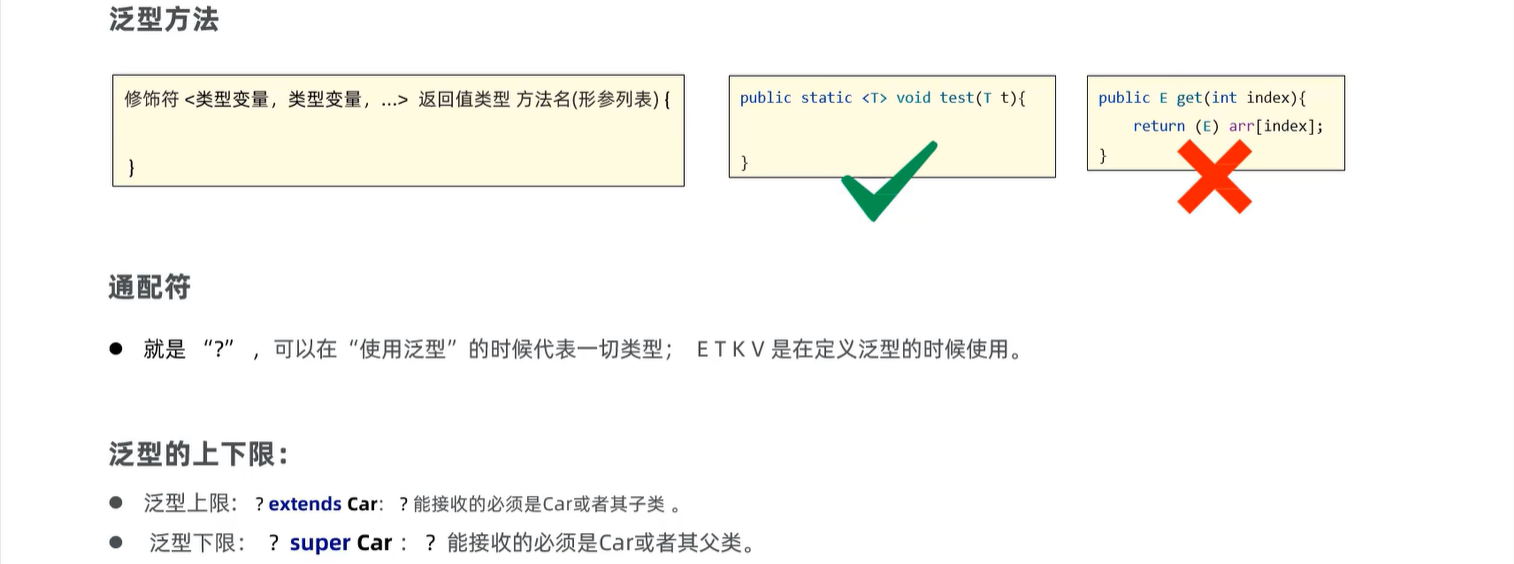
12.3 泛型方法
package com.itheima.d8_generics_method;

import java.util.ArrayList;

public class Test {
    public static void main(String[] args) {
        // 目标:掌握泛型方法的定义和使用。
        String rs = test("java"); //方法的返回值类型为string
        System.out.println(rs);

        Dog d = test(new Dog()); //方法的返回值类型为狗
        System.out.println(d);

    // 泛型方法
    public static <T> T test(T t){
        return t;
    }
}
泛型方法应用:
package com.itheima.d8_generics_method;

public class Car {
}
package com.itheima.d8_generics_method;

public class BENZ extends Car{
}
package com.itheima.d8_generics_method;

public class BMW extends Car{
}
/
public static void go(ArrayList<Car> cars){

}
package com.itheima.d8_generics_method;

import java.util.ArrayList;

public class Test {
    public static void main(String[] args) {
        // 需求:所有的汽车可以一起参加比赛。
        ArrayList<Car> cars = new ArrayList<>();
        cars.add(new BMW());
        cars.add(new BENZ());
        go(cars); // 此处运行正常

        ArrayList<BMW> bmws = new ArrayList<>();
        bmws.add(new BMW());
        bmws.add(new BMW());
        go(bmws); // 此处会报错,因为BMW虽然是Car的子类,但是ArrayList<BMW> 却和    	                           // ArrayList<Car>没有关系

        ArrayList<BENZ> benzs = new ArrayList<>();
        benzs.add(new BENZ());
        benzs.add(new BENZ());
        go(benzs); // 同理此处会报错
    }

    public static void go(ArrayList<Car> cars){

    }

}
为了解决上述报错问题,可以使用泛型方法
public static <T> void go(ArrayList<T> cars){

}
但是上述代码不严谨,非Car的子类的list也可以传入进来:
ArrayList<Dog> dogs = new ArrayList<>();
dogs.add(new Dog());
dogs.add(new Dog());
go(dogs); // 此处也不会报错
因而可以进一步限定类型
public static <T extends Car> void go(ArrayList<T> cars){

}
Array List本身就是一种泛型,上述方法也可以这样实现:
// ? 通配符,在使用泛型的时候可以代表一切类型
public static void go(ArrayList<?> cars){

}
// 进一步限定类型, ? extends Car(上限:上限最多为Car,即Car或Car的子类) ; ? super Car(下限:下限最低为Car,即Car或Car的父类)
public static void go(ArrayList<? extends Car> cars){

}
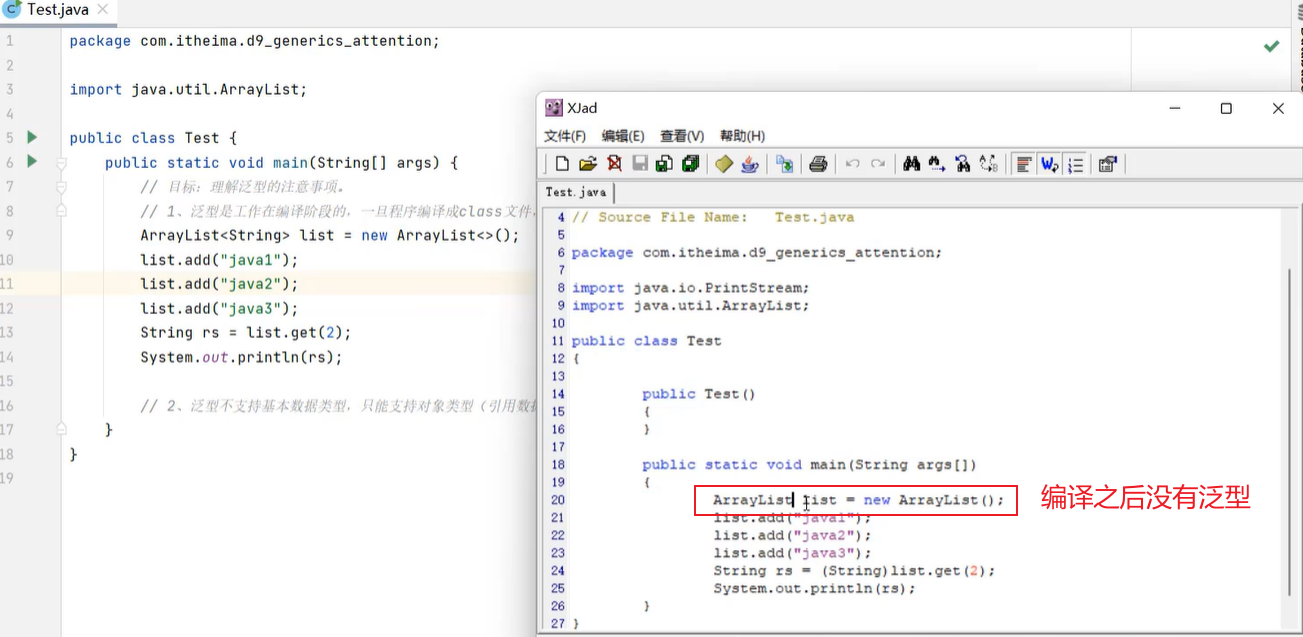
12.4 泛型擦除及注意事项


13. lambda表达式
匿名类常规写法
public class Main {
    public static void main(String[] args) {
        new Animal(){
            @Override
            public void run() {
                System.out.println("狗跑的贼快~~");
            }
        }.run();
    }
}

abstract class Animal{
    public abstract void run();
}
// 注意:Lambda表达式并不是说能简化全部匿名内部类的写法,只能简化**函数式接口**的匿名内部类。错误的代码!
//  Animal a = () -> {
//    System.out.println("狗跑的贼快~~");
//   };
//  a.run();
看如下示例:
interface Swimming{
    void swim();
}
Swimming s = new Swimming(){
    @Override
    public void swim() {
        System.out.println("学生快乐的游泳~~~~");
    }
};
s.swim();
使用lambda表达式进行简化写法:
Swimming s = () -> {
    System.out.println("学生快乐的游泳~~~~");
};
s.swim();
注意:使用了lambda表达式,必须要使用 变量类型接收,不能链式直接调用,否则会报错
() -> {
    System.out.println("学生快乐的游泳~~~~");
}.swim();
)
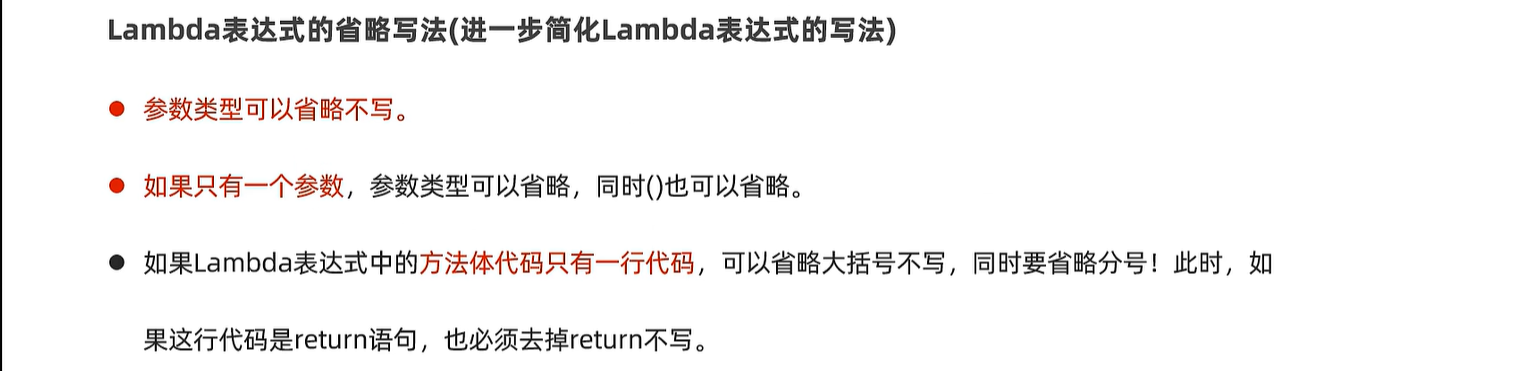
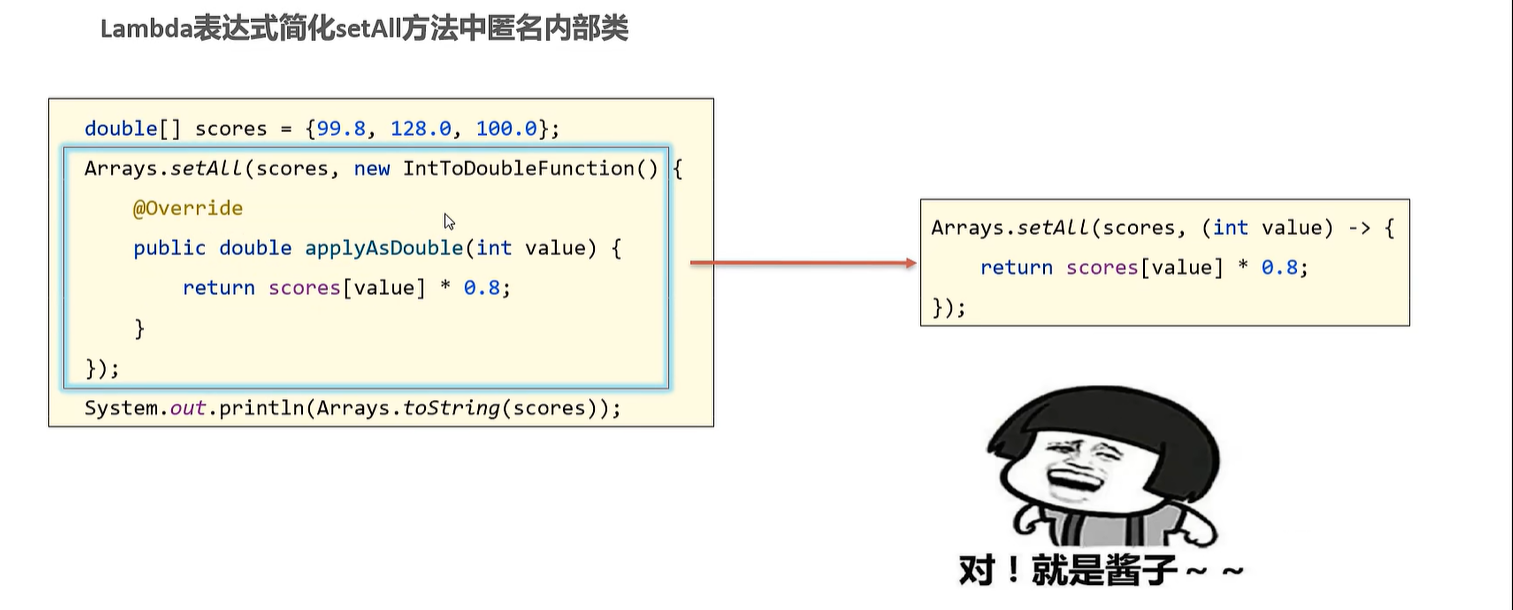
13.1 lambda表达式的省略规则
Arrays.setAll(prices, new IntToDoubleFunction() {
    @Override
    public double applyAsDouble(int value) {
        // value = 0  1  2
        return prices[value] * 0.8;
    }
});
Arrays.setAll(prices, (int value) -> {
    return prices[value] * 0.8;
});
//参数类型可以省略不写
Arrays.setAll(prices, (value) -> {
    return prices[value] * 0.8;
});
//参数只有一个,参数类型可以不写,括号也可以省略
Arrays.setAll(prices, value -> {
    return prices[value] * 0.8;
});
//方法体代码只有一行,可以省略大括号,同时省略分号;
Arrays.setAll(prices, value -> prices[value] * 0.8 );
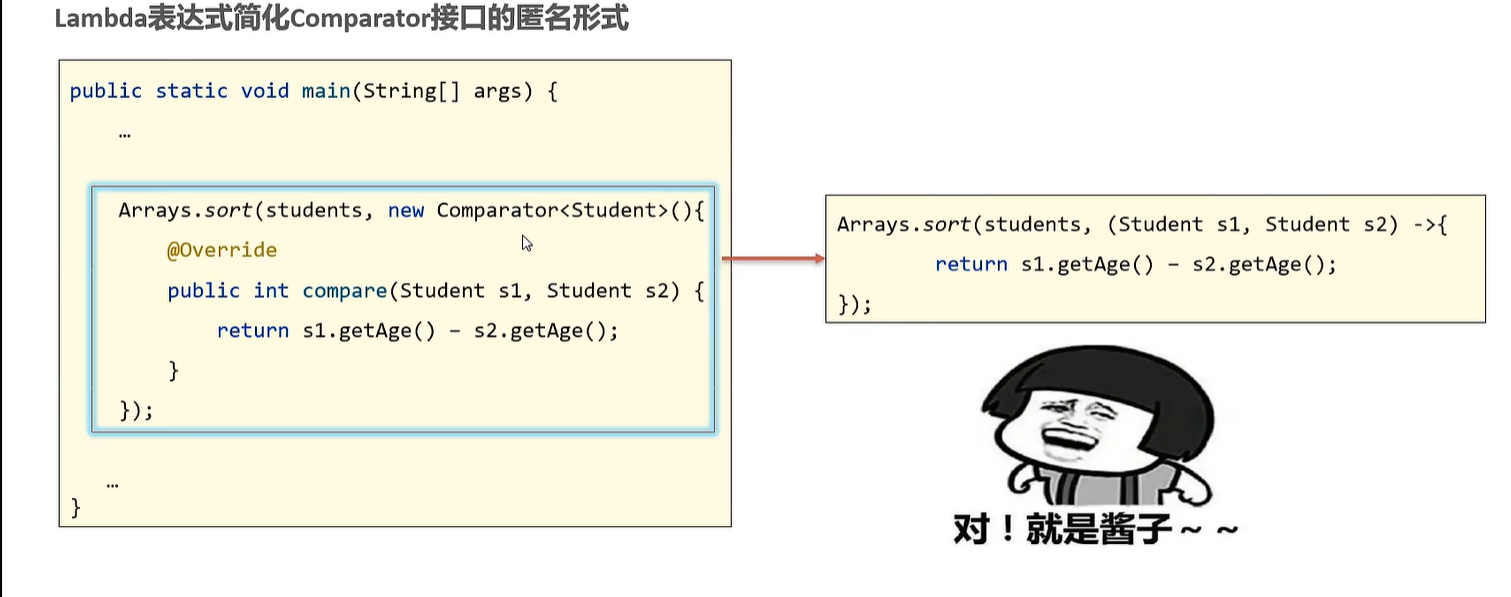
两个参数
Arrays.sort(students, new Comparator<Student>() {
    @Override
    public int compare(Student o1, Student o2) {
        return Double.compare(o1.getHeight(), o2.getHeight()); // 升序
    }
});
Arrays.sort(students, (Student o1, Student o2) -> {
    return Double.compare(o1.getHeight(), o2.getHeight()); // 升序
});
//参数类型可以省略不写
Arrays.sort(students, ( o1,  o2) -> {
    return Double.compare(o1.getHeight(), o2.getHeight()); // 升序
});
//方法体代码只有一行,可以省略大括号,同时省略分号;
Arrays.sort(students, ( o1,  o2) -> Double.compare(o1.getHeight(), o2.getHeight()));
13.2 lambda表达式遍历 collection集合
Collection<String> c = new ArrayList<>();
c.add("赵敏");
c.add("小昭");
c.add("殷素素");
c.add("周芷若");
System.out.println(c); // [赵敏, 小昭, 殷素素, 周芷若]


// default void forEach(Consumer<? super T> action):  结合Lambda表达式遍历集合:
c.forEach(new Consumer<String>() {
    @Override
    public void accept(String s) {
        System.out.println(s);
    }
});

c.forEach((String s) -> {
    System.out.println(s);
});

c.forEach(s  -> {
    System.out.println(s);
});

c.forEach(s  -> System.out.println(s) );

c.forEach(System.out::println );
14. 方法引用
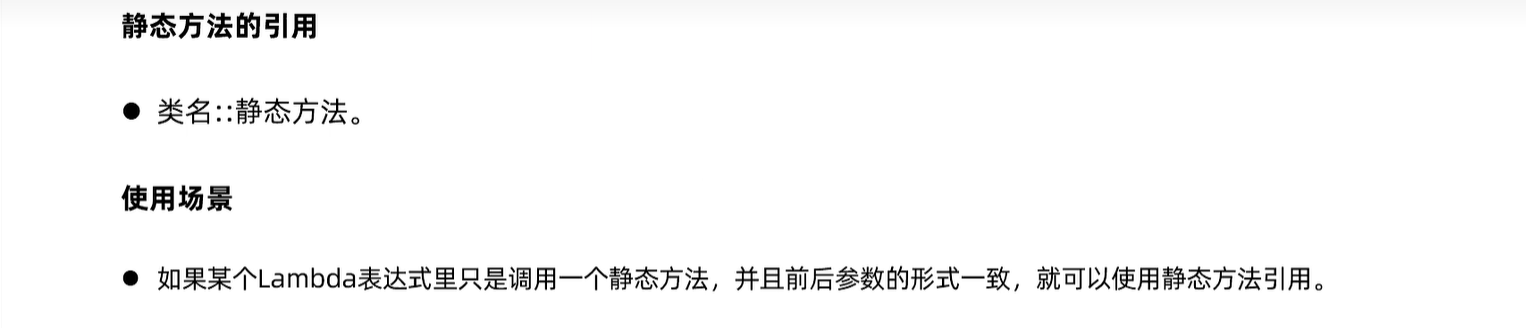
14.1 静态方法引用
public class CompareByData {
    public static int compareByAge(Student o1, Student o2){
        return o1.getAge() - o2.getAge(); // 升序排序的规则
    }

    public int compareByAgeDesc(Student o1, Student o2){
        return o2.getAge() - o1.getAge(); // 降序排序的规则
    }
}
Student[] students = new Student[4];
students[0] = new Student("蜘蛛精", 169.5, 23);
students[1] = new Student("紫霞", 163.8, 26);
students[2] = new Student("紫霞", 163.8, 26);
students[3] = new Student("至尊宝", 167.5, 24);

// 原始写法:对数组中的学生对象,按照年龄升序排序
Arrays.sort(students, new Comparator<Student>() {
    @Override
    public int compare(Student o1, Student o2) {
        return o1.getAge() - o2.getAge(); // 按照年龄升序排序
    }
});

// 使用Lambda简化后的形式
Arrays.sort(students, (o1, o2) -> o1.getAge() - o2.getAge());

//封装成方法后,等价于
Arrays.sort(students, (o1, o2) -> CompareByData.compareByAge(o1, o2));

// 静态方法引用
Arrays.sort(students,  CompareByData::compareByAge);
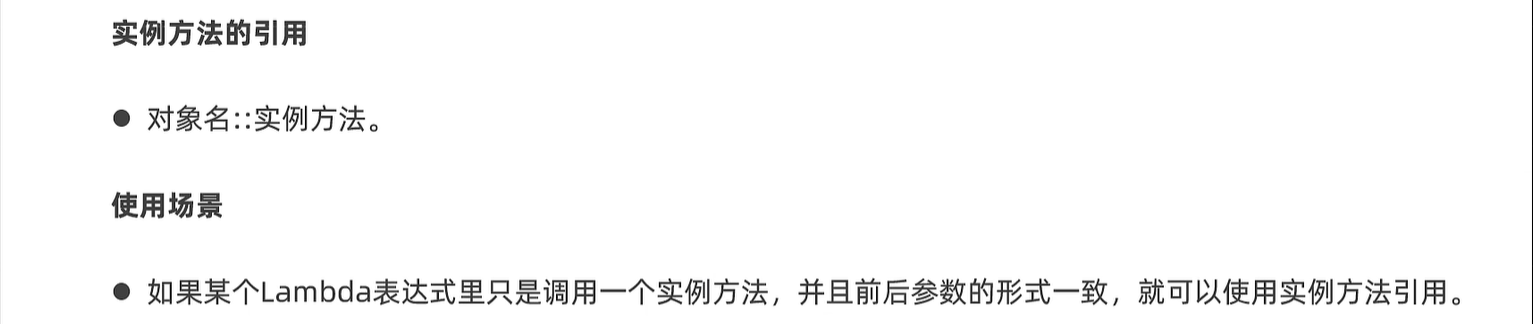
14.2 实例方法引用
Arrays.sort(students, (o1, o2) -> o2.getAge() - o1.getAge()); // 降序

CompareByData compare = new CompareByData();
Arrays.sort(students, (o1, o2) -> compare.compareByAgeDesc(o1, o2)); // 降序
// 实例方法引用
Arrays.sort(students, compare::compareByAgeDesc); // 降序
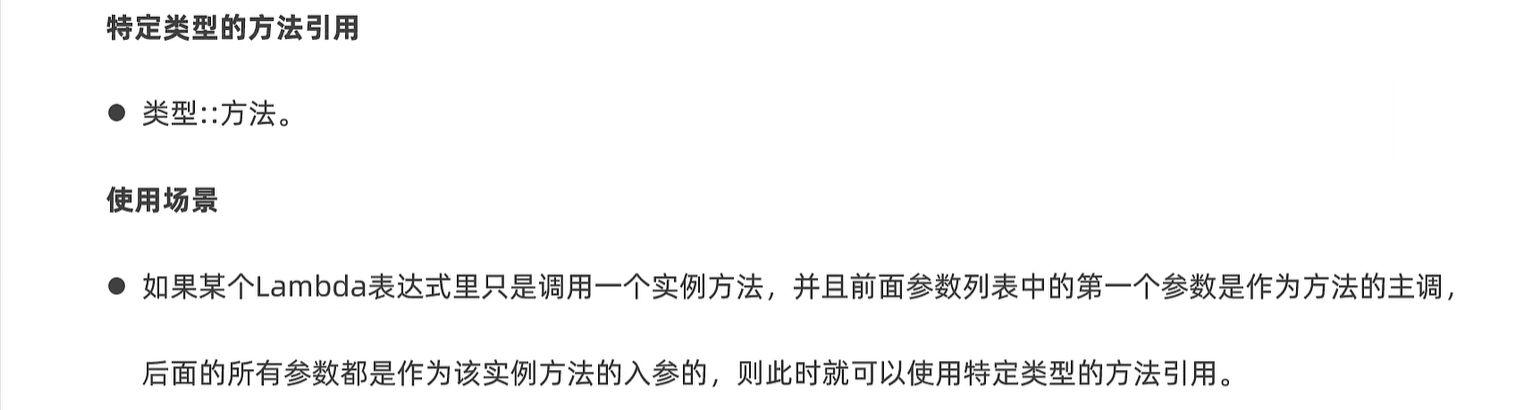
14.3 特定类型的方法引用
String[] names = {"boby", "angela", "Andy" ,"dlei", "caocao", "Babo", "jack", "Cici"};

// 进行排序(默认是按照字符串的首字符编号进行升序排序的)
// Arrays.sort(names);

// 要求忽略首字符大小写进行排序。
Arrays.sort(names, new Comparator<String>() {
    @Override
    public int compare(String o1, String o2) {
        // 制定比较规则。o1 = "Andy"  o2 = "angela"
        return o1.compareToIgnoreCase(o2);
    }
});

// Arrays.sort(names, ( o1,  o2) -> o1.compareToIgnoreCase(o2) ); // o1为方法的主调
// 特定类型的方法引用!
Arrays.sort(names, String::compareToIgnoreCase);
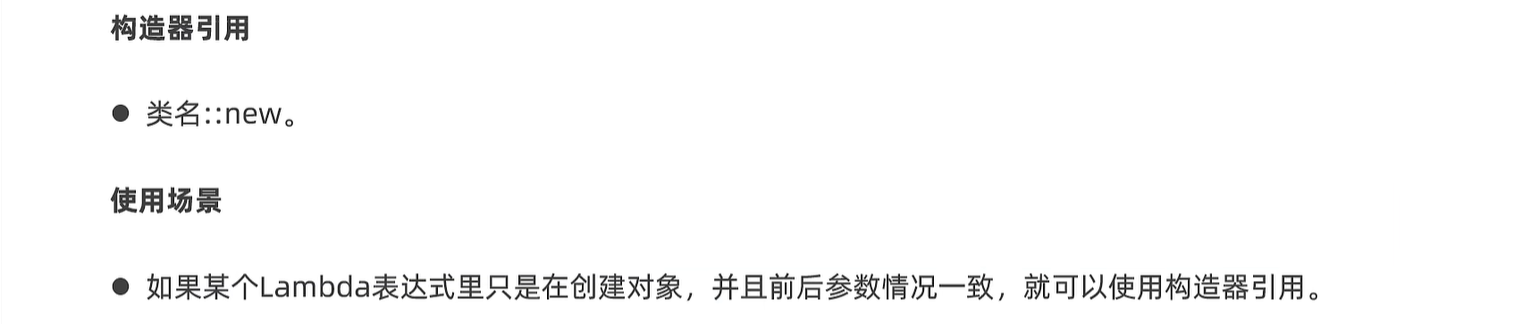
14.4 构造器引用
public class Car {
    private String name;
    private double price;

    public Car() {

    }

    public Car(String name, double price) {
        this.name = name;
        this.price = price;
    }
	//get set方法
}
        // 1、创建这个接口的匿名内部类对象。
CreateCar cc = new CreateCar(){
    @Override
    public Car create(String name, double price) {
        return new Car(name, price);
    }
};

CreateCar cc = ( name,  price) -> new Car(name, price);

// 构造器引用
CreateCar cc = Car::new;
Car c = cc.create("奔驰", 49.9);
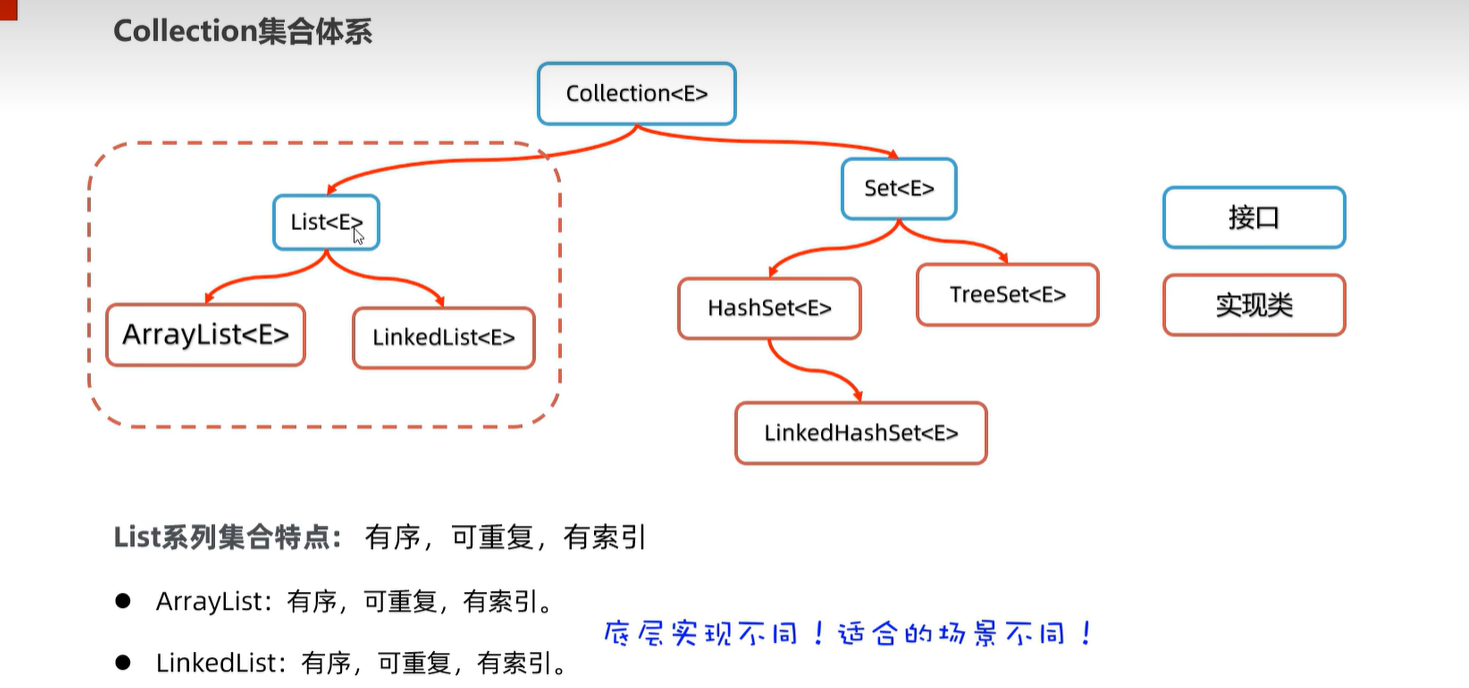
15. Collection集合
15.1 体系
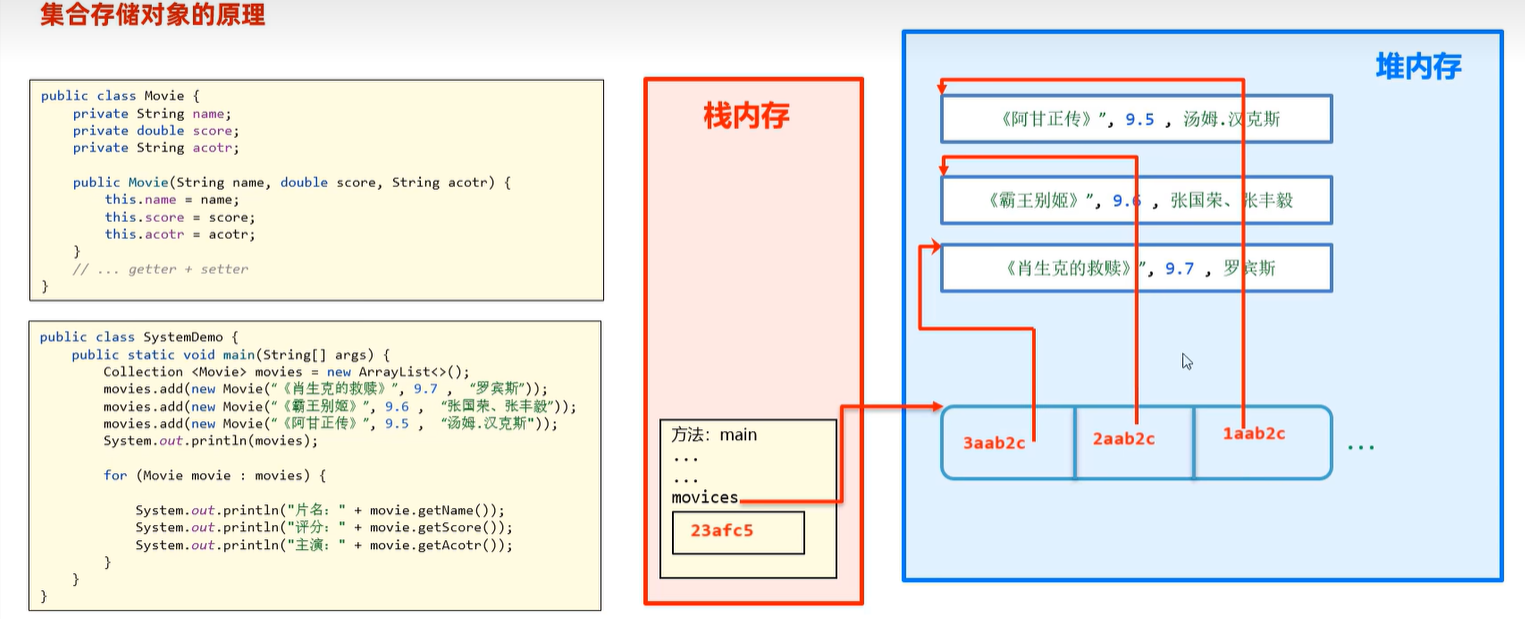
15.2 集合对象的存储原理
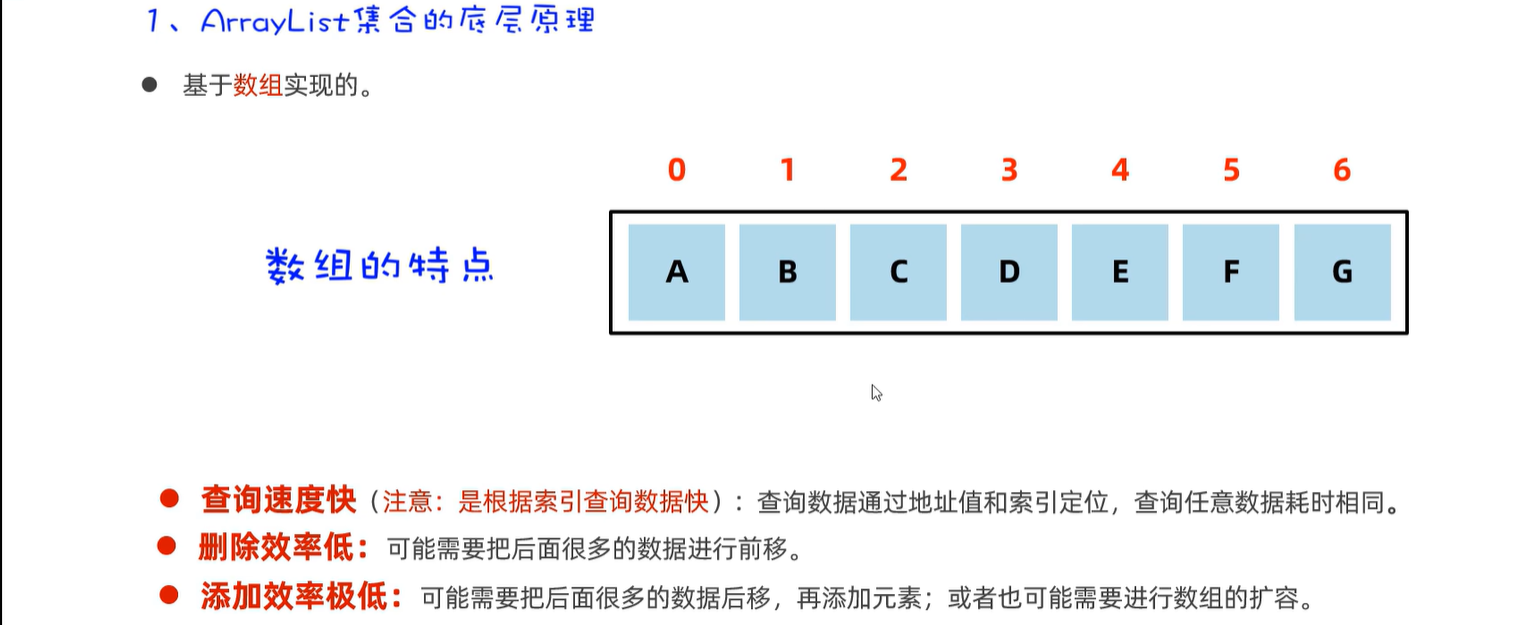
15.3 ArrayList
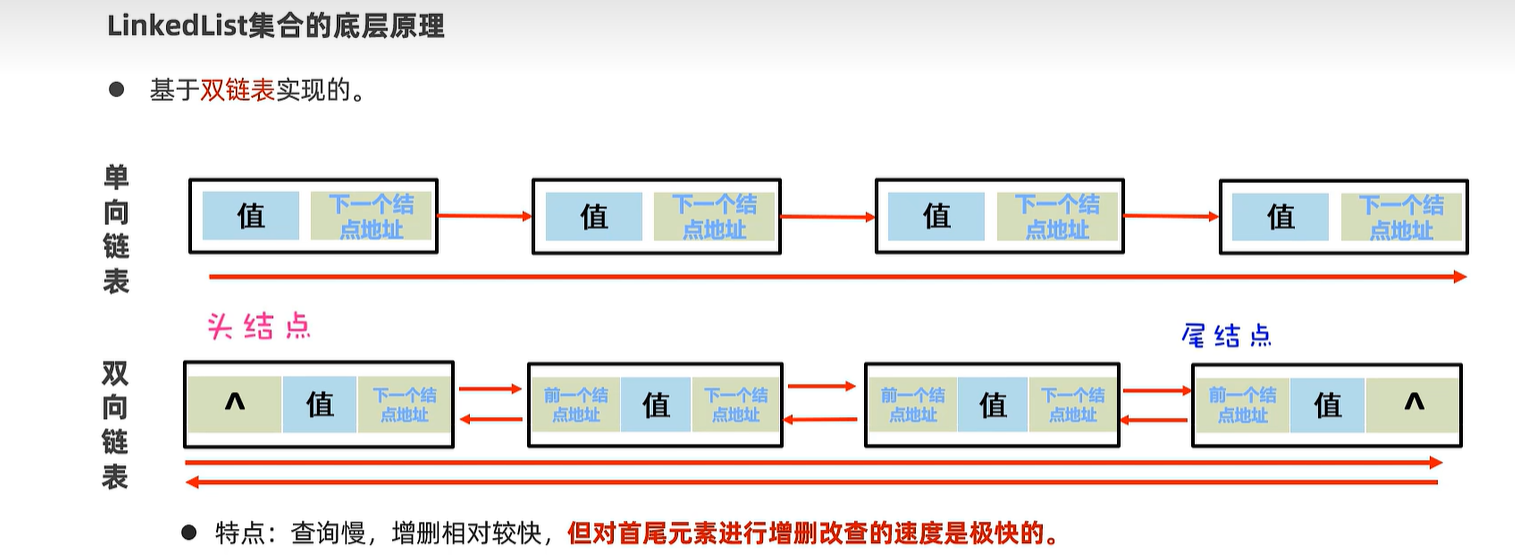
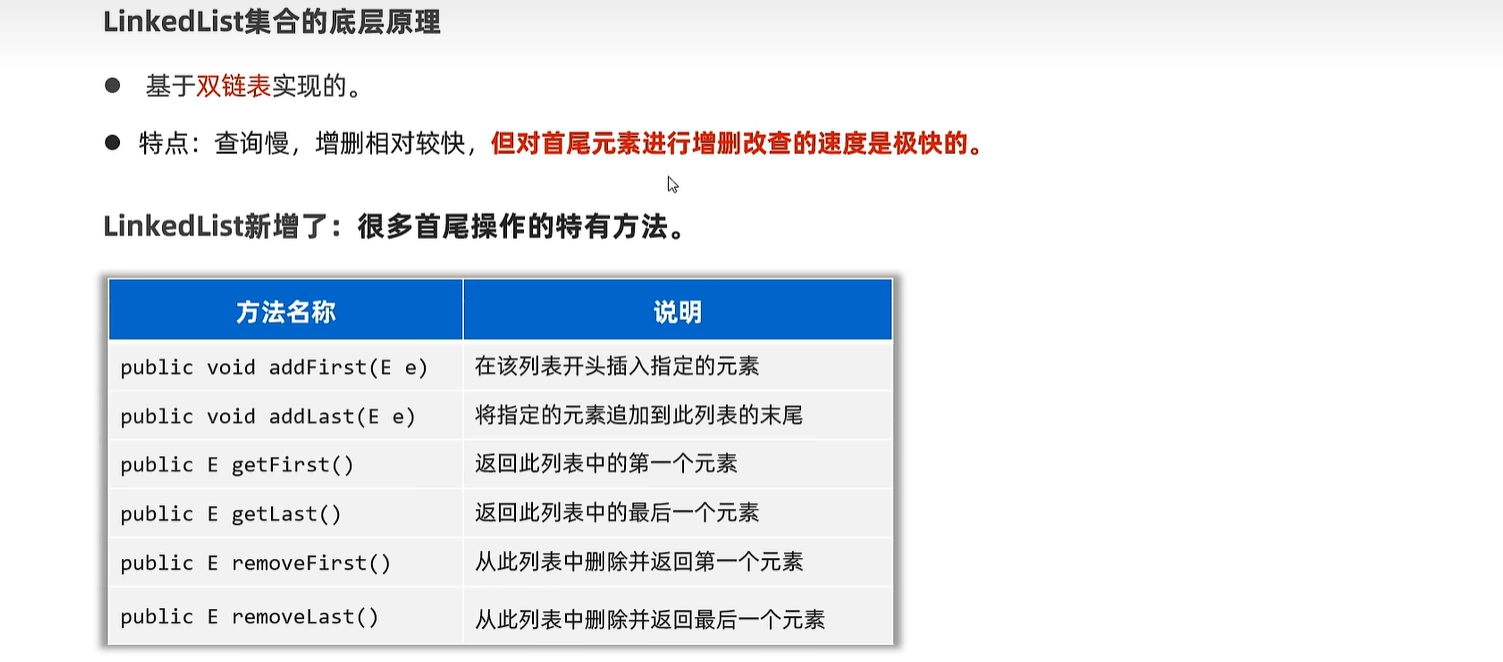
15.4 LinkedList
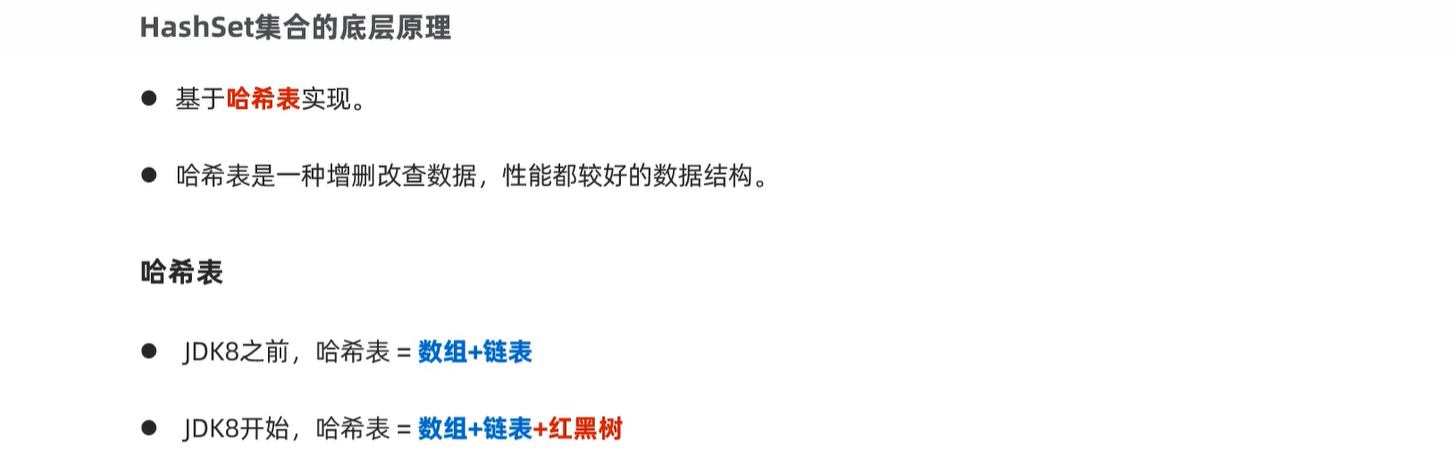
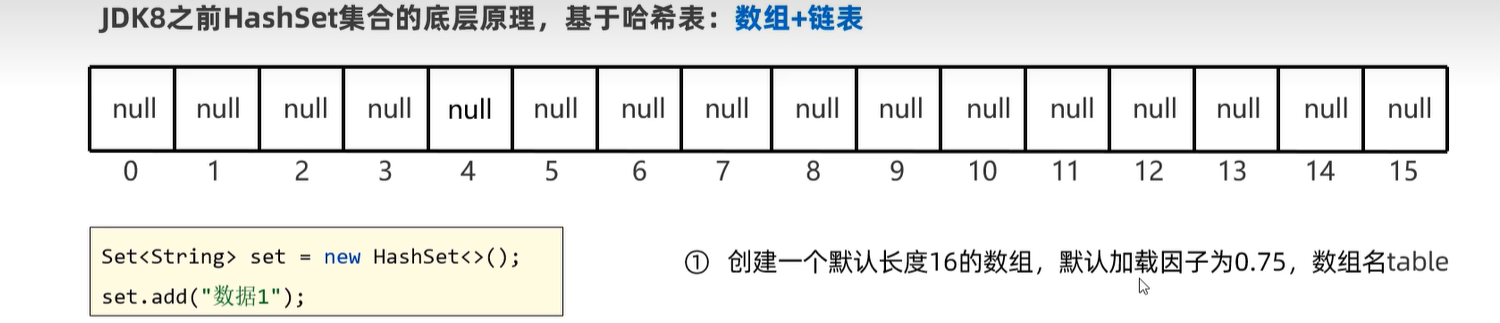
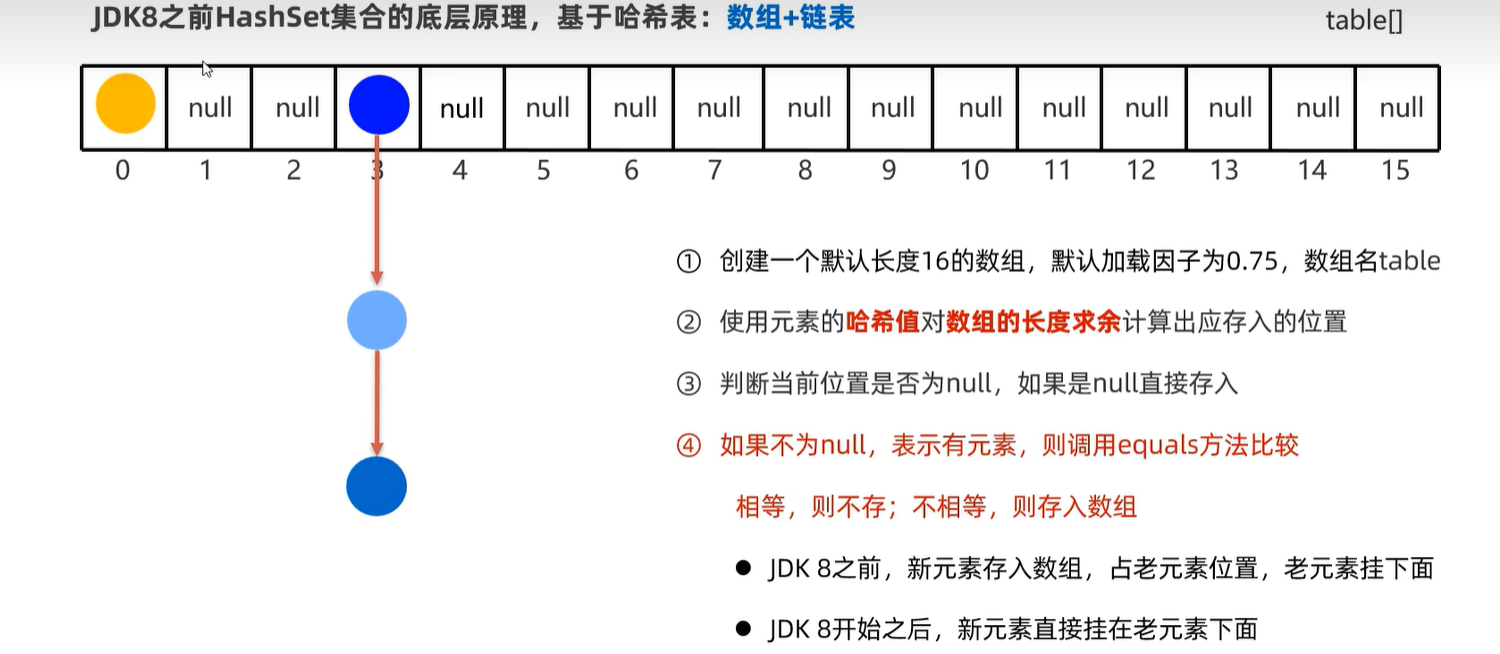
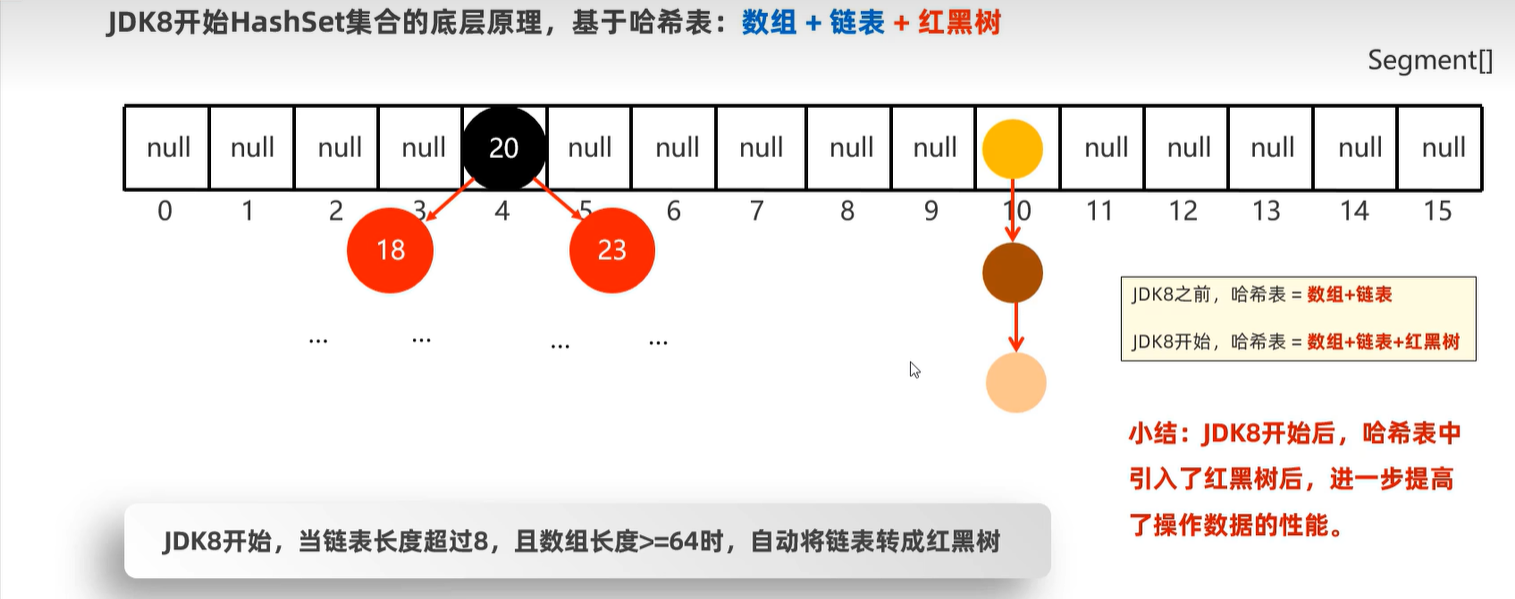
15.5 HashSet
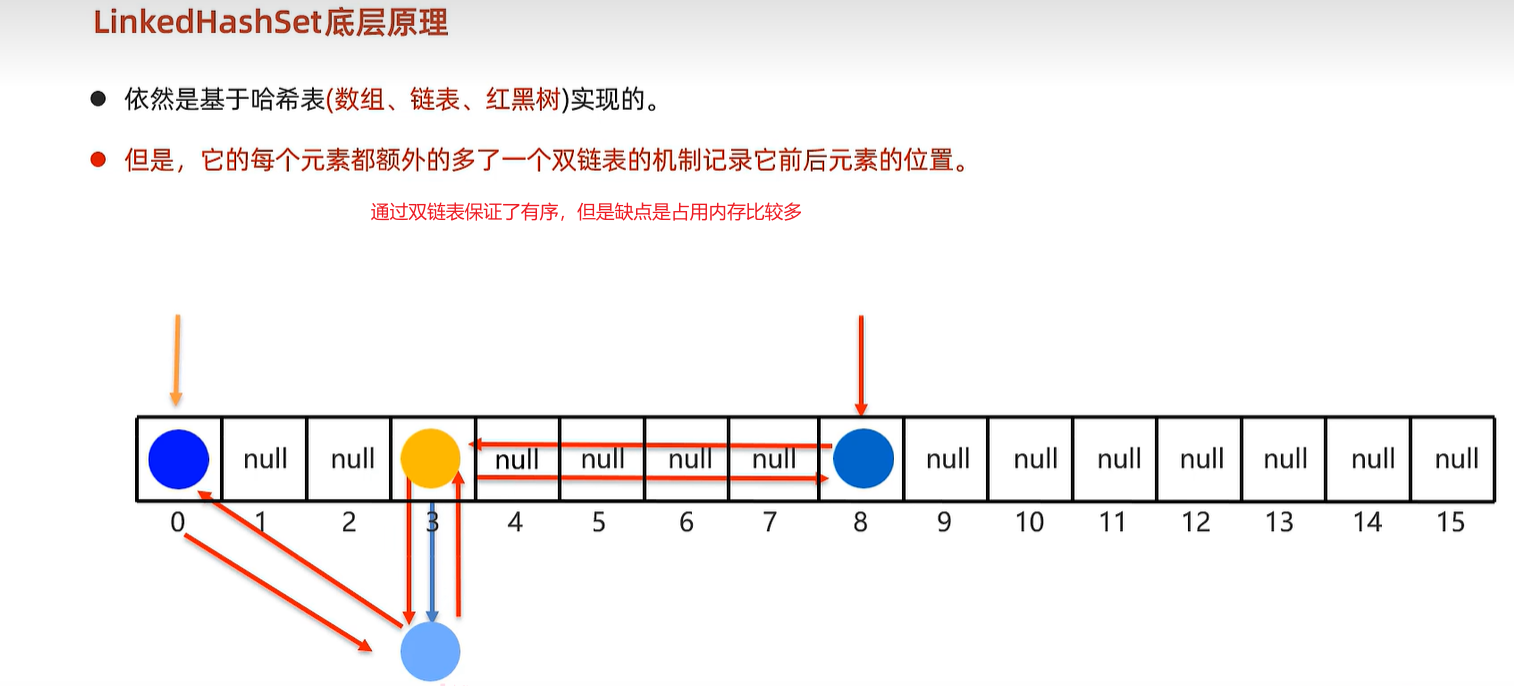
15.6 LinkedHashSet
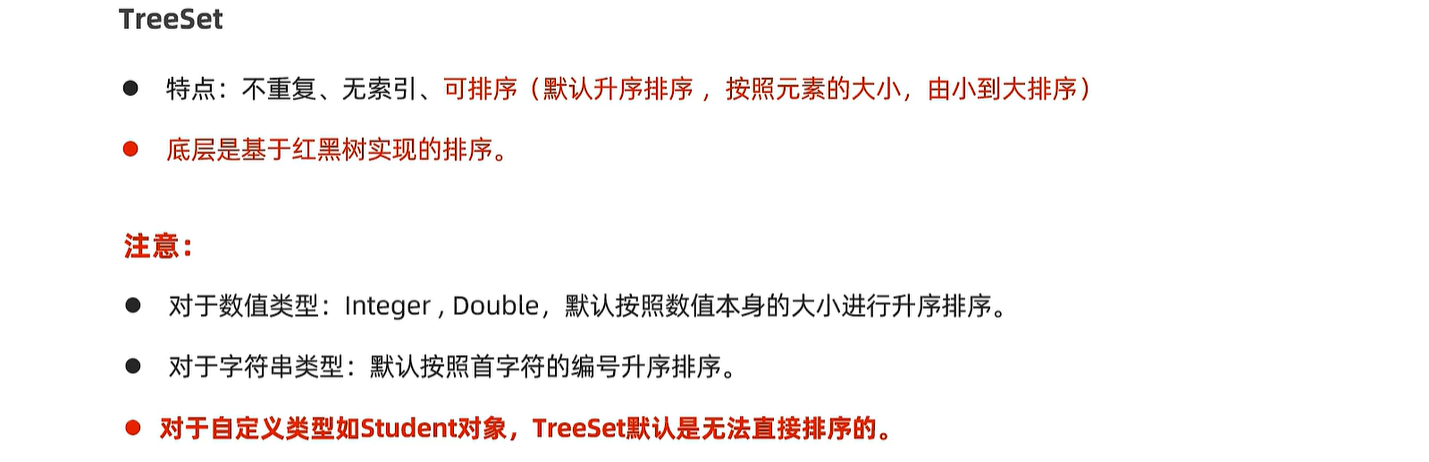
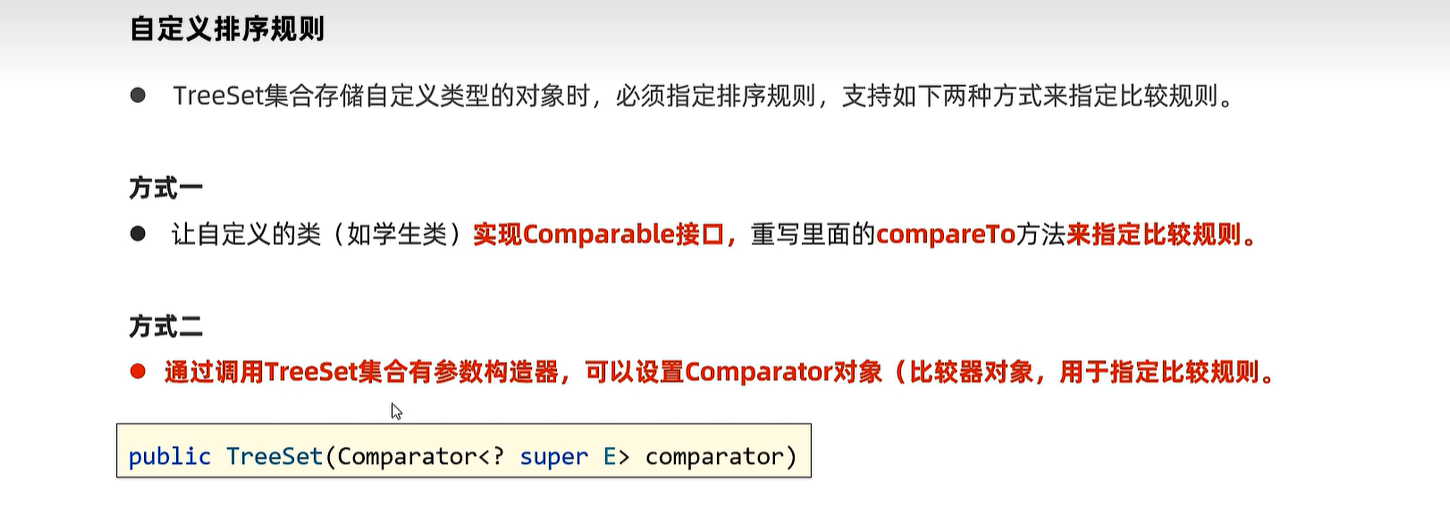
15.7 TreeSet
public class Student implements Comparable<Student>{
    private String name;
    private int age;
    private double height;

    // this  o
    @Override
    public int compareTo(Student o) {
        // 如果认为左边对象大于右边对象返回正整数
        // 如果认为左边对象小于右边对象返回负整数
        // 如果认为左边对象等于右边对象返回0
        // 需求:按照年龄升序排序、
        return this.age - o.age;
    }
}

Set<Integer> set1 = new TreeSet<>();
set1.add(6);
set1.add(5);
set1.add(5);
set1.add(7);
System.out.println(set1);
public class Student {
    private String name;
    private int age;
    private double height;
}

// 如果student类本身已经实现了比较接口, TreeSet就近选择自己自带的比较器对象进行排序
Set<Student> students = new TreeSet<>(new Comparator<Student>() {
    @Override
    public int compare(Student o1, Student o2) {
        // 需求:按照身高升序排序
        return Double.compare(o1.getHeight() , o2.getHeight());
    }
});
Set<Student> students = new TreeSet<>(( o1,  o2) ->  Double.compare(o1.getHeight() , o2.getHeight()));
students.add(new Student("蜘蛛精",23, 169.7));
students.add(new Student("紫霞",22, 169.8));
students.add(new Student("至尊宝",26, 165.5));
students.add(new Student("牛魔王",22, 183.5));
System.out.println(students);
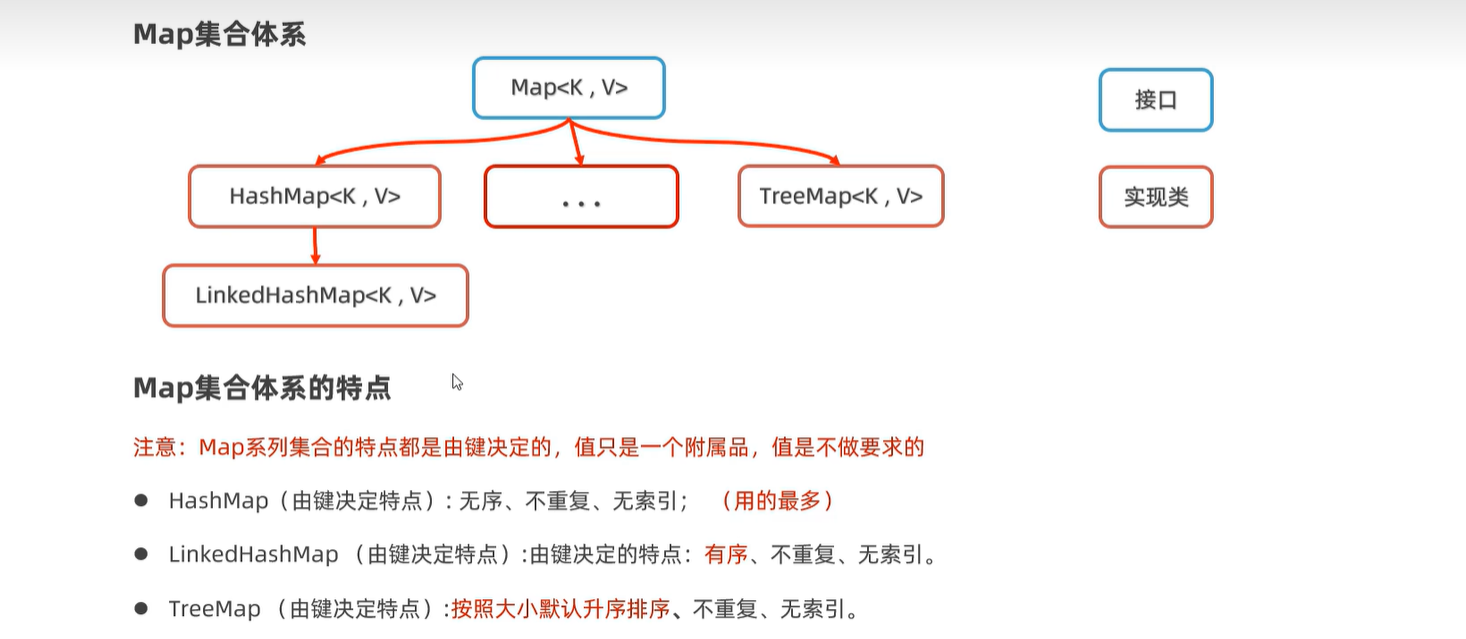
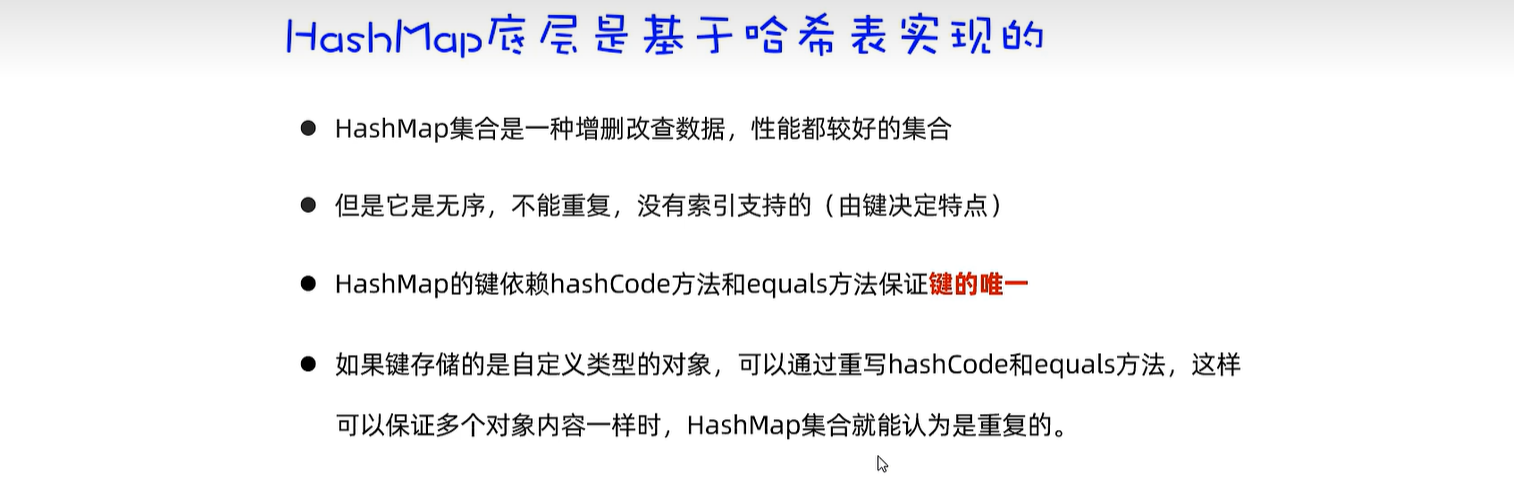
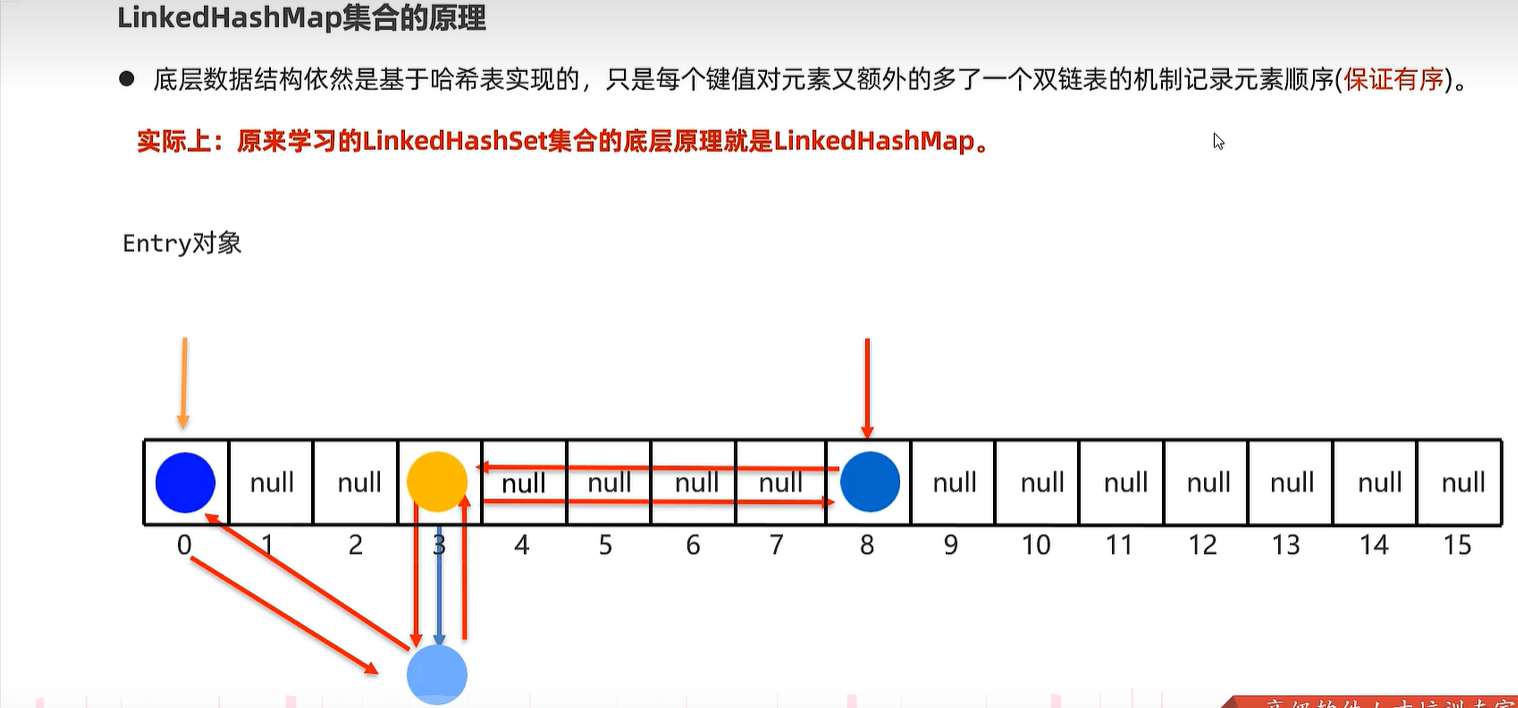
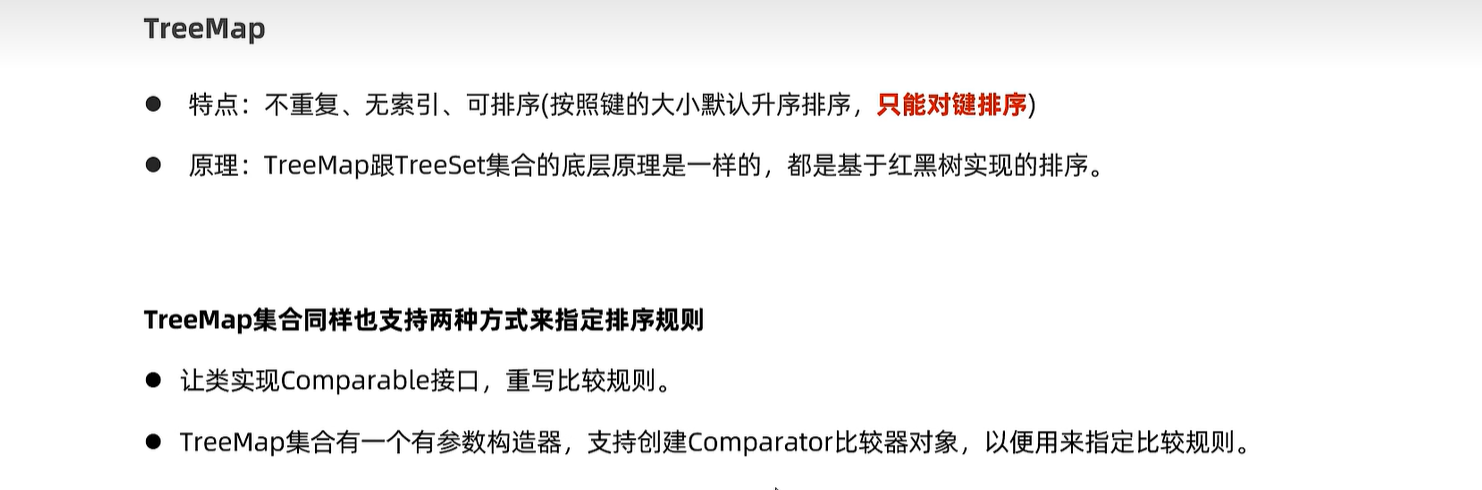
16. Map集合
16.1 体系
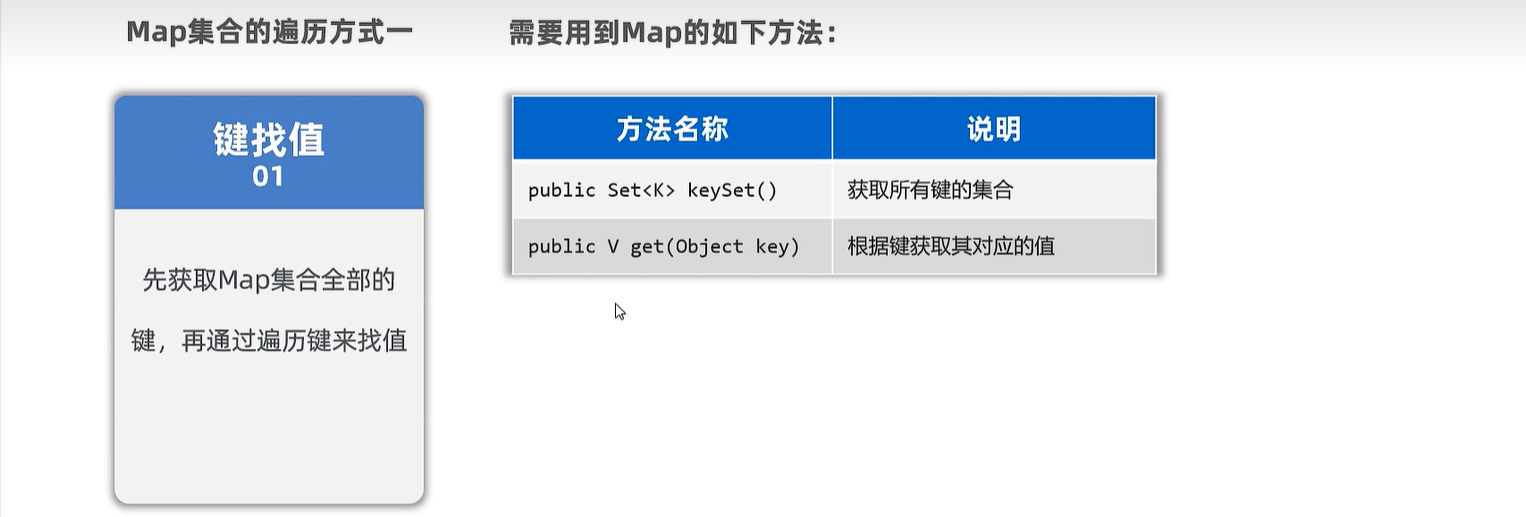
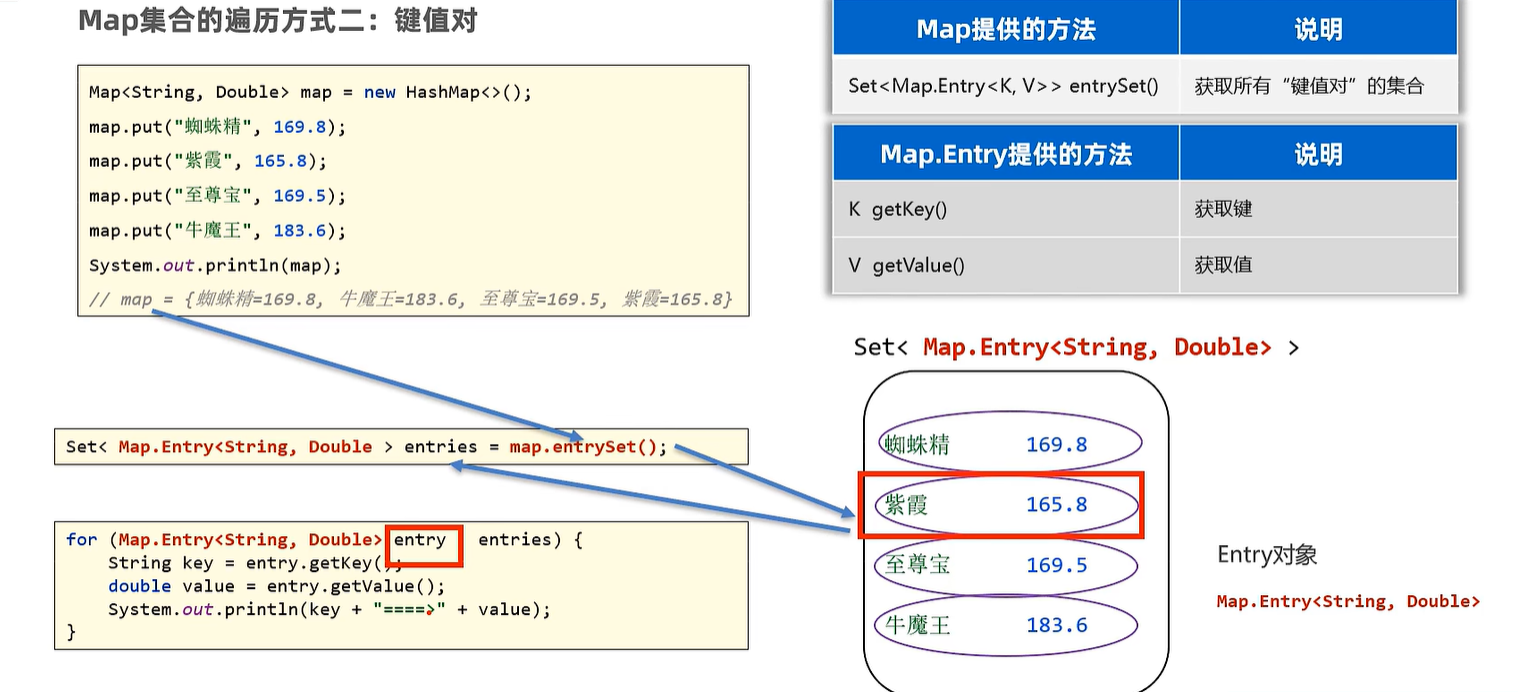
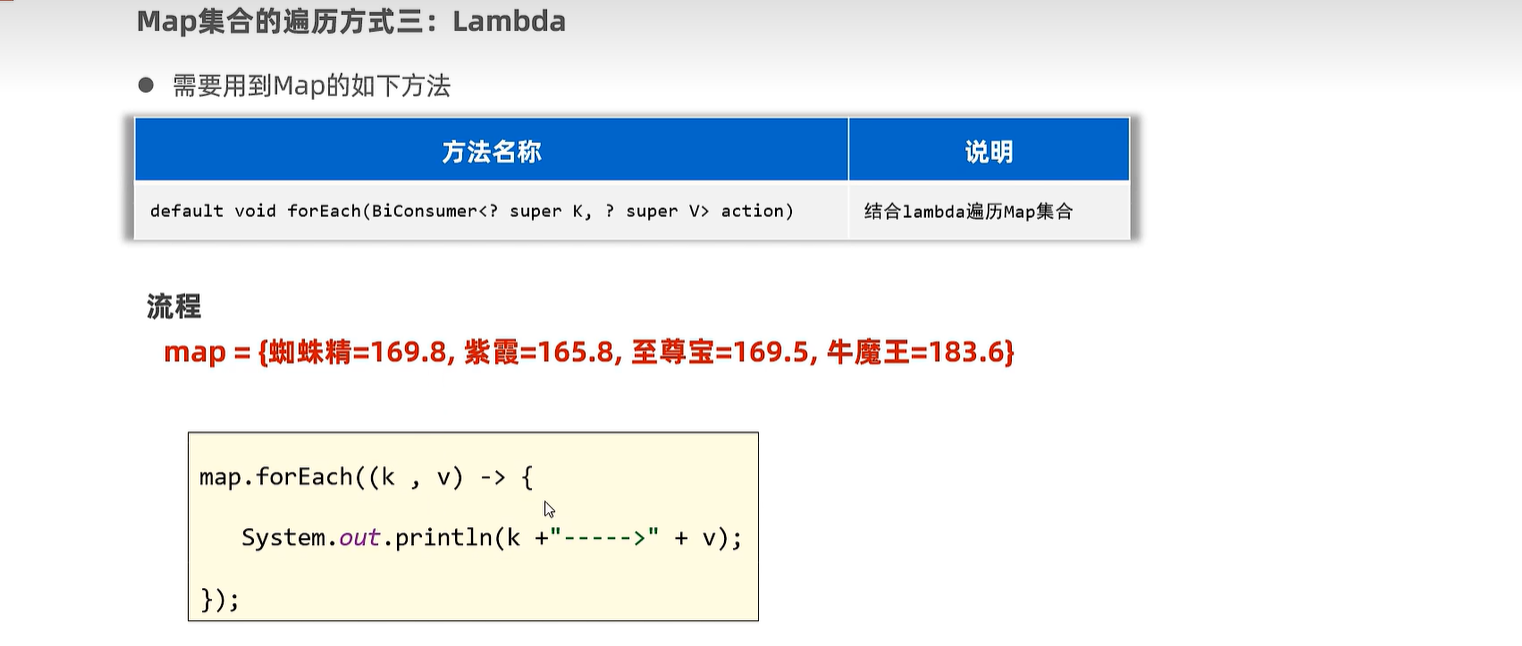
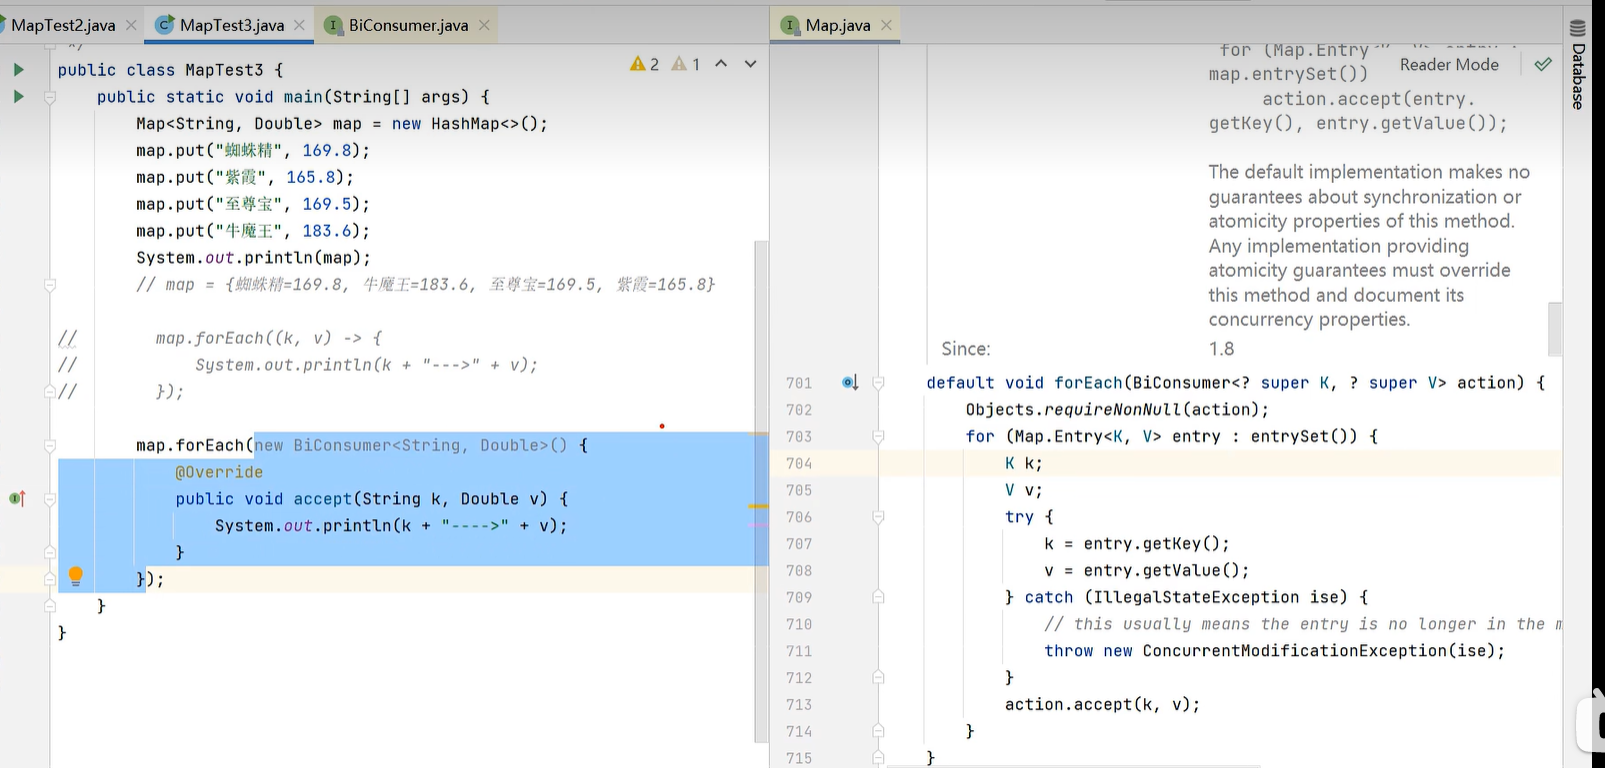
16.2 遍历方法
16.3 底层原理
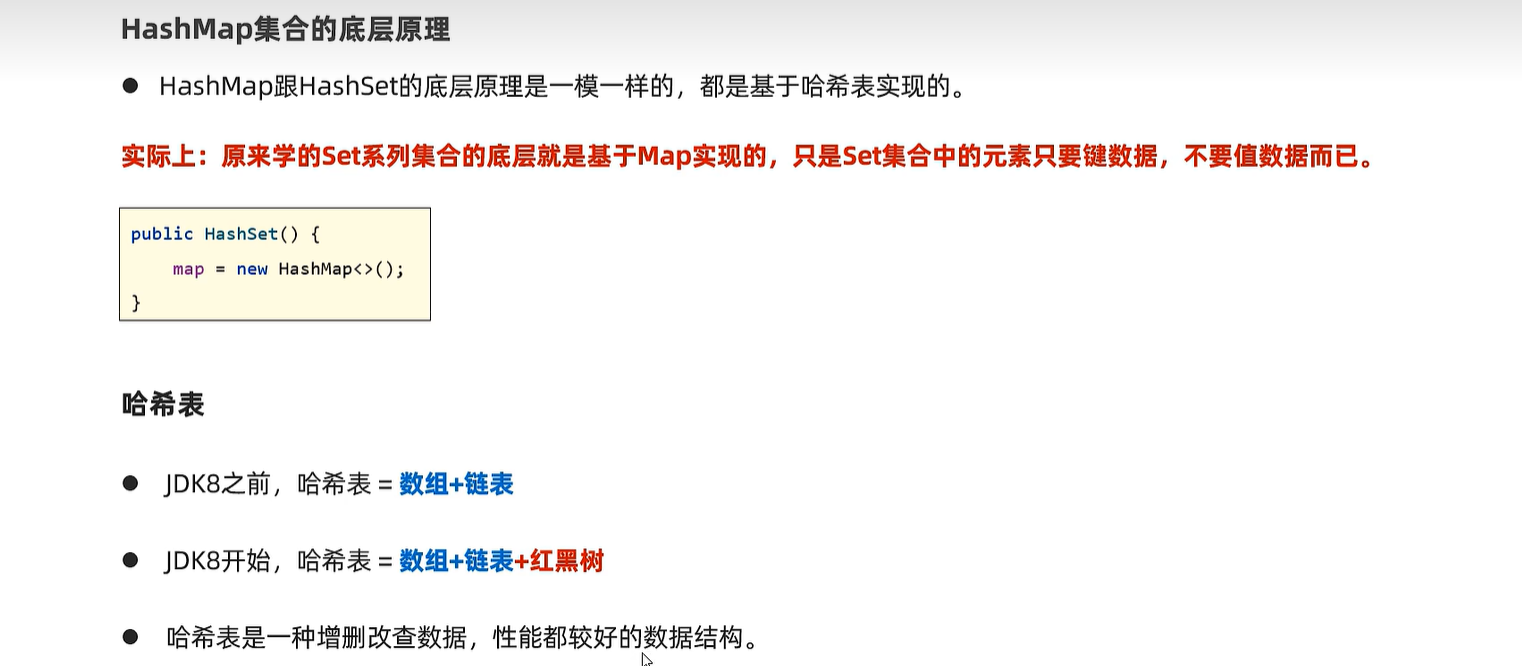
17. Stream
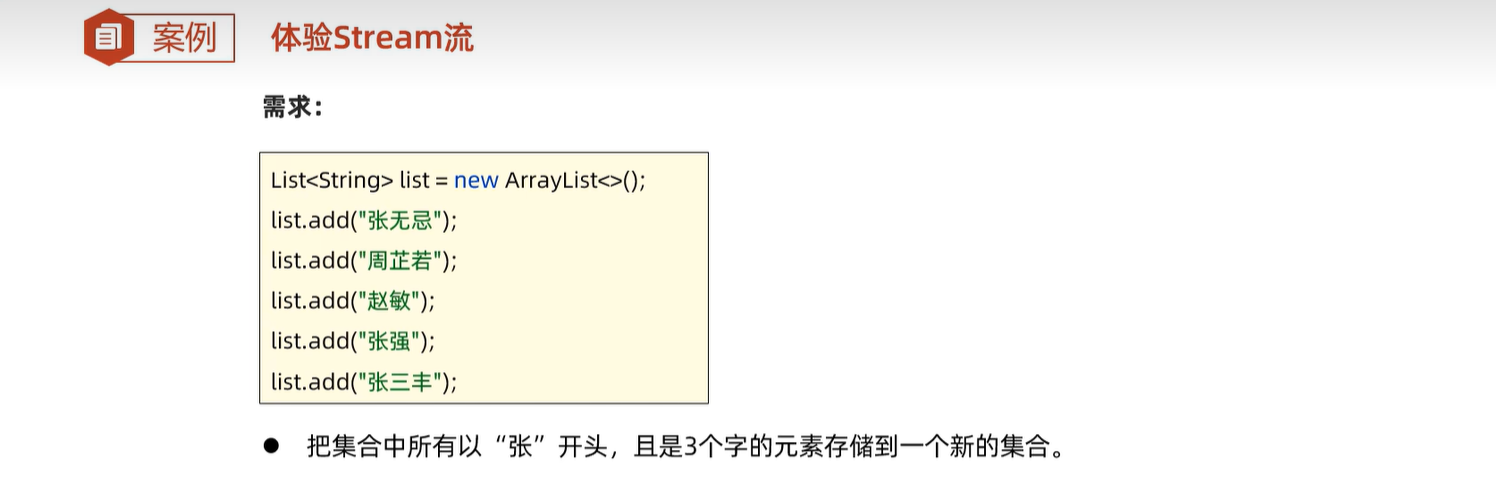
   public static void main(String[] args) {
        List<String> names = new ArrayList<>();
        Collections.addAll(names, "张三丰","张无忌","周芷若","赵敏","张强");
        System.out.println(names);
        // names = [张三丰, 张无忌, 周芷若, 赵敏, 张强]


        // 找出姓张,且是3个字的名字,存入到一个新集合中去。
        List<String> list = new ArrayList<>();
        for (String name : names) {
            if(name.startsWith("张") && name.length() == 3){
                list.add(name);
            }
        }
        System.out.println(list);

        // 开始使用Stream流来解决这个需求。
        List<String> list2 = names.stream().filter(s -> s.startsWith("张"))
                .filter(a -> a.length()==3).collect(Collectors.toList());
        System.out.println(list2);
    }
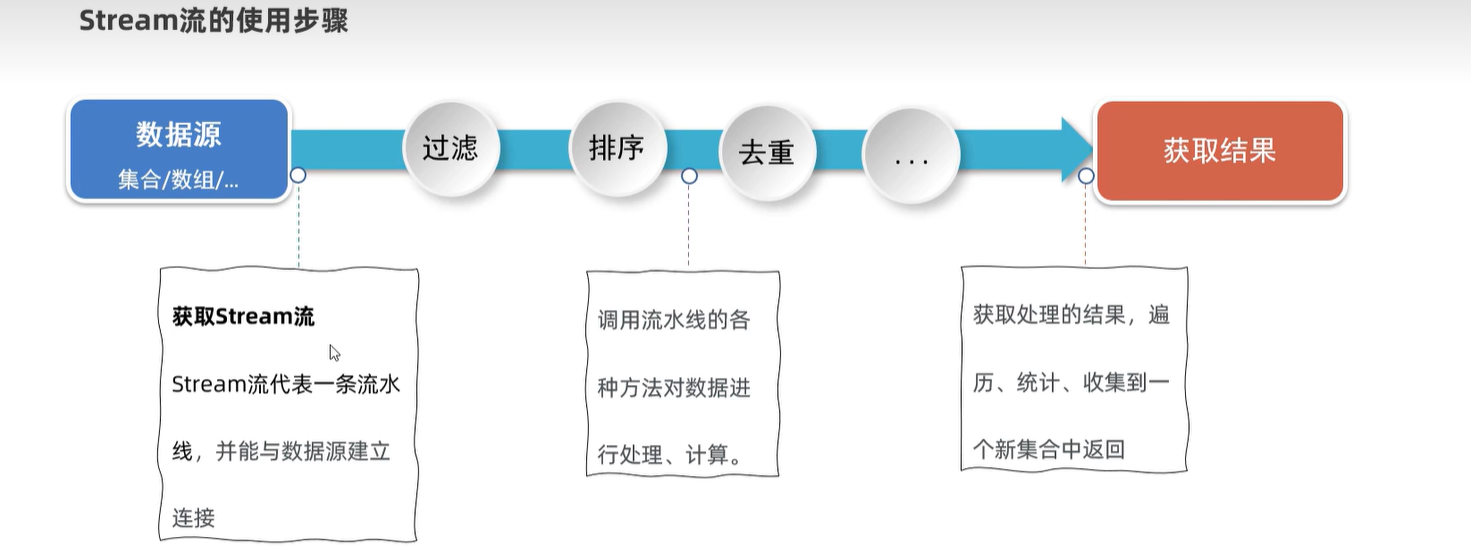
17.1 获取stream流
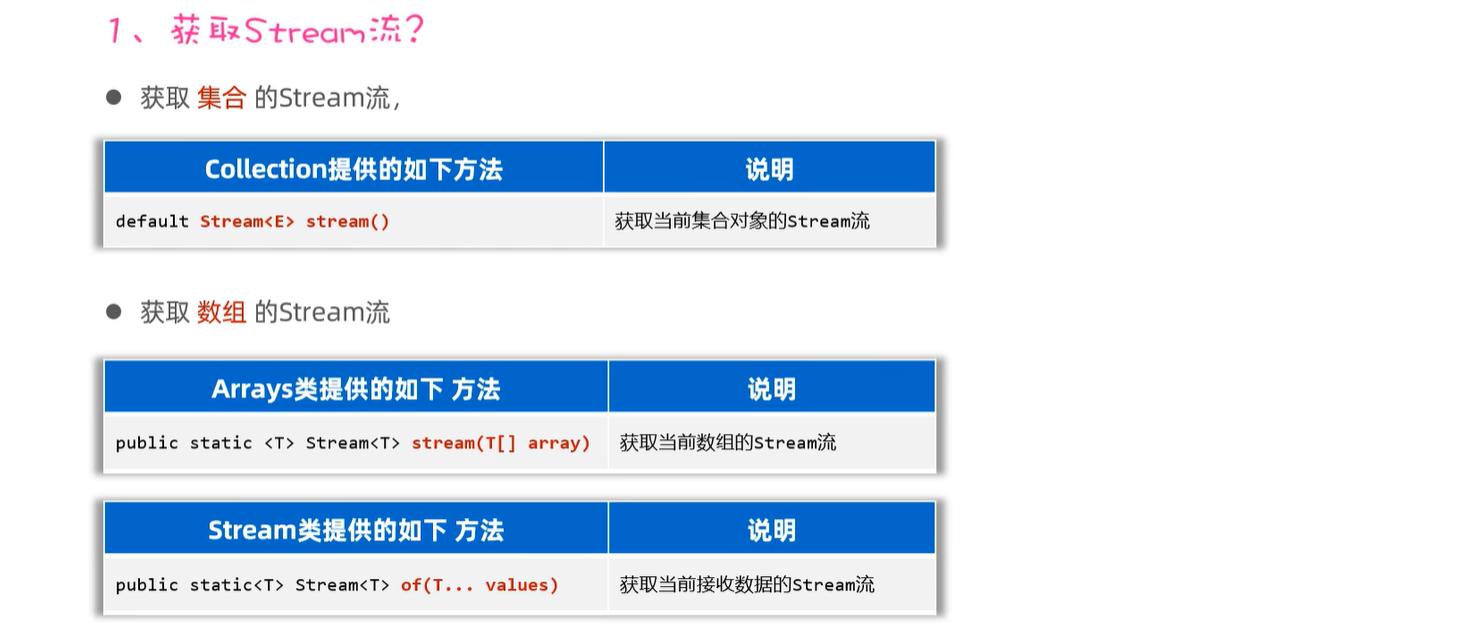
    public static void main(String[] args) {
        // 1、如何获取List集合的Stream流?
        List<String> names = new ArrayList<>();
        Collections.addAll(names, "张三丰","张无忌","周芷若","赵敏","张强");
        Stream<String> stream = names.stream();

        // 2、如何获取Set集合的Stream流?
        Set<String> set = new HashSet<>();
        Collections.addAll(set, "刘德华","张曼玉","蜘蛛精","马德","德玛西亚");
        Stream<String> stream1 = set.stream();
        stream1.filter(s -> s.contains("德")).forEach(s -> System.out.println(s));

        // 3、如何获取Map集合的Stream流?
        Map<String, Double> map = new HashMap<>();
        map.put("古力娜扎", 172.3);
        map.put("迪丽热巴", 168.3);
        map.put("马尔扎哈", 166.3);
        map.put("卡尔扎巴", 168.3);
        // 3.1 获取键和值对
        Set<String> keys = map.keySet();
        Stream<String> ks = keys.stream();
        Collection<Double> values = map.values();
        Stream<Double> vs = values.stream();
        // 3.2 转成entrySet
        Set<Map.Entry<String, Double>> entries = map.entrySet();
        Stream<Map.Entry<String, Double>> kvs = entries.stream();
        kvs.filter(e -> e.getKey().contains("巴"))
                .forEach(e -> System.out.println(e.getKey()+ "-->" + e.getValue()));

        // 4、如何获取数组的Stream流?
        String[] names2 = {"张翠山", "东方不败", "唐大山", "独孤求败"};
        //4.1 Arrays.stream()
        Stream<String> s1 = Arrays.stream(names2);
        //4.2 Stream.of()
        Stream<String> s2 = Stream.of(names2);
    }
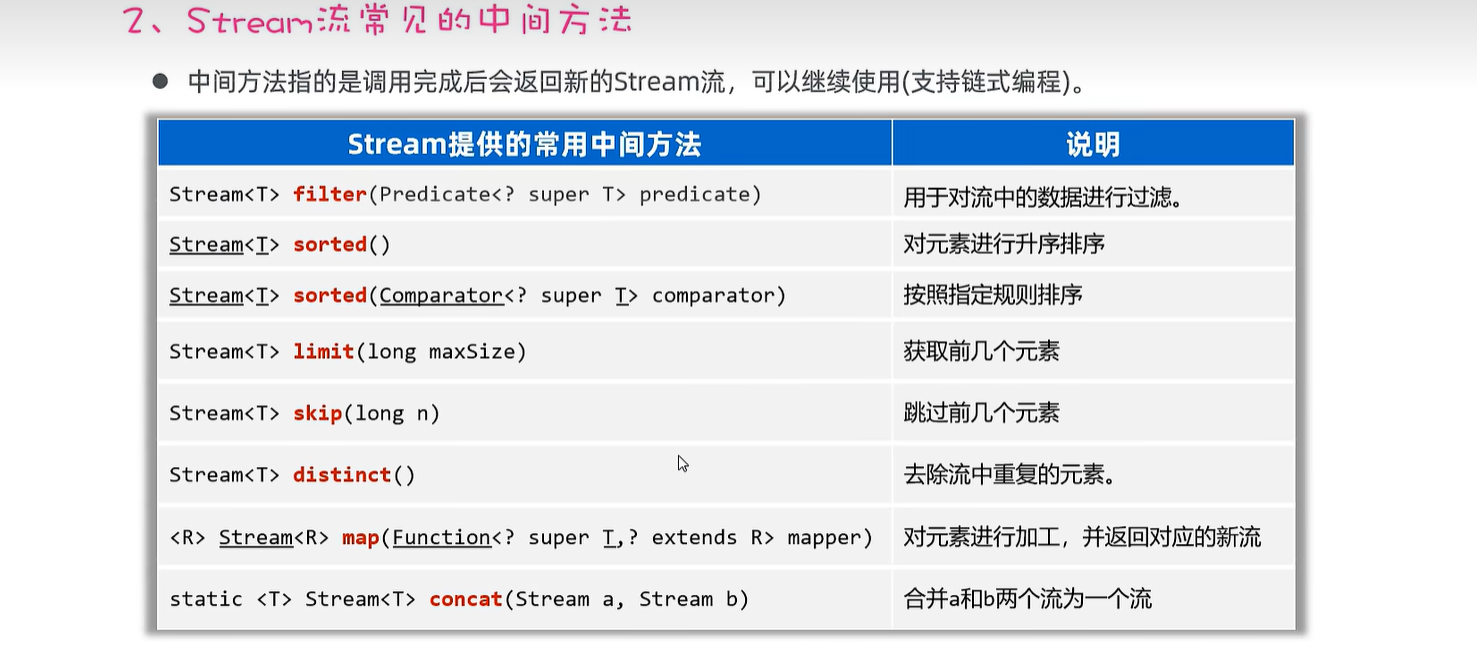
17.2 stream流常用的中间方法
public static void main(String[] args) {
        List<Double> scores = new ArrayList<>();
        Collections.addAll(scores, 88.5, 100.0, 60.0, 99.0, 9.5, 99.6, 25.0);
        // 需求1:找出成绩大于等于60分的数据,并升序后,再输出。
        scores.stream().filter(s -> s >= 60).sorted().forEach(s -> System.out.println(s));

        List<Student> students = new ArrayList<>();
        Student s1 = new Student("蜘蛛精", 26, 172.5);
        Student s2 = new Student("蜘蛛精", 26, 172.5);
        Student s3 = new Student("紫霞", 23, 167.6);
        Student s4 = new Student("白晶晶", 25, 169.0);
        Student s5 = new Student("牛魔王", 35, 183.3);
        Student s6 = new Student("牛夫人", 34, 168.5);
        Collections.addAll(students, s1, s2, s3, s4, s5, s6);
        // 需求2:找出年龄大于等于23,且年龄小于等于30岁的学生,并按照年龄降序输出.
        students.stream().filter(s -> s.getAge() >= 23 && s.getAge() <= 30)
                .sorted((o1, o2) -> o2.getAge() - o1.getAge())
                .forEach(s -> System.out.println(s));

        // 需求3:取出身高最高的前3名学生,并输出。
        students.stream().sorted((o1, o2) -> Double.compare(o2.getHeight(), o1.getHeight()))
                .limit(3).forEach(System.out::println);
        System.out.println("----------------------------------------------------------------");

        // 需求4:取出身高倒数的2名学生,并输出。   s1 s2 s3 s4 s5 s6
        students.stream().sorted((o1, o2) -> Double.compare(o2.getHeight(), o1.getHeight()))
                .skip(students.size() - 2).forEach(System.out::println);

        // 需求5:找出身高超过168的学生叫什么名字,要求去除重复的名字,再输出。
        students.stream().filter(s -> s.getHeight() > 168).map(Student::getName)
               .distinct().forEach(System.out::println);

        // distinct去重复,自定义类型的对象(希望内容一样就认为重复,重写hashCode,equals)
        students.stream().filter(s -> s.getHeight() > 168)
                .distinct().forEach(System.out::println);

        // 需求6:合并两个stream
        Stream<String> st1 = Stream.of("张三", "李四");
        Stream<String> st2 = Stream.of("张三2", "李四2", "王五");
        Stream<String> allSt = Stream.concat(st1, st2);
        allSt.forEach(System.out::println);
    }
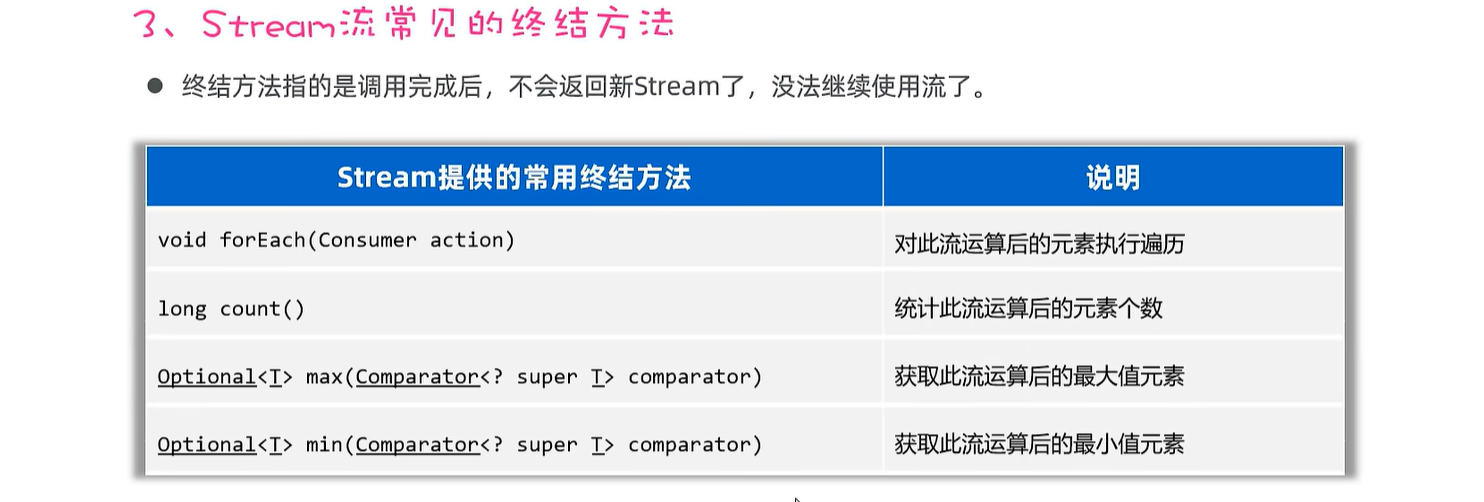
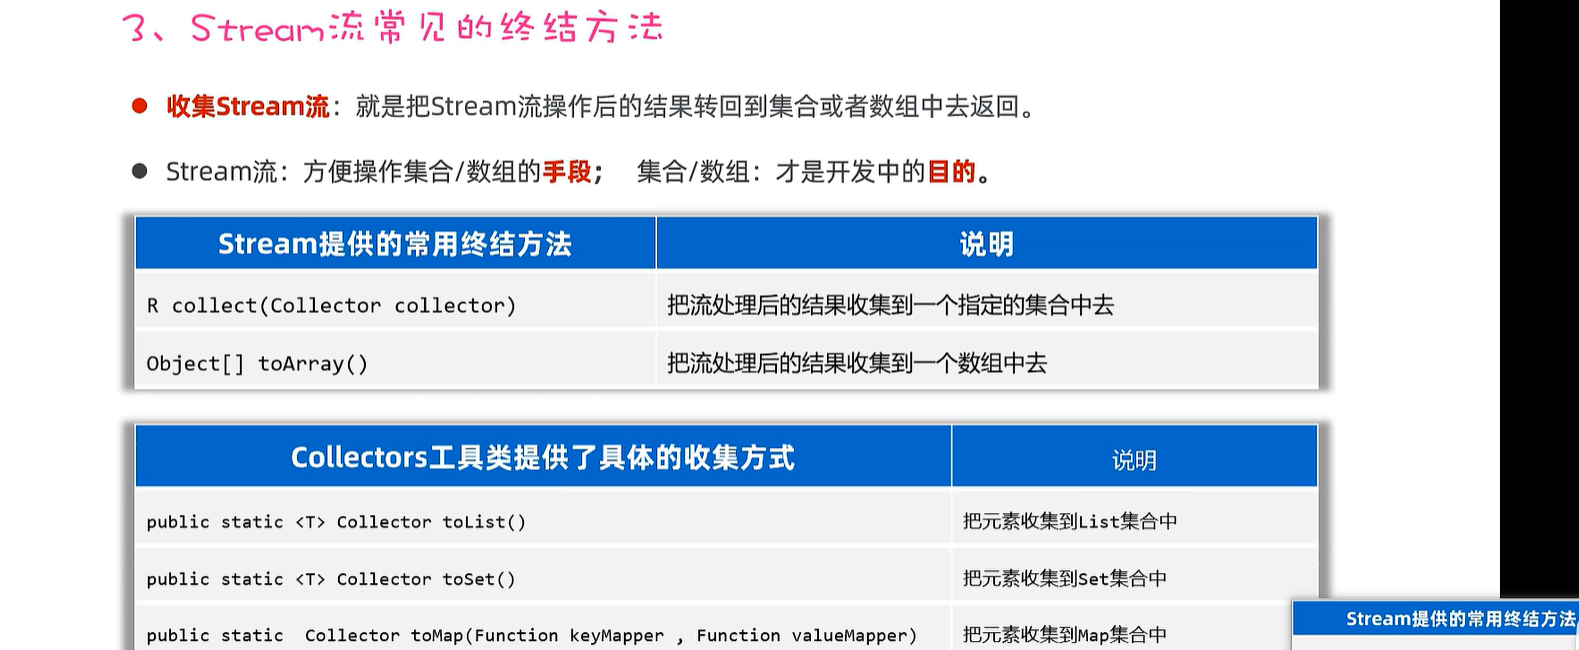
17.3 Stream流常用的终结方法
 public static void main(String[] args) {
        List<Student> students = new ArrayList<>();
        Student s1 = new Student("蜘蛛精", 26, 172.5);
        Student s2 = new Student("蜘蛛精", 26, 172.5);
        Student s3 = new Student("紫霞", 23, 167.6);
        Student s4 = new Student("白晶晶", 25, 169.0);
        Student s5 = new Student("牛魔王", 35, 183.3);
        Student s6 = new Student("牛夫人", 34, 168.5);
        Collections.addAll(students, s1, s2, s3, s4, s5, s6);
        // 需求1:请计算出身高超过168的学生有几人。
        long size = students.stream().filter(s -> s.getHeight() > 168).count();
        System.out.println(size);

        // 需求2:请找出身高最高的学生对象,并输出。
        Student s = students.stream().max((o1, o2) -> Double.compare(o1.getHeight(), o2.getHeight())).get();
        System.out.println(s);

        // 需求3:请找出身高最矮的学生对象,并输出。
        Student ss = students.stream().min((o1, o2) -> Double.compare(o1.getHeight(), o2.getHeight())).get();
        System.out.println(ss);

        // 需求4:请找出身高超过170的学生对象,并放到一个新集合中去返回。
        // 流只能收集一次。
        List<Student> students1 = students.stream().filter(a -> a.getHeight() > 170).collect(Collectors.toList());
        System.out.println(students1);

        Set<Student> students2 = students.stream().filter(a -> a.getHeight() > 170).collect(Collectors.toSet());
        System.out.println(students2);

        // 需求5:请找出身高超过170的学生对象,并把学生对象的名字和身高,存入到一个Map集合返回。
        Map<String, Double> map =
                students.stream().filter(a -> a.getHeight() > 170)
                        .distinct().collect(Collectors.toMap(a -> a.getName(), a -> a.getHeight()));
        System.out.println(map);

        // 需求6: 收集到数组中
        // Object[] arr = students.stream().filter(a -> a.getHeight() > 170).toArray();
        Student[] arr = students.stream().filter(a -> a.getHeight() > 170).toArray(len -> new Student[len]);
        System.out.println(Arrays.toString(arr));
    }
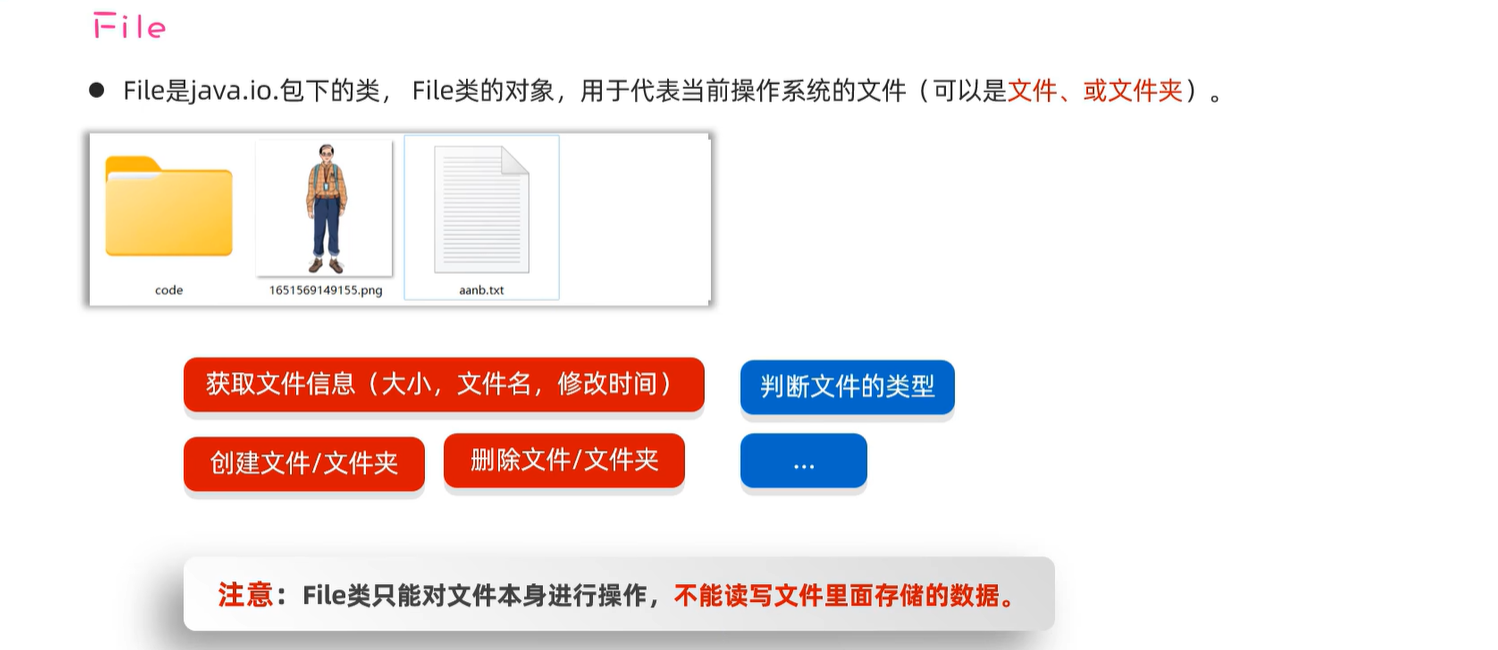
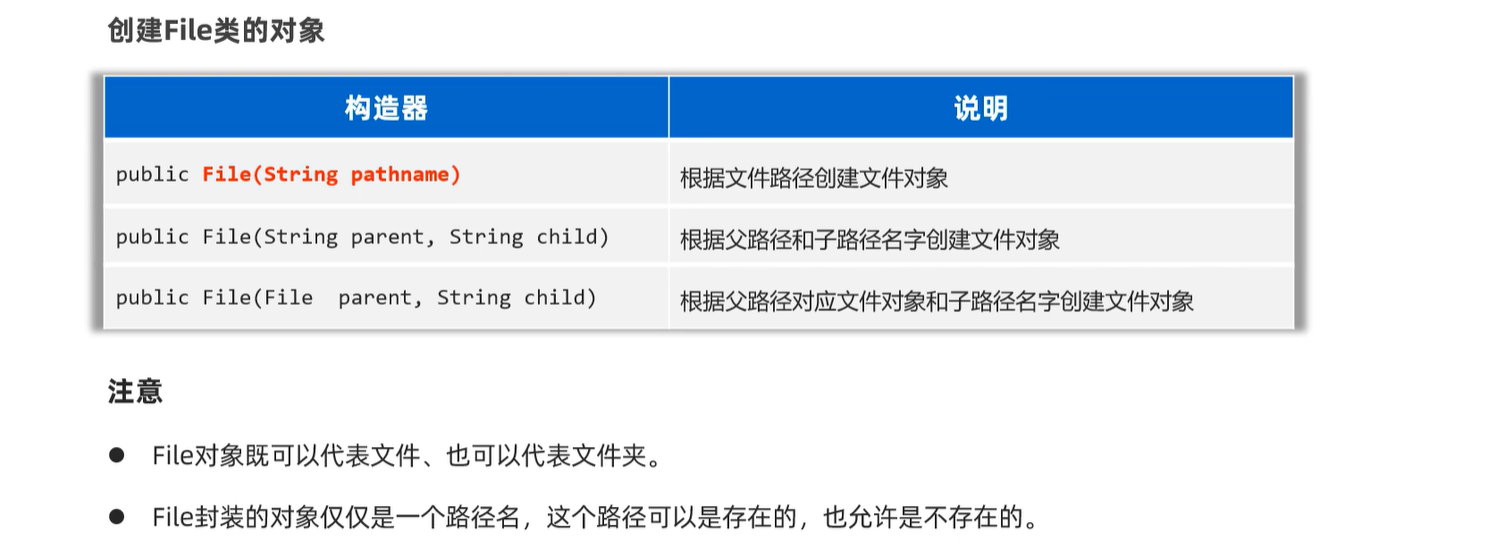
18. File
public static void main(String[] args) {
// 1、创建一个File对象,指代某个具体的文件。
// 路径分隔符
// File f1 = new File("D:/resource/ab.txt");
// File f1 = new File("D:\\resource\\ab.txt");
File f1 = new File("D:" + File.separator +"resource" + File.separator + "ab.txt");
System.out.println(f1.length()); // 文件大小
File f2 = new File("D:/resource");
System.out.println(f2.length());
// 注意:File对象可以指代一个不存在的文件路径
File f3 = new File("D:/resource/aaaa.txt");
System.out.println(f3.length());
System.out.println(f3.exists()); // false
// 我现在要定位的文件是在模块中,应该怎么定位呢?
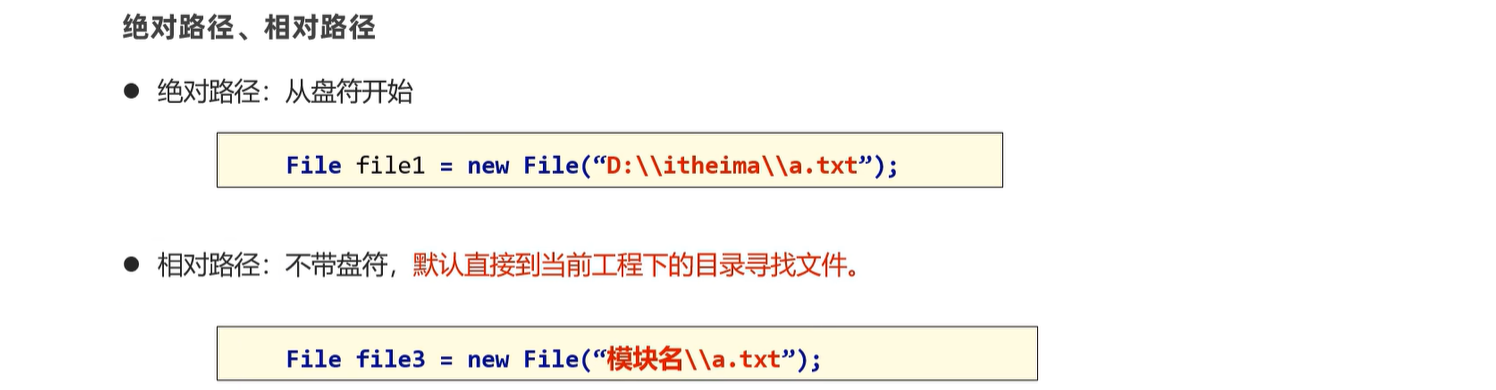
// 绝对路径:带盘符的
// File f4 = new File("D:\\code\\javasepromax\\file-io-app\\src\\itheima.txt");
// 相对路径(重点):不带盘符,默认是直接去工程下寻找文件的。
File f4 = new File("file-io-app\\src\\itheima.txt");
System.out.println(f4.length());
}

 public static void main(String[] args) throws UnsupportedEncodingException {
        // 1.创建文件对象,指代某个文件
        File f1 = new File("D:/resource/ab.txt");
        //File f1 = new File("D:/resource/");

        // 2、public boolean exists():判断当前文件对象,对应的文件路径是否存在,存在返回true.
        System.out.println(f1.exists());

        // 3、public boolean isFile() : 判断当前文件对象指代的是否是文件,是文件返回true,反之。
        System.out.println(f1.isFile());

        // 4、public boolean isDirectory()  : 判断当前文件对象指代的是否是文件夹,是文件夹返回true,反之。
        System.out.println(f1.isDirectory());

        // 5.public String getName():获取文件的名称(包含后缀)
        System.out.println(f1.getName());

        // 6.public long length():获取文件的大小,返回字节个数
        System.out.println(f1.length());

        // 7.public long lastModified():获取文件的最后修改时间。
        long time = f1.lastModified();
        SimpleDateFormat sdf = new SimpleDateFormat("yyyy/MM/dd HH:mm:ss");
        System.out.println(sdf.format(time));

        // 8.public String getPath():获取创建文件对象时,使用的路径
        File f2 = new File("D:\\resource\\ab.txt");
        File f3 = new File("file-io-app\\src\\itheima.txt");
        System.out.println(f2.getPath());
        System.out.println(f3.getPath());

        // 9.public String getAbsolutePath():获取绝对路径
        System.out.println(f2.getAbsolutePath());
        System.out.println(f3.getAbsolutePath());
    }
public static void main(String[] args) throws Exception {
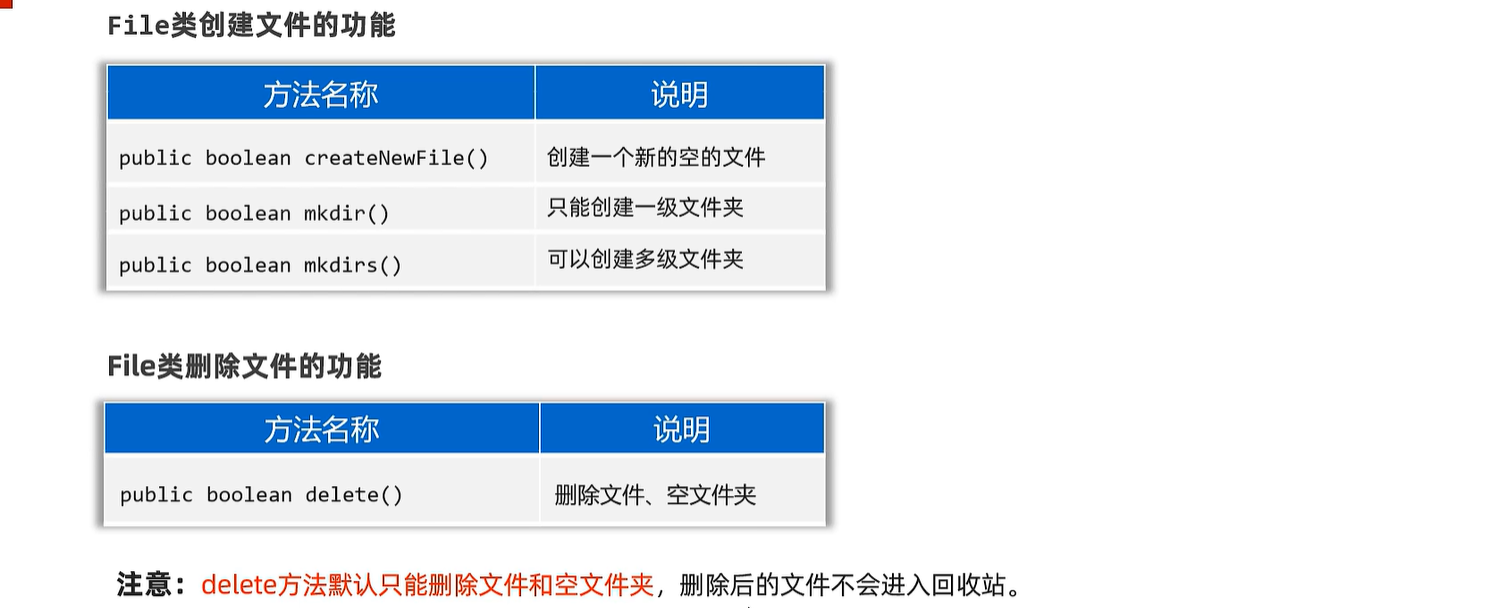
// 1、public boolean createNewFile():创建一个新文件(文件内容为空),创建成功返回true,反之。
File f1 = new File("D:/resource/itheima2.txt");
System.out.println(f1.createNewFile());
// 2、public boolean mkdir():用于创建文件夹,注意:只能创建一级文件夹
File f2 = new File("D:/resource/aaa");
System.out.println(f2.mkdir());
// 3、public boolean mkdirs():用于创建文件夹,注意:可以创建多级文件夹
File f3 = new File("D:/resource/bbb/ccc/ddd/eee/fff/ggg");
System.out.println(f3.mkdirs());
// 3、public boolean delete():删除文件,或者空文件,注意:不能删除非空文件夹。
System.out.println(f1.delete());
System.out.println(f2.delete());
File f4 = new File("D:/resource");
System.out.println(f4.delete());
}
public static void main(String[] args) {
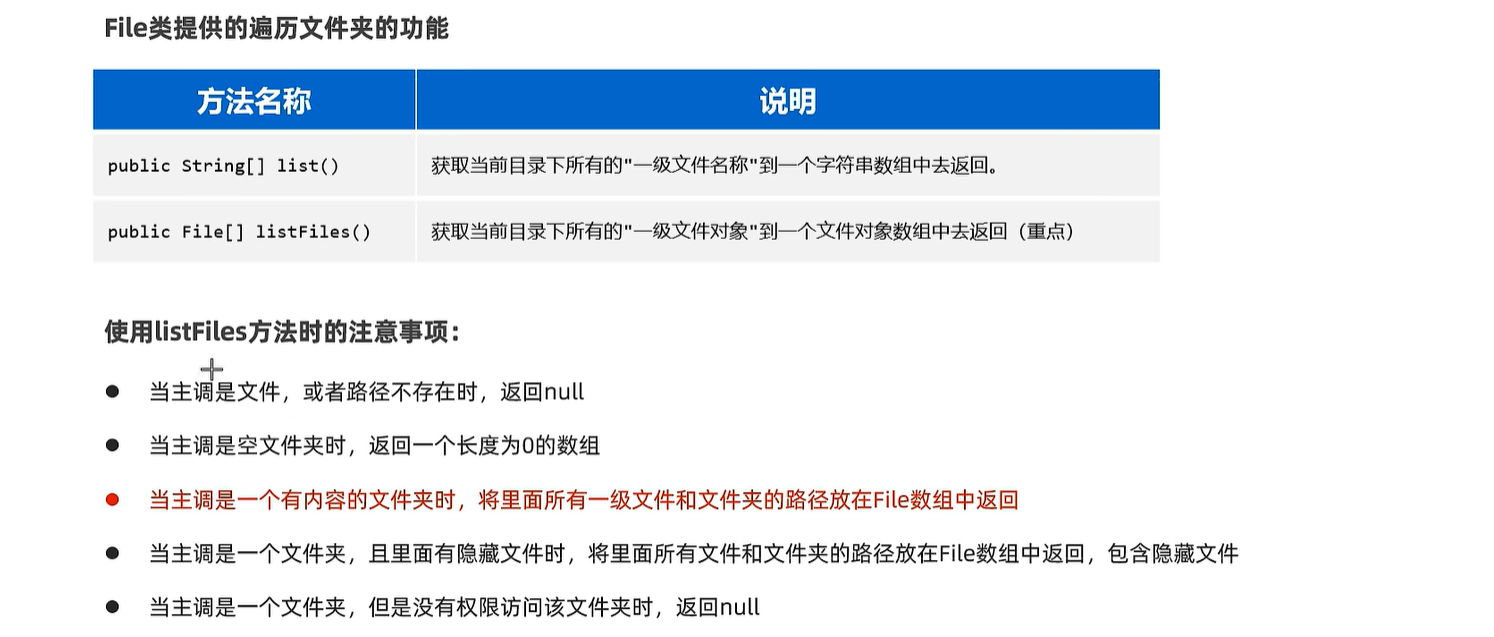
// 1、public String[] list():获取当前目录下所有的"一级文件名称"到一个字符串数组中去返回。
File f1 = new File("D:\\course\\待研发内容");
String[] names = f1.list();
for (String name : names) {
System.out.println(name);
}
// 2、public File[] listFiles():(重点)获取当前目录下所有的"一级文件对象"到一个文件对象数组中去返回(重点)
File[] files = f1.listFiles();
for (File file : files) {
System.out.println(file.getAbsolutePath());
}
File f = new File("D:/resource/aaa"); //若文件夹下没有东西
File[] files1 = f.listFiles();
System.out.println(Arrays.toString(files1)); //[]
}
19. 字符集
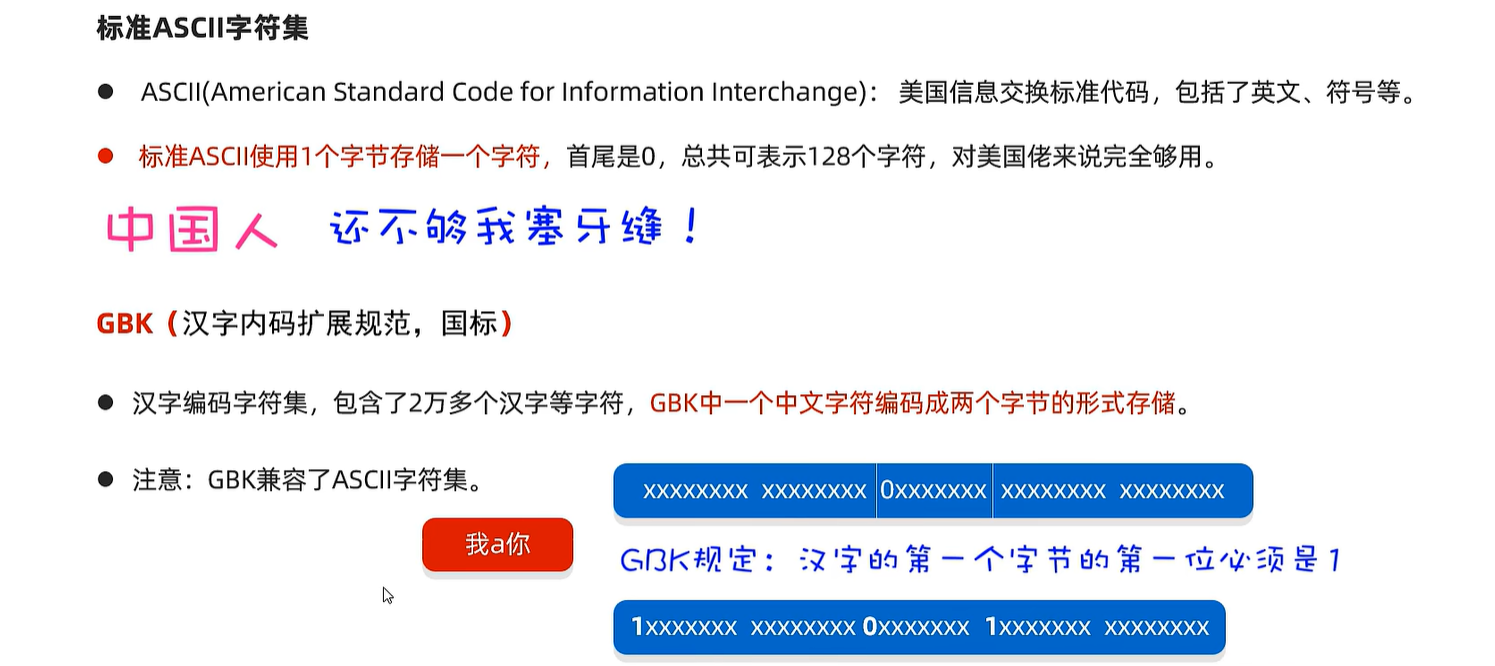
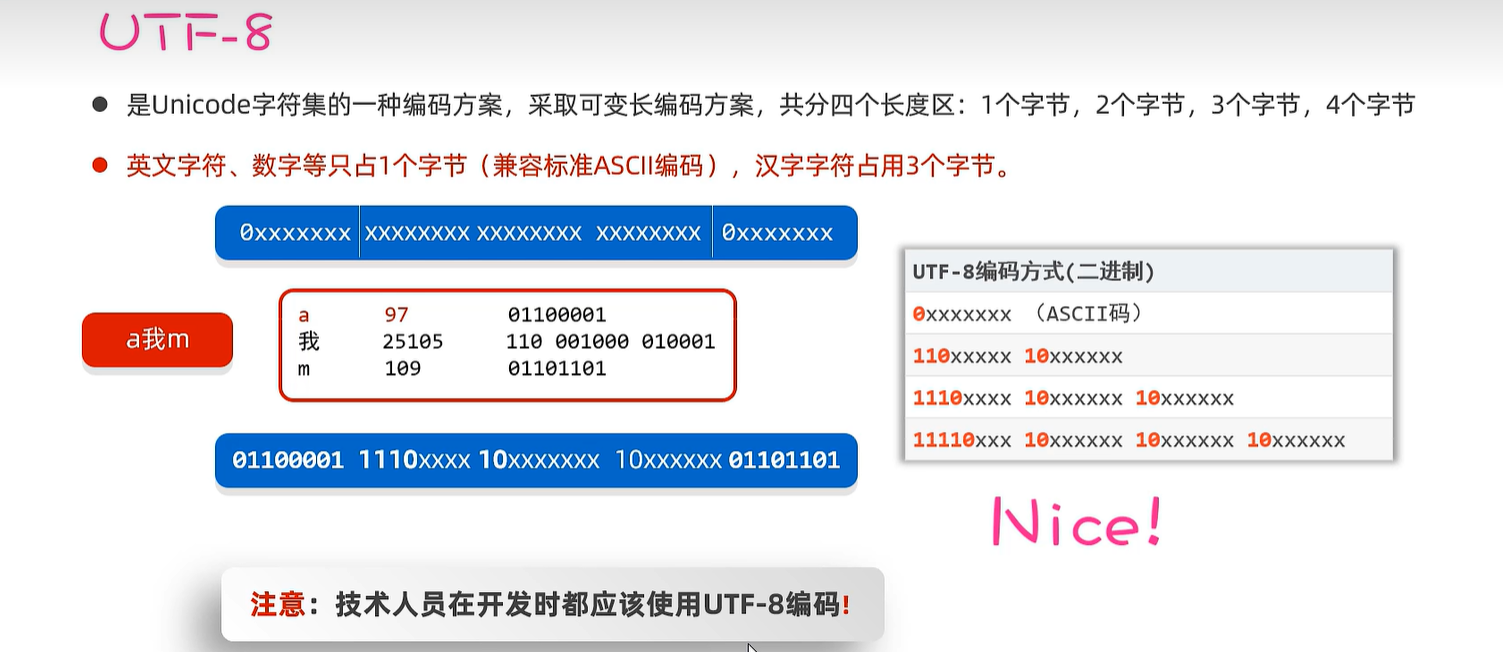
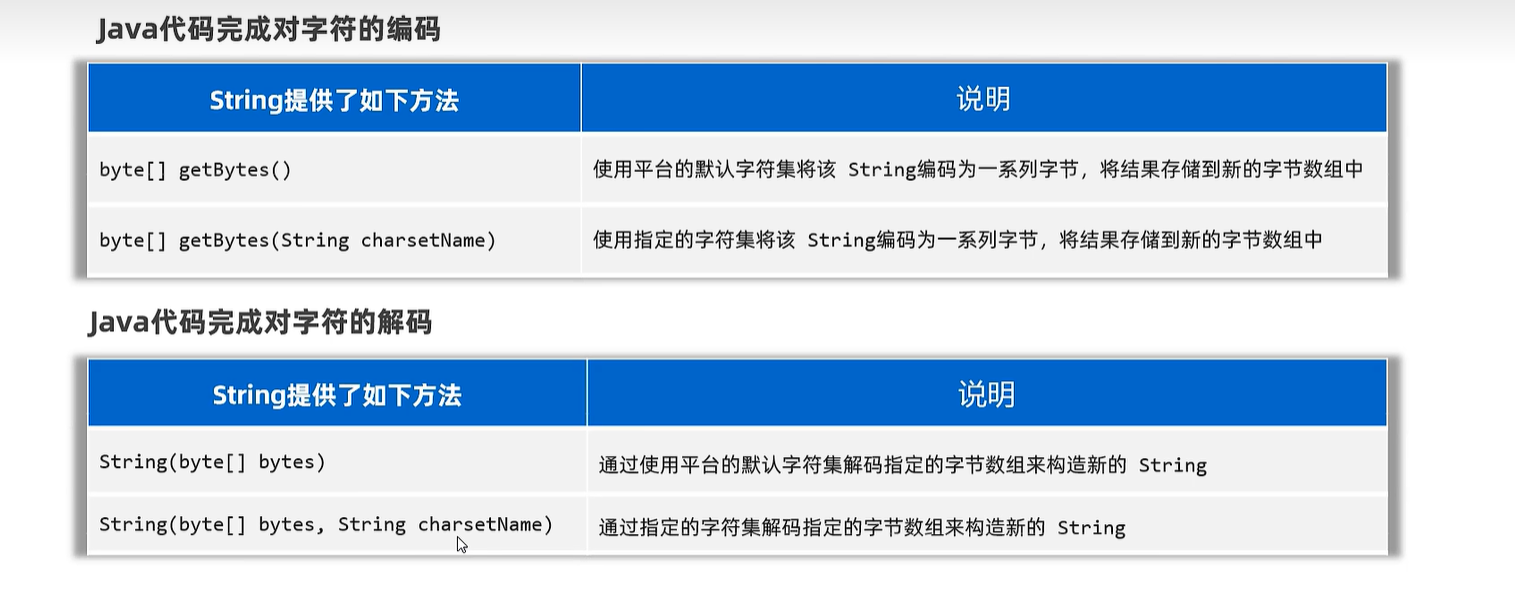
    public static void main(String[] args) throws Exception {
        // 1、编码
        String data = "a我b";
        byte[] bytes = data.getBytes(); // 默认是按照平台字符集(UTF-8)进行编码的。
        System.out.println(Arrays.toString(bytes));

        // 按照指定字符集进行编码。
        byte[] bytes1 = data.getBytes("GBK");
        System.out.println(Arrays.toString(bytes1));

        // 2、解码
        String s1 = new String(bytes); // 按照平台默认编码(UTF-8)解码
        System.out.println(s1);

        String s2 = new String(bytes1, "GBK");
        System.out.println(s2);
    }
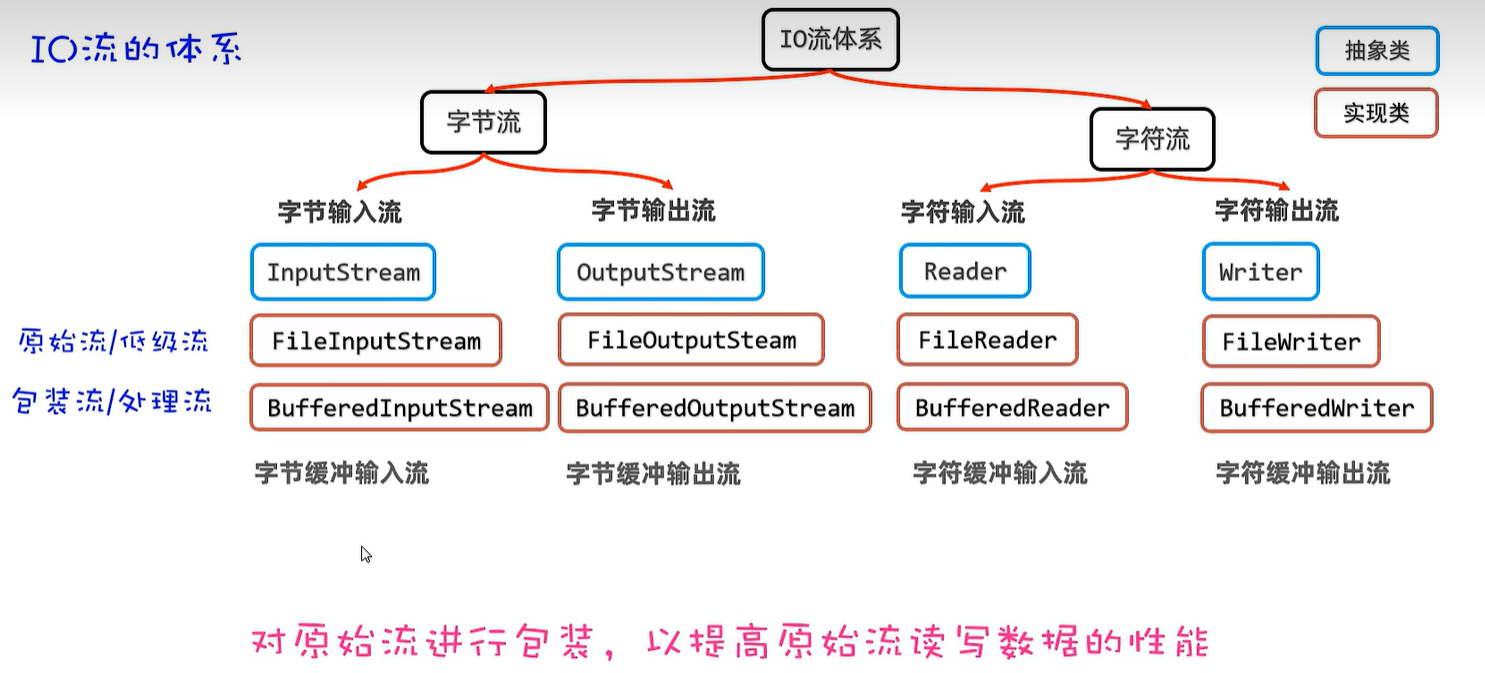
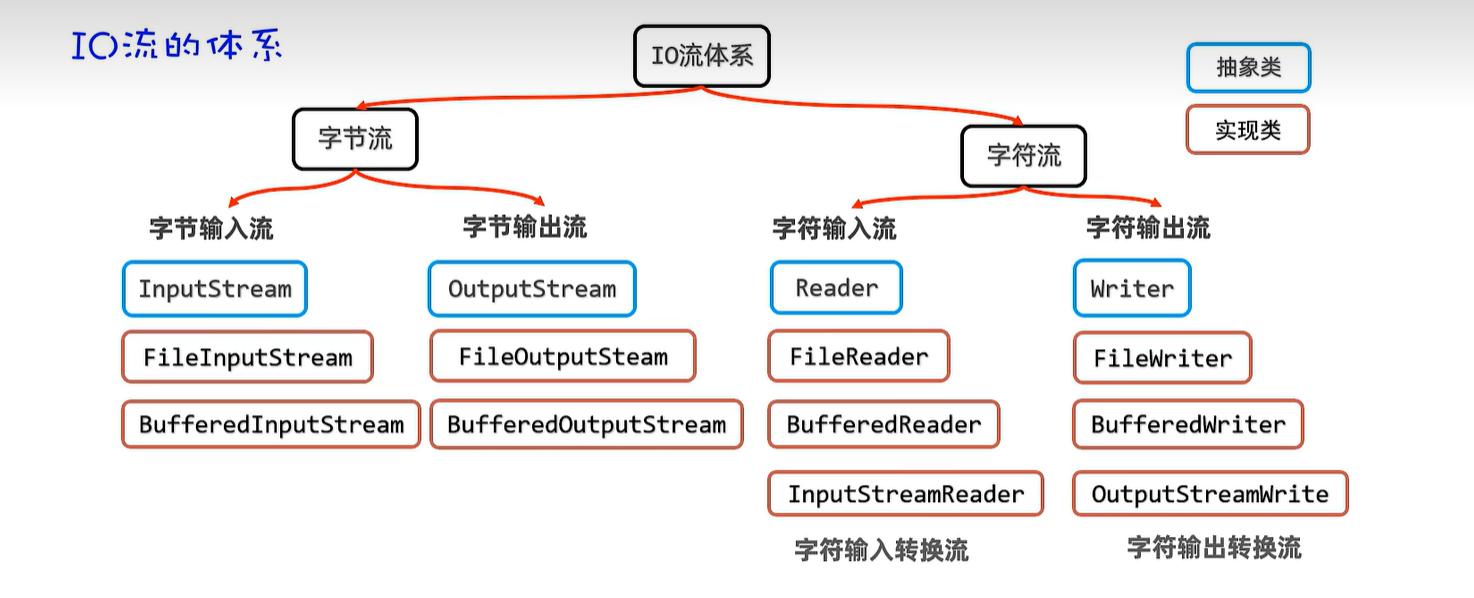
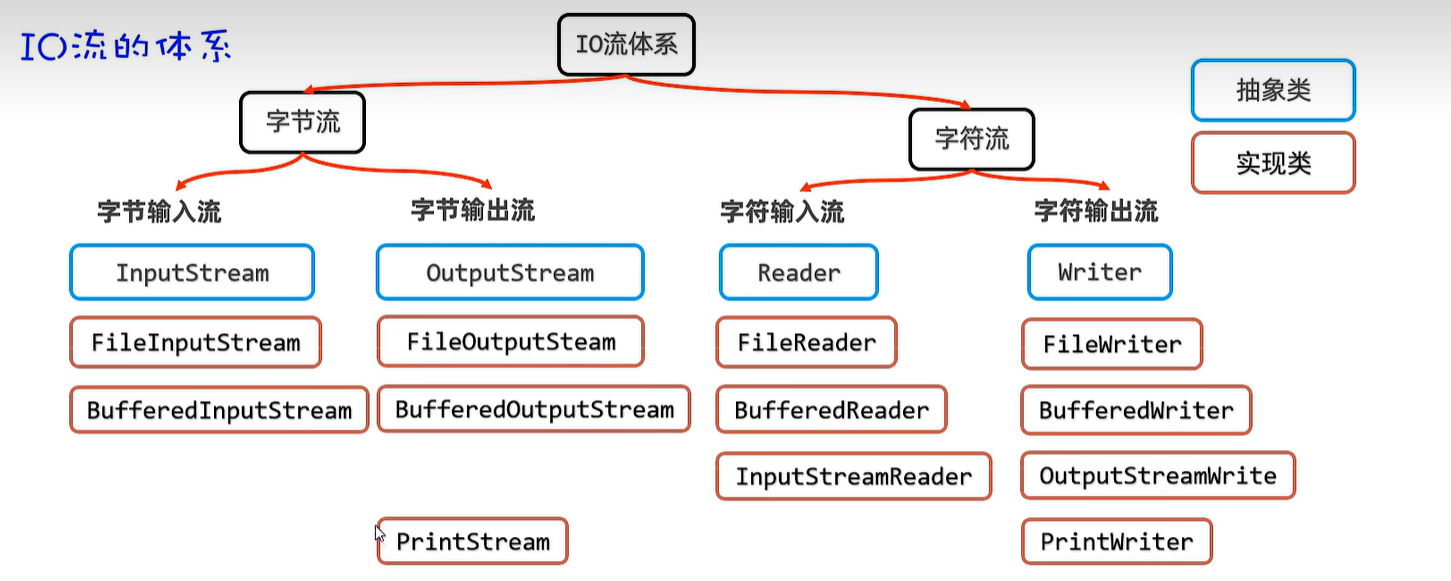
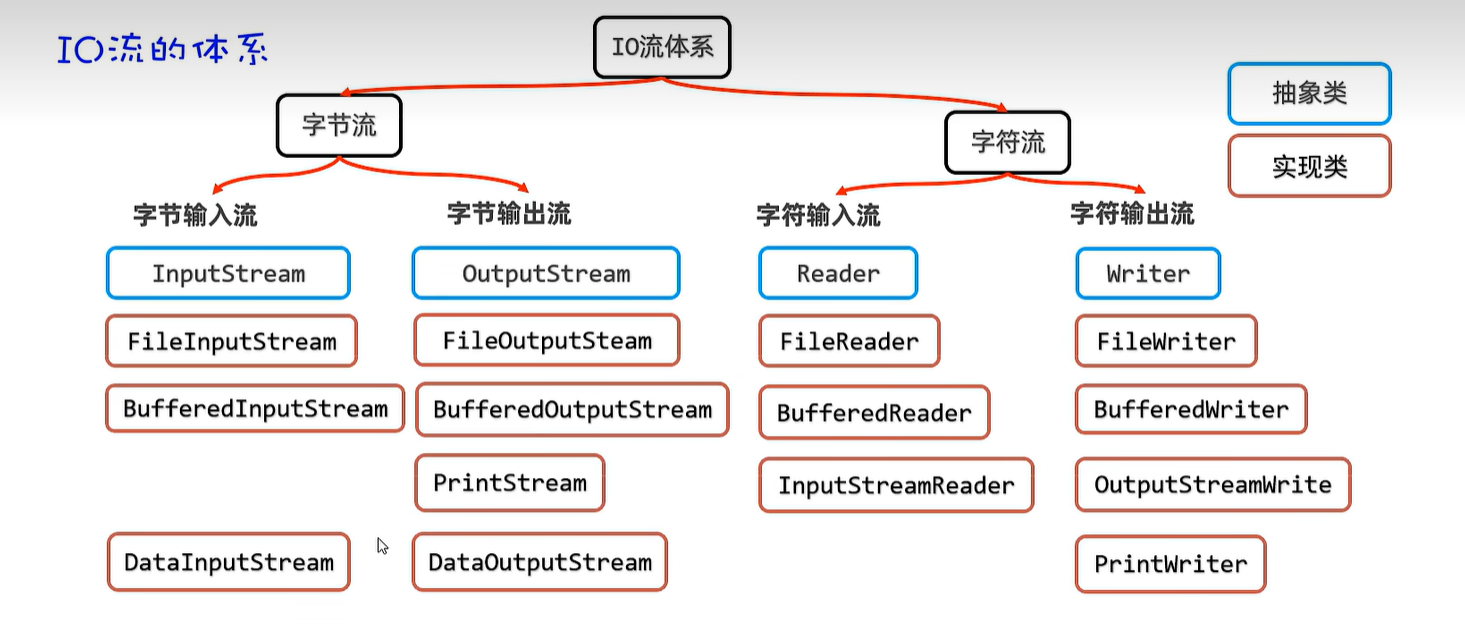
20. IO流
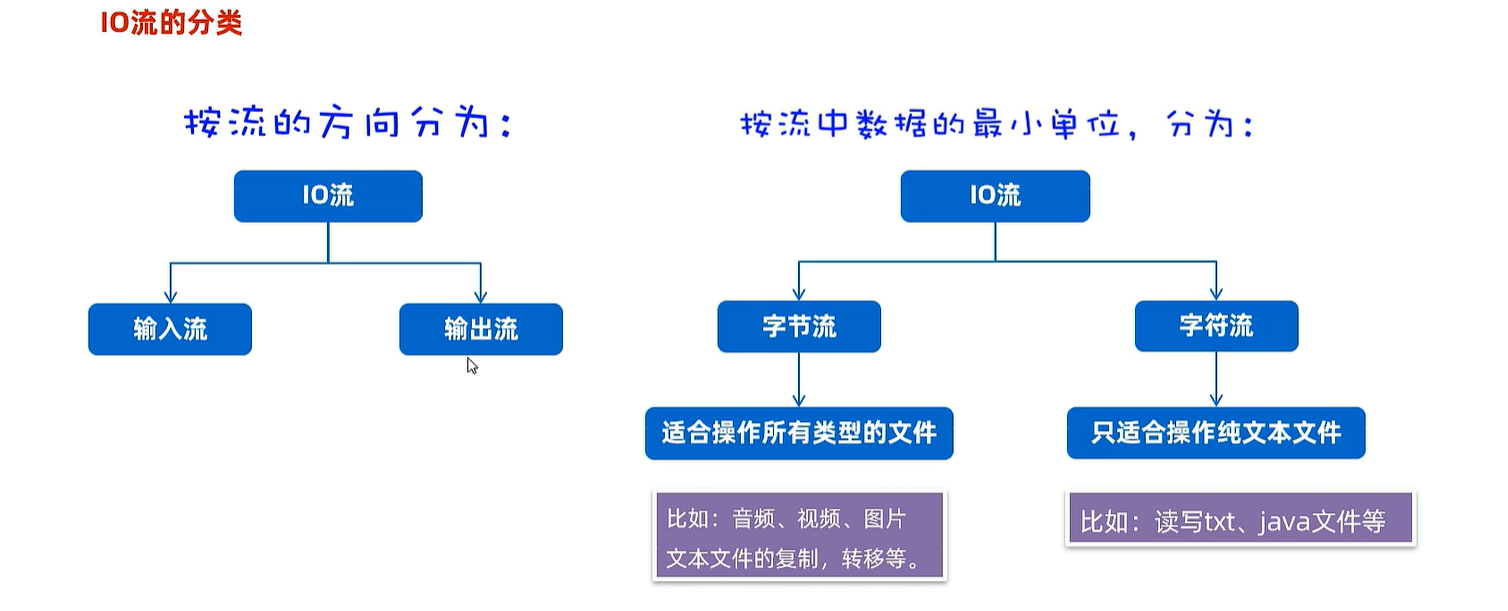
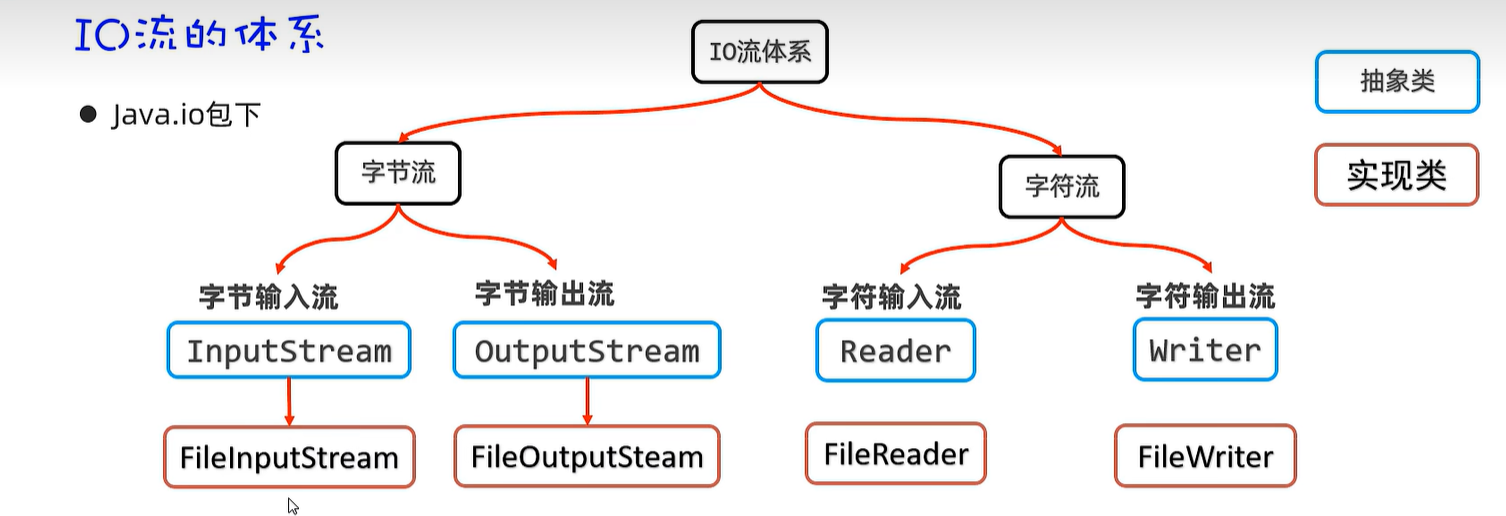
20.1 字节输入流
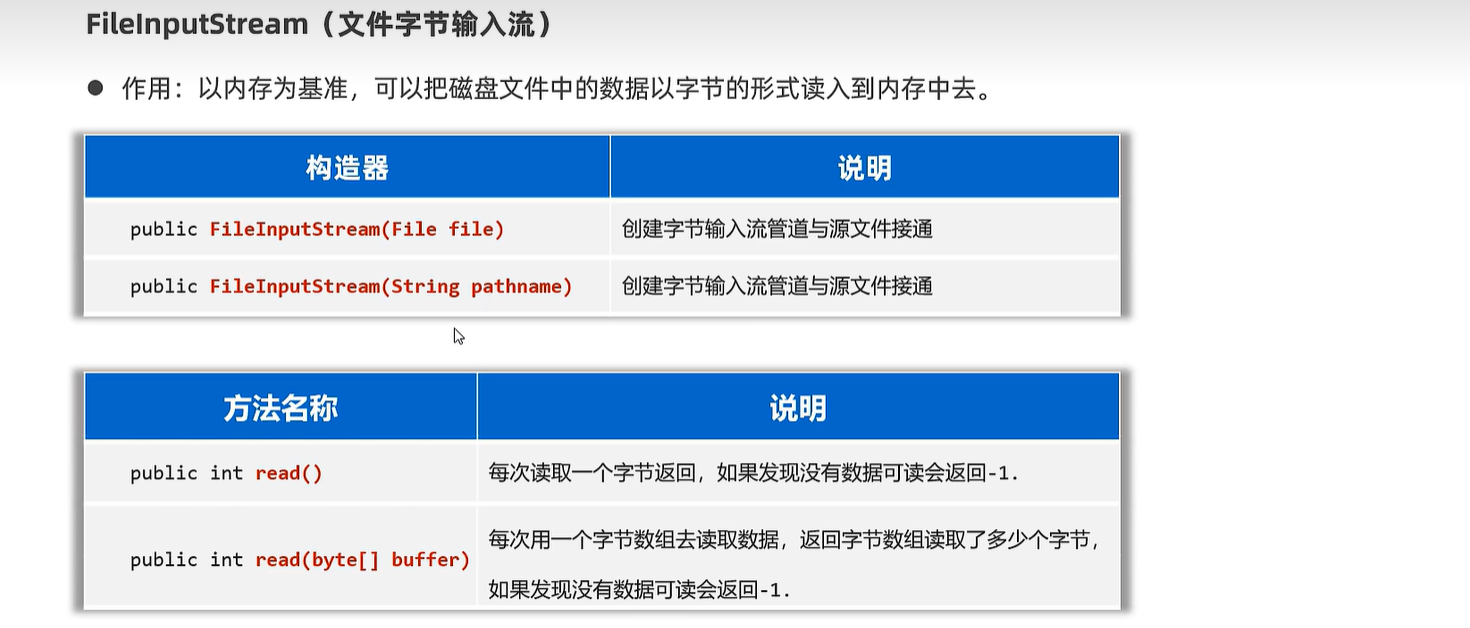
 public static void main(String[] args) throws Exception {
        // 1、创建文件字节输入流管道,与源文件接通。
        // InputStream is = new FileInputStream(new File("file-io-app\\src\\itheima01.txt"));
        // 简化写法:推荐使用。
        InputStream is = new FileInputStream(("file-io-app\\src\\itheima01.txt"));

        // 2、开始读取文件的字节数据。
        // public int read():每次读取一个字节返回,如果没有数据了,返回-1.
        int b1 = is.read();
        System.out.println((char)b1);

        int b2 = is.read();
        System.out.println((char) b2);

        int b3 = is.read();
        System.out.println(b3);

        // 3、使用循环改造上述代码
        int b; // 用于记住读取的字节。
        while ((b = is.read()) != -1){
            System.out.print((char) b);
        }

        // 读取数据的性能很差!
        // 读取汉字输出会乱码!!无法避免的!!
        // 流使用完毕之后,必须关闭!释放系统资源!
        is.close();
    }
    public static void main(String[] args) throws Exception {
        // 1、创建一个字节输入流对象代表字节输入流管道与源文件接通。
        InputStream is = new FileInputStream("file-io-app\\src\\itheima02.txt");

        // 2、开始读取文件中的字节数据:每次读取多个字节。
        //  public int read(byte b[]) throws IOException
        //  每次读取多个字节到字节数组中去,返回读取的字节数量,读取完毕会返回-1.
        byte[] buffer = new byte[3];
        int len = is.read(buffer);
        String rs = new String(buffer);
        System.out.println(rs);
        System.out.println("当次读取的字节数量:" + len);

        // buffer = [abc]
        // buffer = [66c]
        int len2 = is.read(buffer);
        // 注意:读取多少,倒出多少。
        String rs2 = new String(buffer, 0, len2);
        System.out.println(rs2);
        System.out.println("当次读取的字节数量:" + len2);

        int len3 = is.read(buffer);
        System.out.println(len3); // -1

        // 3、使用循环改造。
        byte[] buffer = new byte[3];
        int len; // 记住每次读取了多少个字节。  abc 66
        while ((len = is.read(buffer)) != -1){
            // 注意:读取多少,倒出多少。
            String rs = new String(buffer, 0 , len);
            System.out.print(rs);
        }
        // 性能得到了明显的提升!!
        // 这种方案也不能避免读取汉字输出乱码的问题!!

        is.close(); // 关闭流
    }
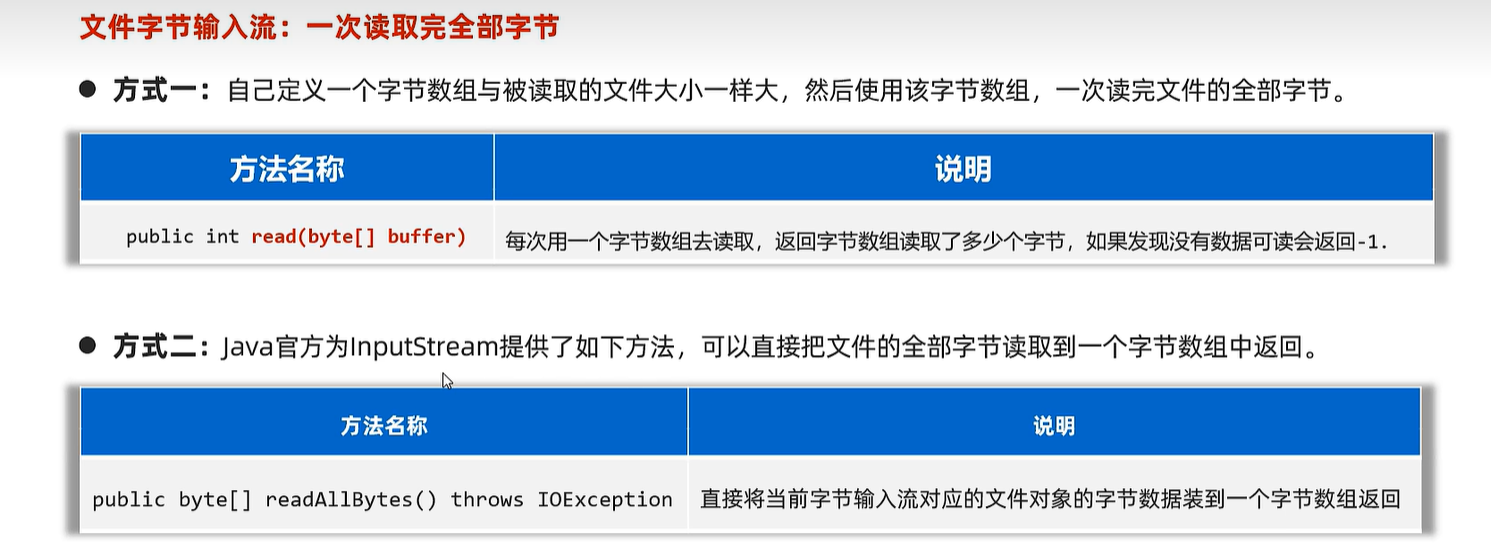
    public static void main(String[] args) throws Exception {
        // 1、一次性读取完文件的全部字节到一个字节数组中去。
        // 创建一个字节输入流管道与源文件接通
        InputStream is = new FileInputStream("file-io-app\\src\\itheima03.txt");

        // 2、准备一个字节数组,大小与文件的大小正好一样大。
        File f = new File("file-io-app\\src\\itheima03.txt");
        long size = f.length();
        byte[] buffer = new byte[(int) size];

        int len = is.read(buffer);
        System.out.println(new String(buffer));

        System.out.println(size);
        System.out.println(len);

        byte[] buffer = is.readAllBytes();
        System.out.println(new String(buffer));

        is.close(); // 关闭流
    }
20.2 字节输出流
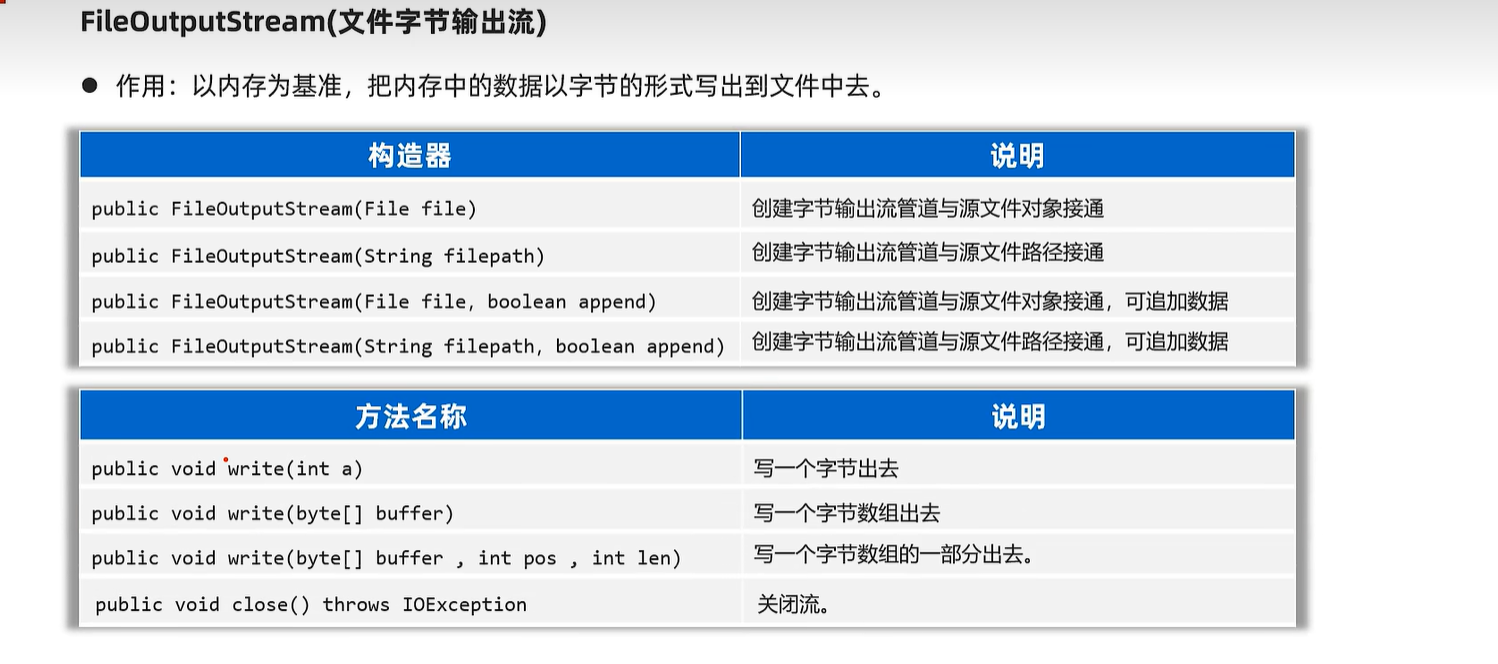
    public static void main(String[] args) throws Exception {
        // 1、创建一个字节输出流管道与目标文件接通。
        // 覆盖管道:覆盖之前的数据
//        OutputStream os =
//                new FileOutputStream("file-io-app/src/itheima04out.txt");
        // 追加数据的管道
        OutputStream os =
                new FileOutputStream("file-io-app/src/itheima04out.txt", true);

        // 2、开始写字节数据出去了
        os.write(97); // 97就是一个字节,代表a
        os.write('b'); // 'b'也是一个字节
        // os.write('磊'); // [ooo] 默认只能写出去一个字节

        byte[] bytes = "我爱你中国abc".getBytes();
        os.write(bytes);

        os.write(bytes, 0, 15);

        // 换行符
        os.write("\r\n".getBytes());

        os.close(); // 关闭流
    }
    public static void main(String[] args) throws Exception {
        // 需求:复制照片。
        // 1、创建一个字节输入流管道与源文件接通
        InputStream is = new FileInputStream("file-io-app\\src\\itheima03.txt");
        // 2、创建一个字节输出流管道与目标文件接通。
        OutputStream os = new FileOutputStream("file-io-app\\src\\itheima03copy.txt");

        System.out.println(10 / 0);
        // 3、创建一个字节数组,负责转移字节数据。
        byte[] buffer = new byte[1024]; // 1KB.
        // 4、从字节输入流中读取字节数据,写出去到字节输出流中。读多少写出去多少。
        int len; // 记住每次读取了多少个字节。
        while ((len = is.read(buffer)) != -1){
            os.write(buffer, 0, len);
        }

        os.close();
        is.close();
        System.out.println("复制完成!!");
    }
    public static void main(String[] args)  {
        InputStream is = null;
        OutputStream os = null;
        try {
            System.out.println(10 / 0);
            // 1、创建一个字节输入流管道与源文件接通
            is = new FileInputStream("file-io-app\\src\\itheima03.txt");
            // 2、创建一个字节输出流管道与目标文件接通。
            os = new FileOutputStream("file-io-app\\src\\itheima03copy.txt");

            System.out.println(10 / 0);

            // 3、创建一个字节数组,负责转移字节数据。
            byte[] buffer = new byte[1024]; // 1KB.
            // 4、从字节输入流中读取字节数据,写出去到字节输出流中。读多少写出去多少。
            int len; // 记住每次读取了多少个字节。
            while ((len = is.read(buffer)) != -1){
                os.write(buffer, 0, len);
            }
            System.out.println("复制完成!!");
        } catch (IOException e) {
            e.printStackTrace();
        } finally {
            // 释放资源的操作
            try {
                if(os != null) os.close();
            } catch (IOException e) {
                e.printStackTrace();
            }
            try {
                if(is != null) is.close();
            } catch (IOException e) {
                e.printStackTrace();
            }
        }
    }
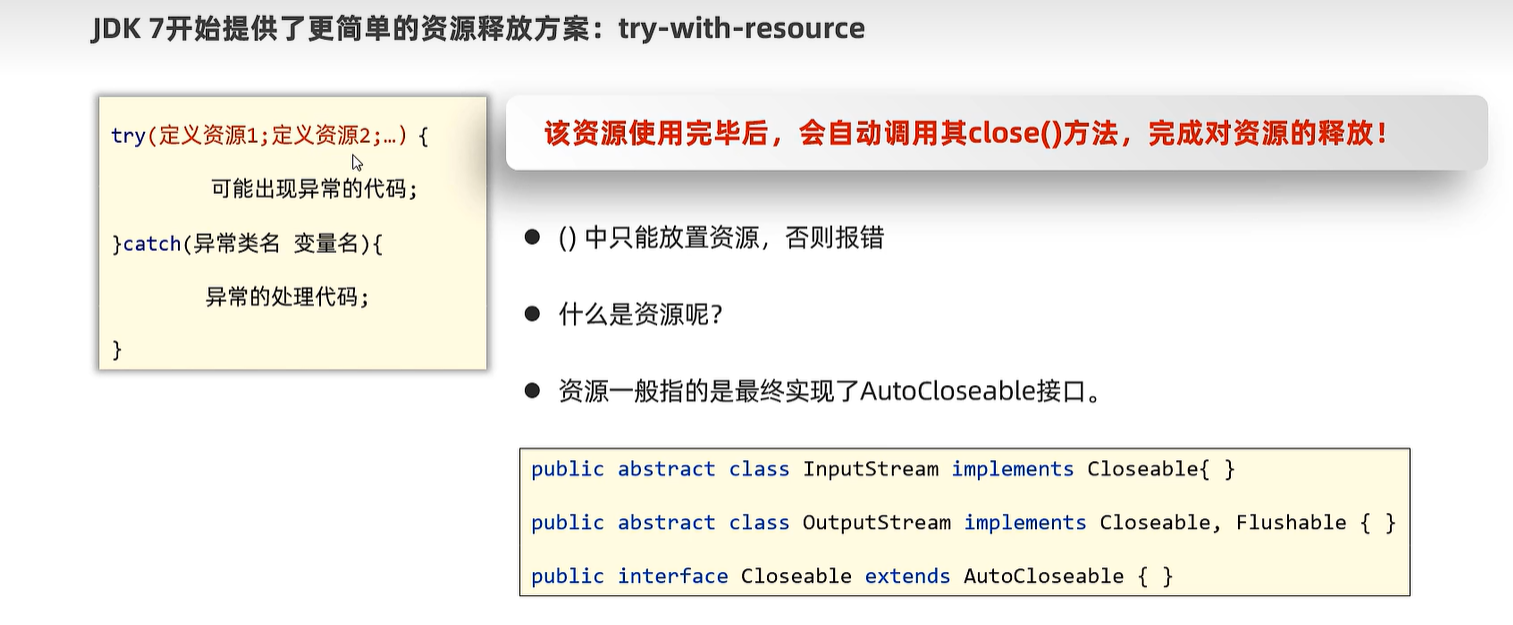
 public static void main(String[] args)  {
        try (
                // 1、创建一个字节输入流管道与源文件接通
                InputStream is = new FileInputStream("file-io-app\\src\\itheima03.txt");
                // 2、创建一个字节输出流管道与目标文件接通。
                OutputStream os = new FileOutputStream("file-io-app\\src\\itheima03copy.txt");

                // 注意:这里只能放置资源对象。(流对象)
                // int age = 21;
                // 什么是资源呢?资源都是会实现AutoCloseable接口。资源都会有一个close方法,并且资源放到这里后
                // 用完之后,会被自动调用其close方法完成资源的释放操作。
                MyConnection conn = new MyConnection();
                ){

            // 3、创建一个字节数组,负责转移字节数据。
            byte[] buffer = new byte[1024]; // 1KB.
            // 4、从字节输入流中读取字节数据,写出去到字节输出流中。读多少写出去多少。
            int len; // 记住每次读取了多少个字节。
            while ((len = is.read(buffer)) != -1){
                os.write(buffer, 0, len);
            }
            System.out.println(conn);
            System.out.println("复制完成!!");

        } catch (Exception e) {
            e.printStackTrace();
        }
    }
20.3 字符输入流
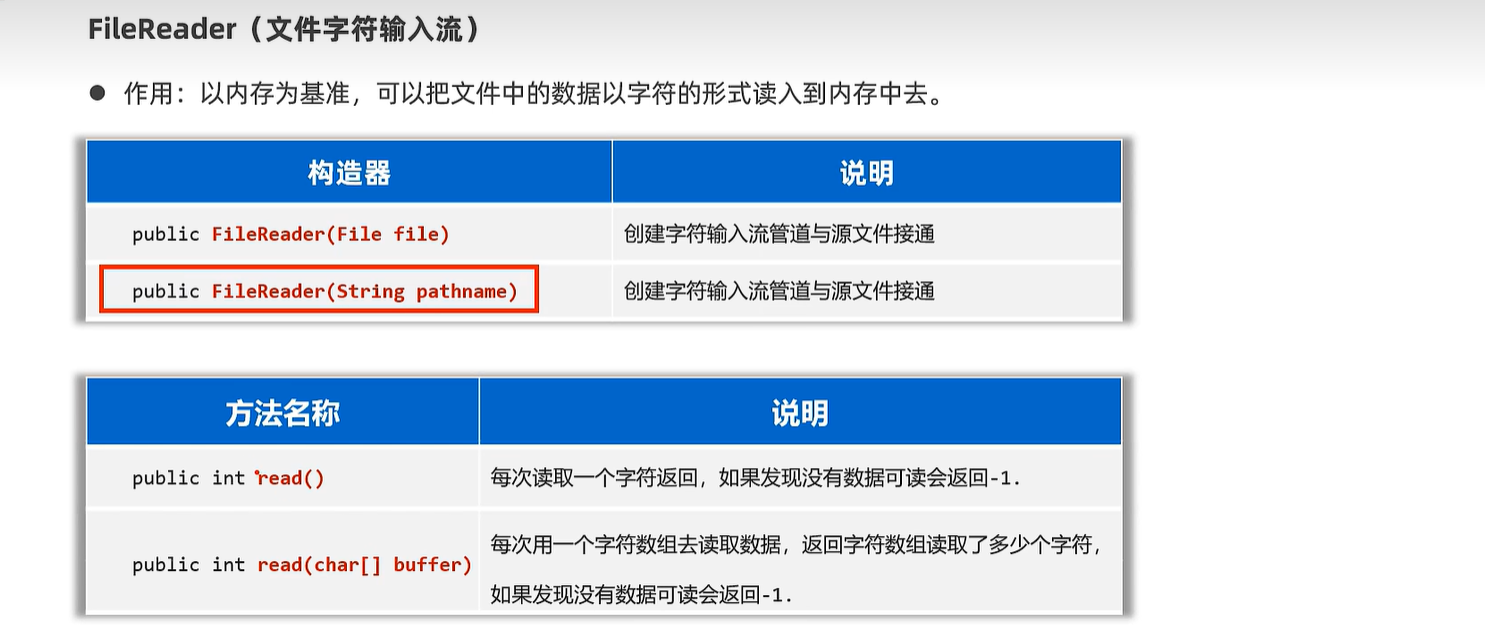
    public static void main(String[] args)  {
        try (
                // 1、创建一个文件字符输入流管道与源文件接通
                Reader fr = new FileReader("io-app2\\src\\itheima01.txt");
                ){
            // 2、读取文本文件的内容了。
            int c; // 记住每次读取的字符编号。
            while ((c = fr.read()) != -1){
                System.out.print((char) c);
            }
            // 每次读取一个字符的形式,性能肯定是比较差的。

            // 3、每次读取多个字符。
            char[] buffer = new char[3];
            int len; // 记住每次读取了多少个字符。
            while ((len = fr.read(buffer)) != -1){
                // 读取多少倒出多少
                System.out.print(new String(buffer, 0, len));
            }
            // 性能是比较不错的!
        } catch (Exception e) {
            e.printStackTrace();
        }
    }
20.4 字符输出流
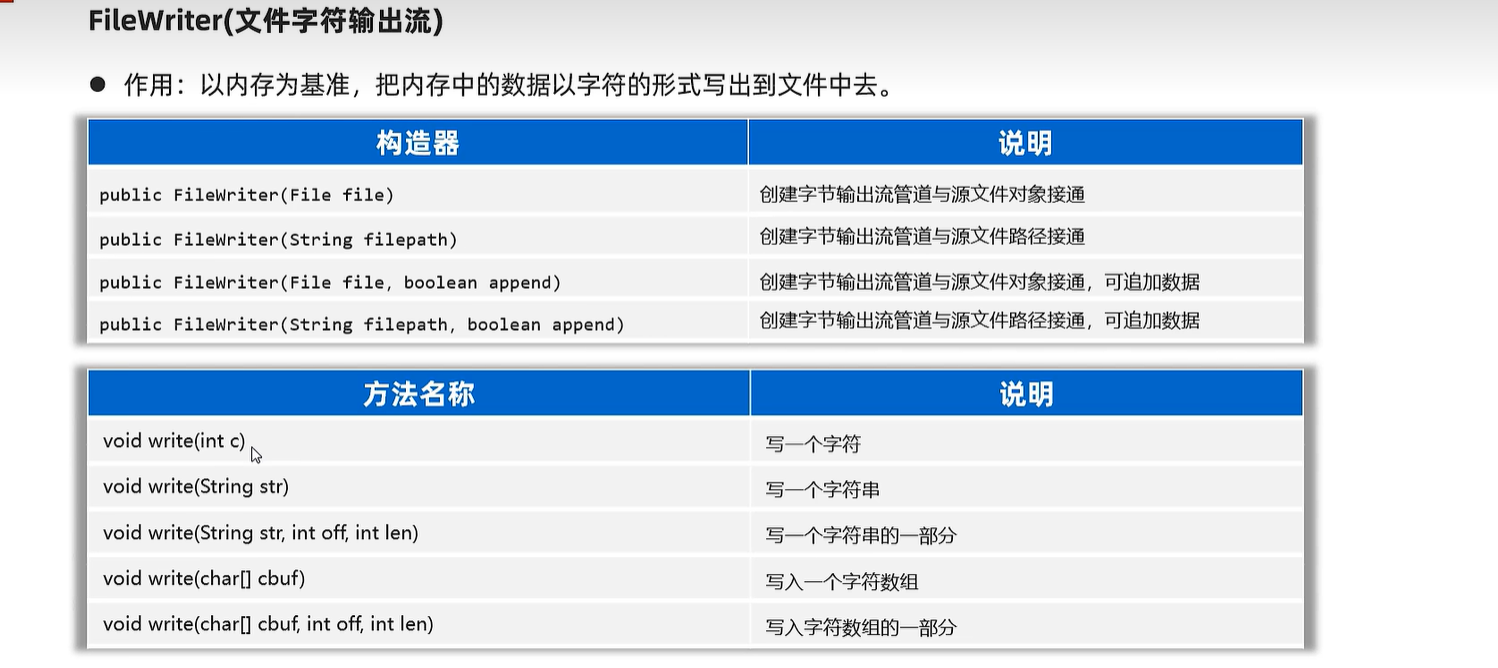
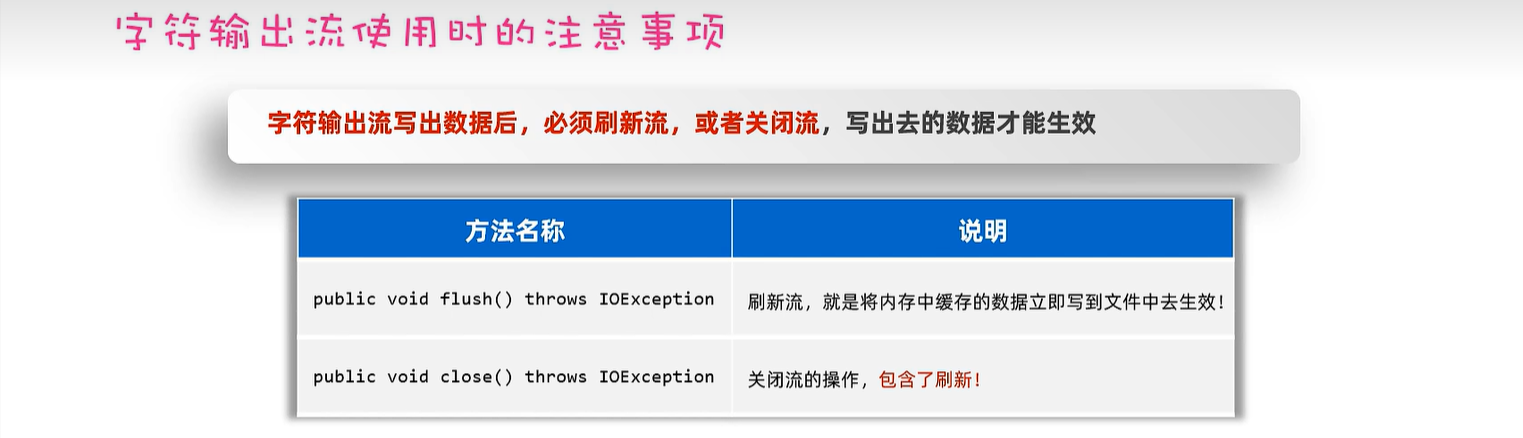
    public static void main(String[] args) {
        try (
                // 0、创建一个文件字符输出流管道与目标文件接通。
                // 覆盖管道
                // Writer fw = new FileWriter("io-app2/src/itheima02out.txt");
                // 追加数据的管道
                Writer fw = new FileWriter("io-app2/src/itheima02out.txt", true);
                ){
            // 1、public void write(int c):写一个字符出去
            fw.write('a');
            fw.write(97);
            //fw.write('磊'); // 写一个字符出去
            fw.write("\r\n"); // 换行

            // 2、public void write(String c)写一个字符串出去
            fw.write("我爱你中国abc");
            fw.write("\r\n");

            // 3、public void write(String c ,int pos ,int len):写字符串的一部分出去
            fw.write("我爱你中国abc", 0, 5);
            fw.write("\r\n");

            // 4、public void write(char[] buffer):写一个字符数组出去
            char[] buffer = {'黑', '马', 'a', 'b', 'c'};
            fw.write(buffer);
            fw.write("\r\n");

            // 5、public void write(char[] buffer ,int pos ,int len):写字符数组的一部分出去
            fw.write(buffer, 0, 2);
            fw.write("\r\n");
        } catch (Exception e) {
            e.printStackTrace();
        }
    }
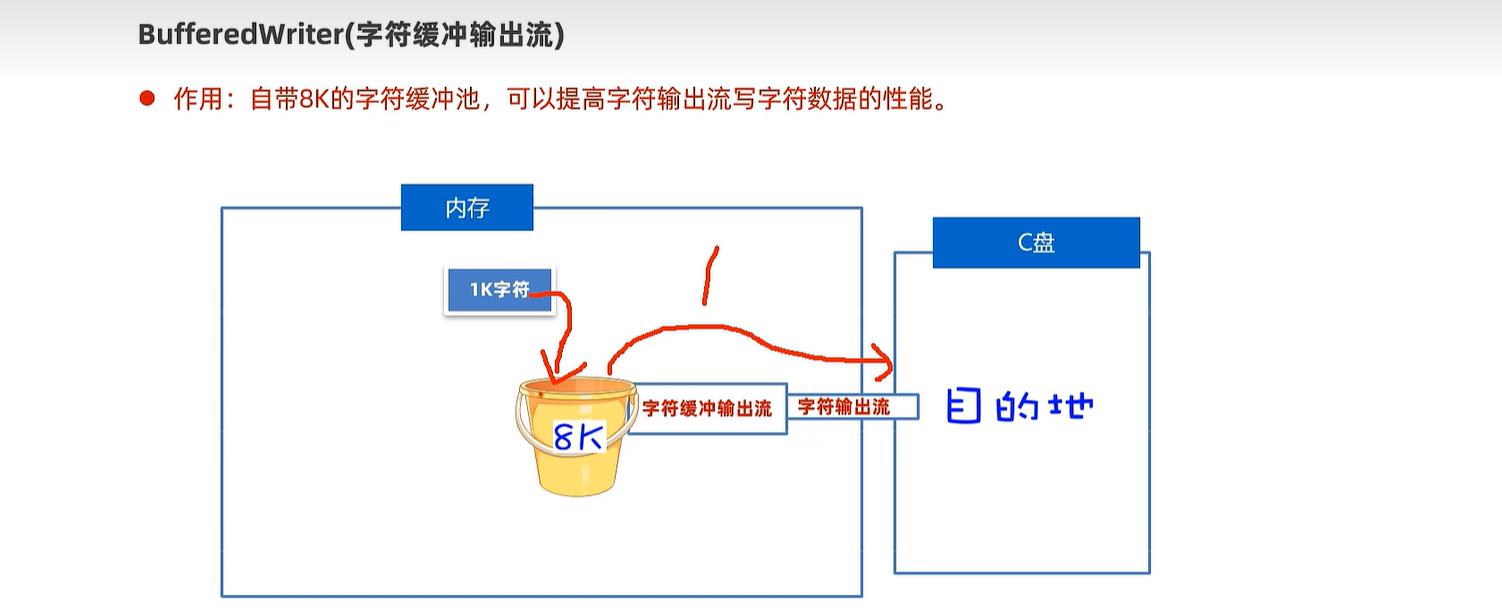
20.5 字节缓冲输入及输出流

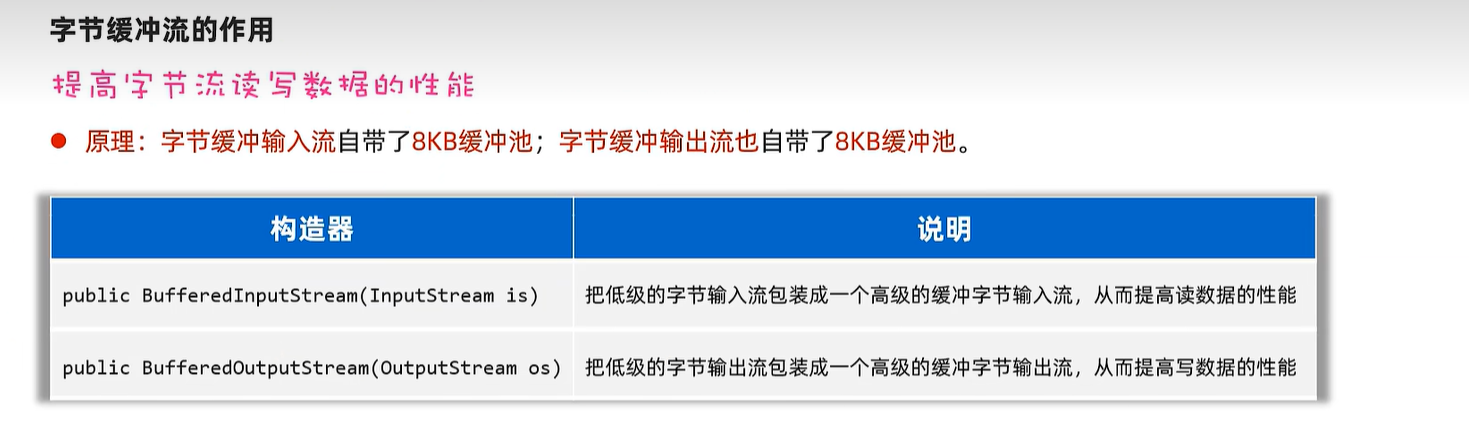
    public static void main(String[] args) {
        try (
                InputStream is = new FileInputStream("io-app2/src/itheima01.txt");
                // 1、定义一个字节缓冲输入流包装原始的字节输入流
                InputStream bis = new BufferedInputStream(is);

                OutputStream os = new FileOutputStream("io-app2/src/itheima01_bak.txt");
                // 2、定义一个字节缓冲输出流包装原始的字节输出流
                OutputStream bos = new BufferedOutputStream(os);
        ){

            byte[] buffer = new byte[1024];
            int len;
            while ((len = bis.read(buffer)) != -1){
                bos.write(buffer, 0, len);
            }
            System.out.println("复制完成!!");

        } catch (Exception e) {
            e.printStackTrace();
        }
    }
20.6 字符缓冲输入及输出流
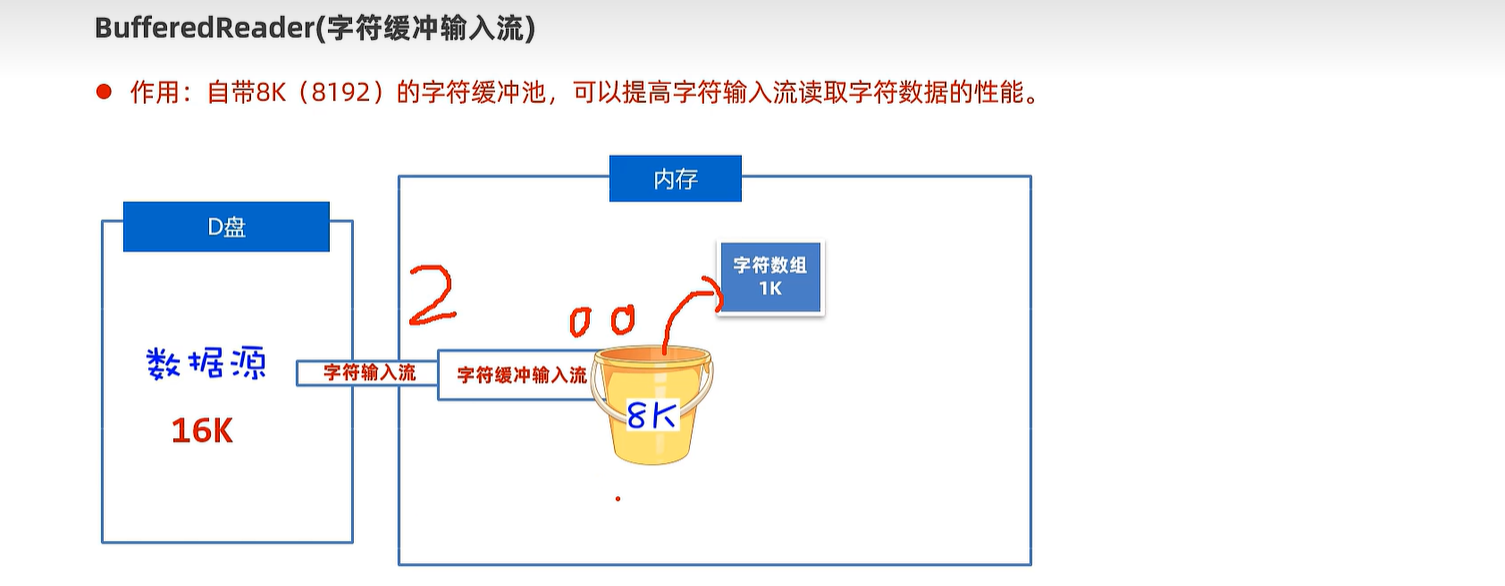
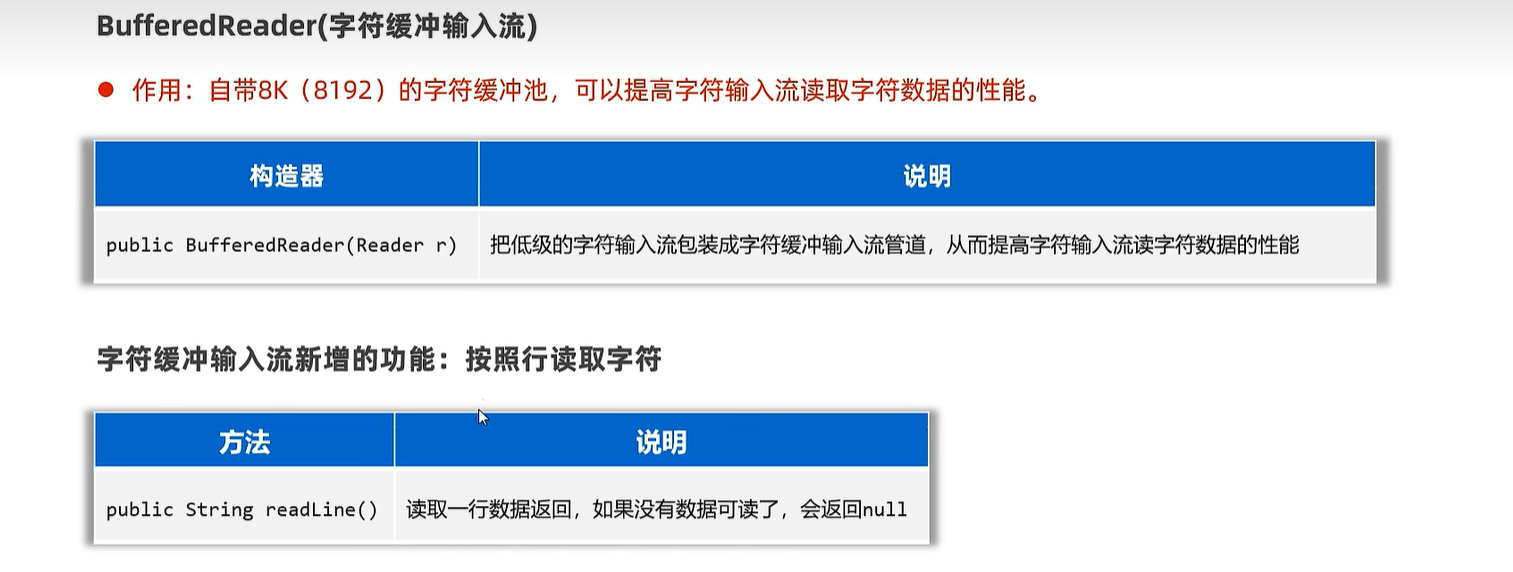
    public static void main(String[] args)  {
        try (
                Reader fr = new FileReader("io-app2\\src\\itheima04.txt");
                // 创建一个字符缓冲输入流包装原始的字符输入流
                BufferedReader br = new BufferedReader(fr);
        ){
            char[] buffer = new char[3];
            int len;
            while ((len = br.read(buffer)) != -1){
                System.out.print(new String(buffer, 0, len));
            }
            System.out.println(br.readLine());
            System.out.println(br.readLine());
            System.out.println(br.readLine());
            System.out.println(br.readLine());

            String line; // 记住每次读取的一行数据
            while ((line = br.readLine()) != null){
                System.out.println(line);
            }
        } catch (Exception e) {
            e.printStackTrace();
        }
    }
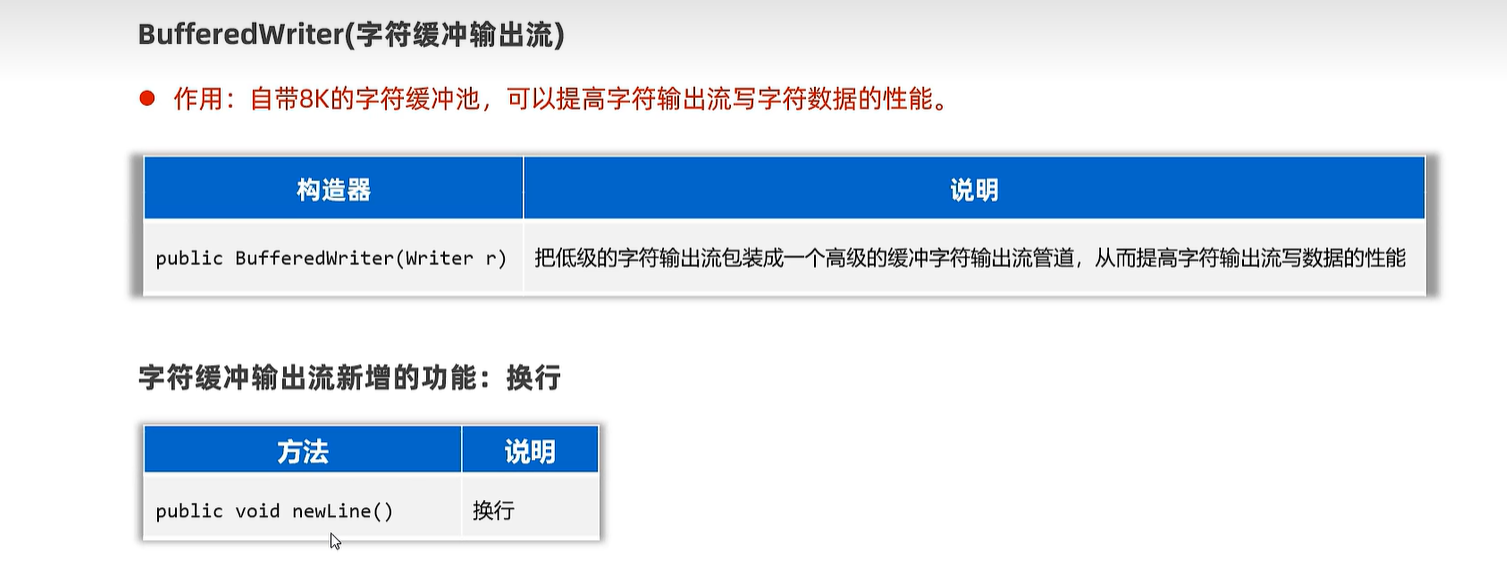
    public static void main(String[] args) {
        try (
                Writer fw = new FileWriter("io-app2/src/itheima05out.txt", true);
                // 创建一个字符缓冲输出流管道包装原始的字符输出流
                BufferedWriter bw = new BufferedWriter(fw);
        ){

            bw.write('a');
            bw.write(97);
            bw.write('磊');
            bw.newLine();

            bw.write("我爱你中国abc");
            bw.newLine();

        } catch (Exception e) {
            e.printStackTrace();
        }
    }
20.7 字符转换输入及输出流
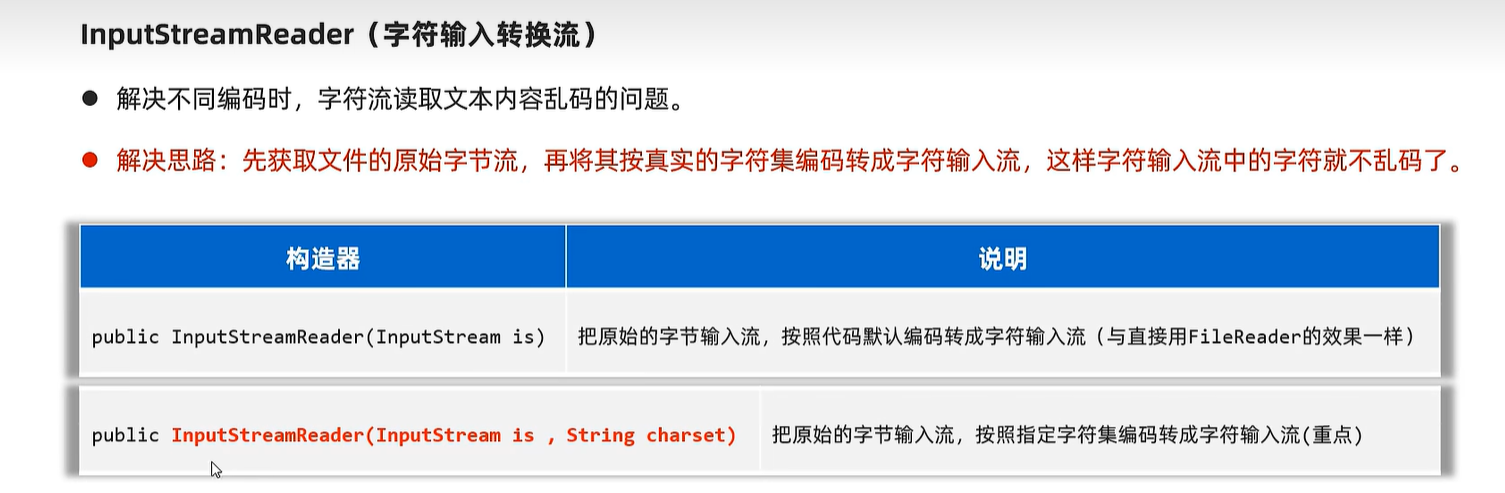
   public static void main(String[] args) {
        try (
                // 1、得到文件的原始字节流(GBK的字节流形式)
                InputStream is = new FileInputStream("io-app2/src/itheima06.txt");
                // 2、把原始的字节输入流按照指定的字符集编码转换成字符输入流
                Reader isr = new InputStreamReader(is, "GBK");
                // 3、把字符输入流包装成缓冲字符输入流
                BufferedReader br = new BufferedReader(isr);
                ){
            String line;
            while ((line = br.readLine()) != null){
                System.out.println(line);
            }


        } catch (Exception e) {
            e.printStackTrace();
        }
    }
    public static void main(String[] args) {
        // 指定写出去的字符编码。
        try (
                // 1、创建一个文件字节输出流
                OutputStream os = new FileOutputStream("io-app2/src/itheima07out.txt");
                // 2、把原始的字节输出流,按照指定的字符集编码转换成字符输出转换流。
                Writer osw = new OutputStreamWriter(os, "GBK");
                // 3、把字符输出流包装成缓冲字符输出流
                BufferedWriter bw = new BufferedWriter(osw);
                ){
            bw.write("我是中国人abc");
            bw.write("我爱你中国123");

        } catch (Exception e) {
            e.printStackTrace();
        }
    }
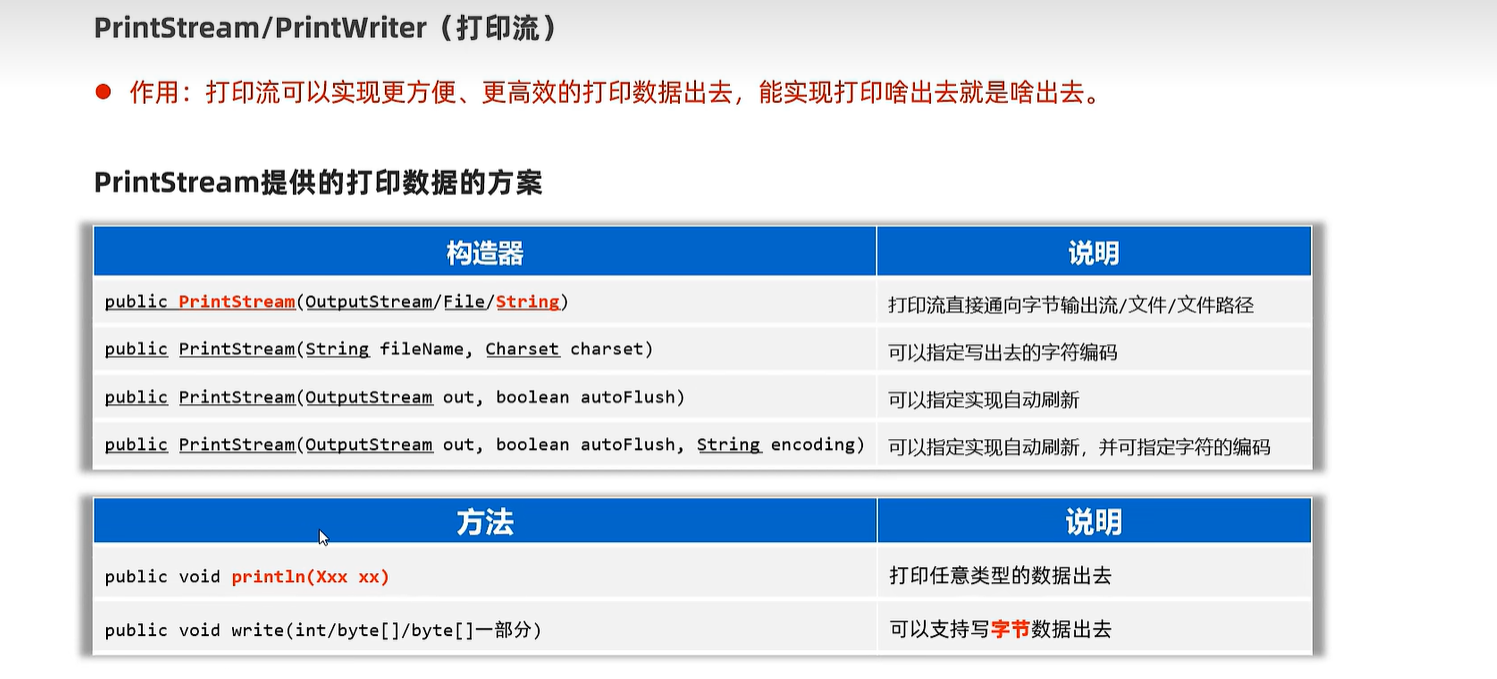
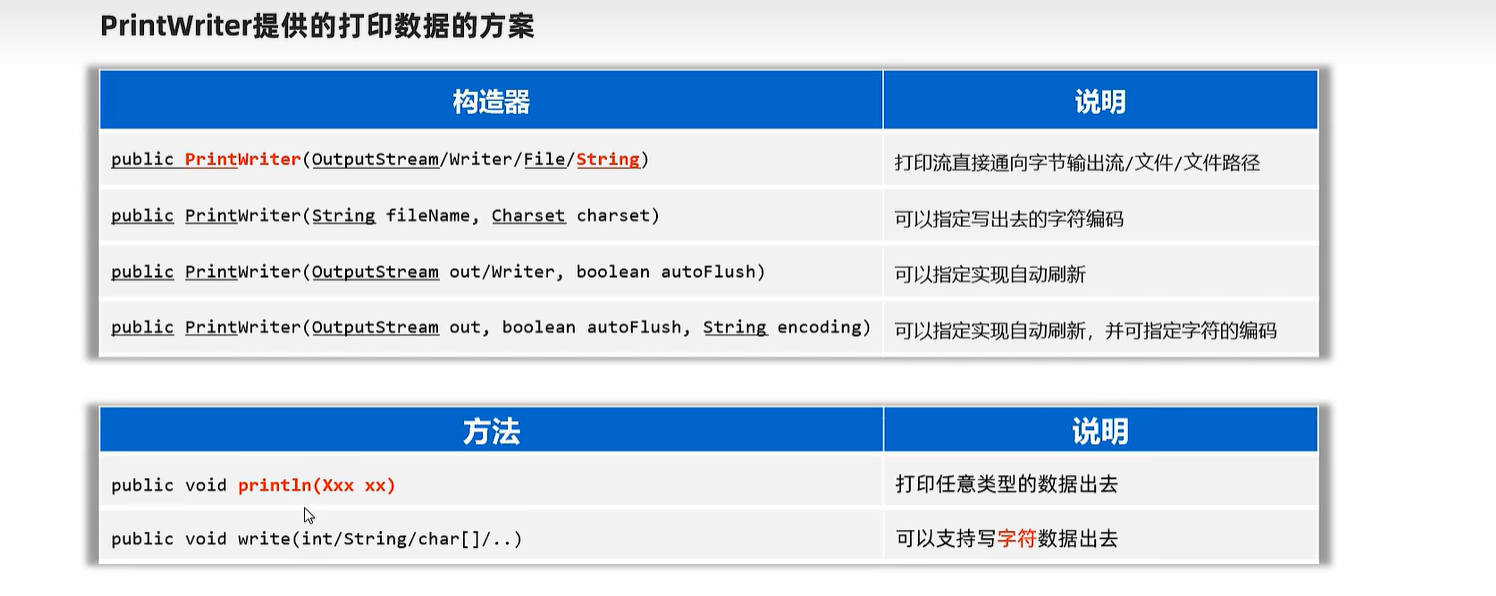
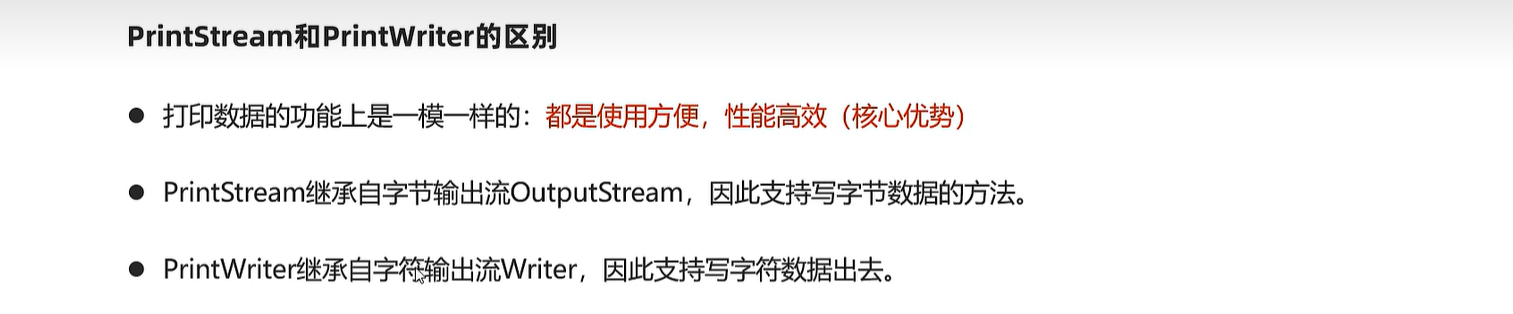
20.8 打印流
        try (
                // 1、创建一个打印流管道
//                PrintStream ps =
//                        new PrintStream("io-app2/src/itheima08.txt", Charset.forName("GBK"));
//                PrintStream ps =
//                        new PrintStream("io-app2/src/itheima08.txt");
                PrintWriter ps =
                        new PrintWriter(new FileOutputStream("io-app2/src/itheima08.txt", true));
                ){
                ps.println(97);
                ps.println('a');
                ps.println("我爱你中国abc");
                ps.println(true);
                ps.println(99.5);

                // ps.write(97); // 'a'

        } catch (Exception e) {
            e.printStackTrace();
        }
    }

    public static void main(String[] args) {
        System.out.println("老骥伏枥");
        System.out.println("志在千里");

        try ( PrintStream ps = new PrintStream("io-app2/src/itheima09.txt"); ){

            // 把系统默认的打印流对象改成自己设置的打印流
            System.setOut(ps);

            System.out.println("烈士暮年");
            System.out.println("壮心不已");
        } catch (Exception e) {
            e.printStackTrace();
        }
    }
20.9 数据流
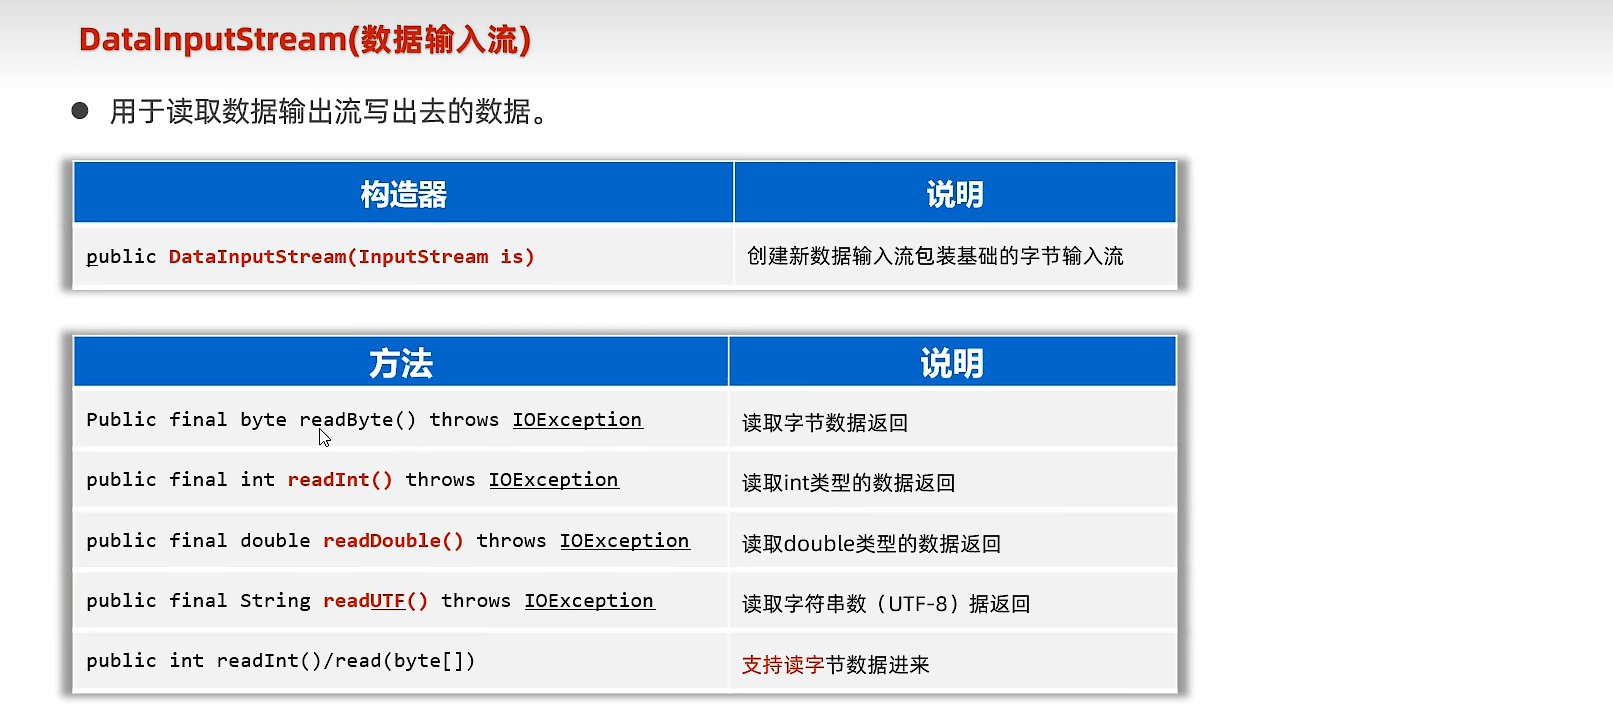
    public static void main(String[] args) {
        try (
                DataInputStream dis =
                        new DataInputStream(new FileInputStream("io-app2/src/itheima10out.txt"));
                ){
            int i = dis.readInt();
            System.out.println(i);

            double d = dis.readDouble();
            System.out.println(d);

            boolean b = dis.readBoolean();
            System.out.println(b);

            String rs = dis.readUTF();
            System.out.println(rs);
        } catch (Exception e) {
            e.printStackTrace();
        }
    }
   public static void main(String[] args) {
        try (
                // 1、创建一个数据输出流包装低级的字节输出流
                DataOutputStream dos =
                        new DataOutputStream(new FileOutputStream("io-app2/src/itheima10out.txt"));
                ){
            dos.writeInt(97);
            dos.writeDouble(99.5);
            dos.writeBoolean(true);
            dos.writeUTF("黑马程序员666!");

        } catch (Exception e) {
            e.printStackTrace();
        }
    }
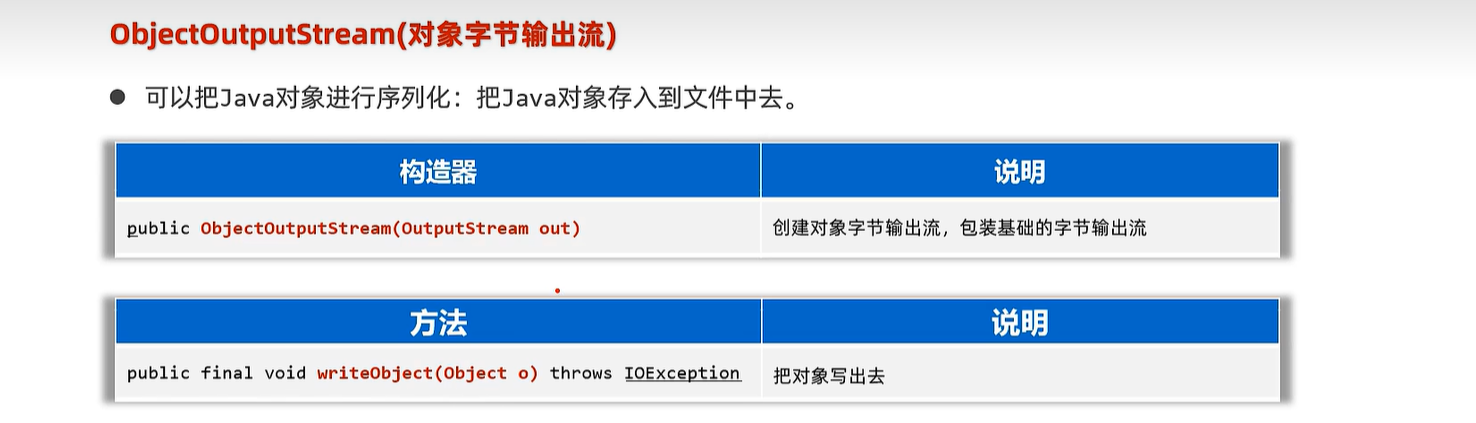
20.10 序列化流
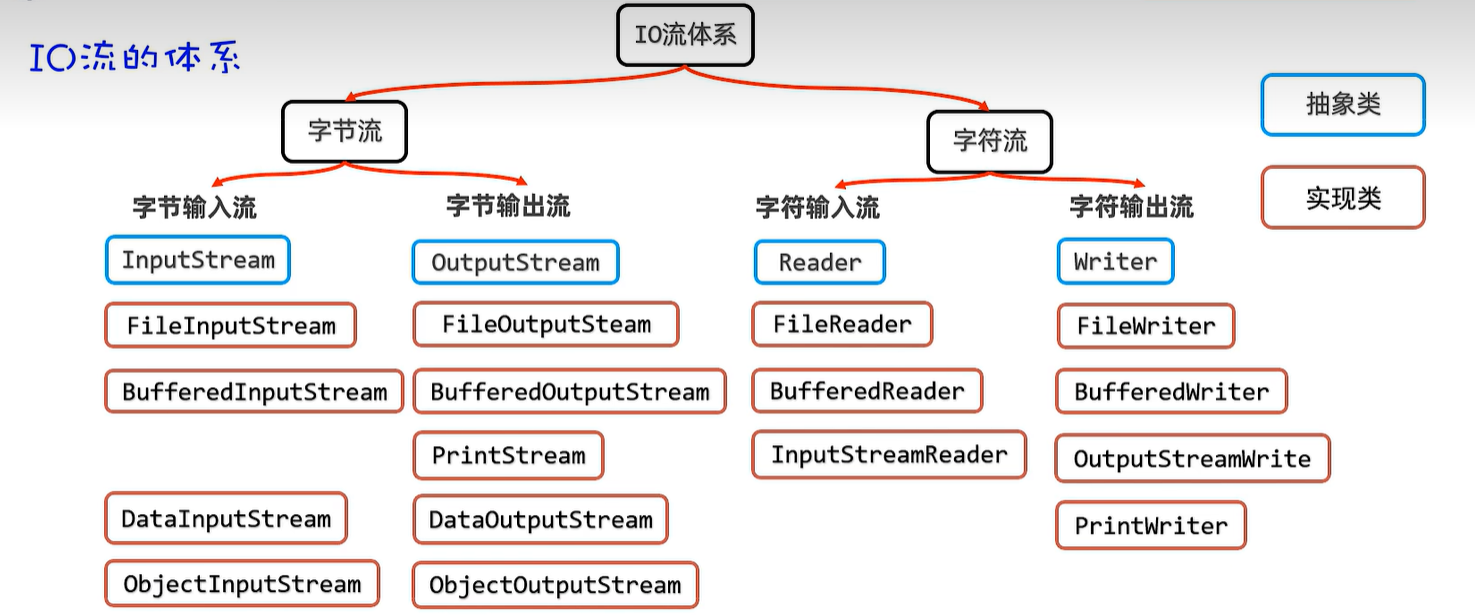
// 注意:对象如果需要序列化,必须实现序列化接口。
public class User implements Serializable {
    private String loginName;
    private String userName;
    private int age;
    // transient 这个成员变量将不参与序列化。
    private transient String passWord;

    public User() {
    }

    public User(String loginName, String userName, int age, String passWord) {
        this.loginName = loginName;
        this.userName = userName;
        this.age = age;
        this.passWord = passWord;
    }
    //get set 方法
}
    public static void main(String[] args) {
        try (
                // 2、创建一个对象字节输出流包装原始的字节 输出流。
                ObjectOutputStream oos =
                        new ObjectOutputStream(new FileOutputStream("io-app2/src/itheima11out.txt"));
                ){
            // 1、创建一个Java对象。
            User u = new User("admin", "张三", 32, "666888xyz");

            // 3、序列化对象到文件中去
            oos.writeObject(u);
            System.out.println("序列化对象成功!!");

        } catch (Exception e) {
            e.printStackTrace();
        }
    }
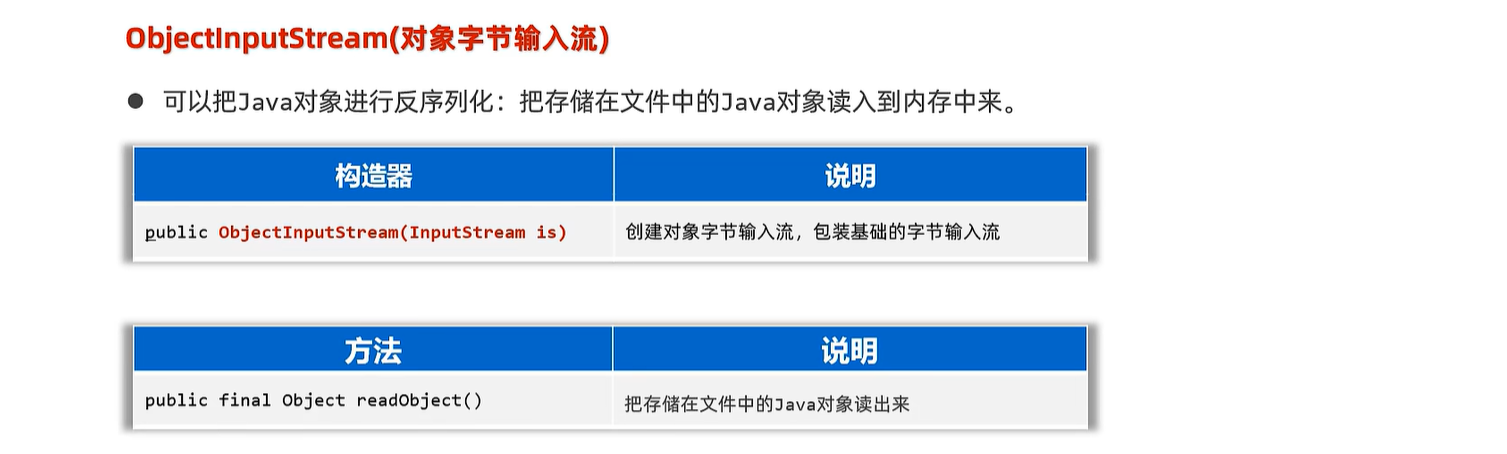
    public static void main(String[] args) {
        try (
                // 1、创建一个对象字节输入流管道,包装 低级的字节输入流与源文件接通
                ObjectInputStream ois = new ObjectInputStream(new FileInputStream("io-app2/src/itheima11out.txt"));
                ){
            User u = (User) ois.readObject();
            System.out.println(u);
        } catch (Exception e) {
            e.printStackTrace();
        }
    }
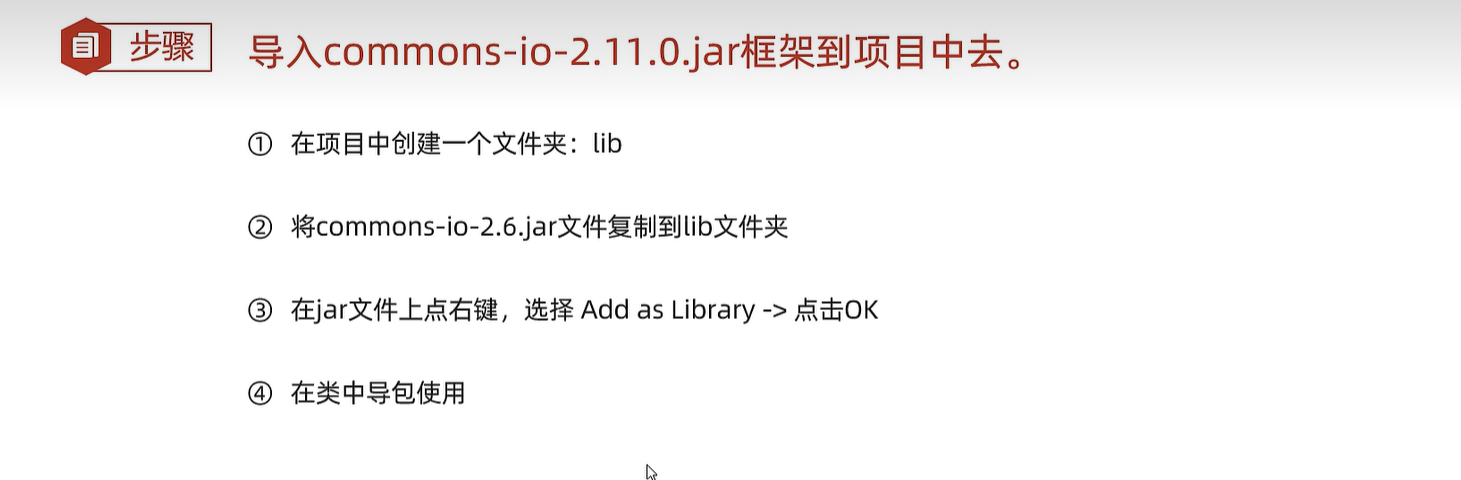
20.11 commons-io框架
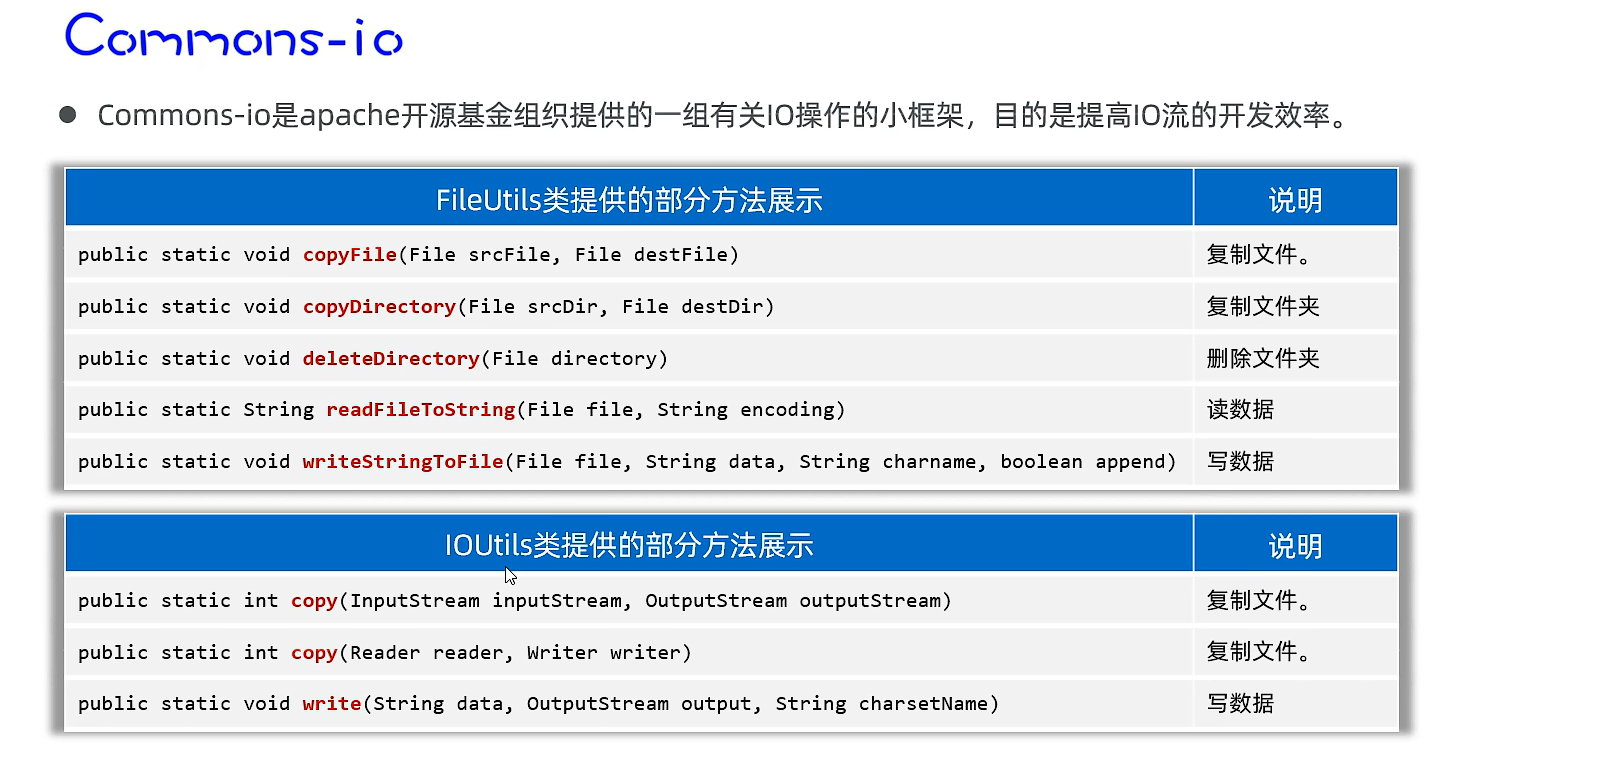
    public static void main(String[] args) throws Exception {
        FileUtils.copyFile(new File("io-app2\\src\\itheima01.txt"), new File("io-app2/src/a.txt"));
        FileUtils.copyDirectory(new File("D:\\resource\\私人珍藏"), new File("D:\\resource\\私人珍藏3"));
        FileUtils.deleteDirectory(new File("D:\\resource\\私人珍藏3"));

        // Java提供的原生的一行代码搞定很多事情
         Files.copy(Path.of("io-app2\\src\\itheima01.txt"), Path.of("io-app2\\src\\b.txt"));
        System.out.println(Files.readString(Path.of("io-app2\\src\\itheima01.txt")));
    }
21. 常用特殊文件
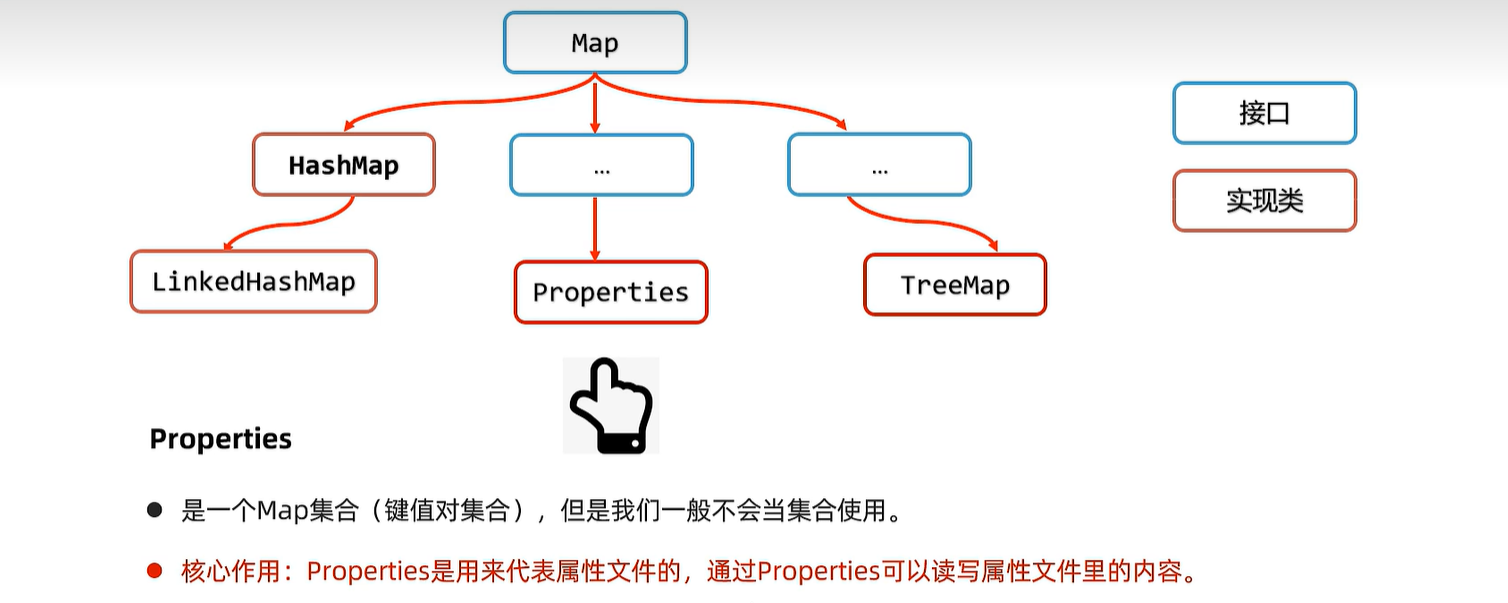
21.1 properties
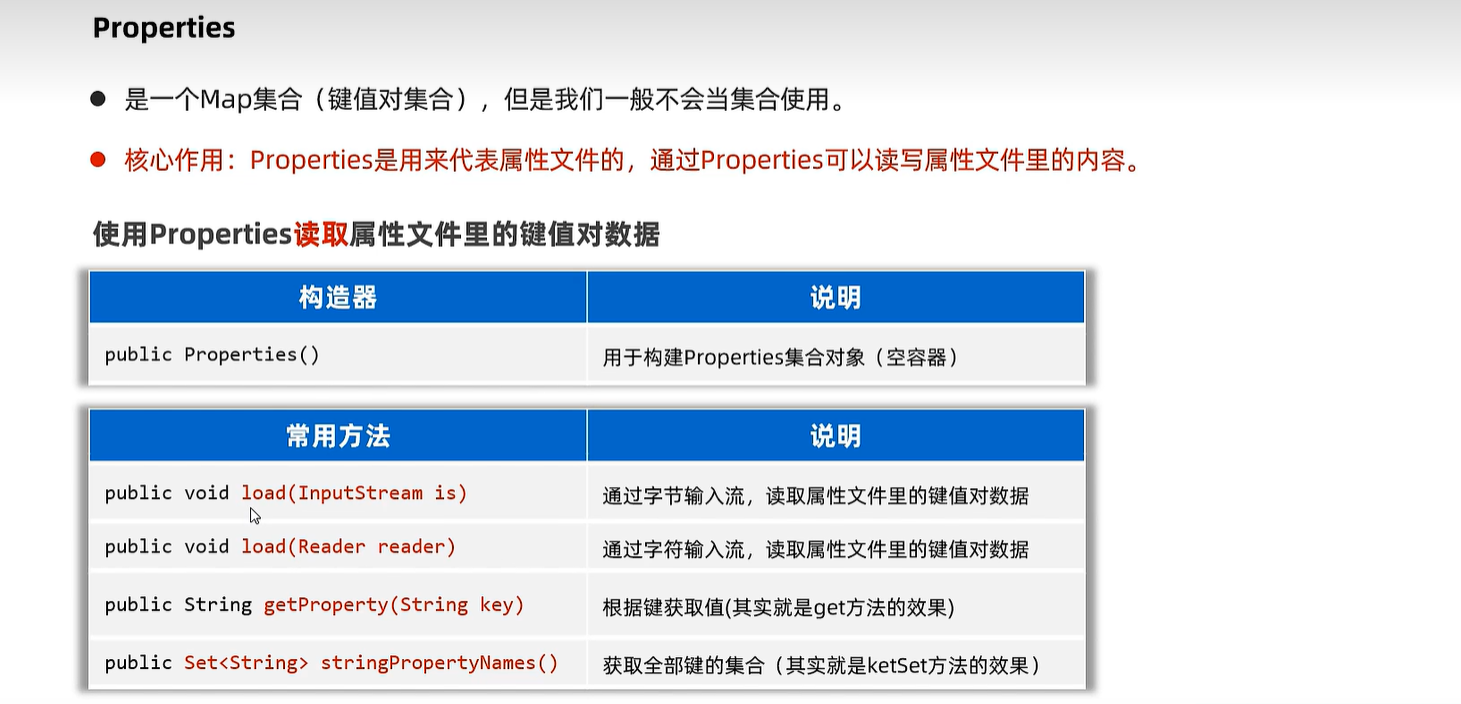
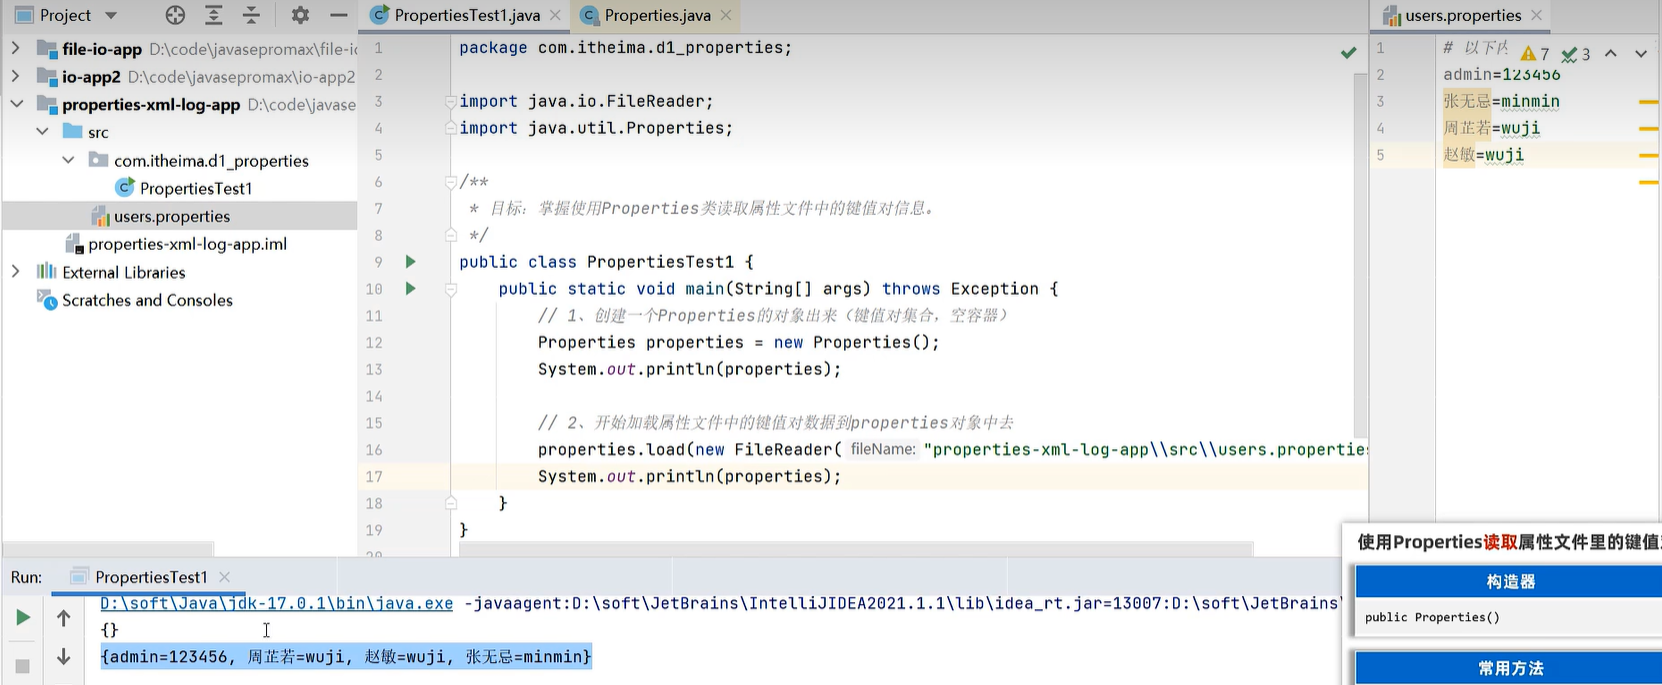
    public static void main(String[] args) throws Exception {
        // 1、创建一个Properties的对象出来(键值对集合,空容器)
        Properties properties = new Properties();
        System.out.println(properties);

        // 2、开始加载属性文件中的键值对数据到properties对象中去
        properties.load(new FileReader("properties-xml-log-app\\src\\users.properties"));
        System.out.println(properties);

        // 3、根据键取值
        System.out.println(properties.getProperty("赵敏"));
        System.out.println(properties.getProperty("张无忌"));

        // 4、遍历全部的键和值。
        Set<String> keys = properties.stringPropertyNames();
        for (String key : keys) {
            String value = properties.getProperty(key);
            System.out.println(key + "---->" + value);
        }

        properties.forEach((k, v) -> {
            System.out.println(k + "---->" + v);
        });
    }
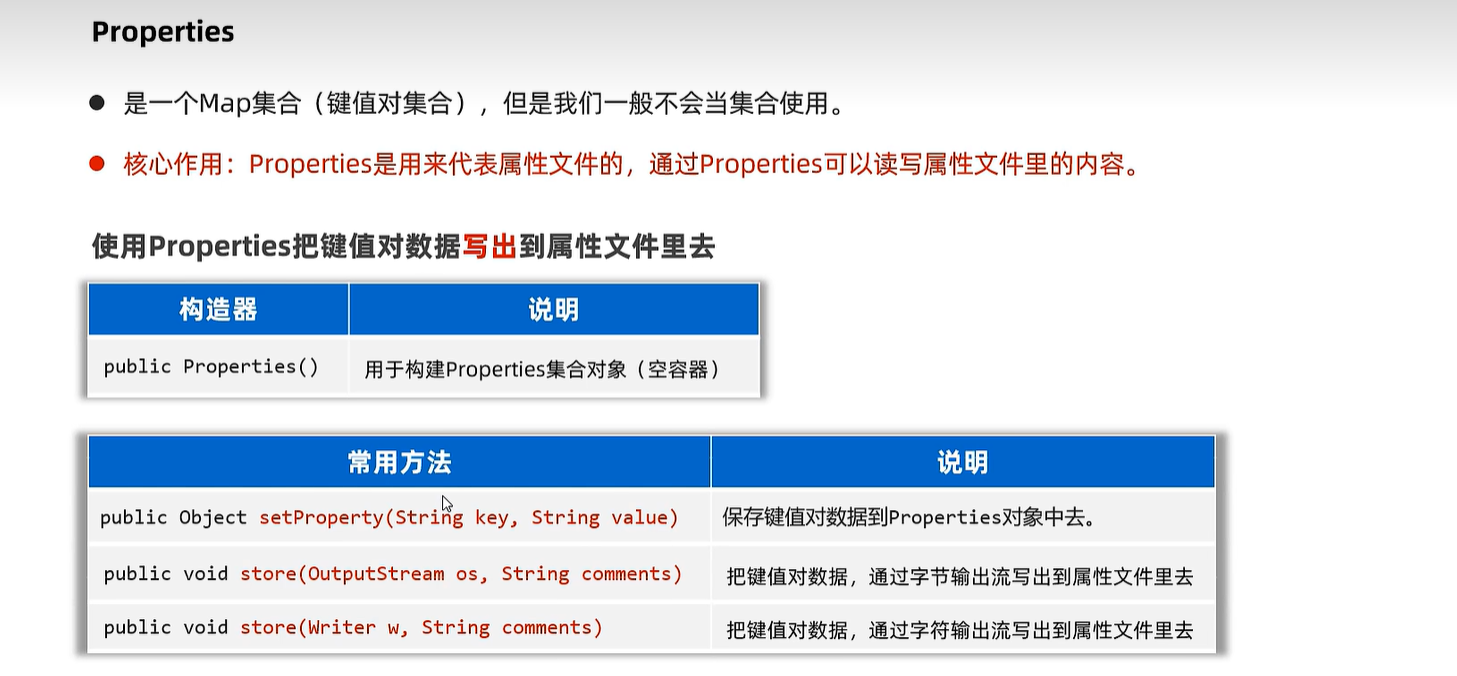
    public static void main(String[] args) throws Exception {
        // 1、创建Properties对象出来,先用它存储一些键值对数据
        Properties properties = new Properties();
        properties.setProperty("张无忌", "minmin");
        properties.setProperty("殷素素", "cuishan");
        properties.setProperty("张翠山", "susu");

        // 2、把properties对象中的键值对数据存入到属性文件中去
        properties.store(new FileWriter("properties-xml-log-app/src/users2.properties")
                , "i saved many users!");

    }
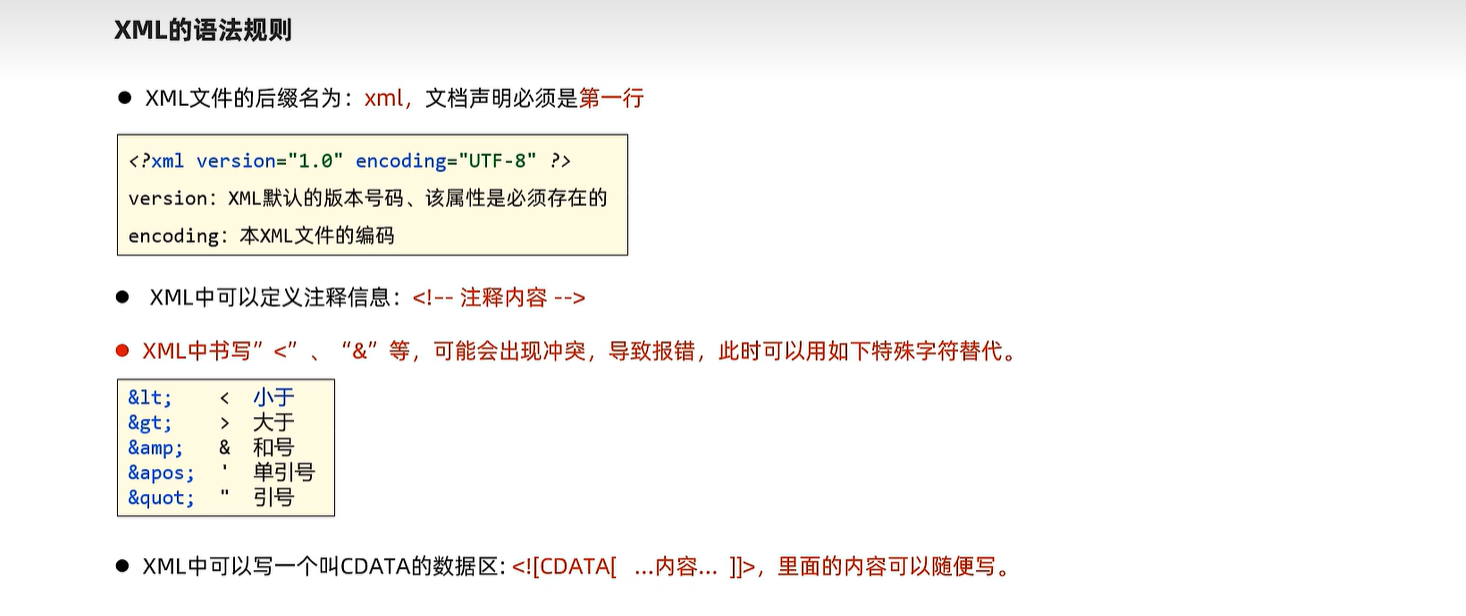
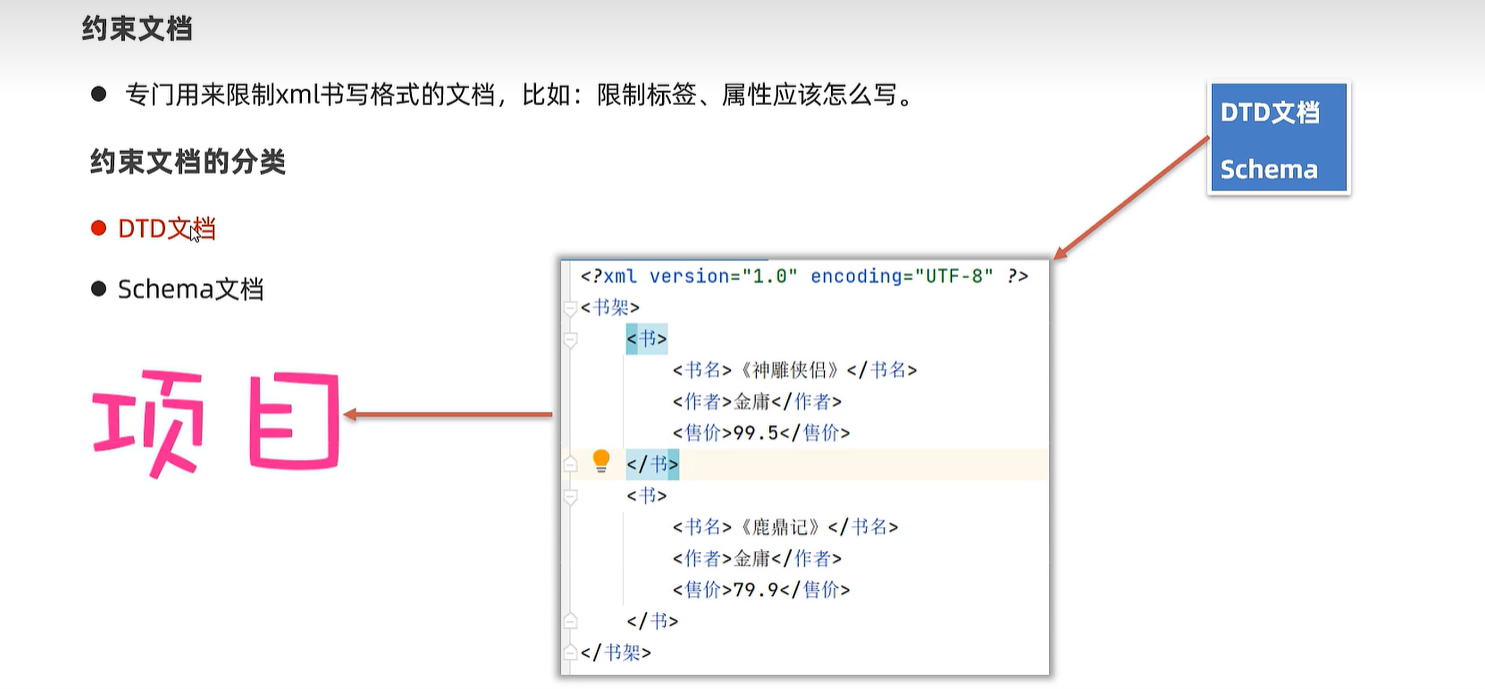
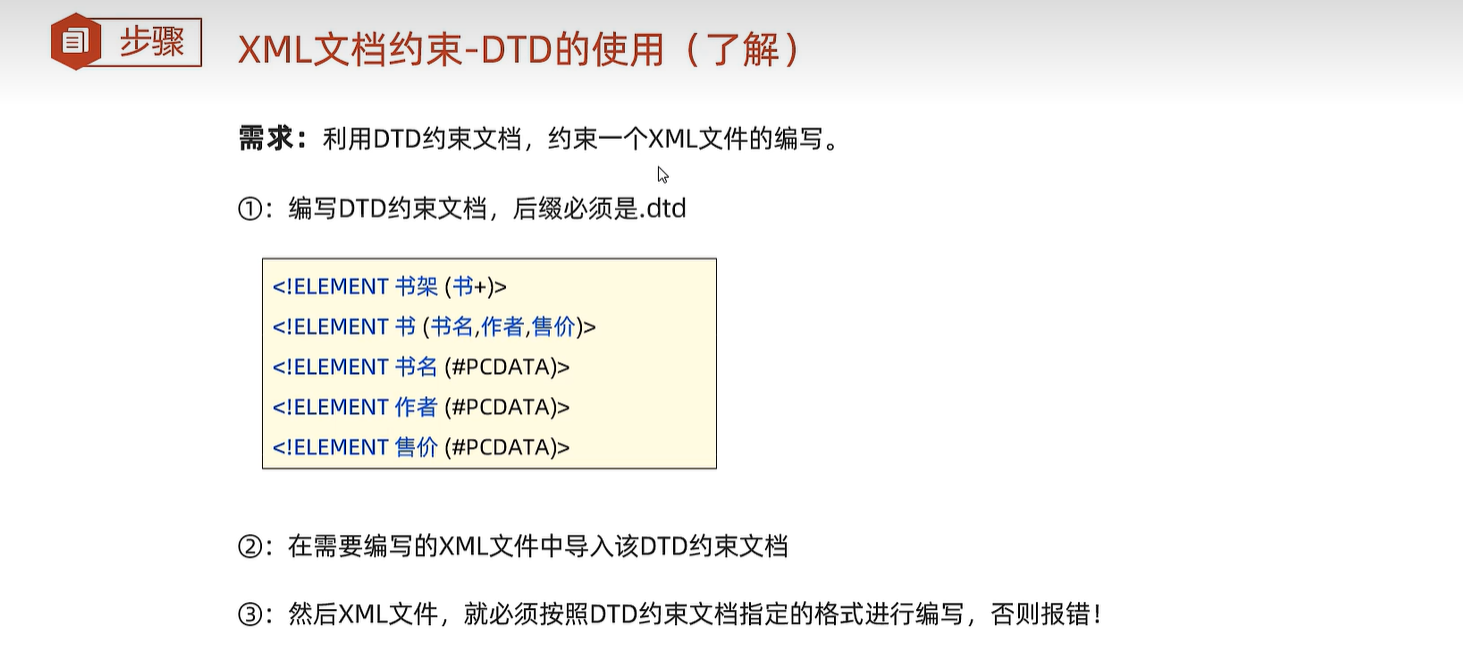
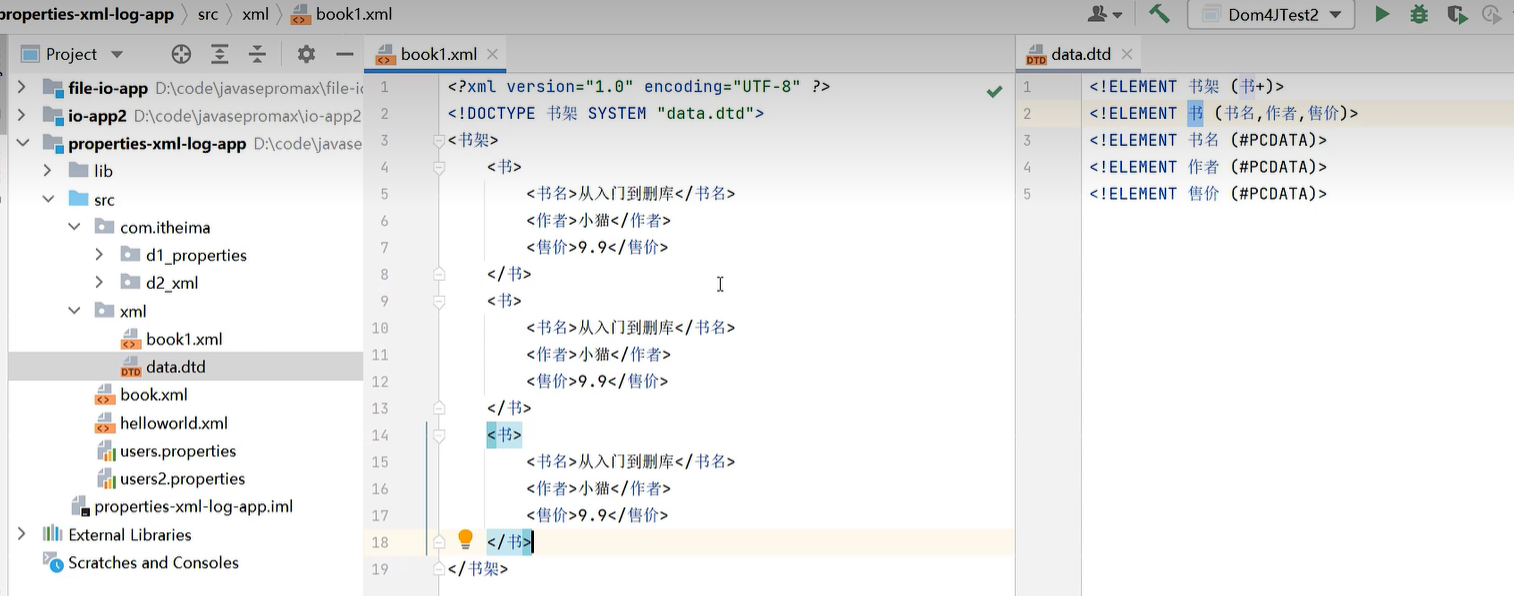
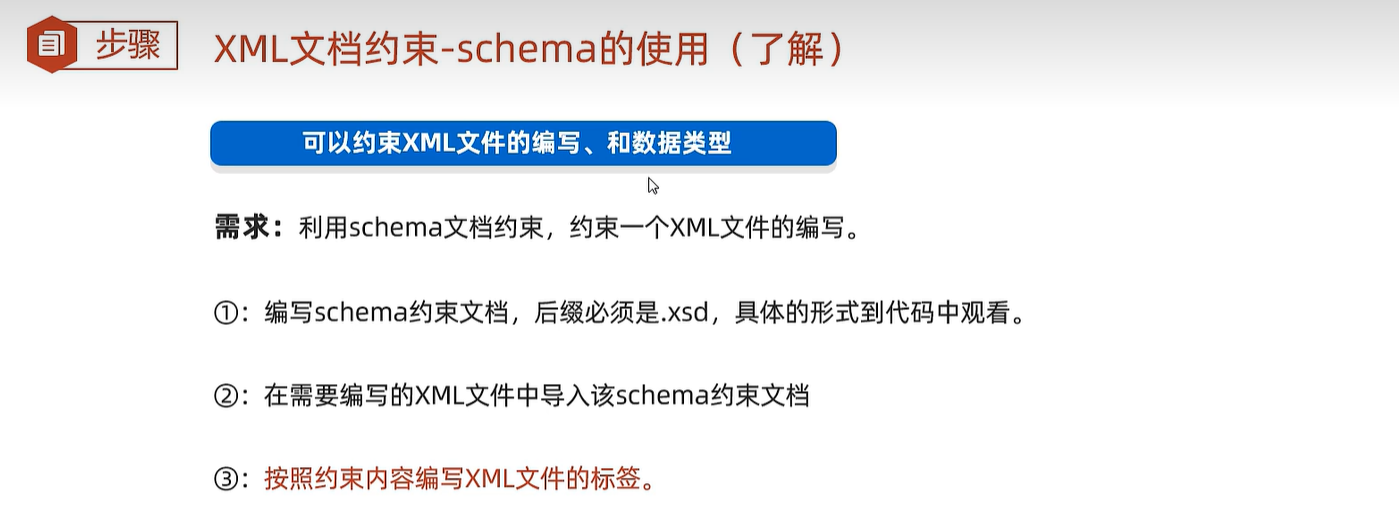
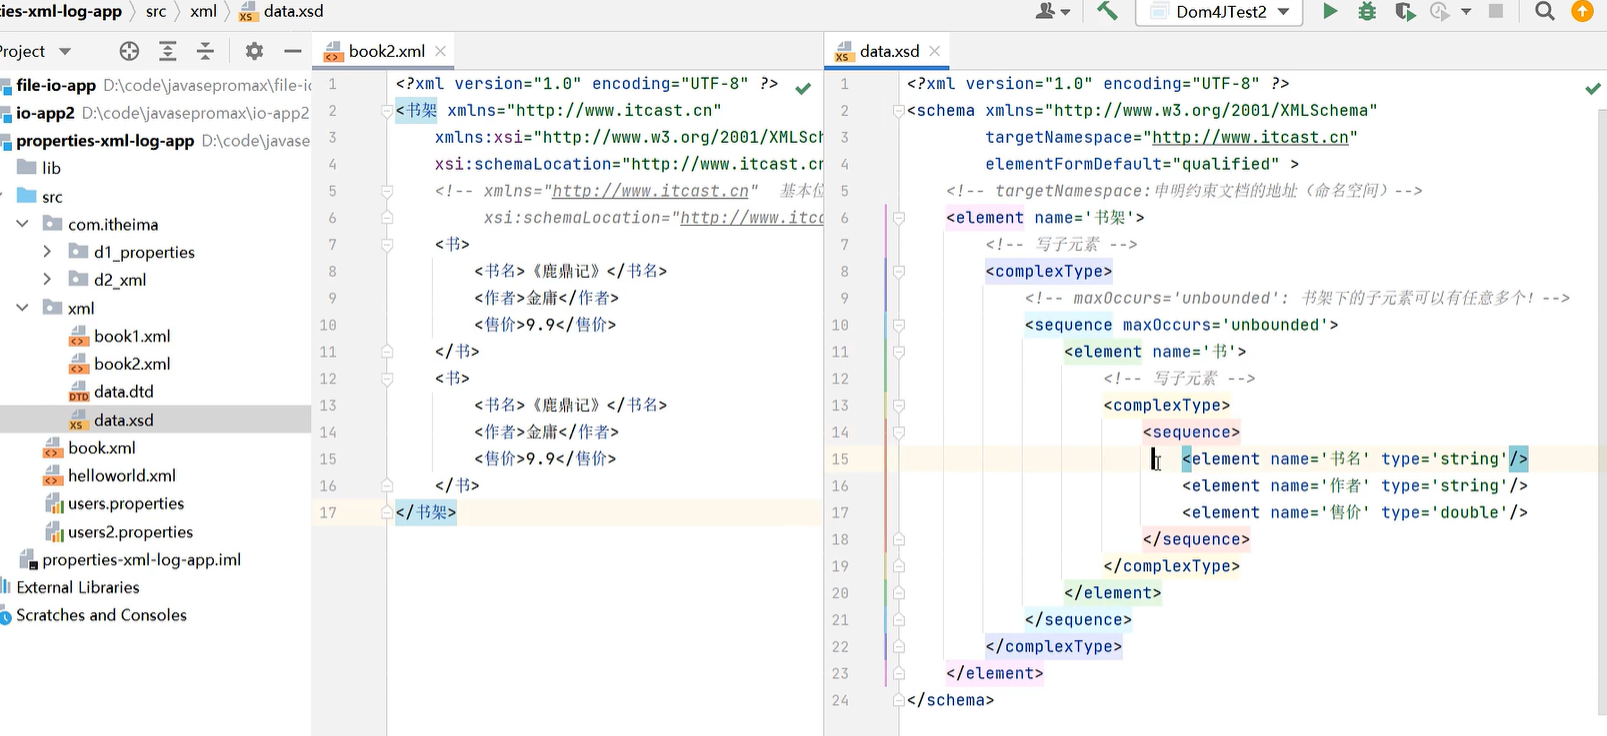
21.2 XML
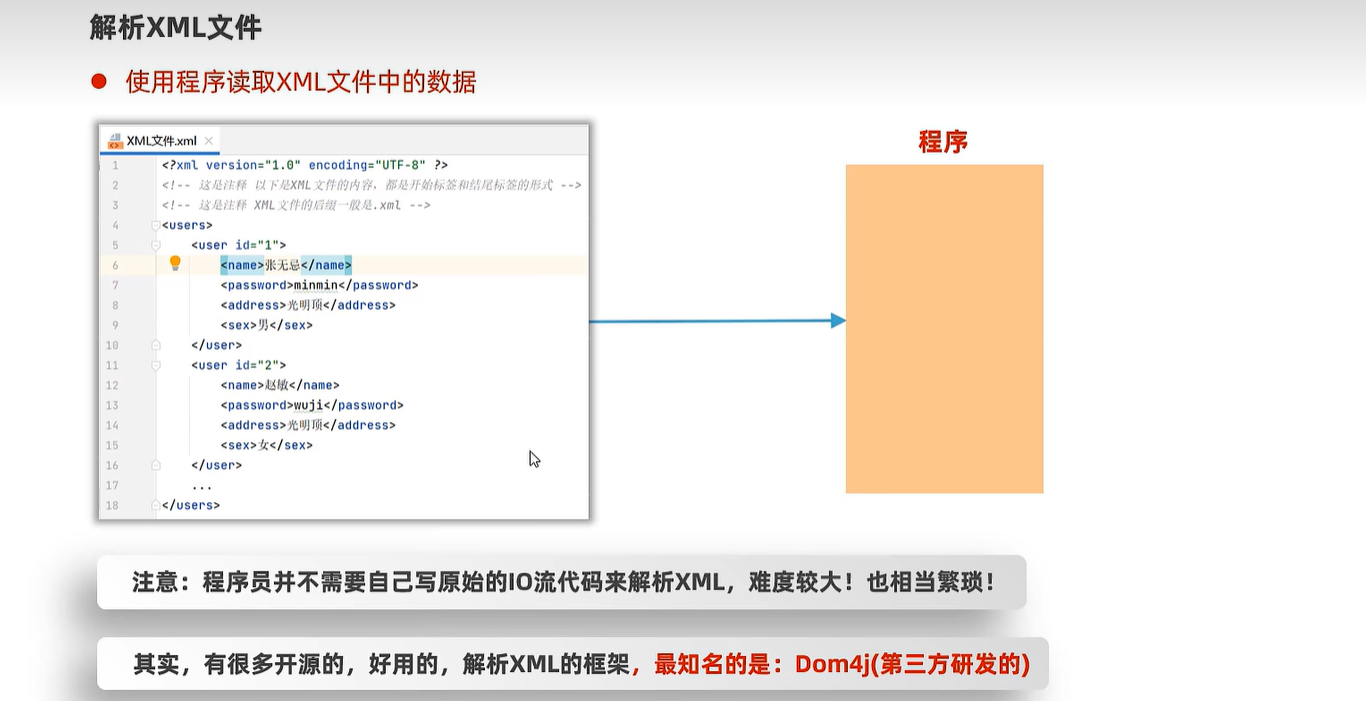
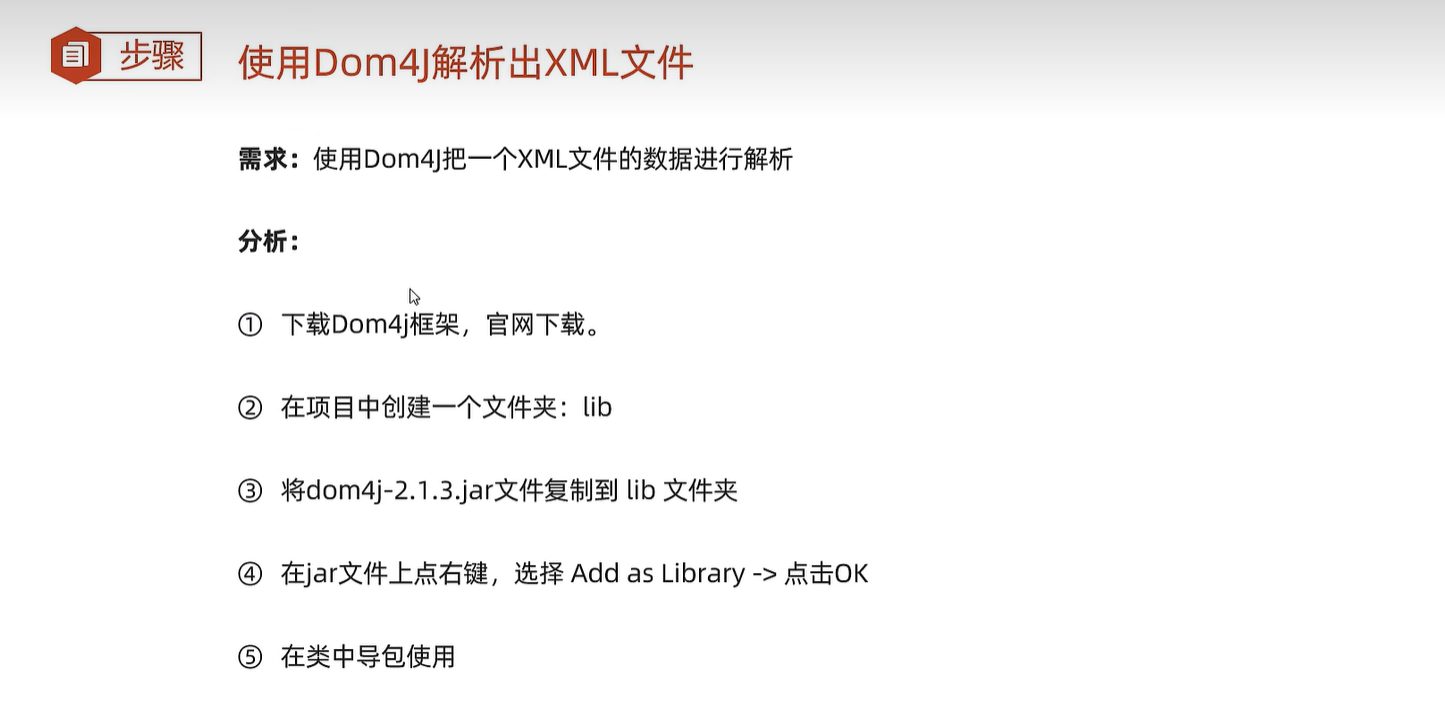

    public static void main(String[] args) throws Exception {
        // 1、创建一个Dom4J框架提供的解析器对象
        SAXReader saxReader = new SAXReader();

        // 2、使用saxReader对象把需要解析的XML文件读成一个Document对象。
        Document document =
                saxReader.read("properties-xml-log-app\\src\\helloworld.xml");

        // 3、从文档对象中解析XML文件的全部数据了
        Element root = document.getRootElement();
        System.out.println(root.getName());

        // 4、获取根元素下的全部一级子元素。
        // List<Element> elements = root.elements();
        List<Element> elements = root.elements("user");
        for (Element element : elements) {
            System.out.println(element.getName());
        }

        // 5、获取当前元素下的某个子元素。
        Element people = root.element("people");
        System.out.println(people.getText());

        // 如果下面有很多子元素user,默认获取第一个。
        Element user = root.element("user");
        System.out.println(user.elementText("name"));

        // 6、获取元素的属性信息呢?
        System.out.println(user.attributeValue("id"));
        Attribute id = user.attribute("id");
        System.out.println(id.getName());
        System.out.println(id.getValue());

        List<Attribute> attributes = user.attributes();
        for (Attribute attribute : attributes) {
            System.out.println(attribute.getName() + "=" + attribute.getValue());
        }

        // 7、如何获取全部的文本内容:获取当前元素下的子元素文本值
        System.out.println(user.elementText("name"));
        System.out.println(user.elementText("地址"));
        System.out.println(user.elementTextTrim("地址")); // 取出文本去除前后空格
        System.out.println(user.elementText("password"));

        Element data = user.element("data");
        System.out.println(data.getText());
        System.out.println(data.getTextTrim()); // 取出文本去除前后空格
    }
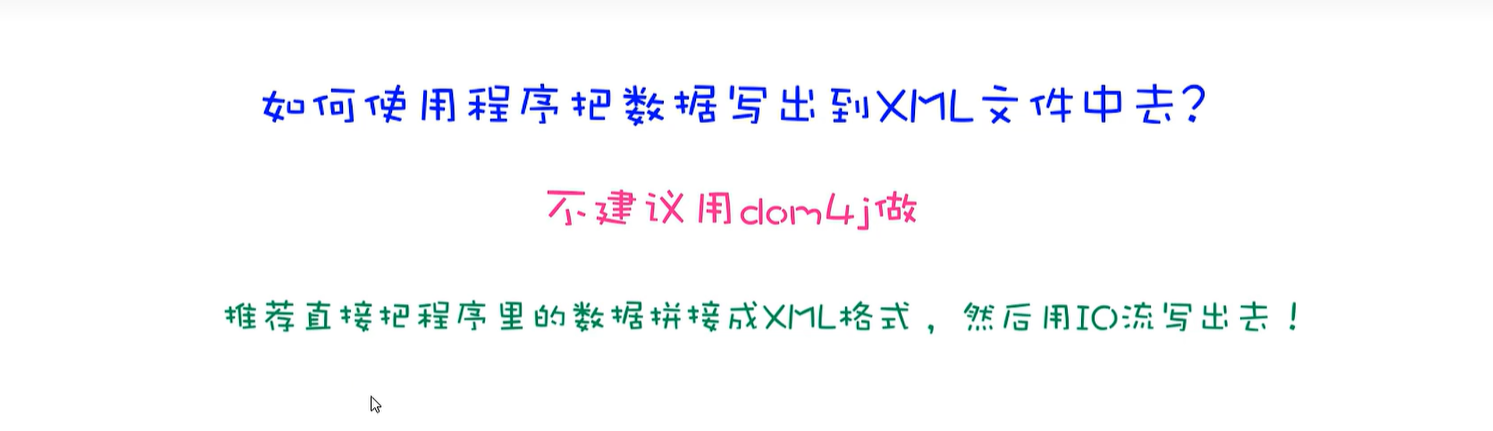
public static void main(String[] args) {
        // 1、使用一个StringBuilder对象来拼接XML格式的数据。
        StringBuilder sb = new StringBuilder();
        sb.append("<?xml version=\"1.0\" encoding=\"UTF-8\" ?>\r\n");
        sb.append("<book>\r\n");
        sb.append("\t<name>").append("从入门到跑路").append("</name>\r\n");
        sb.append("\t<author>").append("dlei").append("</author>\r\n");
        sb.append("\t<price>").append(999.99).append("</price>\r\n");
        sb.append("</book>");

        try (
                BufferedWriter bw = new BufferedWriter(new FileWriter("properties-xml-log-app/src/book.xml"));
                ){
            bw.write(sb.toString());
        } catch (Exception e) {
            e.printStackTrace();
        }

    }
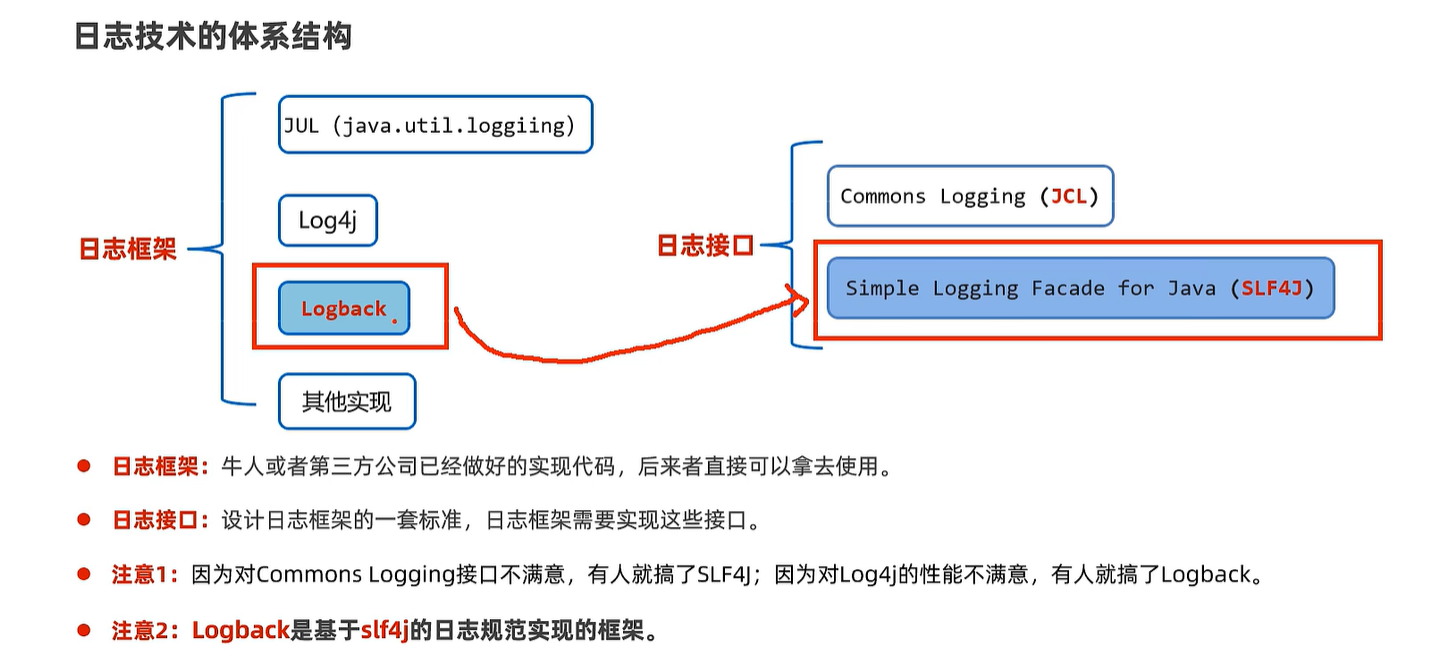
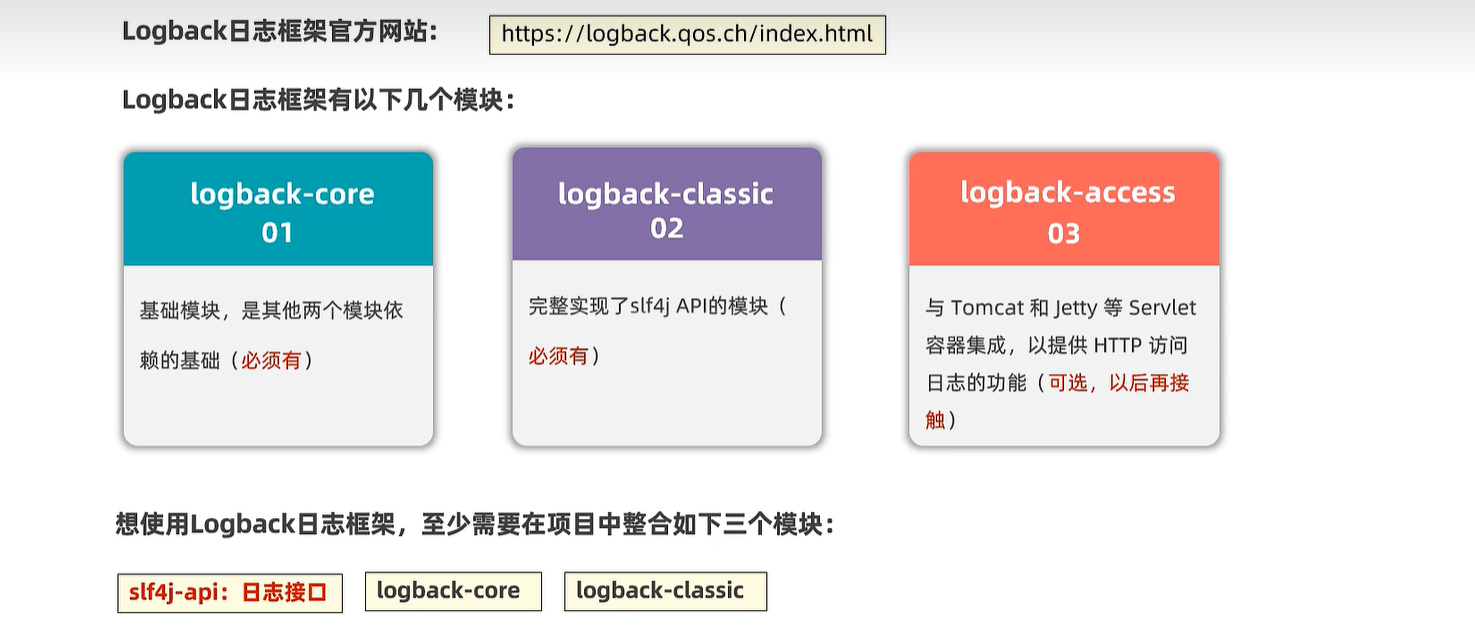
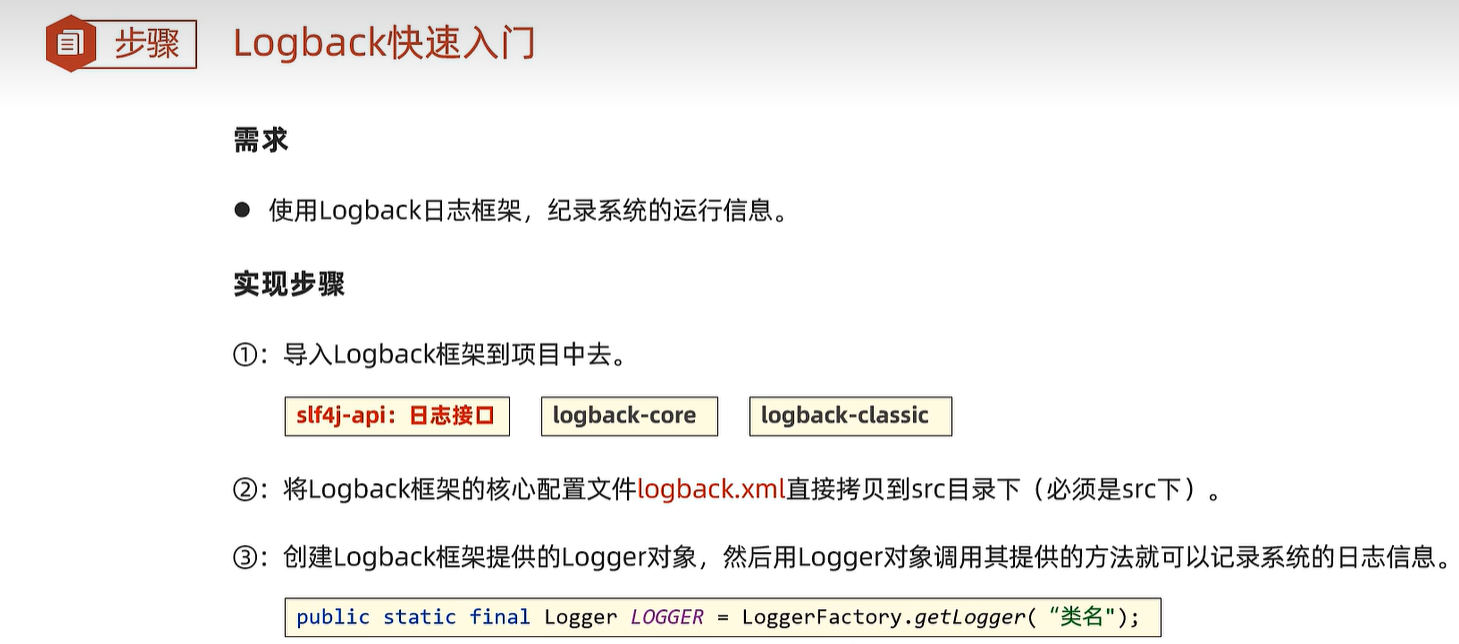
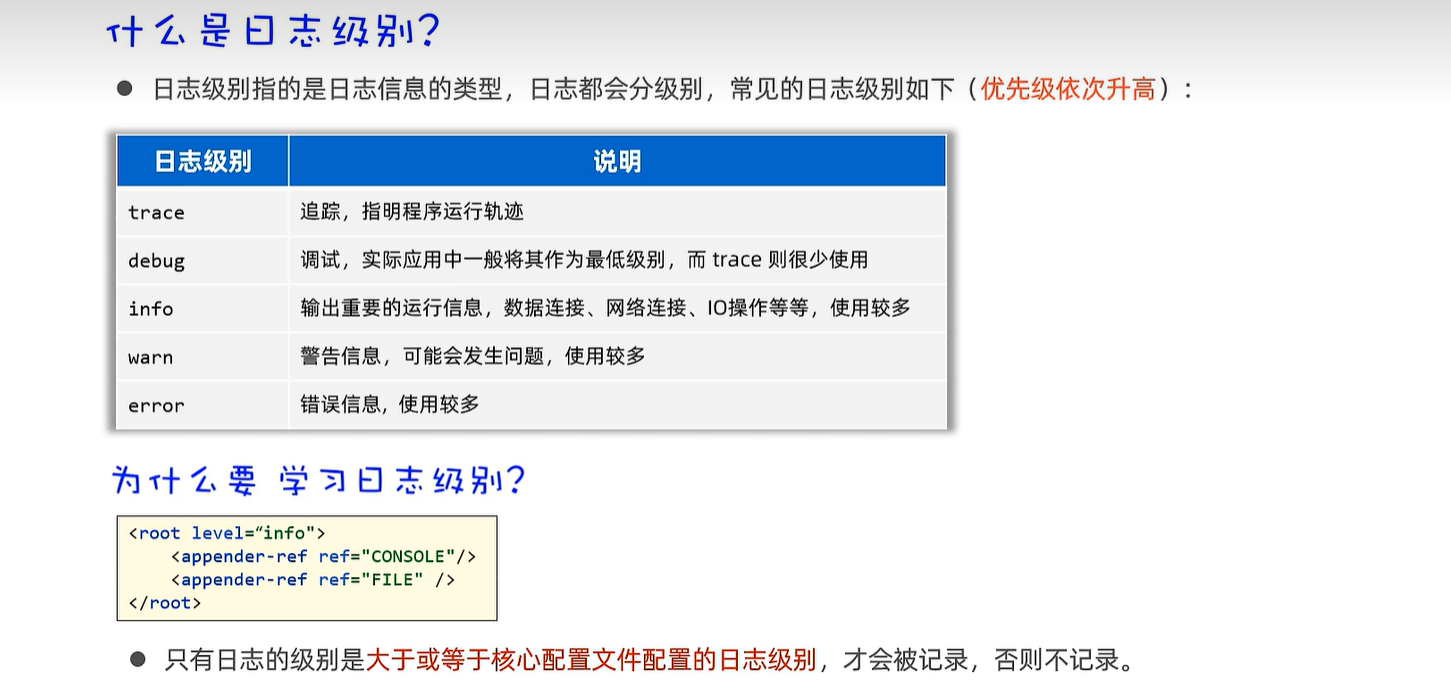
22. 日志框架
logback.xml
<?xml version="1.0" encoding="UTF-8"?>
<configuration>
<!--
CONSOLE :表示当前的日志信息是可以输出到控制台的。
-->
<appender name="CONSOLE" class="ch.qos.logback.core.ConsoleAppender">
<!--输出流对象 默认 System.out 改为 System.err-->
<target>System.out</target>
<encoder>
<!--格式化输出:%d表示日期,%thread表示线程名,%-5level:级别从左显示5个字符宽度
%msg:日志消息,%n是换行符-->
<pattern>%d{yyyy-MM-dd HH:mm:ss.SSS} [%-5level] %c [%thread] : %msg%n</pattern>
</encoder>
</appender>
<!-- File是输出的方向通向文件的 -->
<appender name="FILE" class="ch.qos.logback.core.rolling.RollingFileAppender">
<encoder>
<pattern>%d{yyyy-MM-dd HH:mm:ss.SSS} [%thread] %-5level %logger{36} - %msg%n</pattern>
<charset>utf-8</charset>
</encoder>
<!--日志输出路径-->
<file>D:/log/itheima-data.log</file>
<!--指定日志文件拆分和压缩规则-->
<rollingPolicy
class="ch.qos.logback.core.rolling.SizeAndTimeBasedRollingPolicy">
<!--通过指定压缩文件名称,来确定分割文件方式 -%i 序列号-->
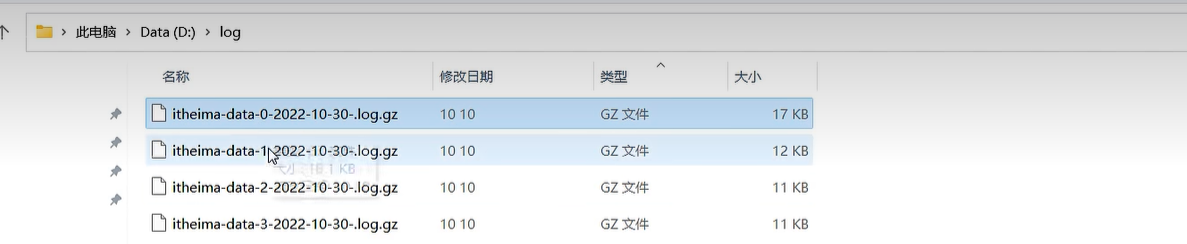
<fileNamePattern>D:/log/itheima-data-%i-%d{yyyy-MM-dd}-.log.gz</fileNamePattern>
<!--文件拆分大小-->
<maxFileSize>1MB</maxFileSize>
</rollingPolicy>
</appender>
<!--
1、控制日志的输出情况:如,开启日志,取消日志
-->
<root level="debug">
<appender-ref ref="CONSOLE"/>
<appender-ref ref="FILE" />
</root>
</configuration>
public class LogBackTest {
    // 创建一个Logger日志对象
    public static final Logger LOGGER = LoggerFactory.getLogger("LogBackTest");

    public static void main(String[] args) {
        //while (true) {
            try {
                LOGGER.info("chu法方法开始执行~~~");
                chu(10, 0);
                LOGGER.info("chu法方法执行成功~~~");
            } catch (Exception e) {
                LOGGER.error("chu法方法执行失败了,出现了bug~~~");
            }
        //}
    }

    public static void chu(int a, int b){
        LOGGER.debug("参数a:" + a);
        LOGGER.debug("参数b:" + b);
        int c = a / b;
        LOGGER.info("结果是:" + c);
    }
}

23. 线程
23.1 线程创建
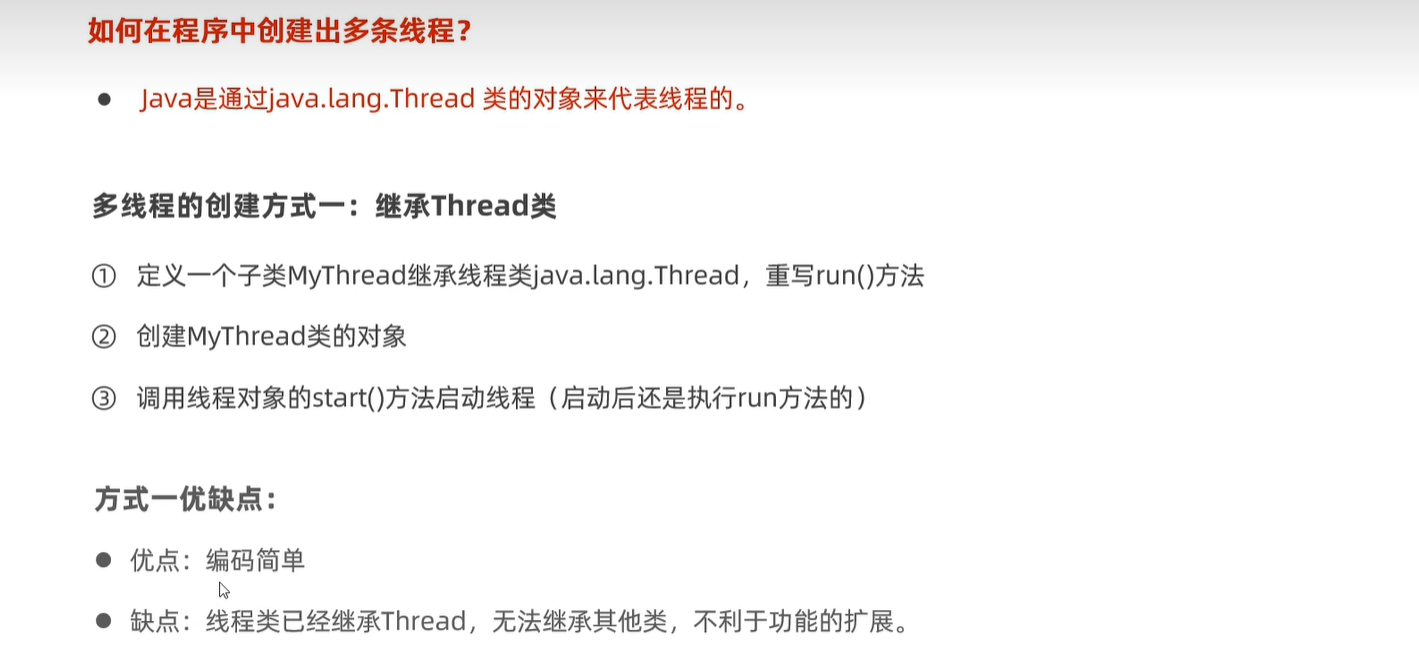
public class MyThread extends Thread{
    // 2、必须重写Thread类的run方法
    @Override
    public void run() {
        // 描述线程的执行任务。
        for (int i = 1; i <= 5; i++) {
            System.out.println("子线程MyThread输出:" + i);
        }
    }
}
public class ThreadTest1 {
    // main方法是由一条默认的主线程负责执行。
    public static void main(String[] args) {

        // 3、创建MyThread线程类的对象代表一个线程
        Thread t = new MyThread();
        // 4、启动线程(自动执行run方法的)
        t.start();  // main线程 t线程

        for (int i = 1; i <= 5; i++) {
            System.out.println("主线程main输出:" + i);
        }
    }
}
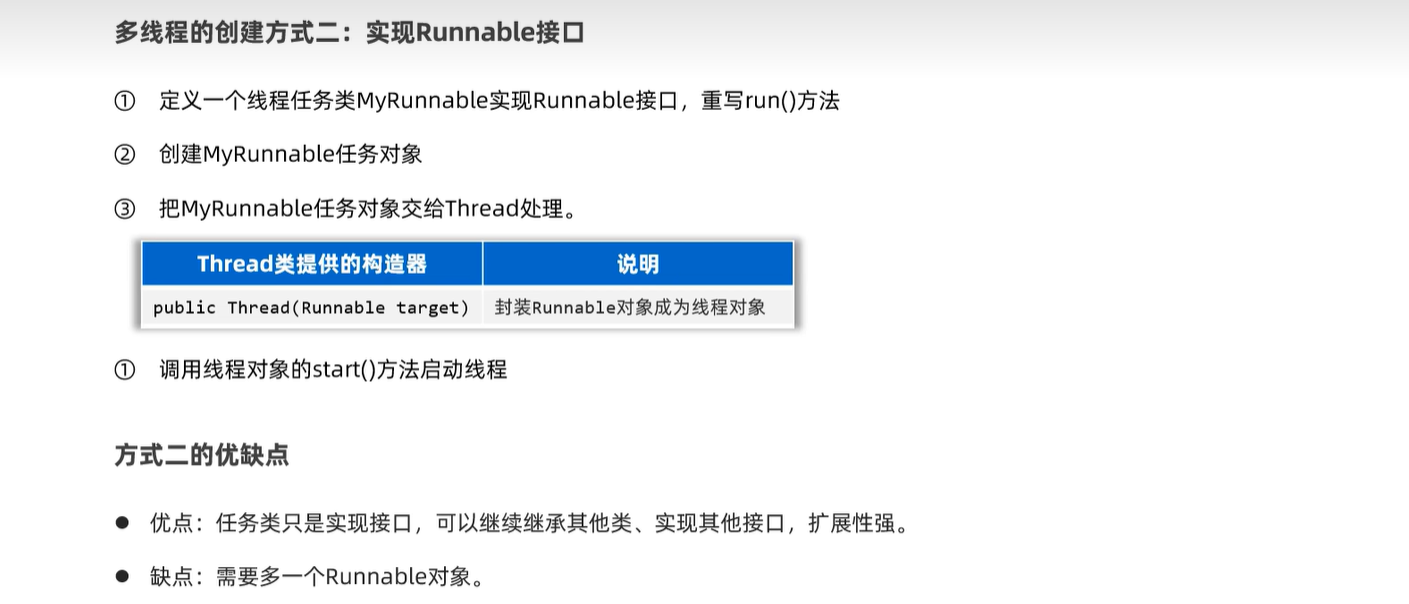
public class MyRunnable implements Runnable{
    // 2、重写runnable的run方法
    @Override
    public void run() {
        // 线程要执行的任务。
        for (int i = 1; i <= 5; i++) {
            System.out.println("子线程输出 ===》" + i);
        }
    }
}
public class ThreadTest2 {
    public static void main(String[] args) {
        // 3、创建任务对象。
        Runnable target = new MyRunnable();
        // 4、把任务对象交给一个线程对象处理。
        //  public Thread(Runnable target)
        new Thread(target).start();

        for (int i = 1; i <= 5; i++) {
            System.out.println("主线程main输出 ===》" + i);
        }
    }
}
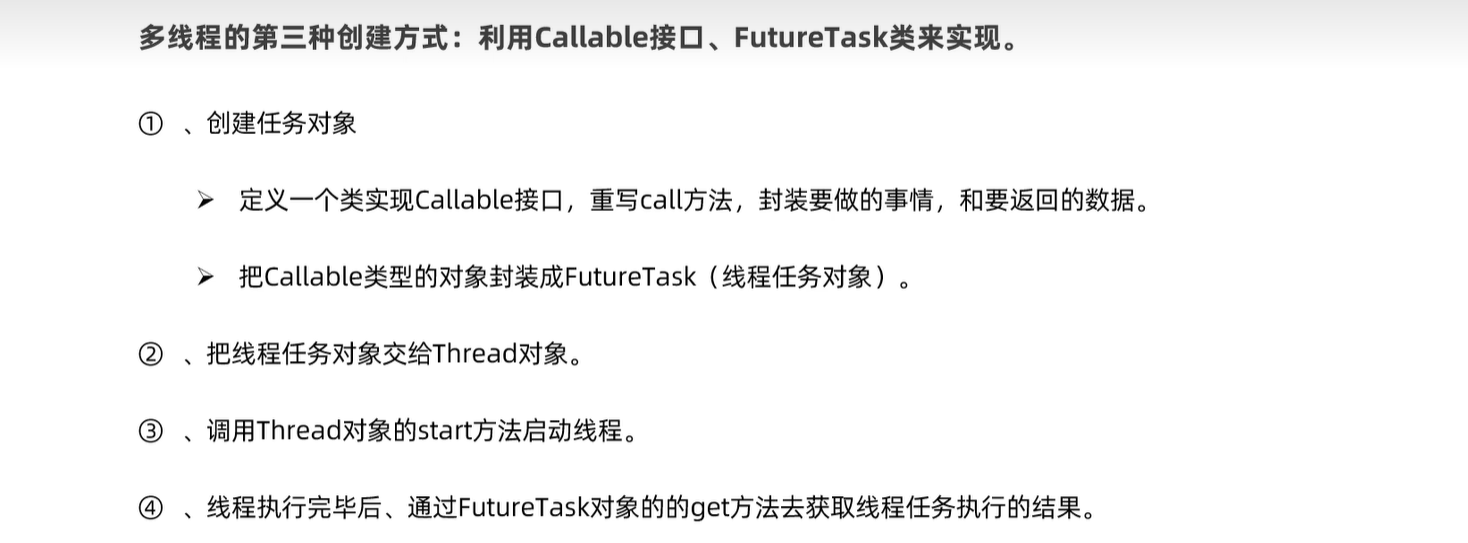
public class MyCallable implements Callable<String> {
    private int n;
    public MyCallable(int n) {
        this.n = n;
    }

    // 2、重写call方法
    @Override
    public String call() throws Exception {
        // 描述线程的任务,返回线程执行返回后的结果。
        // 需求:求1-n的和返回。
        int sum = 0;
        for (int i = 1; i <= n; i++) {
            sum += i;
        }
        return "线程求出了1-" + n + "的和是:" + sum;
    }
}
public class ThreadTest3 {
public static void main(String[] args) throws Exception {
// 3、创建一个Callable的对象
Callable<String> call = new MyCallable(100);
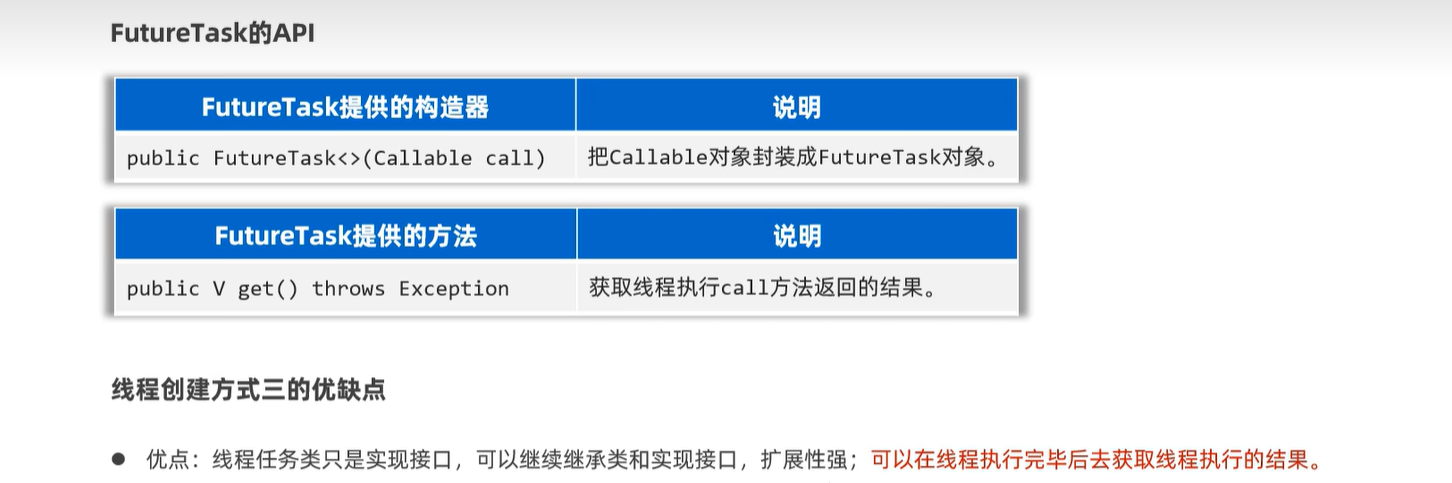
// 4、把Callable的对象封装成一个FutureTask对象(任务对象)
// 未来任务对象的作用?
// 1、是一个任务对象,实现了Runnable对象.
// 2、可以在线程执行完毕之后,用未来任务对象调用get方法获取线程执行完毕后的结果。
FutureTask<String> f1 = new FutureTask<>(call);
// 5、把任务对象交给一个Thread对象
new Thread(f1).start();
Callable<String> call2 = new MyCallable(200);
FutureTask<String> f2 = new FutureTask<>(call2);
new Thread(f2).start();
// 6、获取线程执行完毕后返回的结果。
// 注意:如果执行到这儿,假如上面的线程还没有执行完毕
// 这里的代码会暂停,等待上面线程执行完毕后才会获取结果。
String rs = f1.get();
System.out.println(rs);
String rs2 = f2.get();
System.out.println(rs2);
}
}
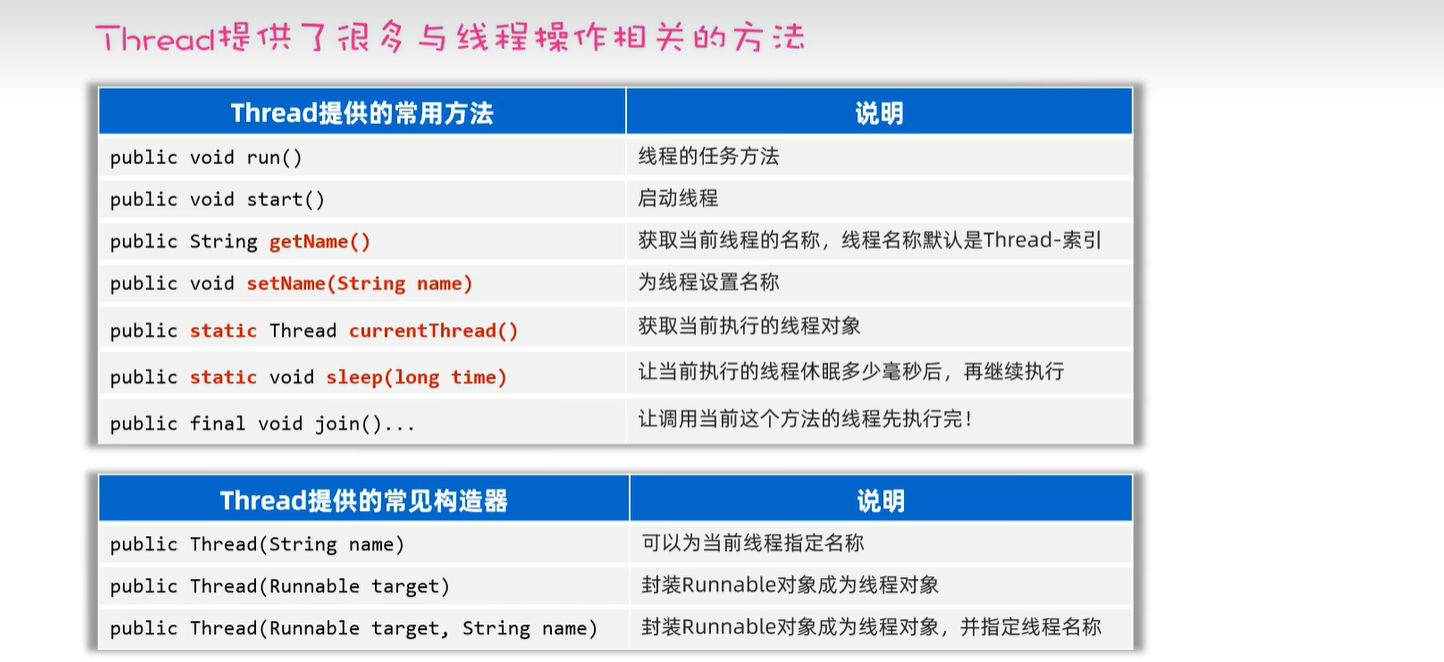
23.2 线程常用api
public class MyThread extends Thread{
    public MyThread(String name){
        super(name); // 为当前线程设置名字了
    }
    @Override
    public void run() {
        // 哪个线程执行它,它就会得到哪个线程对象。
        Thread t = Thread.currentThread();
        for (int i = 1; i <= 3; i++) {
            System.out.println(t.getName() + "输出:" + i);
        }
    }
}
public class ThreadTest1 {
    public static void main(String[] args) {
        Thread t1 = new MyThread("1号线程");
        // t1.setName("1号线程");
        t1.start();
        System.out.println(t1.getName()); // Thread-0

        Thread t2 = new MyThread("2号线程");
        // t2.setName("2号线程");
        t2.start();
        System.out.println(t2.getName()); // Thread-1

        // 主线程对象的名字
        // 哪个线程执行它,它就会得到哪个线程对象。
        Thread m = Thread.currentThread();
        m.setName("最牛的线程");
        System.out.println(m.getName()); // main

        for (int i = 1; i <= 5; i++) {
            System.out.println(m.getName() + "线程输出:" + i);
        }
    }
}
public class ThreadTest2 {
    public static void main(String[] args) throws Exception {
        System.out.println(Runtime.getRuntime().availableProcessors());
        for (int i = 1; i <= 5; i++) {
            System.out.println(i);
            // 休眠5s
            if(i == 3){
                // 会让当前执行的线程暂停5秒,再继续执行
                 Thread.sleep(5000);
            }
        }

        // join方法作用:让当前调用这个方法的线程先执行完。
        Thread t1 = new MyThread("1号线程");
        t1.start();
        t1.join();

        Thread t2 = new MyThread("2号线程");
        t2.start();
        t2.join();

        Thread t3 = new MyThread("3号线程");
        t3.start();
        t3.join();
    }
}
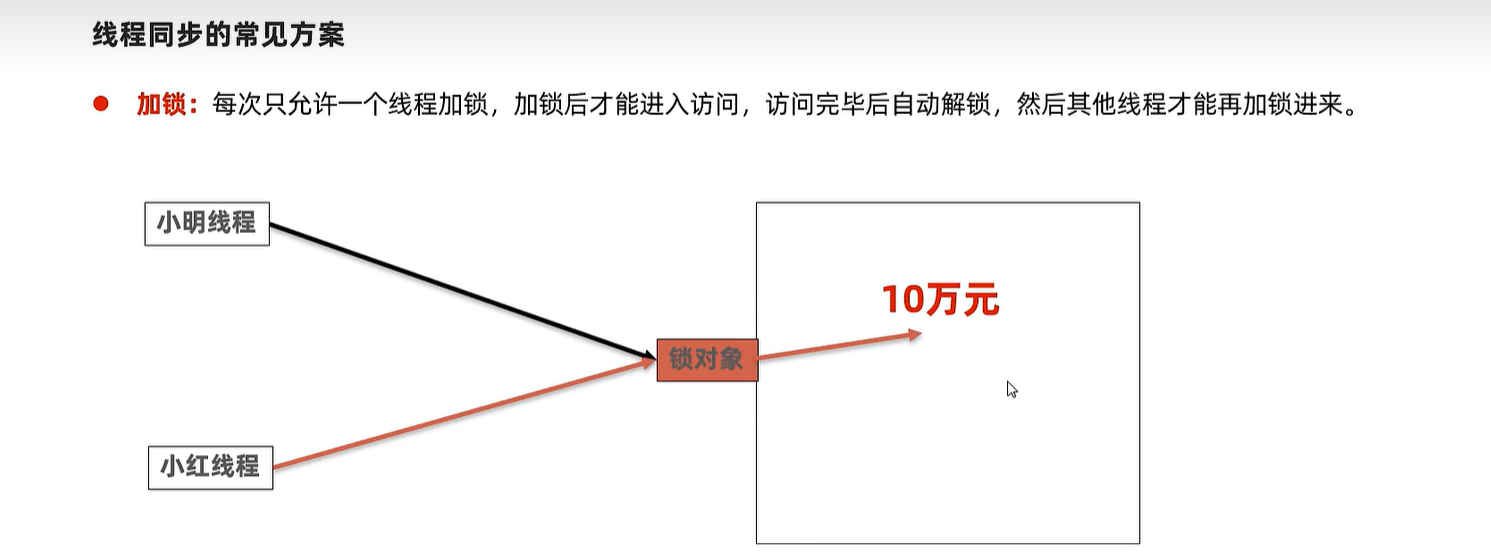
23.3 线程安全
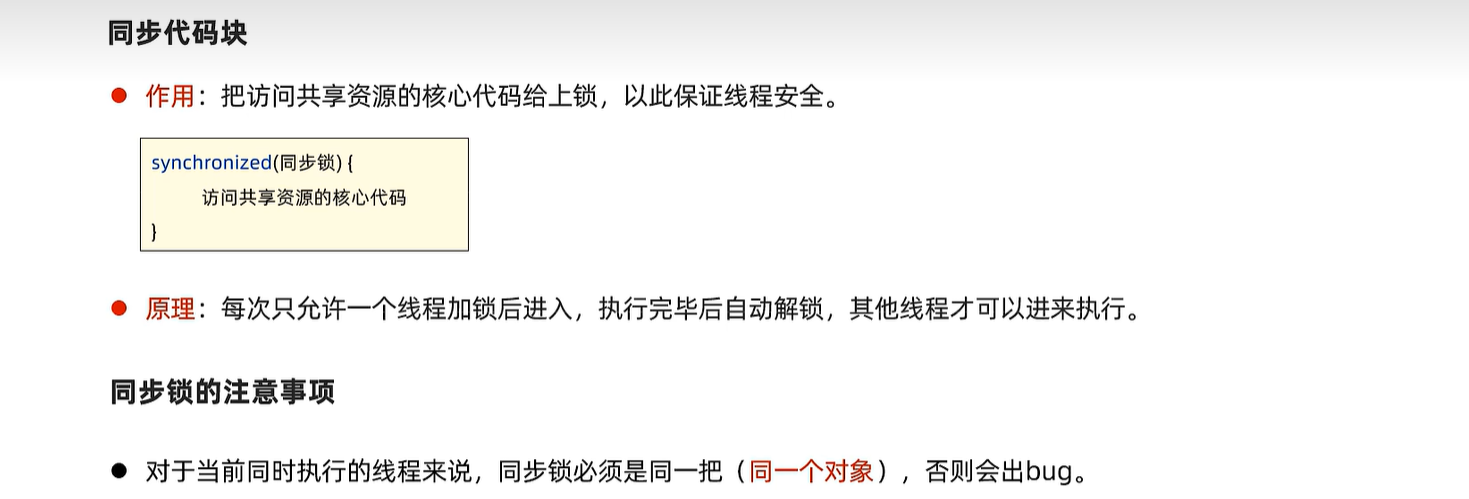
23.3.1 同步代码块
public class Account {
    private String cardId; // 卡号
    private double money; // 余额。

    public Account() {
    }

    public Account(String cardId, double money) {
        this.cardId = cardId;
        this.money = money;
    }

    public static void test(){
        // 静态方法建议使用类名.class
        synchronized (Account.class){

        }
    }

    // 小明 小红线程同时过来的
    public void drawMoney(double money) {
        // 先搞清楚是谁来取钱?
        String name = Thread.currentThread().getName();
        // 1、判断余额是否足够
        // this正好代表共享资源!
        synchronized (this) {
            if(this.money >= money){
                System.out.println(name + "来取钱" + money + "成功!");
                this.money -= money;
                System.out.println(name + "来取钱后,余额剩余:" + this.money);
            }else {
                System.out.println(name + "来取钱:余额不足~");
            }
        }
    }
    // get set 方法
}
public class DrawThread extends Thread{
    private Account acc;
    public DrawThread(Account acc, String name){
        super(name);
        this.acc = acc;
    }
    @Override
    public void run() {
        // 取钱(小明,小红)
        acc.drawMoney(100000);
    }
}
public class ThreadTest {
    public static void main(String[] args) {
        Account acc = new Account("ICBC-110", 100000);
        new DrawThread(acc, "小明").start(); // 小明
        new DrawThread(acc, "小红").start(); // 小红

        Account acc1 = new Account("ICBC-112", 100000);
        new DrawThread(acc1, "小黑").start(); // 小黑
        new DrawThread(acc1, "小白").start(); // 小白
    }
}
23.2 同步方法
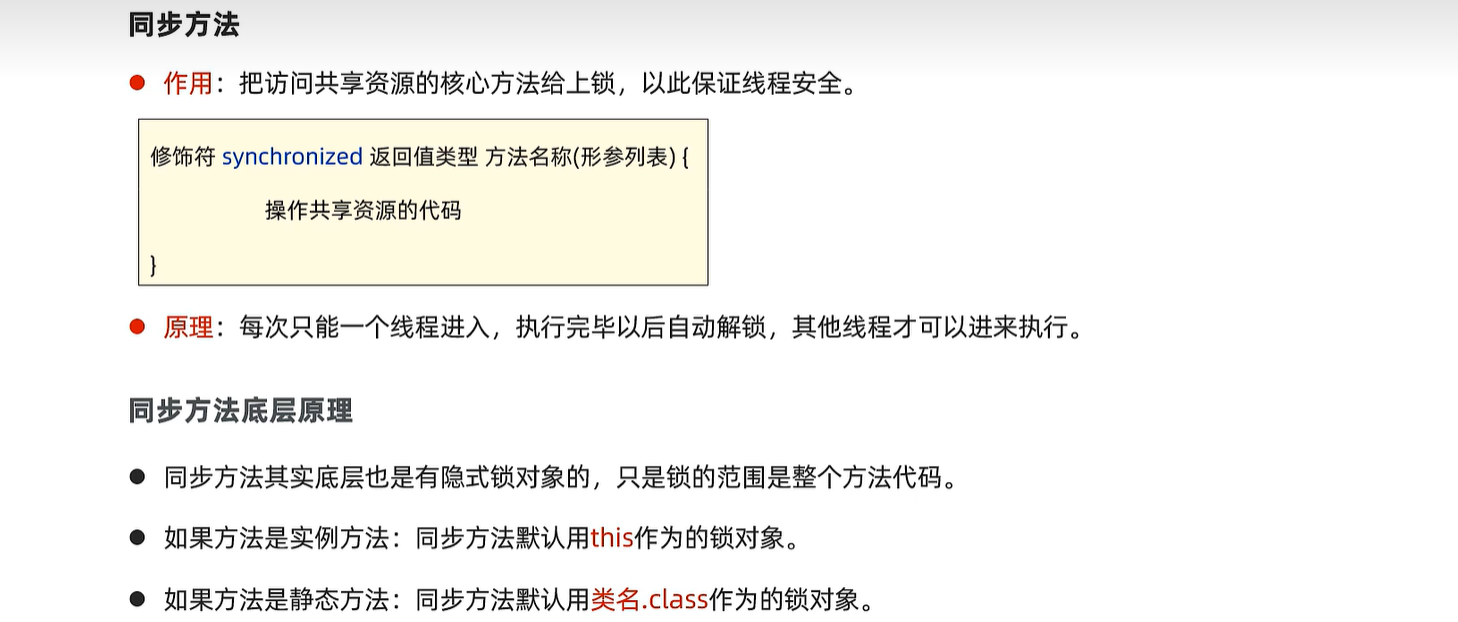
public class Account {
    private String cardId; // 卡号
    private double money; // 余额。

    public Account() {
    }

    public Account(String cardId, double money) {
        this.cardId = cardId;
        this.money = money;
    }

    public static void test(){
        synchronized (Account.class){

        }
    }

    // 小明 小红线程同时过来的
    // 同步方法
    public synchronized void drawMoney(double money) {
        // 先搞清楚是谁来取钱?
        String name = Thread.currentThread().getName();
        // 1、判断余额是否足够
        if(this.money >= money){
            System.out.println(name + "来取钱" + money + "成功!");
            this.money -= money;
            System.out.println(name + "来取钱后,余额剩余:" + this.money);
        }else {
            System.out.println(name + "来取钱:余额不足~");
        }
    }
}
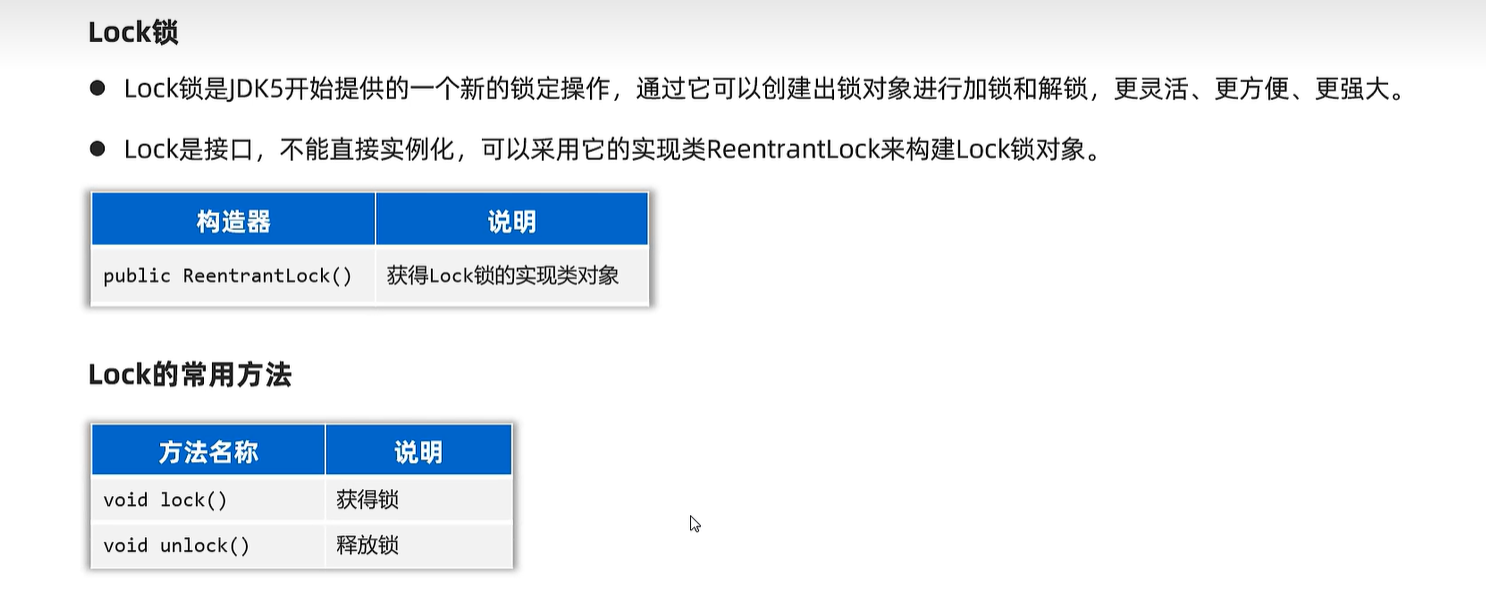
23.3 Lock
public class Account {
    private String cardId; // 卡号
    private double money; // 余额。
    // 创建了一个锁对象
    private final Lock lk = new ReentrantLock();

    public Account() {
    }

    public Account(String cardId, double money) {
        this.cardId = cardId;
        this.money = money;
    }

    // 小明 小红线程同时过来的
    public void drawMoney(double money) {
        // 先搞清楚是谁来取钱?
        String name = Thread.currentThread().getName();
        try {
            lk.lock(); // 加锁
            // 1、判断余额是否足够
            if(this.money >= money){
                System.out.println(name + "来取钱" + money + "成功!");
                this.money -= money;
                System.out.println(name + "来取钱后,余额剩余:" + this.money);
            }else {
                System.out.println(name + "来取钱:余额不足~");
            }
        } catch (Exception e) {
            e.printStackTrace();
        } finally {
            lk.unlock(); // 解锁
        }
    }
}
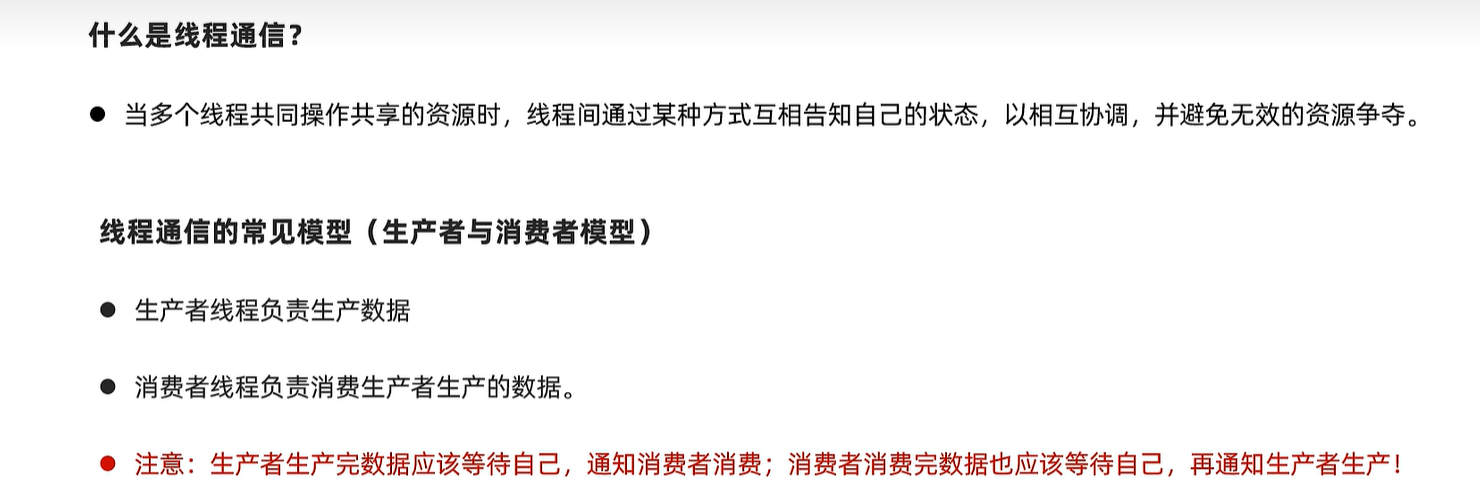
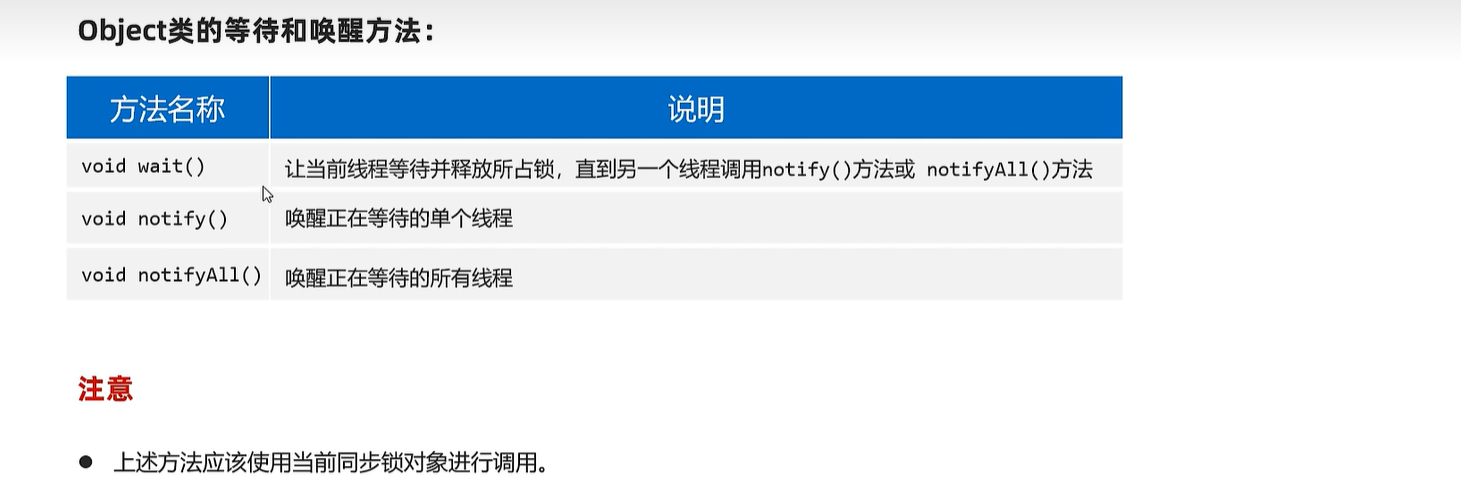
23.4 线程通信

public class Desk {
    private List<String> list = new ArrayList<>();

    // 放1个包子的方法
    // 厨师1 厨师2 厨师3
    public synchronized void put() {
        try {
            String name = Thread.currentThread().getName();
            // 判断是否有包子。
            if(list.size() == 0){
                list.add(name + "做的肉包子");
                System.out.println(name + "做了一个肉包子~~");
                Thread.sleep(2000);

                // 唤醒别人, 等待自己
                this.notifyAll();
                this.wait();
            }else {
                // 有包子了,不做了。
                // 唤醒别人, 等待自己
                this.notifyAll();
                this.wait();
            }
        } catch (Exception e) {
            e.printStackTrace();
        }
    }

    // 吃货1 吃货2
    public synchronized void get() {
        try {
            String name = Thread.currentThread().getName();
            if(list.size() == 1){
                // 有包子,吃了
                System.out.println(name  + "吃了:" + list.get(0));
                list.clear();
                Thread.sleep(1000);
                this.notifyAll();
                this.wait();
            }else {
                // 没有包子
                this.notifyAll();
                this.wait();
            }
        } catch (Exception e) {
            e.printStackTrace();
        }
    }
}
public class ThreadTest {
    public static void main(String[] args) {
        //   需求:3个生产者线程,负责生产包子,每个线程每次只能生产1个包子放在桌子上
        //      2个消费者线程负责吃包子,每人每次只能从桌子上拿1个包子吃。
        Desk desk  = new Desk();

        // 创建3个生产者线程(3个厨师)
        new Thread(() -> {
            while (true) {
                desk.put();
            }
        }, "厨师1").start();

        new Thread(() -> {
            while (true) {
                desk.put();
            }
        }, "厨师2").start();

        new Thread(() -> {
            while (true) {
                desk.put();
            }
        }, "厨师3").start();

        // 创建2个消费者线程(2个吃货)
        new Thread(() -> {
            while (true) {
                desk.get();
            }
        }, "吃货1").start();

        new Thread(() -> {
            while (true) {
                desk.get();
            }
        }, "吃货2").start();
    }
}
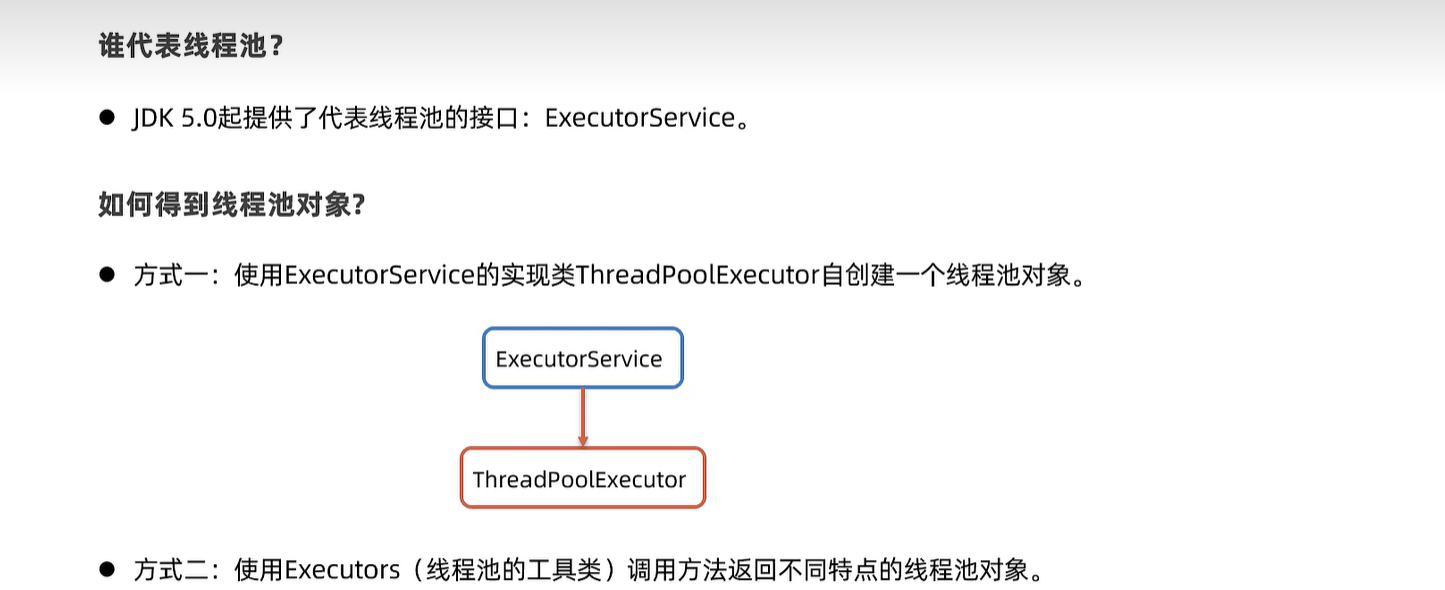
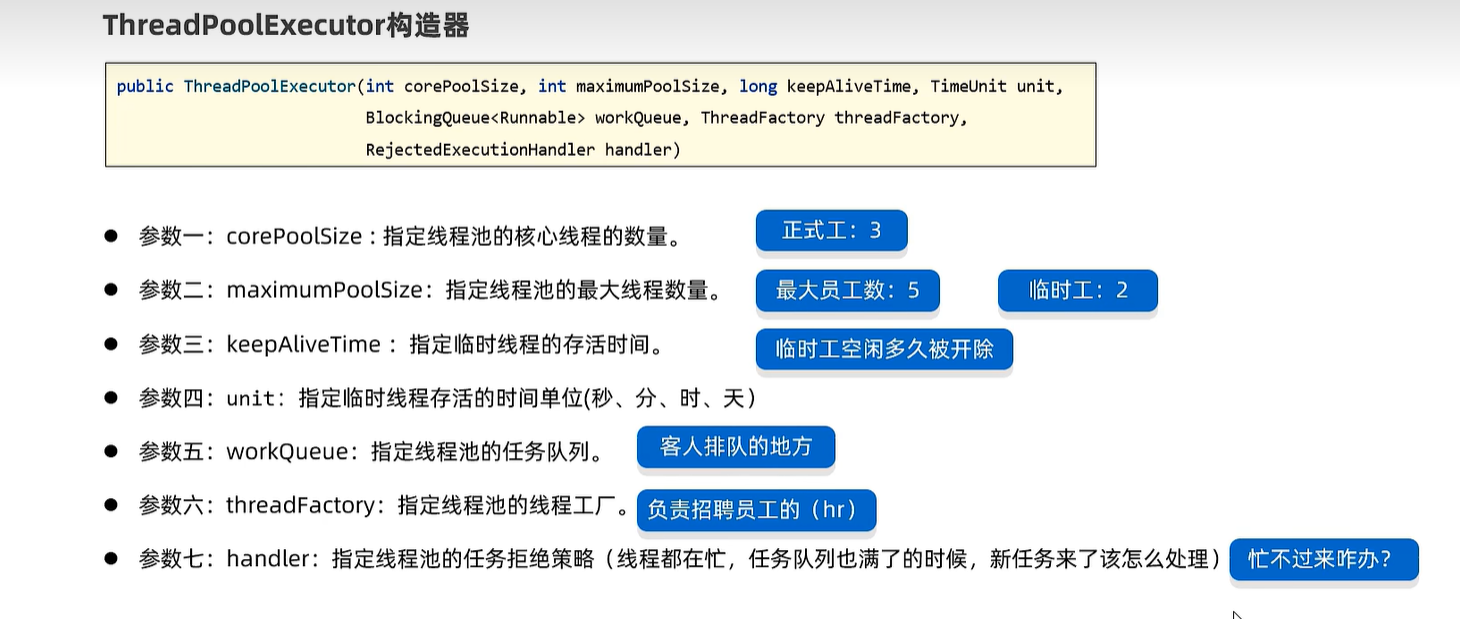
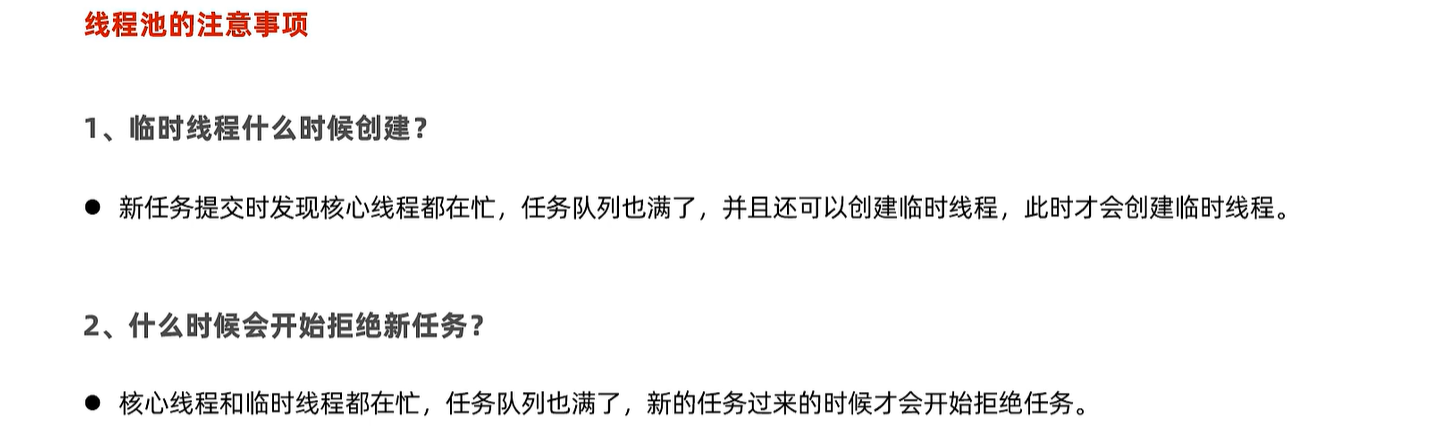
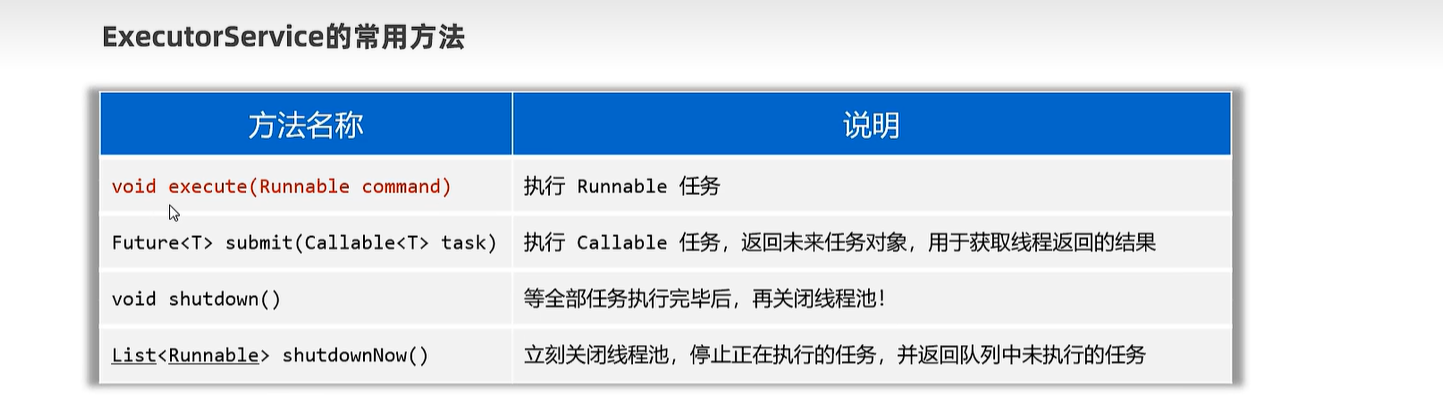
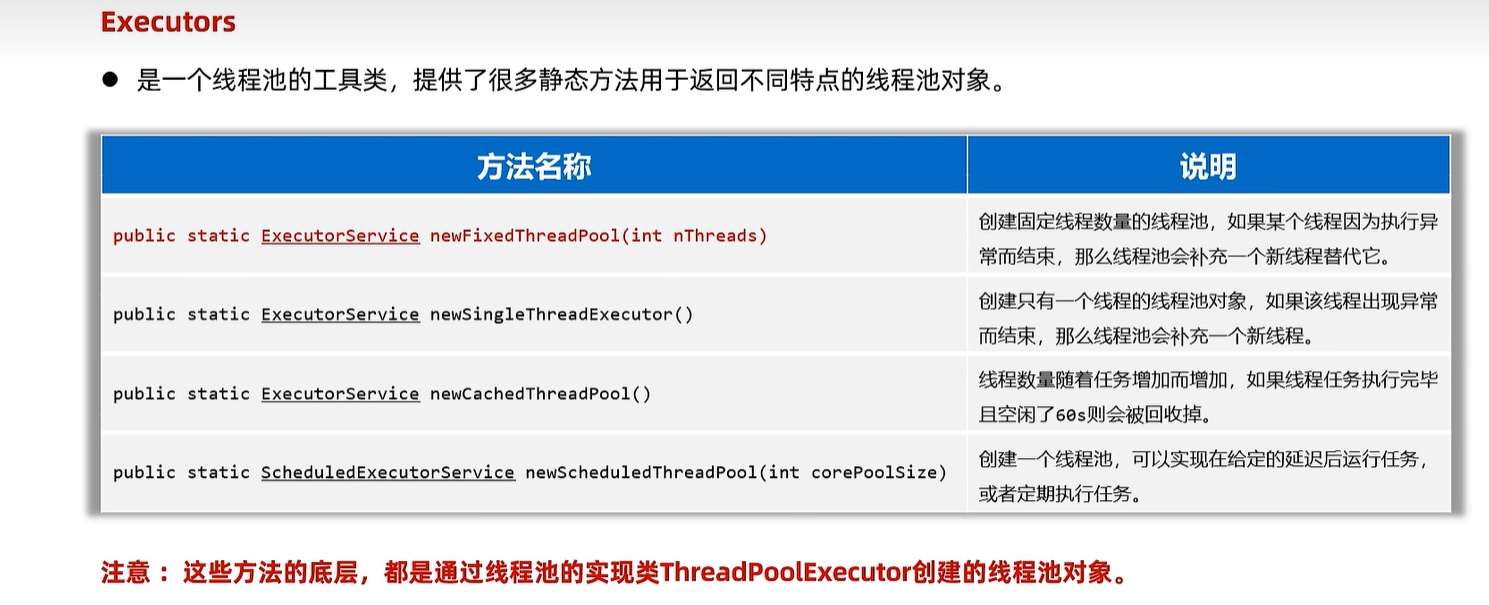
23.5 线程池
public class MyRunnable implements Runnable{
    @Override
    public void run() {
        // 任务是干啥的?
        System.out.println(Thread.currentThread().getName() + " ==> 输出666~~");
        try {
            Thread.sleep(Integer.MAX_VALUE);
        } catch (InterruptedException e) {
            e.printStackTrace();
        }
    }
}
public class ThreadPoolTest1 {
    public static void main(String[] args) {
        // 1、通过ThreadPoolExecutor创建一个线程池对象。
        ExecutorService pool = new ThreadPoolExecutor(3, 5, 8,
                TimeUnit.SECONDS, new ArrayBlockingQueue<>(4), Executors.defaultThreadFactory(),
                new ThreadPoolExecutor.CallerRunsPolicy());

        Runnable target = new MyRunnable();
        pool.execute(target); // 线程池会自动创建一个新线程,自动处理这个任务,自动执行的!
        pool.execute(target); // 线程池会自动创建一个新线程,自动处理这个任务,自动执行的!
        pool.execute(target); // 线程池会自动创建一个新线程,自动处理这个任务,自动执行的!
        pool.execute(target);
        pool.execute(target);
        pool.execute(target);
        pool.execute(target);
        // 到了临时线程的创建时机了
        pool.execute(target);
        pool.execute(target);
        // 到了新任务的拒绝时机了!
        pool.execute(target);

        // pool.shutdown(); // 等着线程池的任务全部执行完毕后,再关闭线程池
        // pool.shutdownNow(); // 立即关闭线程池!不管任务是否执行完毕!
    }
}

public class MyCallable implements Callable<String> {
    private int n;
    public MyCallable(int n) {
        this.n = n;
    }

    // 2、重写call方法
    @Override
    public String call() throws Exception {
        // 描述线程的任务,返回线程执行返回后的结果。
        // 需求:求1-n的和返回。
        int sum = 0;
        for (int i = 1; i <= n; i++) {
            sum += i;
        }
        return Thread.currentThread().getName() + "求出了1-" + n + "的和是:" + sum;
    }
}
public class ThreadPoolTest3 {
    public static void main(String[] args) throws Exception {
        // 1、通过ThreadPoolExecutor创建一个线程池对象。
        ExecutorService pool = new ThreadPoolExecutor(3, 5, 8,
                TimeUnit.SECONDS, new ArrayBlockingQueue<>(4), Executors.defaultThreadFactory(),
                new ThreadPoolExecutor.CallerRunsPolicy());

        // 2、使用线程处理Callable任务。
        Future<String> f1 = pool.submit(new MyCallable(100));
        Future<String> f2 = pool.submit(new MyCallable(200));
        Future<String> f3 = pool.submit(new MyCallable(300));
        Future<String> f4 = pool.submit(new MyCallable(400));

        System.out.println(f1.get());
        System.out.println(f2.get());
        System.out.println(f3.get());
        System.out.println(f4.get());
    }
}
public class ThreadPoolTest3 {
    public static void main(String[] args) throws Exception {
        // 1-2 通过Executors创建一个线程池对象。
        ExecutorService pool = Executors.newFixedThreadPool(17);
        // 老师:核心线程数量到底配置多少呢???
        // 计算密集型的任务:核心线程数量 = CPU的核数 + 1
        // IO密集型的任务:核心线程数量 = CPU核数 * 2

        // 2、使用线程处理Callable任务。
        Future<String> f1 = pool.submit(new MyCallable(100));
        Future<String> f2 = pool.submit(new MyCallable(200));
        Future<String> f3 = pool.submit(new MyCallable(300));
        Future<String> f4 = pool.submit(new MyCallable(400));

        System.out.println(f1.get());
        System.out.println(f2.get());
        System.out.println(f3.get());
        System.out.println(f4.get());
    }
}
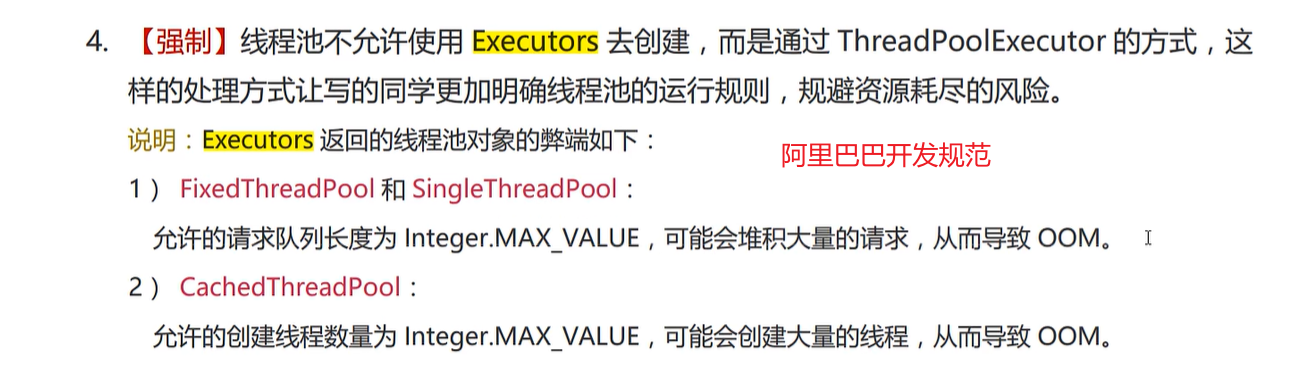
大型系统开发规范
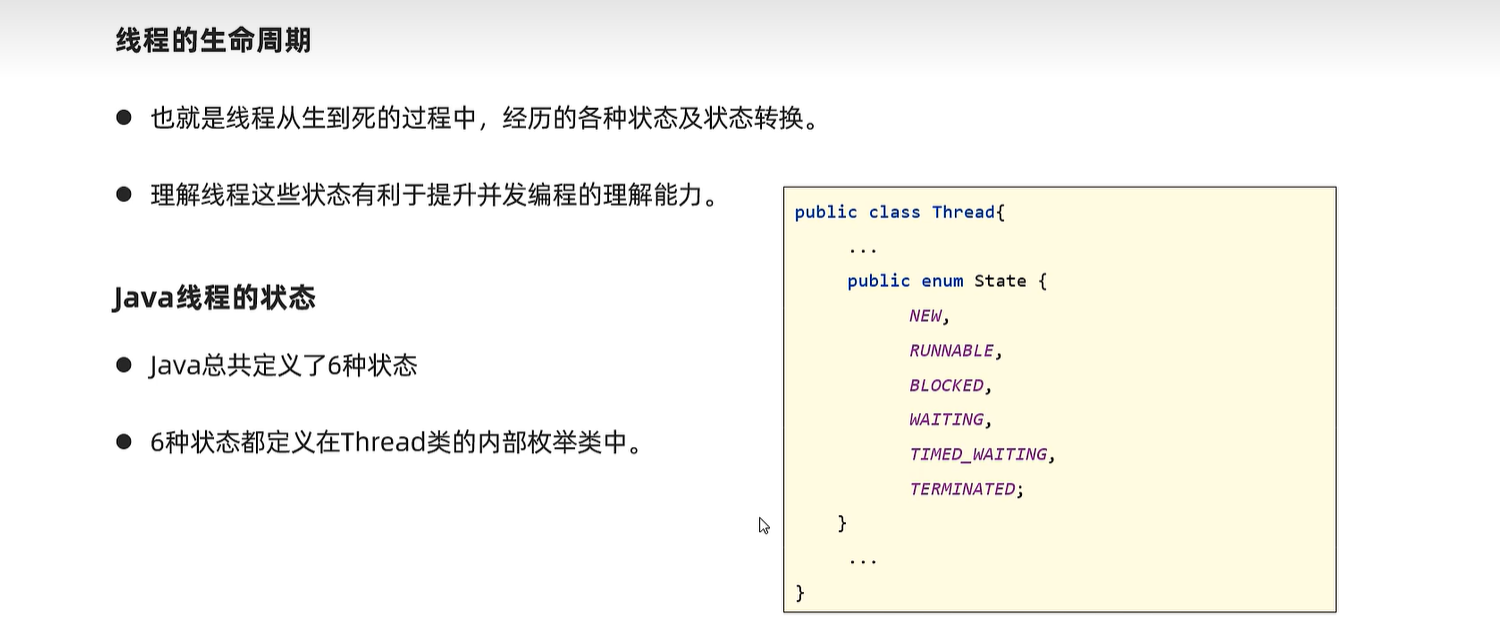
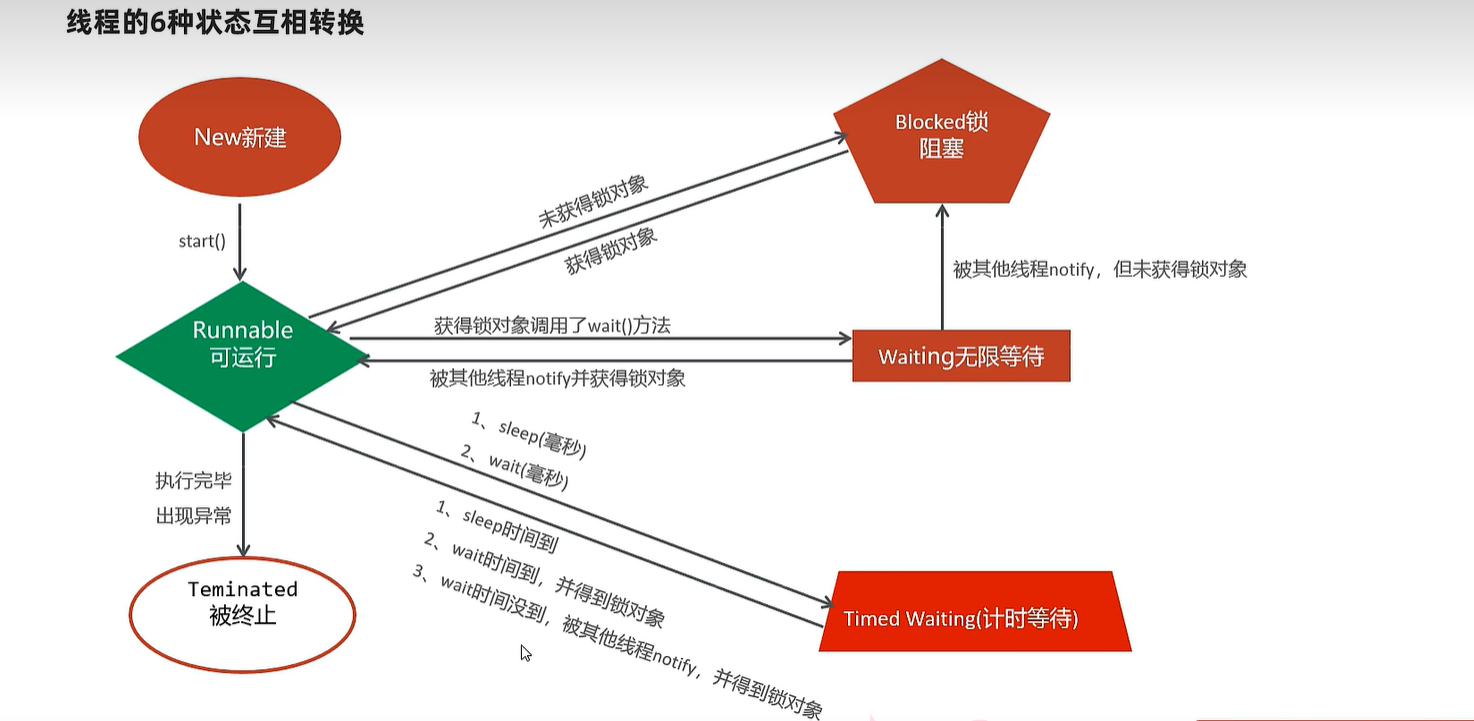
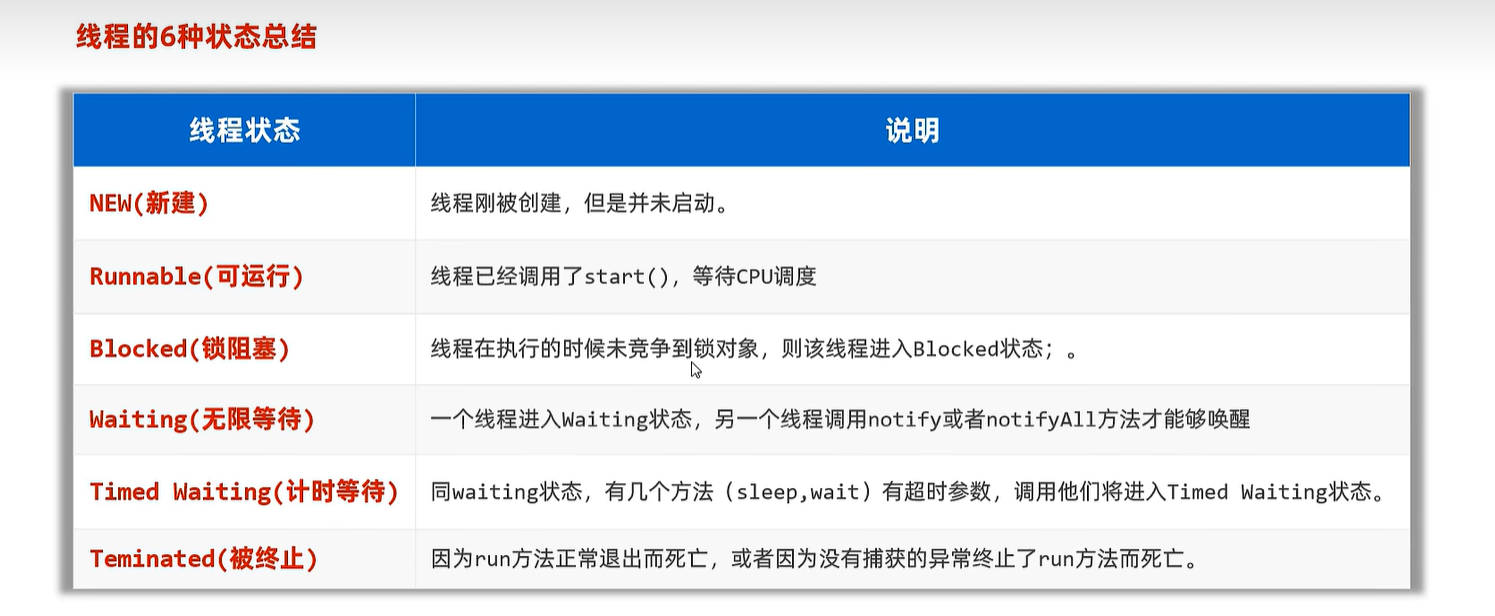
23.6 线程生命周期
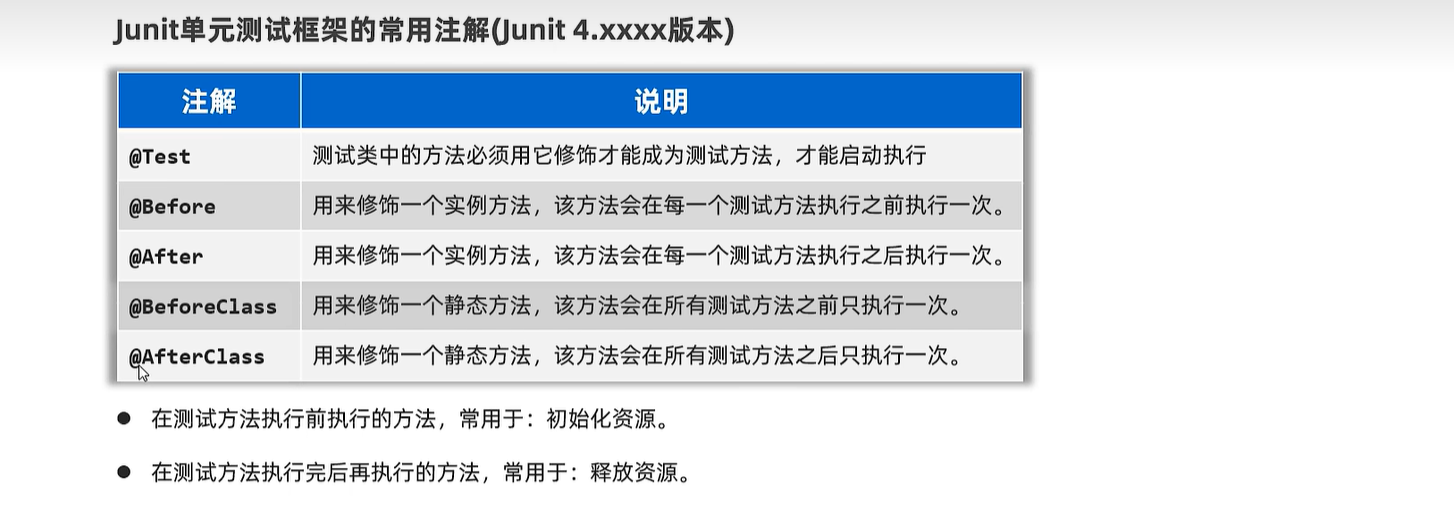
24. junit
public class StringUtilTest {
    @Before
    public void test1(){
        System.out.println("---> test1 Before 执行了---------");
    }

    @BeforeClass
    public static void test11(){
        System.out.println("---> test11 BeforeClass 执行了---------");
    }

    @After
    public void test2(){
        System.out.println("---> test2 After 执行了---------");
    }

    @AfterClass
    public static void test22(){
        System.out.println("---> test22 AfterClass 执行了---------");
    }

    @Test // 测试方法
    public void testPrintNumber(){
        StringUtil.printNumber("admin");
        StringUtil.printNumber(null);
    }

    @Test // 测试方法
    public void testGetMaxIndex(){
        int index1 = StringUtil.getMaxIndex(null);
        System.out.println(index1);

        int index2 = StringUtil.getMaxIndex("admin");
        System.out.println(index2);

        // 断言机制:程序员可以通过预测业务方法的结果。
        Assert.assertEquals("方法内部有bug!", 4, index2);
    }
}
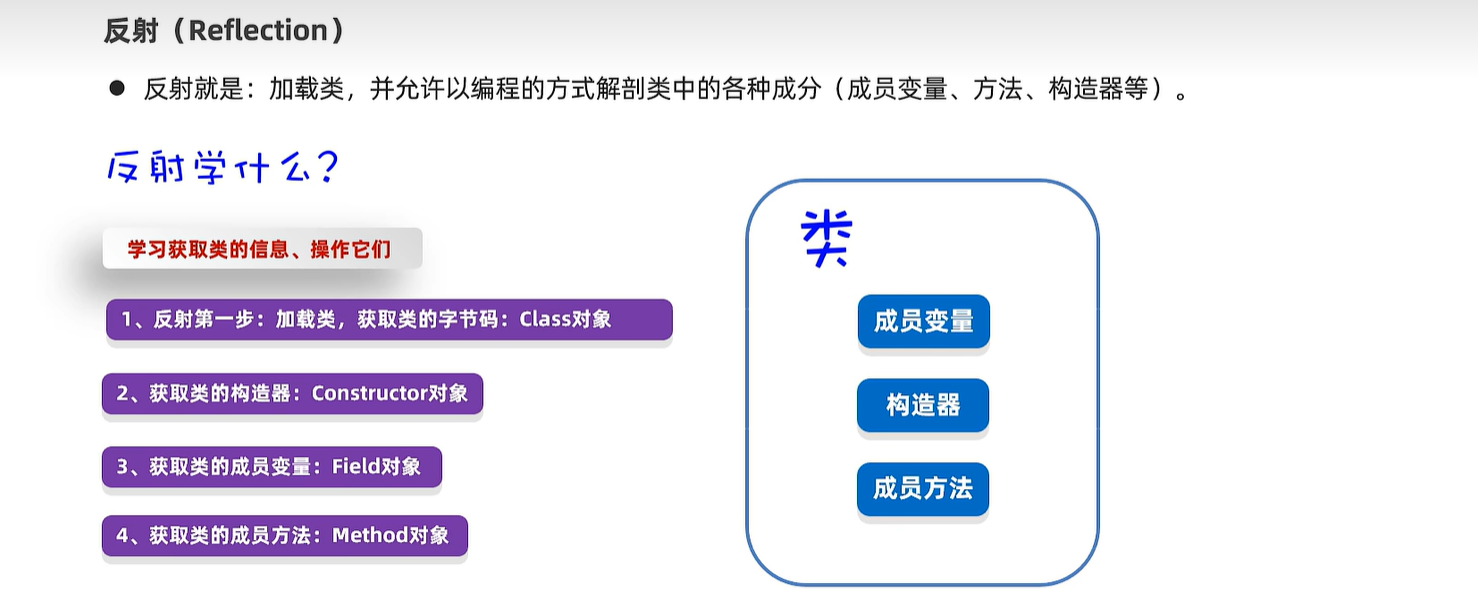
25. 反射
25.1 获取Class对象
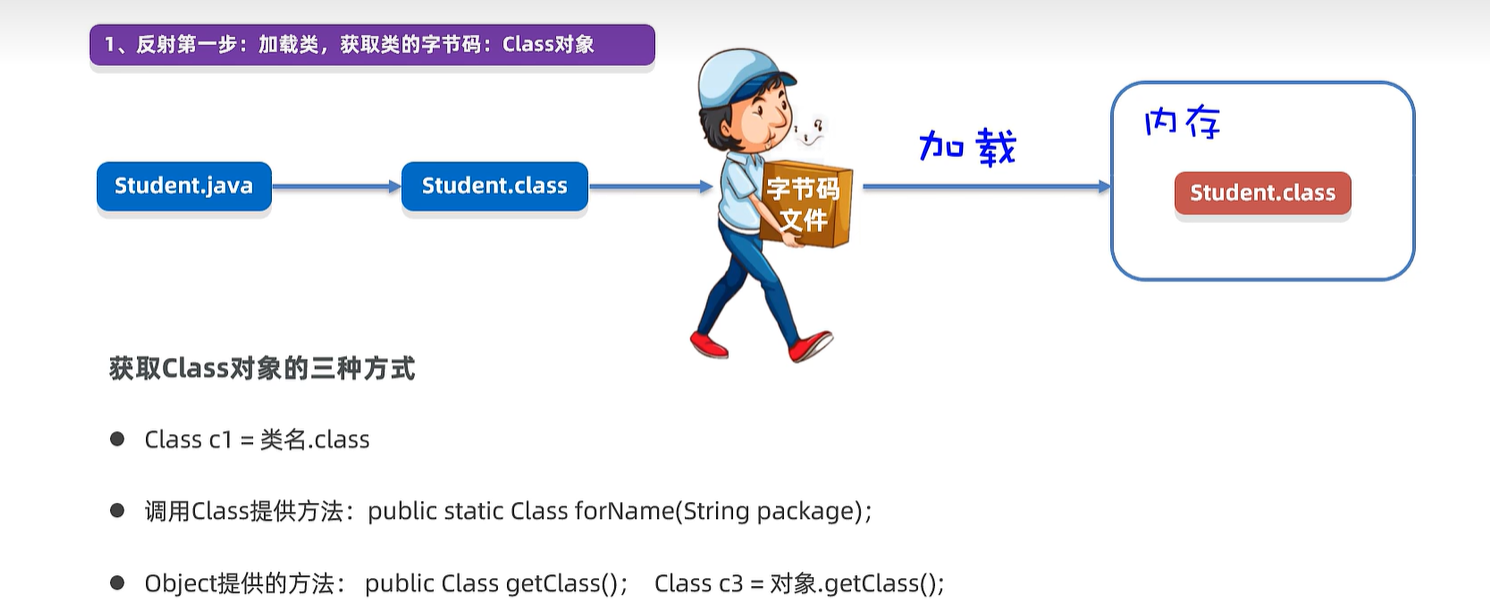
    public static void main(String[] args) throws Exception {
        Class c1 = Student.class;
        System.out.println(c1.getName()); // 全类名
        System.out.println(c1.getSimpleName()); // 简名:Student

        Class c2 = Class.forName("com.itheima.d2_reflect.Student");
        System.out.println(c1 == c2);

        Student s = new Student();
        Class c3 = s.getClass();
        System.out.println(c3 == c2);
    }
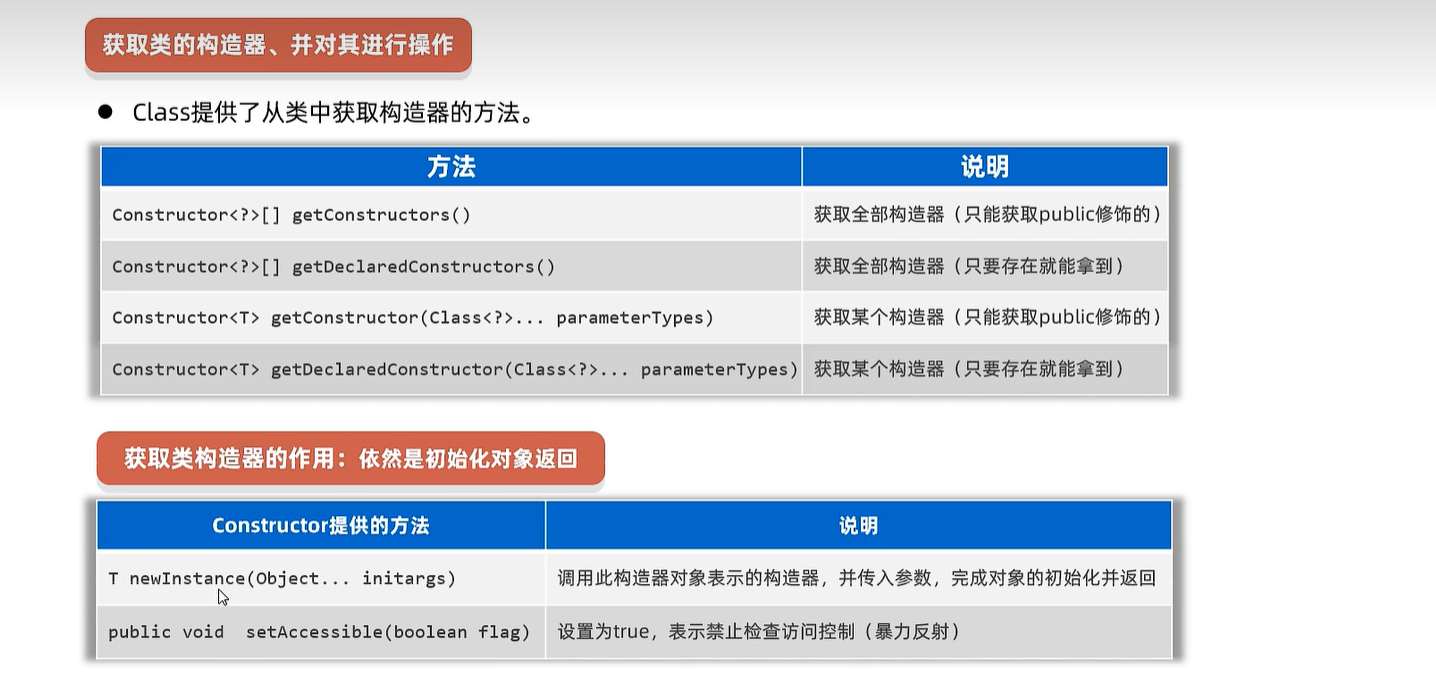
25.2 获取类的构造方法
   @Test
    public void testGetConstructors(){
        // 1、反射第一步:必须先得到这个类的Class对象
        Class c = Cat.class;
        // 2、获取类的全部构造器
        // Constructor[] constructors = c.getConstructors();
        Constructor[] constructors = c.getDeclaredConstructors();
        // 3、遍历数组中的每个构造器对象
        for (Constructor constructor : constructors) {
            System.out.println(constructor.getName() + "--->"
            + constructor.getParameterCount());
        }
    }

    @Test
    public void testGetConstructor() throws Exception {
        // 1、反射第一步:必须先得到这个类的Class对象
        Class c = Cat.class;
        // 2、获取类的某个构造器:无参数构造器
        Constructor constructor1 = c.getDeclaredConstructor();
        System.out.println(constructor1.getName() + "--->"
                + constructor1.getParameterCount());
        constructor1.setAccessible(true); // 禁止检查访问权限
        Cat cat = (Cat) constructor1.newInstance();
        System.out.println(cat);

        // 3、获取有参数构造器
        Constructor constructor2 =
                c.getDeclaredConstructor(String.class, int.class);
        System.out.println(constructor2.getName() + "--->"
                + constructor2.getParameterCount());
        constructor2.setAccessible(true); // 禁止检查访问权限
        Cat cat2 = (Cat) constructor2.newInstance("叮当猫", 3);
        System.out.println(cat2);
    }
25.3 获取类的成员变量
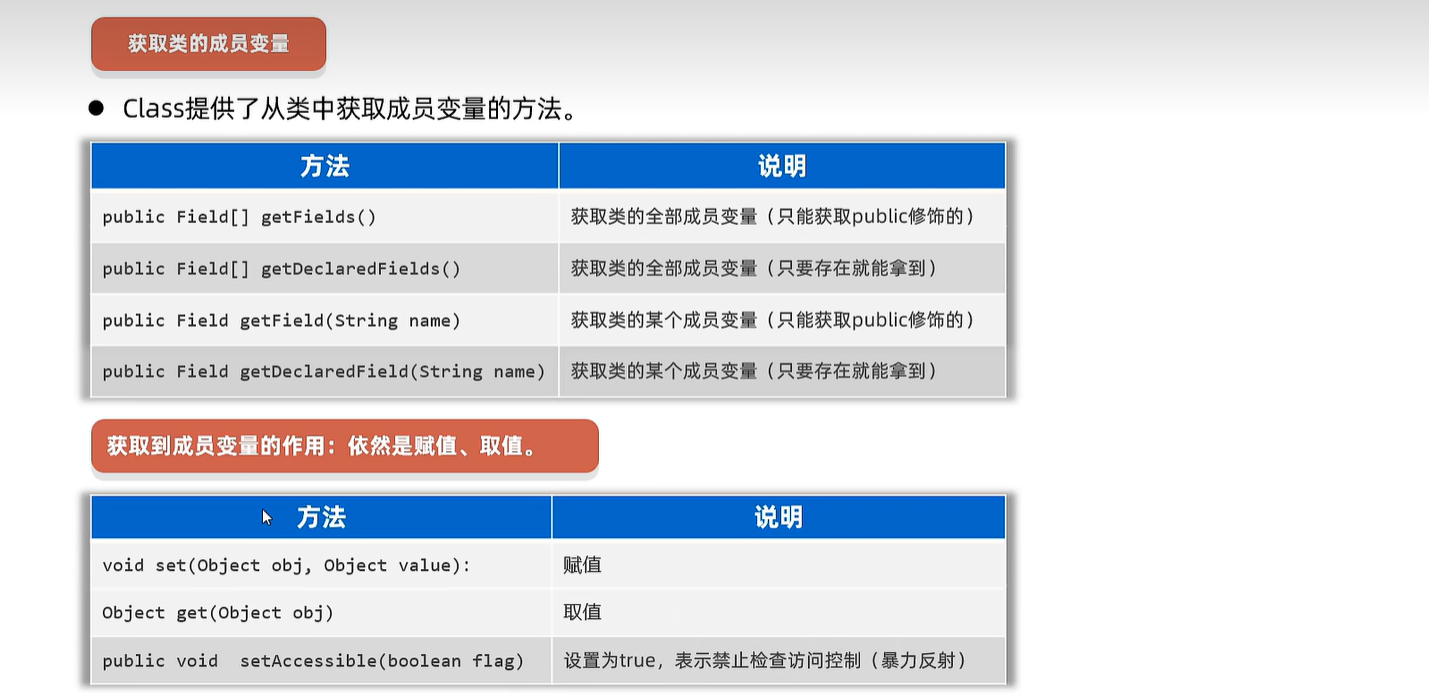
    @Test
    public void testGetFields() throws Exception {
        // 1、反射第一步:必须是先得到类的Class对象
        Class c = Cat.class;
        // 2、获取类的全部成员变量。
        Field[] fields = c.getDeclaredFields();
        // 3、遍历这个成员变量数组
        for (Field field : fields) {
            System.out.println(field.getName() +  "---> "+ field.getType());
        }
        // 4、定位某个成员变量
        Field fName = c.getDeclaredField("name");
        System.out.println(fName.getName() + "--->" + fName.getType());

        Field fAge = c.getDeclaredField("age");
        System.out.println(fAge.getName() + "--->" + fAge.getType());

        // 赋值
        Cat cat = new Cat();
        fName.setAccessible(true); // 禁止访问控制权限
        fName.set(cat, "卡菲猫"); // 类的成员变量,注意赋值时要指定对象
        System.out.println(cat);

        // 取值
        String name = (String) fName.get(cat);
        System.out.println(name);
    }
25.4 获取类的成员方法
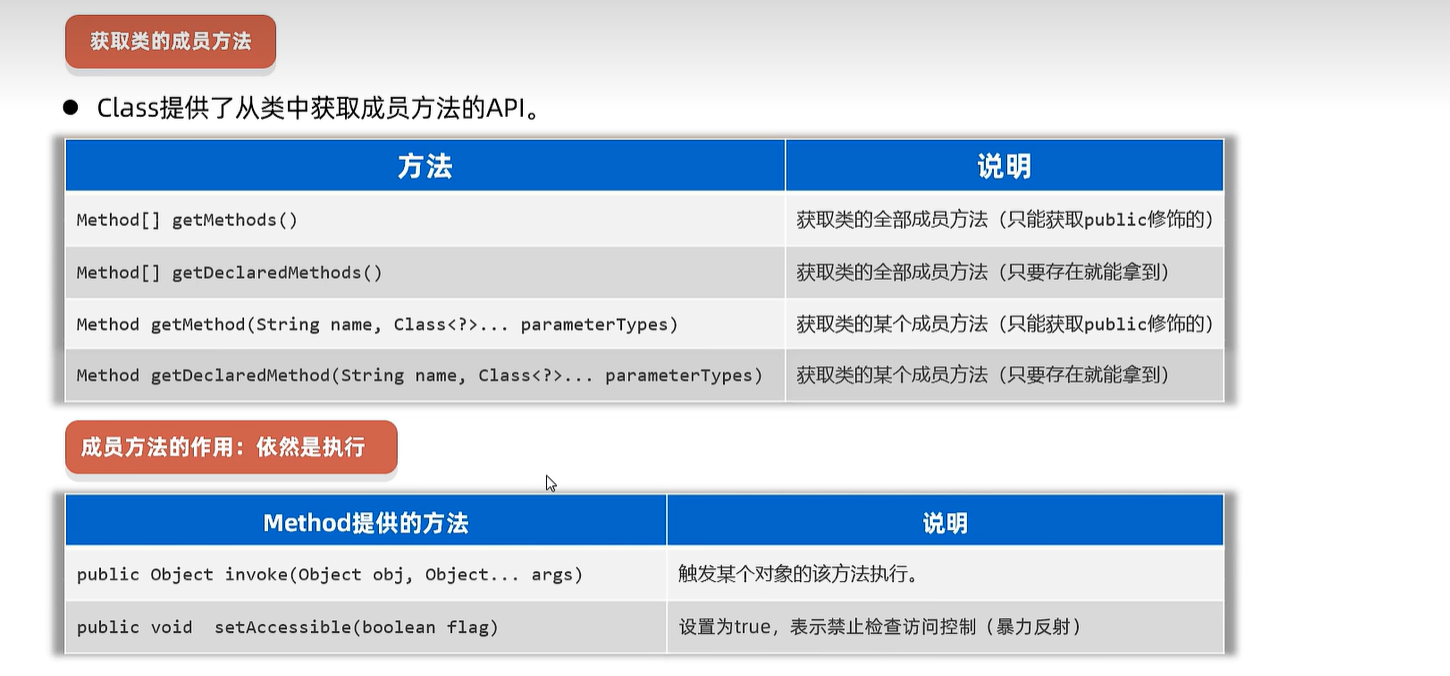
    @Test
    public void testGetMethods() throws Exception {
        //  1、反射第一步:先得到Class对象。
        Class c = Cat.class;
        // 2、获取类的全部成员方法。
        Method[] methods = c.getDeclaredMethods();
        // 3、遍历这个数组中的每个方法对象
        for (Method method : methods) {
            System.out.println(method.getName() + "--->"
                    + method.getParameterCount() + "---->"
                    + method.getReturnType());
        }
        //  4、获取某个方法对象
        Method run = c.getDeclaredMethod("run"); // 拿run方法,无参数的
        System.out.println(run.getName() + "--->"
                + run.getParameterCount() + "---->"
                + run.getReturnType());

        Method eat = c.getDeclaredMethod("eat", String.class);
        System.out.println(eat.getName() + "--->"
                + eat.getParameterCount() + "---->"
                + eat.getReturnType());

        Cat cat = new Cat();
        run.setAccessible(true); // 禁止检查访问权限
        Object rs = run.invoke(cat); // 调用无参数的run方法,用cat对象触发调用的。
        System.out.println(rs);

        eat.setAccessible(true); // 禁止检查访问权限
        String rs2 = (String) eat.invoke(cat, "鱼儿");
        System.out.println(rs2);
    }
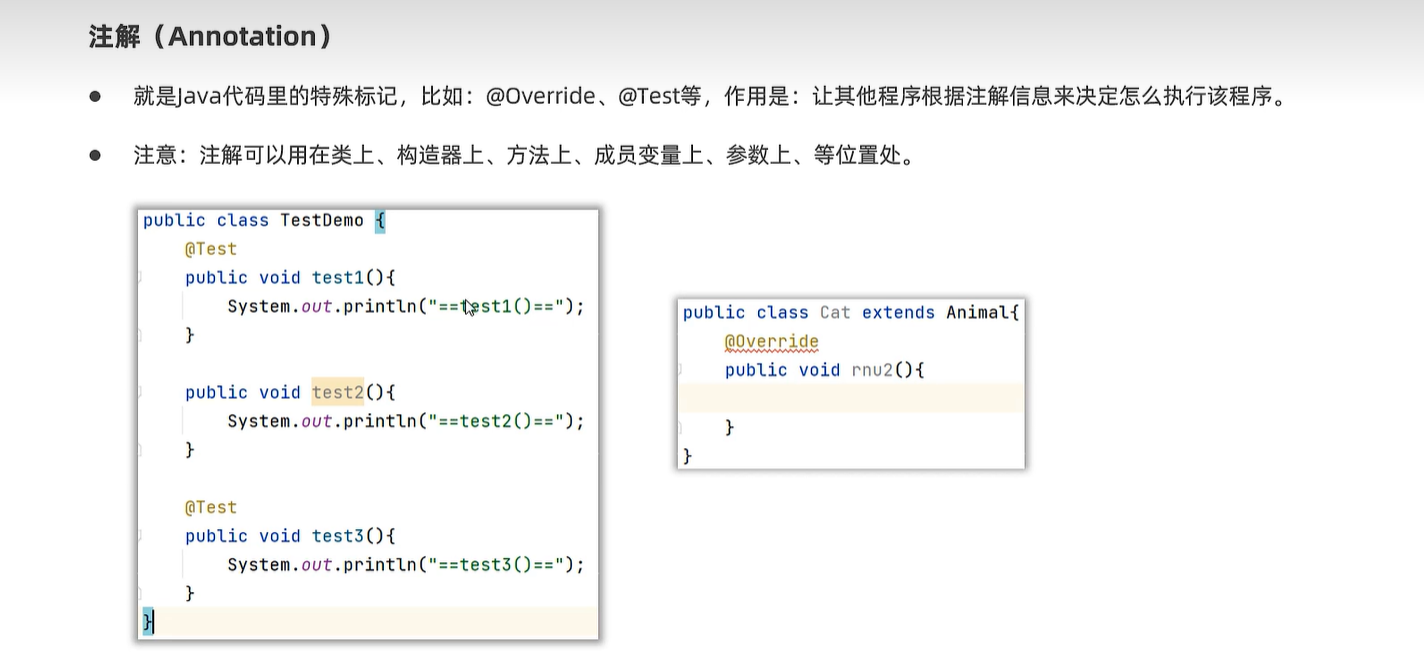
26. 注解
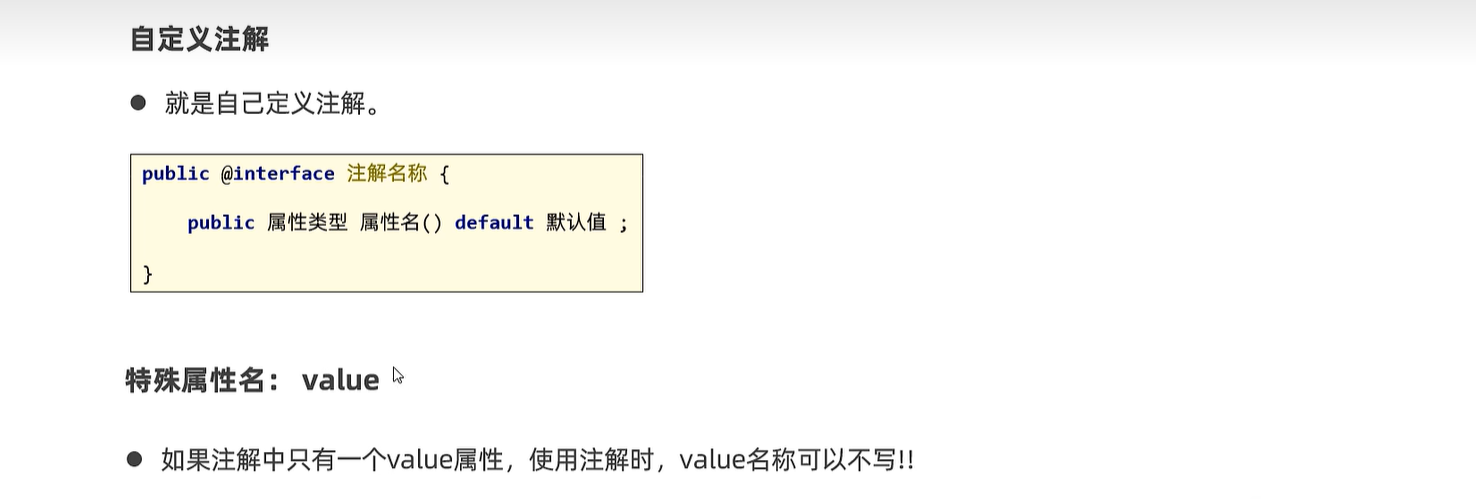
26.1 自定义注解
/**
 * 自定义注解
 */
public @interface MyTest1 {
    String aaa();
    boolean bbb() default true;
    String[] ccc();
}
public @interface MyTest2 {
    String value(); // 特殊属性
    int age() default 23;
}
@MyTest1(aaa="牛魔王", ccc={"HTML", "Java"})
// @MyTest2(value = "孙悟空")
//@MyTest2("孙悟空")
//@MyTest2(value = "孙悟空", age = 1000)
@MyTest2("孙悟空")
public class AnnotationTest1 {
    @MyTest1(aaa="铁扇公主", bbb=false, ccc={"Python", "前端", "Java"})
    public void test1(){

    }
}
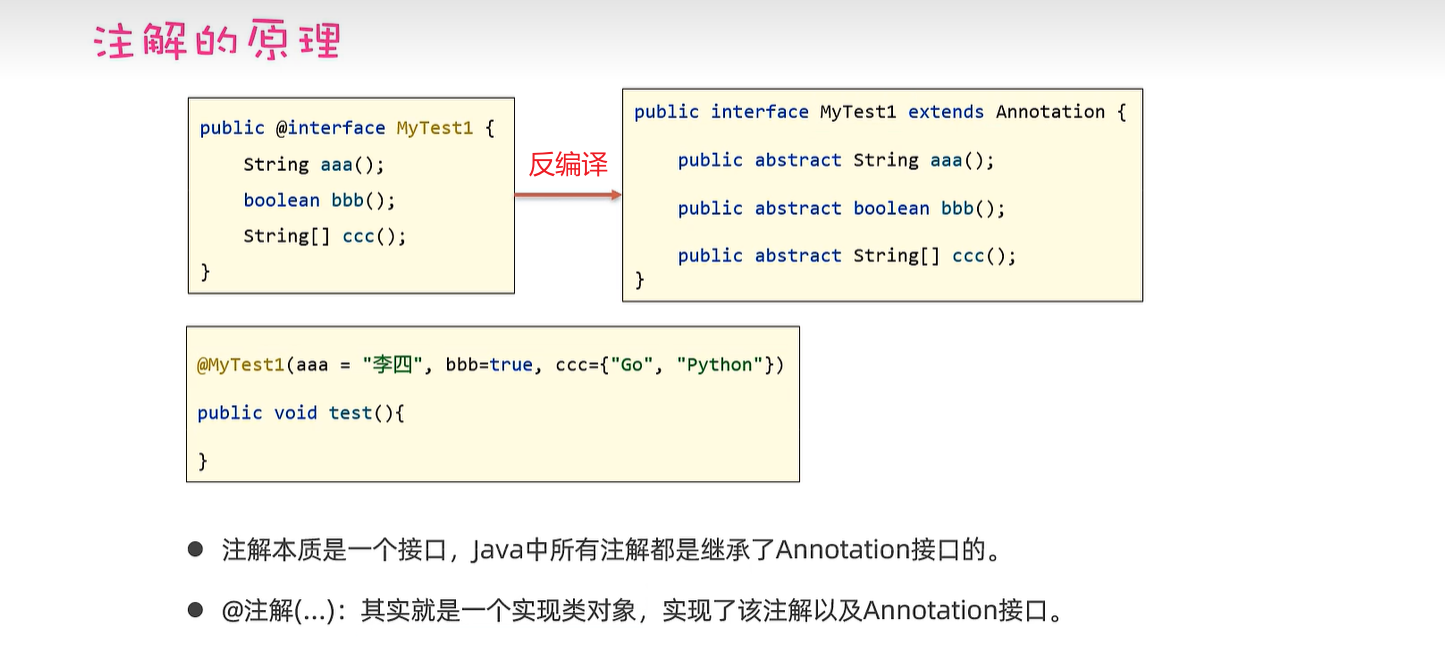
26.2 注解原理
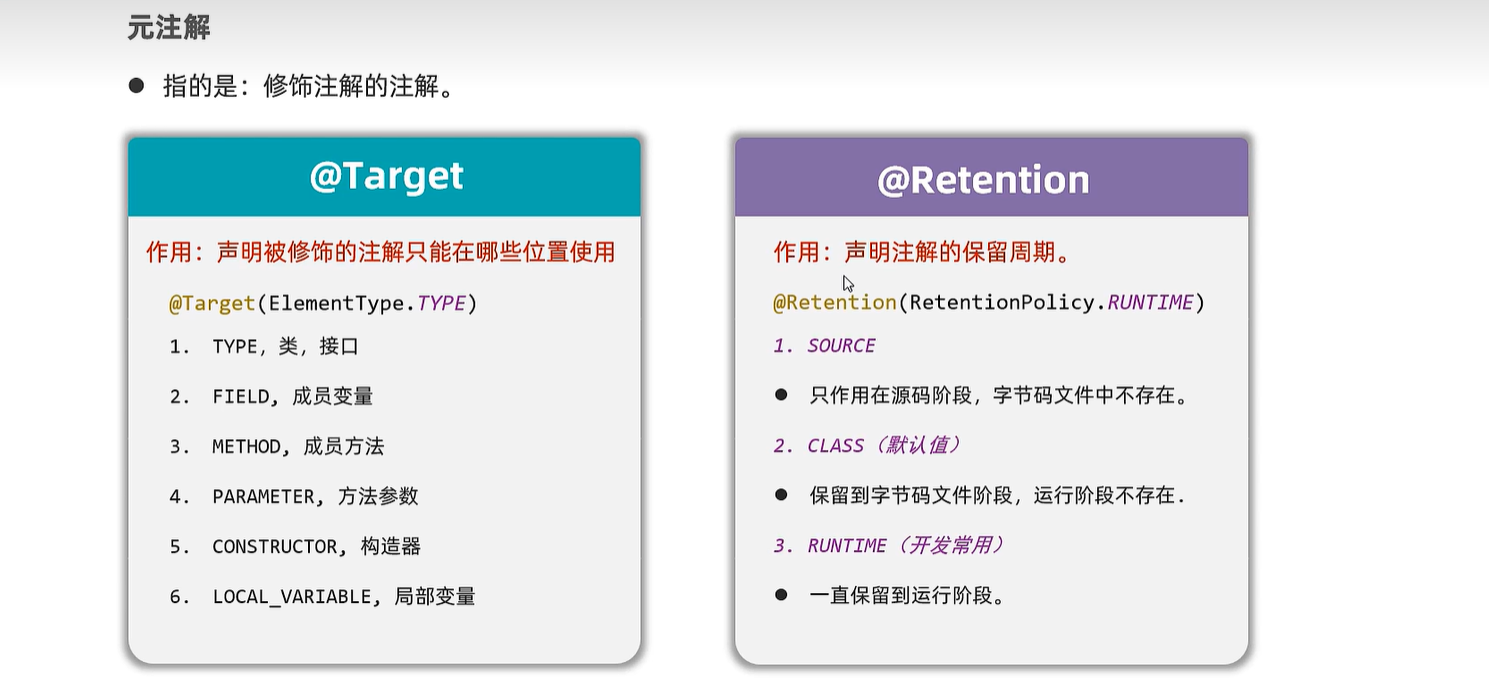
26.3 元注解
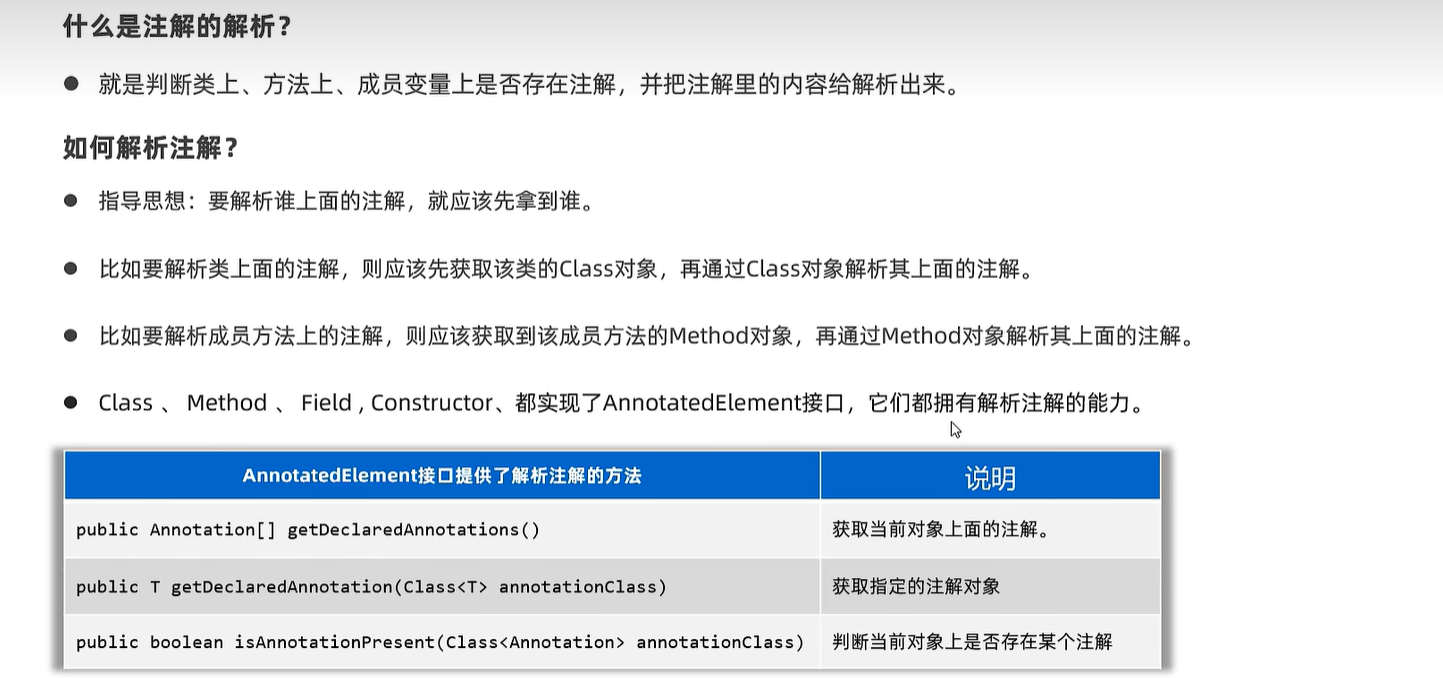
26.4 注解解析
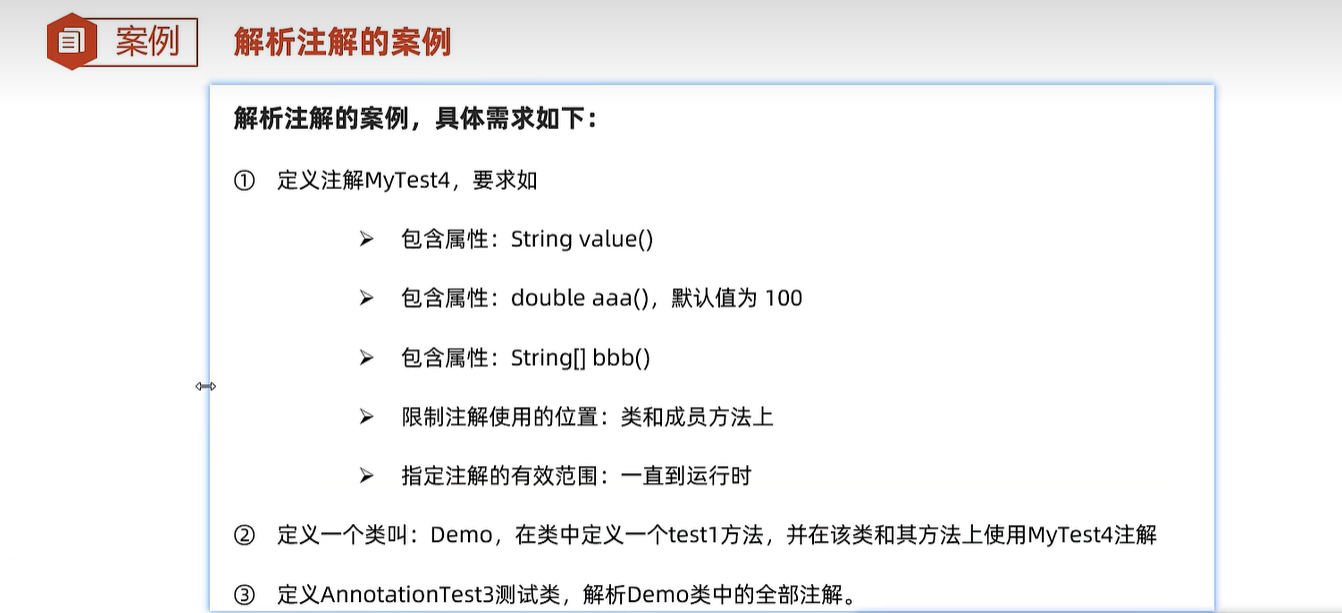
@Target({ElementType.TYPE,ElementType.METHOD})
@Retention(RetentionPolicy.RUNTIME)
public @interface MyTest4 {
    String value();
    double aaa() default 100;
    String[] bbb();
}
@MyTest4(value = "蜘蛛精", aaa=99.5, bbb = {"至尊宝", "黑马"})
@MyTest3
public class Demo {
    @MyTest4(value = "孙悟空", aaa=199.9, bbb = {"紫霞", "牛夫人"})
    public void test1(){
    }
}
public class AnnotationTest3 {
    @Test
    public void parseClass(){
        // 1、先得到Class对象
        Class c = Demo.class;
        // 2、解析类上的注解
        // 判断类上是否包含了某个注解
        if(c.isAnnotationPresent(MyTest4.class)){
            MyTest4 myTest4 =
                    (MyTest4) c.getDeclaredAnnotation(MyTest4.class);
            System.out.println(myTest4.value());
            System.out.println(myTest4.aaa());
            System.out.println(Arrays.toString(myTest4.bbb()));
        }
    }

    @Test
    public void parseMethod() throws Exception {
        // 1、先得到Class对象
        Class c = Demo.class;
        Method m = c.getDeclaredMethod("test1");
        // 2、解析方法上的注解
        // 判断方法对象上是否包含了某个注解
        if(m.isAnnotationPresent(MyTest4.class)){
            MyTest4 myTest4 =
                    (MyTest4) m.getDeclaredAnnotation(MyTest4.class);
            System.out.println(myTest4.value());
            System.out.println(myTest4.aaa());
            System.out.println(Arrays.toString(myTest4.bbb()));
        }
    }
}
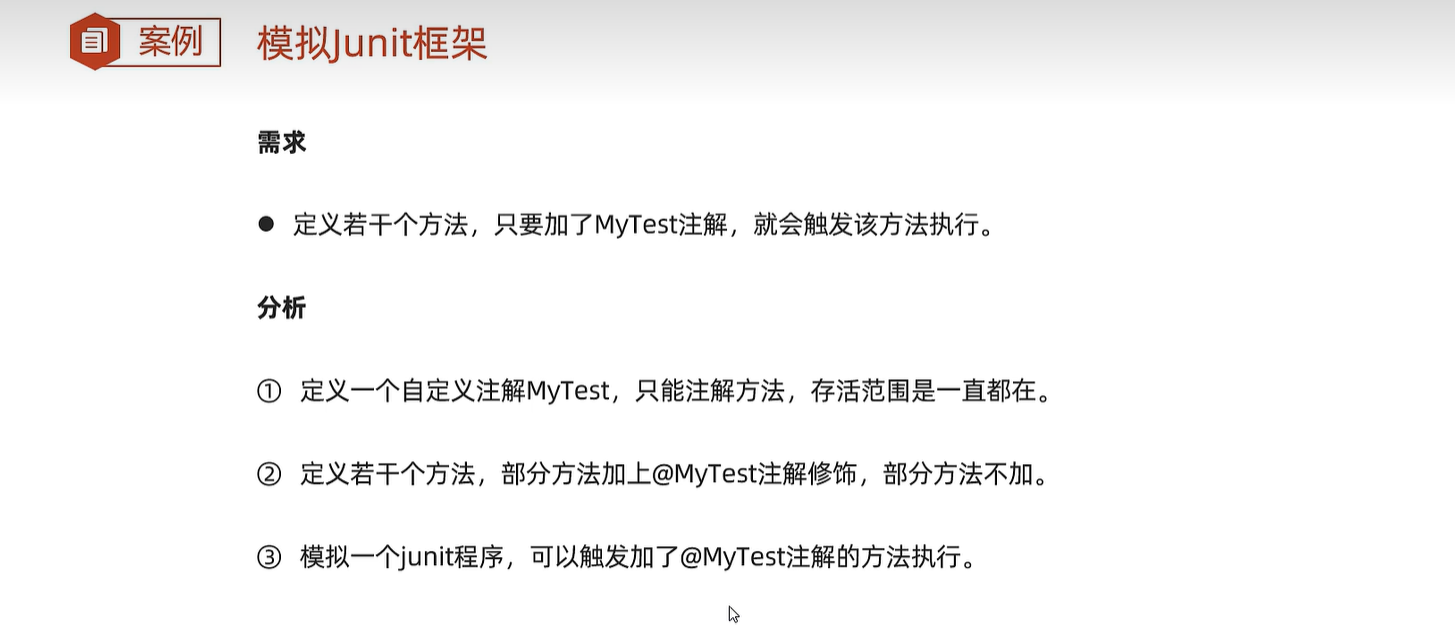
public class AnnotationTest4 {
    // @MyTest
    public void test1(){
        System.out.println("===test1====");
    }

    @MyTest
    public void test2(){
        System.out.println("===test2====");
    }

    @MyTest
    public void test3(){
        System.out.println("===test3====");
    }

    @MyTest
    public void test4(){
        System.out.println("===test4====");
    }

    public static void main(String[] args) throws Exception {
        AnnotationTest4 a = new AnnotationTest4();
        // 启动程序!
        // 1、得到Class对象
        Class c = AnnotationTest4.class;
        // 2、提取这个类中的全部成员方法
        Method[] methods = c.getDeclaredMethods();
        // 3、遍历这个数组中的每个方法,看方法上是否存在@MyTest注解,存在
        // 触发该方法执行。
        for (Method method : methods) {
            if(method.isAnnotationPresent(MyTest.class)){
                // 说明当前方法上是存在@MyTest,触发当前方法执行。
                method.invoke(a);
            }
        }
    }
}
27. 动态代理
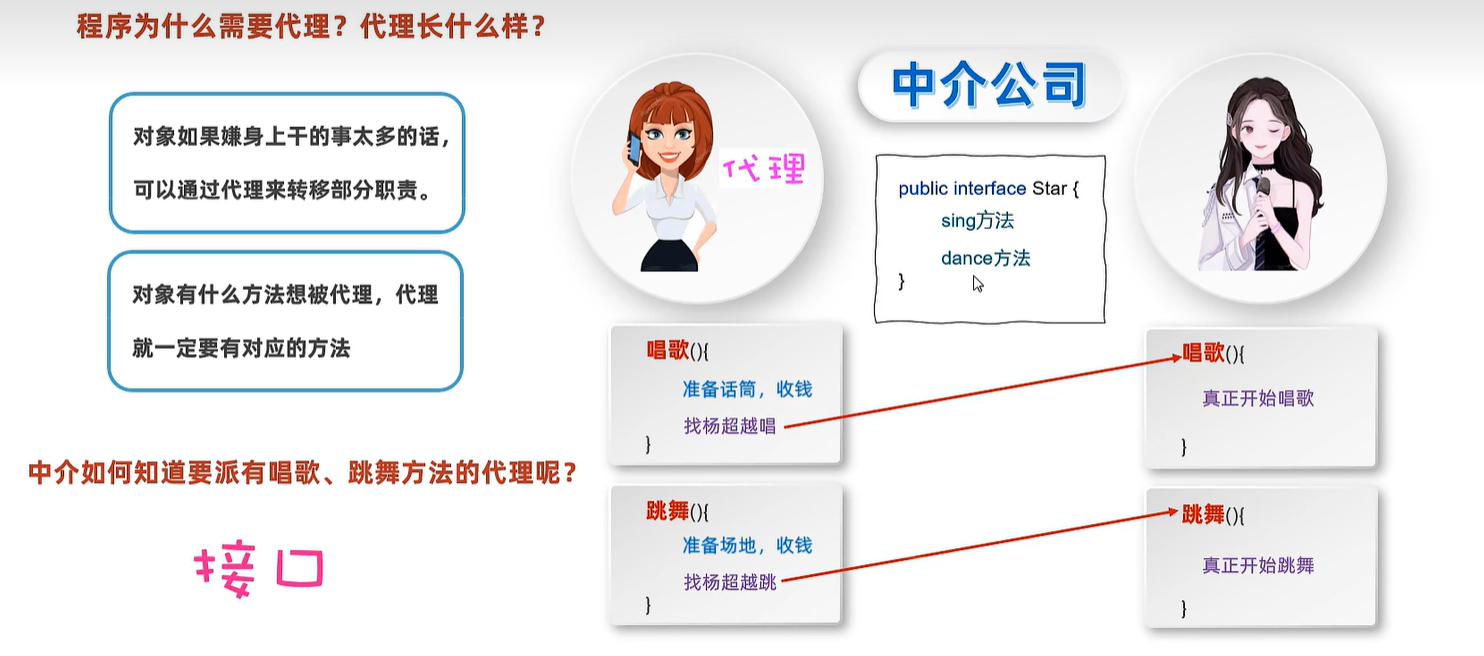
public interface Star {
    String sing(String name);
    void dance();
}
public class BigStar implements Star{
    private String name;

    public BigStar(String name) {
        this.name = name;
    }

    public String sing(String name){
        System.out.println(this.name + "正在唱:" + name);
        return "谢谢!谢谢!";
    }

    public void dance(){
        System.out.println(this.name  + "正在优美的跳舞~~");
    }
}
public class ProxyUtil {
    public static Star createProxy(BigStar bigStar){
       /* newProxyInstance(ClassLoader loader,
                Class<?>[] interfaces,
                InvocationHandler h)
                参数1:用于指定一个类加载器
                参数2:指定生成的代理长什么样子,也就是有哪些方法
                参数3:用来指定生成的代理对象要干什么事情
                */
        // Star starProxy = ProxyUtil.createProxy(s);
        // starProxy.sing("好日子") starProxy.dance()
         // 第一个参数固定,当前类的类加载器;第二个参数为接口的class数组(可能有多个接口);第三个参数固定,重现invoke方法
        Star starProxy = (Star) Proxy.newProxyInstance(ProxyUtil.class.getClassLoader(), 										new Class[]{Star.class}, new InvocationHandler() {
                    @Override // 回调方法
                    public Object invoke(Object proxy, Method method, Object[] args) throws Throwable {
                        // 代理对象要做的事情,会在这里写代码
                        if(method.getName().equals("sing")){
                            System.out.println("准备话筒,收钱20万");
                        }else if(method.getName().equals("dance")){
                            System.out.println("准备场地,收钱1000万");
                        }
                        return method.invoke(bigStar, args);
                    }
                });
        return starProxy;
    }
}
public class Test {
    public static void main(String[] args) {
        BigStar s = new BigStar("杨超越");
        Star starProxy = ProxyUtil.createProxy(s);

        String rs = starProxy.sing("好日子");
        System.out.println(rs);

        starProxy.dance();
    }
}
