边缘提取一
一、边缘提取
边缘提取指数字图像处理中,对于图片轮廓的一个处理。对于边界处,灰度值变化比较剧烈的地方,就定义为边缘。也就是拐点,拐点是指函数发生凹凸性变化的点。二阶导数为零的地方。并不是一阶导数,因为一阶导数为零,表示是极值点。
边缘检测的基本思想首先是利用边缘增强算子,突出图像中的局部边缘,然后定义象素的“边缘强度”,通过设置阈值的方法提取边缘点集。由于噪声和模糊的存在,监测到的边界可能会变宽或在某点处发生间断。因此,边界检测包括两个基本内容:
- 用边缘算子提取出反映灰度变化的边缘点集。
- 在边缘点集合中剔除某些边界点或填补边界间断点(这句话怎么理解????),并将这些边缘连接成完整的线。
边缘定义:图像灰度变化率最大的地方(图像灰度值变化最剧烈的地方)。图像灰度在表面法向变化的不连续造成的边缘。一般认为边缘提取是要保留图像的灰度变化剧烈的区域,这从数学上看,最直观的方法就是微分(对于数字图像来说就是差分),在信号处理的角度来看,也可以说是用高通滤波器,即保留高频信号。
二、边缘提取套路
1、只保留图片中感兴趣的区域,先阈值膨胀保留图片中感兴趣区域,只处理图片中需要处理的区域
threshold阈值分割,
形态学处理dilation_circle,erosion_circle
ROI Region: difference,union1
抠图获取ROI:reduce_domain
2、提取轮廓---合并轮廓上相邻的不相连的点,根据轮廓特征选择相应轮廓
获取轮廓亚像素,像素 edges_sub_pix ,edges_image;
对轮廓选择:
切割edge: segment_contours_xld,segment_contour_attrib_xld
选择edge:select_contours_xld ,select_shape_xld
选择符合要求轮廓整合在一起:union_adjacent_contours_xld
再选择:
length_xld(UnionContours3, Length)
tuple_max(Length, Max)
tuple_find(Length, Max, Indices)
select_obj(UnionContours3, ObjectSelected, Indices+1)
length_xld(ObjectSelected, Length1) *检测选择轮廓是否正确
3. 其他有用算子
length_xld
获取轮廓的长度
tuple_sort_index( : : Tuple : Indices)
按升序对元组的所有元素进行排序,Indices中存储元素的索引,索引的对应元素值从小到大,元素值最小的索引为0。
length_xld (SelectedContours, Length)
Length = [2783.54, 2720.84, 2854.62, 2926.87]//Length元组中的索引为[0,1,2,3]
tuple_sort_index (Length, Indices)//Length中的值按从小到大排列,索引1的值<索引0<索引2<索引3
Indices = [1, 0, 2, 3]//输出的索引,对应的值从小到大
distance_contours_xld(ContourFrom, ContourTo : ContourOut : Mode : )
计算ContourFrom轮廓上的点到ContourTo轮廓上的点或线段最小距离,距离作为属性存储在输出轮廓中
ContourFrom:输入轮廓1
ContourTo:输入轮廓2
ContourOut :输出轮廓,由ContourFrom组成,包含计算所得到的两个轮廓之间距离信息,距离可以用
get_contour_attrib_xld(Contour :: Name : Attrib) 算子提取,设置Attrib = distance获得
Mode: 'point_to_point'、'point_to_segment',速度更快
'point_to_point' :点到点 ,如下图d1,速度更快
point_to_segment : 点到段,如下图d2,精度更准

segment_contour_attrib_xld(Contour : ContourPart : Attribute, Operation, Min, Max : )
根据Attribute属性对轮廓Contour 进行分割,返回符合要求的轮廓ContourPart
分割的时候Attribute属性可以根据需求同时设置两个,如果Operation=‘and’,则分割的轮廓必须同时满足两个属性的特征,都必须处于Min, Max限制范围内。
如果Operation=‘or’,则至少有一个Attribute属性必须在Min, Max限制范围内。属性的处理顺序与在属性中给出的顺序相同。如果只使用一个Attribute属性,
则忽略操作的值。
Contour :输入轮廓
ContourPart :输出轮廓
Attribute:属性
Default value: 'distance'
List of values: 'angle', 'asymmetry', 'contrast', 'distance', 'edge_direction', 'response', 'width_left', 'width_right'
Operation:运算符
smooth_contours_xld(Contours : SmoothedContours : NumRegrPoints : )
平滑轮廓
NumRegrPoints : 值越大平滑程度越厉害
get_contour_attrib_xld(Contour : : Name : Attrib)
根据不同的Attrib属性,返回亚像素轮廓Attrib属性特征的值
Suggested values: 'angle', 'edge_direction', 'width_right', 'width_left', 'response', 'contrast', 'asymmetry', 'distance'
经常和distance_contours_xld(ContourFrom, ContourTo : ContourOut : Mode : )算子一起用,
当Mode =distance时,可用get_contour_attrib_xld(Contour : : Name : Attrib)Attrib=distance,将distance_contours_xld计算所得的轮廓之间的距离提取出来.
get_contour_global_attrib_xld
将轮廓划分为直线段和圆形段,通过get_contour_global_attrib_xld算子把分割出来的轮廓分类,算子可以获取分割出来的轮廓的cont_approx系数的值,
直线段的’cont_approx’ 值为-1,
椭圆形段’cont_approx’值为0,
圆形段 ’cont_approx’ 值为1。
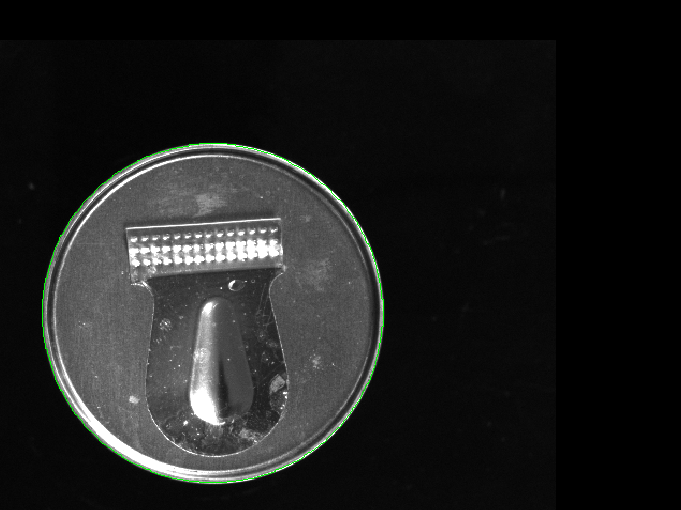
三、实例
 1 *获取硬币边缘
 2 read_image (Cicle, 'E:/学习/Halcon/玩套路之边缘检测/玩套路之边缘检测/cicle.bmp')
 3 dev_set_draw('margin')
 4 dev_set_color('red')
 5
 6 *获取ROI
 7 gen_circle (ROI_0, 253.451, 321.26, 179.988)
 8 reduce_domain(Cicle, ROI_0, ImageReduced)
 9
10 *二值化处理,并打散连接区域,选取目标区域
11
12 threshold(ImageReduced,Regions,23,255)
13 connection(Regions, ConnectedRegions)
14 select_shape(ConnectedRegions,SelectedRegions,'area','and',57706.4,86146.8)
15
16
17 *将目标区域进行膨胀处理
18 dilation_circle(SelectedRegions, RegionDilation, 3.5)
19 *将目标区域进行腐蚀处理
20 erosion_circle(SelectedRegions, RegionErosion, 5.5)
21
22
23 *填充孔洞
24 fill_up(RegionErosion, RegionFillUp)
25
26 *将膨胀后的区域和腐蚀后的区域进行减操作,并进行抠图处理,目的是为了得到有边缘的真实图像
27 difference(RegionDilation,RegionFillUp, RegionDifference)
28 union1(RegionDifference, RegionUnion)
29 reduce_domain(ImageReduced,RegionUnion,ImageReduced1)
30
31 edges_sub_pix(ImageReduced1, Edges, 'canny', 1, 20, 40)
32
33 *smooth_contours_xld(Edges, SmoothedContours, 55)
34 *根据得到的真实边缘,进步处理和计算所需的线、弧、圆等
35 segment_contours_xld (Edges, ContoursSplit, 'lines_circles', 5, 4, 2)
36 select_contours_xld (ContoursSplit, SelectedContours, 'contour_length', 5, 1000, -0.5, 0.5)
37 union_adjacent_contours_xld (SelectedContours, UnionContours3, 10, 1, 'attr_keep')
38 length_xld(UnionContours3, Length)
39 tuple_max(Length, Max)
40 tuple_find(Length, Max, Indices)
41 select_obj(UnionContours3, ObjectSelected, Indices+1)
42 length_xld(ObjectSelected, Length1)
43 dev_clear_window()
44 dev_display(Cicle)
45 dev_display(ObjectSelected)
46 fit_circle_contour_xld (ObjectSelected, 'algebraic', -1, 0, 0, 3, 2, Row1, Column1, Radius1, StartPhi, EndPhi, PointOrder)
47 gen_circle (Circle1, Row1, Column1, Radius1)
48 dev_clear_window()
49 dev_display(Cicle)
50 dev_set_color('green')
51 dev_display(Circle1)