微信小程序开发总结
业务需要,最近又搞起了微信小程序,之前从来没有参与过小程序的开发,对于开发中的流程也是知之甚少,正好学习一下,开搞...
前提:
- 使用企业注册小程序
- 微信认证
- 小程序备案
[本地开发]
1.获取appid和secret
管理 > 开发管理 获取即可, 需要管理员扫码确认
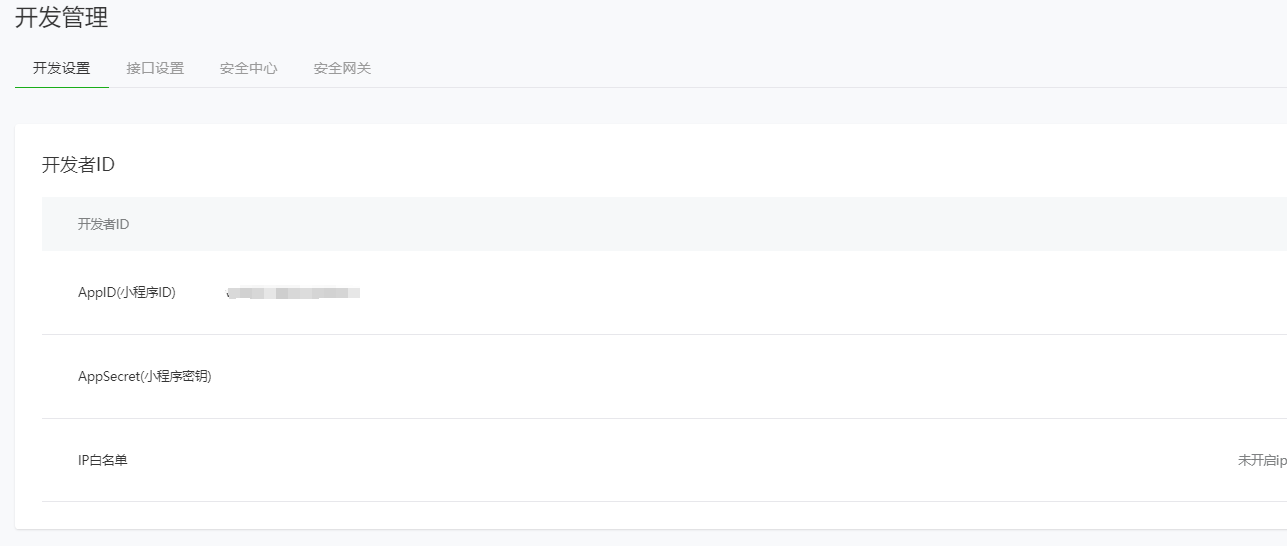
这里获取到的appid在使用开发者工具的时候,需要填写
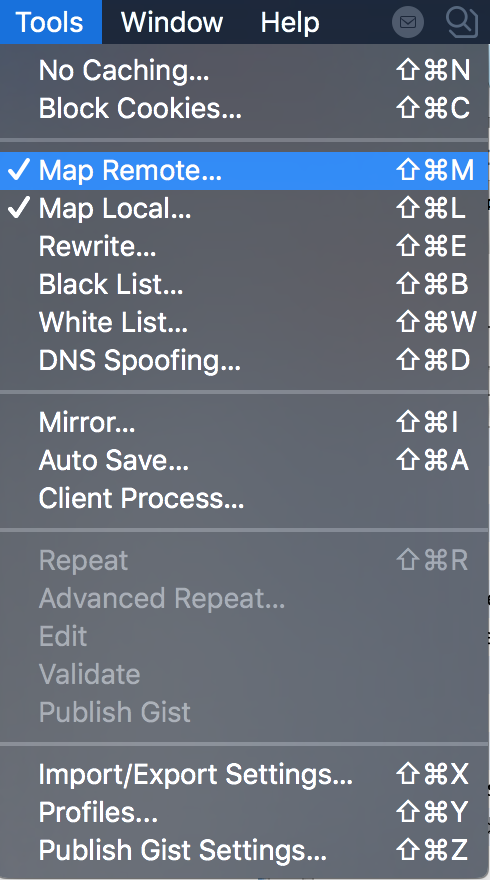
2.设置服务器域名
管理 > 开发管理 > 设置服务器域名
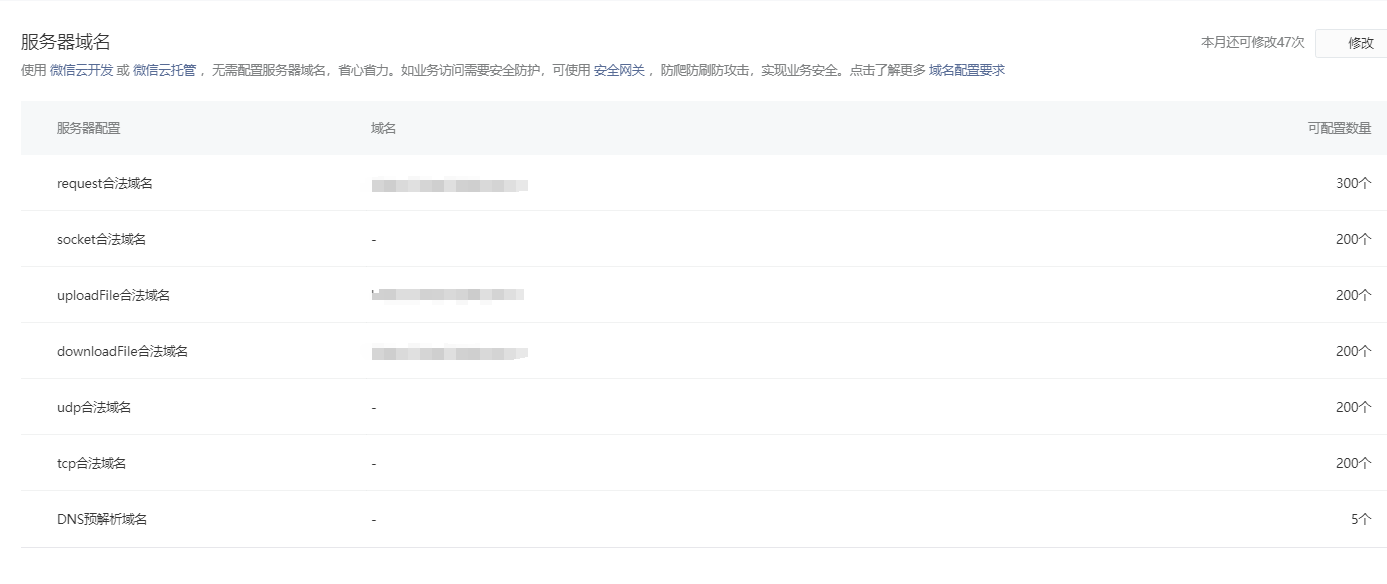
这个如果使用微信开发者工具,开启合法域名和证书验证的话,是需要指定对应的域名的, 否则无法正常调用接口, 另外在上线的时候,也是需要进行配置的
其他设置:
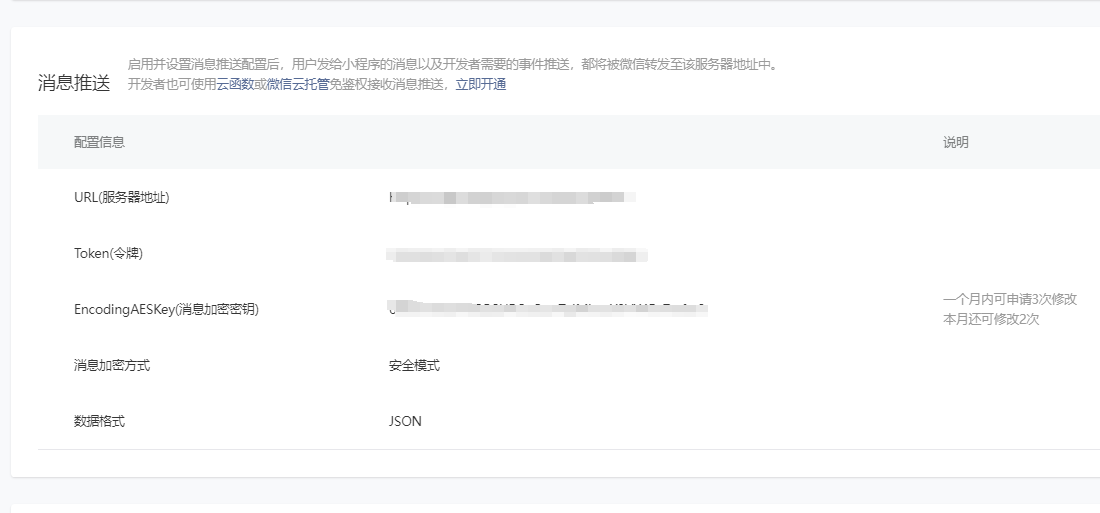
1.消息推送(因为后面会用到小程序的客服功能, 所有需要接收信息并回复使用)
管理 > 开发管理 > 消息推送
2.服务类目设置
账号设置 > 基本设置 > 服务类目
需要进行设置,否则在代码发布流程中还是需要补充对应的服务类目
3. 明文scheme拉起此小程序设置
账号设置 > 基本设置 > 明文scheme拉起此小程序
后面的调用流程,是在APP中可以直接调起微信的小程序,所以这里是需要设置下调起的path(需要管理员确认)
注意点:
1.该路径必须是上线的小程序存在的
2.如果需要添加多个跳转页面,使用分号隔开即可,不用换行
APP唤起微信小程序
1. 小程序进行明文scheme配置
2. APP端调起

基本使用,代码如下(示例):
window.open('weixin://dl/business/?
appid=此处填写自己小程序项目的appid&path=pages/index/index', '_blank');
携带参数:地址后面通过query%3D参数,微信跳转参数使用=号或者&符号可能导致无法跳转,所以使用encode编码形式写即可
= 的encode 编码为 %3D

// 带参数方式
window.open('weixin://dl/business/?
appid=项目appid&path=pages/index/index&query=isApp%3Dtrue', '_blank');
3. 小程序页面接收参数
onLoad: function (options) {
    console.log(options.isApp)
}
其他说明
1. 如果需要在调式的时候,小程序方面也需测试,可传递参数env_version
示例:

window.open('weixin://dl/business/?
appid=项目appid&path=pages/index/index
&env_version='trial'
&query=isApp%3Dtrue', '_blank');
跳转到小程序体验版 或者开发版,即可在不上传小程序审核的情况下进行测试。

2. 传递多个参数,此处多传递一个token参数
    & 符号的encode编码为 %26
    =符号的encode编码为 %3D

示例:

let token = localStorage.getItem('token')

let aa = true

window.open('weixin://dl/business/?
appid=项目appid&path=pages/index/index
&env_version='trial'


JS中的话使用encodeURIComponent进行encode编码
[开发工具]
1.下载开发者工具
https://developers.weixin.qq.com/miniprogram/dev/devtools/download.html
2.使用工具
- 保存即编译
- 真机调试
- 清理缓存
3.查看配置信息并进行相应设置, 例如这里的不校验合法域名,就可以调用本地的接口地址进行自测

4. 发布流程
本地开发完成 -> 点击右上角的"上传" -> 登录到小程序的后台(管理 > 版本管理 > 开发版本中就可以看到提交上来的代码), 这里可以设置为体验版,分享别人进行体验测试 -> 提交审核 -> 代码检测(备案检测,认证检测) --> 发布成功,等待审核等等

[接入小程序客服]
总共分为两种:
- 小程序客服(个人微信扫码登陆客服系统后使用)
- 微信客服(接入企业微信,有消息直接发送到企业微信)
目前使用的是小程序客服方式,并且使用api的方式对接自动回复
1. 页面上放置客服按钮(必须用户手动触发)
<button open-type="contact" bindcontact="handleContact"></button>

Page({
    handleContact (e) {
        console.log(e.detail.path)
        console.log(e.detail.query)
    }
})
需要将 button 组件 open-type 的值设置为 contact,当用户点击后就会进入客服会话,如果用户在会话中点击了小程序消息,则会返回到小程序,开发者可以通过 bindcontact 事件回调获取到用户所点消息的页面路径 path 和对应的参数 query
2.api方式接入
首先进行设置: 消息推送中设置回调地址,Token,AesKey
1) 点击保存会进行Token的验证(第一次设置会触发), query参数中会多传递一个echostr字符串
消息推送的对接: https://developers.weixin.qq.com/miniprogram/dev/framework/server-ability/message-push.html
我使用的EasyWechat, 较为方便的进行参数验证以及数据解密
2) 签名验证
function checkSignature(string $token)
{
    $nonce     = $_GET["nonce"] ?? '';
    $signature = $_GET["signature"] ?? '';
    $timestamp = $_GET["timestamp"] ?? '';
    $tmpArr = array($token, $timestamp, $nonce);
    sort($tmpArr, SORT_STRING);
    $tmpStr = implode('', $tmpArr);
    $tmpStr = trim(sha1($tmpStr));
    if (empty($token)) die('未设置消息推送token令牌');
    if (empty($signature) || empty($tmpStr) || empty($nonce)) die('非法请求!!!');
    if ($tmpStr != $signature) die('签名验证错误');
    isset($_GET['echostr']) ? die($_GET['echostr']) : '';
}
更多说明:
点击按钮进入小程序客服的时候,可以指定session-from, 就可以用来做一些,传递一些参数用于业务处理
1 2 3 4 5 6 7 8 9 10 11 12 13 14 15 16 17 18 19 20 21 22 23 24 25 26 27 28 29 30 31 32 33 34 35 36 37 38 39 40 41 42 43 44 45 46 47 48 49 50 51 52 53 54 55 56 57 58 59 60 61 62 63 64 65 66 67 68 69 70 71 72 73 74 75 76 77 78 79 80 81 82 83 84 85 86 87 88 89 90 91 92 93 94 95 96 97 98 99 100 101 102 103 104 105 106 107 108 109 110 111 112 113 114 115 116 117 118 119 120 121 122 123 124 125 126 127 128 129 130 131 132 133 134 135 | 1.在页面上使用客服消息 <button open-type="contact" bindcontact="handleContact"></button> 必须属性: open-type="contact" 非必须属性: session-from - 会话来源(不同按钮,可以设置不同值,表示不同的会话场景) send-message-title - 会话内消息卡片标题(默认:当前标题) send-message-path - 会话内消息卡片点击跳转小程序路径(默认:当前分享路径) send-message-img - 会话内消息卡片图片(默认:截图) show-message-card - 是否显示会话内消息卡片(默认:false) 设置为 true,用户进行客服会话会在右下角显示 '可能要发送的小程序' 提示,用户点击后可以快速发送小程序消息 bindcontact - 客服消息回调 如果用户在会话中,点击了由 '服务端' 发送的小程序消息,则会返回到小程序,我们可以通过 bindcontact 事件回调,来获取用户所点消息的页面路径 path 和 参数 query // 回调事件 handleContact (e) { console.log(e.path) console.log(e.query) } /* 注意: '服务端' 返回的小程序消息,只能是本小程序,但可以指定不同的页面及参数 miniprogrampage - 小程序消息结构 title - 消息标题 pagepath - 小程序页面路径,支持参数,例如:pages/index/index?foo=bar thumb_media_id - 小程序消息卡片封面,image 类型的 media_id */ 参考文档: https://developers.weixin.qq.com/miniprogram/dev/framework/open-ability/customer-message/customer-message.html https://developers.weixin.qq.com/miniprogram/dev/component/button.html https://developers.weixin.qq.com/miniprogram/dev/api-backend/open-api/customer-message/customerServiceMessage.send.html 2.服务端接收的消息类型: text - 文本消息 Content - 文本内容 image - 图片消息 PicUrl - MediaId - 图片消息媒体ID 可以调用接口 'getTempMedia - 获取临时素材' 拉取数据 miniprogrampage - 小程序卡片消息 Title - 标题 AppId - 小程序 appid PagePath - 小程序页面路径 ThumbUrl - 小程序封面图的临时 cdn 链接 ThumbMediaId - 小程序封面图的临时素材id event - 事件消息 user_enter_tempsession - 进行会话事件 sessionForm - '客服会话按钮' 上设置的 'session-from - 会员来源',有助于我们分析不同场景 参考文档: https://developers.weixin.qq.com/miniprogram/dev/framework/open-ability/customer-message/receive.html 3.服务端发送的消息类型: text - 文本消息 image - 图片消息 link - 图文消息(easywechat 使用的还是 news) miniprogrampage - 小程序卡片消息 参考文档: https://developers.weixin.qq.com/miniprogram/dev/api-backend/open-api/customer-message/customerServiceMessage.send.html 4.转发客服消息: 可以将用户的消息,转发到网页版的客服工具,接入多客服系统 返回的消息类型为: transfer_customer_service 参考文档: https://developers.weixin.qq.com/miniprogram/dev/framework/open-ability/customer-message/trans.html 5.关于消息中,涉及到的媒体文件问题: MediaId 以及 ThumbMediaId,有 2 个接口: 1>uploadTempMedia - 上传临时素材 参数: acccess_token type - 文件类型(目前只有:image) media - form-data 中媒体文件标识,有filename、filelength、content-type等信息(FormData 表单数据) 2>getTempMedia - 下载临时素材 参数: acccess_token media_id - 媒体文件ID 参考文档: https://developers.weixin.qq.com/miniprogram/dev/api-backend/open-api/customer-message/customerServiceMessage.uploadTempMedia.html https://developers.weixin.qq.com/miniprogram/dev/api-backend/open-api/customer-message/customerServiceMessage.getTempMedia.html 6.下发客服状态: 这个没测试 参考文档: https://developers.weixin.qq.com/miniprogram/dev/framework/open-ability/customer-message/typing.html https://developers.weixin.qq.com/miniprogram/dev/api-backend/open-api/customer-message/customerServiceMessage.setTyping.html 7.EasyWeChat 开发 小程序的客服消息:$app->customer_service。同公众号的客服消息应该是一致的。 同时,进入消息、接收消息、发送消息的用法,都是参照公众号文档。 客服消息,跟发送普通消息的区别是(以 text 消息为例): // 普通消息 return new Text('你好!'); // 客服消息 $message = new Text('你好!'); $app->customer_service->message($message)->to($open_id)->send(); 参考文档: 服务端 https://www.easywechat.com/docs/4.1/official-account/server 消息 https://www.easywechat.com/docs/4.1/official-account/messages 多客服消息转发(跟上面的第 4 点一样,转发给客服系统) https://www.easywechat.com/docs/4.1/official-account/message-transfer |
开发中使用到的第三方库:
composer require "overtrue/wechat:^5.0"
[开发调用本地接口]
刚开始开发的时候,一直想让他正常指定线上的访问域名,但是可以访问本地接口进行调试
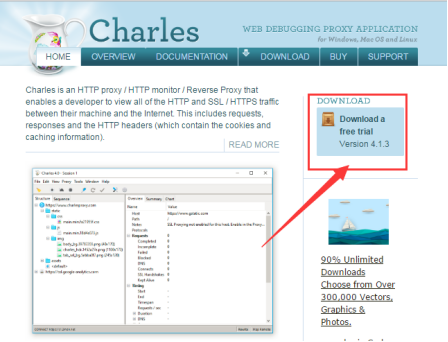
步骤一:Charles工具下载地址http://www.charlesproxy.com/,下载免费试用版本
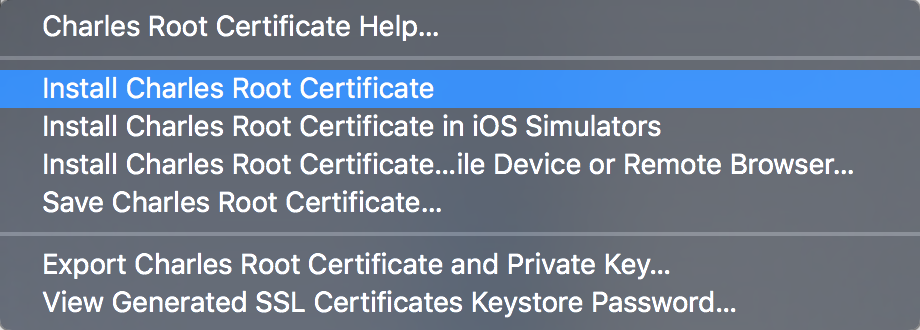
步骤二:打开Charles工具,Help-SSL Proxying-Install Charles Root Certificate 安装证书到本地;

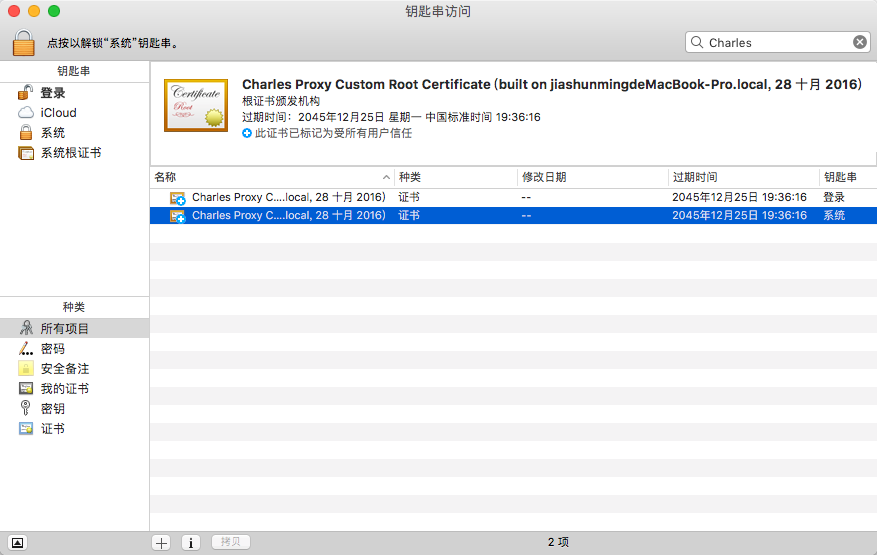
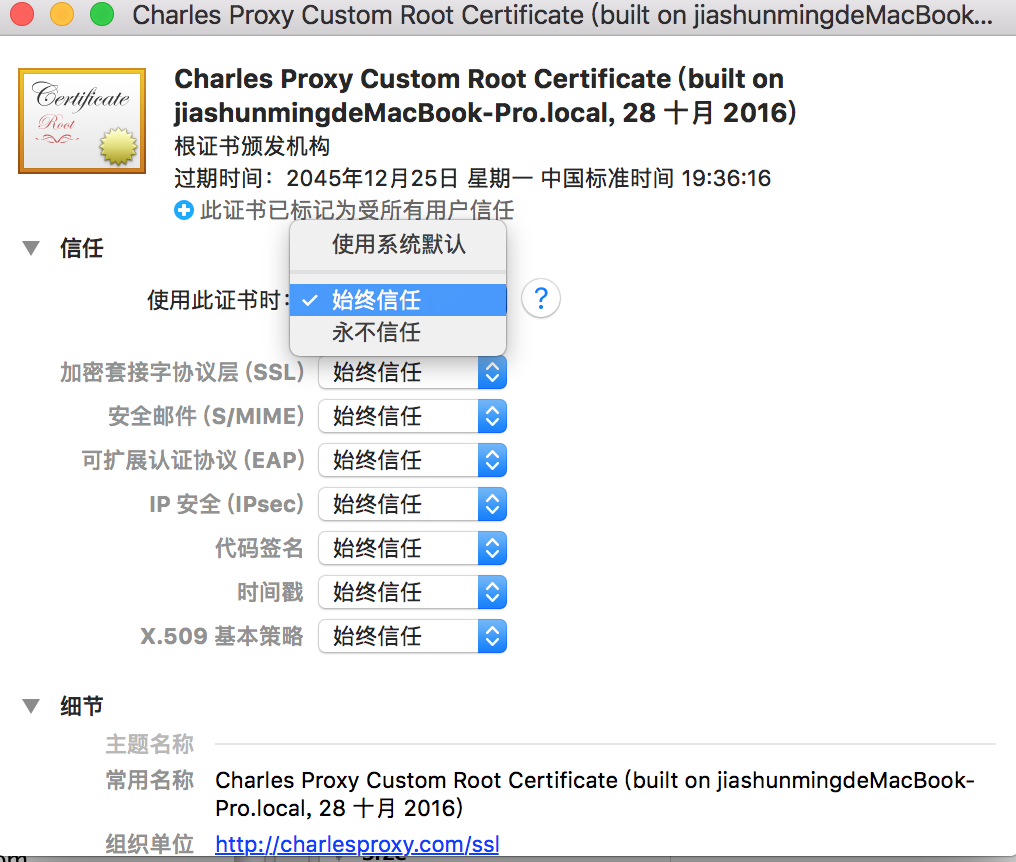
步骤三:搜索 Charles 关键字,找到证书,设置为始终信任。如图所示:
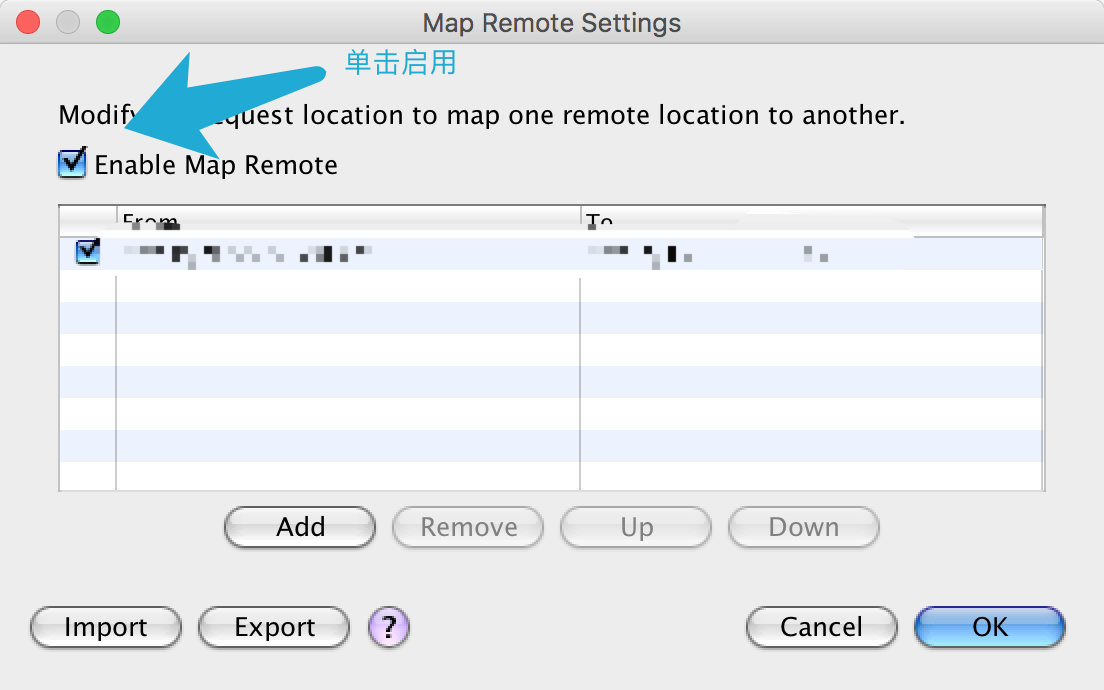
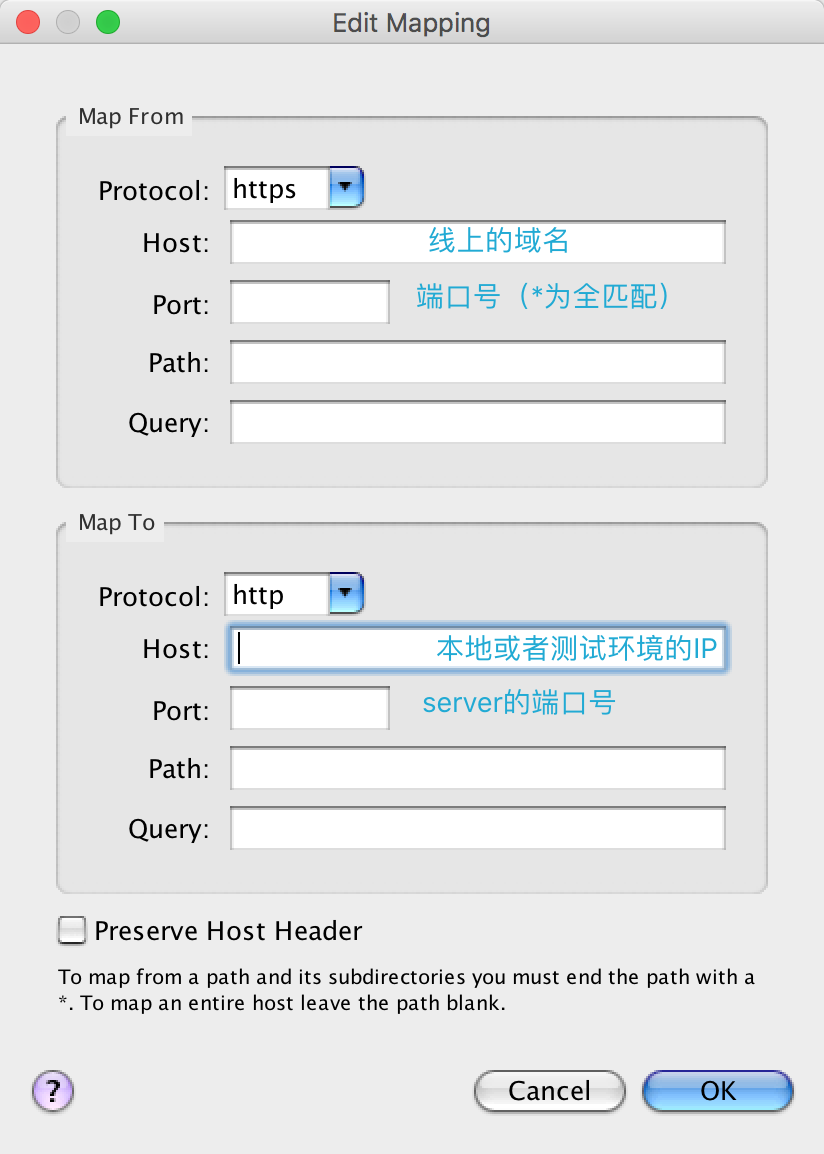
步骤四:打开tools-Map Remote ,添加域名到本地服务器中。
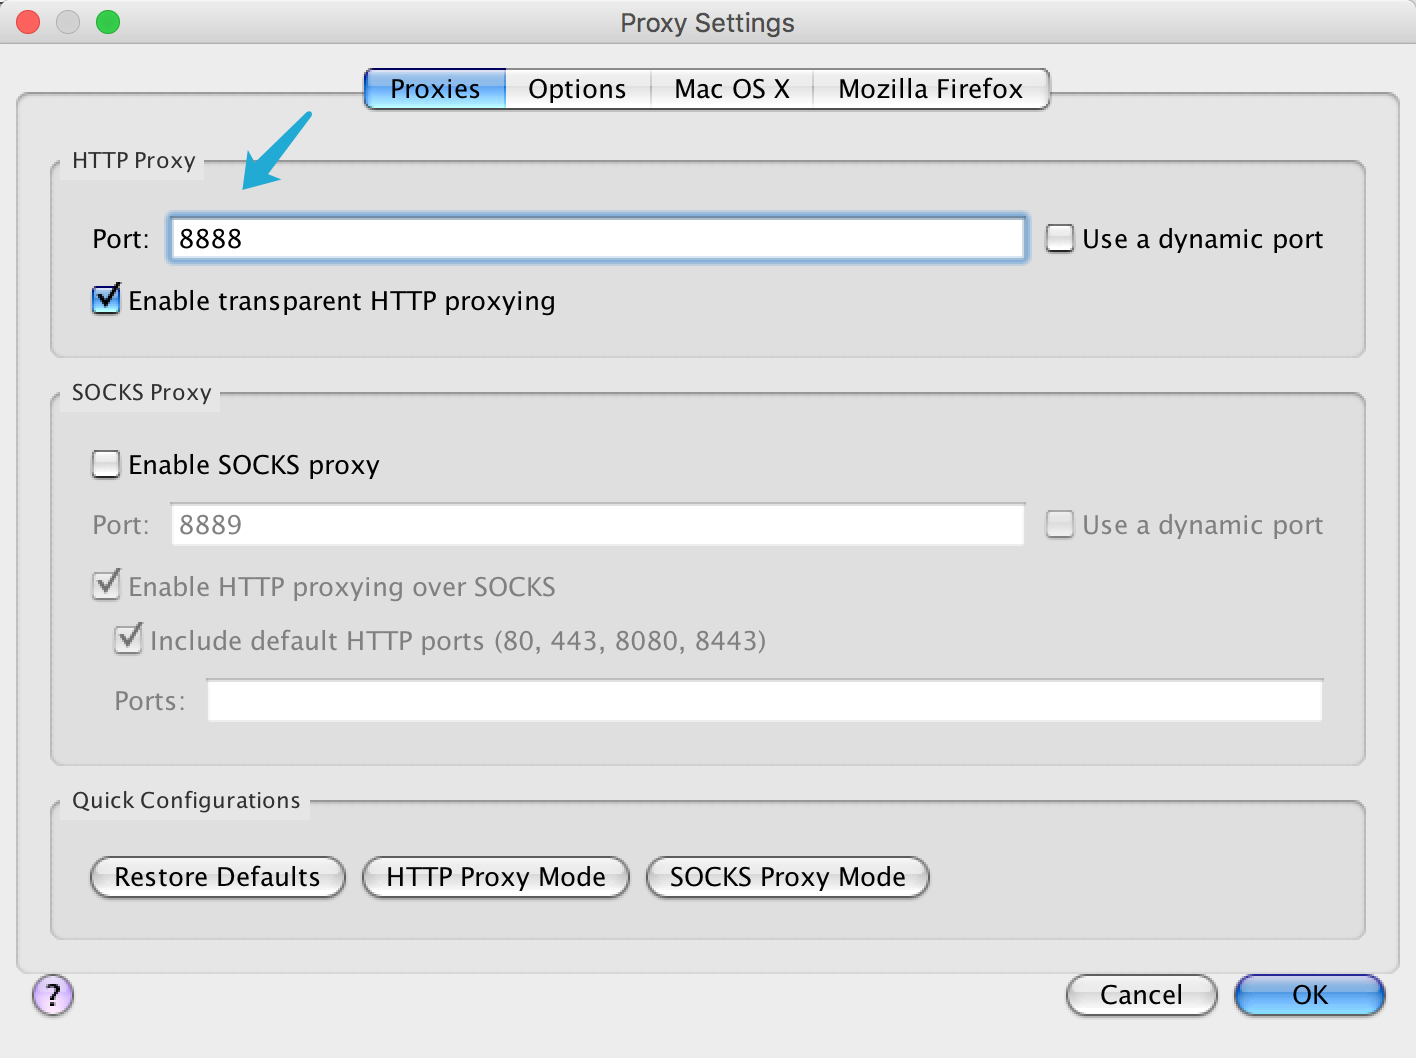
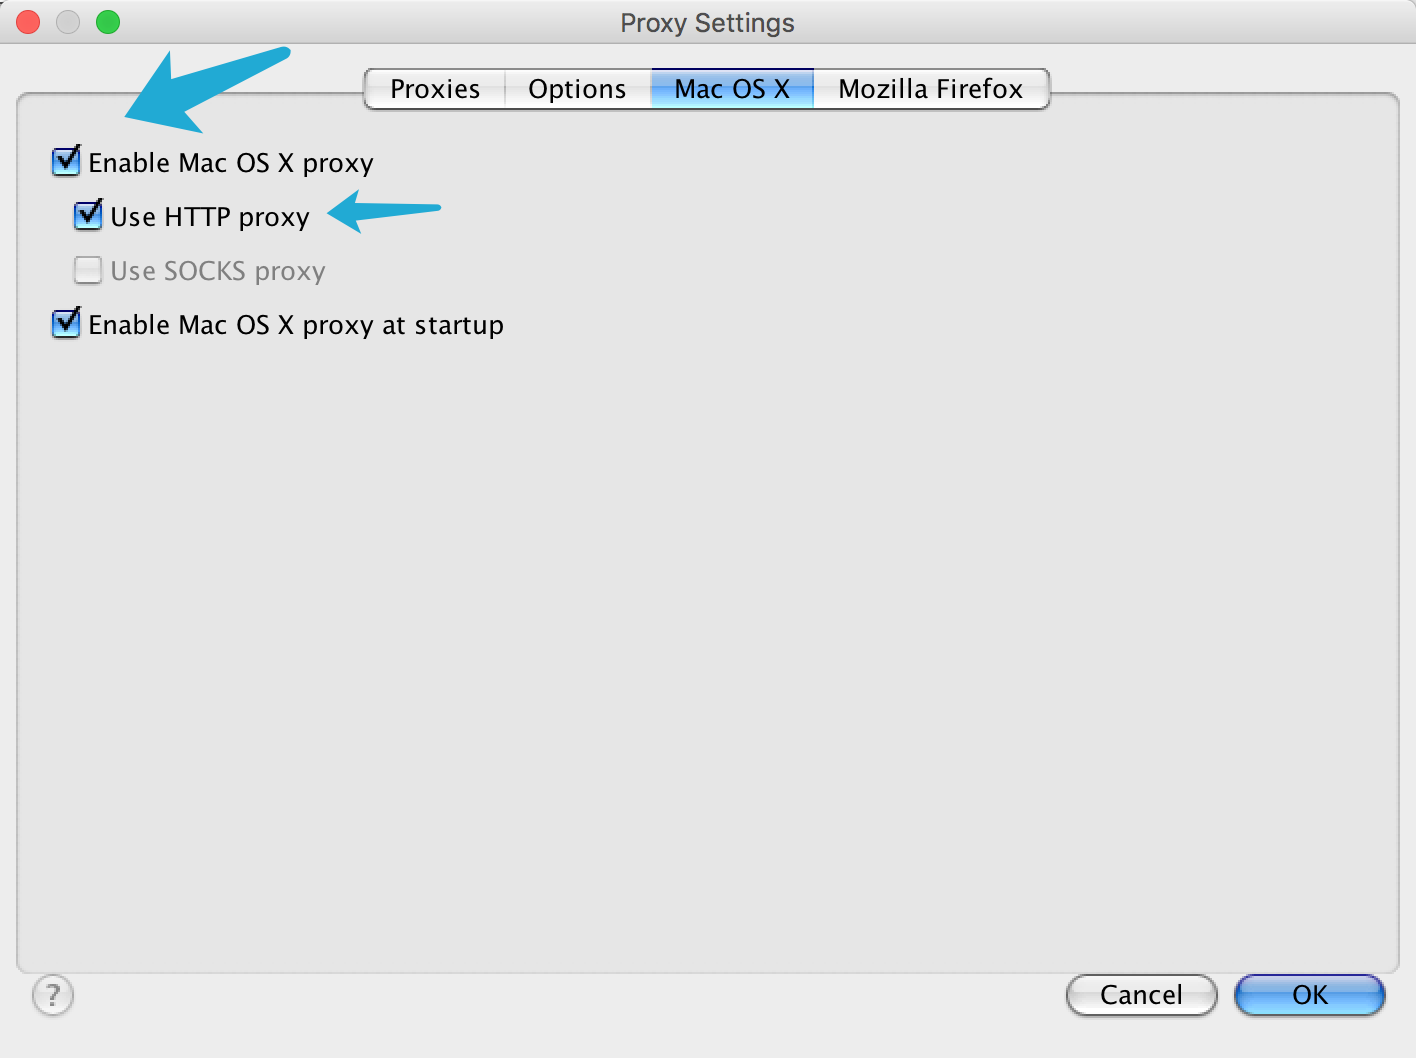
步骤五:打开 Proxy,选Proxy Settings选项,端口值是8888,这个端口号需要记住,后面在微信小程序开发工具会使用到。
步骤六:选择Mac OS X选项卡,启用如下两个选项,如图所示
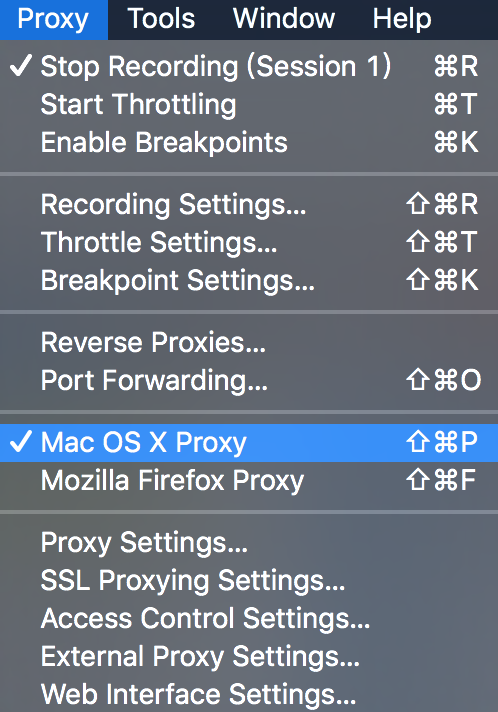
步骤七:选用 Proxy-Mac OS X Proxy 启用本地的代理服务
以上基本上完成了本地服务代理服务的步骤,接下来
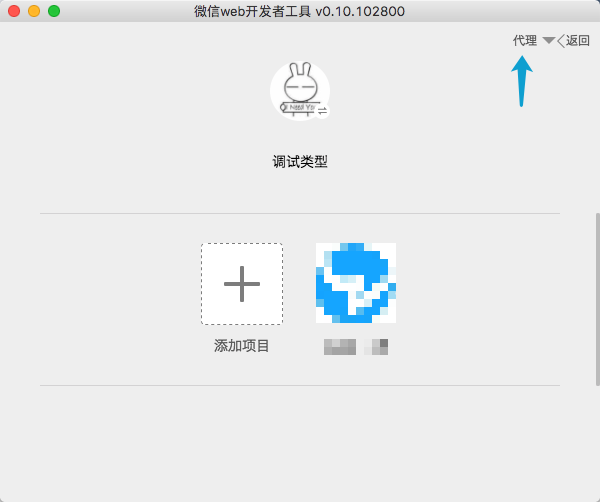
这时,Charles已经完成了本地服务代理线上服务的步骤,接下来就是微信web开发者工具中的一些设置。
在扫码登录后,点击右上角代理的选项
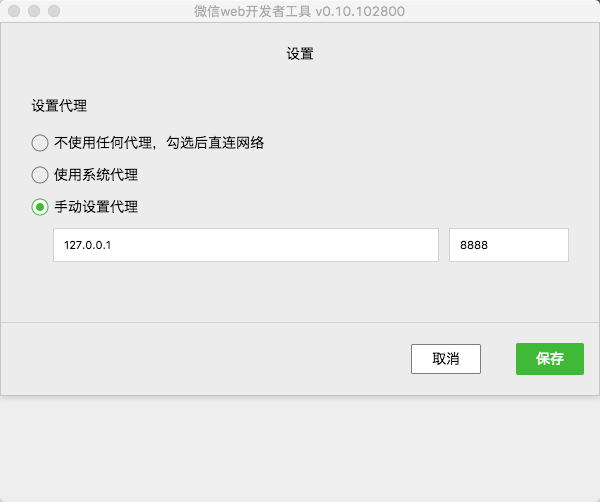
选择手动设置代理,然后填写本地的IP,以及前边在Charles中设置的代理端口号
常见问题:
1)easyWeChat报错Failed to cache access token
解决:
overtrue/wechat 默认使用的是 symfony/cache 来进行缓存操作,
symfony/cache会在/tmp目录下建立symfony_cache来储存临时缓存。
所以从/tmp目录下找到symfony_cache目录删除该目录让其重新创建就可以, 若已经存在数据,则设置为项目的权限即可,例如项目是www:
chown -R www:www /tmp/symfony-cache/
参考文档:
- 小程序客服:https://blog.csdn.net/abccba9978/article/details/124980716
- 回调验证: https://www.itqaq.com/index/224.html
- 接收的消息与事件: https://developers.weixin.qq.com/miniprogram/dev/framework/open-ability/customer-message/receive.html
- 小程序发布流程: https://blog.csdn.net/2301_79985012/article/details/138001540


【推荐】编程新体验,更懂你的AI,立即体验豆包MarsCode编程助手
【推荐】凌霞软件回馈社区,博客园 & 1Panel & Halo 联合会员上线
【推荐】抖音旗下AI助手豆包,你的智能百科全书,全免费不限次数
【推荐】博客园社区专享云产品让利特惠,阿里云新客6.5折上折
【推荐】轻量又高性能的 SSH 工具 IShell:AI 加持,快人一步
· CSnakes vs Python.NET:高效嵌入与灵活互通的跨语言方案对比
· DeepSeek “源神”启动!「GitHub 热点速览」
· 我与微信审核的“相爱相杀”看个人小程序副业
· Plotly.NET 一个为 .NET 打造的强大开源交互式图表库
· 上周热点回顾(2.17-2.23)
2018-12-25 Mac之lnmp环境搭建
2018-12-25 PHP之pear包总结