
7.3 Android Basic UI的布局 Dialog演示
Dialog 演示
-
新建项目DialogDemo. 编辑res/layout/main.xml 布局文件:
<?xml version="1.0" encoding="utf-8"?>
<LinearLayout xmlns:android="http://schemas.android.com/apk/res/android"
android:orientation="vertical"
android:layout_width="fill_parent"
android:layout_height="fill_parent"
>
<TextView
android:layout_width="fill_parent"
android:layout_height="wrap_content"
android:text="对话框演示"
/>
<Button android:id="@+id/button1"
android:layout_width="fill_parent"
android:layout_height="wrap_content" android:text="两个button的对话框1" />
<Button android:id="@+id/button2"
android:layout_width="fill_parent"
android:layout_height="wrap_content" android:text="三个button的对话框2" />
<Button android:id="@+id/button3"
android:layout_width="fill_parent"
android:layout_height="wrap_content" android:text="可以进行输入的对话框" />
<Button android:id="@+id/button4"
android:layout_width="fill_parent"
android:layout_height="wrap_content" android:text="进度框" />
</LinearLayout>
2. 修改DialogDemo类,创建4个dialog id,重载onCreateDialog()和onPrepareDialog()方法。
public class DialogDemo extends Activity {
private static final int DIALOG1=1;
private static final int DIALOG2=2;
private static final int DIALOG3=3;
private static final int DIALOG4=4;
@Override
protected Dialog onCreateDialog(int id) {
switch(id){
case DIALOG1:
return createDialog1(DialogDemo.this);
case DIALOG2:
return createDialog2(this);
case DIALOG3:
return createDialog3(this);
case DIALOG4:
return createDialog4(this);
}
return null;
}
@Override
protected void onPrepareDialog(int id, Dialog dialog) {
// TODO Auto-generated method stub
if(id == DIALOG1){
setTitle("测试测试");
}
}
/** Called when the activity is first created. */
@Override
public void onCreate(Bundle savedInstanceState) {
super.onCreate(savedInstanceState);
setContentView(R.layout.main);
Button btn1 = (Button)findViewById(R.id.button1);
btn1.setOnClickListener(new Button.OnClickListener(){
@Override
public void onClick(View v) {
//使用showDialog()方法显示对话框
showDialog(DIALOG1);
}
});
Button btn2 = (Button)findViewById(R.id.button2);
btn2.setOnClickListener(new Button.OnClickListener(){
@Override
public void onClick(View v) {
//使用showDialog()方法显示对话框
showDialog(DIALOG2);
}
});
Button btn3 = (Button)findViewById(R.id.button3);
btn3.setOnClickListener(new Button.OnClickListener(){
@Override
public void onClick(View v) {
//使用showDialog()方法显示对话框
showDialog(DIALOG3);
}
});
Button btn4 = (Button)findViewById(R.id.button4);
btn4.setOnClickListener(new Button.OnClickListener(){
@Override
public void onClick(View v) {
//使用showDialog()方法显示对话框
showDialog(DIALOG4);
}
});
}
//Create Dialog1
private Dialog createDialog1(Context context){
AlertDialog.Builder builder = new AlertDialog.Builder(context);
builder.setIcon(R.drawable.alert_dialog_icon); //设置对话框的图标
builder.setTitle("Dialog1 标题");
builder.setPositiveButton("确定", new DialogInterface.OnClickListener(){
@Override
public void onClick(DialogInterface dialog, int which) {
// TODO Auto-generated method stub
setTitle("单击了确定按钮");
}
});
builder.setNegativeButton("取消", new DialogInterface.OnClickListener() {
@Override
public void onClick(DialogInterface dialog, int which) {
// TODO Auto-generated method stub
setTitle("单击了取消按钮");
}
});
return builder.create();
}
//Create Dialog2
private Dialog createDialog2(Context context){
return null;
}
//Create Dialog3
private Dialog createDialog3(Context context){
return null;
}
//Create Dialog4
private Dialog createDialog4(Context context){
return null;
}
}
我们先实现了创建带有确定和取消按钮的对话框。
showDialog方法显示指定id的对话框,这个函数的调用会使系统回调Dialog的onCreateDialog方法。
onPrepareDialog方法是当Dialog生成但是没有显示出来的时候,使得有机会在显示前对Dialog做一些修改。
在onCreateDialog方法中创建Dialog,我们使用自定义的方法createDialog1来实现Dialgo1的创建
初始化一个AlertDialog.Builder 对象,用来创建Dialog
AlertDialog.Builder builder = new AlertDialog.Builder(context);
setPositiveButton方法设置确定按钮的一些属性,第一个参数是按钮的文字,第二个参数是DialogInterface.OnClickListener监听事件来捕获用户的单击事件
builder.setPositiveButton("确定", new DialogInterface.OnClickListener(){……});
setNegativeButton方法设置取消按钮。
builder.setNegativeButton("取消", new DialogInterface.OnClickListener() {
………
);
使用 AlertDialog.Builder的create()方法创建对话框。
return builder.create();

3. 创建Dialog2, 编辑createDialog2方法:
private Dialog createDialog2(Context context){
AlertDialog.Builder builder = new AlertDialog.Builder(context);
builder.setTitle("Dialog2");
builder.setMessage("9月13日消息,今天苹果公司正式对外宣布,WiFi版iPad平板电脑将于9月17日(周五)登陆中国大陆市场,16GB版建议零售价为3988元,3G版的具体发售日期及售价暂无消息");
builder.setPositiveButton("确定", new DialogInterface.OnClickListener() {
@Override
public void onClick(DialogInterface dialog, int which) {
// TODO Auto-generated method stub
setTitle("确定按钮");
}
});
builder.setNeutralButton("详细", new DialogInterface.OnClickListener() {
@Override
public void onClick(DialogInterface dialog, int which) {
// TODO Auto-generated method stub
setTitle("详细按钮");
}
});
builder.setNegativeButton("取消", new DialogInterface.OnClickListener() {
@Override
public void onClick(DialogInterface dialog, int which) {
// TODO Auto-generated method stub
setTitle("取消按钮");
}
});
return builder.create();
}
setNeutralButton方法设置详细按钮的内容。
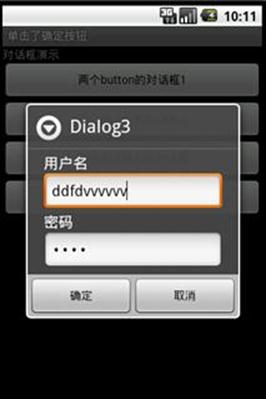
4. 创建自定义界面的Dialog。
在res/layout新建alert_dialog_view.xml 布局文件,内容如下:
<?xml version="1.0" encoding="utf-8"?>
<LinearLayout xmlns:android="http://schemas.android.com/apk/res/android"
android:layout_width="fill_parent" android:layout_height="wrap_content"
android:orientation="vertical">
<TextView android:id="@+id/username_view"
android:layout_height="wrap_content"
android:layout_width="wrap_content" android:layout_marginLeft="20dip"
android:layout_marginRight="20dip" android:text="用户名"
android:textAppearance="?android:attr/textAppearanceMedium" />
<EditText android:id="@+id/username_edit"
android:layout_height="wrap_content"
android:layout_width="fill_parent" android:layout_marginLeft="20dip"
android:layout_marginRight="20dip" android:capitalize="none"
android:textAppearance="?android:attr/textAppearanceMedium" />
<TextView android:id="@+id/password_view"
android:layout_height="wrap_content"
android:layout_width="wrap_content" android:layout_marginLeft="20dip"
android:layout_marginRight="20dip" android:text="密码"
android:textAppearance="?android:attr/textAppearanceMedium" />
<EditText android:id="@+id/password_edit"
android:layout_height="wrap_content"
android:layout_width="fill_parent" android:layout_marginLeft="20dip"
android:layout_marginRight="20dip" android:capitalize="none"
android:password="true"
android:textAppearance="?android:attr/textAppearanceMedium" />
</LinearLayout>
布局文件创建了一个登陆框界面,用户名和密码输入界面。
android:textAppearance="?android:attr/textAppearanceMedium" 设置Textview里边的字体,字体是系统内置的。
android:capitalize="none" 控制输入的大小写,none表示输入的字母是小写。
android:password="true" 表示是输入密码的。
编辑createDialog3方法,按如下代码:
//Create Dialog3
private Dialog createDialog3(Context context){
LayoutInflater inflater = LayoutInflater.from(context);
final View loginView = inflater.inflate(R.layout.alert_dialog_view, null);
AlertDialog.Builder builder = new AlertDialog.Builder(context);
builder.setTitle("Dialog3");
builder.setView(loginView);
builder.setPositiveButton("确定", new DialogInterface.OnClickListener(){
@Override
public void onClick(DialogInterface dialog, int which) {
// TODO Auto-generated method stub
setTitle("单击了确定按钮");
}
});
builder.setNegativeButton("取消", new DialogInterface.OnClickListener() {
@Override
public void onClick(DialogInterface dialog, int which) {
// TODO Auto-generated method stub
setTitle("单击了取消按钮");
}
});
return builder.create();
}
使用LayoutInflater 加载布局文件:
LayoutInflater inflater = LayoutInflater.from(context);
final View loginView = inflater.inflate(R.layout.alert_dialog_view, null);
使用setView方法设置加载的view。
builder.setView(loginView);
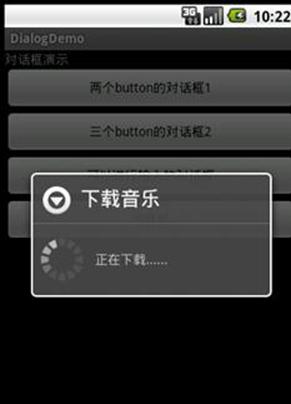
5. ProgressDialog 进度对话框,编辑createDialog4方法代码如下:
//Create Dialog4
private Dialog createDialog4(Context context){
ProgressDialog dlg = new ProgressDialog(context);
dlg.setTitle("下载音乐");
dlg.setMessage("正在下载......");
return dlg;
}
http://www.cnblogs.com/xingquan

