
6. Android Basic UI的布局 汇总Demo
UI布局
如何使用FrameLayout布局
如何单独使用LinearLayout布局
如何单独使用RelativeLayout布局
结合LinearLayout和RelativeLayout布局
如何使用TableLayout布局
FrameLayout
- 创建项目 Layouts,用于布局的演示。
-
打开res/layout/main.xml 如下编辑
<?xml version="1.0" encoding="utf-8"?>
<LinearLayout xmlns:android="http://schemas.android.com/apk/res/android"
android:orientation="vertical" android:layout_width="fill_parent"
android:layout_height="fill_parent">
<TextView android:layout_height="wrap_content" android:id="@+id/textview"
android:layout_width="fill_parent" android:text="Android 布局演示"
android:typeface="normal"></TextView>
<Button android:text="FrameLayout演示" android:id="@+id/Button01"
android:layout_height="wrap_content" android:layout_width="match_parent"></Button>
<Button android:text="LinearLayout演示" android:id="@+id/Button02"
android:layout_width="match_parent" android:layout_height="wrap_content"></Button>
<Button android:text="RelativeLayout演示" android:id="@+id/Button03"
android:layout_height="wrap_content" android:layout_width="match_parent"></Button>
<Button android:text="LinearLayout 和 RelativeLayout演示"
android:id="@+id/Button04" android:layout_height="wrap_content"
android:layout_width="match_parent"></Button>
<Button android:text="TableLayout演示" android:id="@+id/Button05"
android:layout_height="wrap_content" android:layout_width="match_parent"></Button>
</LinearLayout>
为程序添加了4个按钮。 Android:id="@+id/textview" 定义控件的名称,android:layout_height="wrap_content" 定义控件的高度为内容的高度,android:layout_width="match_parent" 定义控件的宽度与父控件匹配。
-
在res/layout目录中添加布局文件framelayout.xml,内容如下:
<?xml version="1.0" encoding="UTF-8"?>
<FrameLayout xmlns:android="http://schemas.android.com/apk/res/android"
android:layout_height="match_parent" android:layout_width="match_parent">
<ImageView android:src="@drawable/koala"
android:layout_height="wrap_content" android:layout_width="wrap_content" />
<Button android:layout_height="wrap_content" android:text="按钮"
android:layout_width="match_parent" />
<ImageView android:src="@drawable/icon"
android:layout_height="wrap_content" android:layout_width="wrap_content" />
</FrameLayout>
在FrameLayout中添加了两个ImageView和一个Button。

FrameLayout中的所有元素都被放在左上角,在FrameLayout中无法为元素指定一个具体的位置,后添加的元素重叠在前一个元素上。
4. 添加一个Activity Layout_Framelayout用于显示 framelayout.xml中内容
public class Layout_Framelayout extends Activity {
@Override
protected void onCreate(Bundle savedInstanceState) {
// TODO Auto-generated method stub
super.onCreate(savedInstanceState);
setContentView(R.layout.framelayout);
}
}
在AndroidManifest.xml中添加配置:
<activity android:name=".Layout_Framelayout" android:label="Framelayout输出"></activity>
5. 在主程序中调用显示,打开src/layouts.java,添加如下代码
public class Layouts extends Activity {
/** Called when the activity is first created. */
@Override
public void onCreate(Bundle savedInstanceState) {
super.onCreate(savedInstanceState);
setContentView(R.layout.main);
//找到按钮Button0
Button button0 = (Button)findViewById(R.id.Button01);
//添加单击事件
button0.setOnClickListener(new OnClickListener(){
@Override
public void onClick(View v) {
// TODO Auto-generated method stub
Intent intent = new Intent(Layouts.this,Layout_Framelayout.class);
setTitle("FrameLayout演示");
startActivity(intent);
}
});
}
}
LinearLayout
-
在res/layout目录中添加布局文件linearlayout.xml,内容如下:
<?xml version="1.0" encoding="UTF-8"?>
<LinearLayout xmlns:android="http://schemas.android.com/apk/res/android"
android:orientation="vertical" android:layout_width="fill_parent"
android:layout_height="fill_parent">
<LinearLayout android:orientation="horizontal" android:background="#00ff00" android:layout_width="wrap_content" android:layout_height="wrap_content">
<TextView android:text="hello world1!" android:layout_width="150dip" android:layout_height="30dip" android:background="#ff00ff"/>
<TextView android:text="hello world2!" android:layout_width="150dip" android:layout_height="30dip" android:background="#332277"/>
<TextView android:text="hello world3!" android:layout_width="150dip" android:layout_height="30dip" android:background="#543266"/>
</LinearLayout>
<LinearLayout android:orientation="vertical" android:background="#00ff00" android:layout_width="wrap_content" android:layout_height="wrap_content">
<TextView android:text="hello world1!" android:layout_width="150dip" android:layout_height="30dip" android:background="#1f4422"/>
<TextView android:text="hello world2!" android:layout_width="150dip" android:layout_height="30dip" android:background="#332277"/>
<TextView android:text="hello world3!" android:layout_width="150dip" android:layout_height="30dip" android:background="#543266"/>
</LinearLayout>
<LinearLayout android:orientation="horizontal" android:background="#00ff00" android:layout_width="match_parent" android:layout_height="wrap_content">
<TextView android:text="hello world1!" android:layout_width="wrap_content" android:layout_height="30dip" android:background="#1f4422"/>
<TextView android:text="hello world2!" android:layout_width="wrap_content" android:layout_height="wrap_content" android:background="#332277"/>
<TextView android:text="hello world3!" android:layout_width="match_parent" android:layout_height="match_parent" android:background="#543266"/>
</LinearLayout>
</LinearLayout>

LinearLayout是将自己包含的元素按照一个方向布局(水平或垂直)。
2. 在src/新建类 Layout_Linearlayout 继承自 Activity。
public class Layout_Linearlayout extends Activity {
@Override
protected void onCreate(Bundle savedInstanceState) {
// TODO Auto-generated method stub
super.onCreate(savedInstanceState);
setContentView(R.layout.linearlayout);
}
}
3. 在主程序中调用显示,编辑Layouts.java增加如下内容:
/*
* LinearLayout demo
*/
//找到按钮
btn = (Button)findViewById(R.id.Button02);
//添加单击事件
btn.setOnClickListener(new OnClickListener(){
@Override
public void onClick(View v) {
// TODO Auto-generated method stub
Intent intent = new Intent(Layouts.this,Layout_Linearlayout.class);
setTitle("LinearLayout演示");
startActivity(intent);
}
});
在AndroidManifest.xml中添加:
<activity android:name=".Layout_Linearlayout"></activity>
RelativeLayout
-
新建Layout配置文件 res/layout/relativelayout.xml
<?xml version="1.0" encoding="UTF-8"?>
<RelativeLayout android:id="@+id/RelativeLayout01"
android:layout_width="fill_parent" android:layout_height="fill_parent"
xmlns:android="http://schemas.android.com/apk/res/android">
<TextView android:layout_height="wrap_content" android:text="请输入用户名:"
android:layout_width="fill_parent" android:id="@+id/label"></TextView>
<EditText android:layout_toRightOf="@+id/TextView01"
android:layout_height="wrap_content" android:id="@+id/EditText01"
android:layout_width="match_parent" android:layout_below="@+id/label"
android:text="please input text"></EditText>
<Button android:layout_below="@+id/EditText01"
android:layout_toRightOf="@+id/TextView01" android:layout_width="wrap_content"
android:layout_height="wrap_content" android:id="@+id/cancel"
android:text="取消" android:layout_alignParentRight="true"
android:layout_marginLeft="10dip"></Button>
<Button android:id="@+id/ok" android:layout_toLeftOf="@id/cancel"
android:layout_width="wrap_content" android:layout_height="wrap_content"
android:text="确定" android:layout_alignTop="@id/cancel" />
</RelativeLayout>
RelativeLayout 是相对定位的布局,
<Button android:layout_below="@+id/EditText01" 按钮在EditText01的下面
android:layout_toRightOf="@+id/TextView01" 按钮在 TextView01的右边
/>
android:layout_toLeftOf="@id/cancel" button按钮在id为cancel控件的左边
android:layout_alignTop="@id/cancel" button按钮与id为cancel控件一样高
2. 添加新的Activity Layout_Relativelayout 类。
import android.app.Activity;
import android.os.Bundle;
public class Layout_Relativelayout extends Activity {
@Override
protected void onCreate(Bundle savedInstanceState) {
// TODO Auto-generated method stub
super.onCreate(savedInstanceState);
setContentView(R.layout.relativelayout);
}
}
在AndroidManifest.xml中配置
<activity android:name=".Layout_Relativelayout"></activity>
3. 编辑Layouts.java ,为button编辑事件。
/*
* RelativeLayout demo
*/
//找到按钮
btn = (Button)findViewById(R.id.Button03);
//添加单击事件
btn.setOnClickListener(new OnClickListener(){
@Override
public void onClick(View v) {
// TODO Auto-generated method stub
Intent intent = new Intent(Layouts.this,Layout_Relativelayout.class);
setTitle("RelativeLayout演示");
startActivity(intent);
}
});
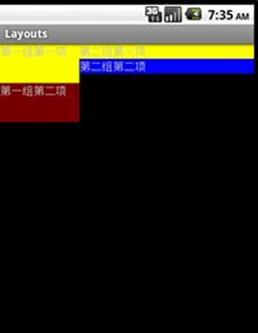
RelativityLayout 和 LinearLayout结合使用
-
在res/layout新建布局文件 relativelinearlayout.xml
<?xml version="1.0" encoding="UTF-8"?>
<RelativeLayout android:id="@+id/RelativeLayout01"
android:layout_width="fill_parent" android:layout_height="fill_parent"
xmlns:android="http://schemas.android.com/apk/res/android">
<TextView android:text="第一组第一项" android:id="@+id/TextView01"
android:layout_width="fill_parent" android:layout_height="50dip"
android:background="@drawable/yellow"></TextView>
<TextView android:layout_width="fill_parent" android:text="第一组第二项"
android:layout_height="50dip" android:id="@+id/view1"
android:layout_below="@id/TextView01" android:background="@drawable/red"></TextView>
</RelativeLayout>

android:background="@drawable/red" 颜色在 res/values/strings.xml中定义
2. 在res/layout新建布局文件 relativelinearlayout2.xml
<?xml version="1.0" encoding="utf-8"?>
<RelativeLayout android:id="@+id/right"
xmlns:android="http://schemas.android.com/apk/res/android"
android:layout_width="fill_parent"
android:layout_height="fill_parent">
<TextView android:id="@+id/right_view1"
android:background="@drawable/yellow" android:layout_width="fill_parent"
android:layout_height="wrap_content" android:text="第二组第一项" />
<TextView android:id="@+id/right_view2"
android:background="@drawable/blue"
android:layout_width="fill_parent"
android:layout_height="wrap_content"
android:layout_below="@id/right_view1" android:text="第二组第二项" />
</RelativeLayout>
3. 新建类Layout_RelativeLinearlayout
public class Layout_RelativeLinearlayout extends Activity {
@Override
protected void onCreate(Bundle savedInstanceState) {
// TODO Auto-generated method stub
super.onCreate(savedInstanceState);
//创建一个水平的LinearLayout
LinearLayout layoutMain = new LinearLayout(this);
layoutMain.setOrientation(LinearLayout.HORIZONTAL);
setContentView(layoutMain);
//将两个xml布局文件加载RelativeLayout布局
LayoutInflater inflate = (LayoutInflater)getSystemService(Context.LAYOUT_INFLATER_SERVICE);
RelativeLayout layoutLeft = (RelativeLayout)inflate.inflate(R.layout.relativelinearlayout,null);
RelativeLayout layoutRight = (RelativeLayout)inflate.inflate(R.layout.relativelinearlayout2, null);
RelativeLayout.LayoutParams relParam = new
RelativeLayout.LayoutParams(
RelativeLayout.LayoutParams.WRAP_CONTENT,
RelativeLayout.LayoutParams.WRAP_CONTENT
);
layoutMain.addView(layoutLeft,100,100);
layoutMain.addView(layoutRight,relParam);
}
在onCreate()方法中,动态定义LinearLayout。使用 LayoutInflater 加载 xml布局文件.
编辑AndroidManifest.xml 添加配置
<activity android:name=".Layout_RelativeLinearlayout"></activity>
4. 编辑Layouts.java 处理按钮事件
/*
* Layout_RelativeLinearlayout demo
*/
//找到按钮
btn = (Button)findViewById(R.id.Button04);
//添加单击事件
btn.setOnClickListener(new OnClickListener(){
@Override
public void onClick(View v) {
// TODO Auto-generated method stub
Intent intent = new Intent(Layouts.this,Layout_RelativeLinearlayout.class);
setTitle("RelativeLayout 和LinearLayout的演示");
startActivity(intent);
}
});
TableLayout
按表格的行和列进行布局。
-
新建布局文件 tablelayout.xml
<?xml version="1.0" encoding="UTF-8"?>
<TableLayout android:id="@+id/table"
xmlns:android="http://schemas.android.com/apk/res/android"
android:layout_width="match_parent" android:layout_height="match_parent" android:stretchColumns="1">
<TableRow>
<TextView android:text="用户名:" android:textStyle="bold"
android:gravity="right" android:padding="3dip" />
<EditText android:id="@+id/username" android:padding="3dip"
android:scrollHorizontally="true" />
</TableRow>
<TableRow>
<TextView android:text="登录密码:" android:textStyle="bold"
android:gravity="right" android:padding="3dip" />
<EditText android:id="@+id/password" android:password="true"
android:padding="3dip" android:scrollHorizontally="true" />
</TableRow>
<TableRow android:gravity="right">
<Button android:id="@+id/cancel" android:text="取消" />
<Button android:id="@+id/login" android:text="登录" />
</TableRow>
</TableLayout>
AndroidManifest.xml 中的配置
<activity android:name=".Layout_Tablelayout"></activity>
2. 新建Layout_Tablelayout.java类
public class Layout_Tablelayout extends Activity {
@Override
protected void onCreate(Bundle savedInstanceState) {
// TODO Auto-generated method stub
super.onCreate(savedInstanceState);
setContentView(R.layout.tablelayout);
}
}


