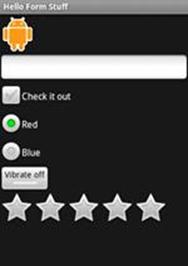
5.2 Android Basic QuickStart Widgets&Other View Form Stuff
Form Stuff
本演练演示使用多样的控件创建表单,如Image button, text files, checkboxes and radio buttons.
- 新建项目 HelloFormStuff
-
打开res/layout/main.xml文件,修改代码如下:
<?xml version="1.0" encoding="utf-8"?>
<LinearLayout xmlns:android="http://schemas.android.com/apk/res/android"
android:orientation="vertical"
android:layout_width="fill_parent"
android:layout_height="fill_parent"
>
</LinearLayout>
3. 现在创建
Custom Button
Edit Text
CheckBox
RadioButtons
Toggle Button
Rating Bar
Cusstom Button
-
复制图片到 res/drawable 目录,这些图片将显示按钮的不同状态。


2. 在res/drawable/目录新建 android_button.xml 插入下面的代码到XML:
<?xml version="1.0" encoding="UTF-8"?>
<selector xmlns:android="http://schemas.android.com/apk/res/android">
<item android:drawable="@drawable/android_pressed"
android:state_pressed="true"/>
<item android:drawable="@drawable/android_focused"
android:state_focused="true"/>
<item android:drawable="@drawable/android_normal"/>
</selector>
以上定义了单个的drawable资源,使用图片来体现按钮的状态改变。第一个<item>定义adnroid_pressed.png 当按钮被按下时显示。第二个<item>定义android_focused.png 当按钮得到焦点时显示。第三个<item>定义android_normal.png 按钮正常状态下显示的图片。
3. 打开 res/layout/main.xml 文件 增加一个button按钮。
<Button
android:id="@+id/button"
android:layout_width="wrap_content"
android:layout_height="wrap_content"
android:padding="10dp"
android:background="@drawable/android_button"
/>
4. 为button在onCreate()方法中添加事件:
@Override
public void onCreate(Bundle savedInstanceState) {
super.onCreate(savedInstanceState);
setContentView(R.layout.main);
final Button button = (Button)findViewById(R.id.button);
button.setOnClickListener(new OnClickListener() {
public void onClick(View v){
//Perform actiononclicks
Toast.makeText(HelloFormStuff.this, "Beep Bop", Toast.LENGTH_SHORT).show();
}
}
);
}
5. 运行应用程序
Edit Text
本节我们将添加 text field 来接受用户的输入,使用EditText控件。一旦用户输入文字按Enter键后将显示出信息。
-
打开res/layout/main.xml 添加如下代码:
<EditText android:id="@+id/edittext" android:layout_width="fill_parent"
android:layout_height="wrap_content" />
2. 为EditText在onCreate()方法中添加键盘事件捕获Enter:
//edit text key listener
final EditText edittext = (EditText)findViewById(R.id.edittext);
edittext.setOnKeyListener(new OnKeyListener(){
public boolean onKey(View v,int keyCode,KeyEvent event){
if((event.getAction()== KeyEvent.ACTION_DOWN)&&
(keyCode== KeyEvent.KEYCODE_ENTER)
){
Toast.makeText(HelloFormStuff.this, edittext.getText(), Toast.LENGTH_SHORT).show();
return true;
}
return false;
}
});
3. 运行应用程序
Checkbox
本节我们创建CheckBox,当CheckBox被选中后,显示CheckBox的状态。
-
打开res/layout/main.xml文件添加CheckBox选项。
<CheckBox android:id="@+id/checkbox" android:layout_width="wrap_content"
android:layout_height="wrap_content" android:text="check it out"/>
2. 在onCreate()方法中为CheckBox添加事件。
//check box listener
final CheckBox checkbox =(CheckBox)findViewById(R.id.checkbox);
checkbox.setOnClickListener(new OnClickListener(){
public void onClick(View v){
//Perform action on clicks. depending on whether it's now checked
if(((CheckBox)v).isChecked()){
Toast.makeText(HelloFormStuff.this, "Selected", Toast.LENGTH_SHORT).show();
}else{
Toast.makeText(HelloFormStuff.this, "Not Selected", Toast.LENGTH_SHORT).show();
}
}
}
);
3. 运行程序。
Radio Buttons
本节我们将创建两个radio buttons ,使用RadioGroup和RadioButton控件。然后显示被选中的radio button的状态。
-
打开 res/layout/main.xml 添加两个RadioButtons 嵌入在RadioGroup中。
<RadioGroup
android:layout_width="fill_parent"
android:layout_height="wrap_content"
android:orientation="vertical">
<RadioButton android:id="@+id/radio_red"
android:layout_width="wrap_content"
android:layout_height="wrap_content"
android:text="Red"/>
<RadioButton android:id="@+id/radio_blue"
android:layout_width="wrap_content"
android:layout_height="wrap_content"
android:text="Blue"/>
</RadioGroup>
2. 为类添加一个OnClickListener成员,处理radiobutton的单击事件。
private OnClickListener radio_listener= new OnClickListener(){
public void onClick(View v){
RadioButton rb=(RadioButton)v;
Toast.makeText(HelloFormStuff.this, rb.getText(),Toast.LENGTH_SHORT).show();
}
};
3. 在onCreate()方法中为radiobutton 添加侦听事件。
// radio button listener
final RadioButton radio_red = (RadioButton)findViewById(R.id.radio_red);
final RadioButton radio_blue= (RadioButton)findViewById(R.id.radio_blue);
radio_red.setOnClickListener(radio_listener);
radio_blue.setOnClickListener(radio_listener);
4. 运行程序。
Toggle Button
在本节我们将创建 toggle button(开关按钮)使用ToggleButton控件。
-
打开res/layout/main.xml 添加ToggleButton节。
<ToggleButton android:id="@+id/togglebutton"
android:layout_width="wrap_content"
android:layout_height="wrap_content"
android:textOn="Vibrate on"
android:textOff="Vibrate off"/>
2. 在onCreate()方法中添加事件。
//Toggle button listener
final ToggleButton togglebutton = (ToggleButton)findViewById(R.id.togglebutton);
togglebutton.setOnClickListener(new OnClickListener(){
public void onClick(View v){
if(togglebutton.isChecked()){
Toast.makeText(HelloFormStuff.this, "Checked", Toast.LENGTH_SHORT).show();
}else{
Toast.makeText(HelloFormStuff.this, "Not checked", Toast.LENGTH_SHORT).show();
}
}
}
);
3. 运行程序。
Rating Bar
本节我们将创建Rating Bar 评价工具栏,使用RatingBar控件。
-
res/layout/main.xml 添加 RatingBar节。
<RatingBar android:id="@+id/ratingbar"
android:layout_width="wrap_content"
android:layout_height="wrap_content"
android:numStars="5"
android:stepSize="1.0"/>
2. 为RatingBar添加事件。
//RatingBar listener
final RatingBar ratingbar =(RatingBar)findViewById(R.id.ratingbar);
ratingbar.setOnRatingBarChangeListener(new OnRatingBarChangeListener(){
@Override
public void onRatingChanged(RatingBar ratingBar, float rating,
boolean fromUser) {
Toast.makeText(HelloFormStuff.this, "NewRating: "+rating, Toast.LENGTH_SHORT).show();
}
}
);
3. 运行程序。
最终的应用程序运行状态。

author: im@xingquan.org


