
3. Android Basic Hello World
本演练演示,输出Hello,World字符串到Android系统屏幕。
搭建Android开发环境 是本演练的前提条件
依照惯例我们将创建Hello,World。程序。
开发平台的安装
创建AVD(Android Virtual Device)
To create an AVD:
1.In Eclipse, choose Window > Android SDK and AVD Manager.
2.Select Virtual Devices in the left panel.
3.Click New.
The Create New AVD dialog appears.
4.Type the name of the AVD, such as "my_avd".
5.Choose a target. The target is the platform (that is, the version of the Android SDK, such as 2.1) you want to run on the emulator.
You can ignore the rest of the fields for now.
6.Click Create AVD.
创建一个新的项目
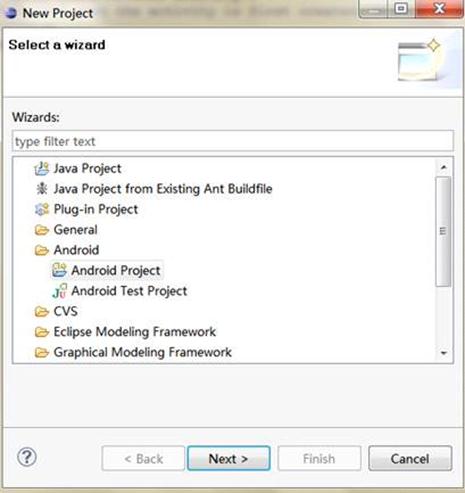
1. 从Eclipse,选择 File > New > Project
如果插件安装正确的话,会看见一个Android文件夹,包含 Android Project 和 Android Test Project。
2.Select "Android Project" and click Next.
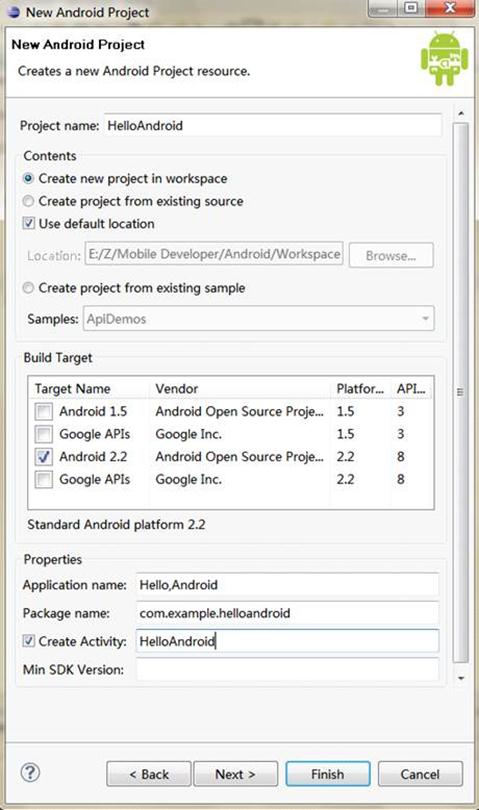
3. Fill in the project details with the following values:
- Project name: HelloAndroid
- Application name: Hello, Android
- Package name: com.example.helloandroid (or your own private namespace)
- Create Activity: HelloAndroid
Click Finish.
Here is a description of each field:
Project Name
项目名称.
Application Name
应用程序的名称,这个名称将会出现在你的Android的设备上
Package Name
包名称,和java概念一样。
Create Activity
创建Activety的子类。Activity可以用来创建用户界面。
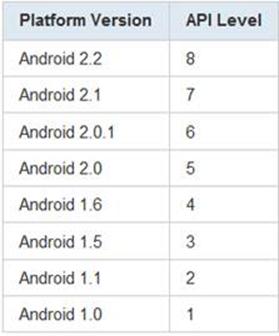
Min SDK Version
此值指定应用程序所需的最小api水平。具体查看 Android API Levels.
"Build Target" 选择目标平台
Your Android project is now ready. It should be visible in the Package Explorer on the left. Open the HelloAndroid.java file, located inside HelloAndroid > src > com.example.helloandroid). It should look like this:
package com.example.helloandroid;
import android.app.Activity;
import android.os.Bundle;
public class HelloAndroid extends Activity {
/** Called when the activity is first created. */
@Override
public void onCreate(Bundle savedInstanceState) {
super.onCreate(savedInstanceState);
setContentView(R.layout.main);
}
}
现在修改一下代码
package com.example.helloandroid;
import android.app.Activity;
import android.os.Bundle;
import android.widget.TextView;
public class HelloAndroid extends Activity {
/** Called when the activity is first created. */
@Override
public void onCreate(Bundle savedInstanceState) {
super.onCreate(savedInstanceState);
TextView tv = new TextView(this);
tv.setText("Hello, Android");
setContentView(tv);
}
}
上面的代码创建了一个TextView类,他的构造函数接受Context Instance。Context可以提供服务如,访问数据库,资源文件等。Activity继承自Context,所以HelloAndroid也具备了这些功能。
下一步使用setText()定义text的内容。
最后将TextView类的实例传递给setContentView(),将TextView显示在UI上。 如果不调用这个方法UI将显示一个空的屏幕。
运行应用程序
1. 选择 Run->Run.
2. 选择 "Android Application".
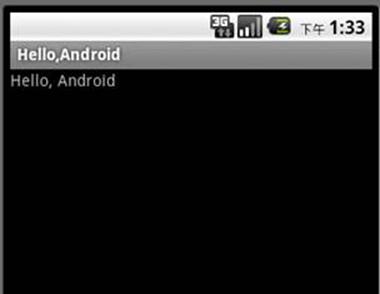
"Hello,Android" 程序运行后将看到一个灰色的工具栏标题。工具栏由Eclipse plugin自动创建。
the string is defined in the res/values/strings.xml file and referenced by your AndroidManifest.xml file
在XML文件中配置UI
Hello,Android程序使用了程序的方式来生成UI,这种方法有事很麻烦,很可能小的布局改动会带来大的调整。浪费时间调试程序。
所以,Android提供了一种UI配置模型:基于XML的UI配置文件。这就是说我们的界面就可以用xml的方式来描述。
下面是一个例子
<?xml version="1.0" encoding="utf-8"?>
<TextView xmlns:android="http://schemas.android.com/apk/res/android"
android:id="@+id/textview"
android:layout_width="fill_parent"
android:layout_height="wrap_content"
android:text="@string/hello"
/>
在这个例子中只有一个View Element TextView, 他有5个属性,下面使他们的说明:
xmlns:android 一个xml的命名空间声明,最外层标签必须有此属性。
android:id 控件的id,可以再代码中引用。
android:layout_width 定义控件在屏幕中的宽度
android:layout_height 定义控件在屏幕中的宽度
android:text 控件显示的文字
xml的Layout文件在 res/layout目录中。 res 是资源文件,包含应用程序的非代码文件,例如图像,声音等。
1. 开发插件自动为我们创建了 main.xml 的布局文件。打开main.xml 使用下面的代码替换。
2. 打开strings.xml 它位于res/values文件夹下,strings.xml文件保存所以文本字符串定义。
<?xml version="1.0" encoding="utf-8"?>
<resources>
<string name="hello">Hello World, 我是字符串资源!</string>
<string name="app_name">Hello,Android程序</string>
</resources>
打开HelloAndroid类文件,使用xml layout,修改代码如下:
package com.example.helloandroid;
import android.app.Activity;
import android.os.Bundle;
public class HelloAndroid extends Activity {
/** Called when the activity is first created. */
@Override
public void onCreate(Bundle savedInstanceState) {
super.onCreate(savedInstanceState);
setContentView(R.layout.main);
}
}
在这里使用布局的资源来代替传递给setContentView的参数。 资源定义在 R.layout.main,这个是有编译器自动生成的。
Now re-run your application — because you've created a launch configuration, all you need to do is click the green arrow icon to run, or select Run > Run History > Android Activity
提示:也可以使用Ctrl-F11启动应用程序。
R.java 实际是索引所用的资源文件。
Debug Your Project
1.设置断点,Debug启动。

