【wangeditor】富文本的使用
1. 富文本组件
 1 <template>
 2   <div class="wangEditor">
 3 // 工具栏
 4     <div :id="editorId" ref="toolbar" class="wangEditor-toolbar"></div>
 5 // 输入部分
 6     <div ref="wangEditor" class="wangEditor-text"></div>
 7 // 手动添加的清空按钮
 8     <!--    <span class="wangEditor-deleteIcon el-icon-circle-close" @click="reset"></span>-->
 9   </div>
10 </template>
  1 <script>
  2   import E from 'wangeditor'
  3
  4   export default {
  5     name: 'RichEditor',
  6     componentName: 'richEditor',
  7     props: {
  8       value: {
  9         type: String,
 10         default: ''
 11       },
 12       editorId: {
 13         type: String,
 14         default: ''
 15       },
 16       disableTag: {
 17         type: Boolean,
 18         default: false
 19       }
 20     },
 21     data () {
 22       return {
 23         editor: null,
 24         info_: null
 25       }
 26     },
 27     watch: {
 28       value: function(value) {
 29         const vm = this;
 30         if (value !== this.editor.txt.html()) {
 31           vm.editor.txt.html(vm.value)
 32         }
 33         vm.$emit('change', value)
 34       }
 35     },
 36     mounted () {
 37       this.setEditor(this.editorId);
 38       // this.editor.txt.html(this.value)
 39     },
 40     methods: {
 41       setEditor (id) {
 42         const vm = this;
 43         vm.editor = new E(vm.$refs.toolbar, vm.$refs.wangEditor);
 44         // 配置菜单
 45         vm.editor.customConfig.menus = [
 46           'link' // 插入链接
 47         ];
 48         vm.editor.customConfig.zIndex = 10;
 49         // 焦点和失焦时候,工具栏的显示与隐藏
 50         const toolbar = document.getElementById(id);
 51         vm.editor.customConfig.onfocus = function () {
 52           setTimeout(() => {
 53             // console.log('???', toolbar.nextSibling.nextSibling);
 54             toolbar.style.display = 'block';
 55             toolbar.nextSibling.nextSibling.style.borderColor = '#1c61fc'
 56           }, 100);
 57         };
 58         vm.editor.customConfig.onblur = function () {
 59           setTimeout(() => {
 60             toolbar.style.display = 'none';
 61             // 将当前页面的所有富文本处理,第一个边框为灰色,其他的边框都无色 (设计需要,存在多层级效果)
 62             const richDom = document.getElementsByClassName('wangEditor')
 63             // console.log(document.getElementsByClassName('wangEditor'));
 64             for (var i = 0; i < richDom.length; i++) {
 65               if (i === 0) {
 66                 richDom[i].lastChild.style.borderColor = '#cdcdcd'
 67               } else {
 68                 richDom[i].lastChild.style.borderColor = 'transparent'
 69               }
 70             }
 71           }, 100);
 72         };
 73         vm.editor.customConfig.onchange = (html) => {
 74           vm.info_ = html; // 绑定当前组件的值
 75           vm.$emit('change', vm.info_); // 将内容同步到父组件中
 76         };
 77         const ED = new E('.wangEditor')
 78         ED.customConfig.zIndex = 100
 79
 80         // 创建富文本编辑器
 81         vm.editor.create();
 82         vm.editor.selection.getSelectionText();
 83         vm.editor.txt.html(vm.value);
 84         // 启用与禁用
 85         if (vm.disableTag) {
 86           vm.editor.$textElem.attr('contenteditable', false)
 87         } else {
 88           vm.editor.$textElem.attr('contenteditable', true)
 89         }
 90         // 启用与禁用时的文字颜色
 91         const editorDom = document.getElementsByClassName('w-e-text')
 92         for (var i = 0; i < editorDom.length; i++) {
 93           // console.log(editorDom[i].contentEditable);
 94           if (editorDom[i].contentEditable === 'false') {
 95             editorDom[i].style.color = '#C0C4CC'
 96           } else {
 97             editorDom[i].style.color = '#606266'
 98           }
 99         }
100       },
101       // 清空内容
102       reset () {
103         this.editor.txt.clear();
104         this.$emit('change', '')
105       }
106     }
107   }
108 </script>
<style lang="less" scoped>
  @import './richEditor';
</style>
2.  父组件的使用
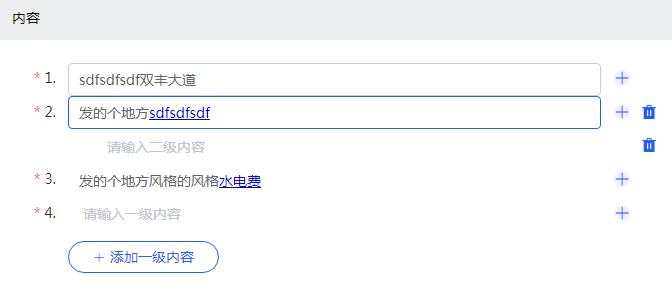
 1 <el-form-item
 2   v-for="(item, index) in projForm.productInsurance"
 3   :key="item.key"
 4   class="hasTwoLevel hasEditor"
 5   :class="index!==0 ? 'hasNoPad' : ''"
 6   :label="index + 1 + '.'"
 7   :prop="'productInsurance.' + index + '.oneInsuranceContent'"
 8 >
 9   <RichEditor
10     :editor-id="item.linkSpanId"
11     :value="item.oneInsuranceContent"
12     :disable-tag="getLookInfo"
13     placeholder="请输入一级内容"
14     @change="val => {getTxt(val, item)}"
15   ></RichEditor>
16   <!--添加二级按钮-->
17   <el-tooltip popper-class="el-tooltip__change" effect="dark" content="添加二级内容" placement="top">
18     <el-button class="addIcon el-icon-plus" @click.prevent="addSubInput(item, index)" />
19   </el-tooltip>
20   <!--删除一级按钮-->
21   <el-button v-if="index!==0" class="deleteIcon el-icon-delete-solid" @click.prevent="removeInput(item)" />
22   <el-form-item
23     v-for="(item1, index1) in item.twoInsuranceContentList"
24     :key="item1.key"
25     class="subItem noEditor hasNoPad"
26     label=""
27     :prop="'productInsurance.' + index + '.twoInsuranceContentList.' + index1 + '.twoInsuranceContent'"
28   >
29     <RichEditor
30       :editor-id="item1.linkSpanId"
31       :value="item1.twoInsuranceContent"
32       :disable-tag="getLookInfo"
33       placeholder="请输入二级内容"
34       @change="val => {getSubTxt(val, item1)}"
35     ></RichEditor>
36     <el-button class="deleteIcon deleteIcon-sub el-icon-delete-solid" @click.prevent="removeSubInput(item1, index)" />
37   </el-form-item>
38 </el-form-item>
39 <el-form-item class="addBtn">
40   <el-button class="el-icon-plus" @click="addInput">添加一级内容</el-button>
41 </el-form-item>
详解:
1.实现的效果: 点击输入框,显示‘添加超链接按钮’,失焦消失
2.在每次添加输入框的时候,会添加一个对应的linkSpanId,传给富文本组件,以使得可以找到相对应的富文本
projForm: {
  productInsurance: [{
    oneInsuranceContent: '',
    twoInsuranceContentList: [],
    linkSpanId: 'linkSpan' + Date.now()
  }]
}
3.父组件获取子组件的值,改、该值为html标签
getTxt (val, item) {
  item.oneInsuranceContent = val
},
getSubTxt (val, item) {
  item.twoInsuranceContent = val
},
*******如果输入框有默认的值得话,也应当为标签,否则初始化数据回显的时候,光标会在新的一行
vm.introBox = [{
  areaCode: '00000000',
  contentList: [{
    oneInsuranceContent: '<p>支付成功后,如需退保或修改保单信息,请您于保险生效日期前前往营业厅办理</p>',
    twoInsuranceContentList: [],
    linkSpanId: 'linkSpan' + Date.now()
  }]
}]
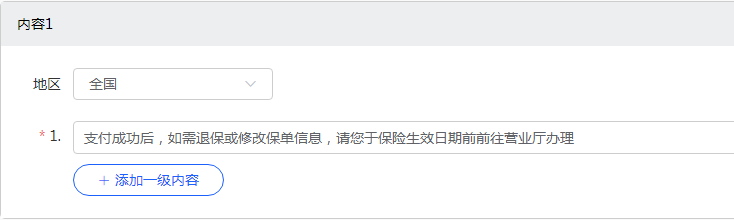
3. 实现的效果

 浙公网安备 33010602011771号