

linux设备驱动(19)设备树详解3-u-boot传输dts
1 传递dtb给内核
对于传统bootloader提供两种工作模式:一是启动加载模式(start loading),一是下载模式(downloading)
工作在启动加载模式时,bootloader会自动执行bootcmd命令,
比如:bootcmd=“nand read 0x100000 0x80000000 0x300000; bootm 0x80000000”
uboot首先把内核镜像拷贝到内存地址为0x80000000的地方,然后执行bootm 0x80000000命令。
bootm命令实际上调用的是do_bootm_linux函数:
theKernel (0,bd->bi_arch_number, bd->bi_boot_params);
r0,r1,r2三个寄存器的设置
r0一般设置为0;
r1一般设置为machine id (在使用设备树时该参数没有被使用);是让内核知道是哪个CPU,从而调用对应的初始化函数
r2一般设置ATAGS或DTB的开始地址;
以前没有使用设备树时,需要bootloader传一个machine id给内核,内核启动的时候会根据这个machine_id来比较内核machine_desc(机器描述结构体)中的.nr,如果相等,就选中了对应的machine_desc(机器描述结构体)),然后调用machine_desc(机器描述结构体)中的.init(初始化函数)。现在使用设备树的话,这个参数就不需要设置了。
对于我们拿到一个新的bootloader,我们怎么能使代码支持dtb模式,我们需要配置#define CONFIG_OF_LIBFDT,可让u-boot支持内核设备树dts,加载命令如下:
  bootm <uImage_addr> <initrd_addr> <dtb_addr>
//bootm + uImage地址 + ramdisk地址 + 设备树镜像地址
如:
1 //1. 下载内核uImage到内存0x30007FC0
2 tftp 0x30007FC0 uImage
3 //2. 下载dtb到内存32000000
4 tftp 0x30001000 s3c2440-smdk2440.dtb
5 //3. - 表示不使用ramdisk加载,如果使用ramdisk则提供其加载地址
6  bootm 0x30007FC0 - 0x30001000
对于我们下载dtb的地址0x32000000,这个地址有什么要求呢?是随意选的地址就可以,还是要遵循什么原则呢?
(1)不要破坏u-boot本身
(2)不要破坏内核本身: 内核本身的空间不能占用, 内核要用到的内存区域也不能占用
对于该问题,我们拿了一块2440的地址空间分配图来说明该问题。
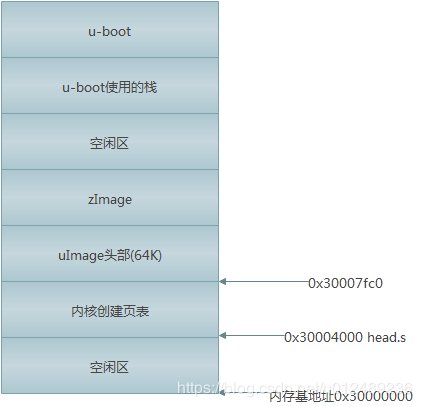
对于dtb的存放,只能存放在空闲区,并且不能与其他区有重合的地方。
2 fdt命令查看设备树
如果修改设备树中的led设备引脚,有两种办法:
(1)修改dts文件,重新编译得到dtb并上传烧写
(2)使用uboot提供的一些命令来修改dtb文件,修改后再把它保存到板子上,以后就使用这个修改后的dtb文件移动值,也就是通过memmove处理
对于u-boot提供了fdt的相关命令
 1 "addr [-c]  <addr> [<length>]   - Set the [control] fdt location to <addr>\n"
 2     "fdt move   <fdt> <newaddr> <length> - Copy the fdt to <addr> and make it active\n"
 3     "fdt resize [<extrasize>]            - Resize fdt to size + padding to 4k addr + some optional <extrasize> if needed\n"
 4     "fdt print  <path> [<prop>]          - Recursive print starting at <path>\n"
 5     "fdt list   <path> [<prop>]          - Print one level starting at <path>\n"
 6     "fdt get value <var> <path> <prop>   - Get <property> and store in <var>\n"
 7     "fdt get name <var> <path> <index>   - Get name of node <index> and store in <var>\n"
 8     "fdt get addr <var> <path> <prop>    - Get start address of <property> and store in <var>\n"
 9     "fdt get size <var> <path> [<prop>]  - Get size of [<property>] or num nodes and store in <var>\n"
10     "fdt set    <path> <prop> [<val>]    - Set <property> [to <val>]\n"
11     "fdt mknode <path> <node>            - Create a new node after <path>\n"
12     "fdt rm     <path> [<prop>]          - Delete the node or <property>\n"
13     "fdt header                          - Display header info\n"
14     "fdt bootcpu <id>                    - Set boot cpuid\n"
15     "fdt memory <addr> <size>            - Add/Update memory node\n"
16     "fdt rsvmem print                    - Show current mem reserves\n"
17     "fdt rsvmem add <addr> <size>        - Add a mem reserve\n"
18     "fdt rsvmem delete <index>           - Delete a mem reserves\n"
19     "fdt chosen [<start> <end>]          - Add/update the /chosen branch in the tree\n"
20     "                                        <start>/<end> - initrd start/end addr\n"
实例
1 nand read.jffs2 32000000 device_tree      // 从flash读出dtb文件到内存(0x32000000)
2 fdt addr 32000000                                      // 告诉fdt, dtb文件在哪
3 fdt print /led pin                                           // 打印/led节点的pin属性
4 fdt get value XXX /led pin                           // 读取/led节点的pin属性, 并且赋给环境变量XXX
5 print XXX                                                    // 打印环境变量XXX的值
6 fdt set /led pin <0x00050005>                     // 设置/led节点的pin属性
7 fdt print /led pin                                            // 打印/led节点的pin属性
8 nand erase device_tree                              // 擦除flash分区
9 nand write.jffs2 32000000 device_tree      // 把修改后的dtb文件写入flash分区
3 u-boot对dtb的支持
dtb可以以两种形式编译到uboot的镜像中
(1)dtb和uboot的bin文件分离
现在的uboot已经做得和kernel很像,最主要的一点是,uboot也使用了dtb的方法,将设备树和代码分离开来(当然可以通过宏来控制)。
1 CONFIG_OF_CONTROL=y
2 // 用于表示是否使用了dtb的方式
3
4 CONFIG_OF_SEPARATE=y
5 // 是否将dtb和uboot分离表一
(2)dtb集成到uboot的bin文件内部;
(3)通过fdtcontroladdr环境变量来指定dtb的地址.
4 u-boot如何获取dtb
在uboot初始化过程中,需要对dtb做两个操作:
(1)获取dtb的地址,并且验证dtb的合法性
(2)根据你编译的是集成还是分离,如果是集成的话,需要为dtb预留内存空间并进行relocate
(3)重新获取一次dtb的地址,bootm传递给内核
4.1 获取dtb的地址,并且验证dtb的合法性
在系统起来的时候,进行一串的初始化函数中,fdtdec_setup会对dtb进行合法性验证
1 static const init_fnc_t init_sequence_f[] = {
2 ...
3     setup_mon_len,
4 #ifdef CONFIG_OF_CONTROL
5     fdtdec_setup,
6 #endif
7     reserve_fdt,
8 ...
9 }
对应代码如下: lib/fdtdec.c
 1 int fdtdec_setup(void)
 2 {
 3 #if CONFIG_IS_ENABLED(OF_CONTROL)
 4 # ifdef CONFIG_OF_EMBED
 5     /* Get a pointer to the FDT */
 6 // 1. 当使用CONFIG_OF_EMBED的方式时,也就是dtb集成到uboot的bin文件中时,通过__dtb_dt_begin符号来获取dtb地址
 7     gd->fdt_blob = __dtb_dt_begin;
 8 # elif defined CONFIG_OF_SEPARATE
 9 #  ifdef CONFIG_SPL_BUILD
10     /* FDT is at end of BSS unless it is in a different memory region */
11     if (IS_ENABLED(CONFIG_SPL_SEPARATE_BSS))
12         gd->fdt_blob = (ulong *)&_image_binary_end;
13     else
14         gd->fdt_blob = (ulong *)&__bss_end;
15
16 #  elif defined CONFIG_FIT_EMBED
17     gd->fdt_blob = locate_dtb_in_fit(&_end);
18
19     if (gd->fdt_blob == NULL || gd->fdt_blob <= ((void *)&_end)) {
20         puts("Failed to find proper dtb in embedded FIT Image\n");
21         return -1;
22     }
23
24 #  else
25     /* FDT is at end of image */
26 //2.
27 //当使用CONFIG_OF_SEPARATE的方式时,也就是dtb追加到uboot的bin文件后面时,通过_end符号来获取dtb地址
28     gd->fdt_blob = (ulong *)&_end;
29 #  endif
30 # elif defined(CONFIG_OF_BOARD)
31     /* Allow the board to override the fdt address. */
32     gd->fdt_blob = board_fdt_blob_setup();
33 # elif defined(CONFIG_OF_HOSTFILE)
34     if (sandbox_read_fdt_from_file()) {
35         puts("Failed to read control FDT\n");
36         return -1;
37     }
38 # endif
39 //3. 可以通过环境变量fdtcontroladdr来指定gd->fdt_blob,也就是指定fdt的地址
40 # ifndef CONFIG_SPL_BUILD
41     /* Allow the early environment to override the fdt address */
42     gd->fdt_blob = (void *)env_get_ulong("fdtcontroladdr", 16,
43                         (uintptr_t)gd->fdt_blob);
44 # endif
45 #endif
46     return fdtdec_prepare_fdt();
47 }
该函数主要做了一下几件事情:
(1)对于集成的dtb的u-boot,使用__dtb_dt_begin符号来获取dtb地址,如果是分离式的,通过_end符号来获取dtb地址,同时也支持通过环境参数fdtcontroladdr来配置
(2)然后通过fdtdec_prepare_fdt来对fdt进行合法性检查,判断dtb是否存在,以及是否有四个字节对齐。然后再调用fdt_check_header看看头部是否正常,fdt_check_header主要是检查dtb的magic是否正确
 1 int fdtdec_prepare_fdt(void)
 2 {
 3     if (!gd->fdt_blob || ((uintptr_t)gd->fdt_blob & 3) ||
 4         fdt_check_header(gd->fdt_blob)) {
 5 #ifdef CONFIG_SPL_BUILD
 6         puts("Missing DTB\n");
 7 #else
 8         puts("No valid device tree binary found - please append one to U-Boot binary, use u-boot-dtb.bin or define CONFIG_OF_EMBED. For sandbox, use -d <file.dtb>\n");
 9 # ifdef DEBUG
10         if (gd->fdt_blob) {
11             printf("fdt_blob=%p\n", gd->fdt_blob);
12             print_buffer((ulong)gd->fdt_blob, gd->fdt_blob, 4,
13                      32, 0);
14         }
15 # endif
16 #endif
17         return -1;
18     }
19     return 0;
20 }
4.2 为dtb分配新的内存地址
当使用CONFIG_OF_EMBED方式时,也就是dtb集成在uboot中的时候,relocate uboot过程中也会把dtb一起relocate,所以这里就不需要处理。当为分离式要为该dtb在内存中分配一片空间即可
 1 static int reserve_fdt(void)
 2 {
 3 #ifndef CONFIG_OF_EMBED
 4     /*
 5      * If the device tree is sitting immediately above our image then we
 6      * must relocate it. If it is embedded in the data section, then it
 7      * will be relocated with other data.
 8      */
 9     if (gd->fdt_blob) {
10         gd->fdt_size = ALIGN(fdt_totalsize(gd->fdt_blob) + 0x1000, 32);
11
12         gd->start_addr_sp -= gd->fdt_size;
13         gd->new_fdt = map_sysmem(gd->start_addr_sp, gd->fdt_size);
14         debug("Reserving %lu Bytes for FDT at: %08lx\n",
15               gd->fdt_size, gd->start_addr_sp);
16     }
17 #endif
18
19     return 0;
20 }
21
22 static int reloc_fdt(void)
23 {
24 #ifndef CONFIG_OF_EMBED
25     if (gd->flags & GD_FLG_SKIP_RELOC)
26         return 0;
27     if (gd->new_fdt) {
28         memcpy(gd->new_fdt, gd->fdt_blob, gd->fdt_size);
29         gd->fdt_blob = gd->new_fdt;
30     }
31 #endif
32
33     return 0;
34 }
参考博文:
https://blog.csdn.net/kunkliu/article/details/82707282

