机器学习——宝可梦识别
一、选题背景
神奇宝贝作为1996年于日本发行的Game Boy角色扮演游戏,并由此衍生出动画,陪伴我们度过了童年的美好时光。通过识别上传图片预测精灵名称,使用户更加了解作品,推广作品知名度。并且希望通过这次课设能对机器学习有更好的了解。
二、设计方案
本次机器学习设计具体方案,通过网上收集数据集,在数据集中的文件打上标签,再对数据进行预处理,之后采用keras框架搭建、使用卷积神经网络构建以及训练模型、通过训练和验证准确性以及训练和验证损失图进行分析、最后导入测试图片进行测试。
数据集来源:https://www.heywhale.com/mw/dataset/63535a9d00092f69e1f19336/file
三、实现步骤
1.下载数据集
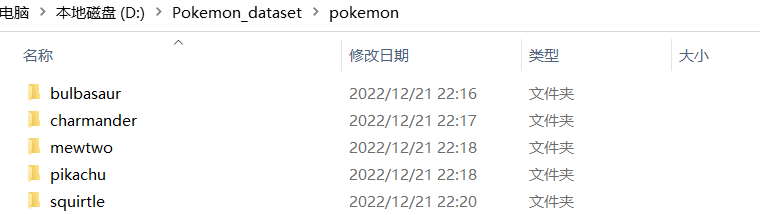
2.数据分析处理
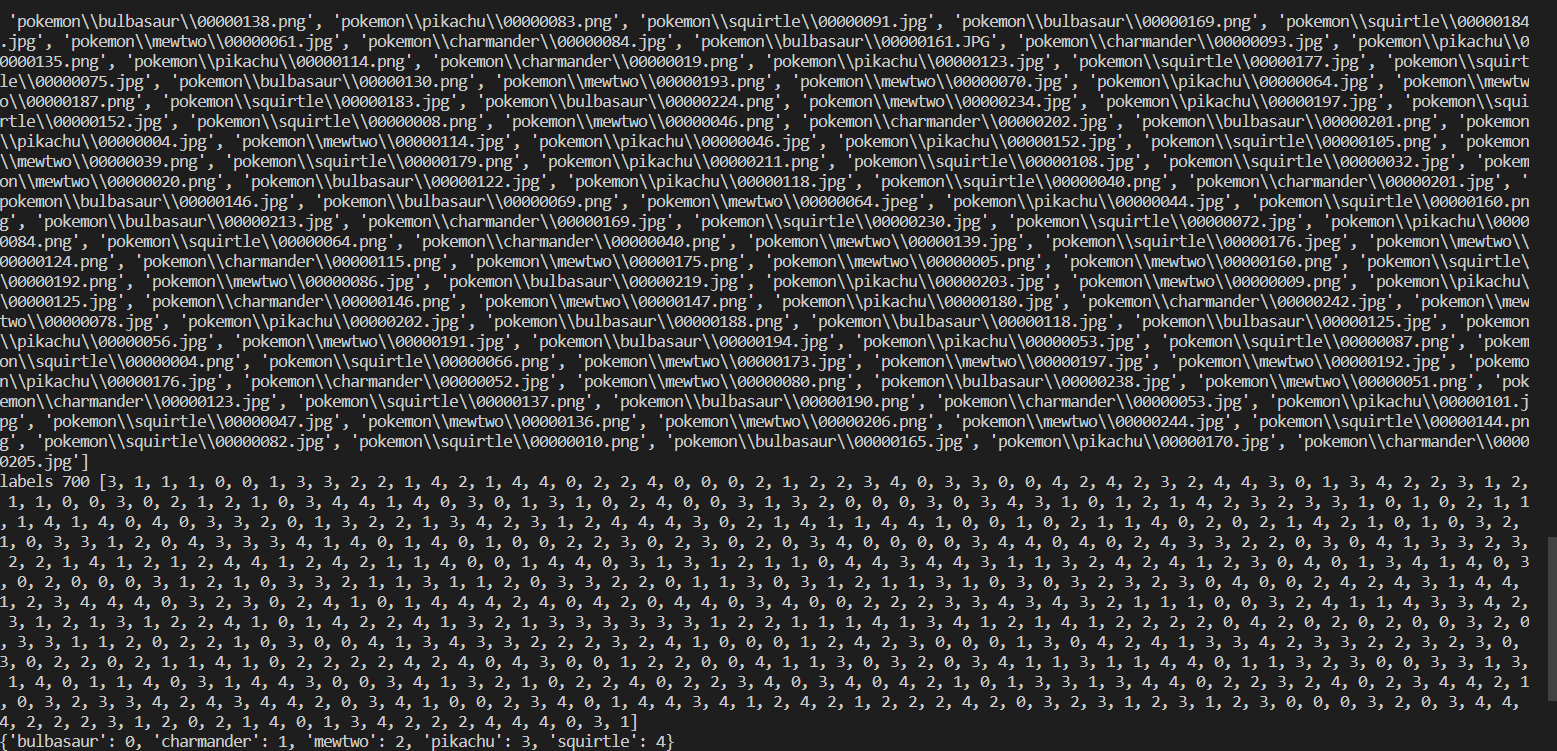
数据集由上千张图片组成,读取图片后缀名,将图片进行编号,并导入csv文件中。
 1 import  os, glob
 2 import  random, csv
 3 import tensorflow as tf
 4
 5 def load_csv(root, filename, name2label):
 6     # root:数据集根目录
 7     # filename:csv文件名
 8     # name2label:类别名编码表
 9
10     if not os.path.exists(os.path.join(root, filename)):
11         images = []
12         for name in name2label.keys():
13             images += glob.glob(os.path.join(root, name, '*.png'))
14             images += glob.glob(os.path.join(root, name, '*.jpg'))
15             images += glob.glob(os.path.join(root, name, '*.jpeg'))
16
17         print(len(images), images)
18
19         random.shuffle(images)
20         with open(os.path.join(root, filename), mode='w', newline='') as f:
21             writer = csv.writer(f)
22             for img in images:
23                 name = img.split(os.sep)[-2]
24                 label = name2label[name]
25                 writer.writerow([img, label])
26             print('written into csv file:', filename)
读取csv文件中的信息
 1 # 从csv文件中读取信息
 2     images, labels = [], []
 3     with open(os.path.join(root, filename)) as f:
 4         reader = csv.reader(f)
 5         for row in reader:
 6             img, label = row
 7             label = int(label)
 8             images.append(img)
 9             labels.append(label)
10
11     assert len(images) == len(labels)
12
13     return images, labels
创建一个空字典'name2label',它将精灵名称映射到标签。遍历目录中的所有文件名。如果文件名对应的是目录(即精灵的名称),则将其添加到'name2label' 字典中,并将其与当前字典中精灵名称的数量一一对应。使用另一个函数 'load_csv'加载存储在目录中的 'images.csv' 文件中的图像和标签。根据指定的mode类型,将图像和标签分成三组:训练集、验证集和测试集。具体来说,如果mode等于 'train',则取出前 60% 的图像和标签;如果mode等于 'val',则取出中间 20% 的图像和标签;如果mode等于 'test',则取出最后 20% 的图像和标签。
 1 def load_pokemon(root, mode='train'):
 2     # 创建数字编码表
 3     name2label = {}
 4     for name in sorted(os.listdir(os.path.join(root))):
 5         if not os.path.isdir(os.path.join(root, name)):
 6             continue
 7         # 给每个类别编码一个数字
 8         name2label[name] = len(name2label.keys())
 9
10     # 读取Label信息
11     # [file1,file2,], [3,1]
12     images, labels = load_csv(root, 'images.csv', name2label)
13
14     if mode == 'train':
15         images = images[:int(0.6 * len(images))]
16         labels = labels[:int(0.6 * len(labels))]
17
18     elif mode == 'val':
19         images = images[int(0.6 * len(images)):int(0.8 * len(images))]
20         labels = labels[int(0.6 * len(labels)):int(0.8 * len(labels))]
21
22     else:
23         images = images[int(0.8 * len(images)):]
24         labels = labels[int(0.8 * len(labels)):]
25
26     return images, labels, name2label
归一化处理
1 #归一化
2 def normalize(x, mean=img_mean, std=img_std):
3     x = (x - mean)/std
4     return x
5
6
7 def denormalize(x, mean=img_mean, std=img_std):
8     x = x * std + mean
9     return x
3.读取训练数据,batchsize根据内存或显卡显存大小决定。
1 batch_size= 256
2 # 训练集
3 images, labels, table = load_pokemon('pokemon',mode='train')
4
5 db_train = tf.data.Dataset.from_tensor_slices((images, labels))
6
7 db_train = db_train.shuffle(1000).map(preprocess).batch(batch_size)
4.读取验证数据。
 1 # 验证集
 2 images2, labels2, table = load_pokemon('pokemon',mode='val')
 3
 4 db_val = tf.data.Dataset.from_tensor_slices((images2, labels2))
 5
 6 db_val = db_val.map(preprocess).batch(batch_size)
 7
 8 images3, labels3, table = load_pokemon('pokemon',mode='test')
 9
10 db_test = tf.data.Dataset.from_tensor_slices((images3, labels3))
11
12 db_test = db_test.map(preprocess).batch(100)
5.数据预处理。
 1 def preprocess(x,y):
 2     # x: 图片的路径,y:图片的数字编码
 3     # 读取图像文件并将其解码为一个3通道的JPEG图像
 4     x = tf.io.read_file(x)
 5     x = tf.image.decode_jpeg(x, channels=3)
 6     # 图像的大小调整为244x244像素,并将图像从左向右随机翻转
 7     x = tf.image.resize(x, [244, 244])
 8     x = tf.image.random_flip_left_right(x)
 9     # 将图像随机裁剪为224x224像素大小
10     x = tf.image.random_crop(x, [224,224,3])
11     # 将图像转换为浮点数据类型,并将其除以255.0进行归一化
12     x = tf.cast(x, dtype=tf.float32) / 255.
13     x = normalize(x)
14     # 将标签 y 转换为张量并进行 one-hot 编码以创建一个5维向量
15     y = tf.convert_to_tensor(y)
16     y = tf.one_hot(y, depth=5)
17     return x, y
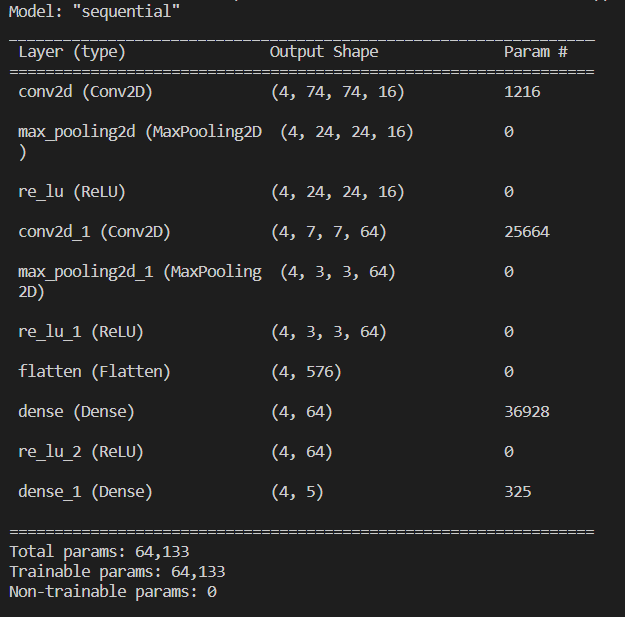
6.构建模型
 1 # 构造网络
 2 network = keras.Sequential([
 3     layers.Conv2D(16,5,3),#第一个卷积层,有16个滤波器,尺寸为5x5,跨度为3
 4     layers.MaxPool2D(3,3),#池化层,大小为3x3,跨度为3
 5     layers.ReLU(),#激活函数
 6     layers.Conv2D(64,5,3),#第二个卷积层,有64个滤波器,尺寸为5x5,跨度为3。
 7     layers.MaxPool2D(2,2),#池化层,大小为2x2,跨度为2
 8     layers.ReLU(),
 9     layers.Flatten(),#将输入层的数据压成一维的数据
10     layers.Dense(64),#全连接层,64个单元
11     layers.ReLU(),
12     layers.Dense(5)#全连接层,有5个单元,它将输出预测的类概率的输入数据。
13 ])
7.模型训练,损失采用交叉熵,使用earlystop防止过拟合。
 1 network.build(input_shape=(4, 224, 224, 3))
 2
 3 network.summary()
 4
 5
 6 # 提前停止训练防止过拟合
 7 early_stopping = EarlyStopping(
 8     monitor='val_accuracy',
 9     min_delta=0.001,
10     patience=5
11 )
12
13
14 # 配置训练器
15 network.compile(optimizer=optimizers.Adam(learning_rate=1e-3),
16                loss=losses.CategoricalCrossentropy(from_logits=True),
17                metrics=['accuracy'])
18
19
20 # 利用生成器训练模型
21 network.fit(db_train,
22             validation_data=db_val,
23             validation_freq=1,
24             epochs=20,
25             callbacks=[early_stopping])
26 network.evaluate(db_test)

8.保存模型。
1 # 保存模型
2 network.save('model.h5')
9.图像读取和预处理。
 1 # 调整图像像素
 2
 3 def preprocess(img):
 4     # 读取图像文件并对其进行解码
 5     img = tf.io.read_file(img)
 6     img = tf.image.decode_jpeg(img, channels=3)
 7     # 将图像调整到固定大小,并在必要时填充
 8     img = tf.image.resize_with_pad(img, 224, 224)
 9     # 随机裁剪图像
10     img = tf.image.random_crop(img, [224,224,3])
11     if random.random() > 0:
12         img = tf.image.random_flip_left_right(img)
13     # 将图像值缩放到范围[0,1]
14     img = tf.cast(img, dtype=tf.float32) / 255.
15     return img
16
17 img = '1.png'
18 x = preprocess(img)
19 x = tf.reshape(x, [1, 224, 224, 3])
10.加载训练模型。
1 # 加载训练模型
2 network = tf.keras.models.load_model('model.h5')
11.预测分类结果及对应概率,这里使用softmax将输出的logits转换为每个分类对应概率。
 1 # 预测分类结果及对应概率
 2 logits = network.predict(x)
 3 # 使用softmax将输出的logits转换为每个分类对应概率
 4 prob = tf.nn.softmax(logits, axis=1)
 5 print(prob)
 6
 7 max_prob_index = np.argmax(prob, axis=-1)[0]
 8 prob = prob.numpy()
 9 max_prob = prob[0][max_prob_index]
10 print(max_prob)
11
12 max_index = np.argmax(logits, axis=-1)[0]
13 name = ['妙蛙种子', '小火龙', '超梦', '皮卡丘', '杰尼龟']
14 print(name[max_index])
15 img = mpimg.imread(img)
16 plt.imshow(img)
17 plt.show()
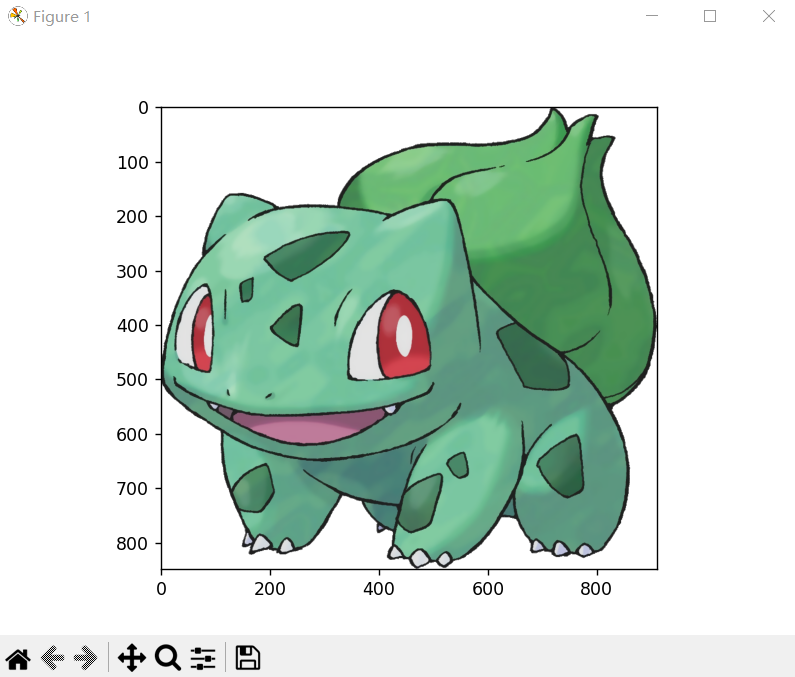
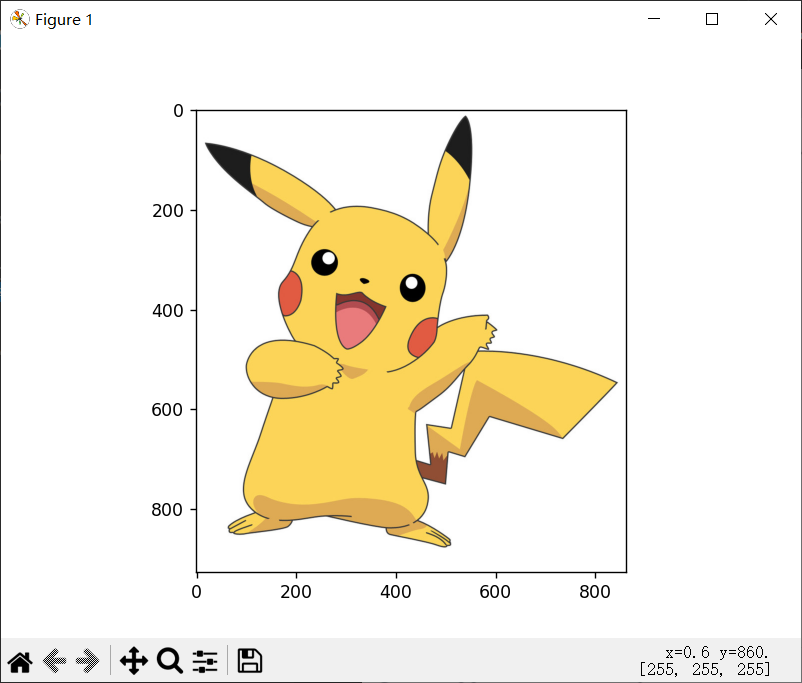
预测使用的图片
预测结果


四、总结
从训练和预测效果上看,在训练集上已经达到了较良好的精度,但是在验证集和测试集上精度有小幅下降。通过预测,可以看出一张很明显的妙蛙种子图像预测概率不高,虽然可以正确分类,但还没有达到比较好拟合状态。可以通过对数据集和模型结构优化来提高预测准确率。为了快速完成训练,这里采用的比较浅的卷积网络,并且由于训练数据太少(总共只有一千多张图像),很难达到比较好的拟合效果,因此可以继续增加数据集以提升精度,也可以用更深层的网络进行训练。通过这次课程设计,使我更加了解了数据分析、构造模型等知识点,为以后设计相关程序奠定了基础。
五、全部代码
  1 import  os, glob
  2 import  random, csv
  3 import tensorflow as tf
  4
  5 def load_csv(root, filename, name2label):
  6     # root:数据集根目录
  7     # filename:csv文件名
  8     # name2label:类别名编码表
  9
 10     if not os.path.exists(os.path.join(root, filename)):
 11         images = []
 12         for name in name2label.keys():
 13             images += glob.glob(os.path.join(root, name, '*.png'))
 14             images += glob.glob(os.path.join(root, name, '*.jpg'))
 15             images += glob.glob(os.path.join(root, name, '*.jpeg'))
 16
 17         print(len(images), images)
 18
 19         random.shuffle(images)
 20         with open(os.path.join(root, filename), mode='w', newline='') as f:
 21             writer = csv.writer(f)
 22             for img in images:
 23                 name = img.split(os.sep)[-2]
 24                 label = name2label[name]
 25                 writer.writerow([img, label])
 26             print('written into csv file:', filename)
 27
 28     # 从csv文件中读取信息
 29     images, labels = [], []
 30     with open(os.path.join(root, filename)) as f:
 31         reader = csv.reader(f)
 32         for row in reader:
 33             img, label = row
 34             label = int(label)
 35             images.append(img)
 36             labels.append(label)
 37
 38     assert len(images) == len(labels)
 39
 40     return images, labels
 41
 42
 43 def load_pokemon(root, mode='train'):
 44     # 创建数字编码表
 45     name2label = {}
 46     for name in sorted(os.listdir(os.path.join(root))):
 47         if not os.path.isdir(os.path.join(root, name)):
 48             continue
 49         # 给每个类别编码一个数字
 50         name2label[name] = len(name2label.keys())
 51
 52     # 读取Label信息
 53     # [file1,file2,], [3,1]
 54     images, labels = load_csv(root, 'images.csv', name2label)
 55
 56     if mode == 'train':
 57         images = images[:int(0.6 * len(images))]
 58         labels = labels[:int(0.6 * len(labels))]
 59
 60     elif mode == 'val':
 61         images = images[int(0.6 * len(images)):int(0.8 * len(images))]
 62         labels = labels[int(0.6 * len(labels)):int(0.8 * len(labels))]
 63
 64     else:
 65         images = images[int(0.8 * len(images)):]
 66         labels = labels[int(0.8 * len(labels)):]
 67
 68     return images, labels, name2label
 69
 70
 71 img_mean = tf.constant([0.485, 0.456, 0.406])
 72
 73 img_std = tf.constant([0.229, 0.224, 0.225])
 74
 75
 76 #归一化
 77 def normalize(x, mean=img_mean, std=img_std):
 78     x = (x - mean)/std
 79     return x
 80
 81
 82 def denormalize(x, mean=img_mean, std=img_std):
 83     x = x * std + mean
 84     return x
 85
 86
 87 def main():
 88     import time
 89     images, labels, table = load_pokemon('pokemon', 'train')
 90     print('images', len(images), images)
 91     print('labels', len(labels), labels)
 92     print(table)
 93
 94
 95 if __name__ == '__main__':
 96     main()
 97
 98
 99 import os
100 import tensorflow as tf
101 import numpy as np
102 from tensorflow import keras
103 from tensorflow.keras import layers, optimizers, losses
104 from tensorflow.keras.callbacks import EarlyStopping
105 from pokemon import load_pokemon, normalize
106
107
108 # 设置随机种子
109 tf.random.set_seed(22)
110
111 np.random.seed(22)
112
113 os.environ['TF_CPP_MIN_LOG_LEVEL'] = '2'
114
115 assert tf.__version__.startswith('2.')
116
117
118 def preprocess(x,y):
119     # x: 图片的路径,y:图片的数字编码
120     # 读取图像文件并将其解码为一个3通道的JPEG图像
121     x = tf.io.read_file(x)
122     x = tf.image.decode_jpeg(x, channels=3)
123
124     # 图像的大小调整为244x244像素,并将图像从左向右随机翻转
125     x = tf.image.resize(x, [244, 244])
126     x = tf.image.random_flip_left_right(x)
127
128     # 将图像随机裁剪为224x224像素大小
129     x = tf.image.random_crop(x, [224,224,3])
130
131     # 将图像转换为浮点数据类型,并将其除以255.0进行归一化
132     x = tf.cast(x, dtype=tf.float32) / 255.
133     x = normalize(x)
134
135     # 将标签 y 转换为张量并进行 one-hot 编码以创建一个5维向量
136     y = tf.convert_to_tensor(y)
137     y = tf.one_hot(y, depth=5)
138
139     return x, y
140
141
142 batch_size= 256
143 # 训练集
144 images, labels, table = load_pokemon('pokemon',mode='train')
145
146 db_train = tf.data.Dataset.from_tensor_slices((images, labels))
147
148 db_train = db_train.shuffle(1000).map(preprocess).batch(batch_size)
149 # 验证集
150 images2, labels2, table = load_pokemon('pokemon',mode='val')
151
152 db_val = tf.data.Dataset.from_tensor_slices((images2, labels2))
153
154 db_val = db_val.map(preprocess).batch(batch_size)
155
156 images3, labels3, table = load_pokemon('pokemon',mode='test')
157
158 db_test = tf.data.Dataset.from_tensor_slices((images3, labels3))
159
160 db_test = db_test.map(preprocess).batch(100)
161
162
163 # 构造网络
164 network = keras.Sequential([
165     layers.Conv2D(16,5,3),
166     layers.MaxPool2D(3,3),
167     layers.ReLU(),
168     layers.Conv2D(64,5,3),
169     layers.MaxPool2D(2,2),
170     layers.ReLU(),
171     layers.Flatten(),
172     layers.Dense(64),
173     layers.ReLU(),
174     layers.Dense(5)
175 ])
176
177 network.build(input_shape=(4, 224, 224, 3))
178
179 network.summary()
180
181
182 # 提前停止训练防止过拟合
183 early_stopping = EarlyStopping(
184     monitor='val_accuracy',
185     min_delta=0.001,
186     patience=5
187 )
188
189
190 # 配置训练器
191 network.compile(optimizer=optimizers.Adam(learning_rate=1e-3),
192                loss=losses.CategoricalCrossentropy(from_logits=True),
193                metrics=['accuracy'])
194
195
196 # 利用生成器训练模型
197 network.fit(db_train,
198             validation_data=db_val,
199             validation_freq=1,
200             epochs=20,
201             callbacks=[early_stopping])
202 network.evaluate(db_test)
203
204
205 # 保存模型
206 network.save('model.h5')
207
208
209 import tensorflow as tf
210 import numpy as np
211 import matplotlib.image as mpimg
212 from matplotlib import pyplot as plt
213 import random
214
215 # 调整图像像素
216
217 def preprocess(img):
218     # 读取图像文件并对其进行解码
219     img = tf.io.read_file(img)
220     img = tf.image.decode_jpeg(img, channels=3)
221     # 将图像调整到固定大小,并在必要时填充
222     img = tf.image.resize_with_pad(img, 224, 224)
223     # 随机裁剪图像
224     img = tf.image.random_crop(img, [224,224,3])
225     if random.random() > 0:
226         img = tf.image.random_flip_left_right(img)
227     # 将图像值缩放到范围[0,1]
228     img = tf.cast(img, dtype=tf.float32) / 255.
229     return img
230
231 img = '1.png'
232 x = preprocess(img)
233 x = tf.reshape(x, [1, 224, 224, 3])
234
235 # 加载训练模型
236 network = tf.keras.models.load_model('model.h5')
237
238 # 预测分类结果及对应概率
239 logits = network.predict(x)
240 # 使用softmax将输出的logits转换为每个分类对应概率
241 prob = tf.nn.softmax(logits, axis=1)
242 print(prob)
243
244 max_prob_index = np.argmax(prob, axis=-1)[0]
245 prob = prob.numpy()
246 max_prob = prob[0][max_prob_index]
247 print(max_prob)
248
249 max_index = np.argmax(logits, axis=-1)[0]
250 name = ['妙蛙种子', '小火龙', '超梦', '皮卡丘', '杰尼龟']
251 print(name[max_index])
252 img = mpimg.imread(img)
253 plt.imshow(img)
254 plt.show()

 浙公网安备 33010602011771号