
Dubbo服务消费过程源码分析(九)
一、服务消费应具备的逻辑
如果要实现服务的消费,大致分以下几个步骤
- 通过@DubboReference注解生成远程服务的代理
- 获得目标服务的url地址
- 实现远程网络通信
- 实现负载均衡
- 实现集群容错
二、服务消费端流程
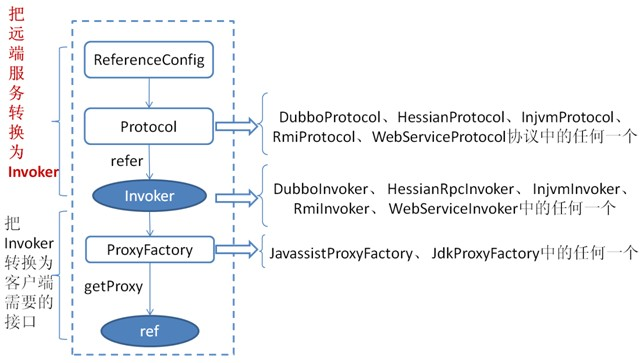
上图中可以看到,服务消费的流程与服务暴露的流程有点类似逆向的。同样,Dubbo 服务也是分为两个大步骤:
第一步就是将远程服务通过Protocol转换成Invoker。
第二步通过动态代理将Invoker转换成消费服务需要的接口。
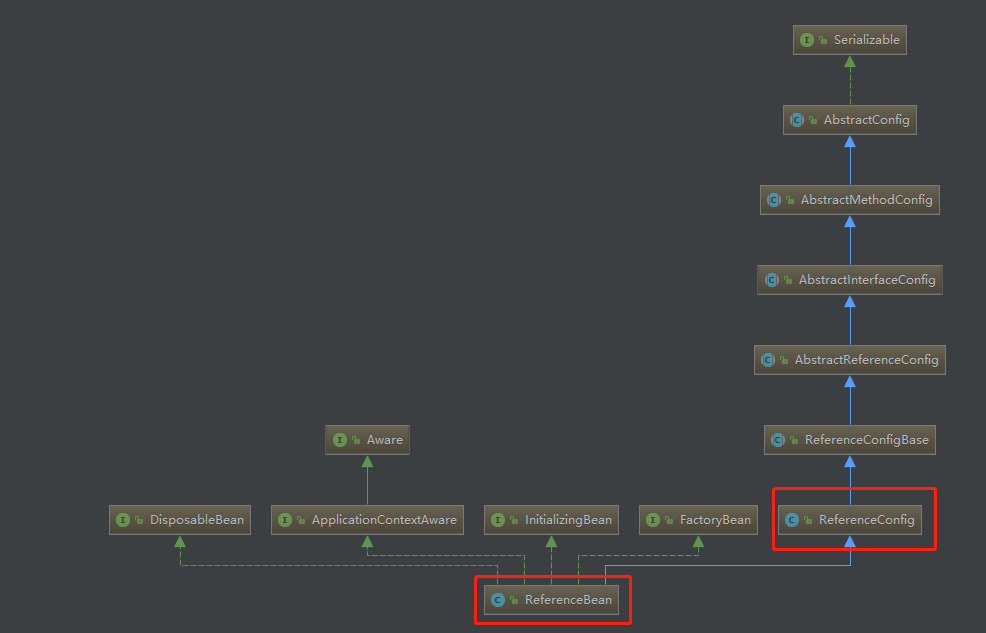
org.apache.dubbo.config.ReferenceConfig类是ReferenceBean的父类,与生产端服务的ServiceBean一样,存放着解析出来的 XML 和注解信息。类关系如下:
三、源码分析
xml的方式现在用的少,现在都是基于注解的方式进行开发,所以在讲切入点时就以注解的方式进行讲解,基于注解的方式无非就是扩展spring里面的东西,如果要扩展肯定是扩展BeanPostProcessor()中进行扩展(BeanPostProcessor是Spring IOC容器给我们提供的一个扩展接口。如果不了解可以先看下),因为最好是在Bean加载完成后去识别@DubboReference中的成员属性。所以接下来要找的就是什么时候进入到了BeanPostProcessor并且他是怎么做的,Dubbo中有个类叫DubboAutoConfiguration,他在里面配置一个自动装配机制。
    @ConditionalOnMissingBean
    @Bean(name = ReferenceAnnotationBeanPostProcessor.BEAN_NAME)
    public ReferenceAnnotationBeanPostProcessor referenceAnnotationBeanPostProcessor() {
        return new ReferenceAnnotationBeanPostProcessor();
    }
进入ReferenceAnnotationBeanPostProcessor类
    public ReferenceAnnotationBeanPostProcessor() {
        super(new Class[]{DubboReference.class, Reference.class, com.alibaba.dubbo.config.annotation.Reference.class});
        this.referenceBeanCache = new ConcurrentHashMap(CACHE_SIZE);
        this.injectedFieldReferenceBeanCache = new ConcurrentHashMap(CACHE_SIZE);
        this.injectedMethodReferenceBeanCache = new ConcurrentHashMap(CACHE_SIZE);
        this.referencedBeanInvocationHandlersCache = new ConcurrentHashMap();
    }
会发现他会把DubboReference、Reference、Reference这三种不同的注解传进来,最终会执行 ReferenceAnnotationBeanPostProcessor 中的重写方法 doGetInjectedBean执行获取依赖的Bean ,也就是实现bean的依赖注入的方法。在这个方法中,主要做两个事情
- 注册一个ReferenceBean到Spring IOC容器中
- 调用 getOrCreateProxy 返回一个动态代理对象
//由父类调用,实例化ReferenceBean
   protected Object doGetInjectedBean(AnnotationAttributes attributes, Object bean, String beanName, Class<?> injectedType, InjectedElement injectedElement) throws Exception {
        //需要注入引用Bean的名字
        String referencedBeanName = this.buildReferencedBeanName(attributes, injectedType);
        String referenceBeanName = this.getReferenceBeanName(attributes, injectedType);
         //初始化ReferenceBean
        ReferenceBean referenceBean = this.buildReferenceBeanIfAbsent(referenceBeanName, attributes, injectedType);
        boolean localServiceBean = this.isLocalServiceBean(referencedBeanName, referenceBean, attributes);
        this.registerReferenceBean(referencedBeanName, referenceBean, attributes, localServiceBean, injectedType);
        this.cacheInjectedReferenceBean(referenceBean, injectedElement);
        return this.getOrCreateProxy(referencedBeanName, referenceBean, localServiceBean, injectedType);
    }
getOrCreateProxy
获取或者创建一个动态代理对象。
    private Object getOrCreateProxy(String referencedBeanName, ReferenceBean referenceBean, boolean localServiceBean, Class<?> serviceInterfaceType) {
        if (localServiceBean) {
            return Proxy.newProxyInstance(this.getClassLoader(), new Class[]{serviceInterfaceType}, this.newReferencedBeanInvocationHandler(referencedBeanName));
        } else {
            this.exportServiceBeanIfNecessary(referencedBeanName);
            return referenceBean.get();
        }
    }
可以看到,最终返回的动态代理对象,是通过referenceBean.get();来获得的。
ReferenceConfig.get
    public synchronized T get() {

        if (destroyed) {
            throw new IllegalStateException("The invoker of ReferenceConfig(" + url + ") has already destroyed!");
        }
        if (ref == null) {
            init();
        }
        //返回的ref是个动态代理对象
        return ref;
    }
init方法
开始调用init方法进行ref也就是代理对象的初始化动作.
- 检查配置信息
- 根据dubbo配置,构建map集合。
- 调用 createProxy 创建动态代理对象
   public synchronized void init() {
        //如果已经初始化,则直接返回
        if (initialized) {
            return;
        }

        if (bootstrap == null) {
            bootstrap = DubboBootstrap.getInstance();
            bootstrap.init();
        }
         //检查配置
        checkAndUpdateSubConfigs();
         //检查本地存根 local与stub
        checkStubAndLocal(interfaceClass);
        ConfigValidationUtils.checkMock(interfaceClass, this);

        Map<String, String> map = new HashMap<String, String>();
        map.put(SIDE_KEY, CONSUMER_SIDE);
        //添加运行时参数
        ReferenceConfigBase.appendRuntimeParameters(map);
        //检查是否为泛化接口
        if (!ProtocolUtils.isGeneric(generic)) {
            //获取版本信息
            String revision = Version.getVersion(interfaceClass, version);
            if (revision != null && revision.length() > 0) {
                map.put(REVISION_KEY, revision);
            }
            //获取接口方法列表,添加到map中
            String[] methods = Wrapper.getWrapper(interfaceClass).getMethodNames();
            if (methods.length == 0) {
                logger.warn("No method found in service interface " + interfaceClass.getName());
                map.put(METHODS_KEY, ANY_VALUE);
            } else {
                map.put(METHODS_KEY, StringUtils.join(new HashSet<String>(Arrays.asList(methods)), COMMA_SEPARATOR));
            }
        }
        //通过class加载配置信息
        map.put(INTERFACE_KEY, interfaceName);
        AbstractConfig.appendParameters(map, getMetrics());
        AbstractConfig.appendParameters(map, getApplication());
        AbstractConfig.appendParameters(map, getModule());
        // remove 'default.' prefix for configs from ConsumerConfig
        // appendParameters(map, consumer, Constants.DEFAULT_KEY);
        AbstractConfig.appendParameters(map, consumer);
        AbstractConfig.appendParameters(map, this);
        //将元数据配置信息放入到map中
        MetadataReportConfig metadataReportConfig = getMetadataReportConfig();
        if (metadataReportConfig != null && metadataReportConfig.isValid()) {
            map.putIfAbsent(METADATA_KEY, REMOTE_METADATA_STORAGE_TYPE);
        }
        //遍历methodConfig,组装method参数信息
        Map<String, AsyncMethodInfo> attributes = null;
        if (CollectionUtils.isNotEmpty(getMethods())) {
            attributes = new HashMap<>();
            for (MethodConfig methodConfig : getMethods()) {
                AbstractConfig.appendParameters(map, methodConfig, methodConfig.getName());
                String retryKey = methodConfig.getName() + ".retry";
                if (map.containsKey(retryKey)) {
                    String retryValue = map.remove(retryKey);
                    if ("false".equals(retryValue)) {
                        map.put(methodConfig.getName() + ".retries", "0");
                    }
                }
                AsyncMethodInfo asyncMethodInfo = AbstractConfig.convertMethodConfig2AsyncInfo(methodConfig);
                if (asyncMethodInfo != null) {
//                    consumerModel.getMethodModel(methodConfig.getName()).addAttribute(ASYNC_KEY, asyncMethodInfo);
                    attributes.put(methodConfig.getName(), asyncMethodInfo);
                }
            }
        }
           //获取服务消费者ip地址
        String hostToRegistry = ConfigUtils.getSystemProperty(DUBBO_IP_TO_REGISTRY);
        if (StringUtils.isEmpty(hostToRegistry)) {
            hostToRegistry = NetUtils.getLocalHost();
        } else if (isInvalidLocalHost(hostToRegistry)) {
            throw new IllegalArgumentException("Specified invalid registry ip from property:" + DUBBO_IP_TO_REGISTRY + ", value:" + hostToRegistry);
        }
        map.put(REGISTER_IP_KEY, hostToRegistry);

        serviceMetadata.getAttachments().putAll(map);
        //跟进
        ref = createProxy(map);

        serviceMetadata.setTarget(ref);
        serviceMetadata.addAttribute(PROXY_CLASS_REF, ref);
        ConsumerModel consumerModel = repository.lookupReferredService(serviceMetadata.getServiceKey());
        consumerModel.setProxyObject(ref);
        consumerModel.init(attributes);

        initialized = true;

        checkInvokerAvailable();

        // dispatch a ReferenceConfigInitializedEvent since 2.7.4
        dispatch(new ReferenceConfigInitializedEvent(this, invoker));
    }
createProxy
创建动态代理对象这个过程中,它可能会有哪些操作步骤?首先我们需要注意一个点,这里是创建一个代理对象,而这个代理对象应该也和协议有关系,也就是不同的协议,使用的代理对象也应该不一样。
接下来分析下下面的代码
- 首先检查是不是本地调用,如果是,则使用injvm protocol的refer方法产生一个InjvmInvoker实例
- 否则,再判断是否是点对点通信,也就是url参数不为空,而url参数又可以配置多个,所以这里需要遍历
- 遍历所有注册中心的url,针对每个注册中心协议构建invoker,并保存到invokers中
- 通过Cluster的StaticDirectory把多个静态注册中心组件成一个集群
    private T createProxy(Map<String, String> map) {
        if (shouldJvmRefer(map)) {
            URL url = new URL(LOCAL_PROTOCOL, LOCALHOST_VALUE, 0, interfaceClass.getName()).addParameters(map);
            invoker = REF_PROTOCOL.refer(interfaceClass, url);
            if (logger.isInfoEnabled()) {
                logger.info("Using injvm service " + interfaceClass.getName());
            }
        } else {
            urls.clear();
            if (url != null && url.length() > 0) { // user specified URL, could be peer-to-peer address, or register center's address.
                String[] us = SEMICOLON_SPLIT_PATTERN.split(url);
                if (us != null && us.length > 0) {
                    for (String u : us) {
                        URL url = URL.valueOf(u);
                        if (StringUtils.isEmpty(url.getPath())) {
                            url = url.setPath(interfaceName);
                        }
                        if (UrlUtils.isRegistry(url)) {
                            urls.add(url.addParameterAndEncoded(REFER_KEY, StringUtils.toQueryString(map)));
                        } else {
                            urls.add(ClusterUtils.mergeUrl(url, map));
                        }
                    }
                }
            } else { // assemble URL from register center's configuration
                // if protocols not injvm checkRegistry
                //检查协议是否是injvm,
                if (!LOCAL_PROTOCOL.equalsIgnoreCase(getProtocol())) {
                    checkRegistry(); //检查注册中心配置
                    //获取注册中心列表,由于可以配置多个注册中心,所以这里返回所有配置的注册中心
                    //信息
                    List<URL> us = ConfigValidationUtils.loadRegistries(this, false);
                    //遍历注册中心列表,添加到urls中。

                    if (CollectionUtils.isNotEmpty(us)) {
                        for (URL u : us) {
                            URL monitorUrl = ConfigValidationUtils.loadMonitor(this, u);
                            if (monitorUrl != null) {
                                map.put(MONITOR_KEY, URL.encode(monitorUrl.toFullString()));
                            }
                            urls.add(u.addParameterAndEncoded(REFER_KEY, StringUtils.toQueryString(map)));
                        }
                    }
                    if (urls.isEmpty()) {
                        throw new IllegalStateException("No such any registry to reference " + interfaceName + " on the consumer " + NetUtils.getLocalHost() + " use dubbo version " + Version.getVersion() + ", please config <dubbo:registry address=\"...\" /> to your spring config.");
                    }
                }
            }
          //如果urls=1,表示只配置了一个注册中心,则直接取一个。
            if (urls.size() == 1) {
                invoker = REF_PROTOCOL.refer(interfaceClass, urls.get(0));
            } else {
                //否则,它会把多个注册中心的协议都分别构建一个invoker。
                List<Invoker<?>> invokers = new ArrayList<Invoker<?>>();
                URL registryURL = null;
                for (URL url : urls) {
                    invokers.add(REF_PROTOCOL.refer(interfaceClass, url));
                    if (UrlUtils.isRegistry(url)) {
                        registryURL = url; // use last registry url
                    }
                }
                //如果registryURL不为空
                //则通过CLUSTER.join把invokers以静态的Directory形式构建一个invoker对象。
                //目的是实现注册中心的路由
                if (registryURL != null) { // registry url is available
                    // for multi-subscription scenario, use 'zone-aware' policy by default
                    String cluster = registryURL.getParameter(CLUSTER_KEY, ZoneAwareCluster.NAME);
                    // The invoker wrap sequence would be: ZoneAwareClusterInvoker(StaticDirectory) -> FailoverClusterInvoker(RegistryDirectory, routing happens here) -> Invoker
                    invoker = Cluster.getCluster(cluster, false).join(new StaticDirectory(registryURL, invokers));
                } else { // not a registry url, must be direct invoke.
                    String cluster = CollectionUtils.isNotEmpty(invokers)
                            ? (invokers.get(0).getUrl() != null ? invokers.get(0).getUrl().getParameter(CLUSTER_KEY, ZoneAwareCluster.NAME) : Cluster.DEFAULT)
                            : Cluster.DEFAULT;
                    invoker = Cluster.getCluster(cluster).join(new StaticDirectory(invokers));
                }
            }
        }

        if (logger.isInfoEnabled()) {
            logger.info("Refer dubbo service " + interfaceClass.getName() + " from url " + invoker.getUrl());
        }
在上面这个方法中,有两个核心的代码需要关注,分别是。
- REF_PROTOCOL.refer, 这个是生成invoker对象,它是一个调用器,是dubbo中比较重要的领域对象,它在这里承担这服务调用的核心逻辑.
- PROXY_FACTORY.getProxy(invoker, ProtocolUtils.isGeneric(generic)), 构建一个代理对象,代理客户端的请求。
REF_PROTOCOL.ref
private static final Protocol REF_PROTOCOL = (Protocol)ExtensionLoader.getExtensionLoader(Protocol.class).getAdaptiveExtension();
RegistryProtocol.refer
- 组装注册中心协议的url
- 判断是否配置了group,如果有,则cluster=getMergeableCluster(),构建invoker
- doRefer构建invoker
    public <T> Invoker<T> refer(Class<T> type, URL url) throws RpcException {
        //获得注册中心的url地址
        // 此时,这里得到的是zookeeper://
        url = getRegistryUrl(url);
        //registryFactory,是一个自适应扩展点,RegistryFactory$Adaptive
        // 定位到org.apache.dubbo.registry.RegistryFactory这个类可以知道,返回的实例是: ZookeeperRegistryFactory,并且是一个被RegistryFactoryWrapper包装的实例
        Registry registry = registryFactory.getRegistry(url);
        if (RegistryService.class.equals(type)) {
            return proxyFactory.getInvoker((T) registry, type, url);
        }

        // group="a,b" or group="*"
        Map<String, String> qs = StringUtils.parseQueryString(url.getParameterAndDecoded(REFER_KEY));
        String group = qs.get(GROUP_KEY);
        if (group != null && group.length() > 0) {
            if ((COMMA_SPLIT_PATTERN.split(group)).length > 1 || "*".equals(group)) {
                return doRefer(Cluster.getCluster(MergeableCluster.NAME), registry, type, url);
            }
        }

        Cluster cluster = Cluster.getCluster(qs.get(CLUSTER_KEY));
        return doRefer(cluster, registry, type, url);
    }
doRefer
    private <T> Invoker<T> doRefer(Cluster cluster, Registry registry, Class<T> type, URL url) {
        //初始化RegistryDirectory
        RegistryDirectory<T> directory = new RegistryDirectory<T>(type, url);
        directory.setRegistry(registry);
        directory.setProtocol(protocol);
        // all attributes of REFER_KEY
        Map<String, String> parameters = new HashMap<String, String>(directory.getConsumerUrl().getParameters());
        //注册consumer://协议url
        URL subscribeUrl = new URL(CONSUMER_PROTOCOL, parameters.remove(REGISTER_IP_KEY), 0, type.getName(), parameters);
        if (directory.isShouldRegister()) {
            //注册服务消费者的url地址
            directory.setRegisteredConsumerUrl(subscribeUrl);
            registry.register(directory.getRegisteredConsumerUrl());
        }
        directory.buildRouterChain(subscribeUrl);
        //进行订阅
        // subscribe订阅信息消费url、通知监听、配置监听、订阅url
        // toSubscribeUrl:订阅信息:category、providers、configurators、routers
        directory.subscribe(toSubscribeUrl(subscribeUrl));
         //一个注册中心会存在多个服务提供者,所以在这里需要把多个服务提供者通过cluster.join合并成 一个
        Invoker<T> invoker = cluster.join(directory);
        List<RegistryProtocolListener> listeners = findRegistryProtocolListeners(url);
        if (CollectionUtils.isEmpty(listeners)) {
            return invoker;
        }
        //通过RegistryInvokerWrapper进行包装
        RegistryInvokerWrapper<T> registryInvokerWrapper = new RegistryInvokerWrapper<>(directory, cluster, invoker);
        for (RegistryProtocolListener listener : listeners) {
            listener.onRefer(this, registryInvokerWrapper);
        }
        return registryInvokerWrapper;
    }
Cluster是什么
Invoker<T> invoker = cluster.join(directory);
public void setCluster(Cluster cluster) { this.cluster = cluster; }
@SPI(Cluster.DEFAULT)
public interface Cluster {
    String DEFAULT = FailoverCluster.NAME;

    /**
     * Merge the directory invokers to a virtual invoker.
     *
     * @param <T>
     * @param directory
     * @return cluster invoker
     * @throws RpcException
     */
    @Adaptive
    <T> Invoker<T> join(Directory<T> directory) throws RpcException;

    static Cluster getCluster(String name) {
        return getCluster(name, true);
    }

    static Cluster getCluster(String name, boolean wrap) {
        if (StringUtils.isEmpty(name)) {
            name = Cluster.DEFAULT;
        }
        return ExtensionLoader.getExtensionLoader(Cluster.class).getExtension(name, wrap);
    }
}
Cluster$Adaptive
 public class Cluster$Adaptive implements org.apache.dubbo.rpc.cluster.Cluster {
 public org.apache.dubbo.rpc.Invoker join(org.apache.dubbo.rpc.cluster.Directory arg0) throws org.apache.dubbo.rpc.RpcException {
 if (arg0 == null) throw new IllegalArgumentException("org.apache.dubbo.rpc.cluster.Directory argument == null");
 if (arg0.getUrl() == null) throw new IllegalArgumentException("org.apache.dubbo.rpc.cluster.Directory argument getUrl() == null");
 org.apache.dubbo.common.URL url = arg0.getUrl();
 String extName = url.getParameter("cluster", "failover");
 if(extName == null) throw new IllegalStateException("Failed to get extension (org.apache.dubbo.rpc.cluster.Cluster) name from url (" + url.toString() + ") use keys([cluster])");
 org.apache.dubbo.rpc.cluster.Cluster extension = (org.apache.dubbo.rpc.cluster.Cluster)ExtensionLoader.getExtensionLoader(org.apa che.dubbo.rpc.cluster.Cluster.class).getExtension(extName); return extension.join(arg0);
 }
 }
cluster.join
    private Cluster cluster;

    public MockClusterWrapper(Cluster cluster) {
        this.cluster = cluster;
    }

    @Override
    public <T> Invoker<T> join(Directory<T> directory) throws RpcException {
        return new MockClusterInvoker<T>(directory,
                this.cluster.join(directory));
    }

}
    @Override
    public <T> Invoker<T> join(Directory<T> directory) throws RpcException {
        return buildClusterInterceptors(doJoin(directory), directory.getUrl().getParameter(REFERENCE_INTERCEPTOR_KEY));
    }
    private <T> Invoker<T> buildClusterInterceptors(AbstractClusterInvoker<T> clusterInvoker, String key) {
        AbstractClusterInvoker<T> last = clusterInvoker;
        //通过激活扩展点来获得ClusterInterceptor集合. 如果没有配置激活参数,默认会有一个 ConsumerContextClusterInterceptor拦截器.
        List<ClusterInterceptor> interceptors = ExtensionLoader.getExtensionLoader(ClusterInterceptor.class).getActivateExtension(clusterInvoker.getUrl(), key);

        if (!interceptors.isEmpty()) {
            //遍历拦截器集合,构建一个拦截器链.
            for (int i = interceptors.size() - 1; i >= 0; i--) {
                final ClusterInterceptor interceptor = interceptors.get(i);
                final AbstractClusterInvoker<T> next = last;
                last = new InterceptorInvokerNode<>(clusterInvoker, interceptor, next);
            }
        }
        //最终返回的last= InterceptorInvokerNode
        // ConsumerContextClusterInterceptor -next- FailoverClusterInvoker
        return last;
    }
context=org.apache.dubbo.rpc.cluster.interceptor.ConsumerContextClusterIntercept or
zone-aware=org.apache.dubbo.rpc.cluster.interceptor.ZoneAwareClusterInterceptor
Cluster.join总结
ReferenceConfifig.createProxy
return (T) PROXY_FACTORY.getProxy(invoker, ProtocolUtils.isGeneric(generic));
import org.apache.dubbo.common.extension.ExtensionLoader;
public class ProxyFactory$Adaptive implements org.apache.dubbo.rpc.ProxyFactory {
public java.lang.Object getProxy(org.apache.dubbo.rpc.Invoker arg0) throws org.apache.dubbo.rpc.RpcException {
 if (arg0 == null)
throw new IllegalArgumentException("org.apache.dubbo.rpc.Invoker argument == null");
if (arg0.getUrl() == null)
throw new IllegalArgumentException("org.apache.dubbo.rpc.Invoker argument getUrl() == null");
 org.apache.dubbo.common.URL url = arg0.getUrl();
 String extName = url.getParameter("proxy", "javassist");
if(extName == null)
throw new IllegalStateException("Failed to get extension (org.apache.dubbo.rpc.ProxyFactory) name from url (" + url.toString() + ") use keys([proxy])");
org.apache.dubbo.rpc.ProxyFactory extension = (org.apache.dubbo.rpc.ProxyFactory)ExtensionLoader.getExtensionLoader(org.apache .dubbo.rpc.ProxyFactory.class).getExtension(extName);
return extension.getProxy(arg0);
}
public java.lang.Object getProxy(org.apache.dubbo.rpc.Invoker arg0, boolean arg1) throws org.apache.dubbo.rpc.RpcException {
if (arg0 == null)
throw new IllegalArgumentException("org.apache.dubbo.rpc.Invoker argument == null");
if (arg0.getUrl() == null)
throw new IllegalArgumentException("org.apache.dubbo.rpc.Invoker argument getUrl() == null");
org.apache.dubbo.common.URL url = arg0.getUrl();
String extName = url.getParameter("proxy", "javassist");
if(extName == null)
throw new IllegalStateException("Failed to get extension (org.apache.dubbo.rpc.ProxyFactory) name from url (" + url.toString() + ") use keys([proxy])");
 org.apache.dubbo.rpc.ProxyFactory extension = (org.apache.dubbo.rpc.ProxyFactory)ExtensionLoader.getExtensionLoader(org.apache .dubbo.rpc.ProxyFactory.class).getExtension(extName);
return extension.getProxy(arg0, arg1);
}
public org.apache.dubbo.rpc.Invoker getInvoker(java.lang.Object arg0, java.lang.Class arg1, org.apache.dubbo.common.URL arg2) throws org.apache.dubbo.rpc.RpcException {
if (arg2 == null) throw new IllegalArgumentException("url == null");
org.apache.dubbo.common.URL url = arg2;
String extName = url.getParameter("proxy", "javassist");
if(extName == null) throw new IllegalStateException("Failed to get extension (org.apache.dubbo.rpc.ProxyFactory) name from url (" + url.toString() + ") use keys([proxy])");
org.apache.dubbo.rpc.ProxyFactory extension = (org.apache.dubbo.rpc.ProxyFactory)ExtensionLoader.getExtensionLoader(org.apache .dubbo.rpc.ProxyFactory.class).getExtension(extName);
return extension.getInvoker(arg0, arg1, arg2);
}
}
JavassistProxyFactory.getProxy
public <T> T getProxy(Invoker<T> invoker, Class<?>[] interfaces) {
    return (T) Proxy.getProxy(interfaces).newInstance(new InvokerInvocationHandler(invoker));
}
proxy.getProxy
proxy = (Proxy) pc.newInstance();

public java.lang.String sayHello(java.lang.String arg0){
 Object[] args = new Object[1];
 args[0] = ($w)$1;
 Object ret = handler.invoke(this, methods[0], args);
 return (java.lang.String)ret;
 }
小结
- 构建一个RegistryDirectory对象
- 生成远程服务的代理
RegistryDirectory
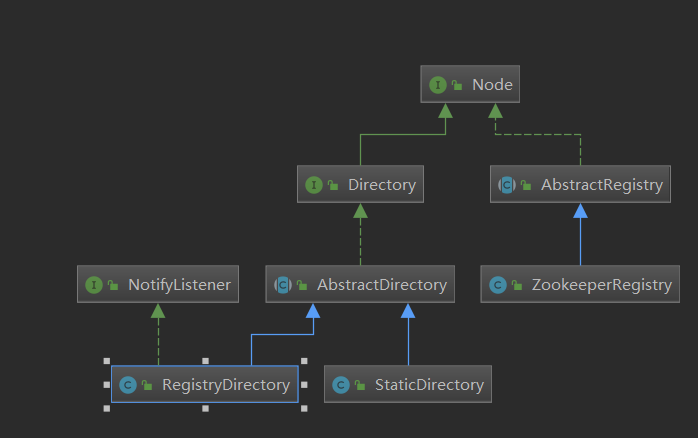
之前在写服务注册发布时提过RegistryProtocol的doRefer这个方法,这个doRefer方法中,构建了一个RegistryDirectory,之前我们不明白Directory的含义,所以暂时没有管,但是它的作用很重要,它负责动态维护服务提供者列表。
 private <T> Invoker<T> doRefer(Cluster cluster, Registry registry, Class<T> type, URL url) {
        //初始化RegistryDirectory
        RegistryDirectory<T> directory = new RegistryDirectory<T>(type, url);
        directory.setRegistry(registry);
        directory.setProtocol(protocol);
        // all attributes of REFER_KEY
        Map<String, String> parameters = new HashMap<String, String>(directory.getConsumerUrl().getParameters());
        //注册consumer://协议url
        URL subscribeUrl = new URL(CONSUMER_PROTOCOL, parameters.remove(REGISTER_IP_KEY), 0, type.getName(), parameters);
        if (directory.isShouldRegister()) {
            //注册服务消费者的url地址
            directory.setRegisteredConsumerUrl(subscribeUrl);
            registry.register(directory.getRegisteredConsumerUrl());
        }
        directory.buildRouterChain(subscribeUrl);
        //进行订阅
        // subscribe订阅信息消费url、通知监听、配置监听、订阅url
        // toSubscribeUrl:订阅信息:category、providers、configurators、routers
        directory.subscribe(toSubscribeUrl(subscribeUrl));
         //一个注册中心会存在多个服务提供者,所以在这里需要把多个服务提供者通过cluster.join合并成 一个
        Invoker<T> invoker = cluster.join(directory);
        List<RegistryProtocolListener> listeners = findRegistryProtocolListeners(url);
        if (CollectionUtils.isEmpty(listeners)) {
            return invoker;
        }
        //通过RegistryInvokerWrapper进行包装
        RegistryInvokerWrapper<T> registryInvokerWrapper = new RegistryInvokerWrapper<>(directory, cluster, invoker);
        for (RegistryProtocolListener listener : listeners) {
            listener.onRefer(this, registryInvokerWrapper);
        }
        return registryInvokerWrapper;
    }
服务目录
RegistryDirectory.subscribe
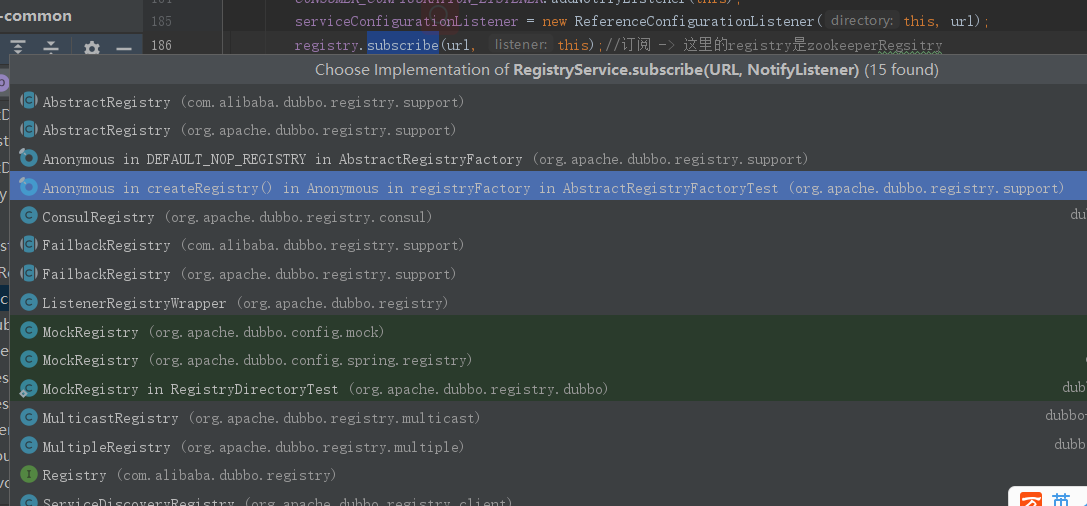
    public void subscribe(URL url) {
        setConsumerUrl(url);
        //把当前RegistryDirectory作为listener,去监听zk上节点的变化
        CONSUMER_CONFIGURATION_LISTENER.addNotifyListener(this);
        serviceConfigurationListener = new ReferenceConfigurationListener(this, url);
        registry.subscribe(url, this);//订阅 -> 这里的registry是zookeeperRegsitry
    }
由于找不到ZookeeperRegistry类,所以找他的父类FailbackRegistry
FailbackRegistry.subscribe
    @Override
    public void subscribe(URL url, NotifyListener listener) {
        super.subscribe(url, listener);
        //移除失效的listener,调用doSubscribe进行订阅
        removeFailedSubscribed(url, listener);
        try {
            // Sending a subscription request to the server side
            // 发送订阅请求到服务端
            doSubscribe(url, listener);
        } catch (Exception e) {
            Throwable t = e;

            List<URL> urls = getCacheUrls(url);
            if (CollectionUtils.isNotEmpty(urls)) {
                notify(url, listener, urls);
                logger.error("Failed to subscribe " + url + ", Using cached list: " + urls + " from cache file: " + getUrl().getParameter(FILE_KEY, System.getProperty("user.home") + "/dubbo-registry-" + url.getHost() + ".cache") + ", cause: " + t.getMessage(), t);
            } else {
                // If the startup detection is opened, the Exception is thrown directly.
                boolean check = getUrl().getParameter(Constants.CHECK_KEY, true)
                        && url.getParameter(Constants.CHECK_KEY, true);
                boolean skipFailback = t instanceof SkipFailbackWrapperException;
                if (check || skipFailback) {
                    if (skipFailback) {
                        t = t.getCause();
                    }
                    throw new IllegalStateException("Failed to subscribe " + url + ", cause: " + t.getMessage(), t);
                } else {
                    logger.error("Failed to subscribe " + url + ", waiting for retry, cause: " + t.getMessage(), t);
                }
            }

            // Record a failed registration request to a failed list, retry regularly
            // 记录失败的注册订阅请求,根据规则进行重试
            addFailedSubscribed(url, listener);
        }
    }
ZookeeperRegistry.doSubscribe
    @Override
    public void doSubscribe(final URL url, final NotifyListener listener) {
        try {
            if (ANY_VALUE.equals(url.getServiceInterface())) {
                //针对所有service层发起的定于
                String root = toRootPath();
                ConcurrentMap<NotifyListener, ChildListener> listeners = zkListeners.computeIfAbsent(url, k -> new ConcurrentHashMap<>());
                ChildListener zkListener = listeners.computeIfAbsent(listener, k -> (parentPath, currentChilds) -> {
                    for (String child : currentChilds) {
                        child = URL.decode(child);
                        if (!anyServices.contains(child)) {
                            anyServices.add(child);
                            subscribe(url.setPath(child).addParameters(INTERFACE_KEY, child,
                                    Constants.CHECK_KEY, String.valueOf(false)), k);
                        }
                    }
                });
                zkClient.create(root, false);
                List<String> services = zkClient.addChildListener(root, zkListener);
                if (CollectionUtils.isNotEmpty(services)) {
                    for (String service : services) {
                        service = URL.decode(service);
                        anyServices.add(service);
                        subscribe(url.setPath(service).addParameters(INTERFACE_KEY, service,
                                Constants.CHECK_KEY, String.valueOf(false)), listener);
                    }
                }
            } else {
                //针对指定的服务地址发起订阅
                // toCategoriesPath 会返回三个结果,分别 是/providers、/configurations、/routers。 也就是服务启动时需要监听这三个节点下的数据变化
                List<URL> urls = new ArrayList<>();
                for (String path : toCategoriesPath(url)) {
                    //构建一个listeners集合,其中key是NotifyListener,其中前面我们知道 RegistryDirectory实现了这个接口,所以这里的key应该是RegistryDirectory
                    // value表示针对这个RegistryDirectory注册的子节点监听。
                    ConcurrentMap<NotifyListener, ChildListener> listeners = zkListeners.computeIfAbsent(url, k -> new ConcurrentHashMap<>());
                    ChildListener zkListener = listeners.computeIfAbsent(listener, k -> (parentPath, currentChilds) -> ZookeeperRegistry.this.notify(url, k, toUrlsWithEmpty(url, parentPath, currentChilds)));
                    zkClient.create(path, false);//创建一个/providers or /configurators、/routers节点
                    List<String> children = zkClient.addChildListener(path, zkListener);
                    if (children != null) {
                        urls.addAll(toUrlsWithEmpty(url, path, children));
                    }
                }
                //调用notify方法触发监听
                notify(url, listener, urls);
            }
        } catch (Throwable e) {
            throw new RpcException("Failed to subscribe " + url + " to zookeeper " + getUrl() + ", cause: " + e.getMessage(), e);
        }
    }
FailbackRegistry.notify
    @Override
    protected void notify(URL url, NotifyListener listener, List<URL> urls) {
        if (url == null) {
            throw new IllegalArgumentException("notify url == null");
        }
        if (listener == null) {
            throw new IllegalArgumentException("notify listener == null");
        }
        try {
            doNotify(url, listener, urls);
        } catch (Exception t) {
            // Record a failed registration request to a failed list, retry regularly
            addFailedNotified(url, listener, urls);
            logger.error("Failed to notify for subscribe " + url + ", waiting for retry, cause: " + t.getMessage(), t);
        }
    }
AbstractRegistry.notify
    protected void notify(URL url, NotifyListener listener, List<URL> urls) {
        if (url == null) {
            throw new IllegalArgumentException("notify url == null");
        }
        if (listener == null) {
            throw new IllegalArgumentException("notify listener == null");
        }
        if ((CollectionUtils.isEmpty(urls))
                && !ANY_VALUE.equals(url.getServiceInterface())) {
            logger.warn("Ignore empty notify urls for subscribe url " + url);
            return;
        }
        if (logger.isInfoEnabled()) {
            logger.info("Notify urls for subscribe url " + url + ", urls: " + urls);
        }
        // keep every provider's category.
        Map<String, List<URL>> result = new HashMap<>();
        for (URL u : urls) {  //urls表示三个empty://协议的地址
            if (UrlUtils.isMatch(url, u)) {
                String category = u.getParameter(CATEGORY_KEY, DEFAULT_CATEGORY);
                List<URL> categoryList = result.computeIfAbsent(category, k -> new ArrayList<>());
                categoryList.add(u);
            }
        }
        if (result.size() == 0) {
            return;
        }
        Map<String, List<URL>> categoryNotified = notified.computeIfAbsent(url, u -> new ConcurrentHashMap<>());
        for (Map.Entry<String, List<URL>> entry : result.entrySet()) {
            String category = entry.getKey();
            List<URL> categoryList = entry.getValue();
            categoryNotified.put(category, categoryList);
            listener.notify(categoryList); //通过listener监听categoryList
            //保存到本地文件中,作为服务地址的缓存信息
            // We will update our cache file after each notification.
            // When our Registry has a subscribe failure due to network jitter, we can return at least the existing cache URL.
            saveProperties(url);
        }
    }
RegistryDirectory.notify
    @Override
    public synchronized void notify(List<URL> urls) {
        //对数据进行过滤。
        Map<String, List<URL>> categoryUrls = urls.stream()
                .filter(Objects::nonNull)
                .filter(this::isValidCategory)
                .filter(this::isNotCompatibleFor26x)
                .collect(Collectors.groupingBy(this::judgeCategory));
         //假设当前进来的通知是 providers节点
        //判断configurator是否为空,这个节点下的配置,是在dubbo-admin控制台上修改配置时,会先 创建一个配置节点到这个路径下,
        // 注册中心收到这个变化时会通知服务消费者,服务消费者会根据新的配置重 新构建Invoker
        List<URL> configuratorURLs = categoryUrls.getOrDefault(CONFIGURATORS_CATEGORY, Collections.emptyList());
        this.configurators = Configurator.toConfigurators(configuratorURLs).orElse(this.configurators);
        //判断路由规则配置是否为空,如果不为空,同样将路由规则添加到url中。
        List<URL> routerURLs = categoryUrls.getOrDefault(ROUTERS_CATEGORY, Collections.emptyList());
        toRouters(routerURLs).ifPresent(this::addRouters);

        // providers
        // providers 得到服务提供者的地址列表
        List<URL> providerURLs = categoryUrls.getOrDefault(PROVIDERS_CATEGORY, Collections.emptyList());
        /**
         * 3.x added for extend URL address
         */
        //获得一个地址监听的激活扩展点。 这里目前应该还没有任何实现,可以先不用管
        ExtensionLoader<AddressListener> addressListenerExtensionLoader = ExtensionLoader.getExtensionLoader(AddressListener.class);
        List<AddressListener> supportedListeners = addressListenerExtensionLoader.getActivateExtension(getUrl(), (String[]) null);
        if (supportedListeners != null && !supportedListeners.isEmpty()) {
            for (AddressListener addressListener : supportedListeners) {
                providerURLs = addressListener.notify(providerURLs, getConsumerUrl(),this);
            }
        }
        refreshOverrideAndInvoker(providerURLs);
    }
refreshOverrideAndInvoker
- 逐个调用注册中心里面的配置,覆盖原来的url,组成最新的url 放入overrideDirectoryUrl 存储,此时我们没有在dubbo-admin中修改任何配置,所以这里没必要去分析
- 根据 provider urls,重新刷新Invoker
    private void refreshOverrideAndInvoker(List<URL> urls) {
        // mock zookeeper://xxx?mock=return null
        //付给DirectoryUrl
        overrideDirectoryUrl();
        //刷新invoker
        refreshInvoker(urls);
    }
refreshInvoker
    private void refreshInvoker(List<URL> invokerUrls) {
        Assert.notNull(invokerUrls, "invokerUrls should not be null");
       //如果只有一个服务提供者,并且如果是空协议,那么这个时候直接返回进制访问,并且销毁所有的 invokers
        if (invokerUrls.size() == 1
                && invokerUrls.get(0) != null
                && EMPTY_PROTOCOL.equals(invokerUrls.get(0).getProtocol())) {
            this.forbidden = true; // Forbid to access
            this.invokers = Collections.emptyList();
            routerChain.setInvokers(this.invokers);
            destroyAllInvokers(); // Close all invokers
        } else {  //第一次初始化的时候,invokerUrls为空
            this.forbidden = false; // Allow to access
            //获取老的invoker集合
            Map<String, Invoker<T>> oldUrlInvokerMap = this.urlInvokerMap; // local reference
            if (invokerUrls == Collections.<URL>emptyList()) {//为null则初始化
                invokerUrls = new ArrayList<>();
            }
            if (invokerUrls.isEmpty() && this.cachedInvokerUrls != null) {
                invokerUrls.addAll(this.cachedInvokerUrls);
            } else {
                this.cachedInvokerUrls = new HashSet<>();
                this.cachedInvokerUrls.addAll(invokerUrls);//Cached invoker urls, convenient for comparison
            }
            if (invokerUrls.isEmpty()) {
                return;
            }
            //把invokerUrls转化为InvokerMap
            Map<String, Invoker<T>> newUrlInvokerMap = toInvokers(invokerUrls);// Translate url list to Invoker map

            /**
             * If the calculation is wrong, it is not processed.
             *
             * 1. The protocol configured by the client is inconsistent with the protocol of the server.
             *    eg: consumer protocol = dubbo, provider only has other protocol services(rest).
             * 2. The registration center is not robust and pushes illegal specification data.
             *
             */
            if (CollectionUtils.isEmptyMap(newUrlInvokerMap)) {
                logger.error(new IllegalStateException("urls to invokers error .invokerUrls.size :" + invokerUrls.size() + ", invoker.size :0. urls :" + invokerUrls
                        .toString()));
                return;
            }
            //转化为list
            List<Invoker<T>> newInvokers = Collections.unmodifiableList(new ArrayList<>(newUrlInvokerMap.values()));
            // pre-route and build cache, notice that route cache should build on original Invoker list.
            // toMergeMethodInvokerMap() will wrap some invokers having different groups, those wrapped invokers not should be routed.
            routerChain.setInvokers(newInvokers);
            //如果服务配置了分组,则把分组下的provider包装成StaticDirectory,组成一个invoker
            // 实际上就是按照group进行合并
            this.invokers = multiGroup ? toMergeInvokerList(newInvokers) : newInvokers;
            this.urlInvokerMap = newUrlInvokerMap;

            try {
                //旧的url 是否在新map里面存在,不存在,就是销毁url对应的Invoker
                destroyUnusedInvokers(oldUrlInvokerMap, newUrlInvokerMap); // Close the unused Invoker
            } catch (Exception e) {
                logger.warn("destroyUnusedInvokers error. ", e);
            }
        }
    }
toInvokers
invoker = new InvokerDelegate<>(protocol.refer(serviceType, url), url, providerUrl);
    private Map<String, Invoker<T>> toInvokers(List<URL> urls) {
        Map<String, Invoker<T>> newUrlInvokerMap = new HashMap<>();
        if (urls == null || urls.isEmpty()) {
            return newUrlInvokerMap;
        }
        Set<String> keys = new HashSet<>();
        String queryProtocols = this.queryMap.get(PROTOCOL_KEY);
        for (URL providerUrl : urls) {
            // If protocol is configured at the reference side, only the matching protocol is selected
            if (queryProtocols != null && queryProtocols.length() > 0) {
                boolean accept = false;
                String[] acceptProtocols = queryProtocols.split(",");
                for (String acceptProtocol : acceptProtocols) {
                    if (providerUrl.getProtocol().equals(acceptProtocol)) {
                        accept = true;
                        break;
                    }
                }
                if (!accept) {
                    continue;
                }
            }
            if (EMPTY_PROTOCOL.equals(providerUrl.getProtocol())) {
                continue;
            }
            if (!ExtensionLoader.getExtensionLoader(Protocol.class).hasExtension(providerUrl.getProtocol())) {
                logger.error(new IllegalStateException("Unsupported protocol " + providerUrl.getProtocol() +
                        " in notified url: " + providerUrl + " from registry " + getUrl().getAddress() +
                        " to consumer " + NetUtils.getLocalHost() + ", supported protocol: " +
                        ExtensionLoader.getExtensionLoader(Protocol.class).getSupportedExtensions()));
                continue;
            }
            URL url = mergeUrl(providerUrl);

            String key = url.toFullString(); // The parameter urls are sorted
            if (keys.contains(key)) { // Repeated url
                continue;
            }
            keys.add(key);
            // Cache key is url that does not merge with consumer side parameters, regardless of how the consumer combines parameters, if the server url changes, then refer again
            Map<String, Invoker<T>> localUrlInvokerMap = this.urlInvokerMap; // local reference
            Invoker<T> invoker = localUrlInvokerMap == null ? null : localUrlInvokerMap.get(key);
            if (invoker == null) { // Not in the cache, refer again
                try {
                    boolean enabled = true;
                    if (url.hasParameter(DISABLED_KEY)) {
                        enabled = !url.getParameter(DISABLED_KEY, false);
                    } else {
                        enabled = url.getParameter(ENABLED_KEY, true);
                    }
                    if (enabled) {
                        invoker = new InvokerDelegate<>(protocol.refer(serviceType, url), url, providerUrl);
                    }
                } catch (Throwable t) {
                    logger.error("Failed to refer invoker for interface:" + serviceType + ",url:(" + url + ")" + t.getMessage(), t);
                }
                if (invoker != null) { // Put new invoker in cache
                    newUrlInvokerMap.put(key, invoker);
                }
            } else {
                newUrlInvokerMap.put(key, invoker);
            }
        }
        keys.clear();
        return newUrlInvokerMap;
    }
总结
- 定于指定注册中心的以下三个路径的子节点变更事件
/dubbo/org.apache.dubbo.demo.DemoService/providers 、/dubbo/org.apache.dubbo.demo.DemoService/configurators、/dubbo/org.apache. dubbo.demo.DemoService/routers
- 触发时间变更之后,把变更的节点信息转化为Invoker
Protocol.refer
invoker = new InvokerDelegate<>(protocol.refer(serviceType, url), url, providerUrl);
- 这个invoker应该和通信有关系
- 那么这里应该会建立一个网络通信的连接
QosProtocolWrapper(ProtocolFilterWrapper(ProtocolListenerWrapper(DubboProtocol)))
AbstractProtocol.refer
    @Override
    public <T> Invoker<T> refer(Class<T> type, URL url) throws RpcException {
        return new AsyncToSyncInvoker<>(protocolBindingRefer(type, url));
    }
protocolBindingRefer
- 优化序列化
- 构建DubboInvoker
    @Override
    public <T> Invoker<T> protocolBindingRefer(Class<T> serviceType, URL url) throws RpcException {
        optimizeSerialization(url);

        // create rpc invoker.
        DubboInvoker<T> invoker = new DubboInvoker<T>(serviceType, url, getClients(url), invokers);
        invokers.add(invoker);

        return invoker;
    }
getClients
- 判断是否为共享连接,默认是共享同一个连接进行通信
- 是否配置了多个连接通道 connections,默认只有一个共享连接
    private ExchangeClient[] getClients(URL url) {
        // whether to share connection

        boolean useShareConnect = false;

        int connections = url.getParameter(CONNECTIONS_KEY, 0);
        List<ReferenceCountExchangeClient> shareClients = null;
        // if not configured, connection is shared, otherwise, one connection for one service
        // 如果没有配置的情况下,默认是采用共享连接,否则,就是针对一个服务提供一个连接。
        // 所谓共享连接,实际上就是
        if (connections == 0) {
            useShareConnect = true;

            /*
             * The xml configuration should have a higher priority than properties.
             */
            String shareConnectionsStr = url.getParameter(SHARE_CONNECTIONS_KEY, (String) null);
            connections = Integer.parseInt(StringUtils.isBlank(shareConnectionsStr) ? ConfigUtils.getProperty(SHARE_CONNECTIONS_KEY,
                    DEFAULT_SHARE_CONNECTIONS) : shareConnectionsStr);
            //返回共享连接
            shareClients = getSharedClient(url, connections);
        }
        //从共享连接中获得客户端连接进行返回
        ExchangeClient[] clients = new ExchangeClient[connections];
        for (int i = 0; i < clients.length; i++) {
            if (useShareConnect) {
                clients[i] = shareClients.get(i);

            } else {//如果不是使用共享连接,则初始化一个新的客户端连接进行返回
                clients[i] = initClient(url);
            }
        }

        return clients;
    }
getSharedClient
    private List<ReferenceCountExchangeClient> getSharedClient(URL url, int connectNum) {
        String key = url.getAddress();
        List<ReferenceCountExchangeClient> clients = referenceClientMap.get(key);
        //检查当前的key检查连接是否已经创建过并且可用,如果是,则直接返回并且增加连接的个数的统计
        if (checkClientCanUse(clients)) {
            batchClientRefIncr(clients);
            return clients;
        }
        //如果连接已经关闭或者连接没有创建过
        locks.putIfAbsent(key, new Object());
        synchronized (locks.get(key)) {
            clients = referenceClientMap.get(key);
            // dubbo check
            // 双重检查
            if (checkClientCanUse(clients)) {
                batchClientRefIncr(clients);
                return clients;
            }

            // connectNum must be greater than or equal to 1
            // 连接数必须大于等于1
            connectNum = Math.max(connectNum, 1);

            // If the clients is empty, then the first initialization is
            //如果当前消费者还没有和服务端产生连接,则初始化
            if (CollectionUtils.isEmpty(clients)) {
                clients = buildReferenceCountExchangeClientList(url, connectNum);
                referenceClientMap.put(key, clients);

            } else {//如果clients不为空,则从clients数组中进行遍历
                for (int i = 0; i < clients.size(); i++) {
                    ReferenceCountExchangeClient referenceCountExchangeClient = clients.get(i);
                    // If there is a client in the list that is no longer available, create a new one to replace him.
                    // 如果在集合中存在一个连接但是这个连接处于closed状态,则重新构建一个进行替换
                    if (referenceCountExchangeClient == null || referenceCountExchangeClient.isClosed()) {
                        clients.set(i, buildReferenceCountExchangeClient(url));
                        continue;
                    }
                   //增加个数
                    referenceCountExchangeClient.incrementAndGetCount();
                }
            }

            /*
             * I understand that the purpose of the remove operation here is to avoid the expired url key
             * always occupying this memory space.
             */
            locks.remove(key);

            return clients;
        }
    }
buildReferenceCountExchangeClient
    private List<ReferenceCountExchangeClient> buildReferenceCountExchangeClientList(URL url, int connectNum) {
        List<ReferenceCountExchangeClient> clients = new ArrayList<>();

        for (int i = 0; i < connectNum; i++) {
            clients.add(buildReferenceCountExchangeClient(url));
        }

        return clients;
    }

    /**
     * Build a single client
     *
     * @param url
     * @return
     */
    private ReferenceCountExchangeClient buildReferenceCountExchangeClient(URL url) {
        ExchangeClient exchangeClient = initClient(url);

        return new ReferenceCountExchangeClient(exchangeClient);
    }
initClient
    private ExchangeClient initClient(URL url) {
        // 获取客户端通信类型,默认是netty
        // client type setting.
        String str = url.getParameter(CLIENT_KEY, url.getParameter(SERVER_KEY, DEFAULT_REMOTING_CLIENT));
        //获取编码解码类型,默认是Dubbo自定义类型
        url = url.addParameter(CODEC_KEY, DubboCodec.NAME);
          // 开启心跳并设置心跳间隔,默认60s
        // enable heartbeat by default
        url = url.addParameterIfAbsent(HEARTBEAT_KEY, String.valueOf(DEFAULT_HEARTBEAT));
         // 如果没有找到指定类型的通信扩展点,则抛出异常。
        // BIO is not allowed since it has severe performance issue.
        if (str != null && str.length() > 0 && !ExtensionLoader.getExtensionLoader(Transporter.class).hasExtension(str)) {
            throw new RpcException("Unsupported client type: " + str + "," +
                    " supported client type is " + StringUtils.join(ExtensionLoader.getExtensionLoader(Transporter.class).getSupportedExtensions(), " "));
        }

        ExchangeClient client;
        try {
            // 是否延迟建立连接
            // connection should be lazy
            if (url.getParameter(LAZY_CONNECT_KEY, false)) {
                client = new LazyConnectExchangeClient(url, requestHandler);
            //默认是直接在启动时建立连接
            } else {
                client = Exchangers.connect(url, requestHandler);
            }

        } catch (RemotingException e) {
            throw new RpcException("Fail to create remoting client for service(" + url + "): " + e.getMessage(), e);
        }

        return client;
    }
Exchangers.connect
    public static ExchangeClient connect(URL url, ExchangeHandler handler) throws RemotingException {
        if (url == null) {
            throw new IllegalArgumentException("url == null");
        }
        if (handler == null) {
            throw new IllegalArgumentException("handler == null");
        }
        url = url.addParameterIfAbsent(Constants.CODEC_KEY, "exchange");
        return getExchanger(url).connect(url, handler);
    }
HeaderExchange.connect
    @Override
    public ExchangeClient connect(URL url, ExchangeHandler handler) throws RemotingException {
        return new HeaderExchangeClient(Transporters.connect(url, new DecodeHandler(new HeaderExchangeHandler(handler))), true);
    }
NettyTransport.connect
    @Override
    public Client connect(URL url, ChannelHandler handler) throws RemotingException {
        return new NettyClient(url, handler);
    }

 浙公网安备 33010602011771号