springboot整合
转自https://blog.csdn.net/qq_33369905/article/details/105828924
一、Spring-boot启动
1、什么是springboot
SpringBoot呢,就是一个javaweb的开发框架,和SpringMVC类似,对比其他javaweb框架的好处,官方说是简化开发,约定大于配置, you can "just run",能迅速的开发web应用,几行代码开发一个http接口。
Spring Boot 基于 Spring 开发,Spirng Boot 本身并不提供 Spring 框架的核心特性以及扩展功能,只是用于快速、敏捷地开发新一代基于 Spring 框架的应用程序。也就是说,它并不是用来替代 Spring 的解决方案,而是和 Spring 框架紧密结合用于提升 Spring 开发者体验的工具。Spring Boot 以约定大于配置的核心思想,默认帮我们进行了很多设置,多数 Spring Boot 应用只需要很少的 Spring 配置。同时它集成了大量常用的第三方库配置(例如 Redis、MongoDB、Jpa、RabbitMQ、Quartz 等等),Spring Boot 应用中这些第三方库几乎可以零配置的开箱即用。
简单来说就是SpringBoot其实不是什么新的框架,它默认配置了很多框架的使用方式,就像maven整合了所有的jar包,spring boot整合了所有的框架 。
Spring Boot 出生名门,从一开始就站在一个比较高的起点,又经过这几年的发展,生态足够完善,Spring Boot 已经当之无愧成为 Java 领域最热门的技术。
Spring Boot的主要优点:
- 为所有Spring开发者更快的入门
- 开箱即用,提供各种默认配置来简化项目配置
- 内嵌式容器简化Web项目
- 没有冗余代码生成和XML配置的要求
2、创建Hello World程序
项目创建:使用 IDEA 直接创建项目
1、创建一个新项目
2、选择spring initalizr
3、填写项目信息
4、选择初始化的组件
5、填写项目路径
6、等待项目构建成功
项目结构分析:
通过上面步骤完成了基础项目的创建。就会自动生成以下文件。
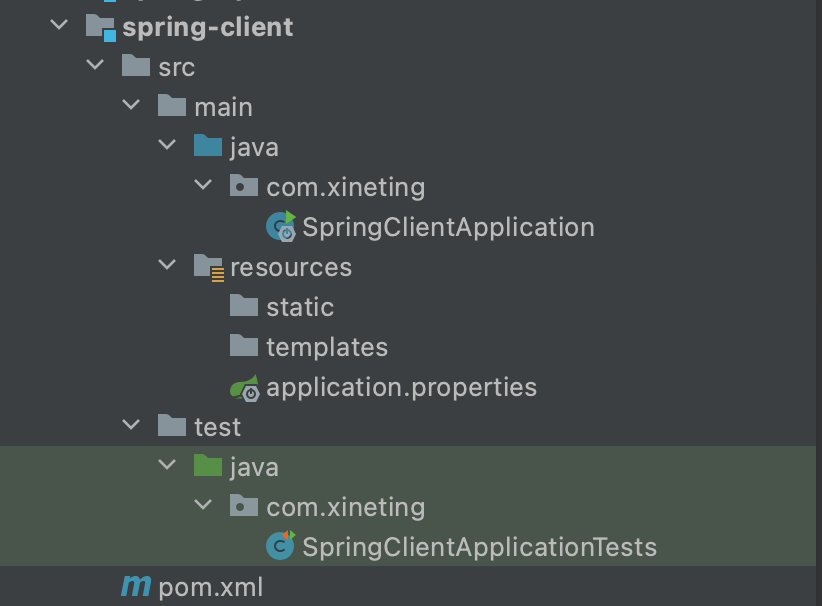
1、程序的主启动类
2、一个 application.properties 配置文件
3、一个 测试类
4、一个 pom.xml
<!-- 父依赖 -->
<parent>
    <groupId>org.springframework.boot</groupId>
    <artifactId>spring-boot-starter-parent</artifactId>
    <version>2.2.5.RELEASE</version>
    <relativePath/>
</parent>

<dependencies>
    <!-- web场景启动器 -->
    <dependency>
        <groupId>org.springframework.boot</groupId>
        <artifactId>spring-boot-starter-web</artifactId>
    </dependency>
    <!-- springboot单元测试 -->
    <dependency>
        <groupId>org.springframework.boot</groupId>
        <artifactId>spring-boot-starter-test</artifactId>
        <scope>test</scope>
        <!-- 剔除依赖 -->
        <exclusions>
            <exclusion>
                <groupId>org.junit.vintage</groupId>
                <artifactId>junit-vintage-engine</artifactId>
            </exclusion>
        </exclusions>
    </dependency>
</dependencies>
<build>
    <plugins>
        <!-- 打包插件 -->
        <plugin>
            <groupId>org.springframework.boot</groupId>
            <artifactId>spring-boot-maven-plugin</artifactId>
        </plugin>
    </plugins>
</build>
5、编写一个http接口
- 在主程序的同级目录下,新建一个controller包,一定要在同级目录下,否则识别不到
- 在包中新建一个HelloController类
@RestControllerpublic class HelloController {
    @RequestMapping("/hello")
    public String hello() {
    return "Hello World";
    }
}
- 编写完毕后,从主程序启动项目,浏览器发起请求,看页面返回;控制台输出了 Tomcat 访问的端口号!

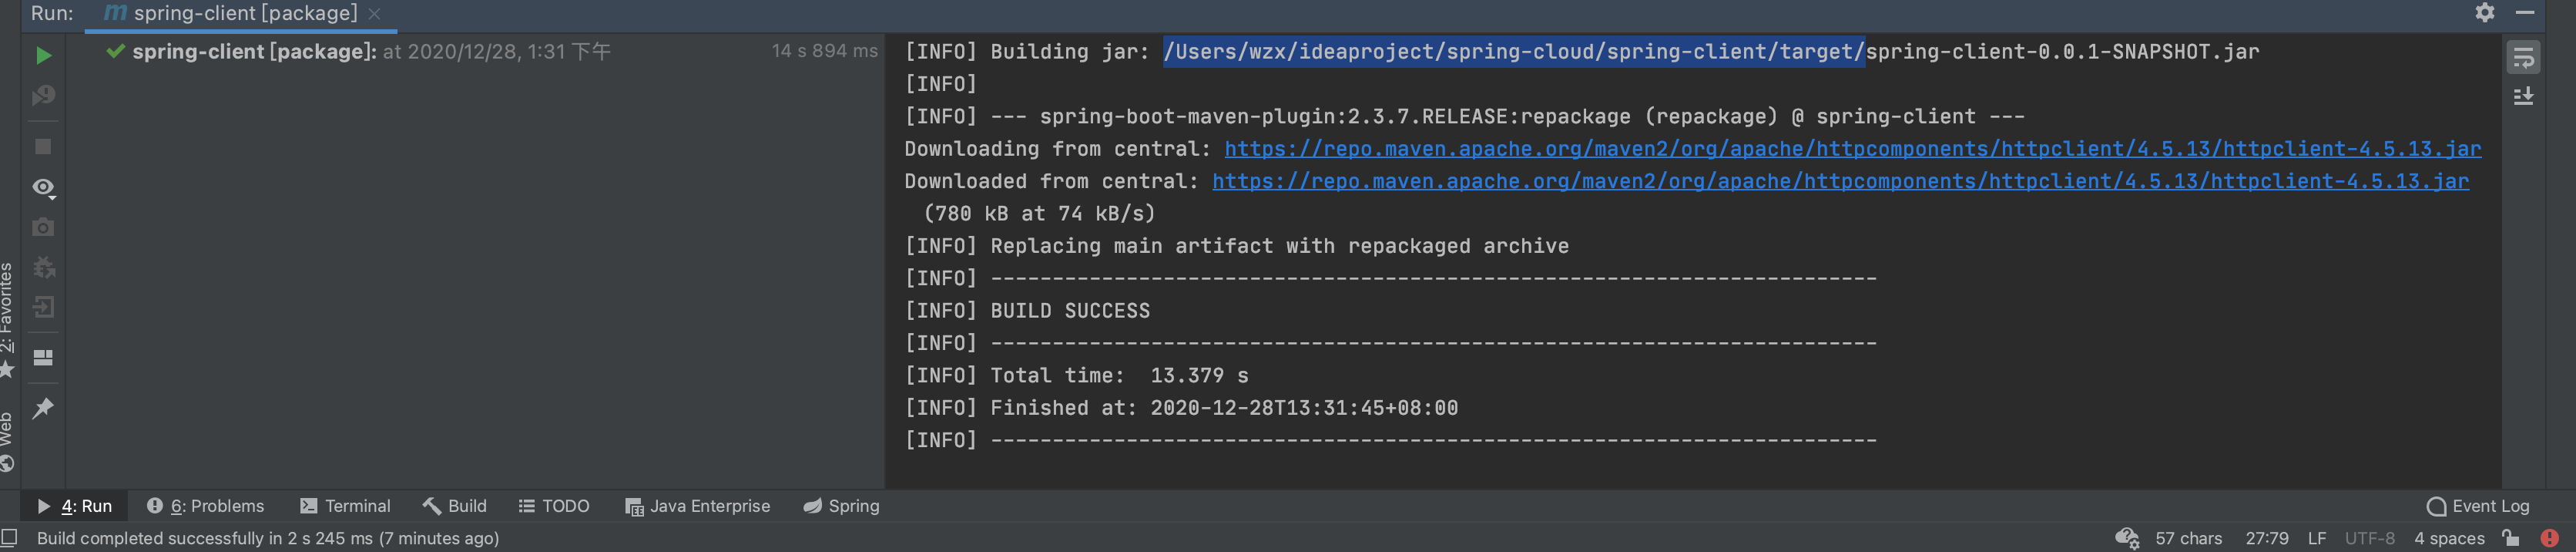
- 将项目打成jar包,点击 maven的 package
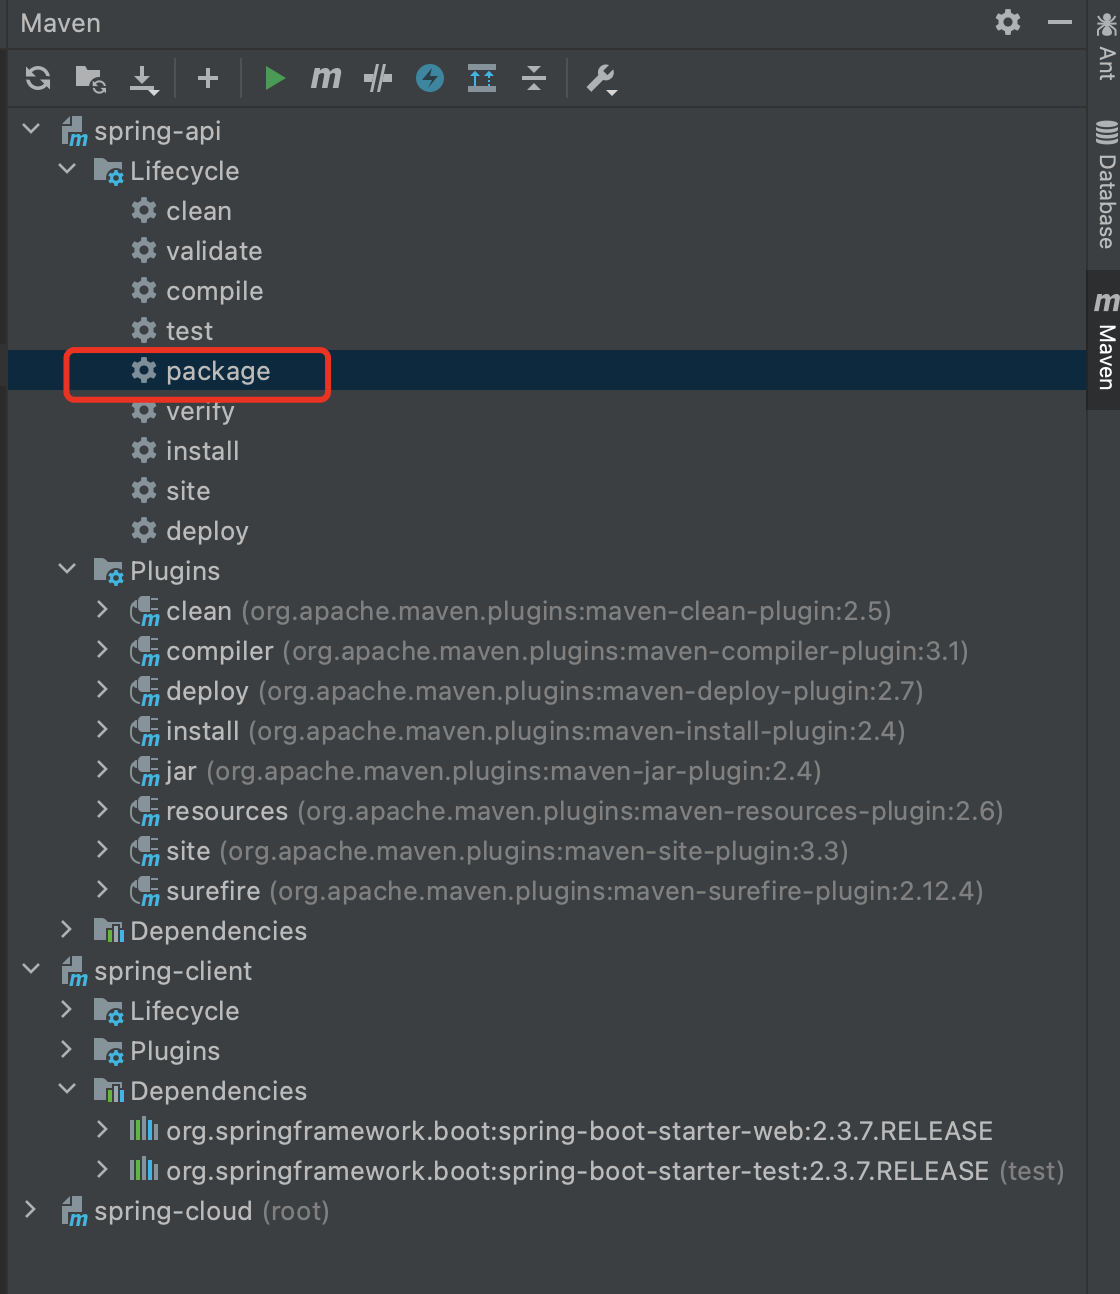
- 成功打包
- 运行结果:
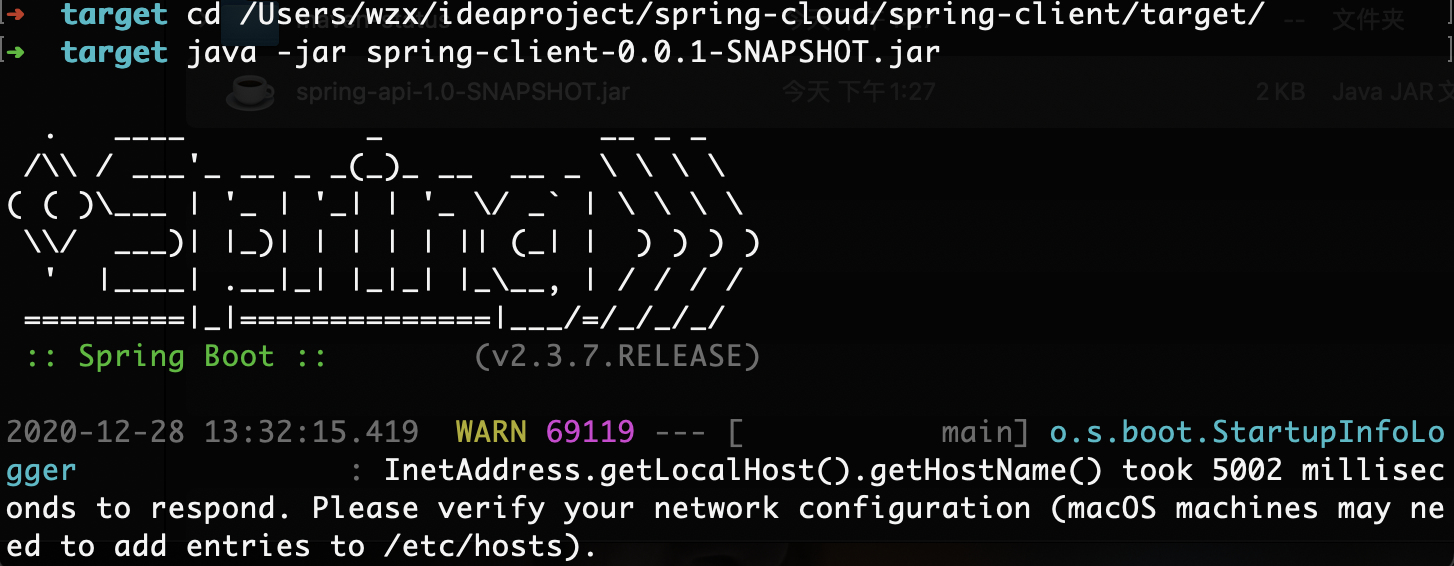
- 访问成功

二、启动原理探究
1、pom.xml
启动器 spring-boot-starter
<dependency>
    <groupId>org.springframework.boot</groupId>
    <artifactId>spring-boot-starter-web</artifactId>
</dependency>
springboot-boot-starter-xxx:就是spring-boot的场景启动器
spring-boot-starter-web:帮我们导入了web模块正常运行所依赖的组件;
SpringBoot将所有的功能场景都抽取出来,做成一个个的starter (启动器),只需要在项目中引入这些starter即可,所有相关的依赖都会导入进来 , 我们要用什么功能就导入什么样的场景启动器即可 ;我们未来也可以自己自定义 starter;
2、默认的主启动类
//@SpringBootApplication 来标注一个主程序类
//说明这是一个Spring Boot应用
@SpringBootApplication
public class SpringbootApplication {

   public static void main(String[] args) {
     //以为是启动了一个方法,没想到启动了一个服务
      SpringApplication.run(SpringbootApplication.class, args);
   }

}
但是一个简单的启动类并不简单!我们来分析一下这些注解都干了什么
@SpringBootApplication
作用:
-
标注在某个类上说明这个类是SpringBoot的主配置类
-
SpringBoot就应该运行这个类的main方法来启动SpringBoot应用;
进入这个注解:可以看到上面还有很多其他注解!
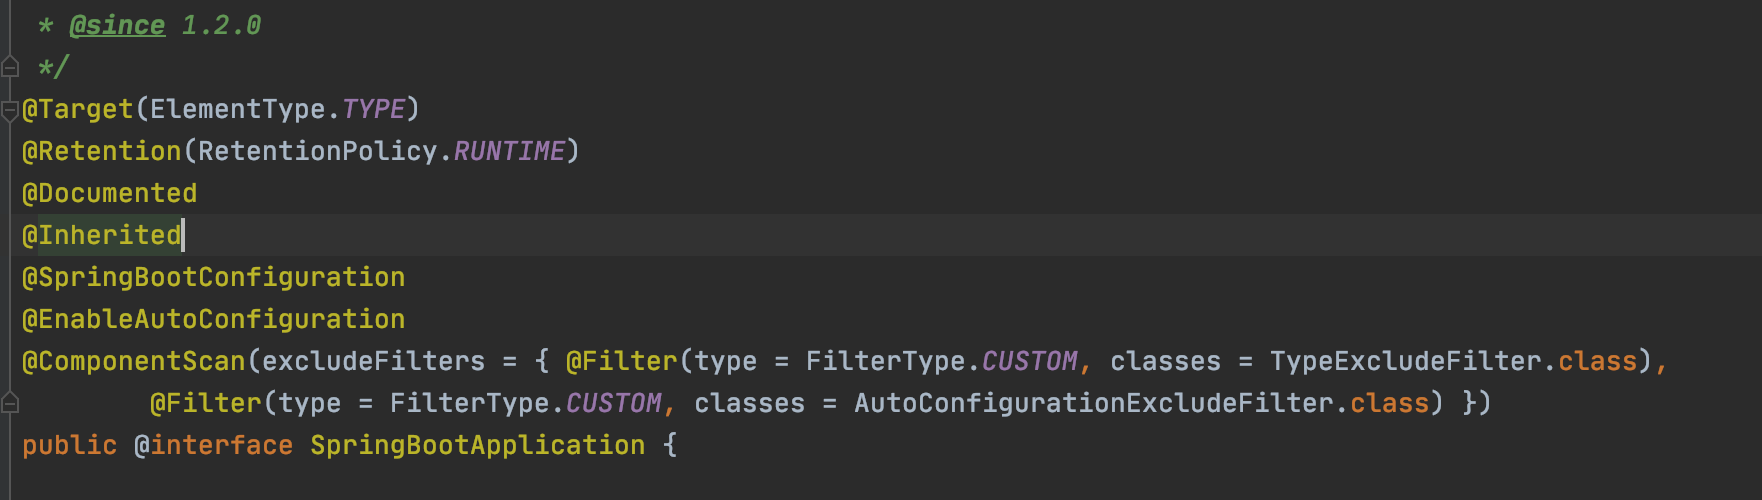
@ComponentScan
这个注解在Spring中很重要 ,它对应XML配置中的元素。
作用:自动扫描并加载符合条件的组件或者bean , 将这个bean定义加载到IOC容器中
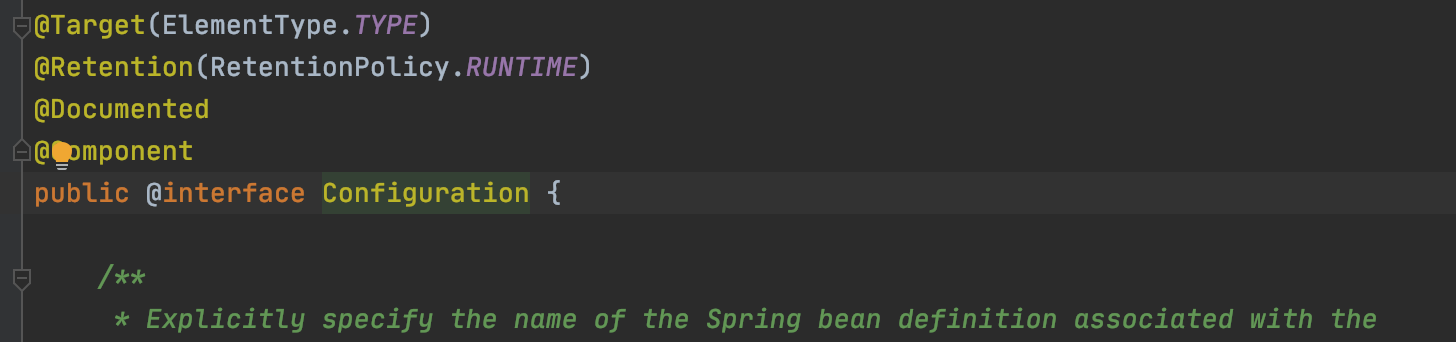
@SpringBootConfiguration
作用:SpringBoot的配置类 ,标注在某个类上 , 表示这是一个SpringBoot的配置类;
我们继续进去这个注解查看

@EnableAutoConfiguration :开启自动配置功能
以前我们需要自己配置的东西,而现在SpringBoot可以自动帮我们配置 ;
@EnableAutoConfiguration告诉SpringBoot开启自动配置功能,这样自动配置才能生效;
点进注解接续查看:
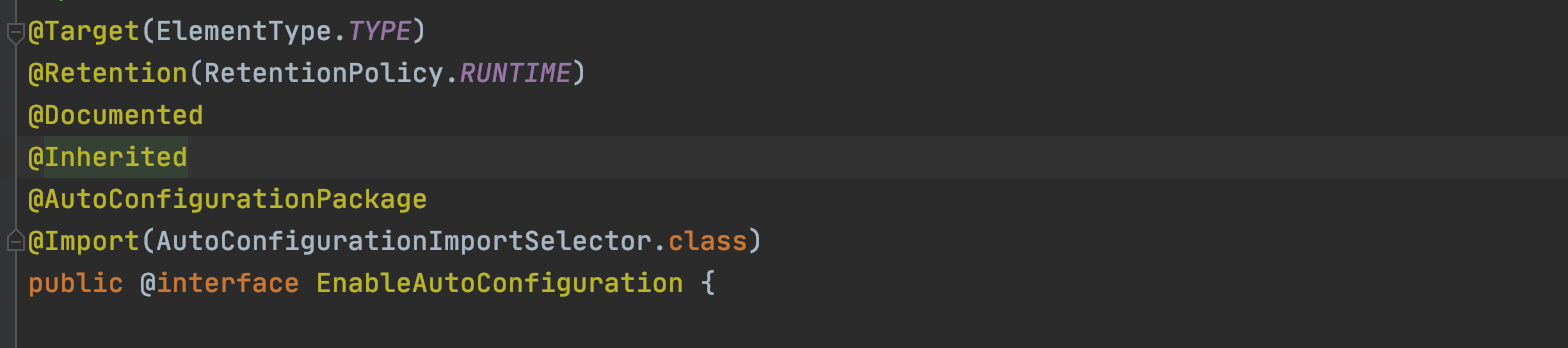
@AutoConfigurationPackage :自动配置包

@import :Spring底层注解@import , 给容器中导入一个组件
Registrar.class 作用:将主启动类的所在包及包下面所有子包里面的所有组件扫描到Spring容器 ;
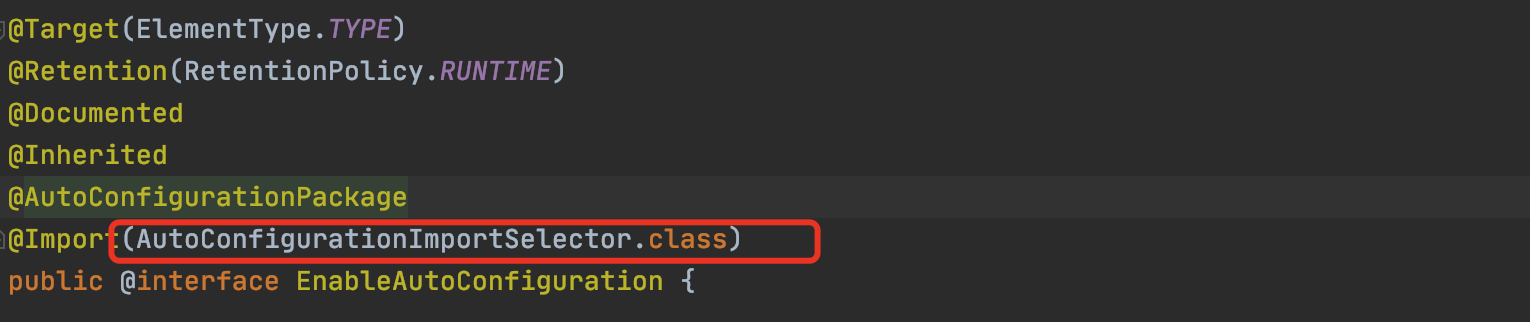
@Import({AutoConfigurationImportSelector.class}) :给容器导入组件 ;
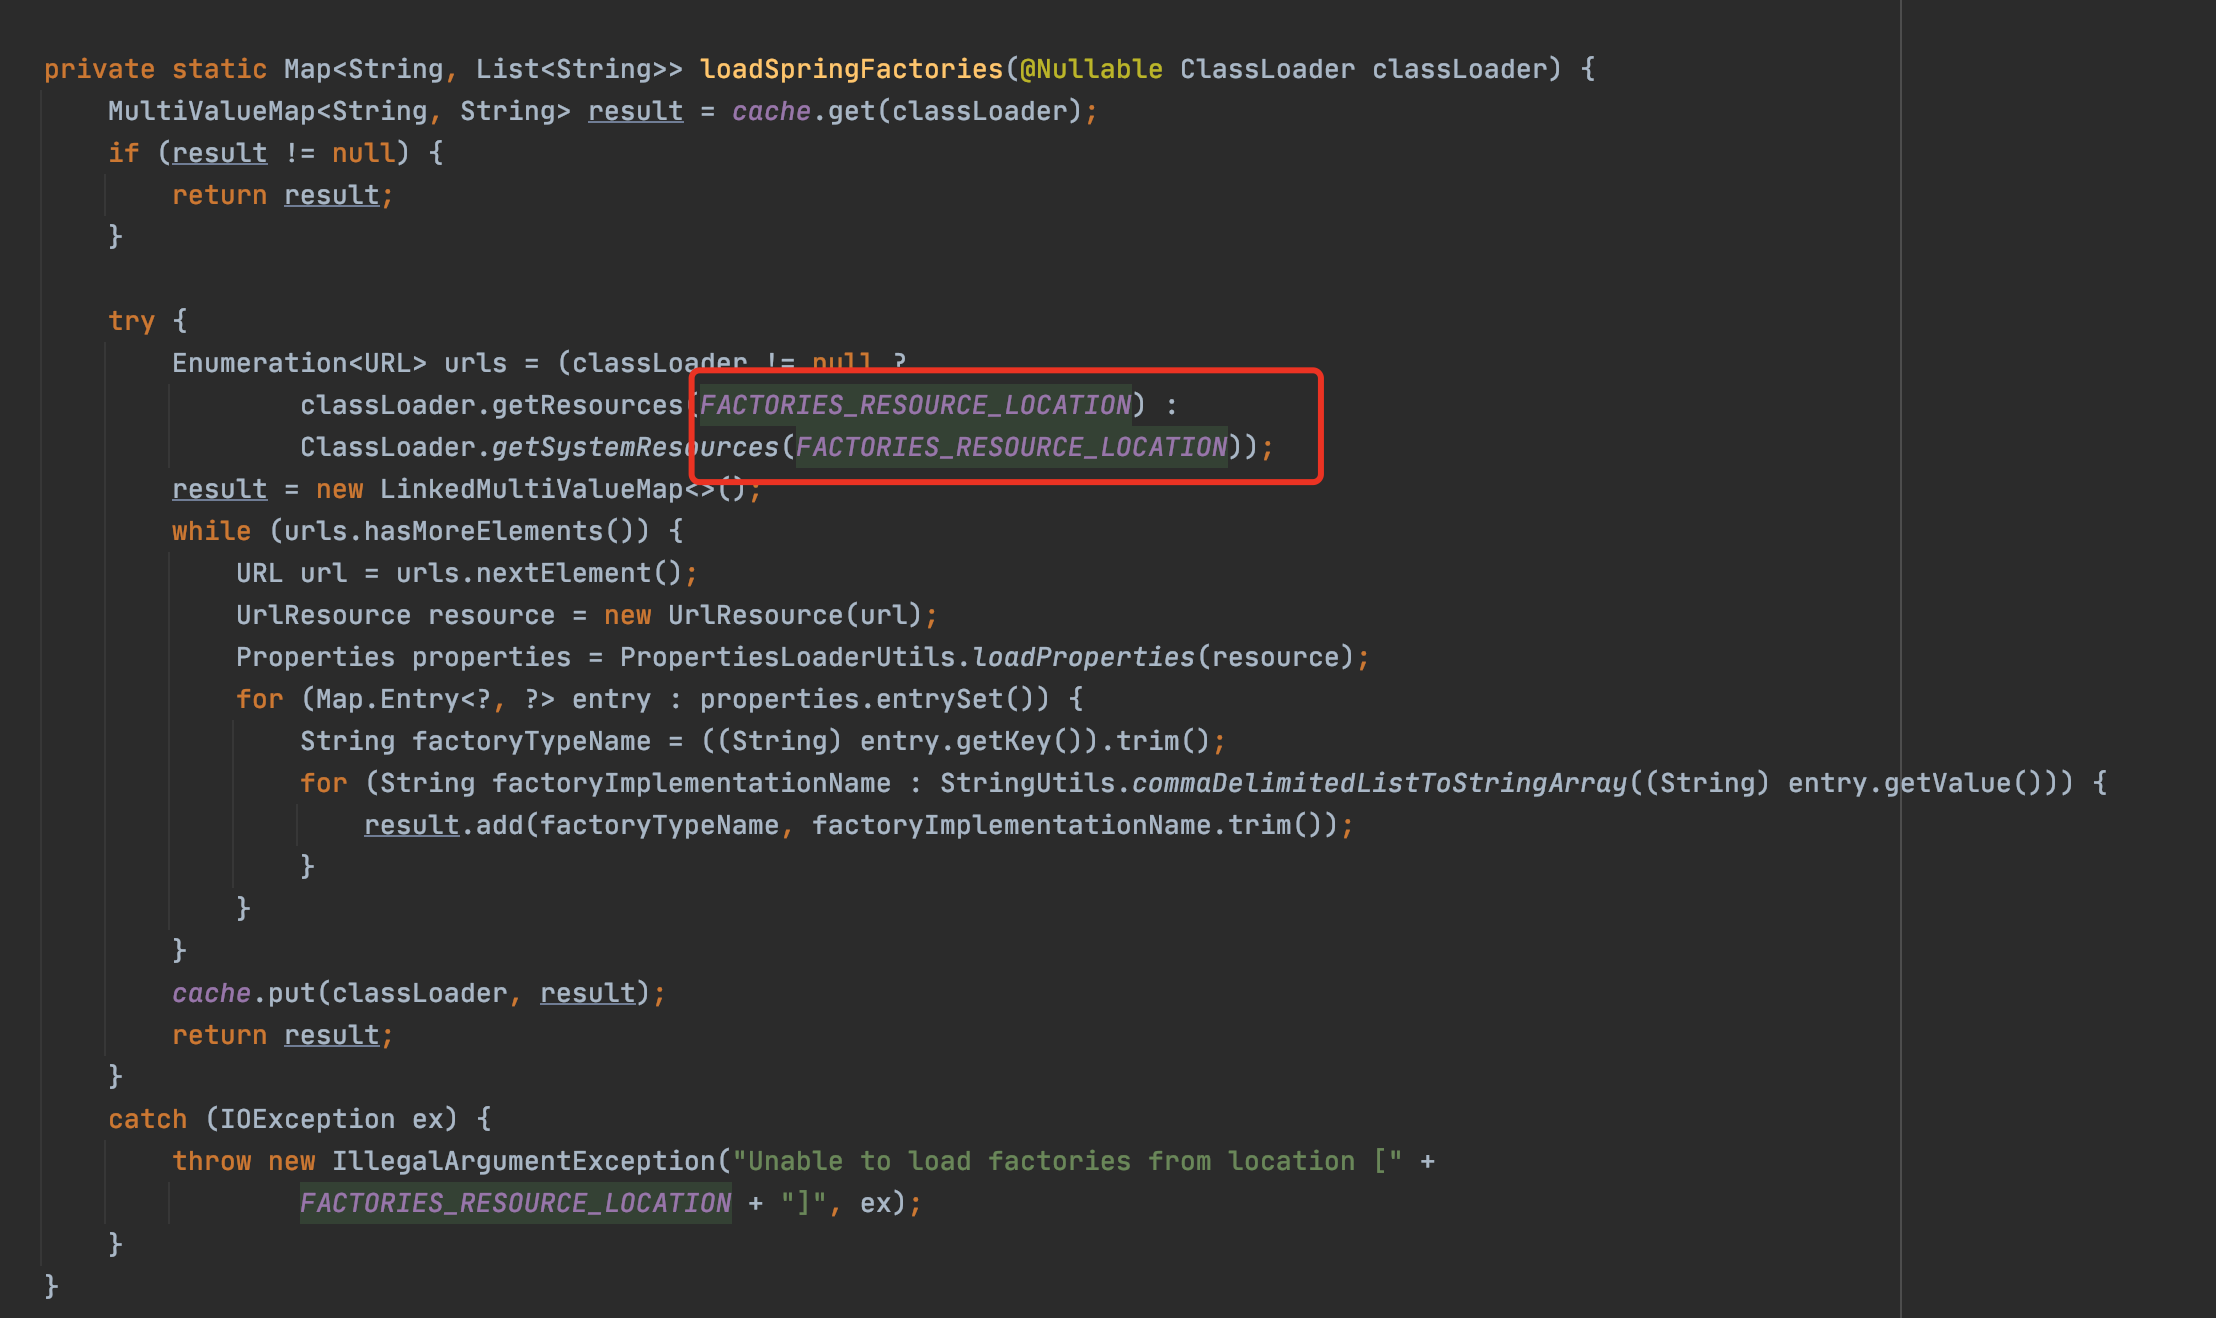
AutoConfigurationImportSelector :自动配置导入选择器,那么它会导入哪些组件的选择器呢?我们点击去这个类看源码:
1、这个类中有一个这样的方法

这个方法又调用了 SpringFactoriesLoader 类的静态方法!我们进入SpringFactoriesLoader类loadFactoryNames() 方法

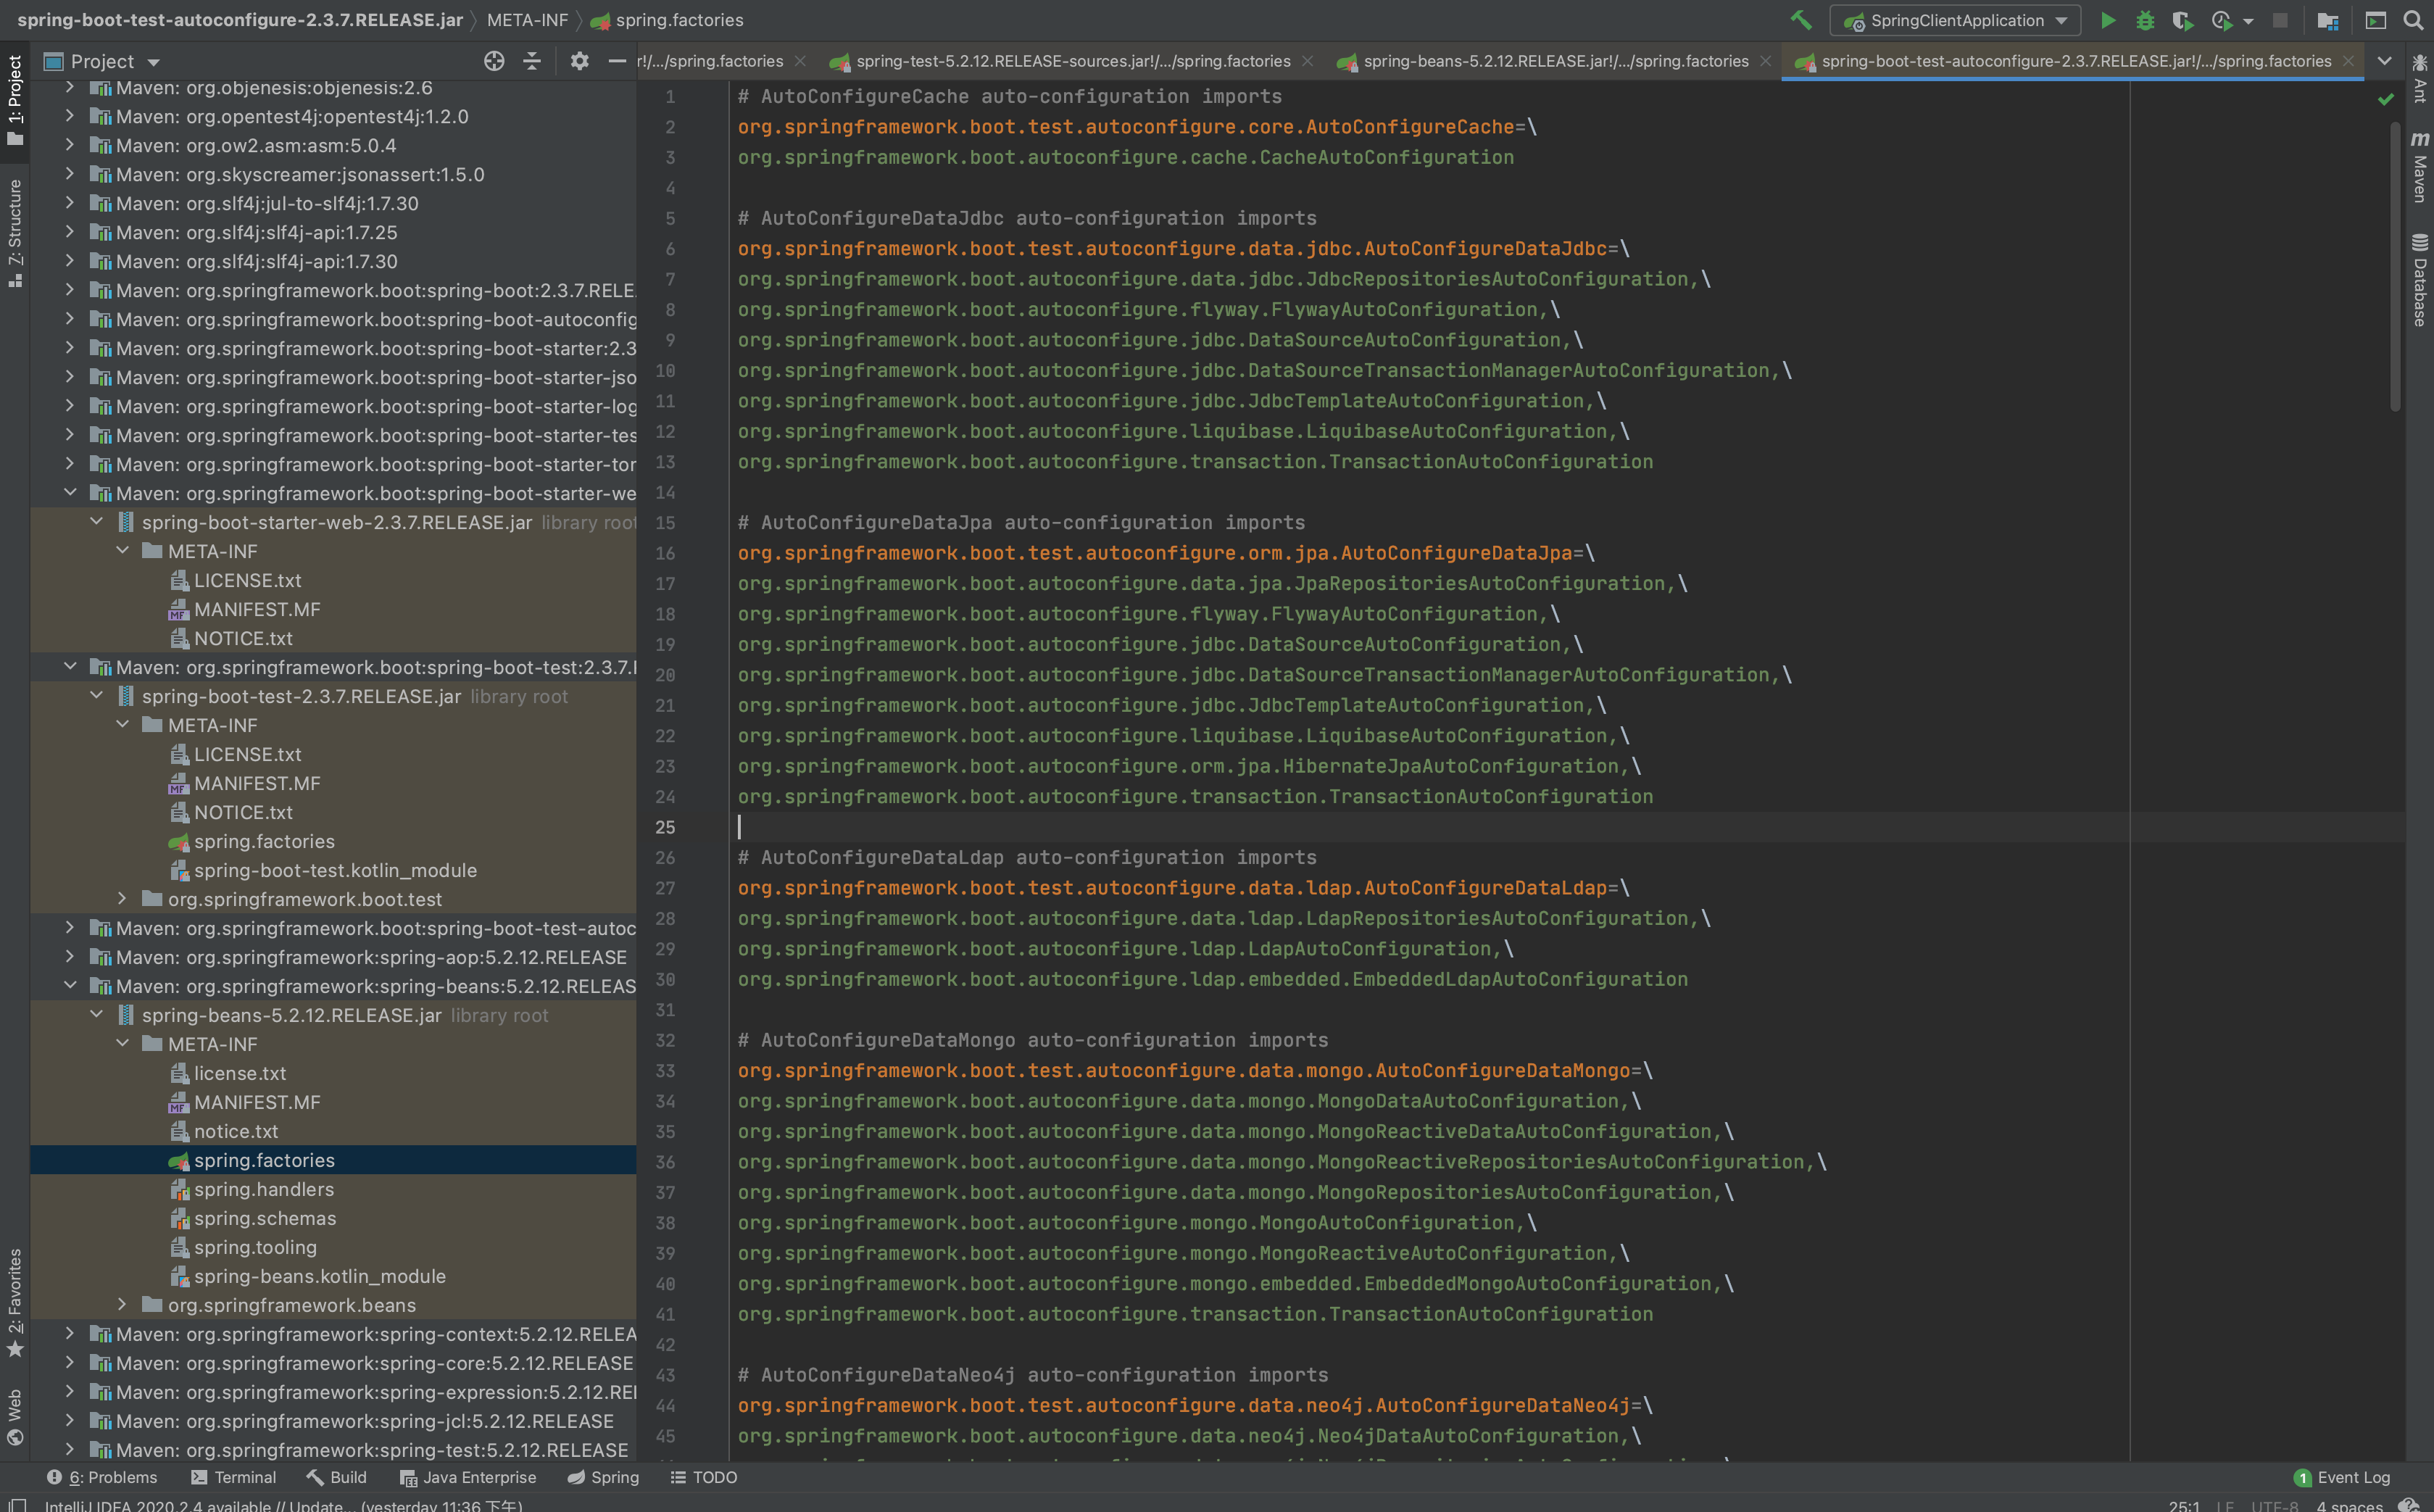
4、发现一个多次出现的文件:spring.factories,全局搜索它

如图所示:
spring.factories
WebMvcAutoConfiguration
我们在上面的自动配置类随便找一个打开看看,比如 :WebMvcAutoConfiguration
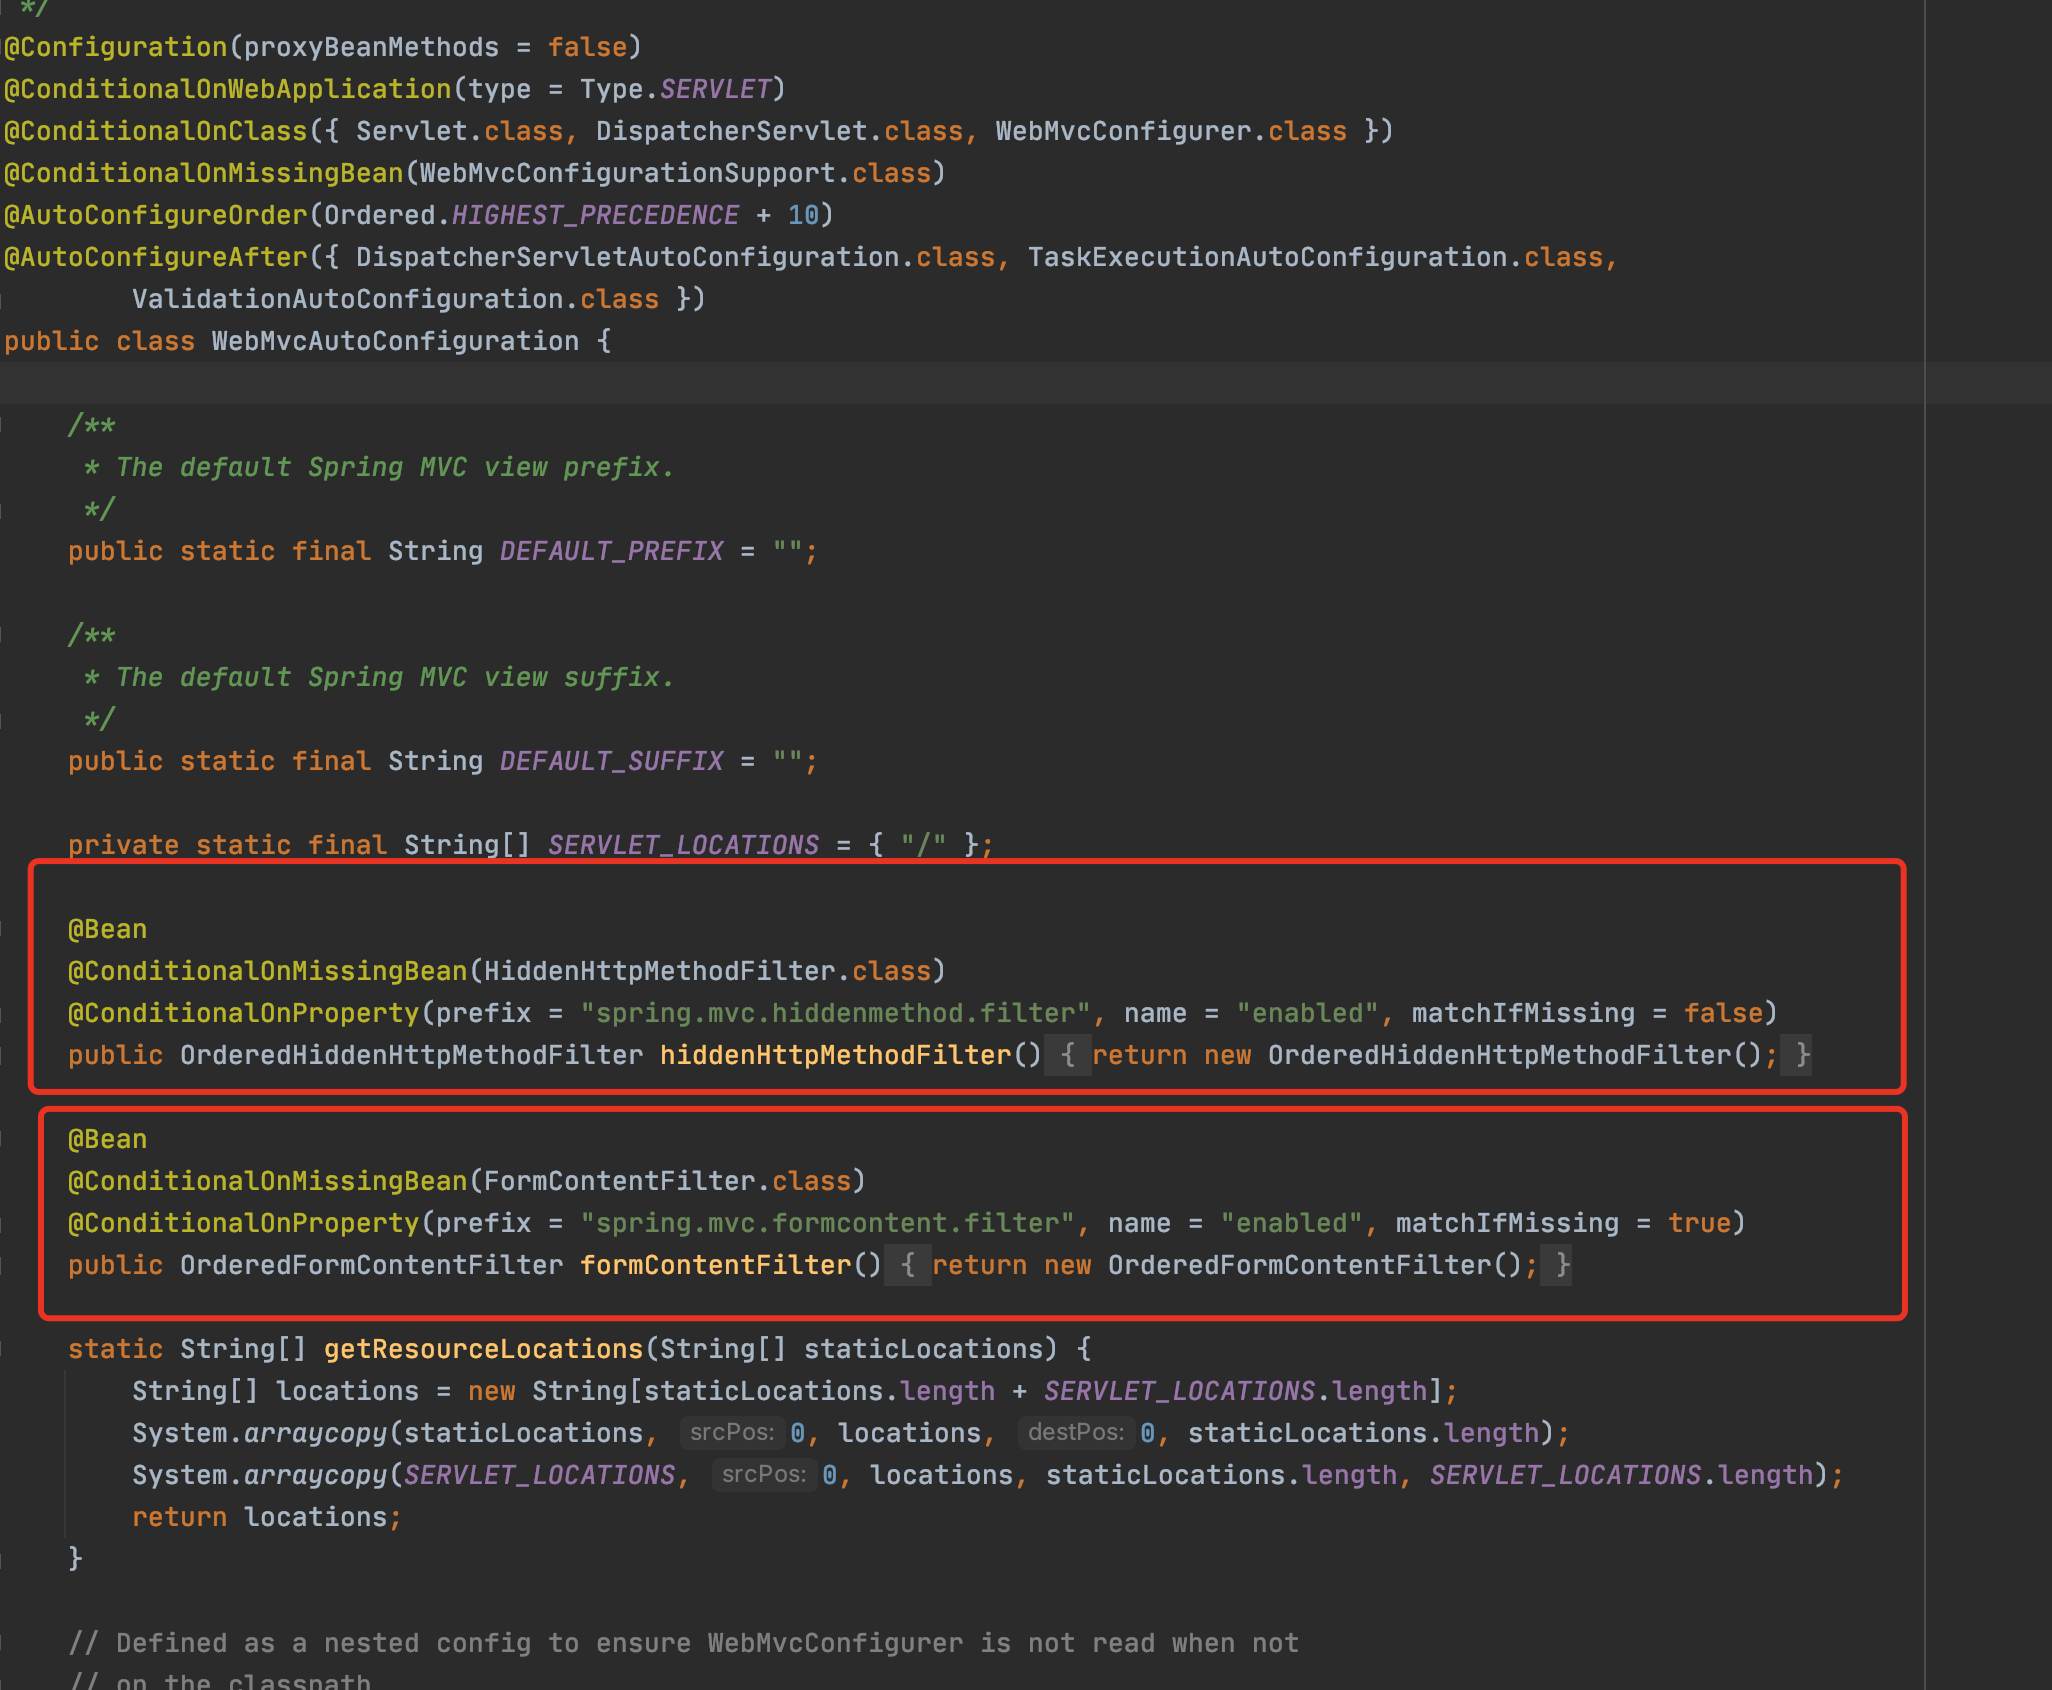
可以看到这些一个个的都是JavaConfig配置类,而且都注入了一些Bean,可以找一些自己认识的类,看着熟悉一下!
所以,自动配置真正实现是从classpath中搜寻所有的META-INF/spring.factories配置文件 ,并将其中对应的 org.springframework.boot.autoconfigure. 包下的配置项,通过反射实例化为对应标注了@Configuration的JavaConfig形式的IOC容器配置类 , 然后将这些都汇总成为一个实例并加载到IOC容器中。
结论:
- SpringBoot在启动的时候从类路径下的META-INF/spring.factories中获取EnableAutoConfiguration指定的值
- 将这些值作为自动配置类导入容器 , 自动配置类就生效 , 帮我们进行自动配置工作;
- 整个J2EE的整体解决方案和自动配置都在springboot-autoconfigure的jar包中;
- 它会给容器中导入非常多的自动配置类 (xxxAutoConfiguration), 就是给容器中导入这个场景需要的所有组件 , 并配置好这些组件 ;
- 有了自动配置类 , 免去了我们手动编写配置注入功能组件等的工作;
3、Springboot run的启动原理
参考https://www.cnblogs.com/shamo89/p/8184960.html
三、yaml配置
SpringBoot使用一个全局的配置文件 , 配置文件名称是固定的
-
application.properties
-
- 语法结构 :key=value
-
application.yml
-
- 语法结构 :key:空格 value
YAML是 "YAML Ain't a Markup Language" (YAML不是一种标记语言)的递归缩写。
在开发的这种语言时,YAML 的意思其实是:"Yet Another Markup Language"(仍是一种标记语言)
这种语言以数据作为中心,而不是以标记语言为重点!
以前的配置文件,大多数都是使用xml来配置
比如一个简单的端口配置,我们来对比下yaml和xml
传统xml配置:
<server>
  <port>8081<port>
</server>
yaml配置:
server:
  prot: 8080
yaml基础语法
说明:语法要求严格!
1、空格不能省略
2、以缩进来控制层级关系,只要是左边对齐的一列数据都是同一个层级的。
3、属性和值的大小写都是十分敏感的。
在下一行来写对象的属性和值得关系,注意缩进;比如:
student:
  name: qinjiang
  age: 3
行内写法
student: {name: qinjiang,age: 3}
数组( List、set )
用 - 值表示数组中的一个元素,比如:
pets:
  - cat
  - dog
  - pig
行内写法
pets: [cat,dog,pig]
修改SpringBoot的默认端口号
配置文件中添加,端口号的参数,就可以切换端口;
server:
  port: 8082
1、注入配置文件
yaml文件更强大的地方在于,他可以给我们的实体类直接注入匹配值!
1、在springboot项目中的resources目录下新建一个文件 application.yml
2、编写一个实体类 Dog;
package com.kuang.springboot.pojo;
@Component  //注册bean到容器中
public class Dog {
  private String name;
  private Integer age;
  //有参无参构造、get、set方法、toString()方法
}
之前我们注入的方法是
@Component //注册bean
public class Dog {
    @Value("阿黄")
    private String name;
    @Value("11")
    private Integer age;
}
在SpringBoot的测试类下注入狗狗输出一下;
@SpringBootTest
class DemoApplicationTests {

    @Autowired //将狗狗自动注入进来
    Dog dog;

    @Test
    public void contextLoads() {
        System.out.println(dog); //打印看下狗狗对象
    }

}
结果成功输出,@Value注入成功,这是我们原来的办法。

我们来使用yaml配置的方式进行注入,大家写的时候注意区别和优势,我们编写一个yaml配置!
person:
  name: qinjiang
  age: 3
  happy: false
  birth: 2000/01/01
  maps: {k1: v1,k2: v2}
  lists:
   - code
   - girl
   - music
  dog:
    name: 旺财
    age: 1
我们刚才已经把person这个对象的所有值都写好了,我们现在来注入到我们的类中!
/*
@ConfigurationProperties作用:
将配置文件中配置的每一个属性的值,映射到这个组件中;
告诉SpringBoot将本类中的所有属性和配置文件中相关的配置进行绑定
参数 prefix = “person” : 将配置文件中的person下面的所有属性一一对应
*/
@Component //注册bean
@ConfigurationProperties(prefix = "person")
public class Person {
    private String name;
    private Integer age;
    private Boolean happy;
    private Date birth;
    private Map<String,Object> maps;
    private List<Object> lists;
    private Dog dog;
}
自定义配置文件目前只支持properties方式
@Component
@Data
@NoArgsConstructor
@AllArgsConstructor
@PropertySource(value = "classpath:person.properties")
@ConfigurationProperties(prefix = "person")
public class Person {
    private String name;
    private Integer age;
    private boolean isBoss;
    private Date birth;
    private String lastName;
    private Map<String, Object> maps;
    private List<Object> lists;
    private dog dog;
}
@SpringBootTest
class test {
    @Autowired
    Person person; //将person自动注入进来
    @Test
    public void contextLoads() {
        System.out.println(person); //打印person信息
    }

}
测试结果:

2、对比小结
| @Configuration | @Value | |
|---|---|---|
| 功能 | 批量注入 | 一个个指定 |
| 松散绑定 | 支持 | 不支持 |
| SpEL | 不支持 | 支持 |
| JSR303数据校验 | 支持 | 不支持 |
| 复杂类型封装 | 支持 | 不支持 |
1、@ConfigurationProperties只需要写一次即可 , @Value则需要每个字段都添加
2、松散绑定:这个什么意思呢? 比如我的yml中写的last-name,这个和lastName是一样的, - 后面跟着的字母默认是大写的。这就是松散绑定。可以测试一下
3、JSR303数据校验 , 这个就是我们可以在字段是增加一层过滤器验证 , 可以保证数据的合法性
4、复杂类型封装,yml中可以封装对象 , 使用value就不支持
JSR303数据校验
3、JSR303数据校验
Springboot中可以用@validated来校验数据,如果数据异常则会统一抛出异常,方便异常中心统一处理。我们这里来写个注解让我们的name只能支持Email格式;
pom.xml
<dependency>
  <groupId>javax.validation</groupId>
  <artifactId>validation-api</artifactId>
  <version>2.0.1.Final</version>
</dependency>
<dependency>
  <groupId>org.hibernate.validator</groupId>
  <artifactId>hibernate-validator</artifactId>
  <version>6.0.16.Final</version>
</dependency>
dog.java
package com.xineting;

import lombok.Data;
import org.springframework.beans.factory.annotation.Value;

import javax.validation.constraints.*;

@Data
public class dog {

    @NotNull(message = "不能为空")
    String name;

    @Max(value = 120,message = "数值太大了")
    int age;

    @Value("11@qq.com")
    @Email(message = "not a message format")
    String Email;
}
DogController.java
package com.xineting;
import org.slf4j.Logger;
import org.slf4j.LoggerFactory;
import org.springframework.validation.annotation.Validated;
import org.springframework.web.bind.annotation.PostMapping;
import org.springframework.web.bind.annotation.RequestMapping;
import org.springframework.web.bind.annotation.RestController;
import javax.validation.Valid;

@RestController
@RequestMapping("/dog")
@Validated
public class DogController {

    private Logger logger = LoggerFactory.getLogger(getClass());
    @PostMapping("/save")
    public String save1(@Valid dog Dog) {
        logger.info("狗狗的信息:", Dog.toString());
        return "save success";
    }
}
发送数据进行测试:
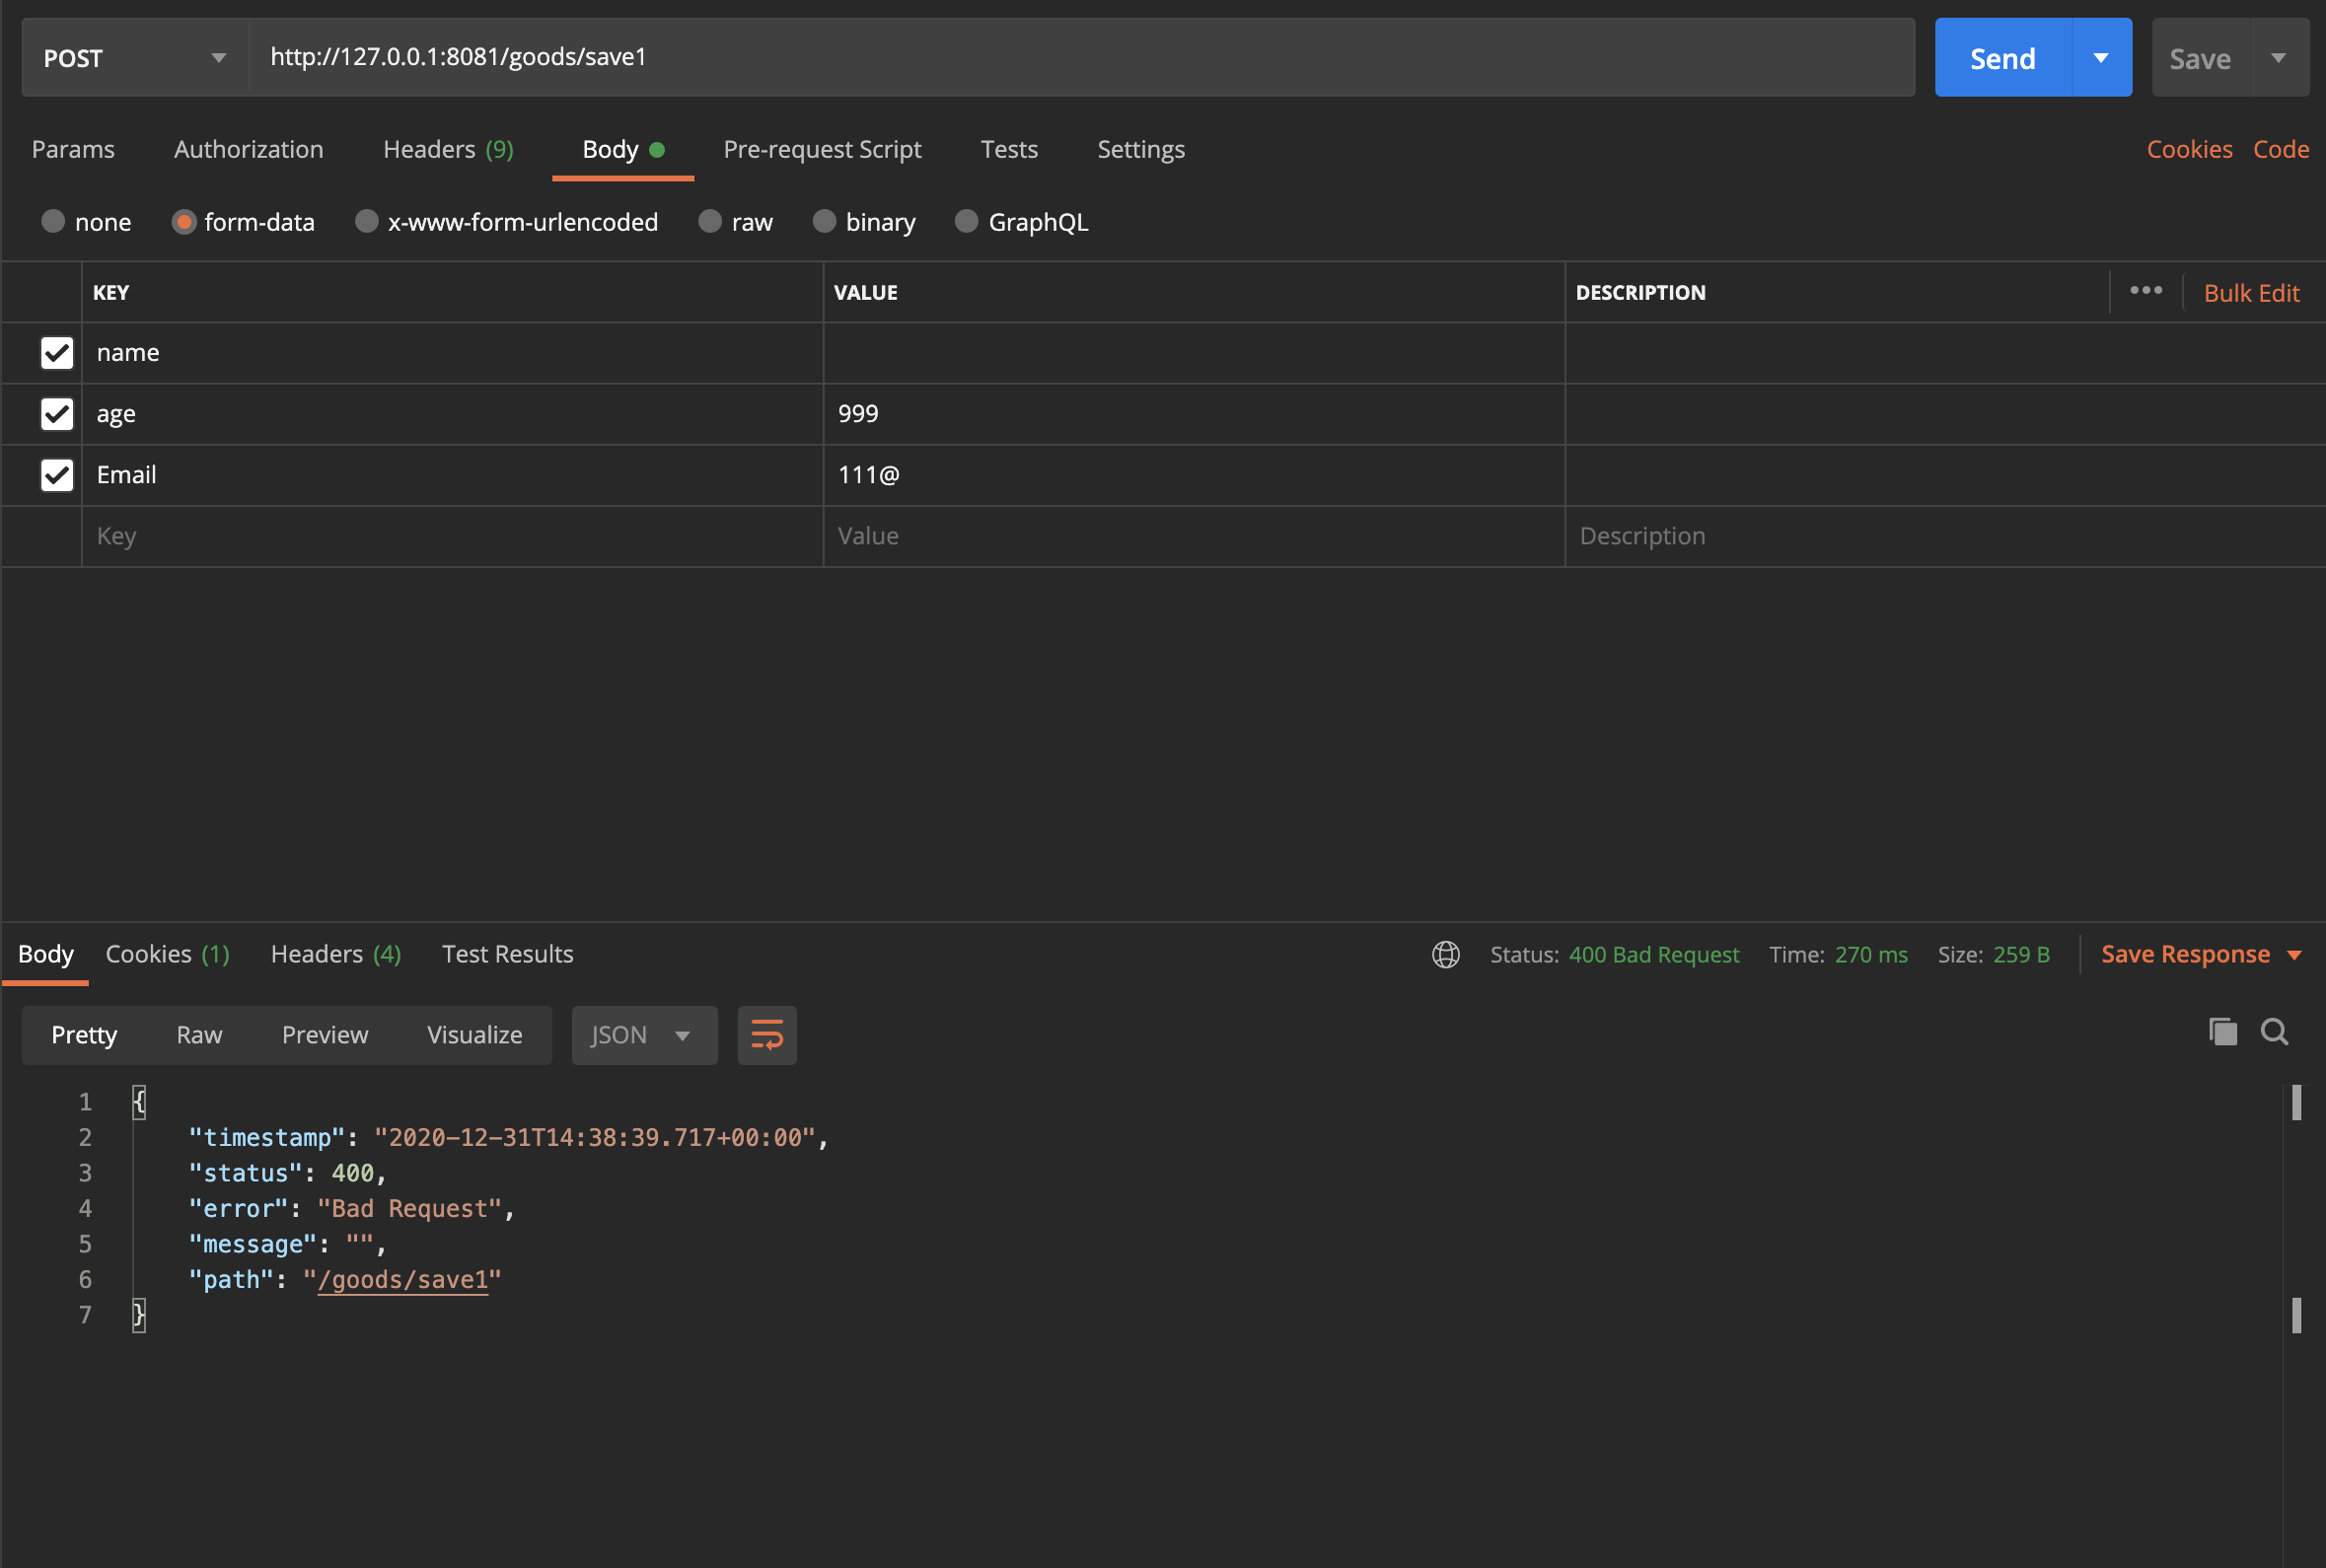
测试结果

传输成功的样例
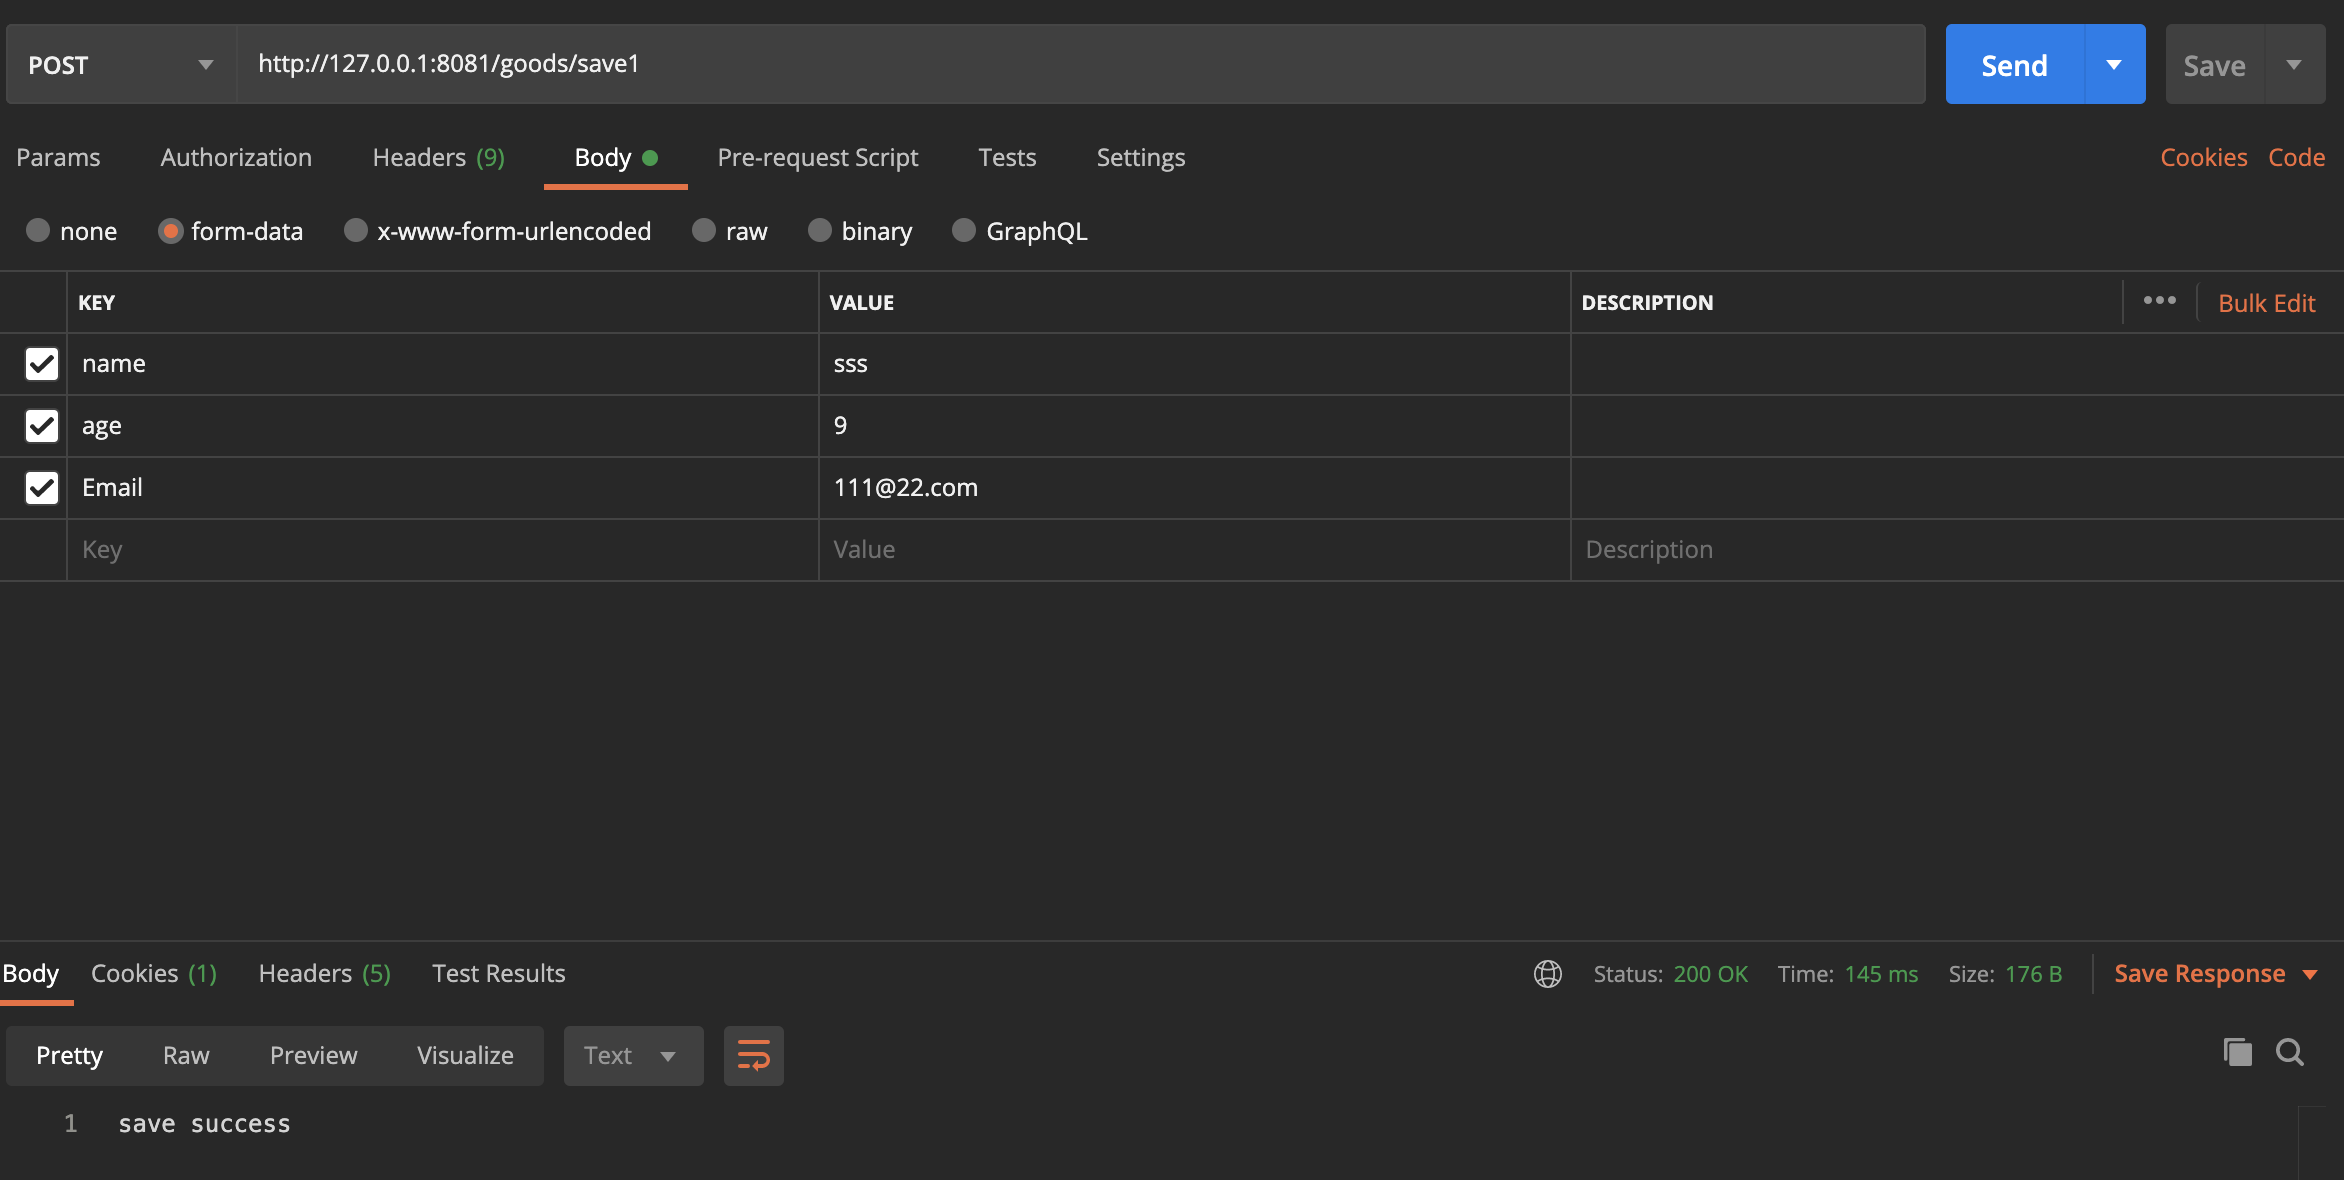
测试成功
4、多环境切换
profile是Spring对不同环境提供不同配置功能的支持,可以通过激活不同的环境版本,实现快速切换环境;
多配置文件
我们在主配置文件编写的时候,文件名可以是 application-{profile}.properties/yml , 用来指定多个环境版本;
application.properties
spring.profiles.active=dev
application-test.properties 代表测试环境配置
server.port=8188
application-dev.properties 代表开发环境配置
server.port=8088
可以切换端口
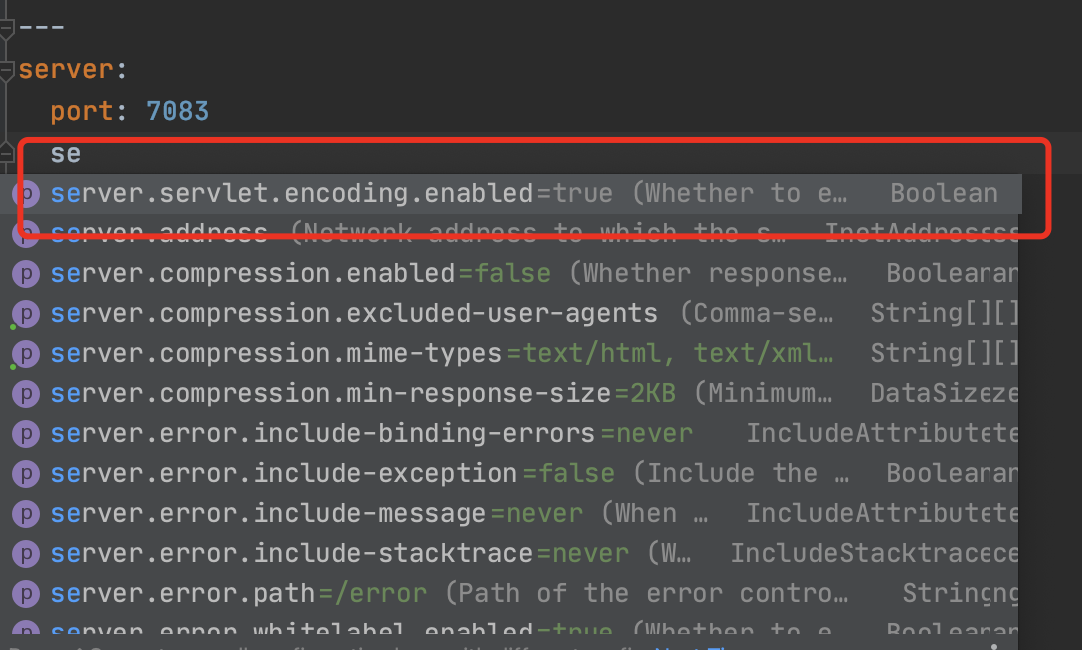
yaml的多文档块
server:
  port: 8081
#选择要激活那个环境块
spring:
  profiles:
    active: prod

---
server:
  port: 8083
spring:
  profiles: dev #配置环境的名称


---

server:
  port: 8084
spring:
  profiles: prod  #配置环境的名称
如果yml和properties同时都配置了端口,并且没有激活其他环境 , 默认会使用properties配置文件的!
springboot 启动会扫描以下位置的application.properties或者application.yml文件作为Spring boot的默认配置文件:
优先级1:项目路径下的config文件夹配置文件
优先级2:项目路径下配置文件
优先级3:资源路径下的config文件夹配置文件
优先级4:资源路径下配置文件
四、自动装配原理
以HttpEncodingAutoConfiguration为例。
//表示这是一个配置类,和以前编写的配置文件一样,也可以给容器中添加组件;
@Configuration

//启动指定类的ConfigurationProperties功能;
//进入这个HttpProperties查看,将配置文件中对应的值和HttpProperties绑定起来;
//并把HttpProperties加入到ioc容器中
@EnableConfigurationProperties({HttpProperties.class})

//Spring底层@Conditional注解
//根据不同的条件判断,如果满足指定的条件,整个配置类里面的配置就会生效;
//这里的意思就是判断当前应用是否是web应用,如果是,当前配置类生效
@ConditionalOnWebApplication(
    type = Type.SERVLET
)

//判断当前项目有没有这个类CharacterEncodingFilter;SpringMVC中进行乱码解决的过滤器;
@ConditionalOnClass({CharacterEncodingFilter.class})

//判断配置文件中是否存在某个配置:spring.http.encoding.enabled;
//如果不存在,判断也是成立的
//即使我们配置文件中不配置pring.http.encoding.enabled=true,也是默认生效的;
@ConditionalOnProperty(
    prefix = "spring.http.encoding",
    value = {"enabled"},
    matchIfMissing = true
)

public class HttpEncodingAutoConfiguration {
    //他已经和SpringBoot的配置文件映射了
    private final Encoding properties;
    //只有一个有参构造器的情况下,参数的值就会从容器中拿
    public HttpEncodingAutoConfiguration(HttpProperties properties) {
        this.properties = properties.getEncoding();
    }

    //给容器中添加一个组件,这个组件的某些值需要从properties中获取
    @Bean
    @ConditionalOnMissingBean //判断容器没有这个组件?
    public CharacterEncodingFilter characterEncodingFilter() {
        CharacterEncodingFilter filter = new OrderedCharacterEncodingFilter();
        filter.setEncoding(this.properties.getCharset().name());
      filter.setForceRequestEncoding(this.properties.shouldForce(org.springframework.boot.autoconfigure.http.HttpProperties.Encoding.Type.REQUEST));
        filter.setForceResponseEncoding(this.properties.shouldForce(org.springframework.boot.autoconfigure.http.HttpProperties.Encoding.Type.RESPONSE));
        return filter;
    }
}
一句话总结 :根据当前不同的条件判断,决定这个配置类是否生效!
- 一但这个配置类生效;这个配置类就会给容器中添加各种组件;
- 这些组件的属性是从对应的properties类中获取的,这些类里面的每一个属性又是和配置文件绑定的;
- 所有在配置文件中能配置的属性都是在xxxxProperties类中封装着;
- 配置文件能配置什么就可以参照某个功能对应的这个属性类

我们去配置文件里面试试前缀,看提示!
这就是自动装配的原理!
五、自定义starter
我们分析完毕了源码以及自动装配的过程,我们可以尝试自定义一个启动器来玩玩!
启动器模块是一个 空 jar 文件,仅提供辅助性依赖管理,这些依赖可能用于自动装配或者其他类库;
命名归约:
官方命名:
- 前缀:spring-boot-starter-xxx
- 比如:spring-boot-starter-web....
自定义命名:
- xxx-spring-boot-starter
- 比如:mybatis-spring-boot-starter
1、编写启动器
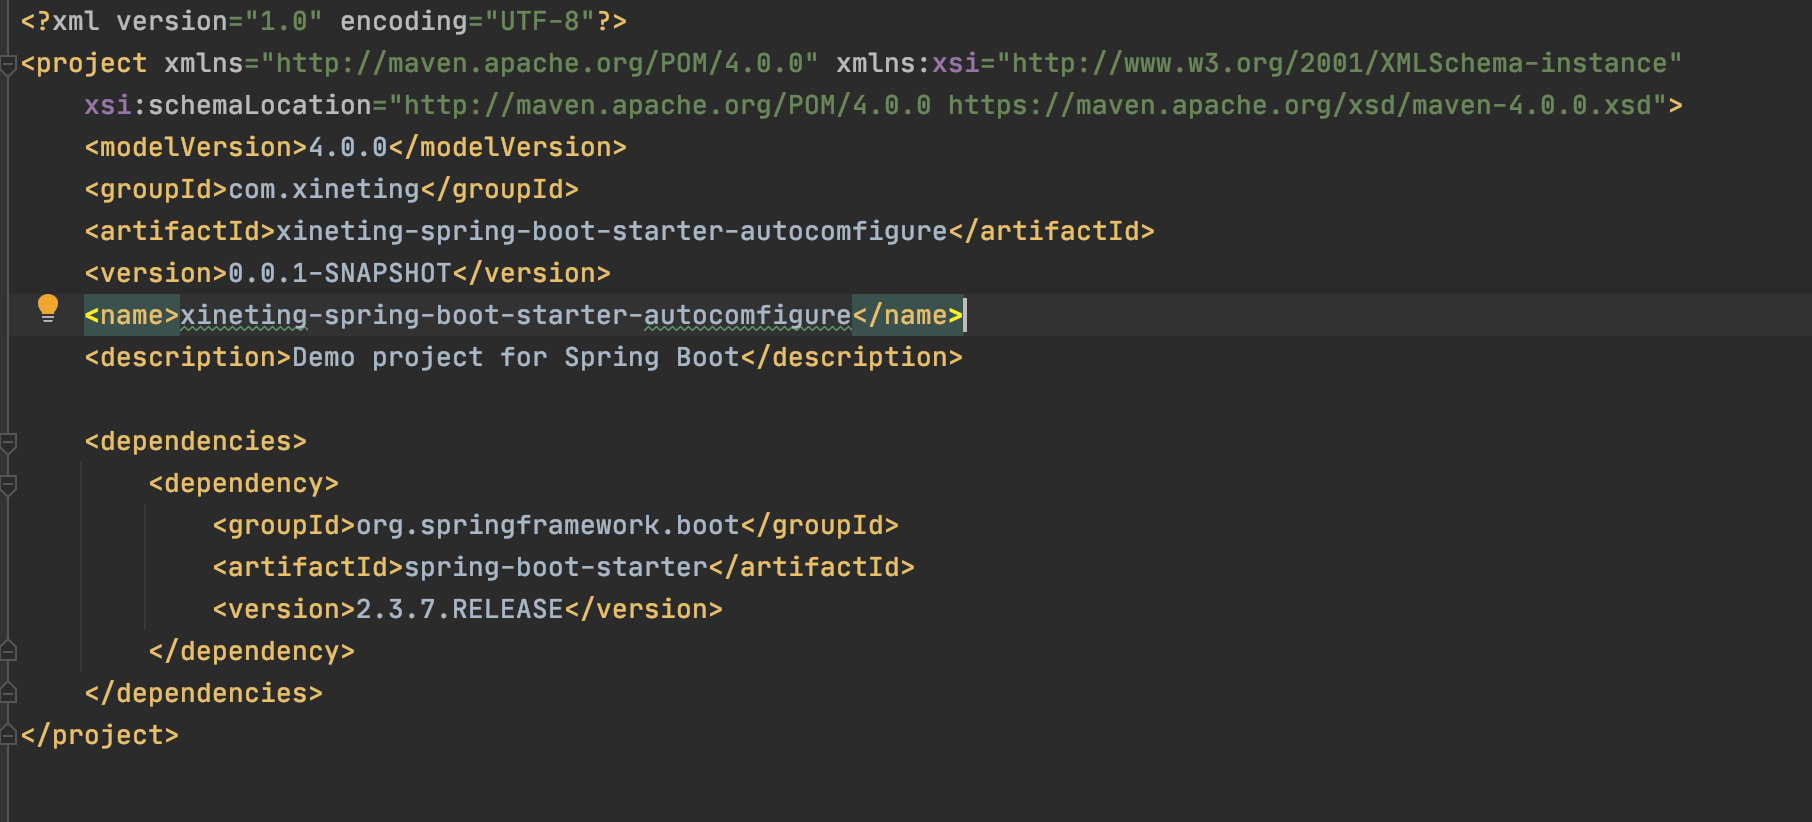
1、在IDEA中新建一个空项目 spring-cloud
2、新建一个普通Maven模块:xineting-spring-boot-starter
3、新建一个Springboot模块:xineting-spring-boot-starter-autoconfigure
4、点击apply即可,基本结构
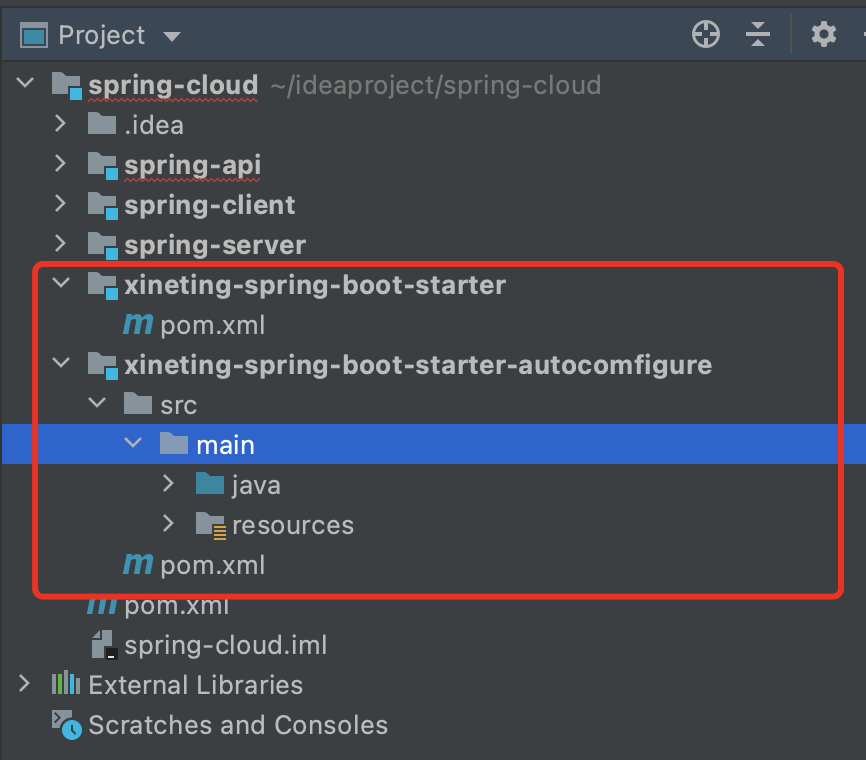
5、在我们的 starter 中 导入 autoconfigure 的依赖!
<!-- 启动器 -->
<dependencies>
    <!--  引入自动配置模块 -->
    <dependency>
        <groupId>com.xineting</groupId>
        <artifactId>xineting-spring-boot-starter-autoconfigure</artifactId>
        <version>0.0.1-SNAPSHOT</version>
    </dependency>
</dependencies>
6、将 autoconfigure 项目下多余的文件都删掉,Pom中只留下一个 starter,这是所有的启动器基本配置!
7、我们编写一个自己的服务
8、编写HelloProperties 配置类
package com.xineting;
import org.springframewk.boot.context.properties.ConfigurationProperties;
@ConfigurationProperties(prefix = "xineting.hello")
public class HelloProperties {
    private String prefix;
    private String suffix;
    public String getPrefix() {
        return prefix;
    }
    public void setPrefix(String prefix) {
        this.prefix = prefix;
    }
    public String getSuffix() {
        return suffix;
    }
    public void setSuffix(String suffix) {
        this.suffix = suffix;
    }
}
8、编写一个自己的服务
package com.xineting;
public class HelloService {
    HelloProperties helloProperties;
    public HelloProperties getHelloProperties() {
        return helloProperties;
    }
    public void setHelloProperties(HelloProperties helloProperties) {
        this.helloProperties = helloProperties;
    }
    public String sayHello(String name){
        return helloProperties.getPrefix() + name + helloProperties.getSuffix();
    }
}
9、编写我们的自动配置类并注入bean,测试!
package com.xineting;

import org.springframework.beans.factory.annotation.Autowired;
import org.springframework.boot.autoconfigure.condition.ConditionalOnWebApplication;
import org.springframework.boot.context.properties.EnableConfigurationProperties;
import org.springframework.context.annotation.Bean;
import org.springframework.context.annotation.Configuration;

@Configuration
@ConditionalOnWebApplication //web应用生效
@EnableConfigurationProperties(HelloProperties.class)
public class HelloServiceAutoConfiguration {

    @Autowired
    HelloProperties helloProperties;

    @Bean
    public HelloService helloService(){
        HelloService service = new HelloService();
        service.setHelloProperties(helloProperties);
        return service;
    }

}
10、在spring-api的resources编写一个自己的 META-INF\spring.factories
# Auto Configure
org.springframework.boot.autoconfigure.EnableAutoConfiguration=com.kuang.HelloServiceAutoConfiguration
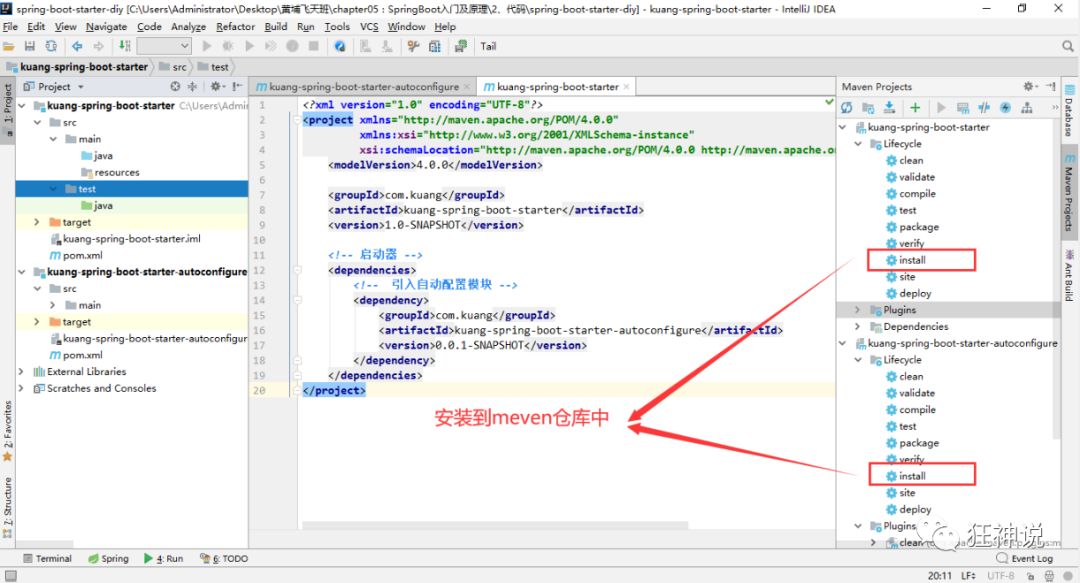
11、编写完成后,可以安装到maven仓库中!
2、新建项目测试我们自己写的启动器
1、新建一个SpringBoot 项目
2、导入我们自己写的启动器
<dependency>
  <groupId>com.xingting</groupId>
  <artifactId>xineting-spring-boot-starter</artifactId>
  <version>1.0-SNAPSHOT</version>
</dependency>
3、编写一个 HelloController 进行测试我们自己的写的接口!
@RestController
public class HelloController {

    @Autowired
    HelloService helloService;

    @RequestMapping("/hello")
    public String hello(){
        return helloService.sayHello("zxc");
    }
}
测试成功
六、整合JDBC
1、创建启动项目
2、项目建好之后,发现自动帮我们导入了如下的启动器:
<dependency>
  <groupId>org.springframework.boot</groupId>
  <artifactId>spring-boot-starter-jdbc</artifactId>
</dependency>
<dependency>
  <groupId>mysql</groupId>
  <artifactId>mysql-connector-java</artifactId>
  <scope>runtime</scope>
</dependency>
3、编写yaml配置文件连接数据库;
spring:
  datasource:
    username: root
    password: rootroot
    driver-class-name: com.mysql.cj.jdbc.Driver
    url: jdbc:mysql://localhost:3306/mysql?serverTimezone=UTC

server:
  port : 8080
2、JDBCTemplate
1、有了数据源(com.zaxxer.hikari.HikariDataSource),然后可以拿到数据库连接(java.sql.Connection),有了连接,就可以使用原生的 JDBC 语句来操作数据库;
2、即使不使用第三方第数据库操作框架,如 MyBatis等,Spring 本身也对原生的JDBC 做了轻量级的封装,即JdbcTemplate。
3、数据库操作的所有 CRUD 方法都在 JdbcTemplate 中。
4、Spring Boot不仅提供了默认的数据源,同时默认已经配置好了JdbcTemplate放在了容器中,程序员只需自己注入即可使用
5、JdbcTemplate的自动配置是依赖org.springframework.boot.autoconfigure.jdbc包下的JdbcTemplateConfiguration类
JdbcTemplate主要提供以下几类方法:
- execute方法:可以用于执行任何SQL语句,一般用于执行DDL语句;
- update方法及batchUpdate方法:update方法用于执行新增、修改、删除等语句;batchUpdate方法用于执行批处理相关语句;
- query方法及queryForXXX方法:用于执行查询相关语句;
- call方法:用于执行存储过程、函数相关语句。
package com.xine;

import org.springframework.beans.factory.annotation.Autowired;
import org.springframework.jdbc.core.JdbcTemplate;
import org.springframework.web.bind.annotation.GetMapping;
import org.springframework.web.bind.annotation.PathVariable;
import org.springframework.web.bind.annotation.RequestMapping;
import org.springframework.web.bind.annotation.RestController;

import java.text.DateFormat;
import java.text.SimpleDateFormat;
import java.util.Date;
import java.util.List;
import java.util.Map;

@RestController
@RequestMapping("/jdbc")
public class jdbccontroller {
    @Autowired
    JdbcTemplate jdbcTemplate;
    @GetMapping("/list")
    public List<Map<String, Object>> userList(){
        String sql = "select * from employee";
        List<Map<String, Object>> maps = jdbcTemplate.queryForList(sql);
        return maps;
    }
    @GetMapping("/add")
    public String addUser(){
        //插入语句,注意时间问题
        DateFormat dateFormat = new SimpleDateFormat("YYYY-MM-DD");
        String sql = "insert into employee(last_name, email,gender,department,birth)" +
                "values('狂神说','24736743@qq.com',1,101,"+"'"+dateFormat.format(new Date())+"'"+")";
        jdbcTemplate.update(sql);
        //查询
        return "addOk";
    }
    //修改用户信息
    @GetMapping("/update/{id}")
    public String updateUser(@PathVariable("id") int id){
        //插入语句
        String sql = "update employee set last_name=?,email=? where id="+id;
        //数据
        Object[] objects = new Object[2];
        objects[0] = "秦疆";
        objects[1] = "24736743@sina.com";
        jdbcTemplate.update(sql,objects);
        //查询
        return "updateOk";
    }

    //删除用户
    @GetMapping("/delete/{id}")
    public String delUser(@PathVariable("id") int id){
        //插入语句
        String sql = "delete from employee where id=?";
        jdbcTemplate.update(sql,id);
        //查询
        return "deleteOk";
    }
}
七、整合Druid
Java程序很大一部分要操作数据库,为了提高性能操作数据库的时候,又不得不使用数据库连接池。Druid 是阿里巴巴开源平台上一个数据库连接池实现,结合了 C3P0、DBCP 等 DB 池的优点,同时加入了日志监控。Druid 可以很好的监控 DB 池连接和 SQL 的执行情况,天生就是针对监控而生的 DB 连接池。Druid已经在阿里巴巴部署了超过600个应用,经过一年多生产环境大规模部署的严苛考验。Spring Boot 2.0 以上默认使用 Hikari 数据源,可以说 Hikari 与 Driud 都是当前 Java Web 上最优秀的数据源,我们来重点介绍 Spring Boot 如何集成 Druid 数据源,如何实现数据库监控。
Github地址:https://github.com/alibaba/druid/
1、配置数据源
1、添加上 Druid 数据源依赖。
<!-- https://mvnrepository.com/artifact/com.alibaba/druid -->
<dependency>
  <groupId>com.alibaba</groupId>
  <artifactId>druid</artifactId>
  <version>1.1.21</version>
</dependency>
2、切换数据源;之前已经说过 Spring Boot 2.0 以上默认使用 com.zaxxer.hikari.HikariDataSource 数据源,但可以 通过 spring.datasource.type 指定数据源。
spring:
  datasource:
    username: root
    password: rootroot
    driver-class-name: com.mysql.cj.jdbc.Driver
    url: jdbc:mysql://localhost:3306/sqltest?serverTimezone=UTC
    type: com.alibaba.druid.pool.DruidDataSource # 自定义数据源

server:
  port : 8080
3、数据源切换之后,在测试类中注入 DataSource,然后获取到它,输出一看便知是否成功切换;

4、切换成功!既然切换成功,就可以设置数据源连接初始化大小、最大连接数、等待时间、最小连接数 等设置项;可以查看源码
spring:
  datasource:
    username: root
    password: rootroot
    driver-class-name: com.mysql.cj.jdbc.Driver
    url: jdbc:mysql://localhost:3306/sqltest?serverTimezone=UTC
    type: com.alibaba.druid.pool.DruidDataSource # 自定义数据源
    #Spring Boot 默认是不注入这些属性值的,需要自己绑定
    #druid 数据源专有配置
    initialSize: 5
    minIdle: 5
    maxActive: 200
    maxWait: 60000
    timeBetweenEvictionRunsMillis: 60000
    minEvictableIdleTimeMillis: 300000
    validationQuery: SELECT 1 FROM DUAL
    testWhileIdle: true
    testOnBorrow: false
    testOnReturn: false
    poolPreparedStatements: true

    #配置监控统计拦截的filters,stat:监控统计、log4j:日志记录、wall:防御sql注入
    #如果允许时报错  java.lang.ClassNotFoundException: org.apache.log4j.Priority
    #则导入 log4j 依赖即可,Maven 地址:https://mvnrepository.com/artifact/log4j/log4j
    filters: stat,wall,log4j
    maxPoolPreparedStatementPerConnectionSize: 20
    useGlobalDataSourceStat: true
    connectionProperties: druid.stat.mergeSql=true;druid.stat.slowSqlMillis=500
server:
  port : 8080
5、导入log4j依赖
<!-- https://mvnrepository.com/artifact/log4j/log4j -->
<dependency>
    <groupId>log4j</groupId>
    <artifactId>log4j</artifactId>
    <version>1.2.17</version>
</dependency>
6、现在需要程序员自己为 DruidDataSource 绑定全局配置文件中的参数,再添加到容器中,而不再使用 Spring Boot 的自动生成了;我们需要 自己添加 DruidDataSource 组件到容器中,并绑定属性;
package com.kuang.config;

import com.alibaba.druid.pool.DruidDataSource;
import org.springframework.boot.context.properties.ConfigurationProperties;
import org.springframework.context.annotation.Bean;
import org.springframework.context.annotation.Configuration;

import javax.sql.DataSource;

@Configuration
public class DruidConfig {
    /*
       将自定义的 Druid数据源添加到容器中,不再让 Spring Boot 自动创建
       绑定全局配置文件中的 druid 数据源属性到 com.alibaba.druid.pool.DruidDataSource从而让它们生效
       @ConfigurationProperties(prefix = "spring.datasource"):作用就是将 全局配置文件中
       前缀为 spring.datasource的属性值注入到 com.alibaba.druid.pool.DruidDataSource 的同名参数中
     */
    @ConfigurationProperties(prefix = "spring.datasource")
    @Bean
    public DataSource druidDataSource() {
        return new DruidDataSource();
    }
}
7、去测试类中测试一下;看是否成功
@SpringBootTest
class SpringbootDataJdbcApplicationTests {
//DI注入数据源
@Autowired
DataSource dataSource;
@Test
public void contextLoads() throws SQLException {
//看一下默认数据源
System.out.println(dataSource.getClass());
//获得连接
Connection connection = dataSource.getConnection();
System.out.println(connection);
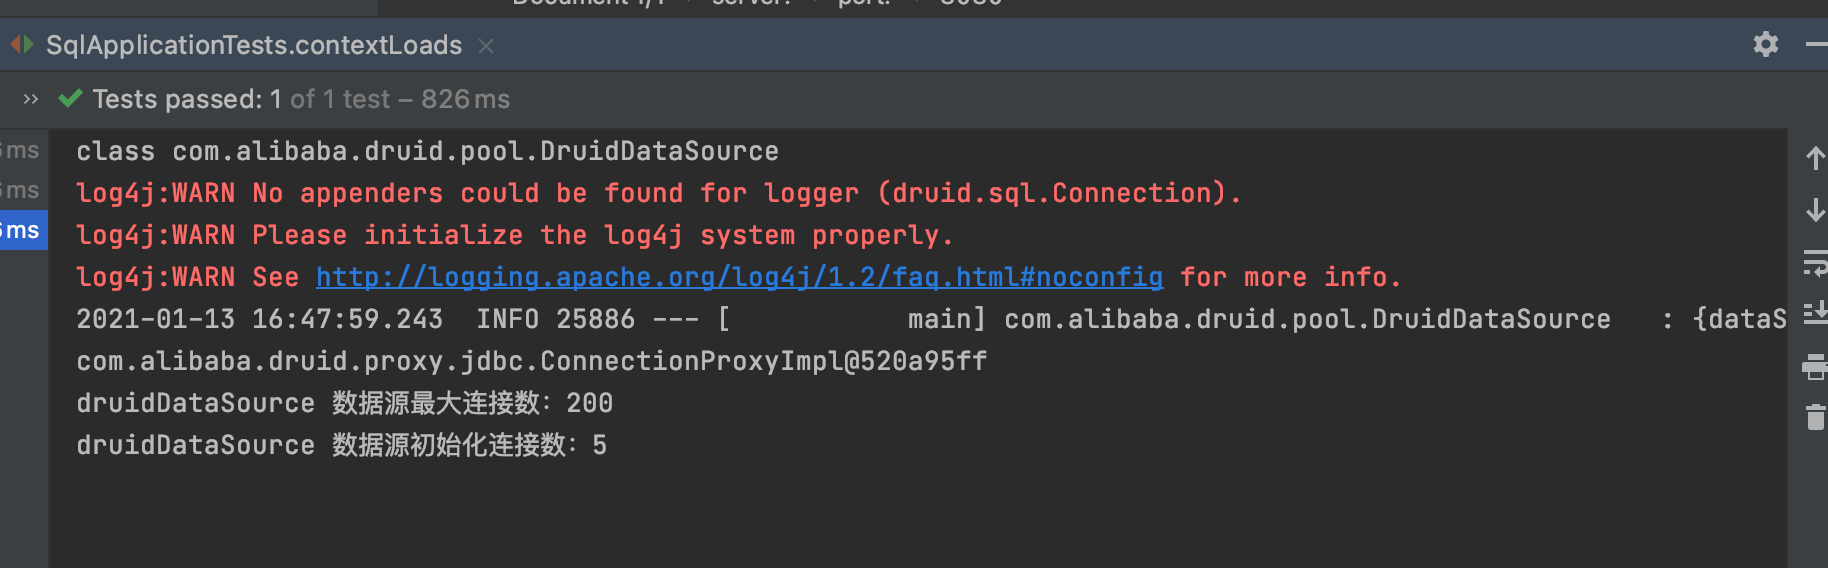
DruidDataSource druidDataSource = (DruidDataSource) dataSource;
System.out.println("druidDataSource 数据源最大连接数:" + druidDataSource.getMaxActive());
System.out.println("druidDataSource 数据源初始化连接数:" + druidDataSource.getInitialSize());
//关闭连接
connection.close();
}
}
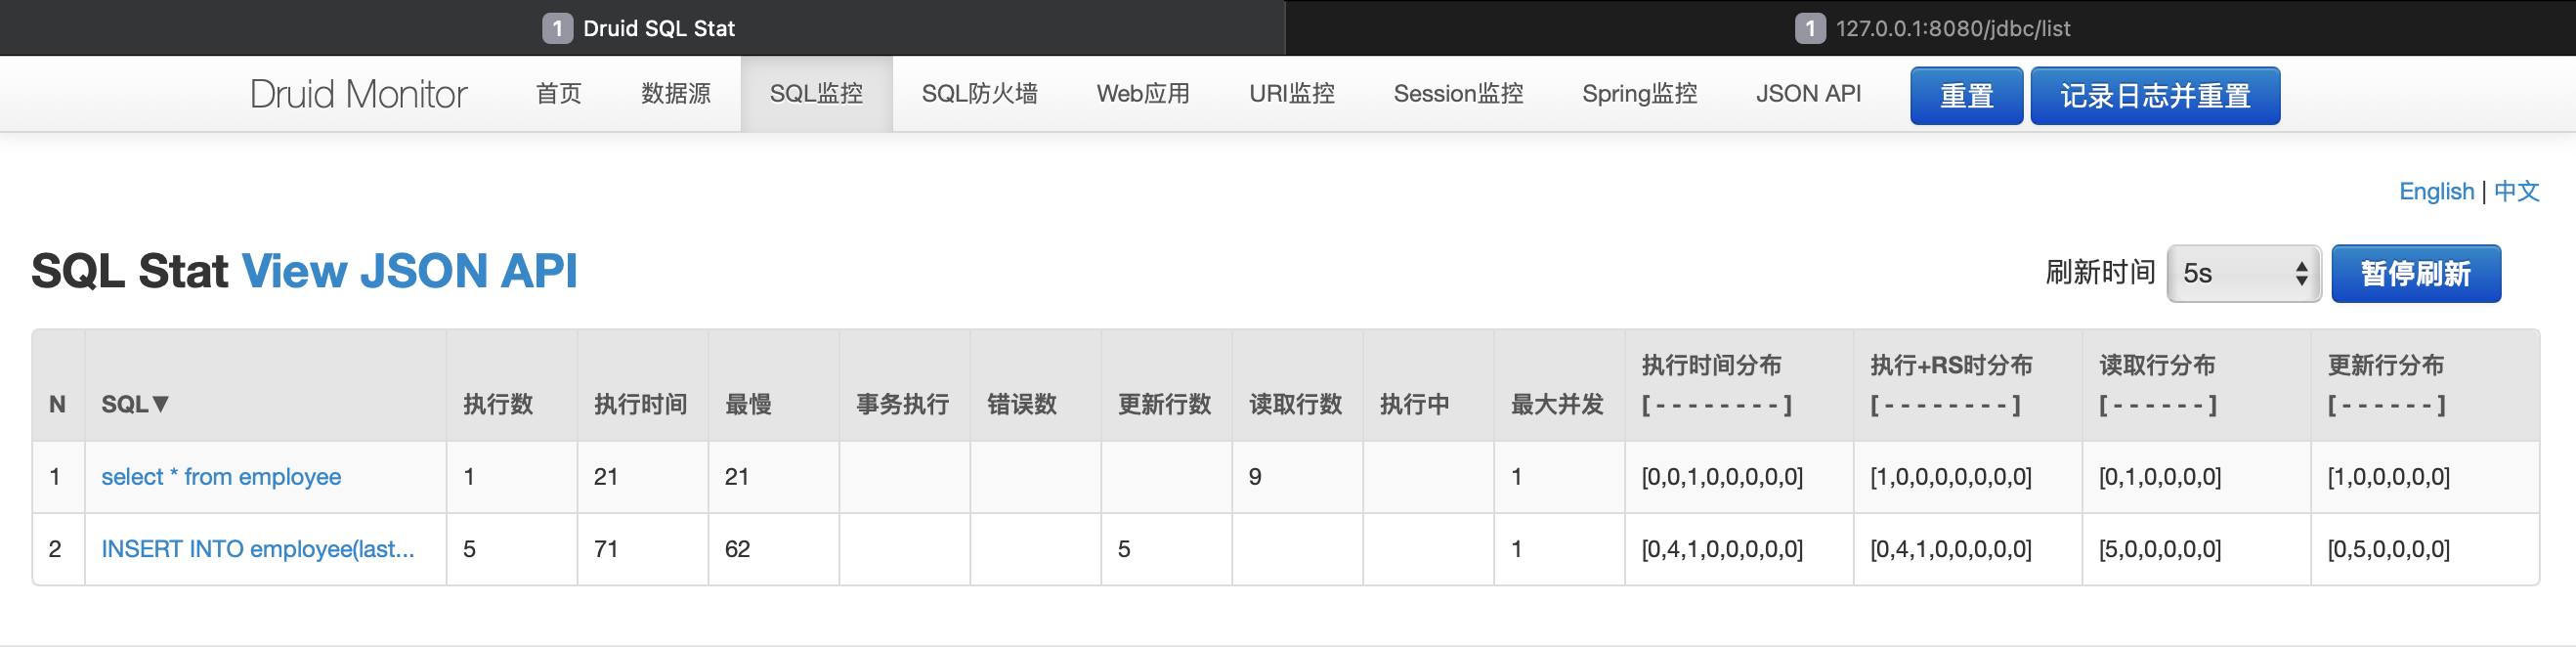
2、监控界面
执行相关的sql语句之后
3、配置 Druid web 监控 filter 过滤器
//配置 Druid 监控 之  web 监控的 filter
//WebStatFilter:用于配置Web和Druid数据源之间的管理关联监控统计
@Bean
public FilterRegistrationBean webStatFilter() {
    FilterRegistrationBean bean = new FilterRegistrationBean();
    bean.setFilter(new WebStatFilter());

    //exclusions:设置哪些请求进行过滤排除掉,从而不进行统计
    Map<String, String> initParams = new HashMap<>();
    initParams.put("exclusions", "*.js,*.css,/druid/*,/jdbc/*");
    bean.setInitParameters(initParams);

    //"/*" 表示过滤所有请求
    bean.setUrlPatterns(Arrays.asList("/*"));
    return bean;
}
八、整合MyBatis
1、创建项目
1、pom.xml
<!--mybatis-spring-boot-starter:整合-->
<dependency>
  <groupId>org.springframework.boot</groupId>
  <artifactId>spring-boot-starter-data-jdbc</artifactId>
</dependency>
<dependency>
  <groupId>org.springframework.boot</groupId>
  <artifactId>spring-boot-starter-web</artifactId>
</dependency>
<dependency>
  <groupId>org.mybatis.spring.boot</groupId>
  <artifactId>mybatis-spring-boot-starter</artifactId>
  <version>2.1.4</version>
</dependency>
<dependency>
  <groupId>mysql</groupId>
  <artifactId>mysql-connector-java</artifactId>
  <scope>runtime</scope>
</dependency>

<dependency>
  <groupId>org.springframework.boot</groupId>
  <artifactId>spring-boot-starter-test</artifactId>
  <scope>test</scope>
  <exclusions>
    <exclusion>
      <groupId>org.junit.vintage</groupId>
      <artifactId>junit-vintage-engine</artifactId>
    </exclusion>
  </exclusions>
</dependency>
2、application.yml
spring:
  datasource:
    username: root
    password: root
    #?serverTimezone=UTC解决时区的报错
    url: jdbc:mysql://localhost:3306/mybatis?serverTimezone=UTC&useUnicode=true&characterEncoding=utf-8
    driver-class-name: com.mysql.cj.jdbc.Driver

#$ 整合mybatis
mybatis:
  type-aliases-package: com.example.demo1.pojo
  mapper-locations: classpath:mapper/*.xml

server:
  port: 8081
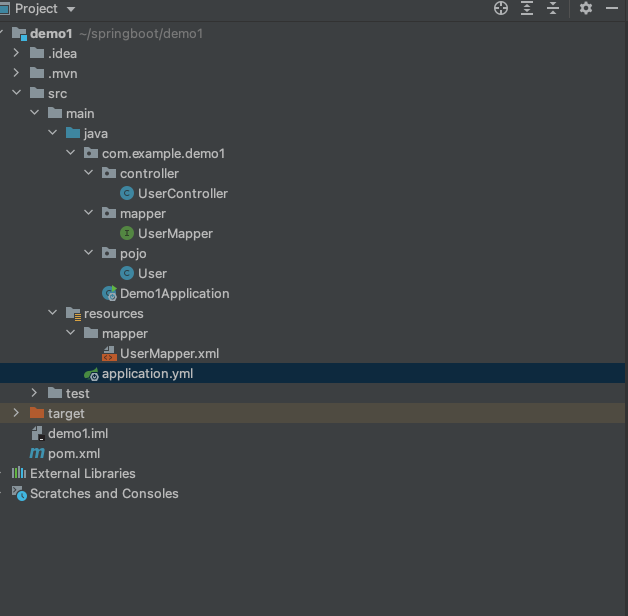
3、目录结构
2、数据库信息
3、创建实体类
package com.example.demo1.pojo;

import lombok.AllArgsConstructor;
import lombok.Data;
import lombok.NoArgsConstructor;

@Data
@AllArgsConstructor
@NoArgsConstructor
public class User {
    private int id;
    private String name;
    private String pwd;
}
4、创建mapper目录以及对应的 Mapper 接口
package com.example.demo1.mapper;

import nuc.ss.pojo.User;
import org.apache.ibatis.annotations.Mapper;
import org.springframework.stereotype.Repository;

import java.util.List;

// 这个注解表示了这是一个 mybatis 的 mapper 类
@Mapper
@Repository
public interface UserMapper {

    List<User> queryUserList();

    User queryUserById(int id);

    int addUser(User user);

    int updateUser(User user);

    int deleteUser(int id);
}
5、创建Mapper映射文件
<?xml version="1.0" encoding="UTF-8" ?>
<!DOCTYPE mapper
        PUBLIC "-//mybatis.org//DTD Mapper 3.0//EN"
        "http://mybatis.org/dtd/mybatis-3-mapper.dtd">
<!--namespace=绑定一个对应的Dao/Mapper接口-->
<mapper namespace="com.example.demo1.mapper.UserMapper">

    <select id="queryUserList" resultType="User">
        select * from mybatis.user;
    </select>

    <select id="queryUserById" resultType="User">
        select * from mybatis.user where id = #{id};
    </select>

    <insert id="addUser" parameterType="User">
        insert into mybatis.user (id, name, pwd) values (#{id},#{name},#{pwd});
    </insert>

    <update id="updateUser" parameterType="User">
        update mybatis.user set name=#{name},pwd = #{pwd} where id = #{id};
    </update>

    <delete id="deleteUser" parameterType="int">
        delete from mybatis.user where id = #{id}
    </delete>
</mapper>
6、编写部门controller进行测试
package com.example.demo1.controller;
import nuc.ss.mapper.UserMapper;
import nuc.ss.pojo.User;
import org.springframework.beans.factory.annotation.Autowired;
import org.springframework.web.bind.annotation.GetMapping;
import org.springframework.web.bind.annotation.RestController;
import java.util.List;
@RestController
public class UserController {
@Autowired
private UserMapper userMapper;
@GetMapping("/queryUserList")
public List<User> queryUserList() {
List<User> userList = userMapper.queryUserList();
for (User user : userList) {
System.out.println(user);
}
return userList;
}
//添加一个用户
@GetMapping("/addUser")
public String addUser() {
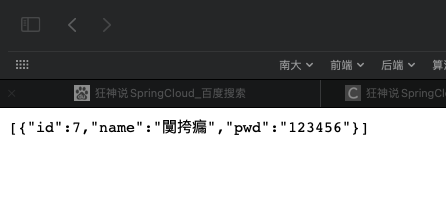
userMapper.addUser(new User(7,"阿毛","123456"));
return "ok";
}
//修改一个用户
@GetMapping("/updateUser")
public String updateUser() {
userMapper.updateUser(new User(7,"阿毛","123456"));
return "ok";
}
@GetMapping("/deleteUser")
public String deleteUser() {
userMapper.deleteUser(7);
return "ok";
}
}
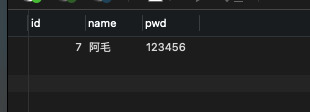
测试结果:
九、Dubbo和Zookeeper集成
1、什么是分布式系统?
在《分布式系统原理与范型》一书中有如下定义:“分布式系统是若干独立计算机的集合,这些计算机对于用户来说就像单个相关系统”;
分布式系统是由一组通过网络进行通信、为了完成共同的任务而协调工作的计算机节点组成的系统。分布式系统的出现是为了用廉价的、普通的机器完成单个计算机无法完成的计算、存储任务。其目的是利用更多的机器,处理更多的数据。
分布式系统(distributed system)是建立在网络之上的软件系统。
首先需要明确的是,只有当单个节点的处理能力无法满足日益增长的计算、存储任务的时候,且硬件的提升(加内存、加磁盘、使用更好的CPU)高昂到得不偿失的时候,应用程序也不能进一步优化的时候,我们才需要考虑分布式系统。因为,分布式系统要解决的问题本身就是和单机系统一样的,而由于分布式系统多节点、通过网络通信的拓扑结构,会引入很多单机系统没有的问题,为了解决这些问题又会引入更多的机制、协议,带来更多的问题。
2、Dubbo
https://dubbo.apache.org/zh/docs/
随着互联网的发展,网站应用的规模不断扩大,常规的垂直应用架构已无法应对,分布式服务架构以及流动计算架构势在必行,急需一个治理系统确保架构有条不紊的演进。
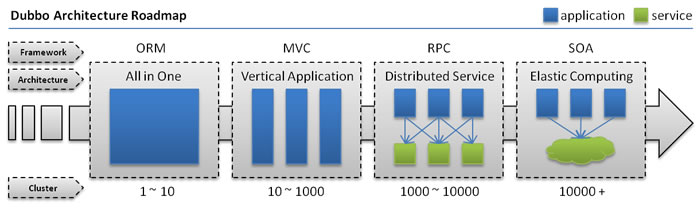
单一应用架构
当网站流量很小时,只需一个应用,将所有功能都部署在一起,以减少部署节点和成本。此时,用于简化增删改查工作量的数据访问框架(ORM)是关键。
垂直应用架构
当访问量逐渐增大,单一应用增加机器带来的加速度越来越小,提升效率的方法之一是将应用拆成互不相干的几个应用,以提升效率。此时,用于加速前端页面开发的Web框架(MVC)是关键。
分布式服务架构
当垂直应用越来越多,应用之间交互不可避免,将核心业务抽取出来,作为独立的服务,逐渐形成稳定的服务中心,使前端应用能更快速的响应多变的市场需求。此时,用于提高业务复用及整合的分布式服务框架(RPC)是关键。
流动计算架构
当服务越来越多,容量的评估,小服务资源的浪费等问题逐渐显现,此时需增加一个调度中心基于访问压力实时管理集群容量,提高集群利用率。此时,用于提高机器利用率的资源调度和治理中心(SOA)是关键。
3、什么是RPC
RPC【Remote Procedure Call】是指远程过程调用,是一种进程间通信方式,他是一种技术的思想,而不是规范。它允许程序调用另一个地址空间(通常是共享网络的另一台机器上)的过程或函数,而不用程序员显式编码这个远程调用的细节。即程序员无论是调用本地的还是远程的函数,本质上编写的调用代码基本相同。
也就是说两台服务器A,B,一个应用部署在A服务器上,想要调用B服务器上应用提供的函数/方法,由于不在一个内存空间,不能直接调用,需要通过网络来表达调用的语义和传达调用的数据。为什么要用RPC呢?就是无法在一个进程内,甚至一个计算机内通过本地调用的方式完成的需求,比如不同的系统间的通讯,甚至不同的组织间的通讯,由于计算能力需要横向扩展,需要在多台机器组成的集群上部署应用。RPC就是要像调用本地的函数一样去调远程函数;
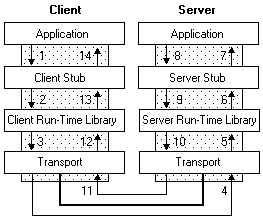
步骤解析:

RPC两个核心模块:通讯,序列化。
4、测试环境搭建
Dubbo
Apache Dubbo |ˈdʌbəʊ| 是一款高性能、轻量级的开源Java RPC框架。
它提供了三大核心能力:
- 面向接口的远程方法调用
- 智能容错和负载均衡
- 以及服务自动注册和发现。
1.了解Dubbo的特性
2.查看官方文档
dubbo基本概念
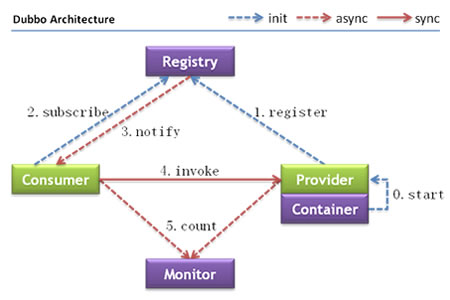
a、节点角色说明
| 节点 | 角色说明 |
|---|---|
Provider |
暴露服务的服务提供方 |
Consumer |
调用远程服务的服务消费方 |
Registry |
服务注册与发现的注册中心 |
Monitor |
统计服务的调用次数和调用时间的监控中心 |
Container |
服务运行容器 |
b、调用关系说明
- 服务容器负责启动,加载,运行服务提供者。
- 服务提供者在启动时,向注册中心注册自己提供的服务。
- 服务消费者在启动时,向注册中心订阅自己所需的服务。
- 注册中心返回服务提供者地址列表给消费者,如果有变更,注册中心将基于长连接推送变更数据给消费者。
- 服务消费者,从提供者地址列表中,基于软负载均衡算法,选一台提供者进行调用,如果调用失败,再选另一台调用。
- 服务消费者和提供者,在内存中累计调用次数和调用时间,定时每分钟发送一次统计数据到监控中心。
Dubbo 架构具有以下几个特点,分别是连通性、健壮性、伸缩性、以及向未来架构的升级性。
5、Dubbo环境搭建
1、下载zookeeper安装
http://zookeeper.apache.org/releases.html#download
2、将解压后的文件,配置环境变量

3、修改zookeeper/conf下的zoo_sample.cfg文件
(1)将zoo_sample.cfg重命名为zoo.cfg
(2)修改dataDir文件路径,在zookeeper/下新建data目录:

4、启动zk
(1)、终端下执行
zkServer.sh start

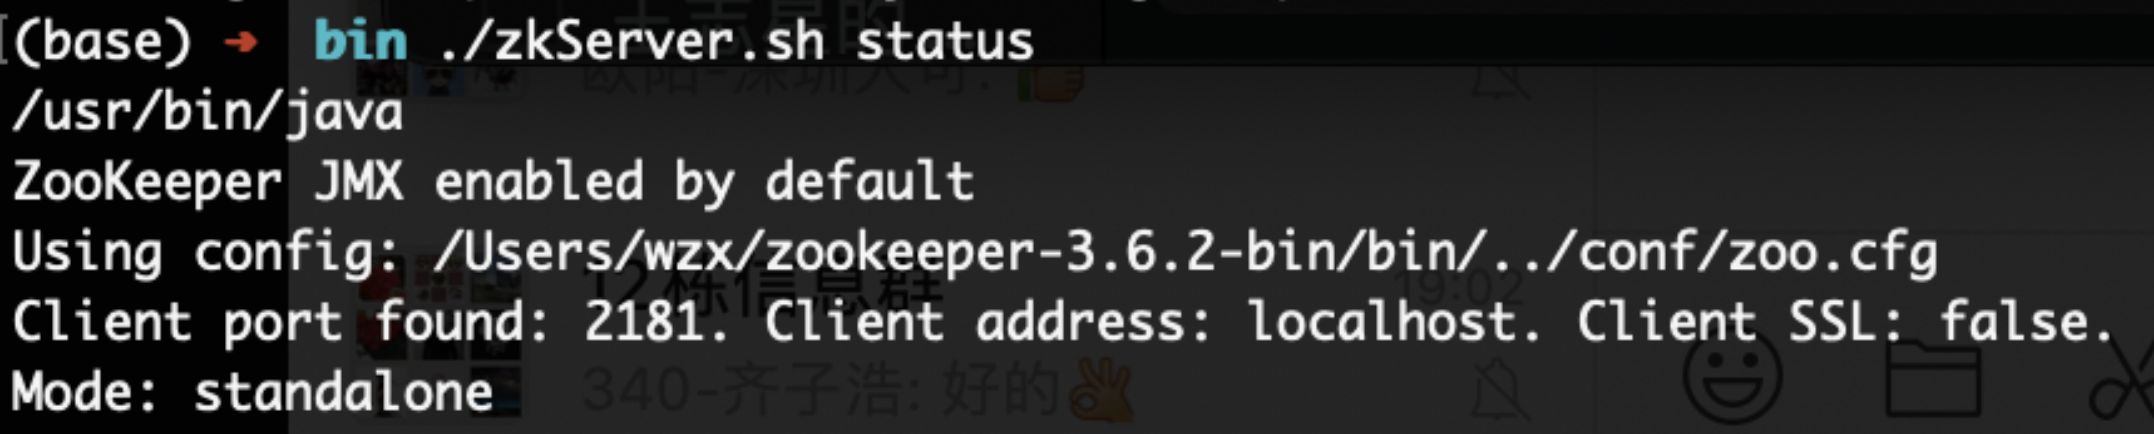
(2)、started之后并不能代表启动成功,查看状态
zkServer.sh status
如图代表单点模式启动成功
(3)、连接到zk,
zkCli.sh -server localhost

6、安装dubbo-admin
dubbo本身并不是一个服务软件。它其实就是一个jar包,能够帮你的java程序连接到zookeeper,并利用zookeeper消费、提供服务。但是为了让用户更好的管理监控众多的dubbo服务,官方提供了一个可视化的监控程序dubbo-admin,不过这个监控即使不装也不影响使用。
地址 :https://github.com/apache/dubbo-admin/tree/master
7、框架搭建
-
启动zookeeper !
-
IDEA创建一个空项目;
-
创建一个模块,实现服务提供者:provider-server , 选择web依赖即可
-
项目创建完毕,我们写一个服务,比如卖票的服务;
编写接口
public interface TicketService {
   public String getTicket();
}
编写实现类
public class TicketServiceImpl implements TicketService {
   @Override
   public String getTicket() {
       return "*******";
  }
}
5.创建一个模块,实现服务消费者:consumer-server , 选择web依赖即可
6.项目创建完毕,我们写一个服务,比如用户的服务;
编写service
package com.example.consumer.service;
public class UserService {
   //我们需要去拿去注册中心的服务
}
需求:现在我们的用户想使用买票的服务,这要怎么弄呢 ?
8、服务提供者
1、将服务提供者注册到注册中心,我们需要整合Dubbo和zookeeper,所以需要导包
我们从dubbo官网进入github,看下方的帮助文档,找到dubbo-springboot,找到依赖包
<!-- Dubbo Spring Boot Starter -->
<dependency>
   <groupId>org.apache.dubbo</groupId>
   <artifactId>dubbo-spring-boot-starter</artifactId>
   <version>2.7.3</version>
</dependency>
zookeeper的包我们去maven仓库下载,zkclient;
<!-- https://mvnrepository.com/artifact/com.github.sgroschupf/zkclient -->
<dependency>
   <groupId>com.github.sgroschupf</groupId>
   <artifactId>zkclient</artifactId>
   <version>0.1</version>
</dependency>
【新版的坑】zookeeper及其依赖包,解决日志冲突,还需要剔除日志依赖;
<!-- 引入zookeeper -->
<dependency>
   <groupId>org.apache.curator</groupId>
   <artifactId>curator-framework</artifactId>
   <version>2.12.0</version>
</dependency>
<dependency>
   <groupId>org.apache.curator</groupId>
   <artifactId>curator-recipes</artifactId>
   <version>2.12.0</version>
</dependency>
<dependency>
   <groupId>org.apache.zookeeper</groupId>
   <artifactId>zookeeper</artifactId>
   <version>3.4.14</version>
   <!--排除这个slf4j-log4j12-->
   <exclusions>
       <exclusion>
           <groupId>org.slf4j</groupId>
           <artifactId>slf4j-log4j12</artifactId>
       </exclusion>
   </exclusions>
</dependency>
2、在springboot配置文件中配置dubbo相关属性!
#当前应用名字
dubbo.application.name=provider-server
#注册中心地址
dubbo.registry.address=zookeeper://127.0.0.1:2181
#扫描指定包下服务
dubbo.scan.base-packages=com.kuang.provider.service
3、在service的实现类中配置服务注解,发布服务!注意导包问题
import org.apache.dubbo.config.annotation.Service;
import org.springframework.stereotype.Component;

@Service //将服务发布出去
@Component //放在容器中
public class TicketServiceImpl implements TicketService {
   @Override
   public String getTicket() {
       return "《狂神说Java》";
  }
}
逻辑理解 :应用启动起来,dubbo就会扫描指定的包下带有@component注解的服务,将它发布在指定的注册中心中!
9、服务消费者
1、配置参数
#当前应用名字
dubbo.application.name=consumer-server
#注册中心地址
dubbo.registry.address=zookeeper://127.0.0.1:2181
2、本来正常步骤是需要将服务提供者的接口打包,然后用pom文件导入,我们这里使用简单的方式,直接将服务的接口拿过来,路径必须保证正确,即和服务提供者相同;
完善消费者的服务类
package com.example.consumer.service;
import com.kuang.provider.service.TicketService;
import org.apache.dubbo.config.annotation.Reference;
import org.springframework.stereotype.Service;
@Service //注入到容器中
public class UserService {
@Reference //远程引用指定的服务,他会按照全类名进行匹配,看谁给注册中心注册了这个全类名
TicketService ticketService;
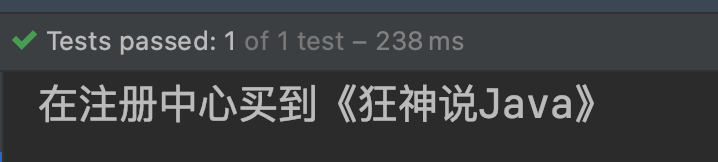
public void bugTicket(){
String ticket = ticketService.getTicket();
System.out.println("在注册中心买到"+ticket);
}
}
3、测试类编写;
@RunWith(SpringRunner.class)
@SpringBootTest
public class ConsumerServerApplicationTests {

   @Autowired
   UserService userService;
   @Test
   public void contextLoads() {
       userService.bugTicket();

  }
}
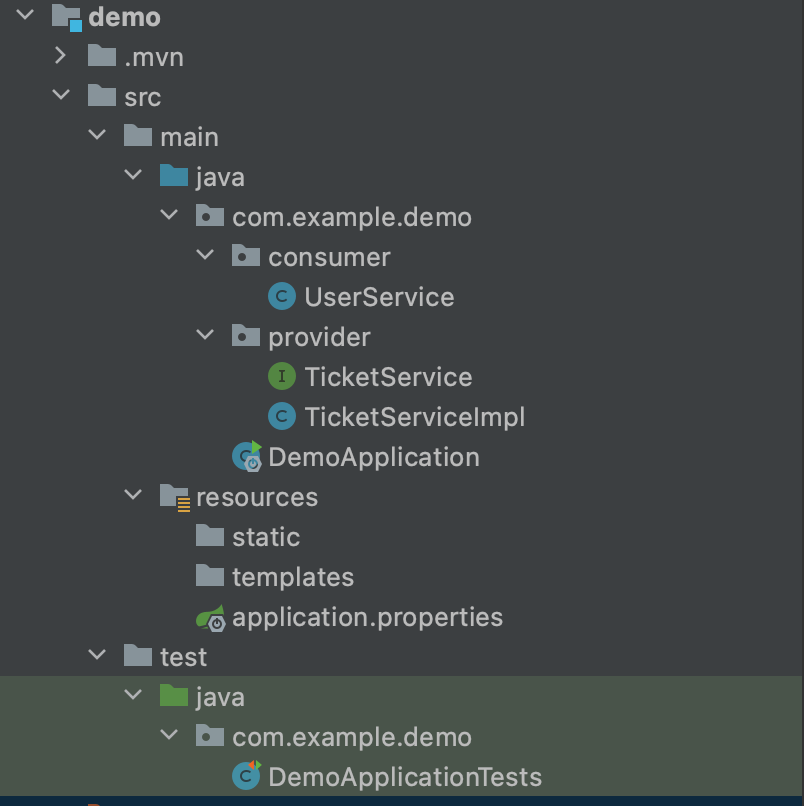
文件目录
4、启动测试
- 开启zookeeper
- 打开dubbo-admin实现监控【可以不用做】
- 开启服务者
- 消费者消费测试,结果:
这就是SpingBoot + dubbo + zookeeper实现分布式开发的应用,其实就是一个服务拆分的思想

 浙公网安备 33010602011771号