LearnToast
Brief Introduction:
l Five different styles of Toast
n string name="A">Default Toast Style</string>
n <string name="B">User Defined Position </string>
n <string name="C">Toast With A Picture</string>
n <string name="D">Complete User Defined </string>
n <string name="E">From Other Thread </string>
l Focusing on how to make a “Complete User Defined”
l Discuss a problem when using an online project file .
================================
Download project link : https://skydrive.live.com/redir?resid=60A420B1DDCF1BF9!186
1. LearnToast.docx
2. pic1.jpg
3. pic2.jpg
4. pic3.jpg
5. pic4.jpg
6. pic5.jpg
7. testToast.apk
8. testToast.zip
================================
Now , Let’s see the SOURCE CODE first .
package edu.cquptzx.testtoast;
import android.app.Activity;
import android.os.Bundle;
import android.os.Handler;
import android.view.Gravity;
import android.view.LayoutInflater;
import android.view.View;
import android.view.ViewGroup;
import android.view.View.OnClickListener;
import android.widget.Button;
import android.widget.ImageView;
import android.widget.LinearLayout;
import android.widget.TextView;
import android.widget.Toast;
publicclass TestToastActivity extends Activity implements OnClickListener{
Handler handler = new Handler();
/** Called when the activity is first created. */
@Override
publicvoid onCreate(Bundle savedInstanceState) {
super.onCreate(savedInstanceState);
setContentView(R.layout.main);
Button btn1 = (Button) findViewById(R.id.button1);
Button btn2 = (Button) findViewById(R.id.button2);
Button btn3 = (Button) findViewById(R.id.button3);
Button btn4 = (Button) findViewById(R.id.button4);
Button btn5 = (Button) findViewById(R.id.button5);
btn1.setOnClickListener(this);
btn2.setOnClickListener(this);
btn3.setOnClickListener(this);
btn4.setOnClickListener(this);
btn5.setOnClickListener(this);
}
@Override
publicvoid onClick(View v)
{
int ID = v.getId();
Toast toast;
switch(ID)
{
case R.id.button1 :
Toast.makeText(getApplicationContext(), R.string.A , Toast.LENGTH_SHORT).show();
break;
case R.id.button2 :
toast = Toast.makeText(getApplicationContext(),
R.string.B, Toast.LENGTH_LONG);
toast.setGravity(Gravity.CENTER, 0, 0);
toast.show();
break;
case R.id.button3 :
toast = Toast.makeText(getApplicationContext(), R.string.C, Toast.LENGTH_LONG);
/*public void setGravity (int gravity, int xOffset, int yOffset)
Set the location at which the notification should appear on the screen.*/
toast.setGravity(Gravity.CENTER, 0, 0);
/* Create a LinearLayout to show a picture */
LinearLayout toastLinearLayout = (LinearLayout) toast.getView();
/* Create a ImageView */
/* android.content.ContextWrapper.getApplicationContext() return context. */
ImageView imageOnToast= new ImageView(getApplicationContext());
/* public void setImageResource (int resId)
Sets a drawable as the content of this ImageView. */
imageOnToast.setImageResource(android.R.drawable.ic_menu_add);
/* add the ImageView object to the LinearLayout object.*/
toastLinearLayout.addView(imageOnToast, 0);
/* Call the show method to make a toast message. */
toast.show();
break;
case R.id.button4 :
/* Get a LayoutInflater object by */
/* [LayoutInflater android.app.Activity.getLayoutInflater()]*/
LayoutInflater inflater = getLayoutInflater();
/* @Introduce Inflate a new view hierarchy from the specified xml resource.
* @method public View inflate (int resource, ViewGroup root)
* @resourceID for an XML layout resource to load (e.g., R.layout.main_page)
* @rootOptional view to be the parent of the generated hierarchy.
* @return The root View of the inflated hierarchy.
* If root was supplied, this is the root View;
* otherwise it is the root of the inflated XML file.*/
View customView = inflater.inflate(R.layout.custom,(ViewGroup) findViewById(R.id.llToast));
/*===========set the IopText in the custom.xml============*/
TextView TopTitle = (TextView) customView.findViewById(R.id.tvTitleToast);
TopTitle.setText("Attention");
/*===========set the Image in the custom.xml============*/
/* Find the ImageView Object by ID. */
/* View android.view.View.findViewById(int id) */
ImageView image = (ImageView) customView.findViewById(R.id.tvImageToast);
/* public void setImageResource (int resId)
Sets a drawable as the content of this ImageView. */
image.setImageResource(R.drawable.ic_launcher);
/*===========set the BottomText in the custom.xml============*/
TextView BottomText = (TextView) customView.findViewById(R.id.tvTextToast);
BottomText.setText(R.string.E);
/* Make a toast and SET THE SPECIFIC VIEW : customView .*/
toast = new Toast(getApplicationContext());
toast.setGravity(Gravity.CENTER, 12, 40);
toast.setDuration(Toast.LENGTH_LONG);
toast.setView(customView);
toast.show();
break;
case R.id.button5 :
new Thread(new Runnable()
{
publicvoid run()
{
showToast();
}
}).start();
break;
default: break;
}
}
publicvoid showToast()
{
handler.post(new Runnable()
{
@Override
publicvoid run() {
Toast.makeText(getApplicationContext(), R.string.E ,
Toast.LENGTH_SHORT).show();
}
});
}
}
>>>Default Toast Style
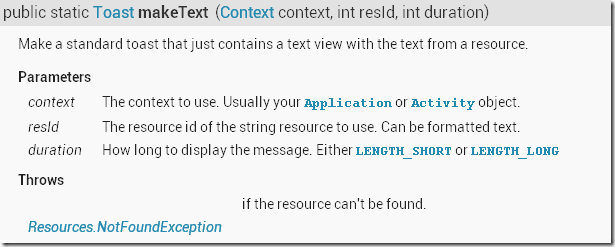
Toast android.widget.Toast.makeText(Context context, int resId, int duration)
>>>User Defined Position
void android.widget.Toast.setGravity(int gravity, int xOffset, int yOffset)
Set the location at which the notification should appear on the screen.
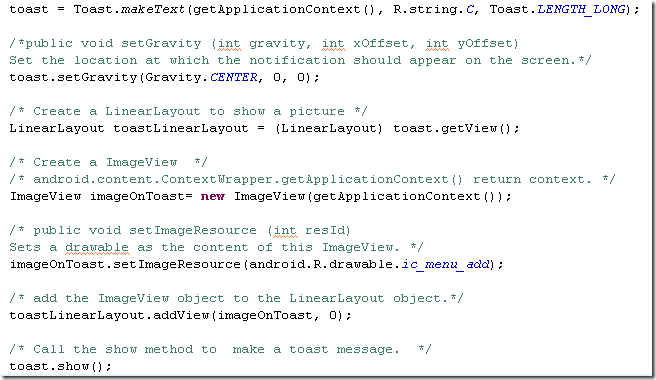
>>> Toast WithA Picture
void android.view.ViewGroup.addView(View child, intindex)
1.First create a toast object.
2.Find the view of this toast object.
3.Create a ImageView .
4.Add the ImageView to the view of this object (in step 2.)
5.Start the toast .
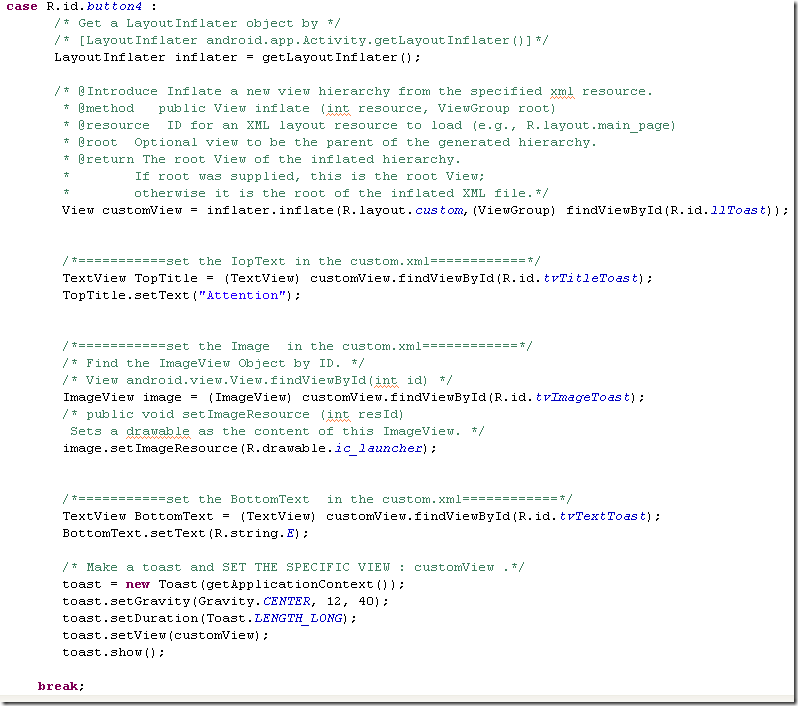
>>>Complete User Defined
To create a user defined toast,
1. create a style file in “res/layout/custom.xml”(in the file , you can design the style you want.)
2. Create a LayoutInflaterobject ,youcan write as follows :
LayoutInflater inflater = getLayoutInflater();
3.use the method of LayoutInflaterobject
View android.view.LayoutInflater.inflate(int resource, ViewGrouproot)
to make a view with the xlm-file you have designed above. You can wrirelike this.
View customView = inflater.inflate(
R.layout.custom,
(ViewGroup) findViewById(R.id.llToast));
(for the R.id.llToast, you can download the project file and then check yourself . )
4.Find the ID in the view you have created in step 3, and then set the text of TextView,set the image resource of a picture.
5.Create a toast object and the most important is to use the method setViewto your toast object .
6.Let the toast start(By calling the method .how())
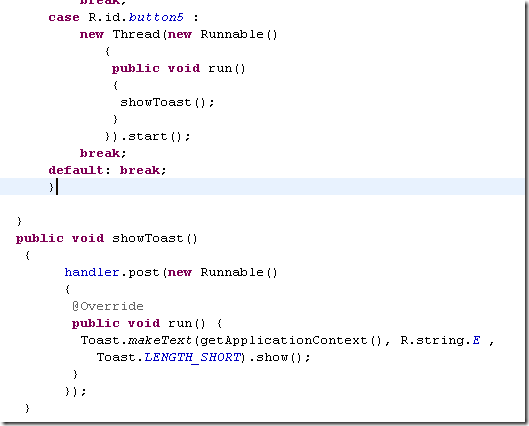
>>>From Other Thread
1.Createa handler object.
2.new a Thread and override the run method.
3.use the post methodof the handler object you have created.
4.implement the run methodin the post method.
=====================================
Discuss a problem when using an online project file .
When doing this project, you can see the content at website :
http://www.2cto.com/kf/201109/102533.html
but in the xml-file, there is an error :
Multiple annotations found at this line:
tosolve this problem by delete the space in the
xmlns:android="http://schemas.android.com/apk/res/android "
changedto:
xmlns:android="http://schemas.android.com/apk/res/android"
For more questions , contacts me by :
cquptzx@qq.com or cquptzx@outlook.com


