二刷Redux笔记
关于react的一些思考
所有的数据全部先要发送给容器,然后容器负责接受数据单后再分发数据给他下面的组件,通过props来传递,一个页面就可以相当于一个容器,容器之中就会有很多子组件,一般组件只负责接受容器的数据的渲染,容器来处理组件的状态
开始redux
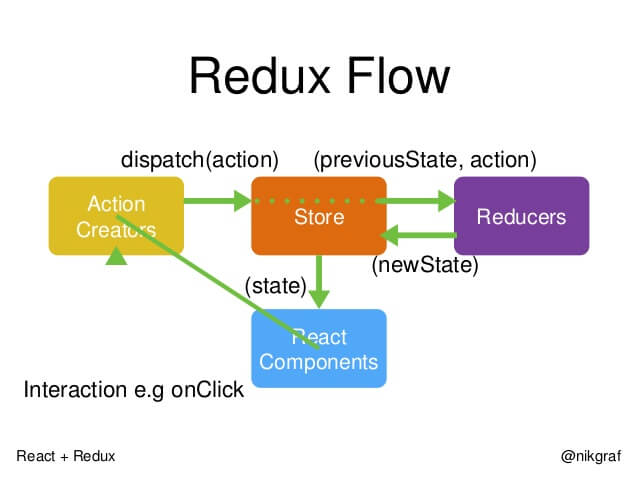
redux主要是三个部分组成
- Action 在这里定义一些操作和操作需要的数据交流
- Reducer 这里需要定义数据,也就是state然后要根据不同action做出不同的操作
- Store 这个主要就是起到链接作用的
然后主要的数据流向是
在你的界面上发生事件然后传递到容器上,
容器负责链接上Action
然后Action把请求通过store找到reducers
在reducers上对数据进行处理
然后数据改变后reducers通过store找到绑定容器
在容器上对数据进行绑定
然后就可以在界面上显示出来了

Store
就一句话来链接容器和reducers
同时加上Provider组件
let store = createStore(testAPP);

ReactDOM.render((
	<Provider store={store}>
		<App/>
	</Provider>
	), document.getElementById('root'));
registerServiceWorker();
Action
类似于这种
每个action有一个type,然后后面是对应的交互的数据
export const addData = addDelta => {
	return {
		type: 'ADD_DATA',
		addDelta//添加量
	}
};
Reducer
在里面要定义state
然后写一个switch循环来判断不同的Action给出不同的操作
const initialState = {
	data : 0
}

const test = (state = initialState, action)=>{
	switch (action.type) {
		case 'ADD_DATA':
			console.log(state);
			return {
				data : state.data + action.addDelta
			}
		case 'SUBTRACT_DATA':
			return {
				data : state.data + action.addDelta
			}
		default:
			return state;
	}
};

export default test;
在容器中展示和触发
你在容器中使用redux的话需要绑定一下
export default connect(mapStateToProps,mapDispatchToProps)(Test)
mapStateToProps函数是绑定state里面的数据
mapDispatchToProps就是绑定一些方法方便触发
在组件中就直接通过props获取到
const mapStateToProps = state => ({
	data: state
})
const mapDispatchToProps = dispatch => ({
	test: id => dispatch(addData(id))
})
class Test2 extends Component {
	render() {
		const {data} = this.props;
		return (
			<div className="App">
				<p className="App-intro">
					<li><Link to='/test'>to test</Link></li>
					this is test2------<span>{JSON.stringify(data)}</span>
					<li><Link to='/'>to app</Link></li>
				</p>
			</div>
		)

	}
}


