命令行操作es(转)
==========
1.检查ES节点是否正常启动
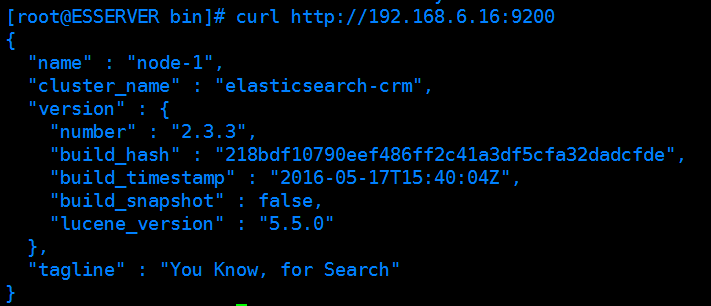
curl http://192.168.6.16:9200
正常状态:
非正常状态:
1>确保服务是不是正常启动了,端口用的是哪个
2>防火墙是否关闭或者端口是否开放
3>你的curl命令是否有问题,curl命令可能导致服务无法访问,可以尝试重启服务后,在外部浏览器访问URL地址即可。不一定非得用curl
2.cat检测集群健康状况
curl http://192.168.6.16:9200/_cat/health?v

绿色表示一切正常, 黄色表示所有的数据可用但是部分副本还没有分配,红色表示不可用
3.查询es中所有索引,所有已存在的索引
curl http://192.168.6.16:9200/_cat/indices?v

4.创建新的索引【索引要求是全小写字符,可以有下划线隔开】
curl -XPUT http://192.168.6.16:9200/my_new_index?pretty
再查看:
curl http://192.168.6.16:9200/_cat/indices?v

5.对新增的索引,插入一条数据
type是user, id指定为1
curl -XPUT http://192.168.6.16:9200/my_new_index/user/1?pretty -d '{"name":"张三","age":"23"}'

6.根据ID,获取刚刚索引中新增的数据
curl -XGET http://192.168.6.16:9200/my_new_index/user/1?pretty

7.修改数据
7.1先新增一条数据
curl -XPUT http://192.168.6.16:9200/my_new_index/user/2?pretty -d '{"name":"李四","age":"25"}'

7.2 根据ID查询这条数据
curl -XGET http://192.168.6.16:9200/my_new_index/user/2?pretty

7.3修改id为2的数据
curl -XPUT http://192.168.6.16:9200/my_new_index/user/2?pretty -d '{"name":"李四修改","age":"28"}'
即使用相同的新增命令操作 相同的ID,数据不同

7.4查询修改结果
curl -XGET http://192.168.6.16:9200/my_new_index/user/2?pretty

8.更新数据,使用POST请求,注意请求体,格式
curl -XPOST http://192.168.6.16:9200/my_new_index/user/2/_update?pretty -d '{"doc":{"name":"李四更新","age":"230"}}'

查看更新后的数据:
curl -XGET http://192.168.6.16:9200/my_new_index/user/2?pretty

9.更新数据的同时,新增列
就是将doc中的json数据列增加即可
curl -XPOST http://192.168.6.16:9200/my_new_index/user/2/_update?pretty -d '{"doc":{"name":"李四更新","age":"230","address":"北京东直门"}}'

查看:
curl -XGET http://192.168.6.16:9200/my_new_index/user/2?pretty

10.将age字段字符串类型,修改为数字类型,并使用简单脚本对其操作
10.1 查看数据
curl -XGET http://192.168.6.16:9200/my_new_index/user/2?pretty

10.2 将age类型由字符串更改为数值
就是将json中的age的值的引号去掉
curl -XPOST http://192.168.6.16:9200/my_new_index/user/2/_update?pretty -d '{"doc":{"name":"李四更新","age":230,"address":"北京东直门"}}'

10.3 查看修改后数据
curl -XGET http://192.168.6.16:9200/my_new_index/user/2?pretty

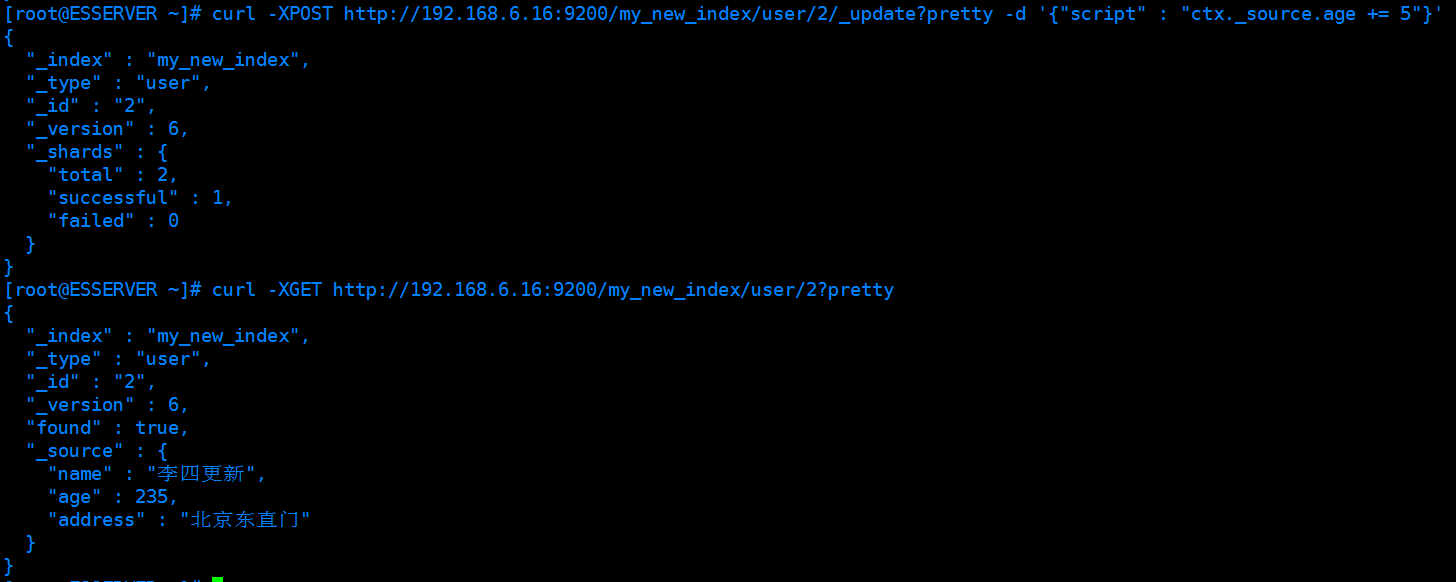
10.4使用简单脚本,对年龄增加5
如果报错。解决方法:https://www.cnblogs.com/sxdcgaq8080/p/11119420.html
curl -XPOST http://192.168.6.16:9200/my_new_index/user/2/_update?pretty -d '{"script" : "ctx._source.age += 5"}'
查看:
curl -XGET http://192.168.6.16:9200/my_new_index/user/2?pretty
11.删除数据,根据ID删除
curl -XDELETE http://192.168.6.16:9200/my_new_index/user/2?pretty

13.批量插入 bulk
【注意JSON字符串格式】
curl -XPOST http://192.168.6.16:9200/my_new_index/user/_bulk?pretty -d '
{"index":{"_id":"3"}}
{"name":"赵思","age":12}
{"index":{"_id":"4"}}
{"name":"钱三一","age":13}
'
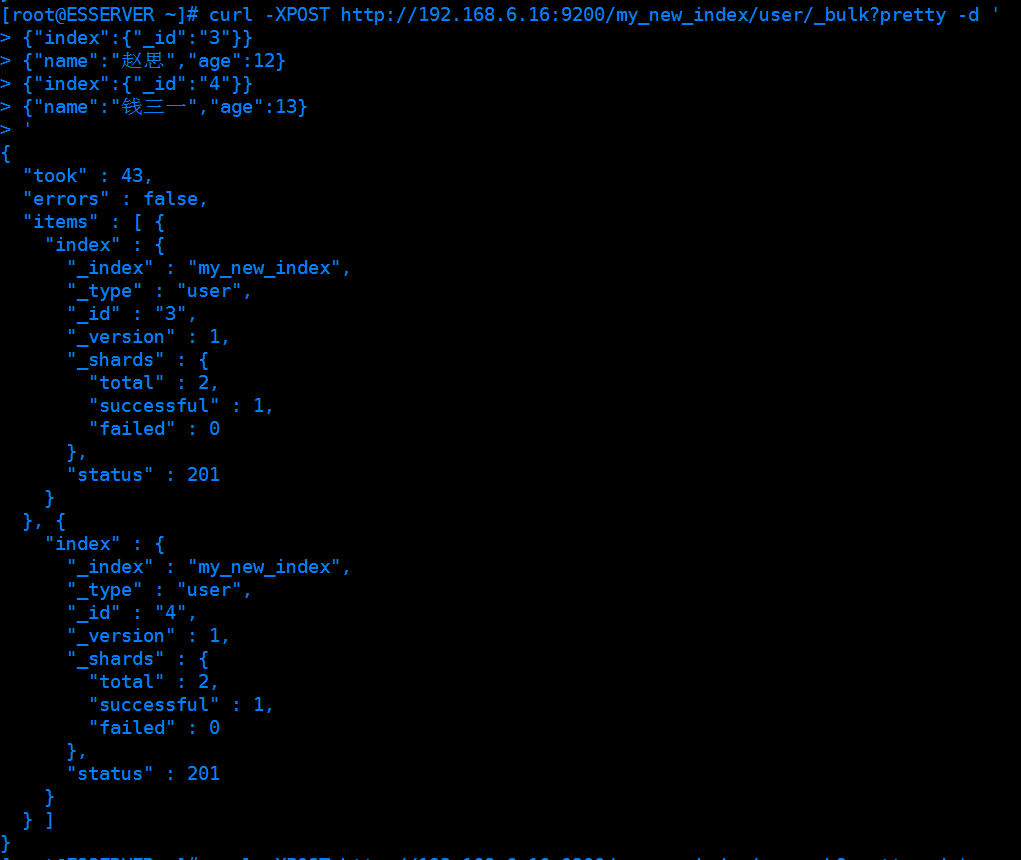
想要看插入以后索引下的数据,查询在后面16
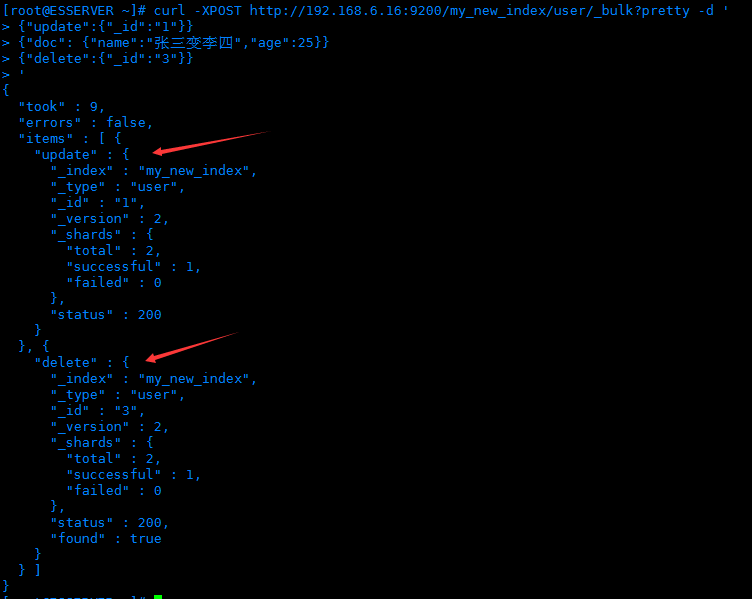
14.批处理语句,bulk,更新id为1的数据,删除id为3的数据
curl -XPOST http://192.168.6.16:9200/my_new_index/user/_bulk?pretty -d '
{"update":{"_id":"1"}}
{"doc": {"name":"张三变李四","age":25}}
{"delete":{"_id":"3"}}
'
15.导入批量数据集文件json文件【使用bulk批量导入】
测试的json批量数据集文件,java生成代码:

public static void main(String[] args) {
        File file   = new File("E:\\1\\myjson.json");
        FileWriter writer = null;
        int size = 200;

        try {
            writer =new FileWriter("E:\\1\\myjson.json");
            for (int i = 10; i < size+10; i++) {
                writer.write("{\"index\":{\"_id\":\""+i+"\"}}"+"\r\n"+"{\"name\":\"张三"+i+"\",\"age\": "+i+",\"address\":\"北京"+i+"\"}"+"\r\n");
            }
            writer.flush();
        } catch (IOException e) {
            e.printStackTrace();
        }finally {
            try {
                writer.close();
            } catch (IOException e) {
                e.printStackTrace();
            }
        }


    }
如果报错,解决方案:https://www.cnblogs.com/sxdcgaq8080/p/11119883.html
指定要导入的 索引、type、使用bulk命令 @符号后面跟json文件的绝对路径
curl -XPOST http://192.168.6.16:9200/my_new_index/user/_bulk?pretty --data-binary @/cjf/es/elasticsearch-2.3.3/data/myjson.json
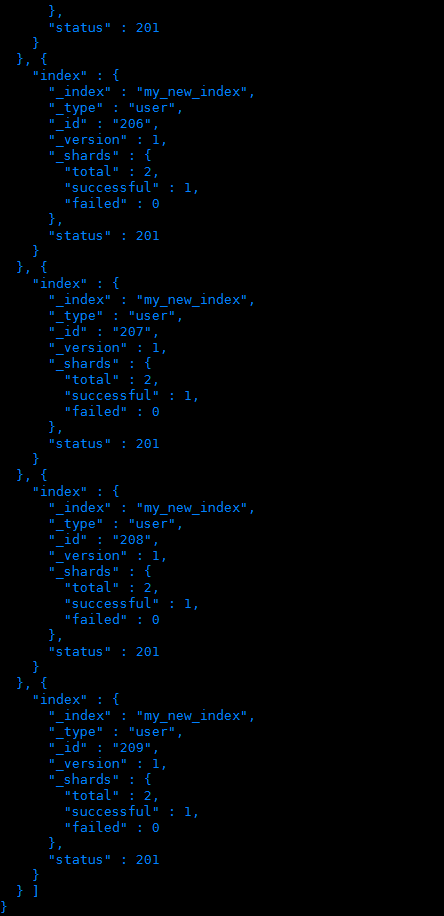
查看index详情:
curl http://192.168.6.16:9200/_cat/indices?v
可以看到成功批量插入了200条

===================================下来看查询(删除索引在最后)=========================================
16.查询某个索引中的所有数据
curl http://192.168.6.16:9200/my_new_index/_search?q=*&pretty
等价于
curl -XPOST http://192.168.6.16:9200/my_new_index/_search?pretty -d '
{
    "query":{
        "match_all":{

        }
    }
}
'
即
curl -XPOST http://192.168.6.16:9200/my_new_index/_search?pretty -d '{"query":{ "match_all":{}}}'
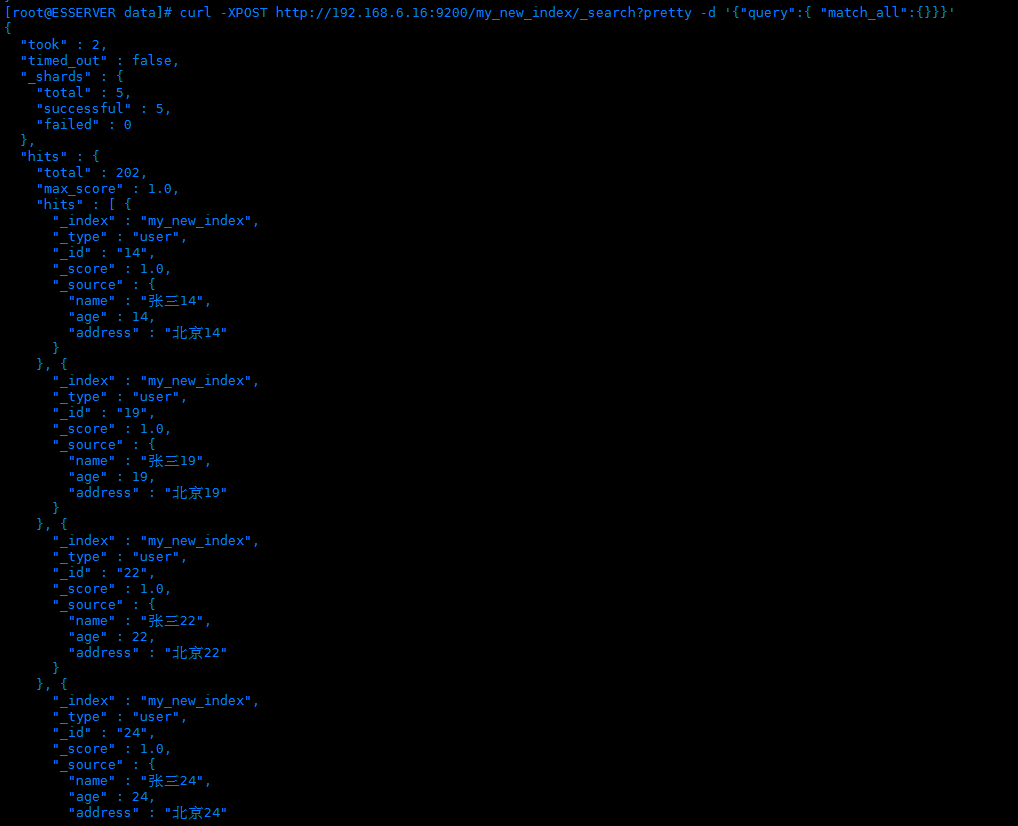
17.查询指定索引下的数据
【如果不指定size,默认返回10条】
curl -XPOST http://192.168.6.16:9200/my_new_index/_search?pretty -d '
{
    "query":{
        "match_all":{

        }
    },
    "size":10
}
'
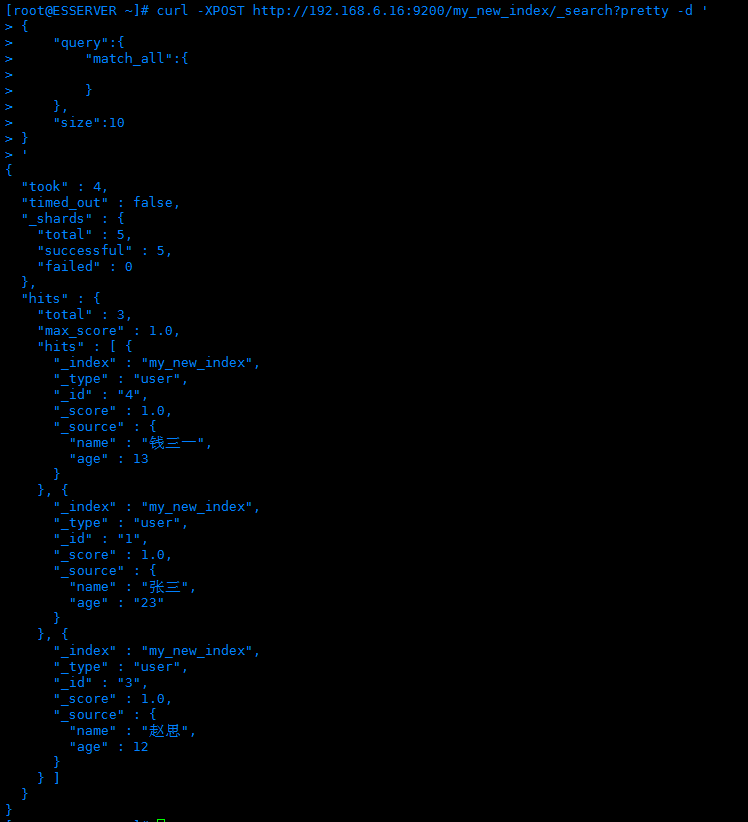
18.分页查询,从第10条,返回10条
curl -XPOST http://192.168.6.16:9200/my_new_index/_search?pretty -d '
{
    "query":{
        "match_all":{

        }
    },
    "from": 10,
    "size": 10
}
'
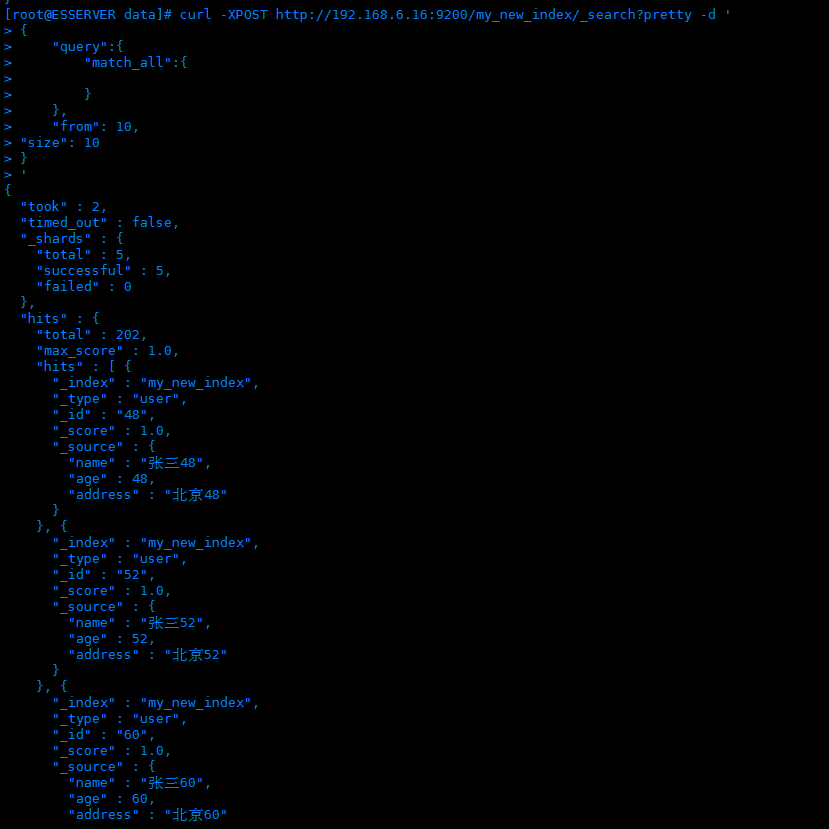
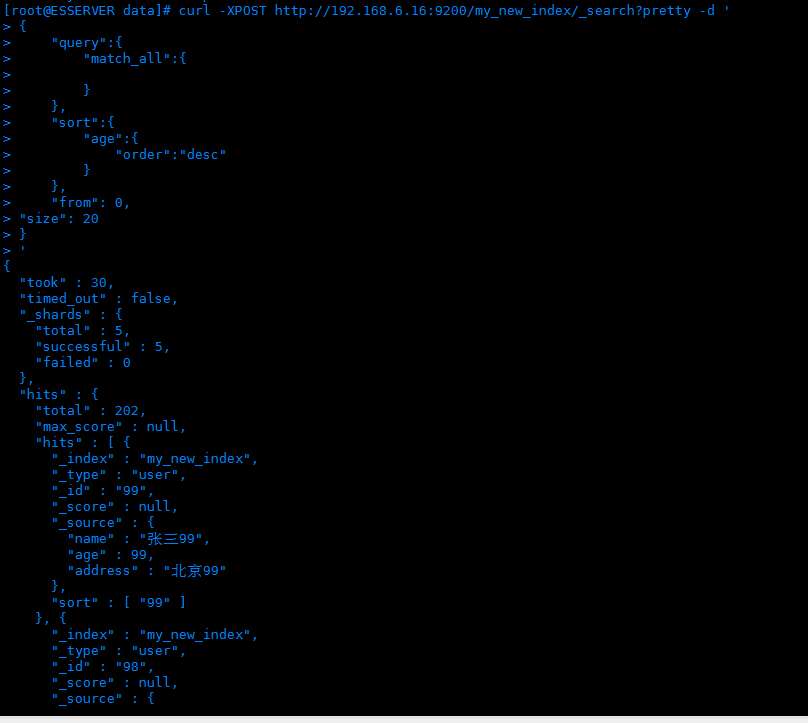
19.按照age字段倒序排序 sort,取出20条
curl -XPOST http://192.168.6.16:9200/my_new_index/_search?pretty -d '
{
    "query":{
        "match_all":{

        }
    },
    "sort":{
        "age":{
            "order":"desc"
        }
    },
    "from": 0,
    "size": 20
}
'
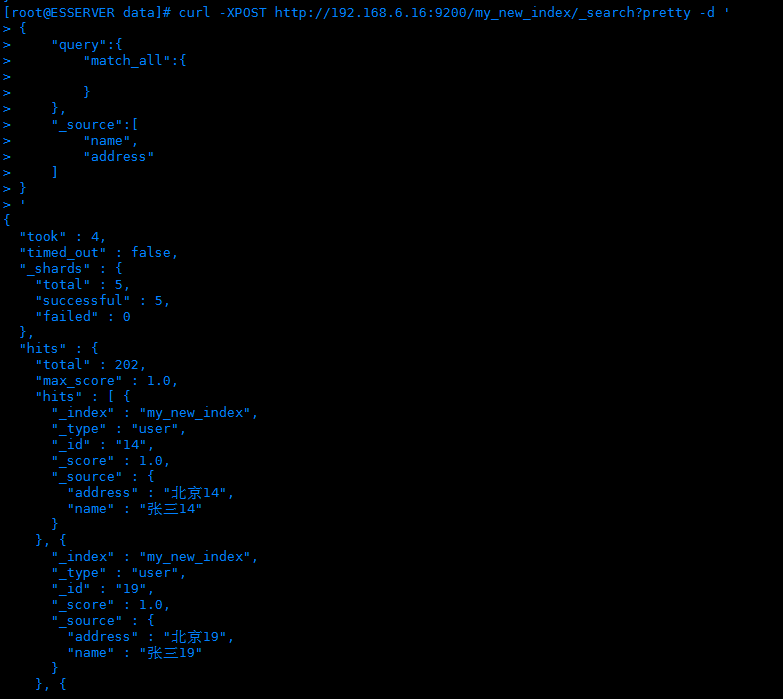
20.只返回想查询的部分字段
只返回name和address列
curl -XPOST http://192.168.6.16:9200/my_new_index/_search?pretty -d '
{
    "query":{
        "match_all":{

        }
    },
    "_source":[
        "name",
        "address"
    ]
}
'
21.条件匹配查询
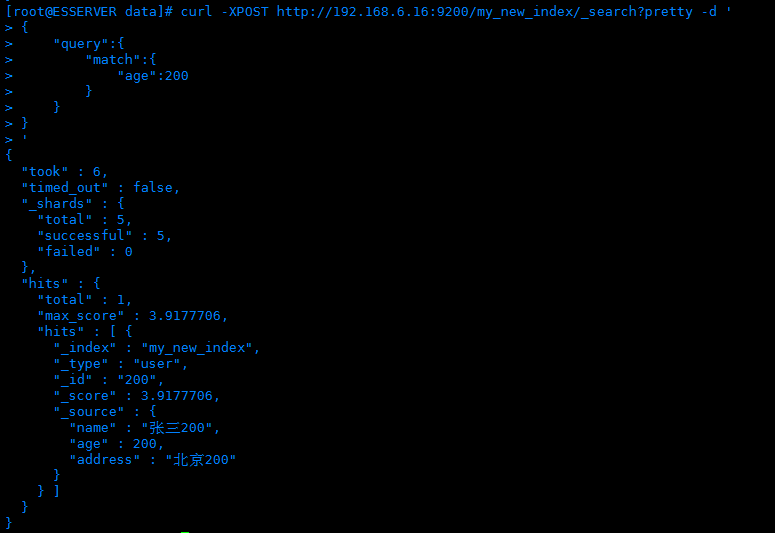
21.1查询age=200的数据
curl -XPOST http://192.168.6.16:9200/my_new_index/_search?pretty -d '
{
    "query":{
        "match":{
            "age":200
        }
    }
}
'
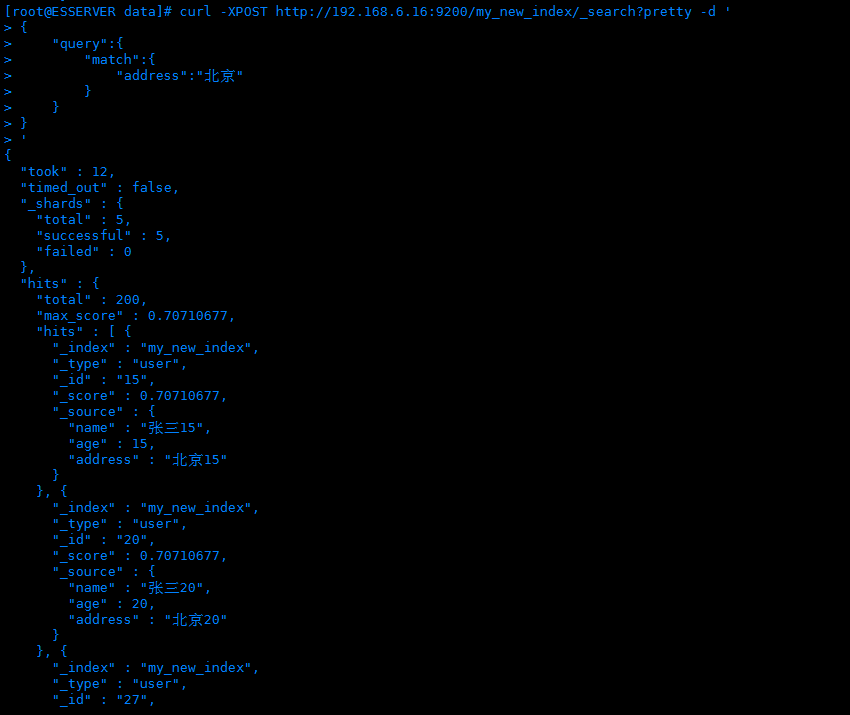
21.2 查询address中包含 “北京” 的数据
curl -XPOST http://192.168.6.16:9200/my_new_index/_search?pretty -d '
{
    "query":{
        "match":{
            "address":"北京"
        }
    }
}
'
21.3 查询 address中 包含“北京” 或 “西安”的所有数据 【匹配单个词语 空格分隔】
curl -XPOST http://192.168.6.16:9200/my_new_index/_search?pretty -d '
{
    "query":{
        "match":{
            "address":"北京 西安"
        }
    }
}
'
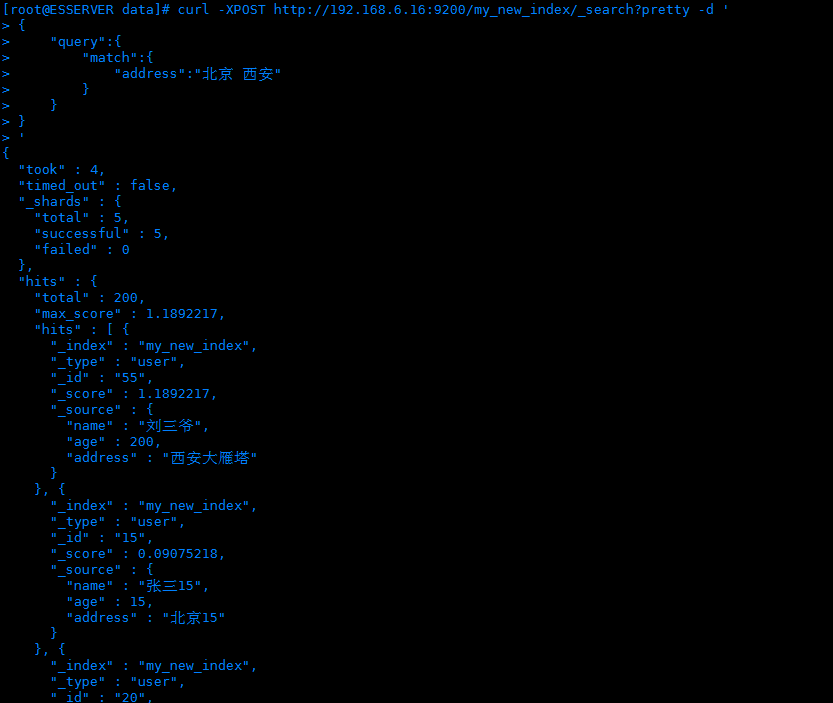
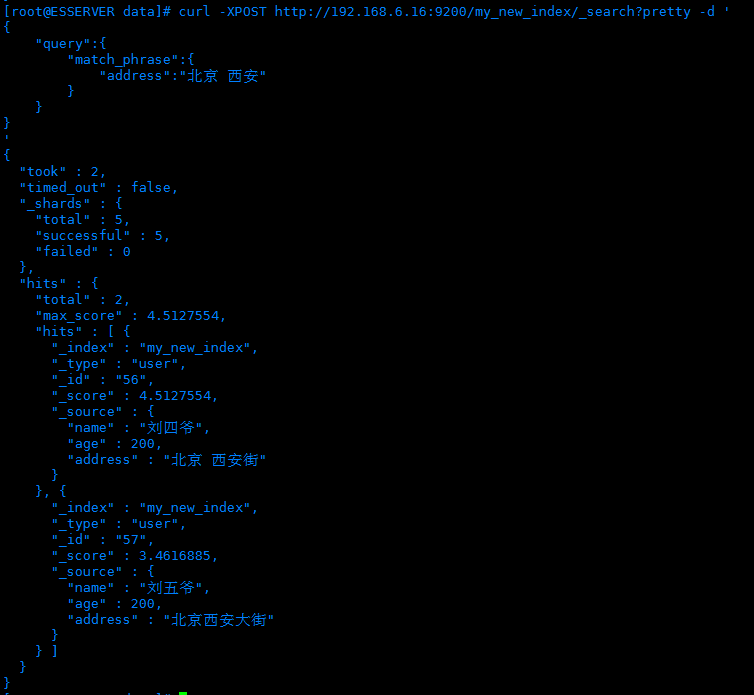
21.4 查询address中包含“北京 西安” 完整词语的【短语匹配,“北京 西安”作为一个完整词语查询】、
curl -XPOST http://192.168.6.16:9200/my_new_index/_search?pretty -d '
{
    "query":{
        "match_phrase":{
            "address":"北京 西安"
        }
    }
}
'
22.布尔查询 bool
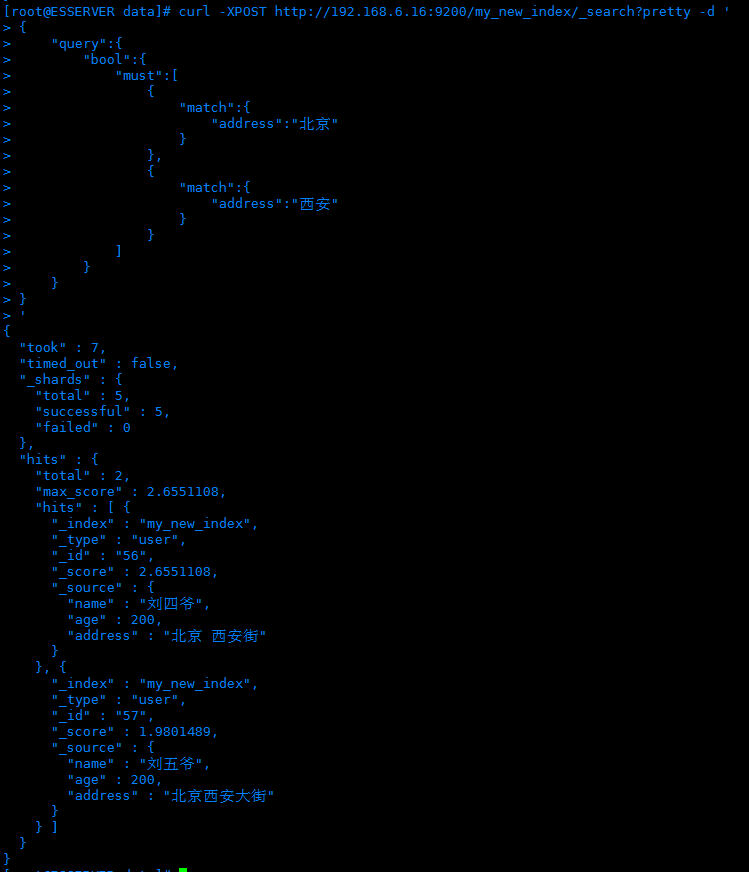
22.1布尔查询bool and查询,必须同时满足 address中包含“北京”,又要满足address中包含“西安”
must表示所有查询必须都为真才被认为匹配
curl -XPOST http://192.168.6.16:9200/my_new_index/_search?pretty -d '
{
    "query":{
        "bool":{
            "must":[
                {
                    "match":{
                        "address":"北京"
                    }
                },
                {
                    "match":{
                        "address":"西安"
                    }
                }
            ]
        }
    }
}
'
22.2 布尔查询bool or查询 address中包含“北京” 或者 address中包含“西安” 都可以
should 表示查询列表中只要有任何一个为真则认为匹配
curl -XPOST http://192.168.6.16:9200/my_new_index/_search?pretty -d '
{
    "query":{
        "bool":{
            "should":[
                {
                    "match":{
                        "address":"北京"
                    }
                },
                {
                    "match":{
                        "address":"西安"
                    }
                }
            ]
        }
    }
}
'

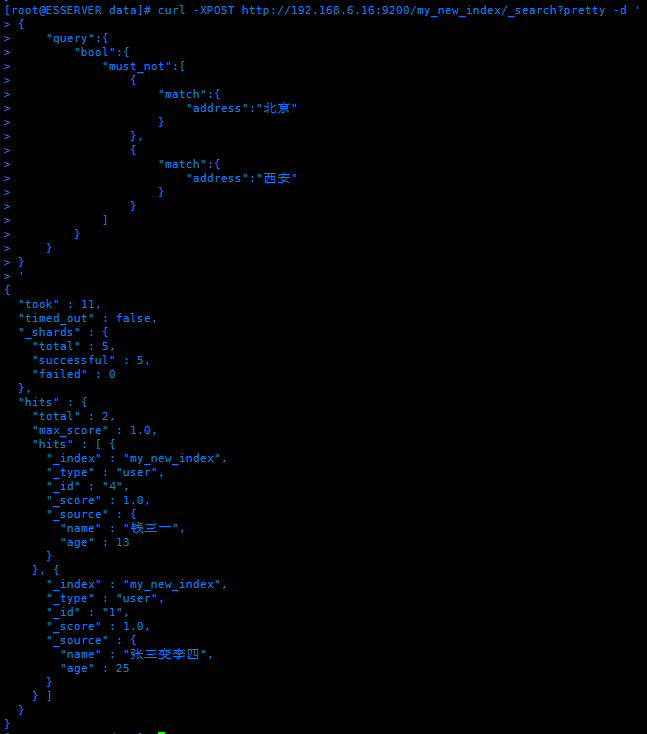
22.3 布尔查询bool 都不能满足的 既不能包含这个,也不能包含那个
must_not表示查询列表中没有为真的(也就是全为假)时则认为匹配
curl -XPOST http://192.168.6.16:9200/my_new_index/_search?pretty -d '
{
    "query":{
        "bool":{
            "must_not":[
                {
                    "match":{
                        "address":"北京"
                    }
                },
                {
                    "match":{
                        "address":"西安"
                    }
                }
            ]
        }
    }
}
'
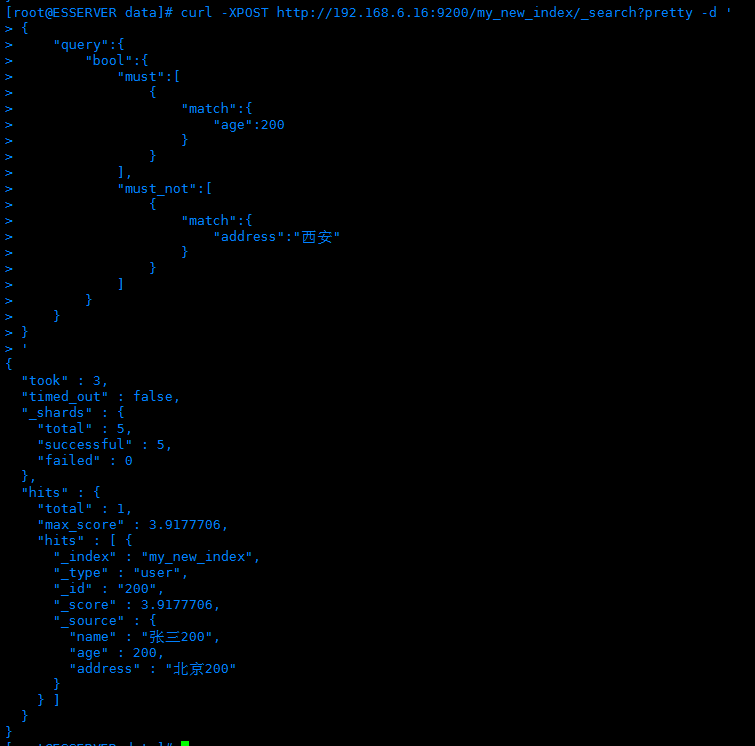
22.4 这样,就可以布尔查询 多条件组合 查询
curl -XPOST http://192.168.6.16:9200/my_new_index/_search?pretty -d '
{
    "query":{
        "bool":{
            "must":[
                {
                    "match":{
                        "age":200
                    }
                }
            ],
            "must_not":[
                {
                    "match":{
                        "address":"西安"
                    }
                }
            ]
        }
    }
}
'
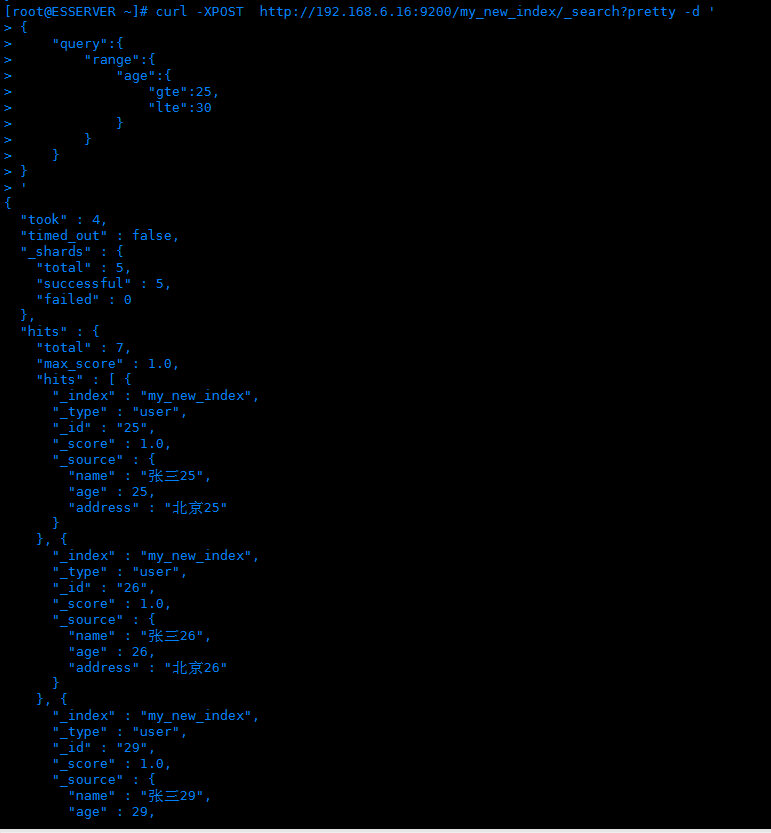
23. 范围查询 range 查询年龄25-30之间的
curl -XPOST  http://192.168.6.16:9200/my_new_index/_search?pretty -d '
{
    "query":{
        "range":{
            "age":{
                "gte":25,
                "lte":30
            }
        }
    }
}
'
24.聚合查询 aggs
按照name进行聚合分组,然后按照记录数,从大到小排序,默认返回前10条
curl -XPOST http://192.168.6.16:9200/my_new_index/_search?pretty -d '
{
    "size":0,
    "aggs":{
        "group_by_name":{
            "terms":{
                "field":"name"
            }
        }
    }
}
'

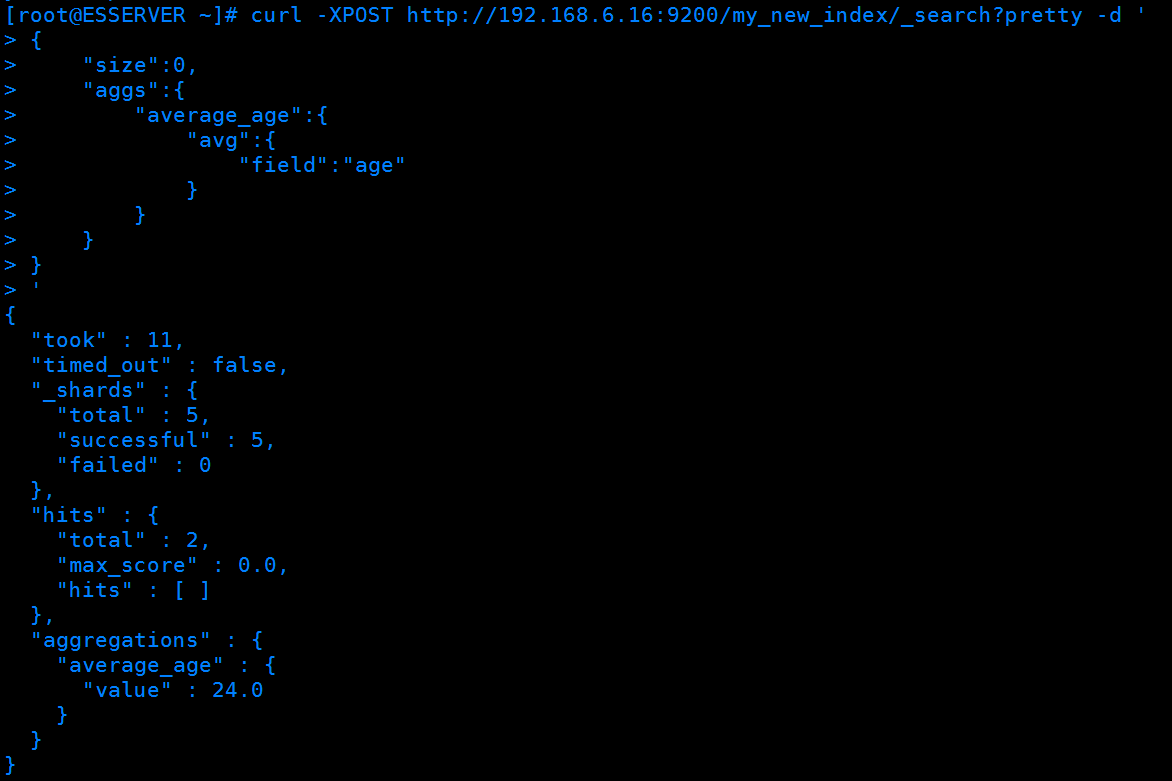
25. 聚合查询 aggs ,求age的平均值
curl -XPOST http://192.168.6.16:9200/my_new_index/_search?pretty -d '
{
    "size":0,
    "aggs":{
        "average_age":{
            "avg":{
                "field":"age"
            }
        }
    }
}
'
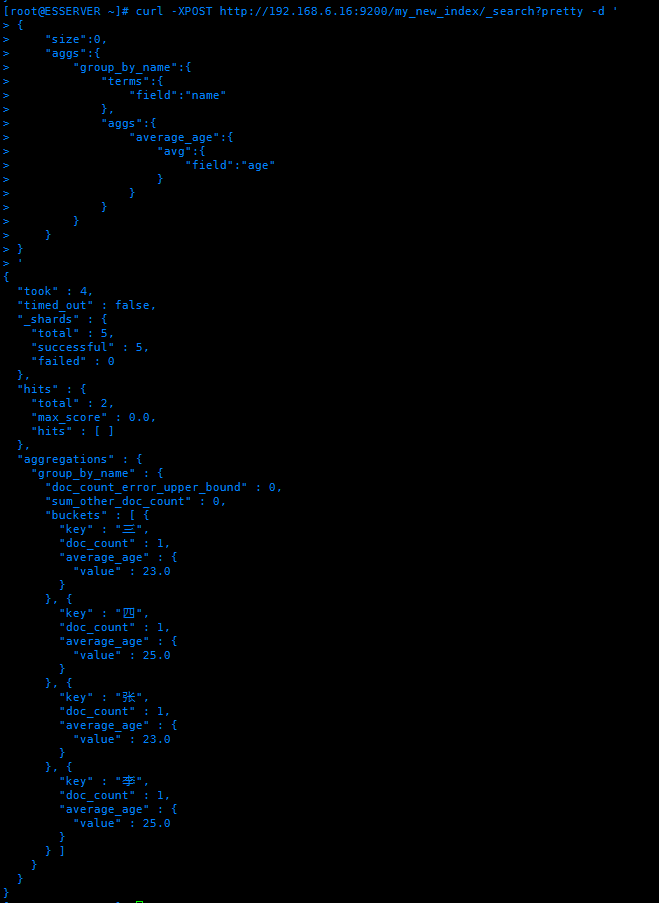
按name分组,求age的平均值
curl -XPOST http://192.168.6.16:9200/my_new_index/_search?pretty -d '
{
    "size":0,
    "aggs":{
        "group_by_name":{
            "terms":{
                "field":"name"
            },
            "aggs":{
                "average_age":{
                    "avg":{
                        "field":"age"
                    }
                }
            }
        }
    }
}
'
100.删除索引
100.1 查看所有索引信息
curl http://192.168.6.16:9200/_cat/indices?v

100.2 删除指定索引
curl -XDELETE http://192.168.6.16:9200/my_new_index?pretty

100.3 再次查看
curl http://192.168.6.16:9200/_cat/indices?v


【推荐】国内首个AI IDE,深度理解中文开发场景,立即下载体验Trae
【推荐】编程新体验,更懂你的AI,立即体验豆包MarsCode编程助手
【推荐】抖音旗下AI助手豆包,你的智能百科全书,全免费不限次数
【推荐】轻量又高性能的 SSH 工具 IShell:AI 加持,快人一步
· 基于Microsoft.Extensions.AI核心库实现RAG应用
· Linux系列:如何用heaptrack跟踪.NET程序的非托管内存泄露
· 开发者必知的日志记录最佳实践
· SQL Server 2025 AI相关能力初探
· Linux系列:如何用 C#调用 C方法造成内存泄露
· 无需6万激活码!GitHub神秘组织3小时极速复刻Manus,手把手教你使用OpenManus搭建本
· Manus爆火,是硬核还是营销?
· 终于写完轮子一部分:tcp代理 了,记录一下
· 别再用vector<bool>了!Google高级工程师:这可能是STL最大的设计失误
· 单元测试从入门到精通