

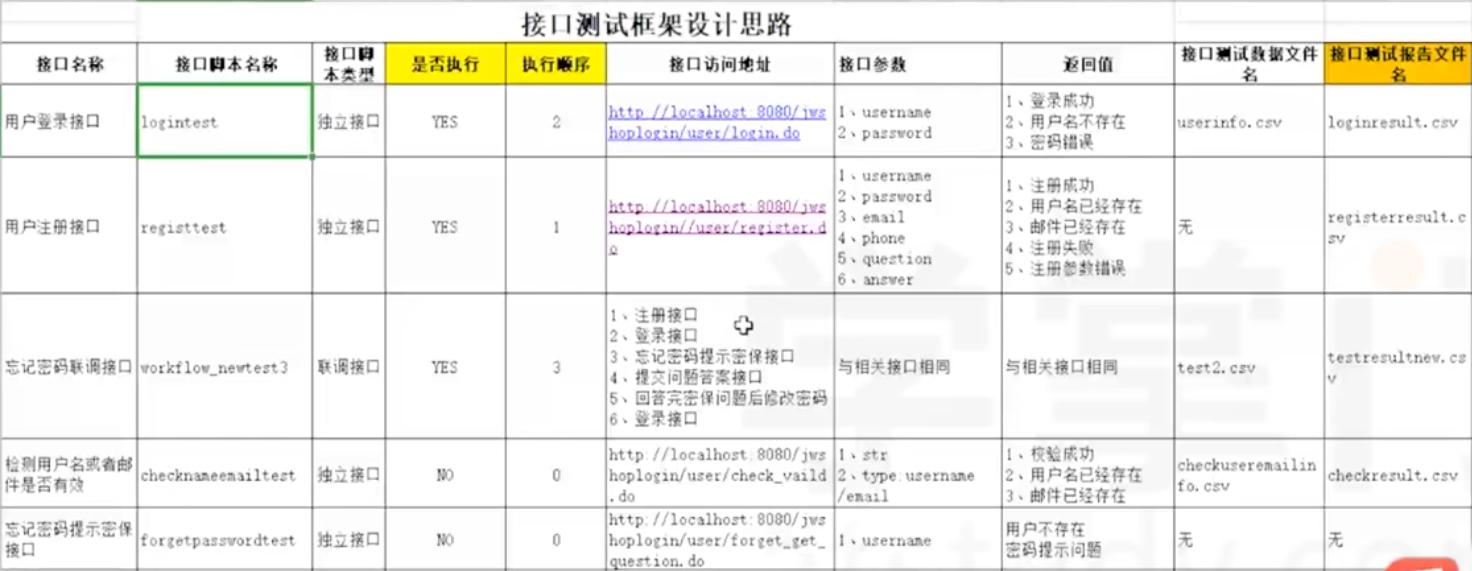
11 - 接口测试脚本:独立、联调和框架
一、针对单个接口的独立脚本:
1、接口测试脚本原理
- 分析接口,调用接口
- 传入接口参数,发送请求
- 获取接口实际响应结果
- 断言:和预期结果作比较,得出测试结论
2、面向对象编程思想
1、设计思路:
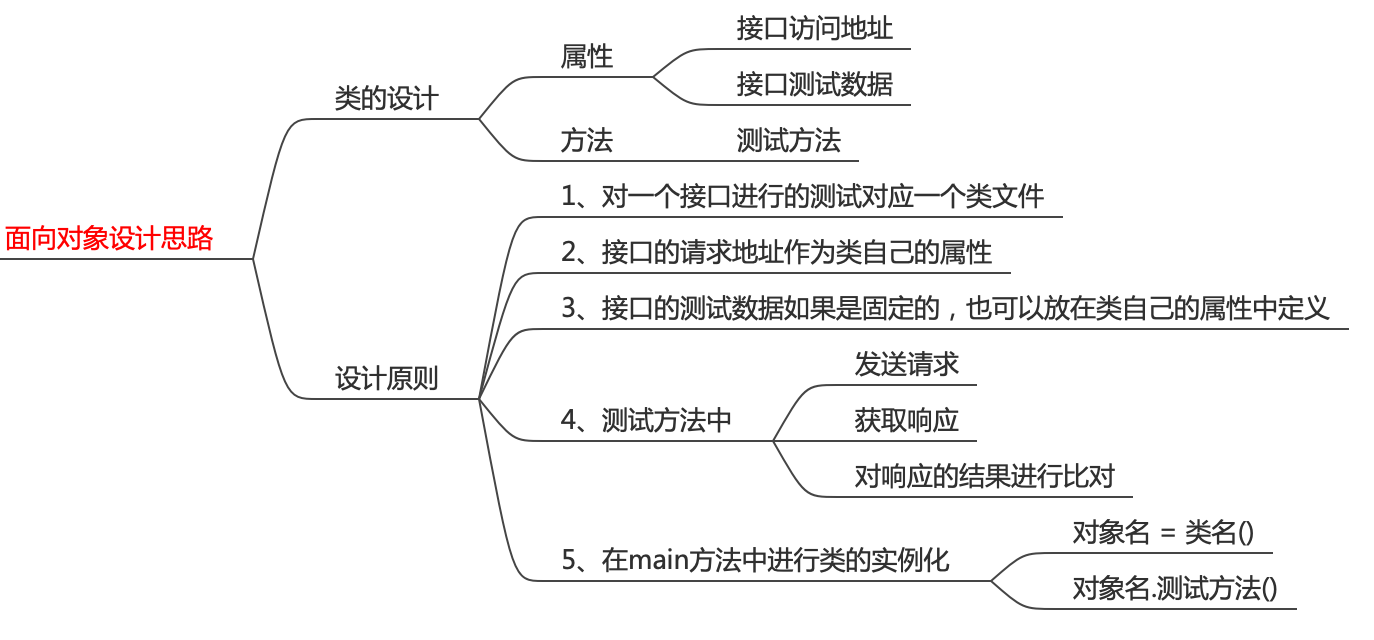
2、对应的代码:


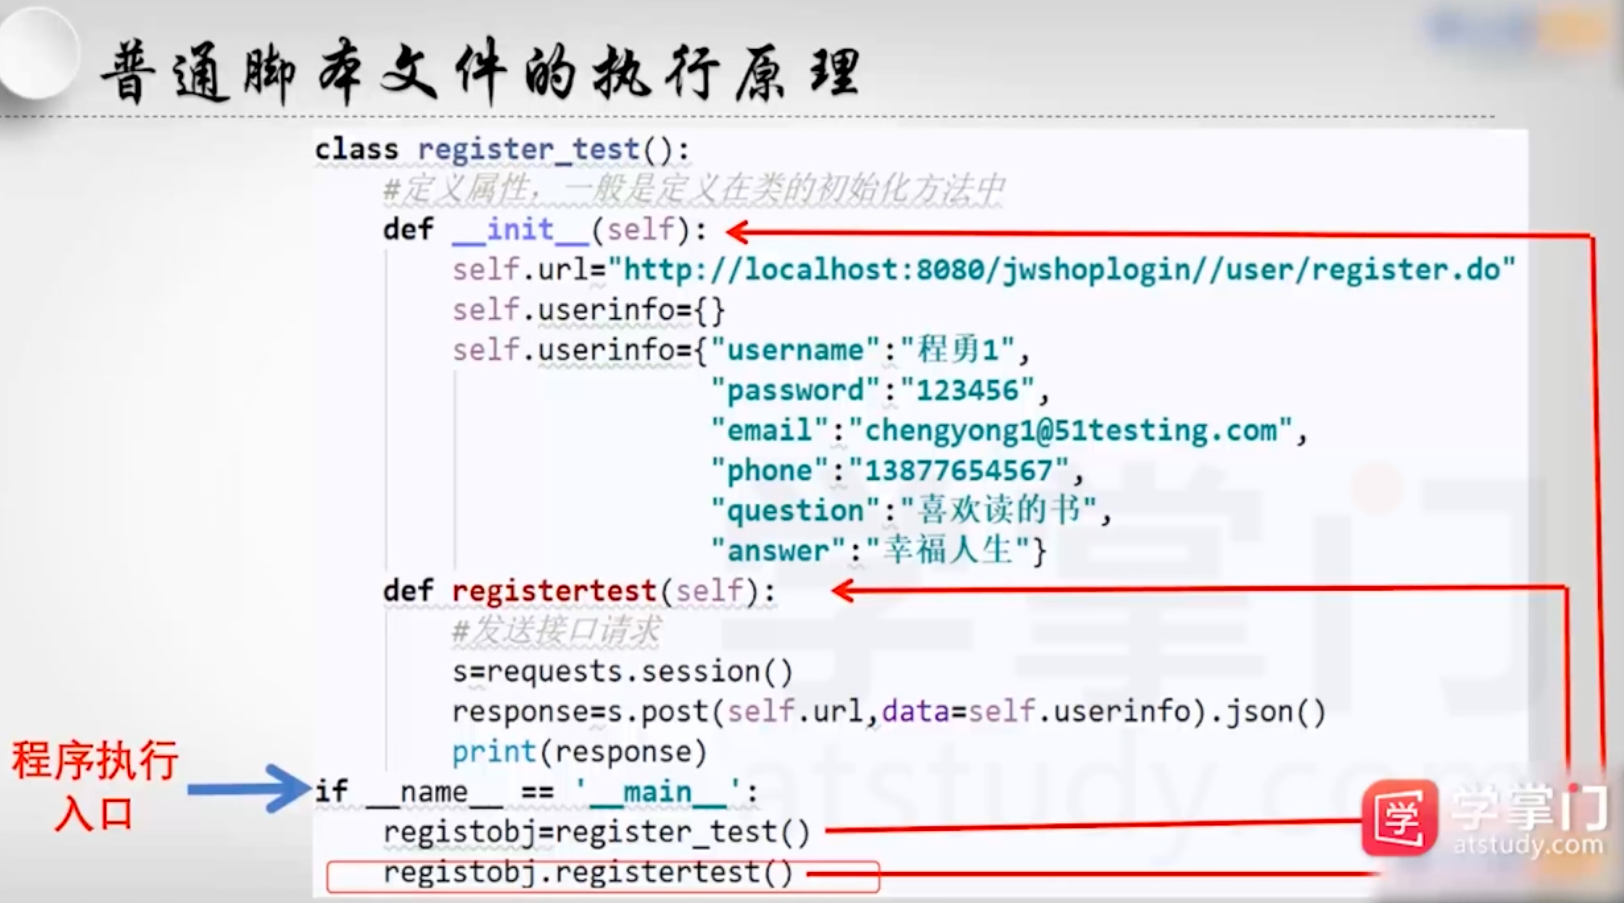
import requests
import csv

# 定义测试类
class check_test():

    # 定义类自己的属性
    def __init__(self):
        self.url = "http://localhost:8080/jwshoplogin/user/register.do"

    def checktest(self):
        # 从csv文件中获取测试数据
        checkinfo = { }
        file1 = open("checkuseremailinfo.csv","r")
        file2 = open("checkresult.csv","w")
        table = csv.reader(file1)
        for row in table:
            checkinfo["str"] = row[0]
            checkinfo["type"] = row[1]
            s = requests.session()
            response = s.post(self.url,data=checkinfo).text
            # print(response)
            # 调用find方法,查找响应的文本字符串中是否存在对应的信息:result = response.find("预期结果")
            # 判断语句得出相关的测试结论
            result = response.find(row[2])
            if result > 0:
                file2.write("row[0]" + "," + "row[1]" + "," + "row[2]" + "," + "测试通过" + "\n")
            else:
                file2.write("row[0]" + "," + "row[1]" + "," + "row[2]" + "," + "测试失败" + "\n")
        file2.close()

if __name__ == '__main__':
    check = check_test()
    check.checktest()
二、针对多个接口的联调脚本
1、接口联调业务理解
1、接口之间相互调用时,是否正确
2、接口组合起来,能否完成预定的业务
3、接口之间的依赖关系
2、接口联调工作分解
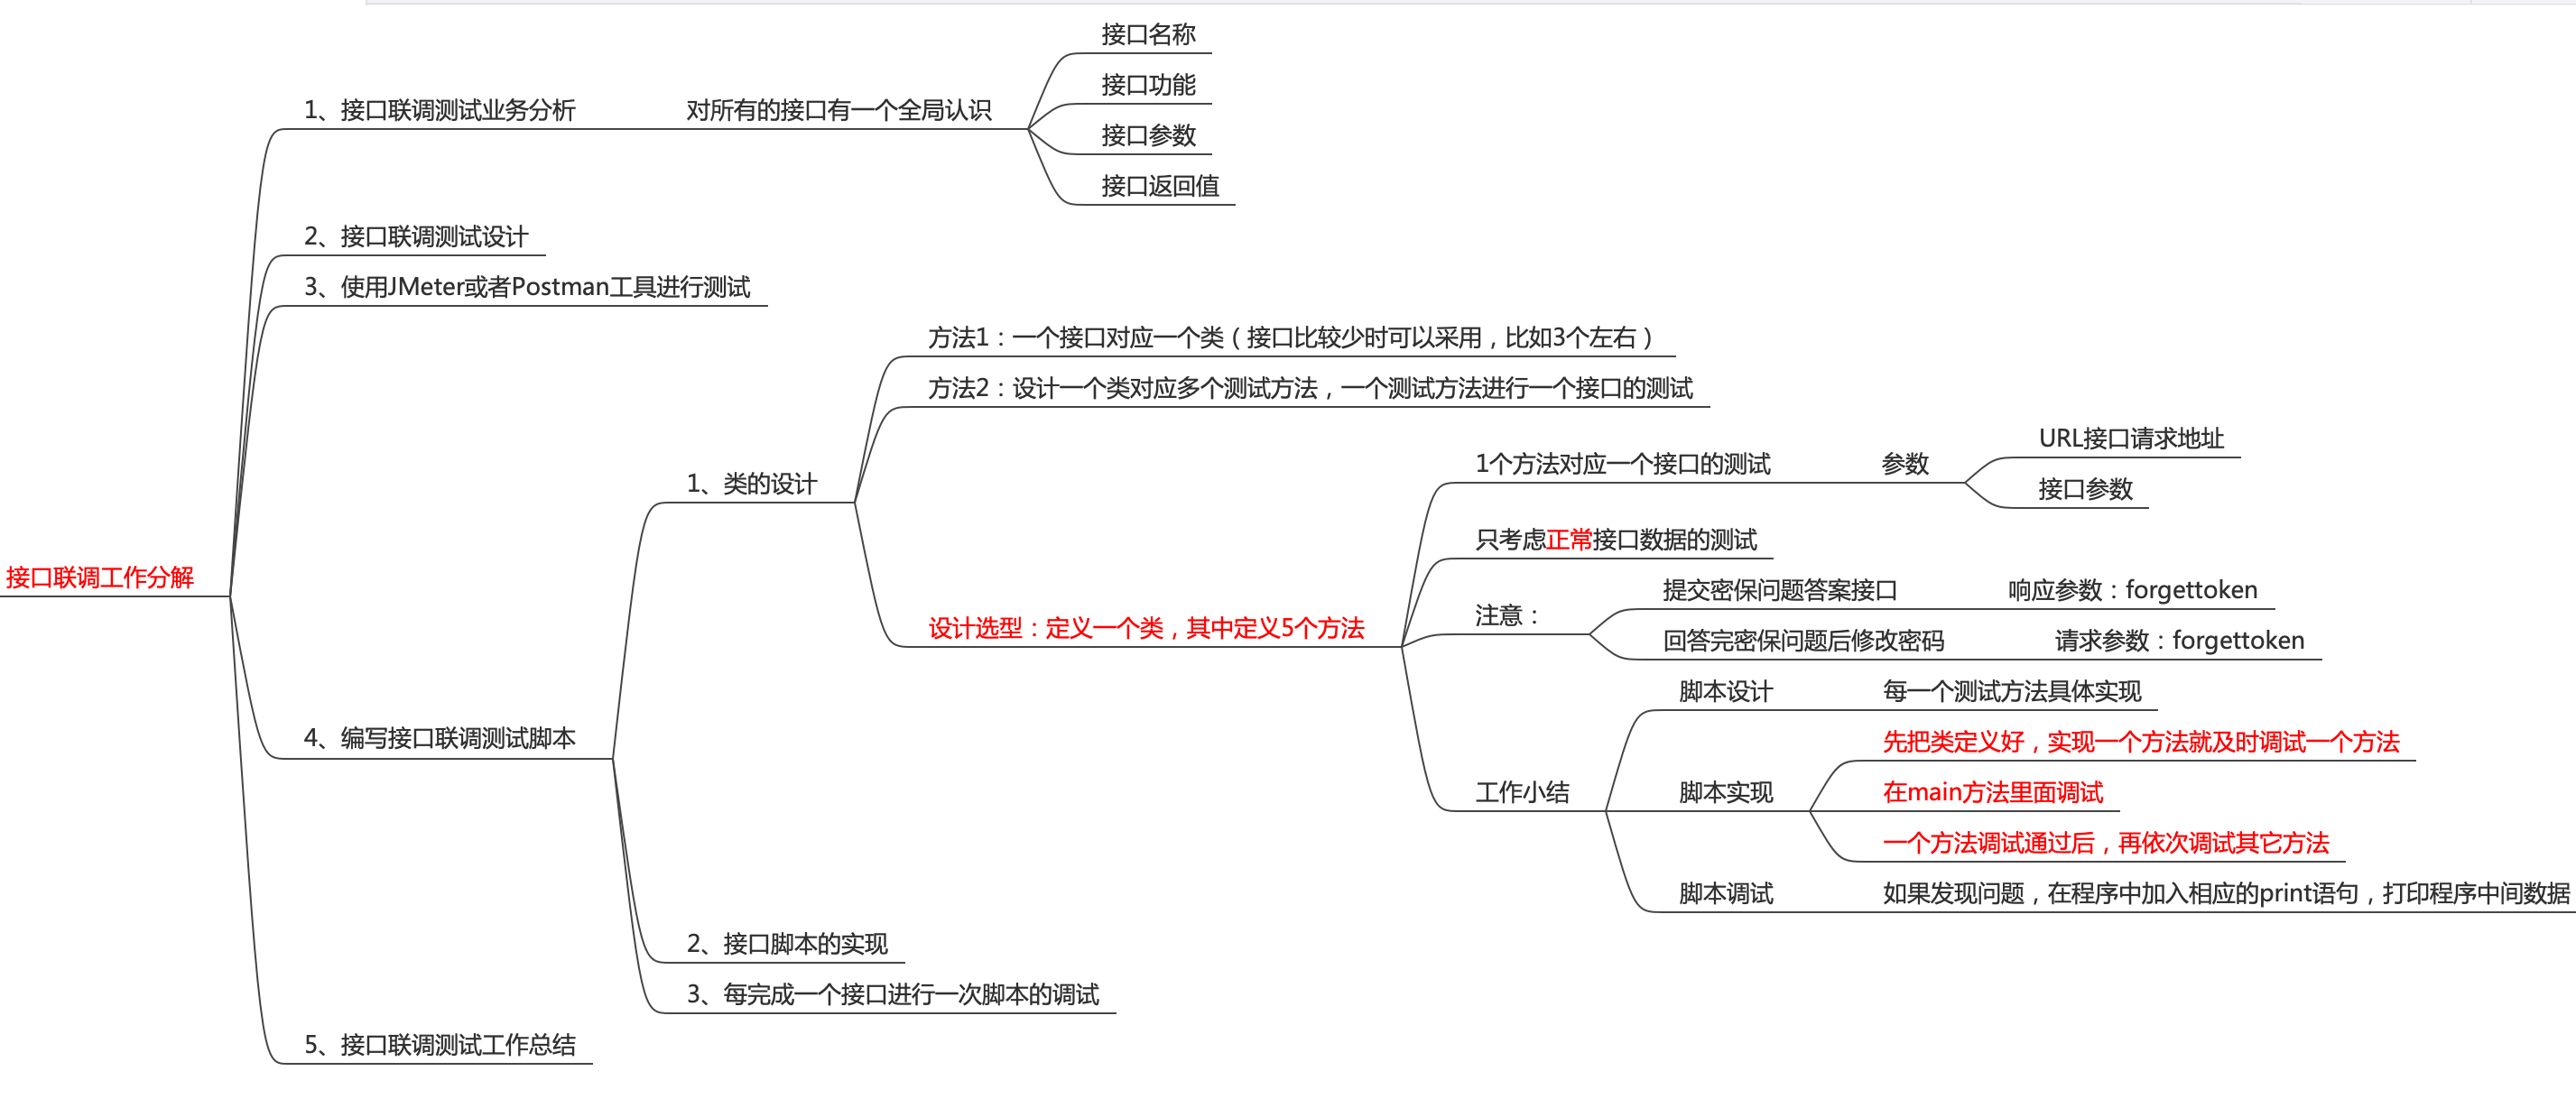
3、实际场景:用户找回密码
1、总共串联5个接口的调用:用户注册->用户登录->忘记密码->提交密保问题答案->回答完密保问题后修改密码->用户登录(新密码登录查看新密码是否生效)
2、先拿接口测试工具将此场景调通:使用工具按照场景一步步调用涉及到的5个接口
3、然后使用脚本代码具体实现
# 针对多个接口进行联调测试,接口内容如下
# 1、用户注册接口
# 2、用户登录接口
# 3、忘记密码接口
# 4、提交密保答案接口
# 5、回答完密保问题后修改密码接口

import requests


# 定义一个接口联调的测试类
class workflow_forgetpassword_test():

    # 1、用户注册接口测试
    def register_test(self):
        url = "http://localhost:8080/jwshoplogin/user/register.do"
        userinfo = {}
        # 正确的用户注册数据
        userinfo = {
            "username": "春艳",
            "password": "123456",
            "email": "cc@163.com",
            "phone": "15555555555",
            "question": "喜欢的话",
            "answer": "读万卷书,行万里路"
        }
        # 发送注册请求并获取响应
        response = requests.post(url, data=userinfo).text
        print(response)
        r = response.find("注册成功")
        if r > 0:
            print("用户注册接口测试通过")
        else:
            print("用户注册接口测试失败")

    # 2、用户登录接口测试
    def login_test(self):
        url = "http://localhost:8080/jwshoplogin/user/login.do"
        logininfo = {}
        # 正确的用户登录数据
        logininfo = {
            "username": "春艳",
            "password": "123456"
        }
        # 发送登录请求并获取响应
        response = requests.post(url, data=logininfo).text
        print(response)
        r = response.find("登陆成功")
        if r > 0:
            print("用户登录接口测试通过")
        else:
            print("用户登录接口测试失败")

    # 3、忘记密码接口测试
    def forgetpassword_test(self):
        url = "http://localhost:8080/jwshoplogin/user/forget_get_question.do"
        userinfo = {}
        # 忘记密码对应的用户
        userinfo = {"username": "春艳"}
        # 发送忘记密码请求并获取响应
        response = requests.post(url, data=userinfo).text
        print(response)
        r = response.find("喜欢吃的水果")
        if r > 0:
            print("忘记密码接口测试通过")
        else:
            print("忘记密码接口测试失败")

    # 4、提交密保答案接口测试
    def checkanswer_test(self):
        url = "http://localhost:8080/jwshoplogin/user/forget_check_answer.do"
        userinfo = {}
        # 密保问题对应的答案
        userinfo = {"username": "春艳",
                    "question": "喜欢的话",
                    "answer": "读万卷书,行万里路"
                    }
        # 发送密保问题答案并获取响应
        response = requests.post(url, data=userinfo).text
        print(response)
        # 1、字符串类型的返回结果转化为字典类型
        dic = {}
        dic = eval(response)
        # 2、根据字典的key获取value
        token=dic["data"]
        print(token)
        r = response.find("data")
        if r > 0:
            print("提交密保问题接口测试通过")
        else:
            print("提交密保问题接口测试失败")
        # 返回获取到的token,方便接口联调
        return token

    # 5、修改密码接口测试
    def resetpassword_test(self,token):
        url = "http://localhost:8080/jwshoplogin/user/forget_reset_password.do"
        userinfo = {}
        # 忘记密码对应的用户
        print("传入的token",token)
        userinfo = {"username": "春艳",
                    "passwordNew": "111111",
                    "forgetToken":"token"
                    }
        # 修改新密码并获取响应
        response = requests.post(url, data=userinfo).text
        print(response)
        r = response.find("修改密码成")
        if r > 0:
            print("回答完密保问题后修改密码接口测试通过")
        else:
            print("回答完密保问题后修改密码接口测试失败")

if __name__ == '__main__':
    workflow = workflow_forgetpassword_test()
    workflow.register_test()  # 第一次调试:调试用户注册接口
    workflow.login_test()  # 第二次调试:调试"用户注册->用户登录"流程
    workflow.forgetpassword_test()  # 第三次调试:调试"用户注册->用户登录->忘记密码"流程
    token = workflow.checkanswer_test()  # 第四次调试:调试"用户注册->用户登录->忘记密码->提交密保答案"流程
    # print("返回的token",token) 是一个调试语句,想要看看token信息
    workflow.resetpassword_test(token) # 第五次调试:调试"用户注册->用户登录->忘记密码->提交密保答案->修改密码"流程
    workflow.login_test() # 第六次调试:调试"用户注册->用户登录->忘记密码->提交密保答案->修改密码->登录失败(因为新旧密码不同)"流程
4、接口联调脚本优化
1、优化思路
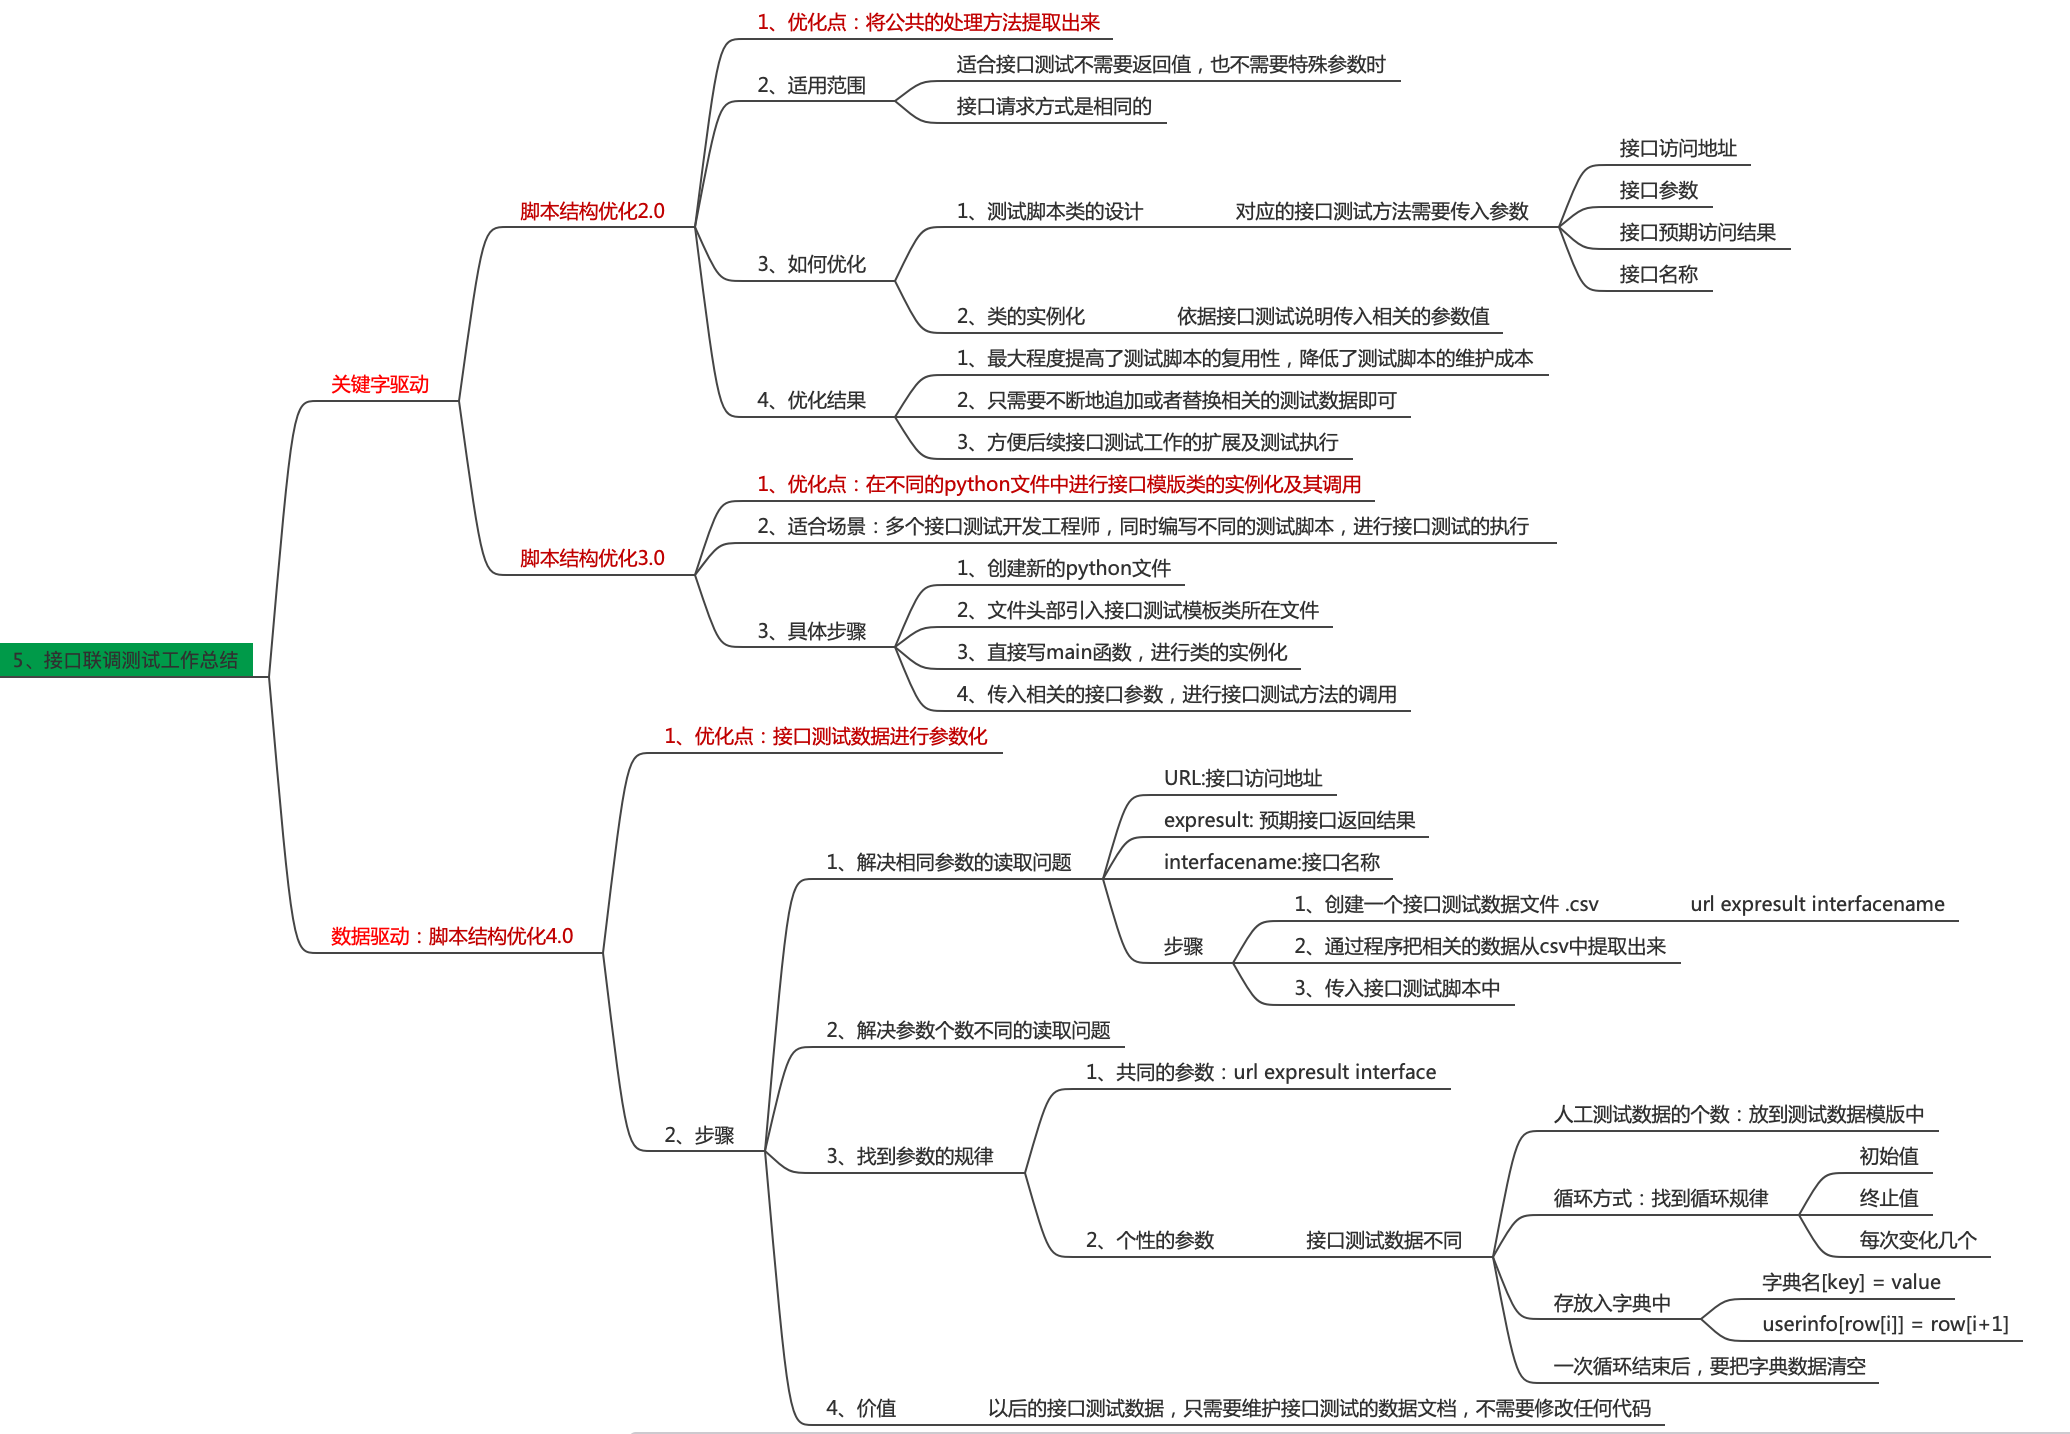
2、优化的代码
1)2.0版本
# 对多个接口组成的联调测试的脚本进行结构优化

import requests


# 定义一个接口联调的测试类
class workflow_forgetpassword_V2_test():

    # 1、用户注册接口测试
    def userinterface_test(self,url,userinfo,expresult,interfacename):

        # 发送注册请求并获取响应
        response = requests.post(url, data=userinfo).text
        print(response)
        r = response.find("expresult")
        if r > 0:
            print(interfacename,"测试通过")
        else:
            print(interfacename,"测试失败")


if __name__ == '__main__':

    # main函数里面 实例化一次
    workflow_obj2 = workflow_forgetpassword_V2_test()

    # ######################注册接口测试数据及调用#################################################
    url = "http://localhost:8080/jwshoplogin/user/register.do"
    userinfo = {}
    # 正确的用户注册数据
    userinfo = {
        "username": "春艳",
        "password": "123456",
        "email": "cc@163.com",
        "phone": "15555555555",
        "question": "喜欢的话",
        "answer": "读万卷书,行万里路"
    }
    expresult = "注册成功"
    interfacename = "用户注册接口"
    workflow_obj2.userinterface_test(url,userinfo,expresult,interfacename)
    ###########################################################


    # ######################登陆接口测试数据及调用##################################################
    url = "http://localhost:8080/jwshoplogin/user/login.do"
    userinfo = {}
    # 正确的用户注册数据
    logininfo = {
        "username": "春艳",
        "password": "123456"
    }
    expresult = "登陆成功"
    interfacename = "用户登陆接口"
    workflow_obj2.userinterface_test(url, userinfo, expresult,interfacename)
    ###########################################################
2)3.0版本
# 在不同的python文件中,调用通用的接口测试脚本

import requests

from MultiAPI.workflow_forgetpassword_2 import workflow_forgetpassword_V2_test

if __name__ == '__main__':
    ################################# 忘记密码接口#######################################
    forgetpwdobj = workflow_forgetpassword_V2_test()
    url = "http://localhost:8080/jwshoplogin/user/forget_get_question.do"
    userinfo = {}
    # 正确的用户注册数据
    userinfo = {"username": "春艳"}
    expresult = "喜欢看的书"
    interfacename = "忘记密码接口"
    forgetpwdobj.userinterface_test(url, userinfo, expresult, interfacename)
4)4.0版本
# 从接口测试数据文件中获取相关的内容,传入接口测试脚本

# 4.1 : 共同的接口数据进行读取和传递

import csv
import requests

class workflow_forgetpassword_V4_test():

    def userinterface_test(self,url,userinfo,expresult,interfacename):

        # 发送注册请求并获取响应
        response = requests.post(url, data=userinfo).text
        print(response)
        r = response.find("expresult")
        if r > 0:
            print(interfacename,"测试通过")
        else:
            print(interfacename,"测试失败")

if __name__ == '__main__':

    workflowobj = workflow_forgetpassword_V4_test()
    # 读取相关的接口测试文件
    file = open("test1.csv", "r")
    userinfo = {}
    table = csv.reader(file)
    for row in table:  # 逐行读取,并将其设置为相应的参数
        url = row[1]
        expresult = row[3]
        interfacename = row[5]
        # print("url=",url,  "expresult=",expresult, "interfacenem=",interfacename,)
        userinfo={}
        j=int(row(6))
        for i in range(7,j*2+7,2):
             userinfo[row[i]]= row[i+1]

    workflowobj.userinterface_test(url,userinfo,expresult,interfacename)
    userinfo = {}
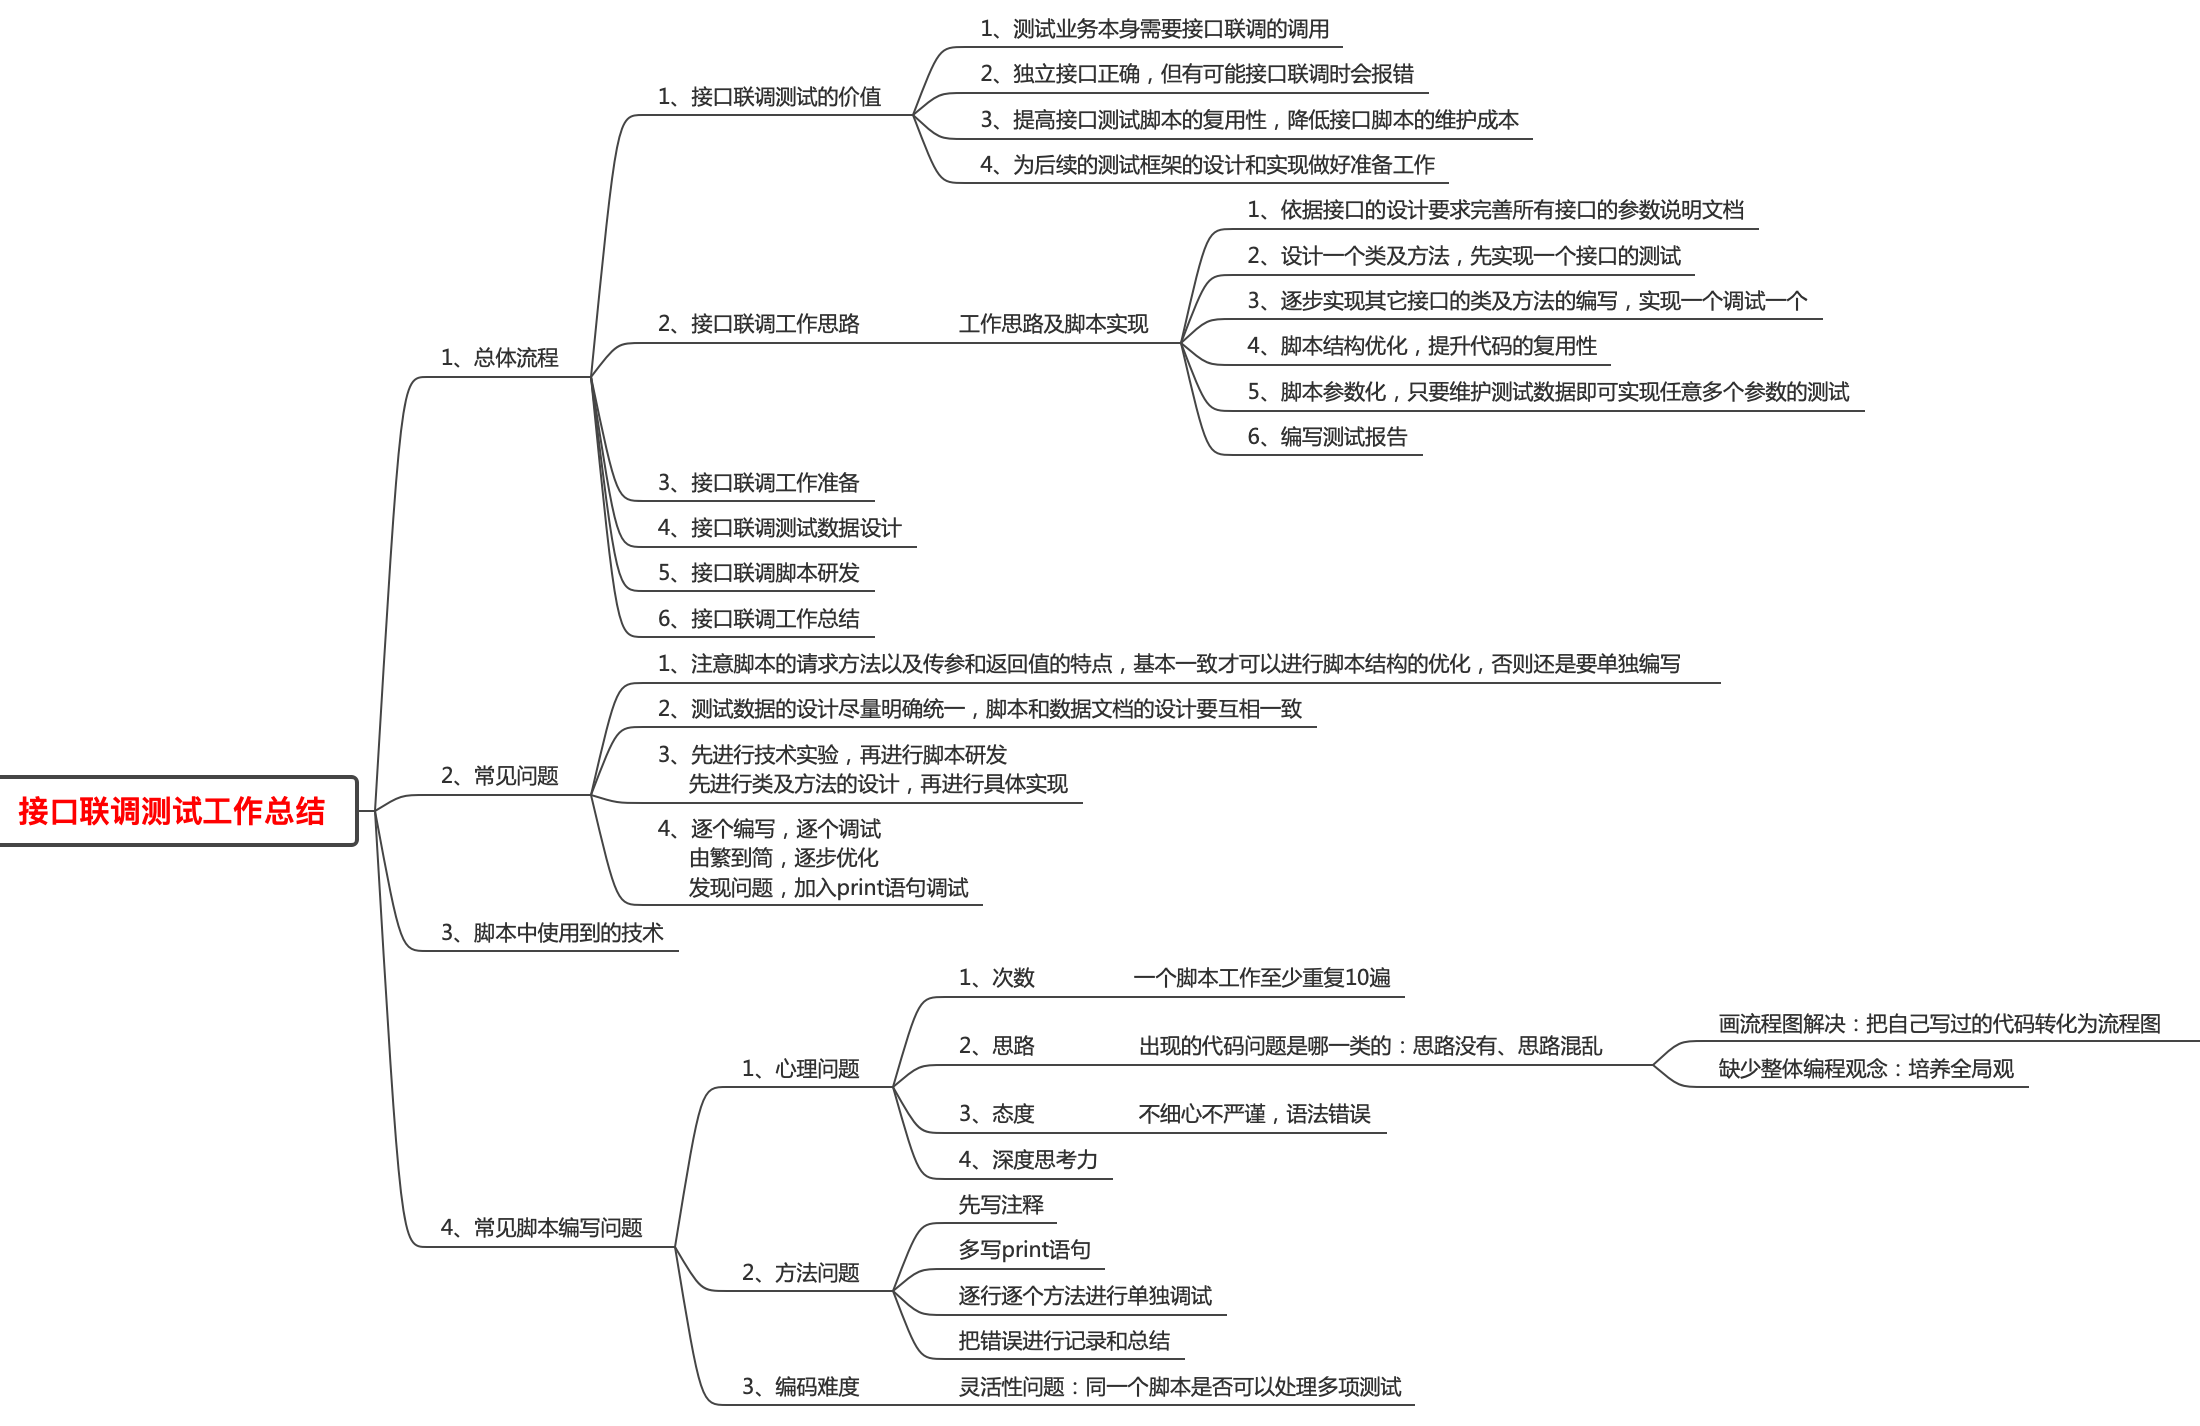
五、接口联调总结
三、接口测试框架
一、普通脚本文件的执行原理
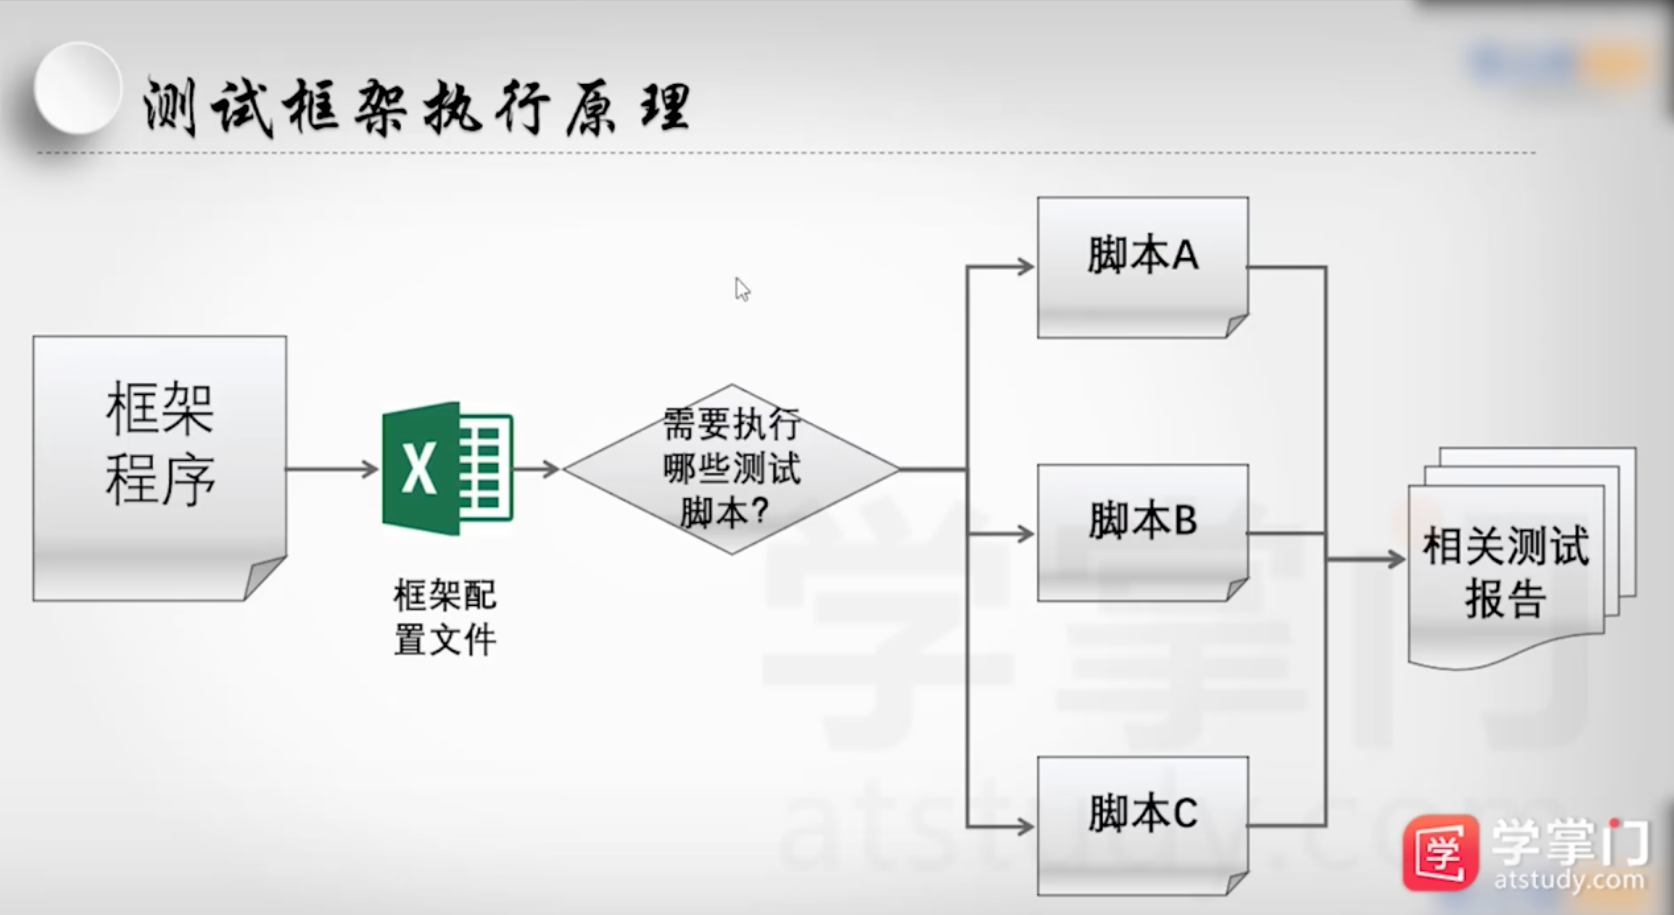
二、测试框架执行原理
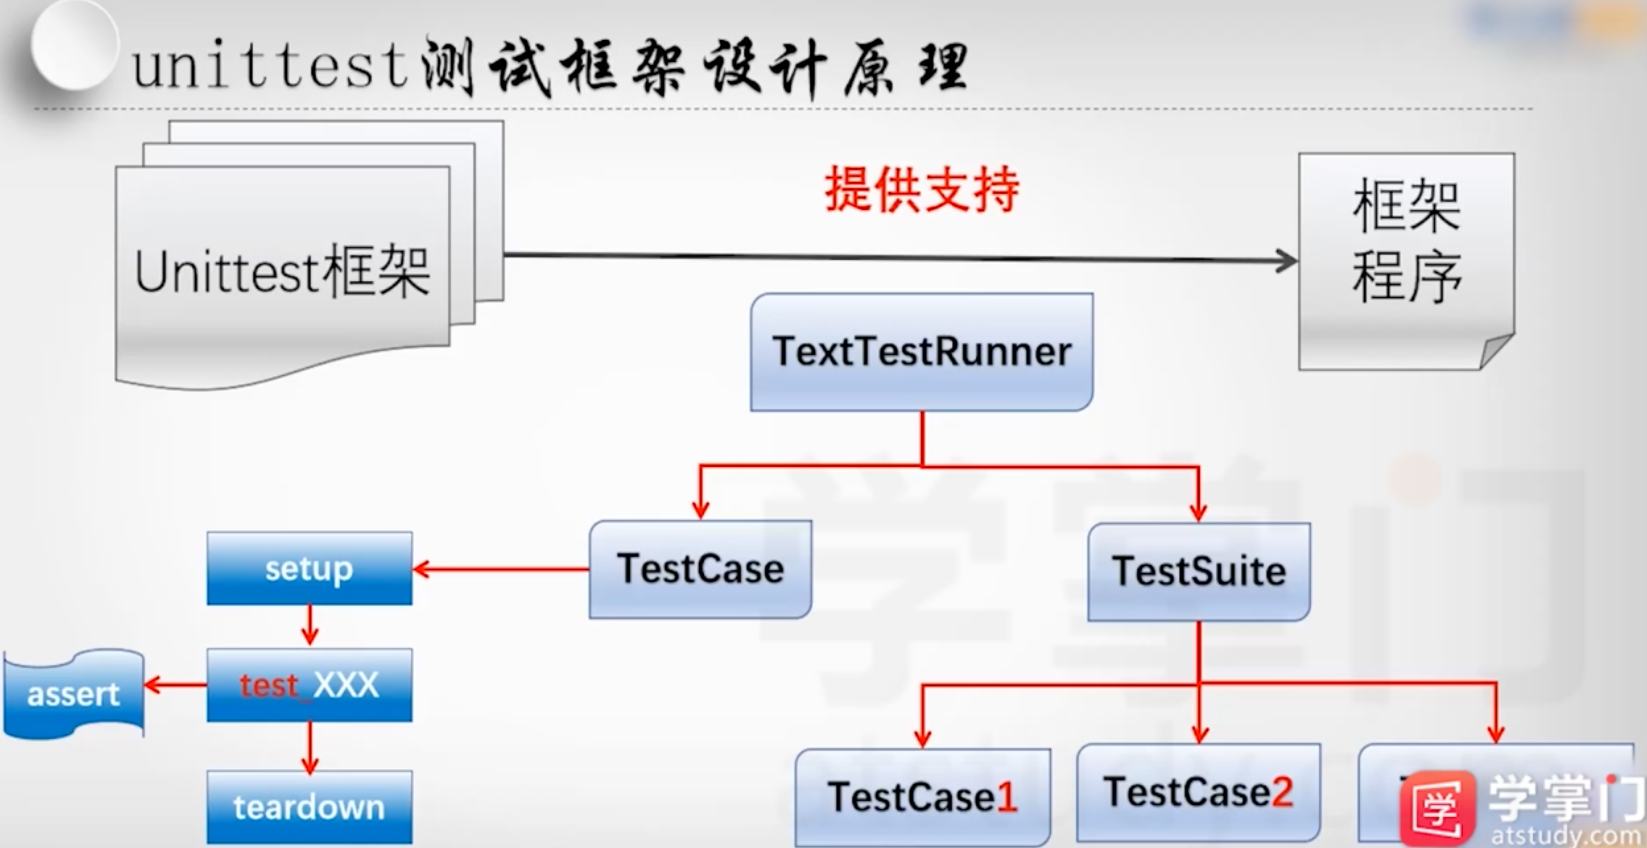
三、Unittest成熟测试框架
1、设计原理
2、unittest实现单接口测试代码
# 试验:使用unittest框架进行注册接口的测试

# 导入相关的unittest类库
import unittest
import requests

# 定义测试类,继承unittest框架
class testregister(unittest.TestCase):

    # 使用setup方法完成接口测试的初始化工作
    def setUp(self):
        self.url = "http://localhost:8080/jwshoplogin/user/register.do"
        self.userinfo = {
            "username": "春艳",
            "password": "123456",
            "email": "cc@163.com",
            "phone": "15555555555",
            "question": "喜欢的话",
            "answer": "读万卷书,行万里路"
        }

    # 定义unittest测试方法
    def test_register(self):
            # 发送接口请求
            s = requests.session()
            response = s.post(self.url, data=self.userinfo).json()
            print(response)
            #使用unittets框架的断言来进行结果判断
            self.assertIn("用户名已经存在",str(response))


if __name__ == '__main__':
    unittest.main()
3、unittest使用setup和teardown实现单接口测试代码
# 针对检查接口通过unittest框架进行脚本实现

import unittest
import requests
import csv

# 定义测试类,继承unittest测试框架
class testcheck(unittest.TestCase):

    # 使用setup进行接口的初始化操作
    def setUp(self):
        self.url = "http://localhost:8080/jwshoplogin/user/check_valid.do"
        self.file1 = open("checkuseremailinfo.csv", "r")
        self.file2 = open("checkresult.csv", "w")

    # 从csv文件中获取测试数据
    def test_check(self):
        checkinfo = {}
        table = csv.reader(self.file1)
        for row in table:
            checkinfo["str"] = row[0]
            checkinfo["type"] = row[1]
            s = requests.session()
            response = s.post(self.url, data=checkinfo).text
            # 通过assert方法进行测试结果的判断
            self.assertIn(row[2],str(response))

    # 使用teardown方法进行接口的回收工作
    def tearDown(self):
        self.file1.close()
        self.file2.close()


if __name__ == '__main__':
    unittest.main()
4、使用unittest实现联调接口的测试
1)多个测试方法时候的执行顺序,代码:
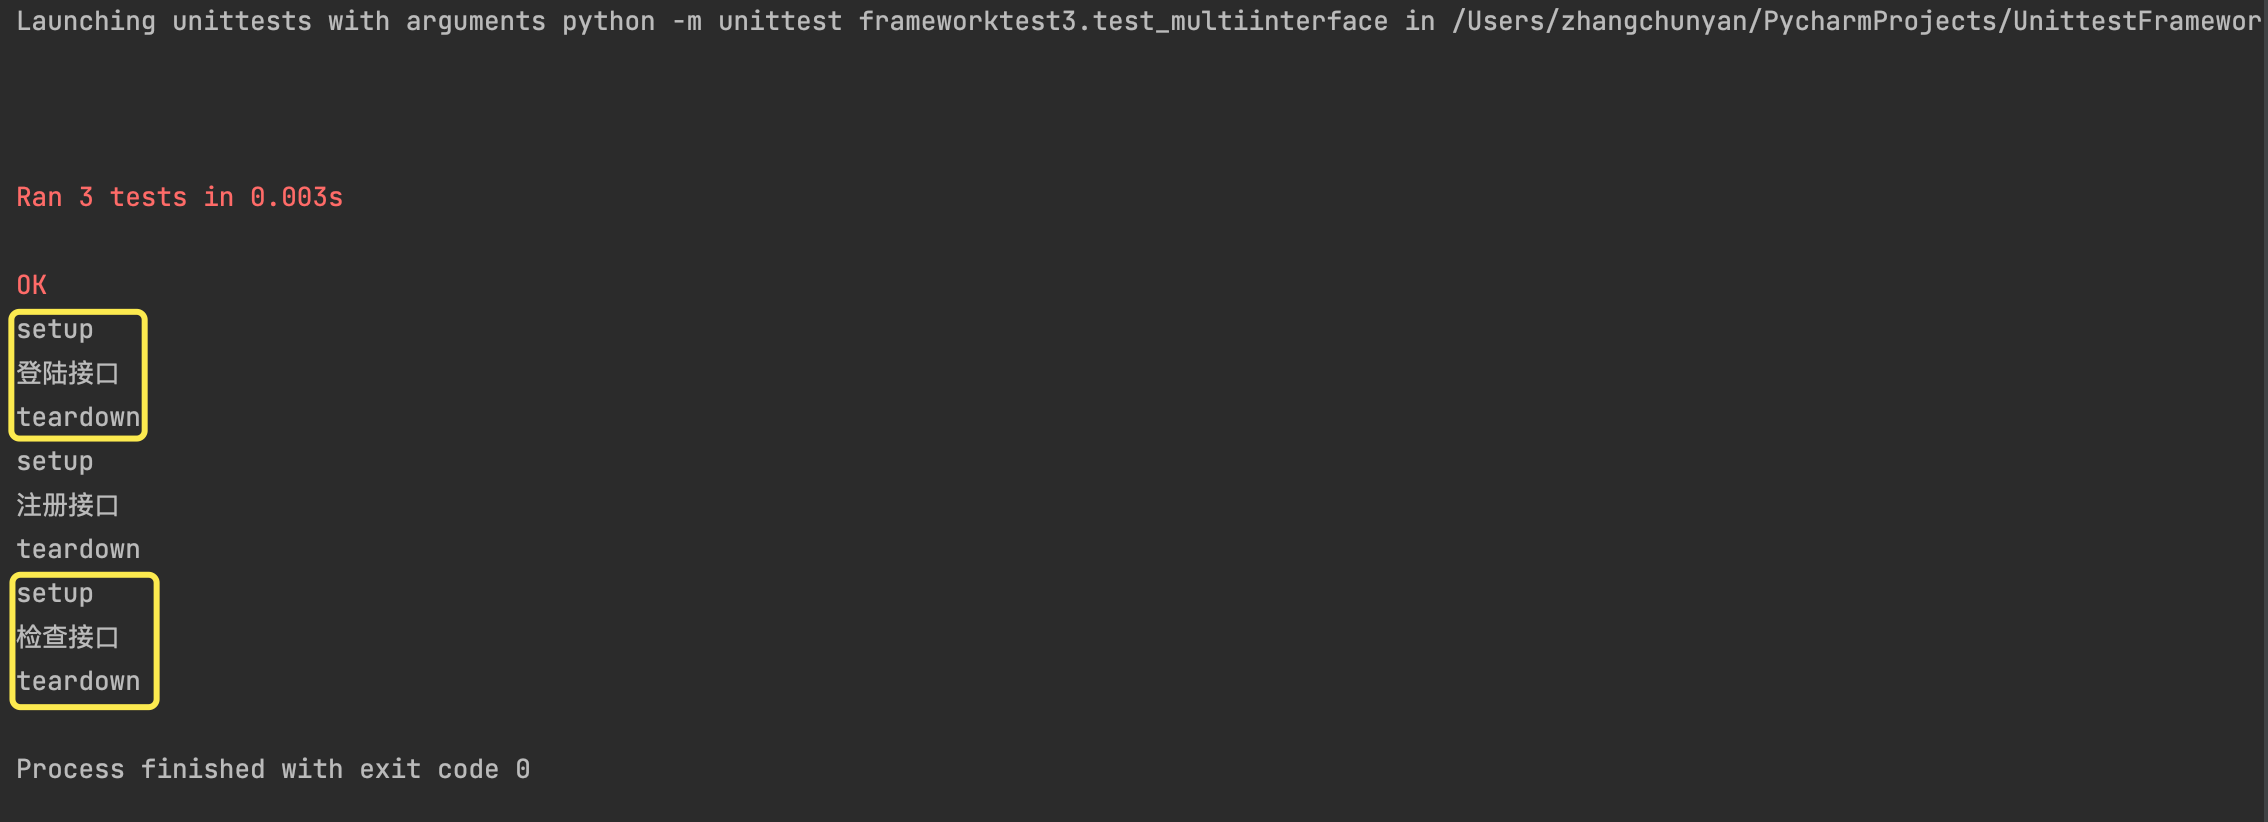
# 使用unittest框架完成多个接口的测试脚本(登录、注册)
# 观察测试框架执行方法时的执行顺序

import unittest
import requests
import csv

class test_multiinterface(unittest.TestCase):

    def setUp(self):
        print("setup")

    # 定义登录的测试方法
    def test_case1(self):
        print("登陆接口")

    # 定义注册的测试方法
    def test_case2(self):
        print("注册接口")

    # 定义检查的测试方法
    def test_case3(self):
        print("检查接口")

    def tearDown(self):
        print("teardown")

if __name__ == '__main__':
    unittest.main()
2)执行结果分析执行顺序规则
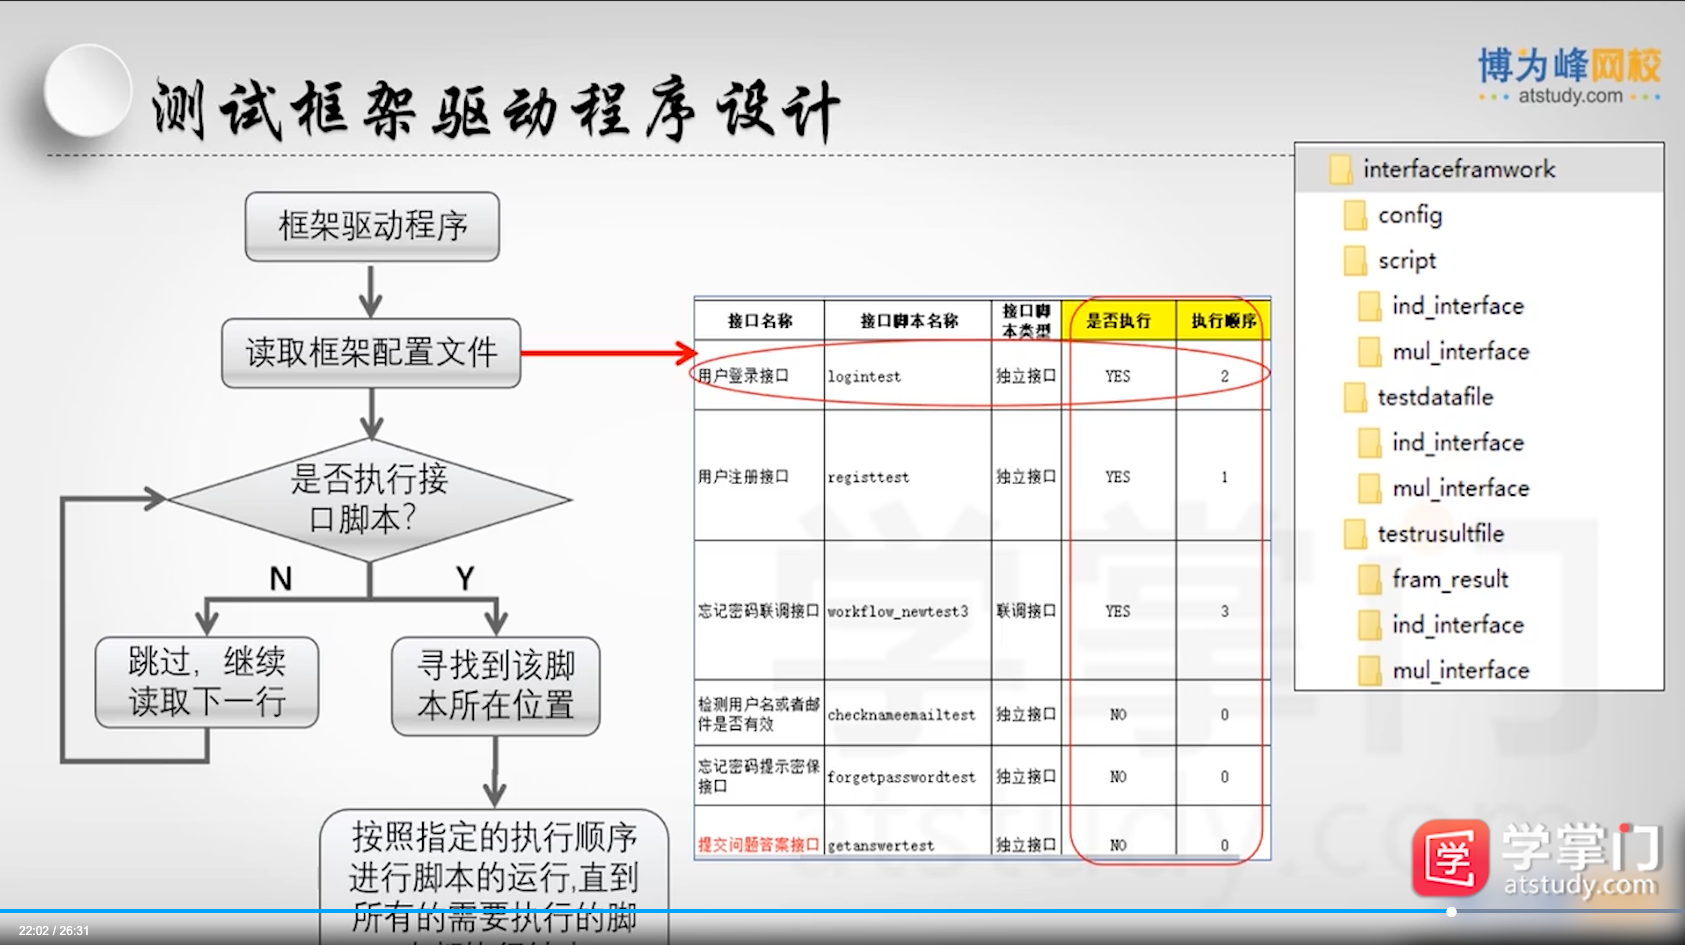
四、测试框架驱动程序的设计

 浙公网安备 33010602011771号