

Spring_Mybatis整合实现CRUD操作
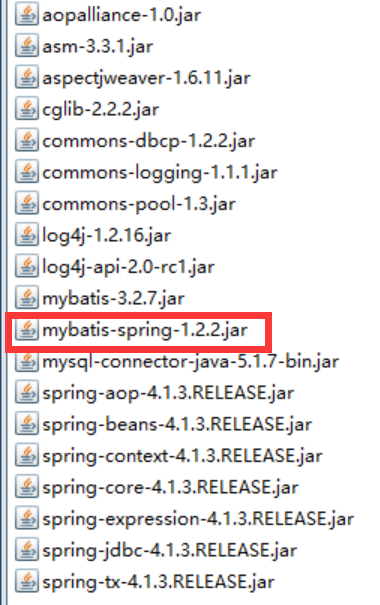
第一步:创建一个Java Project 导入相应的jar包
在src下加入日志文件log4j.properties
1 # Global logging configuration
2 #\u5728\u5f00\u53d1\u73af\u5883\u4e0b\u65e5\u5fd7\u7ea7\u522b\u8981\u8bbe\u7f6e\u6210DEBUG\uff0c\u751f\u4ea7\u73af\u5883\u8bbe\u7f6e\u6210info\u6216error
3 log4j.rootLogger=DEBUG, stdout
4 # Console output...
5 log4j.appender.stdout=org.apache.log4j.ConsoleAppender
6 log4j.appender.stdout.layout=org.apache.log4j.PatternLayout
7 log4j.appender.stdout.layout.ConversionPattern=%5p [%t] - %m%n
在src下加入数据库信息文件db.properties
1 jdbc.driver=com.mysql.jdbc.Driver
2 jdbc.url=jdbc:mysql://localhost:3306/mydb?characterEncoding=utf-8
3 jdbc.username=root
4 jdbc.password=dielianhua
需要操作数据库---》创建数据库mydb 创建表user

第二步:加载spring的核心配置文件applicationContext.xml、加载Mybatis的核心配置文件sqlMapConfig.xml
 1 <?xml version="1.0" encoding="UTF-8"?>
 2 <!-- 引入spring schema约束条件 -->
 3 <beans xmlns="http://www.springframework.org/schema/beans"
 4     xmlns:context="http://www.springframework.org/schema/context"
 5     xmlns:p="http://www.springframework.org/schema/p"
 6     xmlns:aop="http://www.springframework.org/schema/aop"
 7     xmlns:tx="http://www.springframework.org/schema/tx"
 8     xmlns:xsi="http://www.w3.org/2001/XMLSchema-instance"
 9     xsi:schemaLocation="http://www.springframework.org/schema/beans
10     http://www.springframework.org/schema/beans/spring-beans-4.0.xsd
11     http://www.springframework.org/schema/context
12     http://www.springframework.org/schema/context/spring-context-4.0.xsd
13     http://www.springframework.org/schema/aop http://www.springframework.org/schema/aop/spring-aop-4.0.xsd
14     http://www.springframework.org/schema/tx http://www.springframework.org/schema/tx/spring-tx-4.0.xsd
15     http://www.springframework.org/schema/util http://www.springframework.org/schema/util/spring-util-4.0.xsd">
16
17     <!-- 加载数据源的属性文件 -->
18     <context:property-placeholder location="classpath:db.properties"/>
19
20     <!-- 数据库连接池 -->
21     <bean id="dataSource" class="org.apache.commons.dbcp.BasicDataSource"
22     destroy-method="close">
23     <property name="driverClassName" value="${jdbc.driver}"></property>
24     <property name="url" value="${jdbc.url}"></property>
25     <property name="username" value="${jdbc.username}"></property>
26     <property name="password" value="${jdbc.password}"></property>
27     <property name="maxActive" value="10"></property>
28     <property name="maxIdle" value="5"></property>
29     </bean>
30
31     <!-- Mybatis的工厂 -->
32     <bean id="sqlSessionFactoryBean" class="org.mybatis.spring.SqlSessionFactoryBean">
33     <property name="dataSource" ref="dataSource"></property>
34     <!-- 核心配置文件的位置 -->
35     <property name="configLocation" value="classpath:sqlMapConfig.xml"></property>
36     </bean>
37
38     <!-- Mapper动态代理开发 -->
39     <bean id="userMapper" class="org.mybatis.spring.mapper.MapperFactoryBean">
40     <property name="sqlSessionFactory" ref="sqlSessionFactoryBean"></property>
41     <property name="mapperInterface" value="com.cn.mapper.UserMapper"></property>
42     </bean>
43
44     <!-- 动态代理开发 扫描 -->
45     <bean class="org.mybatis.spring.mapper.MapperScannerConfigurer">
46     <!-- 基本包 -->
47     <!-- 指定扫描的包名 如果扫描多个包,每个包中间使用半角逗号分隔-->
48     <property name="basePackage" value="com.cn.mapper"></property>
49     <property name="sqlSessionFactoryBeanName" value="sqlSessionFactoryBean"/>
50     </bean>
51 </beans>
 1 <?xml version="1.0" encoding="UTF-8" ?>
 2 <!DOCTYPE configuration
 3 PUBLIC "-//mybatis.org//DTD Config 3.0//EN"
 4 "http://mybatis.org/dtd/mybatis-3-config.dtd">
 5 <configuration>
 6
 7     <mappers>
 8         <package name="com.cn.mapper"/>
 9     </mappers>
10
11 </configuration>
第三步:创建Pojo类User.java
 1 package com.cn.pojo;
 2
 3 public class User {
 4
 5     private Integer id;
 6     private String uname;
 7     private String upsw;
 8     private String usex;
 9     public Integer getId() {
10         return id;
11     }
12     public void setId(Integer id) {
13         this.id = id;
14     }
15     public String getUname() {
16         return uname;
17     }
18     public void setUname(String uname) {
19         this.uname = uname;
20     }
21     public String getUpsw() {
22         return upsw;
23     }
24     public void setUpsw(String upsw) {
25         this.upsw = upsw;
26     }
27     public String getUsex() {
28         return usex;
29     }
30     public void setUsex(String usex) {
31         this.usex = usex;
32     }
33
34     public User(Integer id, String upsw) {
35         super();
36         this.id = id;
37         this.upsw = upsw;
38     }
39     public User() {
40         super();
41     }
42     public User(Integer id, String uname, String upsw, String usex) {
43         super();
44         this.id = id;
45         this.uname = uname;
46         this.upsw = upsw;
47         this.usex = usex;
48     }
49     @Override
50     public String toString() {
51         return "User [id=" + id + ", uname=" + uname + ", upsw=" + upsw + ", usex=" + usex + "]";
52     }
53
54 }
第四步:利用Mapper动态代理实现CRUD接口功能
 1 package com.cn.mapper;
 2
 3 import java.io.Serializable;
 4 import java.util.List;
 5
 6 import com.cn.pojo.User;
 7
 8 public interface UserMapper {
 9
10     public void add(User user);
11     public void deleteById(Serializable id);
12     public void updateById(User user);
13     public List<User> findAll();
14     public User findById(Serializable id);
15
16 }
 1 <?xml version="1.0" encoding="UTF-8"?>
 2 <!DOCTYPE mapper PUBLIC "-//mybatis.org//DTD Mapper 3.0//EN"
 3 "http://mybatis.org/dtd/mybatis-3-mapper.dtd">
 4 <mapper namespace="com.cn.mapper.UserMapper">
 5 <!-- 添加用户 -->
 6 <insert id="add" parameterType="com.cn.pojo.User">
 7 insert into user values(#{id},#{uname},#{upsw},#{usex})
 8 </insert>
 9
10 <!-- 删除用户 -->
11 <delete id="deleteById" parameterType="java.io.Serializable">
12 delete from user where id=#{id}
13 </delete>
14
15 <!-- 修改用户 -->
16 <update id="updateById" parameterType="com.cn.pojo.User">
17 update user set upsw=#{upsw} where id=#{id}
18 </update>
19
20 <!-- 查询用户 -->
21 <select id="findAll" resultType="com.cn.pojo.User">
22 select * from user
23 </select>
24 <select id="findById" resultType="com.cn.pojo.User" parameterType="java.io.Serializable">
25 select * from user where id=#{id}
26 </select>
27 </mapper>
第五步:编写测试类
 1 package com.cn.test;
 2
 3 import java.util.List;
 4
 5 import org.junit.Test;
 6 import org.springframework.context.ApplicationContext;
 7 import org.springframework.context.support.ClassPathXmlApplicationContext;
 8
 9 import com.cn.mapper.UserMapper;
10 import com.cn.pojo.User;
11
12 public class TestUserMapper {
13
14     ApplicationContext applicationContext = new ClassPathXmlApplicationContext("applicationContext.xml");
15     UserMapper userMapper = applicationContext.getBean(UserMapper.class);
16     @Test
17     public void testAdd() throws Exception {
18         User user = new User(0003,"格格","0099","女");
19         userMapper.add(user);
20     }
21     @Test
22     public void testDelete() throws Exception {
23         userMapper.deleteById(0003);
24     }
25     @Test
26     public void testUpdate() throws Exception {
27         User user = new User();
28         user.setId(0001);
29         user.setUpsw("2200");
30         userMapper.updateById(user);
31     }
32     @Test
33     public void testFindAll() throws Exception {
34         List<User> users = userMapper.findAll();
35         for(User user : users) {
36             System.out.println(user);
37         }
38     }
39     @Test
40     public void testFindById() throws Exception {
41         User user = userMapper.findById(0001);
42         System.out.println(user);
43     }
44 }
