在linux搭建操作系统实战的学习环境
Linux中操作系统模拟的环境搭建
1.前期需要的工具
bochs(虚拟机),实际上就是操作系统模拟器
nasm(intel 汇编器),这里不采用as(gas GNU)因为后期都是用的intel 汇编。
在window上搭建的Linux虚拟机
g++编译器
2. 环境的搭建
在window上搭建的Linux虚拟机比较简单,所以这里略过,我使用的是ubuntu 10
安装bochs,可以使用指令安装,sudo apt-get install bochs
也可以在官网下载安装包进行安装,https://sourceforge.net/projects/bochs/files/bochs/2.6.8/
可以参考这边文章进行安装,https://blog.csdn.net/shujuliu818/article/details/61417423
将写好的汇编boot保存为boot.asm
 1 org 0x7c00
 2
 3 BaseOfStack  equ  0x7c00
 4
 5
 6
 7 Label_Start:
 8
 9 mov ax , cs
10
11 mov ds , ax
12
13 mov es , ax
14
15 mov ss , ax
16
17 mov sp , BaseOfStack
18
19
20
21
22
23 ;========clear screen
24
25
26
27 mov ax , 0600h
28
29 mov bx , 0700h
30
31 mov cx , 0
32
33 mov dx , 0184fh
34
35 int 10h
36
37
38
39 ;=======set focus
40
41 mov ax , 0200h
42
43 mov bx , 0000h
44
45 mov dx , 0000h
46
47 int 10h
48
49
50
51 ;====== display on screen : Start Booting .....
52
53 mov ax , 1301h
54
55 mov bx , 000fh
56
57 mov dx , 0000h
58
59 mov cx , 10
60
61 push ax
62
63 mov ax , ds
64
65 mov es , ax
66
67 pop ax
68
69 mov bp , StartBootMessage
70
71 int 10h
72
73
74
75 ;==== reset dloppy
76
77
78
79 xor ah , ah
80
81 xor dl , dl
82
83 int 13h
84
85 jmp $
86
87 ;====== fill zero until whole sector
88
89 StartBootMessage: db  "Start Boot"
90
91 times 510 - ($ -$$) db 0
然后通过指令,nasm boot.asm -o boot.bin
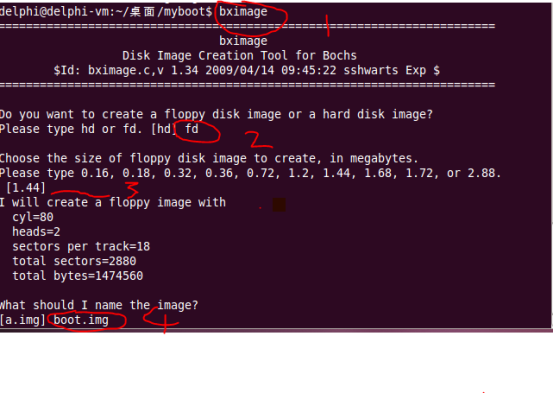
然后是生成软盘映像文件,bximage

第二处,选择fd
第三处,选择为默认,回车即可
第四处,你自己喜好去名字,这里我用boot.img
这样boot.img软盘映像文件成功建立
dd -if boot.bin of=boot.img count=1 bs=512 conv=notrunc,这条指令是用来工作目录下的boot.bin写入boot.img
然后到工作目录下新建一个bochsrc文件
将下列这些写入
 1 ###############################################
 2
 3 # Configuration file for Bochs
 4
 5 ###############################################
 6
 7
 8
 9 # 第一步,首先设置Bochs在运行过程中能够使用的内存,本例为32MB。
10
11 # 关键字为:megs
12
13 megs: 32
14
15
16
17 # 第二步,设置对应真实机器的BIOS和VGA BIOS.
18
19 # 对应两个关键字为:romimage 和 vgaromimage
20
21 romimage: file=$BXSHARE/BIOS-bochs-latest
22
23 vgaromimage: file=$BXSHARE/VGABIOS-lgpl-latest
24
25
26
27 # 第三步,设置Bochs所使用的磁盘,软盘的关键字为floppy。
28
29 # 若只有一个软盘,则使用floppya即可,若有多个,则为floppya,floppyb...
30
31 floppya: 1_44=boot.img, status=inserted
32
33
34
35 # 第四步,选择启动盘符。
36
37 boot: floppy
38
39
40
41 # 第五步,设置日志文件的输出。
42
43 log: bochsout.txt
44
45
46
47 # 第六步,开启或关闭某些功能。
48
49 # 下面是关闭鼠标,并打开键盘。
50
51 mouse: enabled=0
52
53 keyboard_mapping: enabled=1, map=$BXSHARE/keymaps/x11-pc-us.map
这样配置文件就好了。


其实载我的工作目录下在会有这些文件
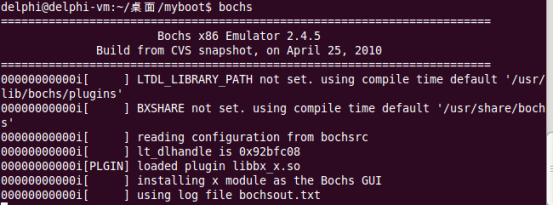
在终端中输入 bochs
回车,发现多出了bochsout.txt文件

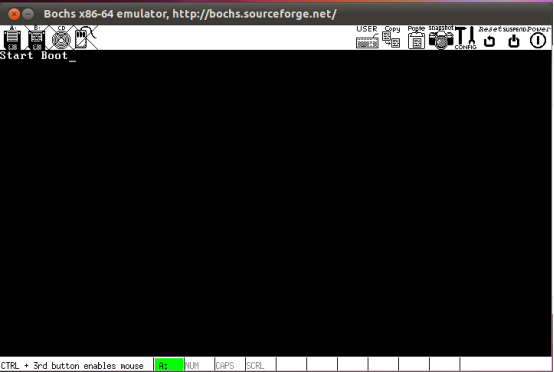
这是模拟器中的景象,哈哈,可以了
bochs的使用可以参考这篇文章
https://blog.csdn.net/vectorX/article/details/81330367
其实载window上也可以用Oracle VM VirtualBox来搭建


