

第三组_通信1班_085_ospf与ospfv3实验
实验目的
- 帧中继环境下OSPF以及OSPFv3的配置
- OSPF以及OSPFv3的NSSA的配置
- OSPF以及OSPFv3的路由汇总
- OSPF以及OSPFv3的路由注入
- Ipv4/Ipv6网络全网互通
实验拓扑
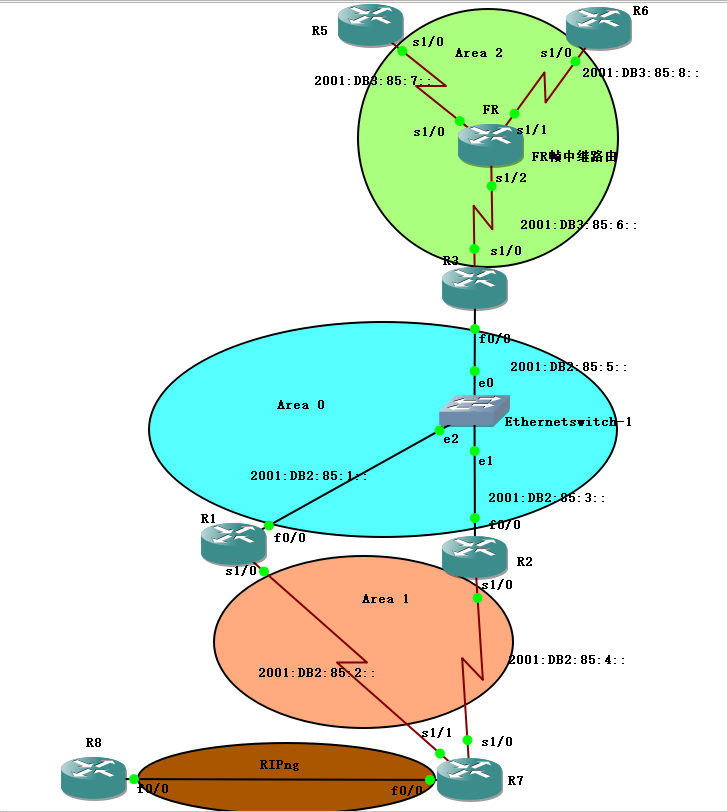
图2
- IP地址规划
- IPV4部分
环回地址:10.X.1N.N/24
路由接口地址:10.X.网段.N/24
帧中继地址:172.网段.X.N/24
其中X为学号后三位,N为路由器号
表格 3- 1 环回地址规划
|
设备 |
接口 |
IP地址 |
|
AR1 |
Loopback0 |
10.85.11.1/24 |
|
AR2 |
Loopback0 |
10.85.12.2/24 |
|
AR3 |
Loopback0 |
10.85.13.3/24 |
|
Loopback1 |
10.85.23.3/24 |
|
|
FR |
Loopback0 |
10.85.14.4/24 |
|
AR5 |
Loopback0 |
10.85.15.5/24 |
|
AR6 |
Loopback0 |
10.85.16.6/24 |
|
AR7 |
Loopback0 |
10.85.17.7/24 |
|
AR8 |
Loopback0 |
10.85.18.8/24 |
|
Loopback1 |
10.85.28.8/24 |
表格 3- 2 路由接口地址规划
|
设备 |
接口 |
接口地址 |
|
AR1 |
F0/0 |
10.85.1.1/24 |
|
S1/0 |
10.85.2.1/24 |
|
|
AR2 |
F0/0 |
10.85.1.2/24 |
|
S1/0 |
10.85.4.2/24 |
|
|
AR7 |
S1/1 |
10.85.2.7/24 |
|
S1/0 |
10.85.4.7/24 |
|
|
F0/0 |
10.85.9.7/24 |
|
|
AR8 |
F0/0 |
10.85.9.8/24 |
表格 3- 3 帧中继地址规划
|
设备 |
接口 |
接口地址 |
|
AR3 |
F0/0 |
10.85.1.3/24 |
|
S1/0 |
172.16.85.3/24 |
|
|
AR5 |
S1/0 |
172.16.85.5/24 |
|
AR6 |
S1/0 |
172.16.85.6/24 |
- IPV6部分
地址规划使用2001:DBX:学号后三位:子网号::N(路由器号)
其中X取值含义:1(环回地址)、2(路由器接口地址)、3(帧中继网络地址)
表格 3- 4 环回地址规划
|
设备 |
接口 |
IPV6地址 |
|
AR1 |
Loop back0 |
2001:DB1:85:1::1/128 |
|
Loop back1 |
2001:DB0:85::1/128 |
|
|
AR2 |
Loop back0 |
2001:DB1:85:2::2/128 |
|
AR3 |
Loop back0 |
2001:DB1:85:3::3/128 |
|
FR |
Loop back0 |
2001:DB1:85:4::4/128 |
|
AR5 |
Loop back0 |
2001:DB1:85:5::5/128 |
|
AR6 |
Loop back0 |
2001:DB1:85:6::6/128 |
|
AR7 |
Loop back0 |
2001:DB1:85:7::7/128 |
|
AR8 |
Loop back0 |
2001:DB1:85:8::8/128 |
表格 3- 5 路由接口地址规划
|
设备 |
接口 |
接口地址 |
|
AR1 |
F0/0 |
自动获取 |
|
S1/0 |
2001:DB2:85:2::1/64 |
|
|
AR2 |
F0/0 |
自动获取 |
|
S1/0 |
2001:DB2:85:4::2/64 |
|
|
AR7 |
S1/1 |
2001:DB2:85:2::7/64 |
|
S1/0 |
2001:DB2:85:3::7/64 |
|
|
F0/0
|
2001:DB2:85:7::7/64 |
|
|
AR8 |
F0/0
|
2001:DB2:85:7::8/64 |
表格 3- 6 帧中继地址规划
|
设备 |
接口 |
接口地址 |
|
AR3 |
F0/0 |
2001:DB2:85:1::3/64 |
|
S1/0 |
2001:DB3:85:3::3/64 |
|
|
AR5 |
S1/0 |
2001:DB3:85:3::5/64 |
|
AR6 |
S1/0 |
2001:DB3:85:3::6/64 |
表格 3- 7 配置帧中继时所需要的link-local地址
|
设备 |
接口 |
接口地址 |
|
AR3 |
S1/0.1 |
FE80::CE03:9FF:FEB3:0 |
|
AR5 |
S1/0.1 |
FE80::CE05:8FF:FE58:0 |
|
AR6 |
S1/0.1 |
FE80::CE06:8FF:FE67:0 |
表格 3- 8 路由汇总
|
汇总类型 |
接口 |
汇总前地址 |
汇总后地址 |
|
外部路由汇总 |
Loopback1 |
2001:DB0:85::1/128 |
2001:DB0:85:: /64 |
|
区域间路由汇总 |
Loopback0 |
2001:DB0:85:1::1/128 |
2001:DB0:85:1:: /64 |
- 设备配置
- IPV4部分
- 配置帧中继交换功能
R5:
interface Loopback0
ip address 10.85.15.5 255.255.255.0
interface Serial1/0
ip address 172.16.85.5 255.255.255.0
encapsulation frame-relay
ip ospf priority 0
serial restart-delay 0
frame-relay map ip 172.16.85.3 301 broadcast
no frame-relay inverse-arp
R6:
interface Loopback0
ip address 10.85.16.6 255.255.255.0
interface Serial1/0
ip address 172.16.85.6 255.255.255.0
encapsulation frame-relay
ip ospf priority 0
serial restart-delay 0
frame-relay map ip 172.16.85.3 401 broadcast
no frame-relay inverse-arp
R3:
interface Loopback0 //配置接口地址
ip address 10.85.13.3 255.255.255.0
interface FastEthernet0/0
ip address 10.85.1.3 255.255.255.0
interface Serial1/0
ip address 172.16.85.3 255.255.255.0
encapsulation frame-relay
ip ospf priority 255
serial restart-delay 0
frame-relay map ip 172.16.85.5 103 broadcast //使用neighbor来指明邻居
frame-relay map ip 172.16.85.6 104 broadcast
no frame-relay inverse-arp
frame-relay lmi-type cisco
FR:
frame-relay switching //配置成帧中继交换机
interface Serial1/0
encapsulation frame-relay //封装成帧中继
clock rate 128000
frame-relay lmi-type cisco //配置帧中继的类型
frame-relay intf-type dce //配置帧中继为DCE
frame-relay route 301 interface Serial1/2 103 //做帧中继映射
frame-relay route 501 interface Serial1/1 105
interface Serial1/1
encapsulation frame-relay
clock rate 128000
frame-relay lmi-type cisco
frame-relay intf-type dce
frame-relay route 105 interface Serial1/0 501 //做帧中继映射
frame-relay route 401 interface Serial1/2 104
interface Serial1/2
encapsulation frame-relay
clock rate 128000
frame-relay lmi-type cisco
frame-relay intf-type dce
frame-relay route 103 interface Serial1/0 301 //做帧中继映射
frame-relay route 104 interface Serial1/1 401
验证测试:
图4- 1 检查帧中继路由器映射是否正常
图4- 2 用AR3分别 Ping AR5、AR6 的s1/0接口
- 配置帧中继中路由器的ospf
R5:
router ospf 1
router-id 5.5.5.5
network 10.85.15.0 0.0.0.255 area 2 //在ospf 1中宣告网段
network 172.16.85.0 0.0.0.255 area 2
R6:
router ospf 1
router-id 6.6.6.6
network 10.85.16.0 0.0.0.255 area 2 //在ospf 1中宣告网段
network 172.16.85.0 0.0.0.255 area 2
R3:
router ospf 1
router-id 3.3.3.3
network 10.85.1.0 0.0.0.255 area 0 //在ospf 1中宣告网段
network 10.85.13.0 0.0.0.255 area 0
network 172.16.85.0 0.0.0.255 area 2
neighbor 172.16.85.5 //在ospf 1中宣告邻居
neighbor 172.16.85.6
- 配置外部路由OSPF
配置接口地址过程在此将省略,具体接口地址和loop back0地址可查IP地址规划表
R1:
interface Loopback0 //配置接口地址
ip address 10.85.11.1 255.255.255.0
interface FastEthernet0/0
ip address 10.85.1.1 255.255.255.0
interface Serial1/0
ip address 10.85.2.1 255.255.255.0
router ospf 1
router-id 1.1.1.1
area 1 nssa //配置区域 1 为 NSSA 区域
network 10.85.1.0 0.0.0.255 area 0 //在ospf 1中宣告网段
network 10.85.2.0 0.0.0.255 area 1
network 10.85.11.0 0.0.0.255 area 0
R2:
router ospf 1
router-id 2.2.2.2
area 1 nssa //配置区域 1 为 NSSA 区域
network 10.85.1.0 0.0.0.255 area 0 //在ospf 1中宣告网段
network 10.85.4.0 0.0.0.255 area 1
network 10.85.12.0 0.0.0.255 area 0
R7:
router ospf 1
router-id 7.7.7.7
area 1 nssa //配置区域 1 为 NSSA 区域
summary-address 10.85.9.0 255.255.255.0 //配置外部自治系统路由汇总
redistribute rip subnets //将RIP 路由重分布到OSPF 中
network 10.85.2.0 0.0.0.255 area 1 //在ospf 1中宣告网段
network 10.85.4.0 0.0.0.255 area 1
network 10.85.9.0 0.0.0.255 area 1
network 10.85.17.0 0.0.0.255 area 1
验证OSPF邻居
图4-3 验证AR3的邻居
图4-4 验证AR1的邻居
图4-5 验证AR7的邻居
- 配置外部路由RIP
R7:
interface FastEthernet0/0
ip address 10.85.9.7 255.255.255.0
router rip
version 2
redistribute ospf 1 metric 2 //将OSPF 路由重分布到RIP 中
network 10.0.0.0
no auto-summary
R8:
interface FastEthernet0/0
ip address 10.85.9.8 255.255.255.0
router rip
version 2
network 10.0.0.0
no auto-summary
- 全网互通验证

图4-6 用AR5 Ping 通 AR8的 loop back地址
图4-7 用AR8 Ping 通 AR6的 int s1/0接口
- 外部路由汇总配置
为了在R7上做外部路由汇总,所以在R8上新增一个环回接口
R8(config)#interface loopback 1
R8(config-if)# ip address 10.85.28.8 255.255.255.0 //在 R8 上新增加一个 loopback1 接口
R8(config-if)#exit
在R7中配置外部自治系统路由汇总
R7(config)# router ospf 1
R7(config-rtr)summary-address 10.85.0.0 255.255.224.0 //配置外部自治系统路由汇总
图4-8 验证外部路由汇总结果
- 区域间路由汇总
为了在R1上配置区域间路由汇总,所以在R3上新增一个环回接口
R3(config)#interface loopback 1
R3(config-if)#ip address 10.85.23.3 255.255.255
在R1中配置区域间路由汇总路由汇总
R1(config)#router ospf 1
R1(config-router)#area 0 range 10.85.0.0 255.255.224.0 //配置区域间路由汇总
图4-9 验证区域间路由汇总结果
- IPV6配置
使用同样的拓扑,在原有配置的基础上配置IPV6
- 配置帧中继交换功能
R3:
r3(config)#ipv6 unicast-routing // 全局打开 IPv6 路由功能
r3(config)#interface loopback 0
r3(config-if)# ipv6 address 2001:DB1:85:3::3/128 // 配置 loopback0 接口地址
r3(config-if)#exit
r3(config)#interface fastEthernet 0/0
r3(config-if)# ipv6 address 2001:DB2:85:1::1/64 //配置 F0/0 接口地址
r3(config-if)#exit
r3(config)#interface serial 1/0.1 multipoint
r3(config-subif)#ipv6 address 2001:DB3:85:3::3/64 //配置 FR 子接口地址
r3(config-subif)#frame-relay map ipv6 2001:DB3:85:3::3 306 broadcast //配置 IPv6 的静态帧中继映射
r3(config-subif)#frame-relay map ipv6 2001:DB3:85:3::6 306 broadcast broadcast
r3(config-subif)#frame-relay map ipv6 2001:DB3:85:3::5 305 broadcast broadcast
r3(config-subif)#frame-relay map ipv6 FE80::CE05:8FF:FE58:0 305 broadcast //对帧中继邻居的 link-local 地址的映射不能忘记,因为 OSPFv3 的路由用的是 link-local 地址来交换 LSA,此处配置映射 R5 的 link-local 地址
r3(config-subif)#frame-relay map ipv6 FE80::CE06:8FF:FE67:0 306 broadcast //此处配置映射R6 的 link-local 地址
R5:
r5(config)#ipv6 unicast-routing
r5(config)#interface loopback 0
r5(config-if)#ipv6 address ipv6 address 2001:DB1:85:5::5/128
r5(config-if)#exit
r5(config)#interface serial 1/0.1 multipoint
r5(config-subif)#ipv6 address 2001:DB3:85:3::5/64
r5(config-subif)#frame-relay map ipv6 2001:DB3:85:3::3 503 broadcast //R6为603
r5(config-subif)#frame-relay map ipv6 2001:DB3:85:3::5 503 broadcast //此映射是为了 ping 通本接口
r5(config-subif)#frame-relay map ipv6 2001:DB3:85:3::6 503 broadcast //此映射千万别忘记
r5(config-subif)# frame-relay map ipv6 FE80::CE06:8FF:FE67:0 503 broadcast――此处配置映射 R6 的
link-local 地址
r5(config-subif)# frame-relay map ipv6 FE80::CE03:9FF:FEB3:0 503 broadcast――此处配置映射 R3 的link-local 地址
图4-8 用AR3分别 Ping AR5、AR6 的s1/0接口
- 配置帧中继中路由器的ospfv3
R3:
r3(config)#ipv6 router ospf 1
r3(config-rtr)#router-id 33.3.3.3
r3(config-rtr)#exit
r3(config)#interface fastEthernet 0/0
r3(config-if)#ipv6 ospf 1 area 0
r3(config-if)#exit
r3(config)#interface loopback 0
r3(config-if)#ipv6 ospf 1 area 0
r3(config-if)#exit
r3(config)#interface serial1/0.1 //缺省的帧中继多点子接口在 OSPFv3 网络类型为 NBMA
r3(config-subif)#ipv6 ospf 1 area 2
r3(config-subif)#exit
r3(config-subif)#ipv6 ospf neighbor FE80::CE05:8FF:FE58:0 //在接口下手动指邻居 R5,使用邻居 的 link-local 地址
r3(config-subif)#ipv6 ospf neighbor FE80::CE06:8FF:FE67:0 //在接口下手动指邻居 R6
R5:
r5(config)#ipv6 router ospf 1
r5(config-rtr)#router-id 55.5.5.5
r5(config-rtr)#exit
r5(config)#interface loopback 0
r5(config-if)#ipv6 ospf 1 area 2
r5(config-if)#exit
r5(config)#interface serial 1/0.1
r5(config-subif)#ipv6 ospf 1 area 2
r5(config-subif)#ipv6 ospf priority 0 //把 spoke 站点的的优先级设置为 0,不让其参与 DR、BRD的选举
R6:
r6(config)#ipv6 router ospf 1
r6(config-rtr)#router-id 66.6.6.6
r6(config-rtr)#exit
r6(config)#interface loopback 0
r6(config-if)#ipv6 ospf 1 area 2
r6(config-if)#exit
r6(config)#interface serial 1/0.1
r6(config-subif)#ipv6 ospf 1 area 2
r6(config-subif)#ipv6 ospf priority 0
- 配置外部路由OSPFv3
R1:
r1(config)#ipv6 router ospf 1 //启动 OSPFv3 进程
r1(config-rtr)#router-id 11.1.1.1 //在路由器没有 IPv4 地址情况下,要求手动配置 Router-ID,如果有 IPv4 地址,将按照优选 loopback 接口的 IP 地址做为 router-ID,如果没有 loopback 接口,选择 IP 地址 大的接口的 IP 为 Router-ID
r1(config-rtr)#area 1 nssa //配置区域 1 为 NSSA 区域
r1(config-rtr)#exit
r1(config)#interface fastEthernet 0/0
r1(config)#ipv6 address autoconfig // f0/0配置自动获取IPV6地址
r1(config-if)#ipv6 ospf 1 area 0 //把 F0/0 接口宣告到 OSPFv3进程1,区域ID为0
r1(config-if)#exit
r1(config)#interface loopback 0
r1(config-if)#ipv6 ospf 1 area 0
r1(config-if)#exit
r1(config)#interface serial 1/0
r1(config-if)#ipv6 ospf 1 area 1
R2:
r2(config)#ipv6 router ospf 1
r2(config-rtr)#router-id 22.2.2.2
r2(config-rtr)#area 1 nssa //配置区域 1 为 NSSA 区域
r2(config-rtr)#exit
r2(config)#interface fastEthernet 0/0 // f0/0 接口配置自动获取IPV6地址
r2(config)#ipv6 address autoconfig
r2(config-if)#ipv6 ospf 1 area 0
r2(config-if)#exit
r2(config)#interface loopback 0
r2(config-if)#ipv6 ospf 1 area 0
r2(config-if)#exit
r2(config)#interface serial 1/0
r2(config-if)#ipv6 ospf 1 area 1
R7:
r7(config)#ipv6 router ospf 1
r7(config-rtr)#router-id 77.7.7.7
r7(config-rtr)#area 1 nssa //配置区域 1 为 NSSA 区域
r7(config-rtr)#exit
r7(config)#interface loopback 0
r7(config-if)#ipv6 ospf 1 area 1
r7(config-if)#exit
r7(config-if)#interface serial 1/1
r7(config-if)#ipv6 ospf 1 area 1
r7(config-if)#exit
r7(config)#interface serial 1/0
r7(config-if)#ipv6 ospf 1 area 1
验证OSPFv3邻居
图4-9 验证AR3的邻居
图4-10 验证AR1的邻居
图4-11 验证AR7的邻居
- 配置外部路由的RIPng
本处需要配置配置 R7 和 R8的RIPng
R7:
r7(config)#ipv6 router rip 2
r7(config-rtr)#exit
r7(config)#interface fastEthernet 0/0
r7(config-if)#ipv6 rip 2 enable
r7(config-if)#exit
r7(config)#ipv6 router ospf 1
r7(config-rtr)#redistribute rip 2 //重分布 RIPng 到 OSPFv3
r7(config-rtr)#redistribute connected //由于重分布 RIPng,不能把连接 R8 的接口网段重分布进入OSPFv3,因此重分布直连,把连接 R8 的网段重分布到 OSPFv3
r7(config)#ipv6 router rip 2
r7(config-rtr)#redistribute ospf 1 metric 2 //重分布OSPFv3 到 RIPng
r7(config-rtr)#redistribute connected
R8:
r8(config)#ipv6 router rip 2
r8(config-rtr)#exit
r8(config)#interface fastEthernet 0/0
r8(config-if)#ipv6 rip 2 enable
r8(config-if)#exit
r8(config)#interface loopback 0
r8(config-if)#ipv6 rip 2 enable
- 全网互通验证
图4-12 用AR5 Ping 通 AR1的 f1/0接口和AR8的loop back地址
图4-13 用AR6 Ping 通 AR2的 f0/0接口和AR8的loop back地址
图4-14 用AR8 Ping 通 AR5和AR6的loop back地址
- 外部路由汇总配置
R1:
r1(config)#interface loopback 1
r1(config-if)#ipv6 address 2001:db0:85::1/128 //在 R1 上新增加一个 loopback1 接口
r1(config-if)#exit
r1(config)#ipv6 router ospf 1
r1(config-rtr)#redistribute connected //把该loopback1 接口重分布进入 OSPFv3
r1(config)#ipv6 router ospf 1
r1(config-rtr)#summary-prefix 2001:db0:85::0/64 //把重分布的 loopback1 接口所在的网段从 128 位汇总为 64 位
图4-15 验证外部路由汇总结果
- 区域间路由汇总
在 R3 上,把 R1 的 loopback0 接口所在的网段汇总为 64 位
R3:
r3(config)#ipv6 router ospf 1
r3(config-rtr)#area 0 range 2001:db1:85:1::0/64 //被汇总路由来自区域 0
图4-16 验证区域间路由汇总结果
- 实验总结
整个实验需要划分两个步骤来进行,首先把上面部分的帧中继做通,重点是帧中继路由器的配置,然后再做OSPF的帧中继,注意宣告邻居。完成帧中继上面的ospf帧中继部分后,我们再做下面R1、R2、R7的Ospf配置,注意三个与交换机相连的路由器接口要配同一个网段的IP地址,最后配置R8与R7的路由注入,最后实现全网互通。
IPV6的部分与IPV4相似,但是注意每个路由器都必须先开启ipv6 unicast-routing,然后配置好各个路由器的环回地址和接口地址,IPV6的帧中继部分还需要配置帧中继邻居的 link-local 地址的映射。
其中也出现了一些问题,如R6的邻居无法确定,后来发现是本地链路地址配错了。RIPng 和OSPFV3的路由重发布也耽搁了很久,R8无法获取到路由表,无法全网互通,理解外部区域汇总的原理,它是在自治系统边界路由器(ASBR)上进行的。

 浙公网安备 33010602011771号